manuals.online logo
Brands
  1. Home
  2. •
  3. Brands
  4. •
  5. Richmond
  6. •
  7. Batteries Pack
  8. •
  9. Richmond GTR205 User manual

Richmond GTR205 User manual

GTR205 Installation Manual: Rev 3
1
Solar Battery Pack for
Richmond Gate Motors GTR205
Take your automatic gate off the grid – this solar battery pack contains
almost everything you need to convert your automatic gate into a self-sufficient
solar powered gate solution.
Suits the Following Richmond Gate Motors:
GTR061, GTR064, GTR207, GTR099 GTR058, GTR062, GTR078
Instructions must be read before beginning installation. Please follow these instructions carefully,
incorrect installation could affect gate operation. If you require more information, please contact
your local Richmond Wheel & Castor Co branch.
AU: 1300 474 246 NZ: 0800 61 71 81 International: +613 9551 2233
For installation or troubleshooting assistance visit gatesupport.richmondau.com
Solar Panel (GTR049) Sold Separately
GTR205
GTR205 Installation Manual: Rev 3
2
GTR205 Solar Battery Pack: How it Works
The solar panel charges the batteries via the solar regulator, the batteries store the voltage
generated from the solar panel to run your gate.
Supplied with this box is a
red battery jumper cable.
This red cable is used to connect
the positive and negative battery
terminals contained inside the box.
See following page for instructions.
Solar Panel (GTR049)
Sold Separately
GTR205 Installation Manual: Rev 3
3
Installing the GTR205 Solar Battery Pack
CAUTION: The correct connection process listed below must be followed to avoid
component damage during installation.
1. Mount the GTR205 solar battery pack within 1.5m of your gate opener.
2. Remove the plastic cover from the battery pack.
3. Connect the electrical components and cables in the order shown below.
CAUTION!
Not following these steps in order may result in shorting of wires and damage to components!
Step 1 – Connect the Red and Black wires from the 2-metre cable to the correct + and - terminals
on the gate motor PC board.
Step 2 – Connect the LOAD plug into the labelled LOAD socket.
Step 3 – Connect the Red battery jumper cable to the + and – battery terminals inside the solar
battery pack (see fig 1 below)
Step 4 – Connect the Red and Black wires from the 5-metre cable to the correct + and – terminals
on the solar panel.
Step 5 – Connect the SOLAR plug into the labelled SOLAR socket.
Fig 1
4. The voltage level on the digital display will show the current battery voltage.
When charging is taking place you will see the digital battery icon filling up.
Instructions for connecting the GTR205 to the circuit board of each
Richmond gate opener can be found in the following pages.
When the red jumper cable between the
batteries is connected the digital display will
power up to display the current charge.
When charging the battery icon on the display will start filling up
GTR205 Installation Manual: Rev 3
4
Connecting to the GTR064 Sliding Gate Motor
GTR205 Installation Manual: Rev 3
5
Connecting to the GTR207 & GTR061
Sliding Gate Motors
GTR205 Installation Manual: Rev 3
6
Connecting to the GTR058 Swing Gate Motor
GTR205 Installation Manual: Rev 3
7
Connecting to the GTR099 Swing Gate Motor
GTR205 Installation Manual: Rev 3
8
Connecting to the GTR062 or GTR078
Swing Gate Motors
GTR205 Installation Manual: Rev 3
9
Battery Charging:
Important: Care is essential when handling your battery for charging. With incorrect
handling and overcharging, shorting can occur.
Important: Protective glasses and gloves should be worn when charging a battery. To
prevent shorting and damage to your battery, it is essential to avoid connection of the
terminals with metallic or conductive materials. Prior to charging your battery, all electrical
components must be switched off before connecting a charger. If the battery needs to be
removed from its case for charging, care must be taken in the removal of the battery.
Important: The charger must be connected to the battery before the charger is connected to
mains power.
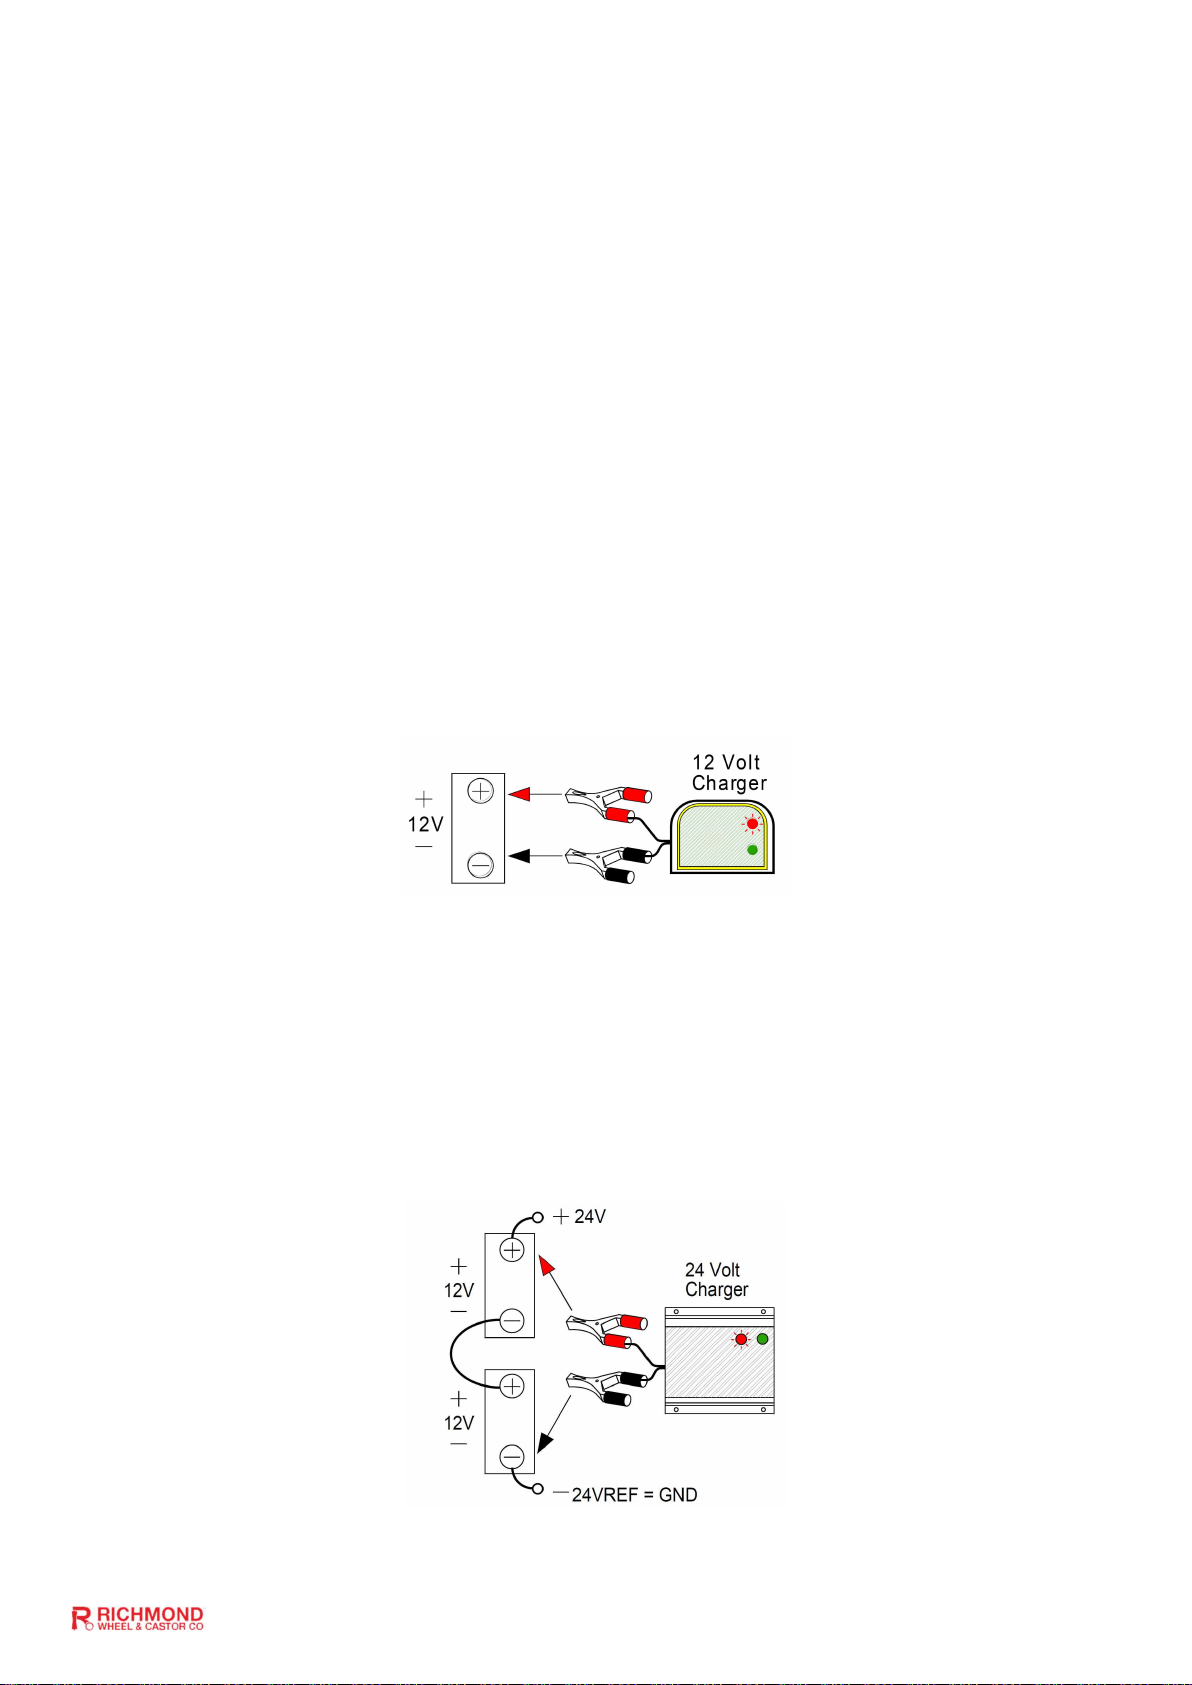
How to connect a single battery for charge?
Richmond recommends connecting one 12v battery to one 12v charger to recharge your
battery. When recharging your battery always remember to connect the positive charger
(red) output to the positive (+) battery terminal. The negative charger output (black) connects
to the negative battery (-) terminal. Once the battery is fully charged disconnect the charger
from mains power first. Then disconnect the cables from the battery. Always ensure the
charger and the battery have the same voltage when recharging the battery.
How to connect two batteries in a series for charge with one 24v battery charger?
To charge two 12v batteries in a series at the same time, connect a single 24v charger. This
can only be done when the batteries in a series requiring charge have the same voltage
output as the battery charger. As illustrated below. When recharging your batteries always
remember to connect the positive charger (red) output to the positive (+) battery terminal.
The negative charger output (black) connects to the negative (-) battery terminal. Once the
batteries are fully charged disconnect the charger from mains power first. Then disconnect
the cables from the battery. Always ensure the charger and the battery have the same
voltage when recharging the battery.

Other manuals for GTR205

1

Other Richmond Batteries Pack manuals

Richmond GTR205 User manual

Richmond

Richmond GTR205 User manual

Richmond GTR206 User manual

Richmond

Richmond GTR206 User manual

Popular Batteries Pack manuals by other brands

BPS C-100 user guide

BPS

BPS C-100 user guide

Lenmar HELIX PPW11000U quick start guide

Lenmar

Lenmar HELIX PPW11000U quick start guide

Dometic PLB40 operating manual

Dometic

Dometic PLB40 operating manual

Harris Battery TRACTION PACK Configuration and Operating Instructions

Harris Battery

Harris Battery TRACTION PACK Configuration and Operating Instructions

Crestron Isys i/O TPMC-8X Operations & installation guide

Crestron

Crestron Isys i/O TPMC-8X Operations & installation guide

EINHELL Power X-Change Plus Original operating instructions

EINHELL

EINHELL Power X-Change Plus Original operating instructions

Pylontech PowerCube-X1 Operation manual

Pylontech

Pylontech PowerCube-X1 Operation manual

Beckhoff C9900-U332-0010 manual

Beckhoff

Beckhoff C9900-U332-0010 manual

Mophie powerstation 1X user manual

Mophie

Mophie powerstation 1X user manual

Rollei Power Station 320 manual

Rollei

Rollei Power Station 320 manual

Epson OT-BY60II user manual

Epson

Epson OT-BY60II user manual

SWIT S-8U63 user manual

SWIT

SWIT S-8U63 user manual

GW Instek GDS-122 quick start guide

GW Instek

GW Instek GDS-122 quick start guide

SUEX 71813 USER INSTRUCTION MANUAL AND WARNINGS

SUEX

SUEX 71813 USER INSTRUCTION MANUAL AND WARNINGS

Bona VIKING VIDAR III user manual

Bona

Bona VIKING VIDAR III user manual

Aegis ABL060010P user manual

Aegis

Aegis ABL060010P user manual

Belkin F8J201 manual

Belkin

Belkin F8J201 manual

Hoyles Gemini GX20e quick start guide

Hoyles

Hoyles Gemini GX20e quick start guide

manuals.online logo
manuals.online logoBrands
  • About & Mission
  • Contact us
  • Privacy Policy
  • Terms and Conditions

Copyright 2025 Manuals.Online. All Rights Reserved.