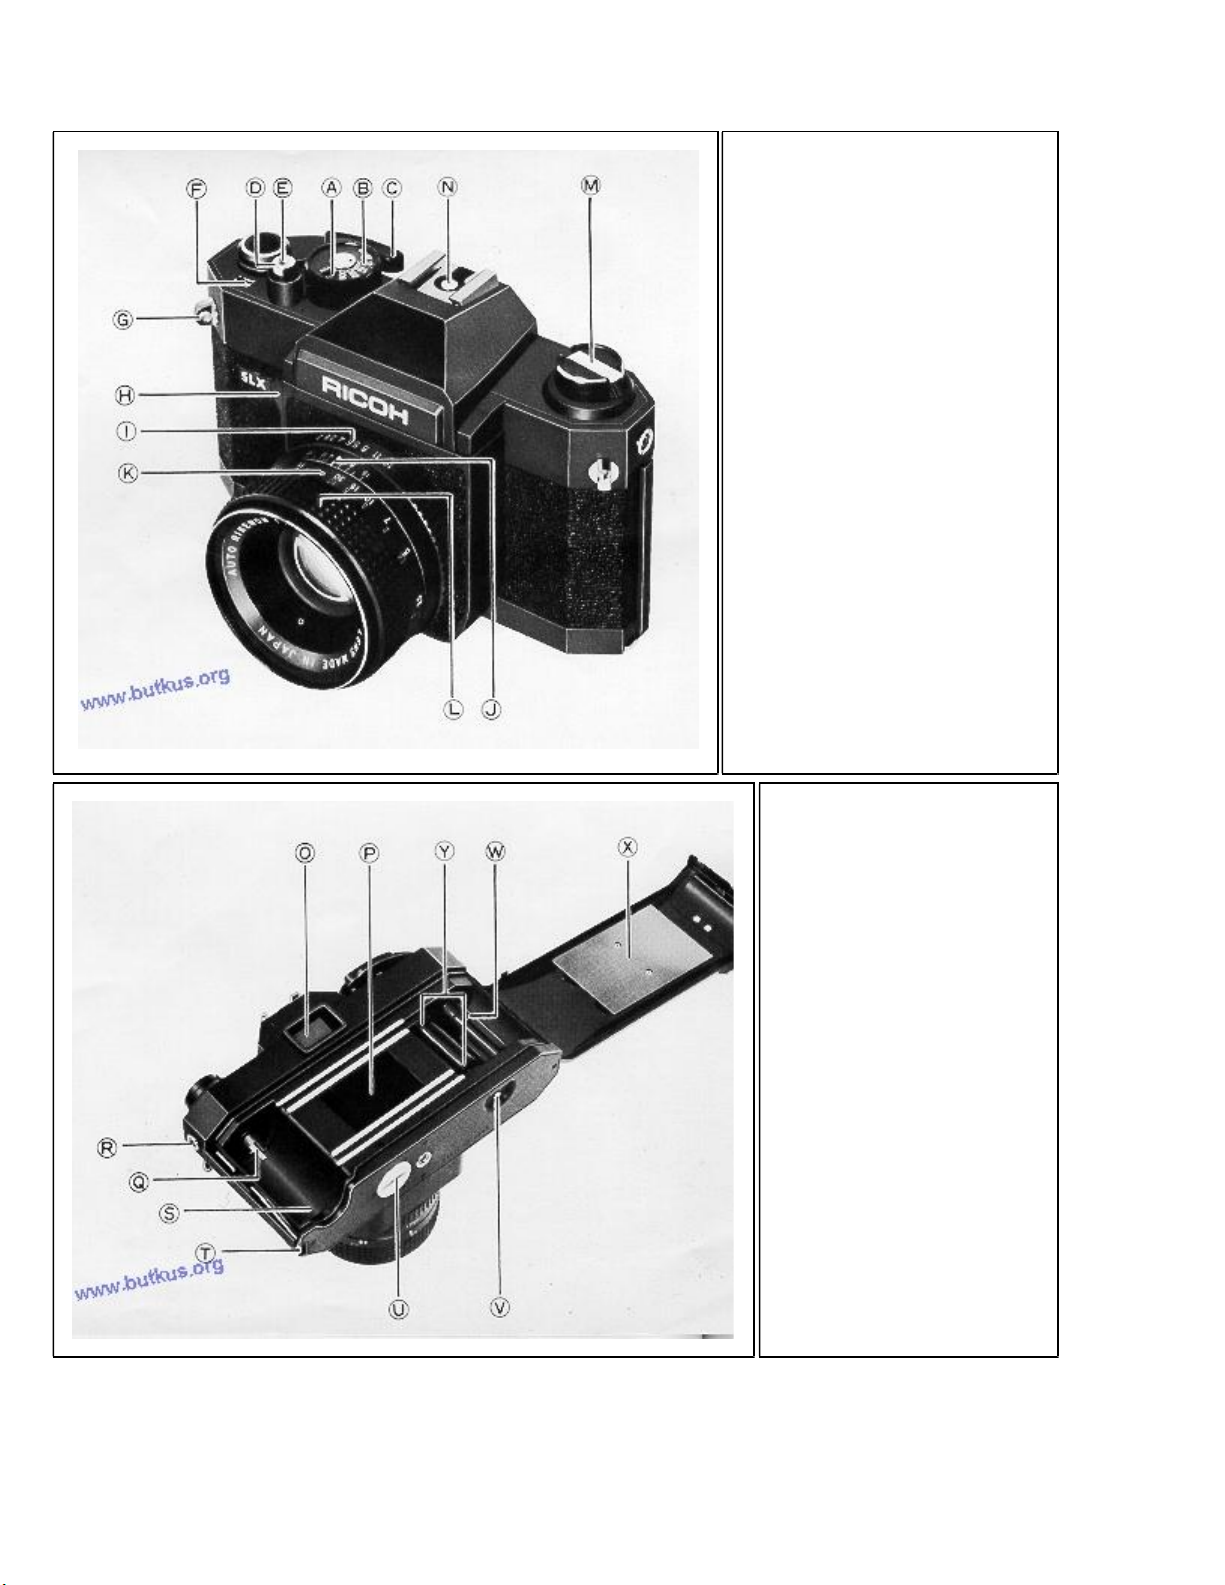
Ricoh SLX 500 User manual

Ricoh SLX 500
Posted 3-7-'04 (redid 2-2020)
This camera manual library is for reference and historical purposes, all rights reserved.
This page is copyright© by , M. Butkus, NJ.
This page may not be sold or distributed without the expressed permission of the producer
I have no connection with any camera company
On-line camera manual library
This is the full text and images from the manual.
If you find this manual useful, how about a donation of $3 to:
M. Butkus, 29 Lake Ave., High Bridge, NJ 08829-1701
and send your e-mail address so I can thank you.
Most other places would charge you $7.50 for a electronic copy or
$18.00 for a hard to read Xerox copy.
This will help me to continue to host this site,
buy new manuals, and pay their shipping costs.
It'll make you feel better, won't it?
If you use Pay Pal, use the link below.
Use the above address for a check, M.O. or cash.
www.PayPal.me/butkus
<<<IF YOU WOULD LIKE THIS OR ANY PDF FILE PRINTED, BOUND AND
MAILED TO YOU, SEE THIS OUTSIDE COMPANY'S OFFER >>>
Back to main camera manual page

FEATURES YOU'LL LIKE
· Through-the-lens viewing ends accidental subject cropping ... you see your exact picture in brilliant
viewfinder before you take it.
· Through-the-lens focusing: Micro-prism image rangefinder plus focusing screen make extra-sharp pictures
easier to take.
· Through-the-lens system US exposure meter measures light with high degree of accuracy.
· Single-stroke film-advance lever also winds the shutter, counts exposures and prevents double exposures.
· Instant-return mirror automatically returns to viewing position the instant exposure is made - no viewfinder
"blackout" to delay picture taking.
· Automatic diaphragm you focus and compose with lens at its widest opening - prevents viewfinder dimming
when smaller lens openings are selected.
· Auto Rikenon lens lets you produce slides and prints of superior sharpness and color fidelity.
· Focal plane shutter: A range of speeds from 1/30 sec. to 1/500 sec. plus bulb let you "freeze" swift action as
well as take photos of excellent quality.
* Hot Shoe makes it easy to take flash pictures with the electronic flash unit.

KNOW YOUR CAMERA
A) Film Speed Selector
B) Shutter Speed Dial C)
Film-Advance Lever
D) Shutter Release Button
E) Cable Release Socket
F) Exposure Counter
G) Neck Strap Eyelet
H) Preview Lever and
Exposure Meter Switch
I) F-stop Ring
J) Depth of Field Scale
K) Distance Scale
L) Focusing Ring
M) Film Rewind Knob
N) Hot Shoe
0) Viewfinder Eyepiece
P) Focal Plane Shutter
Q) Film Rewind Shaft
R) Flash Socket (X-type)
S) Film Chamber
T) Back Cover Latch
U) Battery Compartment
Cover
V) Rewind Button
W) Film Take-up Spool
X) Film Pressure Plate
Y) Sprocket Teeth (2)

FILM LOADING
Always load camera in shade, never in bright or direct sunlight. Use good quality standard 35 mm (12, 20
or 36 exposures) film, color or black and white.
Press Shutter Release Button (D) to see that the shutter has been released. Pull Back Cover Latch (T) until
camera back clicks open .
Swing open camera back and place
film cartridge into Film Chamber (S).
To place film cartridge properly
make sure that the projected core of
the film cartridge comes to bottom of
camera
and rotate Film Rewind Knob (M)
back and forth so that Film Rewind
Shaft (Q) engages film cartridge and
film cartridge is seated in place
Pull tapered end of film across back
of camera and insert into and
through any one of the slits of Film
Take-up Spool (W). Rotate Film
Take-up Spool (W) by advancing
Film-Advance Lever (C) to take up
film slack and check to see that the
tip of film has been firmly hooked
onto Film Take-up Spool (W). Wind
film and press Shutter Release
Button (D) each time until a set of
sprocket holes on the film engage
Sprocket Teeth (Y)

Close camera back and snap it shut.
Advance Film-Advance Lever (C)
two or three times depressing
Shutter Release Button (D) each
time until Exposure Counter (F) is
set to "1", ready for your first
picture . Set the camera for the film
which you are using. To set film
speed pull up Shutter Speed Dial
(B) and rotate it until the ASA
number of your film is opposite the
red marker
Check the instruction sheet packaged with your film for the correct ASA speed for that film. If you are using
German film, refer to Fig. 7 for the relation between ASA and DIN.
When you check the camera before loading the film, do not turn the sprocket or Film Take-up Spool (W) after
advancing Film-Advance Lever (C). Besides, do not turn the sprocket at 350 . degrees before advancing Film-
Advance Lever (C).
BATTERY LOADING
Unscrew Battery Compartment Cover (U) with a coin and remove it. Wipe off the surface of the mercury
battery (packaged with your camera) with cloth and place the mercury battery
in the compartment with plus "+" end up

(Fig. 8). Make double sure that the mercury battery was loaded
correctly and replace the cover. If the mercury battery is placed
incorrectly, the exposure meter needle will not move. The mercury
battery is the power source of automatic exposure system and will
last for about one year. Replace the mercury battery when the
exposure meter needle does not move in bright or direct sunlight
with Exposure Meter Switch (H) pressed. For replacement use
Eveready EPX625, Mallory RM625 or equivalent.
You must find a Wein-Air battery as a replacement.
* The mercury battery may explode if disposed in fire.
CORRECT EXPOSURE
Correct exposure is achieved by setting the lens (f-stop) and shutter in correct combination for the film, subject
and lighting condition. As your SLX 500 camera has a built-in through-the-lens system CdS exposure meter,
you can adjust exposure with high degree of accuracy in the following manner.
1. Set shutter speed by rotating Shutter Speed Dial (B). A shutter speed ranging from 1/60 - 1/250 sec. will suit
your normal outdoor picture-taking and 1/30 sec. and "B" (bulb) for indoor. (Read "Setting the shutter"
carefully).
2. Rotate F-stop Ring (1) and set the lens at its full opening (Smallest number).
3. Hold your camera and look your subject through Viewfinder
Eyepiece (0). Then, press Preview Lever (H) and at the same
time turn F-stop Ring (1) until the exposure meter needle in the
viewfinder comes to horizontal position in-between "+" and -"
indicators (Fig. 9).

(Fig. 10),
If the exposure meter needle is in the area of "+" indicator this
is overexposure. Select a smaller lens opening or a faster shutter
speed. If, on the contrary, the needle stays in the area of "-"
indicator
(Fig. 11), this means underexposure - choose a larger lens
opening or a slower shutter speed.
4. Focus the lens and release the shutter. For focusing the lens, refer to "Viewing and focusing".
You may set F-stop first and then shutter speed. Other procedure is same as above. This setting may be used
when you take a portrait or the like making your subject attractive with the back ground and the scene in front
of your subject blurred. How your subject stands out depends on F-stop setting (Refer to "Depth of field"). Hold
your camera firm or use a steady support like tripod if you have to use a slow shutter speed.
* Correct exposure may not be obtained when you expose the subject with your eye away from Viewfinder
Eyepiece (0) or with the sunlight in front of your because your face may reflect inside the viewfinder, which
will influence the exposure meter.
* Press Exposure Meter Switch (H) until it completely stops.

SETTING THE SHUTTER
Simply turn Shutter Speed Dial (B) until the desired shutter speed number is set opposite the white marker
(Fig. 12). Make sure the Dial is set at a click stop. Do not set
Shutter Speed Dial (B) in between two shutter speeds. Always set it
at a click stop. The shutter speed setting governs the amount of time
the film is exposed to light. "60" (1/60 sec.) is recommended for
subjects not in motion. Where motion exists, shutter speeds ranging
from 1/125 to 1/500 should be used.
To achieve maximum depth of field (area of sharpness in front of and behind subject), or when shooting in
poorly lit areas, 1/30 and B (bulb) are available. When using "B" (bulb), use a tripod or other firm support to
prevent blurring of the picture. When set at "B" the shutter will remain open as long as Shutter Release Button
(D) is depressed. The "B" setting is ideal for long night exposure using street lights or electric signs as a light
source, or under poor light conditions when flash cannot be used.
· Do not turn Shutter Speed Dial (B) with Shutter Release Button (D) pressed.
· Do not depress Shutter Release Button (D) with Film-Advance Lever (C) not completely advanced.
· Do not wind Film-Advance Lever (C) while pressing Shutter Release Button (D).
SETTING THE LENS
Rotate F-stop Ring (I) until the desired f-stop number is opposite the red marker
(Fig. 13). Click stops are
provided to prevent accidental
movement from setting made.
The lens opening determines
the amount of light entering the
lens and striking and exposing
the film. The smaller the f-stop
number (f2.0, f2.8 etc.) the
wider the lens opening and the
greater the amount of light
entering the lens.

The larger the f-stop number
(f16, f11 etc.) the smaller the
lens opening and the smaller
the amount of light entering the
lens.
As the lens opening is moved
from f16 to f11 the amount of
light entering the lens is
doubled; as the lens opening is
moved from f2.0 to f2.8 the
amount of entering light is cut
in half. You may set F-stop
Ring (1) in between two f-stop
numbers if necessary.
VIEWING AND FOCUSING
Look into Viewfinder Eyepiece (0) to compose your picture and focus the
lens. Rotate Focusing Ring (L) until subject becomes clear in the micro-
prism image, the center circle area
(Fig. 14). When your subject appears sharp in the micro-prism image,
your picture has been focused. To take the picture hold the camera as
steady as you can and press Shutter Release Button (D) slowly and
smoothly. Since you are viewing through the lens there is no parallax
problem ... what you are viewing in the viewfinder will appear in your
picture. Even when you shoot close-ups there is no danger of accidental
cropping as may occur when the viewfinder is above or to one side of the
lens.

DEPTH OF FIELD
A portion of the picture in front of and behind your subject will also be sharp. If you wish to know how much of
an area will be sharp in your final picture, this can be predetermined in two ways.
Depth of Field Pre-viewer
Pressing Preview Lever (H) will set the lens at the corresponding opening you previously set on F-stop Ring (1)
(Fig. 15 ) This will enable you to preview the area of sharpness in the picture before you take it. The viewfinder
will become dark corresponding to F-stop you previously set on F-stop Ring (1). The Preview Lever (H) will
automatically return to its original position when you leave your finger off the lever and the viewfinder will
become bright.
Depth of Field Scale
After you have set the lens opening and have focused the camera, area of sharpness in front of and behind your
subject can also be determined on the Depth of Field Scale (J).
Locate on Depth of Field Scale (J) the two numbers corresponding to the f-stop you have set on F-stop Ring (I).
The distance between these two f numbers of Distance Scale (K) will be the area of sharpness in your picture.
For example, if F-stop Ring (I) is set at 8 (f8), about 3.5 - 10 m (11.5 - 33 ft.) will be in focus.
When Focusing Ring (L) is set at 5 m (16.5 ft.) (Fig. 16).
CHANGING THE LENS
Your camera is equipped with a 50 mm Practica type thread mount lens, the focal length of which is proper for
general-purpose picture taking. You may select additional Practica type thread mount lenses from wide range of
Rikenon lenses which include extremely wide lenses through long focal length telephoto and zoom lenses.
Rikenon lenses are made of selected high quality materials under severe quality control to give high
performance and full satisfaction. To remove the lens, continuously turn the lens in a counterclockwise
direction until it can be removed (Fig. 17). To insert another lens, turn the lens in a clockwise direction until the
lens is secured in position.
· Never change the lens with Preview Lever (H) pressed.

FLASH PICTURES
Your camera has Hot Shoe (N) on top of camera which permits you to use a direct contact type electronic flash
unit and Flash Socket (R) on one side of body to enable you to use electronic flash unit with connecting cord.
If your electronic flash unit is of direct contact type, simply mount it onto Hot Shoe (N)
(Fig. 18). No other setting is
necessary. If you have an electronic
flash unit with connecting cord,
mount the flash unit onto Hot Shoe
(N) and connect the end of
connecting cord to Flash Socket (R).
Regardless the type of electronic
flash unit, set shutter speed at 1/60
or 1/30. Setting the shutter speed at
faster speed than 1/60 will result in
unsynchronized picture.
· Flash Bulbs cannot be used
because only X contact via Hot
Shoe (N) or Flash Socket (R) is
available.
· Never deeply touch the central part
of Flash Socket (R) when you use
an electronic flash unit by mounting
it onto Hot Shoe (N).
UNLOADING FILM
Always unload your camera in the shade, never in bright light.
After the last picture on the roll has been taken, depress Shutter Release Button (D). Press Rewind Button (V)
and lift up crank on Film Rewind Knob (M). Turn crank in a clockwise direction until the entire roll has been
rewound. Tension on the crank will decrease noticeably (Fig. 19). Open camera back by pulling Back Cover
Latch (T), and remove the film cartridge. Have film processed as soon as possible.
TIPS FOR BETTER PICTURES
· Read the instruction book carefully
· Before you go on a trip or photograph a special event, shoot a practice roll
· Keep fingers and neck strap clear of the camera lens.
· When you reach the end of the roll of film [check Exposure Counter (F), Film-Advance Lever (C) becomes
harder to advance .. don't try for "Just one more shot", it's time to rewind.

· Protect your camera from dust, water, rain dampness, salt air, dirt and rough handling. Do not expose your
camera or film to excessively high or low temperatures.
· Put lens cap to protect the lens.
Angle of View
Lens
Speed
F-stop
Control
Lens
Sect.
Lens
Elem.
Min.
Focus
Filter
Size
Net
Weight
Lb.
Gr.
450g
0.99 Ib
1. f4.0 Auto 10 11 0.3m 72.0
17 mm 102°
2. 21 mm 90' f38 Auto 8 9 03m 72.0 290g 0.64 lb
3 24 mm 85
,
f28 Auto 8 10 0.2m 62.0 2609 0.57 Ib
4 28 mm 75' f 28 Auto 6 7 03m 58.0 240 g 0 53 Ib
5. 35 mm 63' 12.8 Auto 5 6 04m 52.0 220 g 0 48 Ib
6. 135 mm 18' f2.8 Auto 4 4 1.8m 55.0 390g 086 lb
7 200 mm 12' 135 Auto 4 4 3.0m 62.0 740g 1.63lb
8 300 mm 8' 15.5 Auto 3 5 6.0m 62.0 840g 1.85 Ib
9. 400 mm 6' f6.3 Auto 3 4 8.0w 72.0 1,0459 2.30lb
10. 55-135 mm Zoom
43-18° f3.5 Auto 9 13 1.5m 62.9 6508 1.43lb
11 90-190 mm Zoom
27"--13° f58 Auto 6 7 2.0m 55.0 560g 1.23lb
12 70-230 mm Zoom
34"-11° f4.5 Auto 8 13 2-5m 67.0 1,320g 2.90 lb
Lens
Angle of
View
Lens
Speed
F-stop
Control
Lens
Sect
Lens
Elem
Min
Focus
Filter
Size
Net Weight
Lb
1000 g 2.20 lb
13 f8.0 Preset 4 4 40m 77°
500 mm 5°
14 600 mm 4° f8.0 Preset 3 3 l0m 90° 1.860 g 4.09 lb
15 800 mm 3° f8.0 Preset 4 4 18.0m 112° 2.370 g 5.21 lb
16 60 mm
macro 40° f2.8 Preset 4 5 0.2m 58° 400 g 0.88 Ib
17 135 mm
Bellows lens
18° f3.5 Preset 4 4 49° 200 g 044 lb
18 Fisheye 180° Preset 6 9 260g 0.57lb
19. Bellows Attachment For 135 mm Bellows lens has focusing knob for maximum sharpness at extremely
close distances ... excellent for extreme close-ups.
20. Extension Ring Set This is used to photograph objects at extremely close distances. Rings can be used
separately or in combination depending upon distance from object you desire to photograph.

21. Microscope Attachment allows camera to be attached to microscope for photographing objects utilizing
microscope magnification. Plus a broad line of other photographic accessories.
The following accessories are also available for your Ricoh SLX 500 camera.
22. Close-up Lens # 1 100 - 32 cm 23. Close-up Lens #2 50 - 24 cm
24. Bellows Attachment "A"
25. Deluxe Bellows Attachment "B" w/slide copier and focusing track
26. Extension Ring Set (Auto., 3 pieces per set)
27. Microscope Attachment
28. Diopter Adjuster, (-3, -2, +0.2, +1, +2, +3)
29. Eyepiece Magnifier, x 2
30. Copy Stand
31. Cable Release
32. Deluxe Hand Grip (Foldable bracket)
Table of contents
Other Ricoh Digital Camera manuals

Ricoh
Ricoh CX2 Use and care manual

Ricoh
Ricoh Caplio RR-1 User manual

Ricoh
Ricoh FF-90 User manual

Ricoh
Ricoh XR-2s User manual

Ricoh
Ricoh G700SE User manual

Ricoh
Ricoh CX2 User manual

Ricoh
Ricoh Pentax K-3 III Use and care manual

Ricoh
Ricoh Caplio RZ1 User manual

Ricoh
Ricoh CX3 User manual

Ricoh
Ricoh RDC-4200 Assembly instructions

Ricoh
Ricoh R4 User manual

Ricoh
Ricoh WG-20 User manual

Ricoh
Ricoh THETA S User manual

Ricoh
Ricoh Caplio GX8 User manual

Ricoh
Ricoh CX2 User manual

Ricoh
Ricoh RDC-6000 User manual

Ricoh
Ricoh RDC-6000 User manual

Ricoh
Ricoh CX4 User manual

Ricoh
Ricoh Aficio G700 Use and care manual

Ricoh
Ricoh Pentax Q-S1 Guide