Riden RD60 Series User manual

RD6006, RD6012, RD6018 DC Power Supplies
with Custom Firmware by UniSoft
Primary Author: Sunkmail (Scott Mitten)
Contributing Authors: Dougg (Doug G.)
bateau020
Abig thanks to UniSoft for both writing the firmware and technical assistance in creating this document.
This document is user created and definitely has errors and omissions.
Use with Caution.
For any correction or additions to this document, contact Sunkmail by the link provided,
or through the associated forum thread on EEVBlog.com.
Latest Document Change: March 19, 2021

Table of Contents
1. Introduction 4
2. Document Status 5
3. Disclaimer 5
4. Nomenclature & Formatting 6
5. System Isolation 6
6. How to Install Custom Firmware 7
6.1. Prepare the RD60xx 7
6.2. If you use UniSoft's RDFlasher on Windows 8
6.3. If you use Timo Kokkonen's Riden flashtool 10
7. Front Panel Layout 11
7.1. Display Screen Layout 12
8. System Settings Navigation 12
9. Global Menu Pages 13
9.1. ‘Battery’ Icon Page 13
9.1.1. Battery Charger Group 13
9.2. ‘Gear’ Icon Page 13
9.2.1. Power Group 13
9.2.2. Display Group 13
9.2.3. Communication Group 13
9.2.4. Units Group 13
9.2.5. Date and Time Group 13
9.3. ‘Home’ Icon Page 14
9.3.1. Interface Group 14
9.3.2. Appearance Group 14
9.3.3. Buzzer Group 14
9.3.4. Layout 1 Group 14
9.3.5. Colours Group 14
9.4. ‘Disc’ Icon - Memory Location Values Menu 15
9.5. ‘Screwdriver’ Icon Page 15
9.6. ‘Info’ Icon - Device Information Page 15
10. “Current Session” (CS) Menu Layout 15
11. “Quick Settings” (QS) Menu Layout 16
12. Other Settings 16
13. Button Actions & ShortCuts 17
13.1. Graph Mode Only: 17

14. Description of Each Setting’s Options 18
15. ‘Colours Group’ Detailed Explanation 46
16. Graph Display - Detailed Explanation 48
16.1. Graph (View) Mode 51
17. Raw ADC Values and Calibration 52
17.1. How to Adjust the Calibration 53
18. Hardware Modifications 54
18.1. Accessing the Internals 54
18.2. External LED - Modification 55
18.3. Front Power Switch - Modification 60
18.4. Improve Internal Thermal Measurement Accuracy 61
18.5. Using the TTL Interface 61
18.6. Output Surge Problem - Hardware Bug, With Fix 62
18.6.1. How to get rid of the problem: 62
19. How to Connect with WiFi 65
19.1. If WiFi Has NOT been previously configured 65
19.2. If WiFi has been configured previously 66
19.3. If you want to change the "Server"'s IP address. 66
19.4. If you want to change the AP, or if WiFi no longer works at all, and you want to start all over. 66
20. Other Software and Utilities 67
20.1. ScreenDumper Utility 67
20.2. How to Change the Boot Logo Image 68
21. Battery Charging Methods with the RD60xx 69
21.1. Battery chemistries 69
21.2. Connecting a battery 70
21.3. Battery settings 71
21.4. Charging Strategies 71
21.4.1. Time limit 71
21.4.2. Capacity limit 71
21.4.3. Current limit 72
21.4.4. Temperature limit 72
21.4.5. dV/dT 73
21.4.6. Float Charging (aka Trickle Charging) 74
22. Reference Information: 75
22.1. Original Riden Manual 75
22.2. Fuses 75
22.3. Short Circuit Response Time Testing 76
22.4. Miscellaneous 77

4
1. Introduction
This document describes the usage of custom firmware, written by UniSoft, running on the popular "DC Power
Supplies" models RD6006, RD6012, and RD6018, along with their WiFi enabled variants. ("W'' appended to
the model name.) The RD60xx_s are manufactured by the Hangzhou Ruideng Technology Co. Ltd. of
Zhejiang, China. Hereafter the manufacturer will be referred to as Ruideng or Riden; the latter is the name
that appears on the front of these power supplies.
Electrically the RD60xx units can be termed as DC buck converters. They are designed to take an input
voltage up to 70 Volts (MAX) DC and step it down to a user-selectable voltage in the 0-60 Volts DC range. The
last two digits of the product name indicated the maximum current they can deliver (e.g. the RD6018 can
deliver up to 18 Amps). Ruideng has done a good job of documenting their power supplies and postscript files
can be found at this url (note: http rather than https)
Note that DC power supplies used in electronics, often called lab power supplies, typically take mains AC
Voltage as input (85 to 250 Volts AC, 50 or 60 Hertz). Retailers of the RD60xx products usually sell a mains AC
adapter with a 65 to 70 Volt DC output and an enclosure box to hold the adapter and the RD60xx.
This document's primary authors each have an RD6018(W) with a 800 Watt AC adapter that outputs around
65-68 Volts DC, without load. As most of the screenshots are from the primary authors equipment, small
differences may appear between the reader's PS and other models.
For example, only the RD6006 has 1 milliAmp (mA) current setting resolution while the two "larger"
models have 10 milliAmp current setting resolution. Bigger is not always better.
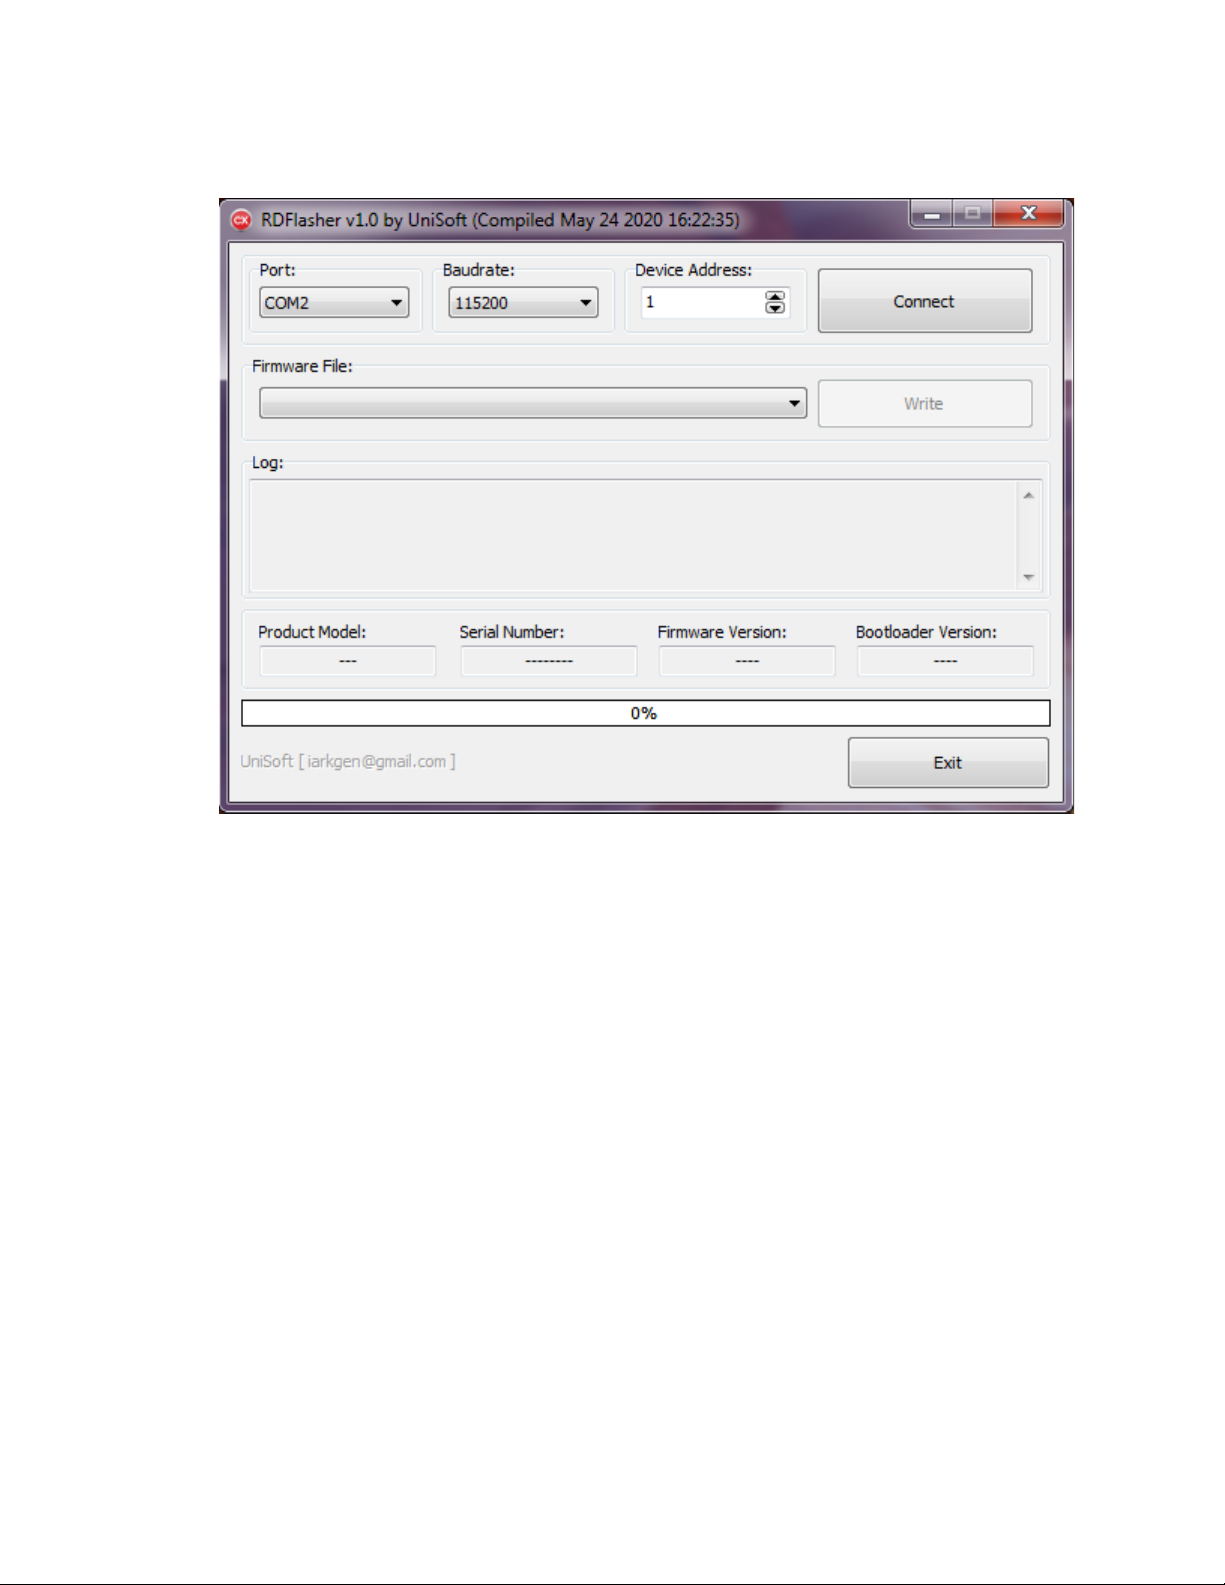
On 25 June 2020 eevblog user "UniSoft'' posted to the ‘Test Equipment’ board in the "RuiDeng Riden RD6006
DC power supply" thread that announced:
"I recovered firmware source code of RD6006... Here is my beta version, if anyone interested."
Probably before that date he sent beta versions to a Russian electronics board. His bio on EEVBlog gives his
nationality as from Kazakhstan, his gender as male, and his location as Shenzhen, China. Other than that we
know he writes good firmware and is very responsive to any bug reports.
It seems the manufacturer, Ruideng, has adopted some of UniSoft's ideas and incorporated them in their own
recent firmware updates. This can make it a little difficult to identify a feature as a UniSoft addition as it may
appear later in Ruideng firmware. But for users of these DC power supplies, this seems like a win-win situation.
The source code that generates UniSoft's firmware has not been open sourced. When asked about this
UniSoft said that it contained some encryption code that the manufacturer would not want to see made public.
That said, UniSoft has stated that he has no relationship with, or been offered any financial
compensation from, Ruideng.
Russian Language Forum where everything started is HERE.

5
2. Document Status
This document was started in February 2021.
The most recent beta firmwares at the time of this document is version n
RD6006 - zip file: RD60061_V1.34.1n.zip
RD6012 - zip file: RD60121_V1.33.1n.zip
RD6018 - zip file: RD60181_V1.34.1n.zip
All released on 19 March 2021.
Each firmware will also work on the corresponding “W” variants
(e.g. RD60xxW) which can add a WiFi daughter board for remote control and monitoring.
Please Note:
You MUST install the correct firmware for your particular RD60xx Model,
Otherwise unexpected behaviour can & will occur.
The recently released RD6006P(a hybrid switching/linear DC power supply) has sufficiently
different hardware that UniSoft has indicated that this firmware is NOT compatible with that
model.
3. Disclaimer
While we have made every attempt to ensure that the information contained in this document is correct, The
Document Authors, Contributors, and Firmware Author are not responsible for any error or omissions, or for
the results obtained from the use of this information. All information in this document is provided “as is”, with no
guarantee of completeness, accuracy, usefulness, timeliness or the results obtained from the use of this
information, and without any warranties of any kind whatsoever, express or implied, including, but not limited to
performance and fitness for a particular purpose.
Any actions you take upon the information in this document are strictly at your own risk. In no event will the
Document Authors, Contributors, or Firmware Author be liable to you or anyone else for any decision made or
action taken in reliance on the information within this document, or for any consequential, special or similar
damages, even if advised of the possibility of such damages. We will not be liable for any losses or damages in
connection with the use of this document or the Firmware it references.

6
4. Nomenclature & Formatting
● Items in double quotes (“ ”) refer to Physical buttons.
○The Font will also be changed to the one used on this line.
● Items in single quotes (‘ ‘) refer to unit settings or modes.
● CC mode - Unit will attempt to maintain a Constant Current (maximum) output, adjusting the
Voltage output as required.
● CV mode - Unit will attempt to maintain a Constant Voltage (maximum) output, as long as the
load’s current (Amps) demands are below the ‘I-Set’ Value.
● Protection Mode - Unit has sensed a value exceeding its protection setting. (eg OVP,OCP, etc)
○ Output will be immediately turned OFF when entering this mode.
● Normal Operating Mode - Unit is not currently experiencing any errors and is not in a protection
mode.
● Graph Display mode - Any screen showing values graphically via a graph, rather than text.
● Primary Power Supply - The Power Supply (PS) that supplies DC power to the RD60xx Unit.
○ MAXIMUM Voltage In = 70V DC. DO NOT EXCEED
5. System Isolation
Assuming your particular Primary Power Supply output is isolated from the AC mains' protective ground (i.e.
green with yellow stripe insulated wire, or bare copper wire; also known as protective earth) then the 3 output
terminals on the front of the RD60xx units will also be isolated.
This makes the RD60xx unit a floating supply.
Some confusion may arise due to Ruideng's choice of a green terminal as an alternate "+" terminal for
battery charging, since many other power supplies choose to have a green "third" terminal on the front
of their units connected to the AC mains protective ground.
The USB port on the front of the RD60xx, is galvanically isolated from the rest of the unit. The isolation
integrated circuit claims 3000 Volts AC rms isolation (UL certificate number: E494497).
Even without dangerous voltages being involved, it is still possible to have unexpected current flows
through the negative terminal (ground) if the USB port were not isolated.
For example, a laptop connected to an external monitor could effectively be tied to the AC
mains' protective ground (via the monitor). If a device that was protective ground referenced
were connected, by a USB cable, between the laptop and a NON-isolated USB port the device
could cause a protection trip or worse.
Therefore, the USB port of the RD60xx unit being isolated is an important safety feature.

7
6. How to Install Custom Firmware
Required Files and Utilities:
As of this document’s latest update:
UniSoft’s most recent RD60xx Firmware
as posted on EEVBlog.
Note: You will need to ensure you have the correct Firmware
for your RD60xx model.
Windows: UniSoft’s most recent ‘Flasher’ Utility.
Recommended to load the custom firmware when using Windows.
Windows 10 Driver for USB interface connection
Only needed if your computer doesn’t see the RD60xx
on a Windows 10 computer.
Any OS (MacOS, Linux, Windows): Timo Kokkonen's Riden flashtool.
Requires command line and Python 3.
6.1. Prepare the RD60xx
IF using the default RD60xx (Riden) Firmware:
1. Press “SHIFT”+”MENU”to enter the
menu system.
2. Ensure ‘Interface’ is set to: USB,
(using the direction keys: ◄►▲▼)
Note:
This image may not perfectly represent the
current Riden firmware setting screen.
Screen changes may occur between
firmware versions.
IF updating an existing UniSoft Firmware:

8
1) Ensure ‘Interface-USB’ is set to the desired baud rate.
(115200 is default for Flasher utility.)
In all cases:
2) Confirm the device ‘Address’.
3) Turn OFF the Primary Power Supply.
4) Ensure you have a USB cable connected from your computer to the micro-USB port on the front
of the RD60xx.
IF any difficulties are encountered, or existing
firmware is corrupted:
Press the “ENTER”button while turning
ON the Primary Power Supply.
(This will manually put the RD60xx
into ‘Boot’ Mode.)
6.2. If you use UniSoft's RDFlasher on Windows
1) In your computer’s file manager:
● Ensure the latest firmware .BIN file is in the ‘FIRMWARES’ sub-folder of the RDFlasher
utility.
○ If not, the Flasher will not be able to detect the file.
● Start ‘RDFLasher.exe’

9
2) In the RDFlasher utility:
a) Ensure your Port, Baudrate and Device Address are set for your RD60xx.
b) Select the desired firmware from the “Firmware File” dropdown box.
< Turn ON the RD60xx’s Primary Power Supply >
c) Click the ‘Connect’ button.
d) Click the ‘Write’ button.
e) Wait for the write process to complete.
DO NOT turn off the power during this process!
Notes:
If you flash back to the stock firmware from the custom firmware, you should restore
default settings:
To reset default parameters: Press "0"while powering on the RD60xx.

10
6.3. If you use Timo Kokkonen's Riden flashtool
This tool can be used on many devices and OSes that have support for python3: Windows, Mac, Linux. It also
works on devices like the raspberry Pi. It requires use of the command line. Be sure you are familiar with that.
Familiarity with Python is not strictly needed.
1) Place the correct firmware file in a directory of your choice. Note the command line path to that
file.
2) Make sure you know the serial device that the RD60xx presents to the OS: look what serial
device gets created when you connect a USB cable from your computer to the micro-USB port
on the front of the RD60xx. The exact name depends on your device and your OS. On MacOS,
the device might be something like "/dev/tty.usbserial-31110"
3) Make sure you have Python3 installed (any recent Linux and MacOS will have it, Windows may
be more troublesome).
4) Make sure you have "pyserial" installed. Most modern OS’s have it installed. If not, you can
install it through pip3 via the command pip3 install pyserial. If you don’t have pip3, and
don’t know how to install that, you might also be able to install pyserial directly through your
OS's package manager (probably as python3-serial)
5) Pick a directory you want to install the software in
6) Fetch the software from github, via your preferred method. Some different ways of doing it are:
a) via command line git, if you have it:
git clone [email protected]:tjko/riden-flashtool.git
b) via a download of the full zip and subsequent unzip to the desired directory.
c) via a download of only the python script file flash-rd.py directly to the desired directory.
7) Connect a USB cable from your computer to the micro-USB port on the front of the RD60xx
8) Follow the instructions from github. An example from a Raspberry Pi is mentioned. On MacOS,
you might need something like
python3 flash-rd.py /dev/tty.usbserial-31110 ../RD60121_V1.33.1n.bin
9) Wait for the write process to complete.
DO NOT turn off the power during this process!
Notes:
If you flash back to the stock firmware from the custom firmware, you should restore
default settings:
To reset default parameters: Press "0"while powering on the RD60xx.

11
7. Front Panel Layout
A“POWER”button
B“SHIFT”button
C“MEM”button
D“I-SET”button
E“V-SET”button
FMicro-USB port
GNegative Binding post / terminal
HBattery Positive Binding post / terminal
Dedicated Battery Charging (+) output
IOutput Positive (+) Binding post / terminal
General Purpose (+) Output
JOutput “ON/OFF”button
K“ENCODER”knob
LDirection arrows
“◄”,“►”,“▲”,“▼”
M“ENTER”button
NNumbered “KEYPAD”
ODisplay - ‘Display Screen Layout’ for Detail
Safety NOTE:
The GREEN Binding post IS NOT GROUND.

12
7.1. Display Screen Layout
{ToDo: Add info for the areas of the display}
{ie, Status area, The Caption area, Normal operating Icon, Memory location Icon, etc}
{Include Icons that may show up, eg internal Fan, LOCK, buzzer, Etc.}
8. System Settings Navigation
To Enter Global Settings:
(From Any Non-Settings page:)
Press “SHIFT”+”MENU”
To Change Global Menu Category:
(With No Options selected:)
Press “◄” or “►”
OR
Rotate “Encoder” Knob
To Enter “Current Session” Settings:
(From Any Non-Settings page:)
“SHIFT”+“▲”
To Enter “Quick Settings”:
(From Any Non-Settings page:)
“SHIFT”+ “▼”
To select current menu options:
Press “▲” or “▼”
To Change Selection Value:
Press “◄” or “►”
OR
Rotate “Encoder” knob
(Numbered settings can also
use the numbered keypad)
To ‘Backspace’ when using the keypad:
Press “►”
To Confirm Selection:
Press “ENTER”
OR
Press “Encoder” knob
OR
Press “▲” or “▼”
To Backout to Previous menu (and store changes)
Press “Encoder” knob
OR
Press “ENTER”

13
9. Global Menu Pages
9.1. ‘Battery’ Icon Page
9.1.1. Battery Charger Group
-- CutOff current
-- CutOff temp.
-- CutOff time
-- CutOff cap.
-- CutOff -dV/dT
-- Reset metrics
-- Charge Buzzer
9.2. ‘Gear’ Icon Page
9.2.1. Power Group
-- Power State
-- Boot Output
-- AutoPowerOff
-- Max Power
-- Power Switch
-- Standby LED
-- External LED
-- ISET > OCP+200
-- OTP (ext)
-- UVP
-- ORP
-- ORP set
-- ORP delay
9.2.2. Display Group
-- Backlight
-- Screensaver
-- ScrsaverBright
-- ScrsaverActive
-- Update Rate
-- Boot Logo
9.2.3. Communication Group
-- USB Interface
-- UART Interface
-- UART Baudrate
-- Server IP
-- Address
-- Comm Buzzer
-- Skip keys lock
9.2.4. Units Group
-- Temperature
9.2.5. Date and Time Group
-- Date Format
-- Date
-- Time

14
9.3. ‘Home’ Icon Page
9.3.1. Interface Group
-- Language
-- Layout
9.3.2. Appearance Group
-- Digits Style
-- Leading Zeros
-- Status Info
-- Mem Hint
-- SkipExitIVSet
-- IVSet Timeout
-- Save Mult.
-- SaveGraphSett.
-- ShiftMemTable
-- Take Ok
-- Take Out
-- Timer icon
-- t° -EXT icon
9.3.3. Buzzer Group
-- Mute
-- Key Beep
-- OxP Beep
-- Timer Beep
-- AutoPwrOffBeep
-- CV—>CC Beep
-- CC Buzzer
9.3.4. Layout 1 Group
Show [Option]
-- Show INPUT
-- Show V-SET
-- Show I-SET
-- Show OVP
-- Show OCP
-- Show OPP
-- Show RL
-- Show t°-EXT
-- Show V-BATT
-- Show t° -BATT
-- Show TIME
-- Show CHARGE
9.3.5. Colours Group
‘Colours Group’ Detailed Explanation
-- Voltage
-- Current
-- Current (CC)
-- CurrentBg(CC)
-- Power
-- Input
-- V-SET
-- I-SET
-- OVP
-- OCP
-- OPP
-- RL
-- Ah
-- Wh
-- Temperature
-- BattVoltage
-- Batt Info
-- Graph (V)
-- Graph (I)
-- Graph (W)
-- Graph (t°)
-- Custom Colours

15
9.4. ‘Disc’ Icon - Memory Location Values Menu
{Add description of how this menu works here}
{placeholder}
{placeholder}
{placeholder}
{placeholder}
{placeholder}
{placeholder}
{placeholder}
{placeholder}
{placeholder}
{placeholder}
9.5. ‘Screwdriver’ Icon Page
Under Construction
This menu is currently not in use
9.6. ‘Info’ Icon - Device Information Page
(Read Only)
Product Model
Serial Number
Firmware
Temperature (Internal)
10. “Current Session” (CS) Menu Layout
“SHIFT” + “▲”
--- Timer Mode
-- Timer Off
-- Timer On
-- Timer Reset
-- CC Buzzer

17
13. Button Actions & ShortCuts
Activate Screensaver
“●”
‘Current Session’ Menu
“SHIFT” + “▲”
Display Layout
“◄” or “►”
Lock
“SHIFT” + “●”
Mute
“●” + “●”
‘Quick Settings’ Menu
“SHIFT” + “▼”
Reset Metrics (Ah/Wh/Time)
“MEM” + “●”
Set OPP
“SHIFT” + “MEM”
Status Bar Info Displayed
“▲” or “▼”
13.1. Graph Mode Only:
Enter View Mode
“MEM” + “ENTER”
Switch to Auto Scaling
“MEM” + Press/click “ENCODER”
Start / Stop (Pause)
“ENTER”
Select Parameter to Scale
“ENCODER”
Change Offset Y
“▲” or “▼”
Reset Offset Y
“MEM” + (“▲” or “▼”)
See ‘Graph Display - Detailed Explanation’ for full
details of graphing mode.

18
14. Description of Each Setting’s Options
Address
➥Communication
Settable Range: 001 - 255
Used to uniquely identify unit when multiple devices connected
AutoPowerOff
➥Power Settings
Settable Range: Never / 00h01m - 59h59m
Automatically Power off after specified time IF RD60xx unit is in idle mode.
Idle mode = output off, no user interaction, no communication.
Any user input or external communication will reset the timer.
AutoPwrOffBeep
➥Buzzer
If AutoPowerOff Enabled:
ON Buzzer will sound when AutoPowerOff activated (timer reaches 0).
OFF Buzzer will NOT sound when AutoPowerOff activated.
Backlight
➥Display
Settable Range: 0 - 5
Screen Brightness Selection. Higher setting is brighter.
Boot Logo
➥Display
ON Display Logo/Splash screen on Boot-up.
OFF Enter the main page directly.
Instructions for How to Change the Boot Logo Image.

19
Boot Output
➥Power Settings
Disable Output will remain OFF until the “ON/OFF” button is pushed.
Enable Turn on the output automatically upon Boot-up.
LastState Return to the ON/OFF state from the last RD600x shut-off.
This option is for the RD60xx’s output when the “Power” button is pressed (Boot-up).
For behaviour when the RD60xx unit first receives power from the Primary Power
Supply, use the ‘Power State’ setting.
CC Buzzer
➥Buzzer
ON Buzzer sounds continuously (for 30 seconds) when in Constant Current (CC) mode.
OFF Buzzer does NOT sound when in CC mode.
This option does NOT affect the operation of the ‘CV->CC Beep’ option.
CC Buzzer {CS menu}
Same as ‘CC Buzzer’, above, except:
Operation returns to ‘CC Buzzer’ value on next Power-On.
Charge Buzzer
➥Battery Charger
ON Buzzer sounds once when a Battery Charging cycle completes.
OFF Buzzer does NOT sound when a Battery Charging cycle completes.
Comm Buzzer
➥Communication
ON Buzzer sounds once when the software writes new parameter(s) .
OFF Buzzer does NOT sound when Parameter(s) changed.

20
CutOff -dV/dT
➥Battery Charger
OFF NOT monitoring for voltage drop during charging.
Value Set in 0.01V steps.
IF Set,
● If, 5 minutes after the output is turned on, the voltage drops by more than the specified
value, the output will be disabled with the "-dV/dT" status.
● If no voltage rise is detected within 15 minutes, the output will be turned off with the
"0dV/dT" status.
Notes:
- This setting is only applicable using the (Green) Battery Charging Binding post.
- To be used for Ni based chemistries (NiMh/NiCd).
- Experimental use only, may not work correctly due to the low ADC resolution.
- Algorithm taken from this project.
CutOff cap.
➥Battery Charger
OFF NOT monitoring for total capacity charged while battery charging.
Value Set in 0.001Ah steps.
IF Set,
Battery charging cycle will halt once the set value is achieved.
Note:
This setting is only applicable using the (Green) Battery Charging Binding post.
CutOff current
➥Battery Charger
Value Set in 10mA steps.
Charging current where the RD60xx unit will consider the battery ‘Full’.
(Charging cycle will halt.)
Note:
This setting is only applicable using the (Green) Battery Charging Binding post.
This manual suits for next models
3
Table of contents
Other Riden Power Supply manuals