RIDGID 918 Roll Groover User manual

918 Roll Groover
•Français – 23
•Castellano – pág. 47
•Deutsche – 73
Roll Groover
Manual

999-998-946.10_REV. Cii
918 Roll G oove
Table of Contents
Safety Symbols ..................................................................................................................................................................................2
General Power Tool Safety Warnings
Work Area Safety ............................................................................................................................................................................2
Personal Safety ..............................................................................................................................................................................2
Power Tool Use And Care ..............................................................................................................................................................3
Service ............................................................................................................................................................................................3
Specific Safety Information
Roll Groover Safety ........................................................................................................................................................................3
RIDGID Contact Information ............................................................................................................................................................4
Description ........................................................................................................................................................................................4
Specifications ....................................................................................................................................................................................5
Standard Equipment ......................................................................................................................................................................5
Assembly ............................................................................................................................................................................................5
Assembling 918 to Bases for Various Machines ............................................................................................................................5
Pre-Operation Inspection ..................................................................................................................................................................6
Machine and Work Area Set-Up........................................................................................................................................................7
Installing 918 On 300 Power Drive..................................................................................................................................................7
Installing 918 On 300 Compact/1233 Threading Machines ............................................................................................................8
Installing On 535 and 1224 Threading Machines............................................................................................................................9
Operation ..........................................................................................................................................................................................10
Pipe Preparation ..........................................................................................................................................................................11
Advance/Retract The Groove Roll ................................................................................................................................................11
Loading Pipe in Roll Groover ........................................................................................................................................................11
Setting/Adjusting Groove Diameter ..............................................................................................................................................13
Stabilizer Operation ......................................................................................................................................................................13
Grooving Operation ......................................................................................................................................................................14
Tracking Tips ................................................................................................................................................................................15
Inspect/Measure the Groove ........................................................................................................................................................15
Preparing Machine for Transport ..................................................................................................................................................15
Storage..............................................................................................................................................................................................16
Maintenance Instructions
Cleaning ........................................................................................................................................................................................16
Lubrication ....................................................................................................................................................................................16
Hydraulic luid Level ....................................................................................................................................................................16
Changing Roll Sets ......................................................................................................................................................................17
Troubleshooting ......................................................................................................................................................................18-20
Service and Repair........................................................................................................................................................................20
Optional Equipment ........................................................................................................................................................................20
Disposal ............................................................................................................................................................................................20
Table I, Pipe Wall Thickness ..........................................................................................................................................................21
Table II, Standard Roll Groove Specifications ..............................................................................................................................21
Table III, Copper Roll Groove Specifications ................................................................................................................................22
Lifetime Warranty ..............................................................................................................................................................Back Cover
*Original Instructions - English

918
Roll Groover
Roll Groover
WARNING!
Read this Ope ato ’s Manual
ca efully befo e using this
tool. Failu e to unde stand
and follow the contents of
this manual may esult in
elect ical shock, fi e and/o
se ious pe sonal inju y.

999-998-946.10_REV. C2
918 Roll G oove
General ower Tool Safety
Warnings
WARNING
Read all safety warnings, instructions, illustrations
and specifications provided with this power tool.
Failure to follow all instructions listed below may re-
sult in electric shock, fire and/or serious injury.
SAVE ALL WARNINGS AND INSTRUCTIONS
FOR FUTURE REFERENCE!
The term "power tool" in the warnings refers to your
mains-operated (corded) power tool or battery-operated
(cordless) power tool.
Work Area Safety
•eep your work area clean and well lit. Cluttered or
dark areas invite accidents.
•Do not operate power tools in explosive atmo-
spheres, such as in the presence of flam mable
liquids, gases, or dust. Power tools create sparks
which may ignite the dust or fumes.
•eep children and bystanders away while oper-
ating a power tool. Distractions can cause you to
lose control.
ersonal Safety
•Stay alert, watch what you are doing and use com-
mon sense when operating a power tool. Do not use
a power tool while you are tired or under the influ-
ence of drugs, alcohol, or medication. A mo ment of
inattention while operating power tools may result in se-
rious personal injury.
•Use personal protective equipment. Always wear
eye protection. Protective equipment such as dust
mask, non-skid safety shoes, hard hat, or hearing pro-
tection used for appropriate conditions will reduce
personal injuries.
•Prevent unintentional starting. Ensure the switch is
in the OFF-position before connecting to power
source and/or battery pack, picking up or carrying
the tool. Carrying power tools with your finger on the
switch or energizing power tools that have the switch
ON invites accidents.
•Remove any adjusting key or wrench before turn-
ing the power tool ON. A wrench or a key left attached
to a rotating part of the power tool may result in per-
sonal injury.
•Do not overreach. eep proper footing and balance
This symbol means always use a foot switch when using
the machine to reduce the risk of injury.
Safety Symbols
In this operator’s manual and on the product, safety symbols and signal words are used to communicate important safety
information. This section is provided to improve understanding of these signal words and symbols.
DANGER
This is the safety alert symbol. It is used to alert you to potential personal injury hazards. Obey all safety messages that follow this
symbol to avoid possible injury or death.
DANGER indicates a hazardous situation which, if not avoided, will result in death or serious injury.
WARNING WARNING indicates a hazardous situation which, if not avoided, could result in death or serious injury.
CAUTION CAUTION indicates a hazardous situation which, if not avoided, could result in minor or moderate injury.
NOTICE indicates information that relates to the protection of property.
This symbol means read the operator’s manual carefully
before using the equipment. The operator’s manual con-
tains important information on the safe and proper opera -
tion of the equipment.
This symbol means always wear safety glasses with side
shields or goggles when handling or using this equip-
ment to reduce the risk of eye injury.
NOTICE
This symbol indicates the risk of fingers and hands being
crushed between the groove rolls.
This symbol indicates the risk of machine tipping, caus-
ing striking or crushing injuries.
This symbol indicates that the pipe to be grooved should
be a minimum of 8” (200 mm) long to reduce the risk of
injury.
This symbol means do not reach inside of pipe being
grooved to reduce the risk of entanglement, cutting,
crushing and other injuries.

999-998-946.10_REV. C 3
918 Roll G oove
at all times. This enables better control of the power
tool in unexpected situations.
•Dress properly. Do not wear loose clothing or
jewel ry. eep your hair and clothing away from
moving parts. Loose clothes, jewelry, or long hair
can be caught in moving parts.
•Do not let familiarity gained from frequent use of
tools allow you to become complacent and ignore
tool safety principles. A careless action can cause se-
vere injury within a fraction of a second.
ower Tool Use and Care
•Do not force the power tool. Use the correct power
tool for your application. The correct power tool will
do the job better and safer at the rate for which it is de-
signed.
•Do not use power tool if the switch does not turn it
ON and OFF. Any power tool that cannot be con-
trolled with the switch is dangerous and must be
repaired.
•Disconnect the plug from the power source and/or
remove the battery pack, if detachable, from the
power tool before making any adjustments, chang-
ing accessories, or storing power tools. Such pre -
ventive safety measures reduce the risk of starting
the power tool accidentally.
•Store idle power tools out of the reach of children
and do not allow persons unfamiliar with the pow -
er tool or these instructions to operate the power
tool. Power tools are dangerous in the hands of un-
trained users.
•Maintain power tools and accessories. Check for
misalignment or binding of moving parts, breakage
of parts and any other condition that may affect the
power tool’s op er ation. If damaged, have the power
tool repaired before use. Many accidents are caused
by poorly maintained power tools.
•Use the power tool, accessories and tool bits etc. in
accordance with these instructions, taking into
account the working conditions and the work to be
performed. Use of the power tool for operations dif-
ferent from those intended could result in a hazardous
situation.
•eep handles and grasping surfaces dry, clean
and free from oil and grease. Slippery handles and
grasping surfaces do not allow for safe handling and
control of the tool in unexpected situations.
Service
•Have your power tool serviced by a qualified repair
person using only identical replacement parts.
This will ensure that the safety of the power tool is
maintained.
Specific Safety Information
WARNING
This section contains important safety information
that is specific to this tool. Read these precautions
carefully before using 918 Roll Groover to reduce the
risk of electrical shock or other serious injury.
SAVE ALL WARNINGS AND INSTRUCTIONS
FOR FUTURE REFERENCE!
Keep this manual with the machine for use by the operator.
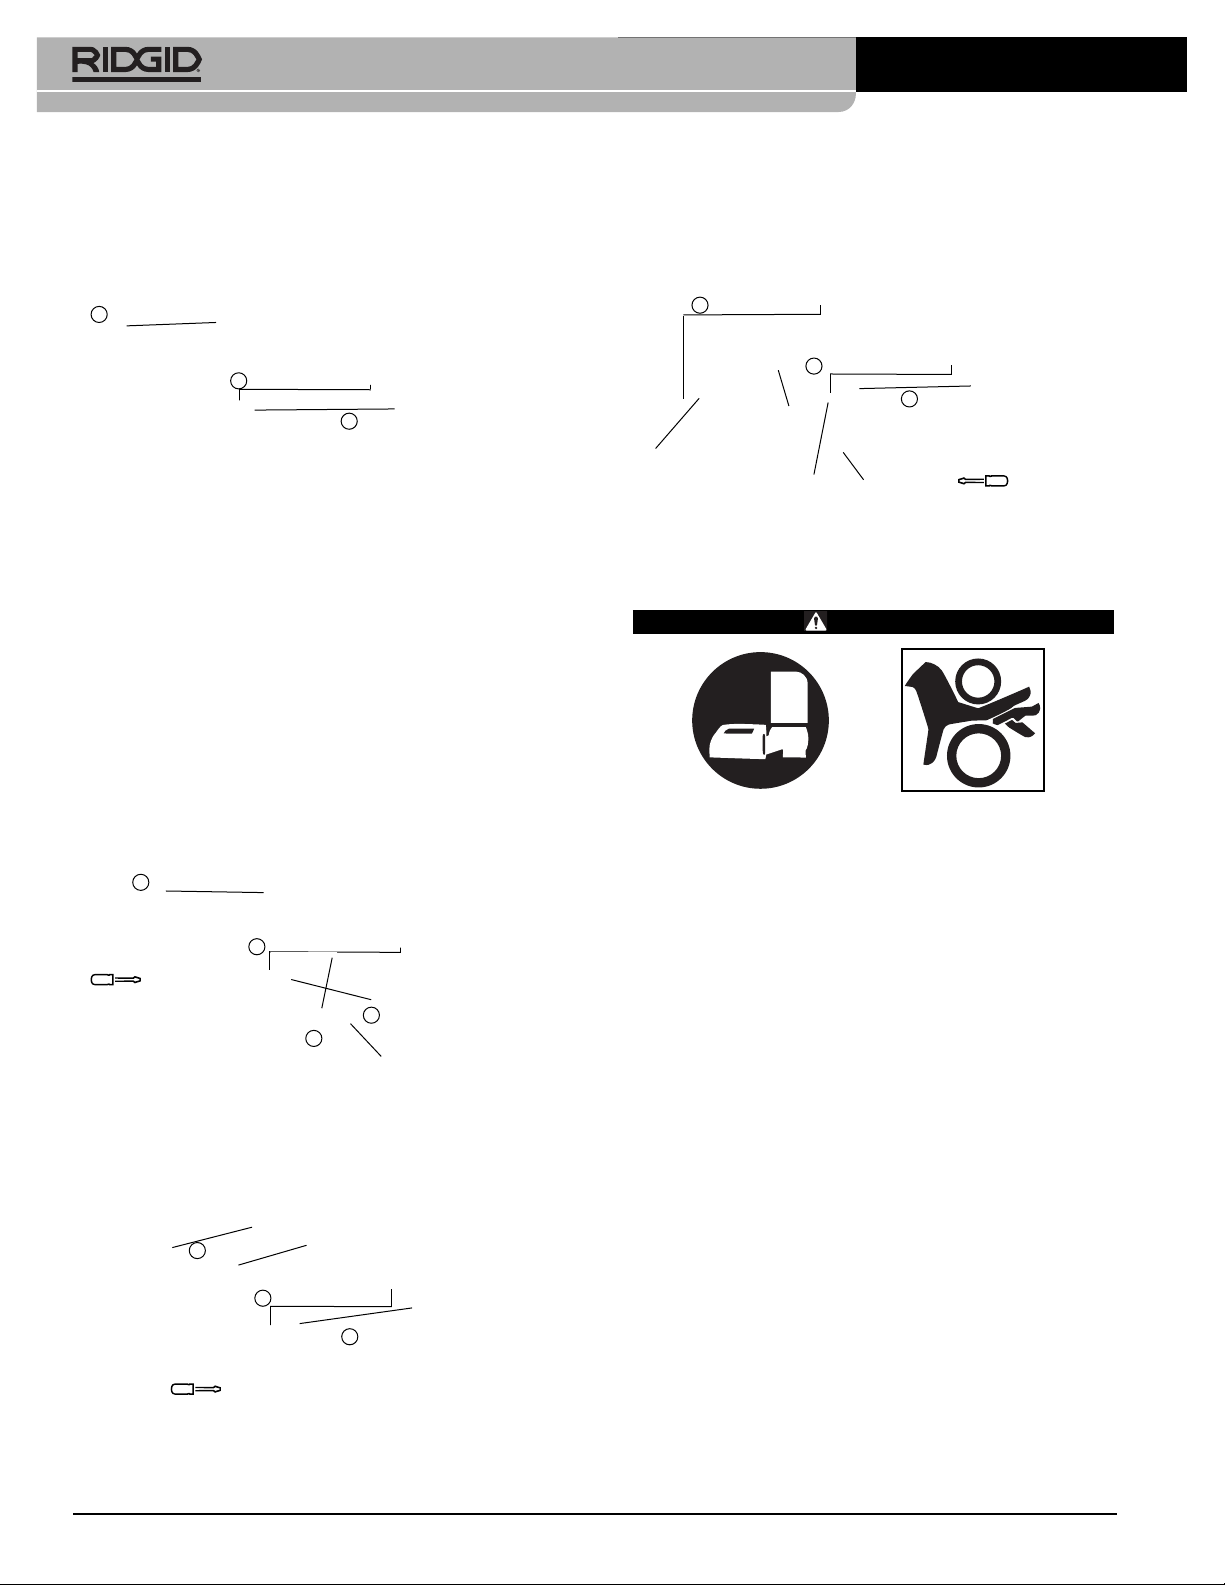
Roll Groover Safety
•eep hands away from groove rolls. Do not wear
loose fitting gloves. ingers can be crushed between
groove rolls, groove roll and pipe or between pipe and
stabilizer wheel.
•eep hands away from ends of pipe. Do not reach
inside pipe. Do not touch groove while operating.
Burrs and sharp edges can catch and cut. ingers
can be crushed between groove rolls or between
groove roll and pipe.
•eep guards in place. Do not operate the roll
groover with the guard removed. Exposure to groove
rolls may result in entanglement and serious injury.
•Only groove pipe 8" (200 mm) or longer. Grooving
shorter than specified pipe can result in entanglement
and crushing injuries.
•Do not wear loose clothing when operating ma-
chine. eep sleeves and jackets buttoned. Do not
reach across the machine or pipe. Clothing can be
caught by the pipe or machine resulting in entanglement.
•Do not use this roll groover with a power drive or
threading machine that does not have a foot switch.
Never block a foot switch in the ON position so it
does not control the machine. A foot switch provides
better control by letting you shut off the machine motor by
removing your foot. If entanglement should occur and
power is maintained to the motor, you will be pulled into
the machine. This machine has high torque and can
cause clothing to bind around your am or other body parts
with enough force to crush or break bones or cause
striking or other injuries.
•Be sure that the roll groover, pipe, stands and
machine are stable. Be sure the roll groover is prop-

Description
The RIDGID®918 Roll Groover is designed to form rolled
grooves in steel, stainless steel, aluminum, PVC pipes
and copper tubes. The grooves are formed by hydraulically
advancing the groove roll into the pipe, which is supported
by the drive roll.
The 918 Roll Groover typically includes two groove and
drive roll sets for grooving pipe:
• 2"-6" schedule 10 and 40 steel pipe
• 8"-12" schedule 10 and 8” Schedule 40 steel pipe
Other materials can be grooved – see tables in appendix.
Other groove and drive shaft sets are required for other
sizes and copper tubing.
A two-stage hydraulic hand pump is used to advance the
groove roll into the pipe to form grooves. An adjustment nut
is included to control groove diameter.
An adjustable stabilizer is provided to aid in maintaining
tracking and control of the pipe during grooving, espe-
cially pipe lengths approaching the 8" minimum pipe length.
The groover can be driven by a variety of RIDGID ma-
chines. Different mounting kits are required for each
machine.
Figure 1A – 918 Roll Groover
999-998-946.10_REV. C4
918 Roll G oove
erly set up and secured. This will help prevent tipping
of the equipment and pipe. Properly support the
pipe. This will help to prevent the tipping of the pipe
and equipment.
•Properly prepare and handle pipe. Burrs and sharp
edges can catch and cut.
•One person must control the work process, ma-
chine operation and foot switch. Only the operator
should be in the work area when the machine is run-
ning. This helps reduce the risk of injury.
•Restrict access or barricade the area when work-
piece extends beyond machine to provide a mini -
mum of one meter (3 feet) clearance from the work-
piece. Restricting access or barricading the work area
around the workpiece will reduce the risk of entangle-
ment.
•Only use power drives and threading machines
that operate under 58 rpm. Higher speed machines
increase the risk of injury.
•Always wear appropriate personal protective equip-
ment while setting up and using the roll groover.
Appropriate personal protective equipment always in-
cludes eye protection and may include equipment such
as tight fitting leather gloves and steel toed footwear.
•Only use roll groover to groove pipe of recom-
mended sizes and types according to these in -
structions. Other uses or modifying the roll groover for
other applications may increase the risk of injury.
•Before operating roll groover, read and under-
stand:
• This operator’s manual
• The operators’ manual for Power Drive or Threading
Machine
• The fitting manufacturer’s installation instructions
• The instructions for any other material or equip-
ment used with this tool
ailure to follow all instructions and warnings may re-
sult in property damage and/or serious injury.
RIDGID Contact Information
If you have any question concerning this RIDGID®product:
– Contact your local RIDGID distributor.
– Visit RIDGID.com to find your local RIDGID contact
point.
– Contact Ridge Tool Technical Service Department at
rtctechservices@emerson.com, or in the U.S. and
Canada call (800) 519-3456.
Guard
Crank
Handle
Hydraulic Pump
Pipe Rotation
Label
Stabilizer
Stabilizer
Wheel
Drive Shaft/-
Drive Roll
Mounting
Base
Warning Label
Pump Handle
Pump Release
Lever

999-998-946.10_REV. C 5
918 Roll G oove
Figure 1B – 918 Roll Groover
Specifications
Materials, Pipe...............Steel, Stainless Steel,
Aluminum and PVC
Capacity
Standard Groove
Roll Sets ......................2"-6" schedule 10 and 40
steel pipe
Optional Groove
Roll sets.......................8"-12" schedule 10 and 8"
Schedule 40* steel pipe
1-1/4" to 1-1/2" schedule 10
and 40 steel pipe
2" - 6" Copper Tube (Type K,
L, M, & DWV)
Refer to the Ta le I, II and III
for other materials and wall
thicknesses
Depth Adjustment..........Depth Adjustment Nut
Actuation .......................2 Stage Hydraulic Hand Pump
Stabilizer........................Manually adjusted, for 2 ½" to
12" Pipe
Mounting Bases
Available........................RIDGID 300 Power Drive
RIDGID 1224 Threading
Machine
RIDGID 535A/M Threading
Machine
RIDGID 300 Compact/1233
Threading Machine
Weight (918, 300 PD Base,
Stabilizer) ......................82 lbs. (37 kg)
Dimensions (918, 300 PD Base,
Stabilizer) (WxDxH ........35" x 14" x 17.5"
(889 mm x 356 mm x 445 mm)
*Do not use to groove 8" schedule 40 steel pipe harder than 150 BHN.
This may result in improperly formed/out of specification grooves.
When properly used, the Model 918 Roll Groov-
er is designed to make grooves in 1" - 12" pipe that are
dimensionally within the specifications of AWWA C606-15.
Improper use of this equipment can make out of specifi-
cation grooves and damage the pipe and equipment.
Selection of appropriate materials and joining methods
is the responsibility of the system designer and/or in-
staller. Before any installation is attempted, careful evalu-
ation of the specific service environment, including chem-
ical environment and service temperature, should be
completed. Selection of improper materials and methods
could cause system failure.
Stainless steel and other corrosion resistant materials
can be contaminated during installation, joining and form-
ing. This contamination could cause corrosion and pre -
mature failure. Careful evaluation of materials and methods
for the specific service conditions, including chemical and
temperature, should be completed before any installation
is attempted.
Standard Equipment
Refer to the RIDGID catalog for details on accessories
supplied with specific machine catalog numbers.
Assembly
WARNING
To reduce the risk of serious injury during use, fol-
low these procedures for proper assembly.
Assembling 918 to Bases for Various
Machines
1. Mount the 918 on appropriate machine base, aligning
with ½” holes. When installing on the 1224 base, in-
stall the spacer plate between the base and 918.
Insert two ½" bolts from underside of base and se-
curely tighten with ¾" Wrench.
2. Mount the hydraulic pump on the base and secure
with four ¼" bolts, securely tighten with 7/16" wrench.
or the 1224 base, the pump bracket will need to be
mounted to the base, and the pump attached to the
pump bracket.
3. Mount the stabilizer on the base. Insert two 3/8" screws
through the base and securely tighten with 5/16" hex
key.
4. or the 1233/300 Compact, loosely attach the rail
clamp to the underside of the base.
5. See Figures or details.
Depth Adjustment Nut
Groove Roll
NOTICE

Figure 2 – Assembling 918 to 300 PD Base
Figure 3 – Assembling 918 to 300 Compact/1233 Base
Figure 4 – Assembling 918 to 535 Base
999-998-946.10_REV. C6
918 Roll G oove
Figure 5 – Assembling 918 to 1224 Base
re-Operation Inspection
WARNING
Do not use this roll groover with a power drive/-
threading machine that does not have a foot switch
Before each use, inspect your roll groover and cor-
rect any problems to reduce the risk of serious
injury from crushing injuries and other causes and
prevent roll groover damage.
1. If installed on a machine, place the machine switch in
the O position and unplug.
2. Clean any oil, grease or dirt from the roll groover, in-
cluding the pump handle and stabilizer crank handle.
This aids inspection and helps prevent the machine or
control from slipping from your grip.
3. Inspect the roll groover for the following:
• Proper assembly, maintenance and completeness.
• Broken, worn, missing, misaligned or binding parts.
• Hydraulic leaks. Oil on the groover can indicate a
hydraulic leak.
• Presence and condition of the guard (See Figure 1).
Do not operate the roll groover without the guard.
• Presence and readability of the warning label (see
Figure 6).
• Condition of the groove roll and drive roll. If the
drive roll knurls are dirty, clean with a wire brush.
Dirty or worn knurls can cause pipe slippage and
tracking issues during grooving.
7/16" Wrench
3/4" Wrench
5/16" Hex
ey
2
1
3
7/16" Wrench
3/4" Wrench
5/16" Hex ey
2
1
3
Drive Bar
9/16" Wrench
4
7/16" Wrench
3/4" Wrench
5/16" Hex
ey
2
1
3
Drive Bar
7/16" Wrench
5/16" Hex
ey
2
1
3
Drive Bar
Rail Clamp
Pump
Bracket
3/4" Wrench
3/4" Wrench
Spacer Plate

• Condition of the stabilizer wheel. Replace if needed.
• Any other condition which may prevent safe and
normal operation.
• If any issues are found, do not use the roll groover
until the issues have been repaired.
Figure 6 – Warning Label
4. Inspect and maintain any other equipment being used
per its instructions to make sure it is functioning prop-
erly. Confirm that the Power Drive or Threading Ma-
chine has a foot switch in good working condition.
Machine and Work Area Set-Up
WARNING
Set up the roll groover and the work area according to
these procedures to reduce the risk of injury from
machine tipping, crushing and other causes, and to
help prevent machine damage.
Be aware of the equipment weight. Use appropriate
methods when lifting or moving.
Secure roll groover to power drive or threading ma-
chine. roperly support pipe. This will reduce the risk
of falling pipe, tipping and serious injury.
1. Locate a work area that has the following:
• Adequate lighting.
• Clear, clean, level, stable and dry place for all equip-
ment and operator. Clean up any oil that may be
present.
2. Inspect the pipe to be grooved and determine the
correct tool for the job, see Specifications. Grooving
equipment for other applications can be found in the
RIDGID catalog online at RIDGID.com. Do not use to
groove anything other than straight stock. Do not
groove pipe with protrusions or outlets such as Tees
or elbows. This increases the risk of entanglement.
3. Confirm all equipment to be used has been properly
inspected and assembled. Confirm that the correct
grooving roll set is installed in the roll groover for the
application.
Use of roll sets (groove roll and drive roll)
on both carbon and stainless steel pipe can lead to
contamination of the stainless steel material. This
contamination could cause corrosion and premature
pipe failure. To prevent ferrous contamination of stain-
less steel pipe, use roll sets dedicated for stainless
steel grooving. Alternately, a stainless steel wire brush
can be used to thoroughly clean the roll set when
switching between materials.
4. Set up the Power Drive or Threading Machine per its
instructions in the flat level area. Confirm that the
REV/O-O / OR switch is in the O position.
If using the 918 with a 535A (Auto Chuck) machine, it
is recommended that the machine be configured for
the chuck jaws to grip the pipe during REV rotation of
the machine. This allows the stabilizer to be used
when grooving. See the 535 Auto Chuck Manual,
Left Hand Threading section for information on con-
figuring the chuck jaws to grip the pipe during REV
rotation of the machine.
5. Install 918 on Power Drive/Threading Machine – see
section for setting up on specific equipment. Confirm
that the equipment is secure and stable.
6. Position the foot switch for proper operation as shown
in Figure 18.
7. After the 918 is properly installed, with dry hands,
plug machine into appropriate outlet per its instruc-
tions.
Installing 918 On 300 ower Drive
1. Confirm 918 and base are properly assembled.
2. Remove carriage or other attachments from the sup-
port arms of the 300 Power Drive. Confirm that the
power drive support arms are fully extended and
fixed in position.
3. ully open front chuck of power drive.
4. Slide the opening in the base (stabilizer side) over the
rear support arm and lower the pump to the front
support arm (Figure 7A).
5. Move the base toward the 300 Power Drive
999-998-946.10_REV. C 7
918 Roll G oove
NOTICE

6. Center drive shaft in the machine chuck. Align the
drive shaft flats with the machine chuck jaws.
7. Securely tighten the front chuck on the flats of the
drive shaft. See Figure 7B.
Figure 7A – Installing 918 on 300 Power Drive
Figure 7B – Securing Drive Shaft In Chuck
Installing 918 On 300 Compact/1233
Threading Machines
If the 300 Compact or 1233 threading machines are mount-
ed on straight pipe legs into the machine base, do not
use with the 918 roll groover. The set up may not be stable
enough for grooving forces. Pipe legs with feet that provide
improved stability (Catalog # 56532) are available for this
use. See Figure 8A for proper orientation of the legs. The
10 mm bolts will go through the holes in the leg to properly
orient the foot of the leg.
The 918 Roll Groover cannot be used with machines
mounted on the 250 olding Stand. The stand handle in-
terferes with the pipe being grooved. The 918 with the
appropriate base can be used with the 100A/150A/200A
stands.
1. Confirm that the 918 is properly assembled on the cor-
rect base for the machine it will be used with.
2. Position machine carriage towards front chuck and
swing carriage mounted tools up away from the op-
erator. Position reamer inside the die head to secure
and reduce risk of contact.
3. ully open front chuck of threading machine. Insert
drive bar into machine chuck, but do not secure at this
time.
4. Place the open slot (pump side) of the base over the
front carriage rail (Figure 8B) and lower the stabilizer
to the rear carriage rail.
5. Place the drive bar over the drive shaft flats. Align the
drive shaft flats with set screws in the drive bar and se-
curely tighten the set screws.
6. With the 918 positioned at the end of the threading
machine securely tighten the machine front chuck
on the drive bar. See Figure 8C.
7. Place the rail clamp under the rear carriage rail and
secure. See Figure 8D.
Figure 8A – Catalog # 56532 Legs with feet installation
999-998-946.10_REV. C8
918 Roll G oove

Figure 8B – Installing 918 on 1233 Threading Machine
Figure 8C – Drive Bar Installation
Figure 8D – Installing Rail Clamp
Installing On 535 and 1224 Threading
Machines
Generally, the 918 can be installed on the 535 and 1224
machines with the drive bar installed, but it can also be in-
stalled separately as done on the 300 Compact/1233
machines (see that section)
If using with a 535 Auto Chuck Threading Machine, set the
machine up so that the chuck jaws grip the pipe during REV
rotation of the machine, as detailed in the Left Hand
Threading section of the 535 Threading Machine Oper-
ator’s Manual.
1. Confirm that the 918 is properly assembled on the cor-
rect base for the machine it will be used with. Securely
attach the drive bar to the driveshaft.
2. Position machine carriage towards front chuck and
swing carriage mounted tools up away from the op-
erator. Position reamer inside the die head to secure
and reduce risk of contact.
3. ully open front chuck of threading machine.
4. With the end of the drive bar in the machine chuck,
place the open slot of the base (stabilizer side) over
the rear carriage rail and lower the pump to the front
carriage rail. See Figure 9.
Figure 9 – 918 Roll Groover on 535 Threading Machine
Mounting Base
5. With the 918 positioned at the end of the threading
machine securely tighten the machine front chuck
on the drive bar. See Figure 10.
999-998-946.10_REV. C 9
918 Roll G oove
Drive Bar
Rail Clamp

Figure 10 – 918 installed on 535A and 1224
Operation
WARNING
Keep hands away from grooving rolls. Do not wear
loose fitting gloves. Fingers can be crushed be-
tween groove rolls, groove roll and pipe or between
pipe and stabilizer wheel.
Keep hands away from ends of pipe. Do not reach in-
side pipe. Do not touch groove while operating.
Burrs and sharp edges can catch and cut. Fingers
can be crushed between groove rolls or between
groove rolls and pipe.
Keep guards in place. Do not operate the roll groov-
er with the guard removed. Exposure to groove
rolls may result in entanglement and serious in-
jury.
Only groove pipe 8" (200 mm) or longer. Grooving
shorter than specified pipe can result in entangle-
ment and crushing injuries.
Do not use this roll groover with a power drive or
threading machine that does not have a foot switch.
Never block a foot switch in the ON position so it
does not control the machine. A foot switch provides
better control by letting you shut off the machine
motor by removing your foot. If entanglement should
occur and power is maintained to the motor, you will
be pulled into the machine. This machine has high
torque and can cause clothing to bind around your
am or other body parts with enough force to crush or
break bones or cause striking or other injuries.
Be sure that the roll groover, pipe, stands and ma-
chine are stable. Be sure the roll groover is properly
set up and secured. This will help prevent tipping of
the equipment and pipe. roperly support the pipe.
This will help to prevent the tipping of the pipe and
equipment.
Always wear eye protection. Wear steel toe footwear
to help protect from tipping tools and falling pipe.
Set up and operate the roll groover according to
these procedures to reduce the risk of injury from
machine tipping, entanglement, crushing, striking
and other causes, and to help prevent equipment
damage.
1. Confirm that the machine and work area is properly set
up and that the work area is free of bystanders and
other distractions. The operator should be the only
person in the area when the machine is operated.
2. Position the foot switch for proper operation as shown
in Figure 18.
3. Check the roll groover for proper operation. While
keeping your hands clear of moving parts:
• Move the power drive/threading machine REV/O-
O / OR switch to the REV position. Press and
release the foot switch. Drive roll should rotate
clockwise (see Figure 14) matching the pipe ro-
tation decal on the groover. If the groover does not
rotate in the correct direction, or the foot switch
does not control the machine operation, do not use
the machine until it has been repaired.
• Depress and hold the foot switch. Inspect the mov-
ing parts for misalignment, binding, odd noises or
any other unusual conditions. Confirm that the ma-
chine rotates less than 58 rpm. Higher speeds can
increase the risk of injury. Remove foot from the foot
switch. If any unusual conditions are found, do not
use the machine until it has been repaired.
999-998-946.10_REV. C10
918 Roll G oove

• Move the REV/O-O / OR switch to the O po-
sition, and with dry hands unplug the machine.
ipe reparation
These are generalized instructions. Always
follow grooved coupling manufacturer’s specific recom-
mendations for pipe end preparation. ailure to follow
these recommendations may lead to an improper con-
nection and cause leaks.
1. Be aware of pipe specifications acceptable for groov-
ing. Out of specification pipe can cause leaks and
other issues. Pipe out-of-roundness must not exceed
total O.D. tolerance listed in the Standard Roll Groove
Specifications, Ta le II.
2. Cut pipe to proper length. Be aware of the minimum
pipe lengths for grooving.
• 5" and smaller diameter pipe should not be shorter
than 8" (200 mm) long.
• 6" to 12" diameter pipe should not be shorter than
10" (250 mm) long.
Grooving shorter pipe increases the risk of injury from
crushed fingers and entanglement.
3. Make sure pipe end is cut square and free of burrs.
Burrs can catch or cut gloves or fingers during groov-
ing. Cut off method and large burrs can affect the
quality of the groove made and tracking of the groover.
Do not attempt to groove pipe that has been cut with
a torch.
4. Remove all internal/external weld beads, flash, seams,
scale, dirt, rust and other contaminants at least 2" back
from the end of the pipe. Do not cut flats into gasket
seat area, this could cause leaks. Contaminants can
clog the drive knurls and prevent proper driving and
tracking of the pipe while grooving.
Advance/Retract The Groove Roll
The movement of the groove roll is controlled by the hy-
draulic pump.
• To advance the groove roll, move the pump lever to the
advance position, then move the pump handle up and
down.
• To retract the groove roll, move the pump lever to the
retract position. See Figure 11.
Figure 11 – Pump Release Lever Position
Loading ipe in Roll Groover
1. Confirm that the machine switch is in the O position.
2. ully retract the groove roll.
3. Appropriate pipe stands must be available to sup-
port the pipe. Adjust the height of the pipe stands so
that the pipe will be level and the top inner diameter of
the pipe will sit on top of the drive roll (see Figure 12).
Place the pipe stands directly in front of the roll groov-
er. Pipe stand placement depends on the pipe length.
or shorter pipe (see Chart A) the pipe is supported by
the drive shaft and at least one stand. In this case, the
stand should be placed slightly more than half the
length of the pipe from the roll groover.
Chart A – Minimum/maximum pipe length to be grooved
with one stand (in inches)
or longer pipes at least two stands should be used,
with the two stands placed approximately 1/4 of the
pipe length from the ends of pipe. ailure to properly
support the pipe may allow the pipe or the pipe and
machine to tip and fall. Always use a pipe stand – it
helps to align the pipe and maintain proper tracking.
999-998-946.10_REV. C 11
918 Roll G oove
NOTICE
Nom. Min. Max. Nom. Min. Max.
Size Length Length Size Length Length
1836 4836
11/48 36 41/28 32
11/28 36 5832
2836 6 O.D. 10 30
21/28 36 6 10 28
3836 8 10 24
31/28 36 10 10 24
4836 12 10 24
Advance
Retract

Figure 12 – Placing Pipe over Drive shaft, Flush to drive
shaft flange (Stabilizer removed for clarity)
4. Place the pipe on the stand(s) with the end of the pipe
flush to the drive shaft flange and the inside of the pipe
contacting the top of the drive shaft (Figure 12). Make
sure the pipe is stable and secure.
Figure 13 – Leveling Pipe
5. Advance the groove roll until it touches and lightly
grips the pipe (Do not drive the groove roll into the
pipe).
6. Confirm the pipe positioning. If the pipe is not properly
positioned, the groove may not track properly.
• The pipe end should be flush against the driveshaft
flange.
• The centerline of the pipe and the centerline of the
drive shaft should be parallel. This can be checked
with a level on top of the hydraulic cylinder and on
the pipe. See Figure 13.
• The roll groover/machine should be sitting firmly
on the ground. If the machine is lifting off the ground
at all, the pipe stand(s) are set improperly and
should be adjusted.
7. Preferred Operation – Switch in REV Setting:
Slightly offset the pipe and pipe stands approximately
1/2 degree (about 1" over at 10 feet from the roll
groover) towards the operator. Proper alignment of the
pipe and roll groover helps to ensure proper tracking of
the pipe while grooving (see Figure 14). This is proper
offset for grooving with the machine in the REV switch
setting, and works with the stabilizer.
Alternate Operation – Switch in FOR Setting: If
using the machine in the OR switch setting (such as
with a 535 Auto Chuck Machine not converted to grip
in both directions), then offset the pipe and pipe stands
approximately 1/2 degree (about 1" over at 10 feet from
the roll groover) away from the operator (see Figure
15). The pipe stabilizer cannot be used with the OR
switch setting – it may cause pipe to spiral out of the
roll set.
Figure 14 – Offsetting the Pipe 1/2° Toward Operator,
(Exaggerated)
Figure 15 – Offsetting the Pipe 1/2° Away from Operator,
(Exaggerated)
999-998-946.10_REV. C12
918 Roll G oove
Drive Shaft Center
Line
Pipe Center Line
Pipe Direction of
Rotation
1/2°
Drive Shaft Center
Line
1/2°
Pipe Center Line
Pipe Direction of
Rotation

999-998-946.10_REV. C 13
918 Roll G oove
8. Restrict access or set up guards or barriers to create
a minimum 3' (1m) clearance around the equipment
and pipe. This helps prevent non-operators from
contacting the equipment or pipe and reduces the risk
of tipping or entanglement.
9. With dry hands, plug the power drive/threading ma-
chine into a properly grounded outlet.
Setting/Adjusting Groove Diameter
Due to differing pipe characteristics, a test
groove should always be performed before the first groove
of the day or when changing pipe size, schedule, material,
or lot to reduce the risk of out of tolerance grooves. Groove
diameter must be measured to confirm proper size.
1. Confirm that equipment is properly set up and pipe is
properly prepared and loaded. Improper set up and
preparation can affect accuracy of groove diameter
settings.
2. Groove roll should be lightly gripping the pipe. If
needed, advance the groove roll to just touch and
lightly grip the pipe – it should not be making an in-
dentation in the pipe, do not apply excessive pressure.
3. Rotate the depth adjustment nut until it stops against
main housing.
4. Back the depth adjustment nut off one turn (Figure 16).
Figure 16 – Depth Adjustment Nut Setting
5. Make a test groove.
6. Inspect/measure the test groove. If the groove diam-
eter is not in specification, the depth adjustment nut
must be repositioned to give the correct groove di-
ameter. See Figure 16.
• To increase groove diameter (shallower groove),
turn the depth adjustment nut clockwise.
• To decrease groove diameter (deeper groove),
turn the depth adjustment nut counter-clockwise.
• Each ¼ turn of the depth adjustment nut changes
the groove diameter approximately 0.025" (0.6 mm).
Moving the nut one mark on the circumference
changes groove diameter approximately 0.002"
(0.05 mm).
7. Repeat steps 4-6 until the groove diameter is within
specifications. If the groove is too large, the groover
can be adjusted and the groove made smaller. If the
groove is too small, another groove will need to be
made. Proper groove diameter is important to insure
connection performance. Out of specification grooves
could cause joint failure.
Stabilizer Operation
The stabilizer is used to apply slight force to 21/2" to 12"
pipe to improve tracking. It is especially useful for short
pieces of pipe, but can be used on all lengths of pipe.
The stabilizer also reduces the swaying of longer, larger
diameter pipe.
The stabilizer can only be used with the machine REV/O-
O / OR switch in the REV position (pipe rotation
marked on groover, Figure 17). If used with the ma-
chine REV/O-O / OR switch in the OR position, the
pipe will spiral/track out of the groove rolls.
1. Properly set up equipment and load pipe.
2. Set groove diameter.
3. Rotate the stabilizer crank handle to bring the roller
in contact with the pipe. Rotate the crank handle
an additional one (1) turn to preload the roller against
the pipe (Figure 17). Do not reach across the pipe to
adjust the stabilizer.
4. Groove pipe. During use, keep hands away from
the groove rolls, stabilizer wheel and end of pipe. Do
not groove pipe shorter than specifications and do not
reach inside pipe or touch the groove. This reduces
the risk of crushing injuries.
If during grooving the pipe does not track properly,
step off foot switch and stop grooving. Set up a new
groove and rotate the crank handle an additional
one half (1/2) turn to increase preload. Do not use ex-
cessive preload. This can damage the roller.
Once the stabilizer is set for a given size and type of
material, it generally does not need to be readjusted
or backed off when pipe is loaded and unloaded.
NOTICE
Decrease Groove
Diameter
Decrease Groove
Diameter
Increase Groove
Diameter
Increase Groove
Diameter
Each Mark
Approx. 0.002"
(0.05mm)

Figure 17 – Stabilizer Positioning
Grooving Operation
1. Confirm that equipment is properly set up and pipe is
properly prepared and loaded. Do not groove pipe
shorter than 8".
2. Set groove diameter.
3. If needed, set the stabilizer position.
4. Assume a proper operating position to help maintain
control of the machine and pipe (see Figure 18).
Figure 18 – Proper Operating Position
• Stand facing the roll groover on the REV/O-O /-
OR switch side of the machine with convenient
access to the switch, pump handle and pipe. Your
left hand will be on the pump handle, and your
right hand is clear of the pipe unless applying slight
force to the pipe to maintain tracking (see Tracking
Tips section).
• Be sure that you can control the foot switch. Do not
step on foot switch yet. In case of emergency you
must be able to release the foot switch.
• Be sure that you have good footing and balance
and do not have to overreach.
5. Move the REV/O-O / OR to the REV position.
6. Apply approximately a quarter stroke of the pump
handle to force the groove roll into the pipe.
7. Depress the foot switch. The pipe will start to turn.
Allow one full pipe rotation between quarter strokes of
the pump handle. Do not advance the groove roll
too aggressively – this can cause the pipe to spiral out
of the roll set and poor groove form. Keep your hands
clear of the groove set, pipe end and stabilizer wheel.
Do not reach inside the pipe or touch groove.
Monitor the pipe as it is grooved. The end of the pipe
should stay in contact with the drive shaft flange,
and the pipe should stay in position. If the pipe starts
to move out of position, step off of the foot switch and
stop grooving. Keep your body clear in case the pipe
comes out of the grip of the roll set. If the pipe starts to
come out of position stop grooving and check set
up. If the pipe end is damaged, a new groove will need
to be prepared.
Continue applying a quarter stroke of the pump han-
dle every pipe rotation.
When using the 1" roll set, it is especially important to
not apply excessive force (improper groove diameter
setting, undersized grooves, more than a quarter
stroke of pump handle per rotation). This can damage
the 1" drive roll.
8. When the depth adjustment nut contacts the top of the
groover, allow the pipe to rotate at least two more full
rotations to ensure uniform groove depth.
9. Remove foot from the foot switch.
10. Move the REV/O-O / OR switch to the O posi-
tion.
11. Retract the groove roll and remove the pipe from the
roll groover.
12. Inspect and measure the groove.
999-998-946.10_REV. C14
918 Roll G oove
Crank Handle Rotation
(Tightening on Pipe)
Pipe Rotation
Direction

Tracking Tips
A typical issue while roll grooving is the pipe “spiraling” or
“walking off” the drive shaft or not “tracking” properly.
or good tracking, it is important that all instructions be
followed. If, even after following all instructions, the pipe
will not properly track; there are other options to im-
prove tracking.
• Slightly increase the offset of the pipe (increase from 1/2
degree to 1 degree) See Figure 14.
• Tighten the stabilizer crank handle an additional 1/2 turn.
• The operator may need to apply slight force on the pipe
while grooving to maintain tracking. This is usually only
needed on shorter pieces of pipe when the stabilizer is
not used. To do this, the operator should wear a leather
glove in good condition and cup their hand around the
pipe as shown in Figure 19 to pull the pipe slightly to-
wards them. This may require that the power drive/thread-
ing machine stand be fixed to the floor to prevent move-
ment during grooving. To reduce the risk of crushing
and cutting injuries, keep hand away from the groove roll
and the ends of the pipe, do not groove pipe shorter than
recommended and do not reach inside pipe or touch
groove.
Figure 19 – Applying Pressure on Pipe with Power Drive
in REV direction
If the machine is run in the OR direction, the stabilizer
cannot be used. Move the stabilizer wheel away from the
pipe. If the stabilizer is used in OR, the pipe will spiral
out of the groove rolls. If needed, the operator should
wear a leather glove in good condition and use their right
hand to push pipe slightly away from them as shown in
Figure 20.
Figure 20 – Applying Pressure on Pipe with Power Drive
in FOR direction
Inspect/Measure the Groove
1. Inspect the groove.
• Make sure that all features are present and fully
formed. See Ta le II and Figure 30.
• Measure the groove diameter and make sure it is
within specification.
• Check any other items required by the fitting man-
ufacturer.
• Test the system in accordance with local codes
and normal practice.
If any problems are found, the groove cannot be
used. Proper groove diameter is important to ensure
connection performance. Out of specification grooves
could cause joint failure.
2. Measure the groove diameter with diameter tape (see
Optional Equipment Section). Snugly wrap the diam-
eter tape around the pipe in the groove. Make sure that
the tape sits flat in the bottom of the groove, and read
the groove diameter (see Figure 21). Compare the
measured groove diameter to the required groove di-
ameter as shown in Ta le II or III or as specified by the
groove fitting manufacturer.
999-998-946.10_REV. C 15
918 Roll G oove

Figure 21 – Checking Groove Diameter with a Diameter
Tape
reparing Machine for Transport
Before transporting, remove the 918 from the power
drive/threading machine. Be aware of the equipment
weight. Use appropriate methods when lifting or moving.
Storage
The 918 Roll Groover must be kept in-
doors or well covered in rainy weather. Store the machine
in a locked area that is out of reach of children and people
unfamiliar with roll groovers. This machine can cause se-
rious injury in the hands of untrained users.
Maintenance Instructions
WARNING
Make sure machine is unplugged from power
source before performing maintenance or making
any adjustments.
Maintain the 918 Roll Groover according to these
procedures to reduce the risk of injury.
Cleaning
Use a soft damp cloth to clean the roll groover.
Clean the drive roll knurls with a wire brush before use
and as necessary during operation. When grooving
stainless steel pipe, thoroughly clean the entire roll set
with a stainless steel wire brush.
Lubrication
On a monthly basis (or more often if needed), lubricate
the groover with a lithium based general purpose grease.
Always lubricate the roll groover after roll set changes.
• Lubricate the groover at grease fittings (See Figure 22).
Add grease until a small amount pushes out.
Figure 22 – Grease Fittings
• Apply a light lubricating oil to pivot points and areas of
relative motion, such as the depth adjustment nut and
the stabilizer feedscrew. Wipe any excess lubricant
from exposed surfaces.
Hydraulic Fluid Level
Remove the reservoir filler cap (Figure 23). The oil level
should come to the fill line when the pump is resting on
its base and the ram is fully retracted. Use only ISO 15
hydraulic oil.
Figure 23 – Reservoir Filler Cap
Once a year, or more often with heavy use or use in
dusty conditions, the hydraulic oil should be changed.
To drain oil, remove the reservoir filler cap and drain the oil
in a container. Properly dispose of the used hydraulic oil
per the Safety Data Sheet (SDS) and local requirements.
999-998-946.10_REV. C16
918 Roll G oove
WARNING

Hydraulic system may need air bled after changing fluid.
To bleed hydraulic system, position ram lower than pump
by tipping the machine on its side. Extend and return the
cylinder piston several times to permit air to return to the
pump reservoir.
Changing Roll Sets
When changing roll set, always make sure
drive roll and groove roll markings match. Mismatched
parts can make improper grooves and cause leaks. Always
change rolls as sets – do not mix rolls from different sets.
If installed, remove the roll groover from power drive or
threading machine and place on a stable workbench.
Properly support the rolls and shafts while replacing.
Changing Groove Roll
1. ully retract the groove roll.
2. ully retract the stabilizer wheel.
3. Loosen groove roll set screw (Figure 24). Grasp
groove roll and remove upper shaft and groove roll
from groover (Figure 25).
4. After changing drive shaft/drive roll, reverse steps to
install. Make sure parts are clean to keep dirt out of
bearings. Lubricate bearings before use.
Figure 24 – Loosening Grooving Roll Set Screw
Figure 25 – Removing Retaining Shaft and Groove Roll
Changing Drive Shaft/Drive Roll
The 918 has two styles of drive shaft. A one piece drive
shaft (used on the 2"-6" and 8"-12" sizes) and the two
piece unit consisting of a drive shaft and interchangeable
drive roll (used for the 1", 11/4" to 11/2" and 2"-6" Copper
sizes). See Figure 26.
Figure 26 – One Piece Drive Shaft (Top), Two Piece Drive
Shaft (Bottom)
1. Remove the groove roll.
2. Manually rotate the drive shaft while applying pressure
to the spindle lock pin until the lock pin engages the
spindle lock hole in the driveshaft.
Changing Drive Shaft
3. With the spindle lock engaged, use the box wrench to
remove the drive shaft bearing retaining nut (Figure
27).
4. Release pressure on the spindle lock pin, allowing to
retract.
5. Remove the drive shaft from the front of the groover.
6. Reverse steps to install. Make sure parts are clean to
keep dirt out of bearings. Lubricate bearings before
use.
999-998-946.10_REV. C 17
918 Roll G oove
NOTICE
Drive Roll Drive Shaft Bearing Bearing
Retaining Nut
Hex Bolt

Figure 27 – Engaging Spindle Lock and Removing Drive
Shaft Retaining Nut
Changing Drive Roll (Two-Piece Drive Shafts)
1. With the spindle lock engaged, use the 15/16" hex in the
box wrench to loosen the draw bolt.
2. Tap draw bolt head with a soft face mallet to release
drive roll from drive shaft.
3. Unthread draw bolt from drive roll, remove drive roll
from front of groover.
4. Reverse steps to install. Make sure drive roll is fully
seated in the drive shaft and draw bolt is secure.
Figure 28 – Engaging Spindle Lock and Loosen Draw
Bolt
Figure 29 – Removing Retaining Plate Hex Screws
Changing One Piece Drive Shaft to Two Piece
Drive Shaft
1. Remove the one piece driveshaft.
2. Remove the rear bearing retaining plate screws and
the plate, see Figure 29.
3. Remove the rear bearing out of the back of the 918
housing.
4. Install the two piece drive shaft assembly into the
back of the 918 housing. Make sure parts are clean to
keep dirt out of bearings.
5. Reinstall the rear bearing retaining plate and screws.
6. Install the required drive roll. Lubricate bearings before
use.
999-998-946.10_REV. C18
918 Roll G oove
Table of contents
Languages:
Other RIDGID Industrial Equipment manuals
Popular Industrial Equipment manuals by other brands

Greenlee
Greenlee Ultra Tugger UT10-22 instruction manual

Lumen Dynamics Group
Lumen Dynamics Group OmniCure 2000 Series quick start guide

TE
TE RBK-X1 Customer's manual

ABB
ABB HT611546 Operation manual

Discount Equipment
Discount Equipment VORTEX-300 Operator's instruction manual

Jäger
Jäger Z62-K360.12 S5 manual