Rixen TH-3800 User manual

CONTENTS
■TH-3800 specifications-------------------------------1
■Instrument descriptions------------------------------2
■Display descriptions----------------------------------3
■Key descriptions--------------------------------------4
■Instructions-------------------------------------------6
■RS-232 transfer protocol-----------------------------11
■Precautions----------------------------------------.-.-13

■TH-3800 specifications
Accessories
AType Probe
φ18×192mm/Approx. 96g
B Type Probe
φ6×260mm/Approx. 115g
TU-RS232-W
Specified RS-232 computer interface cable and windows software
TU-USB-W
Specified USB computer interface cable and windows software
TU-655C
Plastic carrying case
TU-6019/6029
AC Adaptor
※Above accuracy and sampling rate excludes errors generated by Temp./Humidity probe.
※Specifications are subject to change without notice.
-1-
Measuring Range
Temperature: -40.0~85.0℃(-40.0~185.0℉)
Relative humidity: 0.0~100.0% RH
Dew Point: -70~85℃(-94~+185℉)
Accuracy(at 25℃)
Temperature: ±0.3℃(±0.5℉)
Relative humidity: ±2% (0~95% RH)
Resolution
0.1% RH, 0.1℃/0.1℉
Sampling rate
2 seconds to 2 hours (User selectable)
Main Functions
Calculate the dew point, Perpetual calendar, Data hold, Max./Min./Avg
values record, Record data displayed, ℃/℉Switchable, Digital USB /
RS-232 output, AC and DC dual-use, Battery sign and low battery
warning, Outside calibration function, LED Back-light, IP66 water and
dust proof.
Output
USB, RS-232 , 0 .1℃/ 1 BIT (protocol provided)
Power source
One 9 V battery or AC Adaptor
Dimensions
150 x 75 x 28 mm, Approx.320g (battery included)
Input Connections
Five wire connector water proof socket
Operating environment
-20 ~ + 60℃; 0 ~ 100 %RH

■Instrument descriptions
○
1Large LCD Display
○
8Battery cover
○
2Function and Setting key
○
9AC Adaptor Input
○
3Record and Record setting key
○
10 USB Output port
○
4Move key
○
11 RS-232 Output connector
○
5Move key
○
12 Probe socket
○
6Power switch
⑬LED backlight
○
7Model No. and Serial No.
-2-
※This instrument is completely waterproof (IP66), in order to maintain the
stability of its characteristic function, please avoid falling, physical impact or
disassemble.

■Display descriptions
Abnormal displays
A. When Area A shows , please release all keys until the device restored to a normal
status.
B. When Area A or Area C shows , the situations below may be the causes:
1. The read value exceeds measurement range
2. The Temperature probe is damaged or not inserted the connector correctly.
3. If appears when turn on the instrument¸please release all keys and tune it on again.
-3-
Display
Descriptions
Battery Power
Manual shut down
Buzzer on
CAL
Under Calibrating
HOLD
Data Hold
RCD
Record
MAX
Maximum Value
MIN
Minimum Value
AVG
Average Value
Area Digit A.B.C.
Testing Value
℃/℉
℃: Celsius units ; ℉: Fahrenheit units
Hidden Symbol
Shows in the setting mode or the device is abnormal

-4-
■Key descriptions
Key
Function
Descriptions
LCD display
On/Off
Press one second (Be-) to turn on the instrument.
The meter automatically switches OFF after 5 minutes
without any button activity.
..+
Manual
turn off
When the device is on OFF state, press and hold ,
then press in the same time to turn on the meter.
When symbol appears in the display, please release
all keys to finish setting the manual turn off mode.
Change the
value
Press to change the values in any mode
--
Change the
value
Press to change the values in any mode
--
.
turn on
back light
Press to turn on the backlight in any mode.
Press again to turn it off. The auto-off time for active
backlight is 20 seconds.
Note: The LED back light will be unavailable when the
battery power falls below 25%.
(2s)
RCD
Recode
mode
On the testing mode, and which is without recording data,
press to entering the RCD record mode. The symbol
will flashes when recording. Press or to
stop recording. The symbol will stop flash in the
meanwhile. The screen will display FULL when the data
value reach to 9999 records, and the symbol will
display in area B. Press or to finish recording.
When there are records internal, the symbol will
show up.
RCD
Reading
mode
Under the testing mode, press to entering the
reading mode. Press to switch the displayed
record value; Press and hold it can be switch quickly.
Press and hold can switch 100 readings at once; the
records can be read up to 9999 readings. Press to
exit. Press and hold switch to the RCD clear mode.
RCD
Clear mode
Under the testing mode, RCD reading mode, or hold
mode, press and hold two seconds to entering the
RCD Clear mode. The will displayed. Use
to select options, and press or to confirm.
The twinkled means do not clear the data, and the
twinkled means to clear the data. It needs
7 to 10 seconds when processing this instruction.

-5-
(2s)
Hold
mode
Under testing mode, press to enter the reading
HOLD mode. Press and to change the
displayed functions. Press to exit this mode.
If the RCD data has been stored inside, press and hold
to switch to RCD clear mode
Setting
mode
(Ref,Span,
date,time,
sampling
rate,
temperature
unit )
Under testing mode, press and hold more than two
seconds, when area A appears , release to
entering the setting mode. There are several setting
options in the setting mode, press to select it.
Ref, Span setting: Entering when and
appears on the screen, press to switch the value
and to switch the digit. Press to determine the
value.
Date setting: Entering when appears, press
to switch the value and to switch the digit. Press
to determine the value.
Sampling rate setting: Entering when appears,
press and to switch it, press to determine
the value.
Temperature unit setting: Entering when ℃℉appears,
press and to switch the value, press to
determine the value.
Exit: when the screen shows , press to exit.

■Instructions
A. Testing Mode:
Press and to switch display conditions.
Under the testing mode, the display contents describe as below:
Display
Display contents
Normal conditions
Probe condition, battery level
Temperature and Humidity
Humidity measured value (Area A)
Temperature measured value (Area C)
Humidity and Dew point
Humidity measured value (Area A)
Dew point measured value (Area C)
Time and Date
Hour, Minute (Area A)
Month (Area B)
Day (Area C)
※When return to testing mode from hold mode or setting mode, it takes
few seconds, do not press any keys at this moment.
※The humidity and temperature will displayed when connected to the
computer, the symbol -PC-show up means the connection is successful.
-6-
Fig. Temp. and Humidity display
Fig. Probe is not connected
or connection exception
Fig. Humidity and Dew point
Fig. Time and Date

B. Hold mode
Under testing mode, press to entering the HOLD mode. Press and
to change the displayed functions. Press return to the testing mode.
If there are recording data internal, it will display the Max., Min., and Avg. of the
record.
Under HOLD mode, the display contents describe as below:
Display (Humidity and Temp.)
Display contents (area A and area C)
HOLD value
Humidity and Temp. value HOLD
MAX value
The Maximum of Humidity and Temp. value
MIN value
The Minimum of Humidity and Temp. value
AVG value
The Average of Humidity and Temp. value
-7-
Fig. MAX. value display
Fig. MIN. value display
Fig. AVG. value display

-8-
C. RCD Recode mode
Under the testing mode, press to entering the RCD record
mode. Sampling rate will shows before recording.
Press and to switch the display status. The will
flashes when recording. Press or to finish recording.
When there are records on the internal, the symbol RCD will
show up.
D. RCD Reading mode
Under testing mode, press to entering the RCD reading
mode. Press to switch the displayed record value;
Press return to the HOLD mode.
Press and hold can switch to the RCD clear mode.
Press to switch the displayed record value; Press and
hold it can be switch quickly. Press and hold and press
or can switch 100 readings at a time.
E. RCD Clear mode
Under the testing mode, RCD reading mode, press and hold
to entering the RCD Clear mode, and the symbol will
displayed. Use to select options, and press confirm
it. The twinkled means not to clearing the data, and the
twinkled means to clearing the data. The twinkled when
clearing mode process, please waiting until the below symbol –
disappear.

F. Setting Mode
Under the testing mode, press more than 2 seconds, when shows up,
release to entering the setting mode. Press to select the setting
option, press to entering the selected mode. Press again to exit.
Under the Setting mode, the display contents describe as below:
-9-
Display content
Description
Entering REF and SPAN Setting Mode
Entering Date and Time Setting Mode
Entering Sampling rate Setting Mode
℃℉
Entering Temperate unit Setting Mode
Entering Exit Setting Mode
Fig. REF, SPAN Setting
Fig. Date, Time Setting
Fig. Exit Setting

■Setting Mode Description
1. REF, SPAN setting mode
This mode are using for setting the REF and SPAN. Press
to select the number of digits you want to change, and
press to selecte its cycled figures from 0 to 9. When
setting the REF, the thousands digit can be switched to the
negative sign. Press confirm the setting, set the
humidity first then set the temperature. Area C displayed rh
when calibrating humidity, and t-P displayed when calibrating temperature.
REF setting range of humidity: 100.0% to -100.0%
SPAN setting range of humidity: 200.00% to 0.00%
REF setting range of temperature: 100.0℃~ -100.0℃(180.0℉~ -180.0℉)
SPAN setting range of temperature: 200.00% to 0.00%
2. Date / Time setting mode
This mode are using for setting the date and time. Press
to select its cycled figures. Press and hold can speed up
the cycle. The seconds cannot be set and the year can be
set up to 2099. Press confirm the setting.
The area A displayed ” Year”; The area B displayed ” month”and“date”
The area C displayed ”hour”and” minute”
3. Sampling rate setting mode
This mode is use to setting the sampling rate.
press to switch the rate. Display format is “second”
Press to confirm the setting.
Sampling rate setting:
2 seconds, 5 seconds, 10 seconds, 20 seconds, 30 seconds, 1 minute,
2minutes, 5 minutes, 10 minutes, 30 minutes, 1 hour, 2 hours
4. Temperature unit setting mode
This mode is for setting the temperature unit.
Press to switch the unit, press to confirm.
5. Exit the setting mode
Use this option when you finish your setting.
-10-

■ RS-232 Transmission Agreements
※Please connect theACAdaptor if it were required a long time to transfer
the data.
RS-232 is for one-way data transfer, receive and input the signal by three
grounded wires. Recommending using the transmission line which is
manufacture by OE factory or use the cable shorter than 10 meters to
connect the computer and the instrument.
Transfer rate: 57600
Transfer Status: /8 / N / 1
Transmission Content: (8 BIT)
Read instructions: by function 03H (Read Holding Registers)
Modbus RTU CRC16 check
A. Request Data Frame
Ex: Read the data from address 00h
(Read 1 Word of data from address 0000H)
Slave
address
Function
Starting
address
Hi
Starting
address
Lo
No. of
Word
Hi
No. of
Word
Lo
CRC
Lo
CRC
Hi
38H
03H
00H
00H
00H
01H
81H
63H
Response Data Frame
Ex: response data 2 Word = 0x109D
Slave
address
Function
Byte
count
Data
Hi
Data
Lo
CRC
Lo
CRC
Hi
38H
03H
02H
01H
ECH
24H
5CH
0x01EC=492,actual value=Data/10=49.2
B. Request Data Frame
Ex: Read the data from address 02h
(Read 5 Word of data from address 0002H)
Slave
address
Function
Starting
address
Hi
Starting
address
Lo
No. of
Word
Hi
No. of
Word
Lo
CRC
Lo
CRC
Hi
38H
03H
00H
00H
00H
05H
80H
A0H
-11

Response Data Frame Ex. response data 10-Byte
Slave
address
Function
Byte
count
Data(1)
Hi
Data(1)
Lo
Data(2)
Hi
Data
(2) Lo
38H
03H
0AH
02H
04H
02H
D6H
Data(3)
Hi
Data(3)
Lo
Data(4)
Hi
Data(4)
Lo
Data(5)
Hi
Data(5)
Lo
CRC
Lo
CRC
Hi
00H
78H
00H
02H
16H
5CH
D2H
02H
Data (1) is Humidity value 0x0204=516, actual value=Data/10=51.6
Data (2) is Temp. value 0x02D6=726, actual value=(Data-500)/10=22.6
Data (3) is Dew Point value 0x0078=120, actual value=Data/10=12.0
Data (4) Hi and Data (4) Lo is MOD value 0x0002
1.Data(4) Lo 05=℉/℃Judgment
>>> Value =0 represent ℃
>>> Value =1 represent ℉
2. Data(4) Lo 04 No value
3. Data(4) Lo 03= Temperature-Error judgment
>>> Value =1 represent Temperature values abnormal
4. Data(4) Lo 02= Humidity -Error judgment
>>> Value =1 represent Humidity values abnormal
5. Data(4) Lo 01~00=Power gauge
>>> Value =1 represent battery power of 74~50%
Data (5) is number of records, value 0x165C=5724, actual value=Data/2=2862
**Example**
Setting mode 1. Temperature unit=℃
2. Humidity values normally
3. Temperature values normally
.4. Power 74~50%
MOD setting mode
Bit 07
Bit 06
Bit 05
Bit 04
Bit 03
Bit 02
Bit 01~ Bit 00
X
X
℉=1
℃=0
X
Temp.
Error=1
Humidity
Error=1
Power
☆Power Meter is divided into 4 parts 11=100~75% 10=74~50%
01=49~25% 00=24~0%
-12-
Address/ Data name Comparison Table
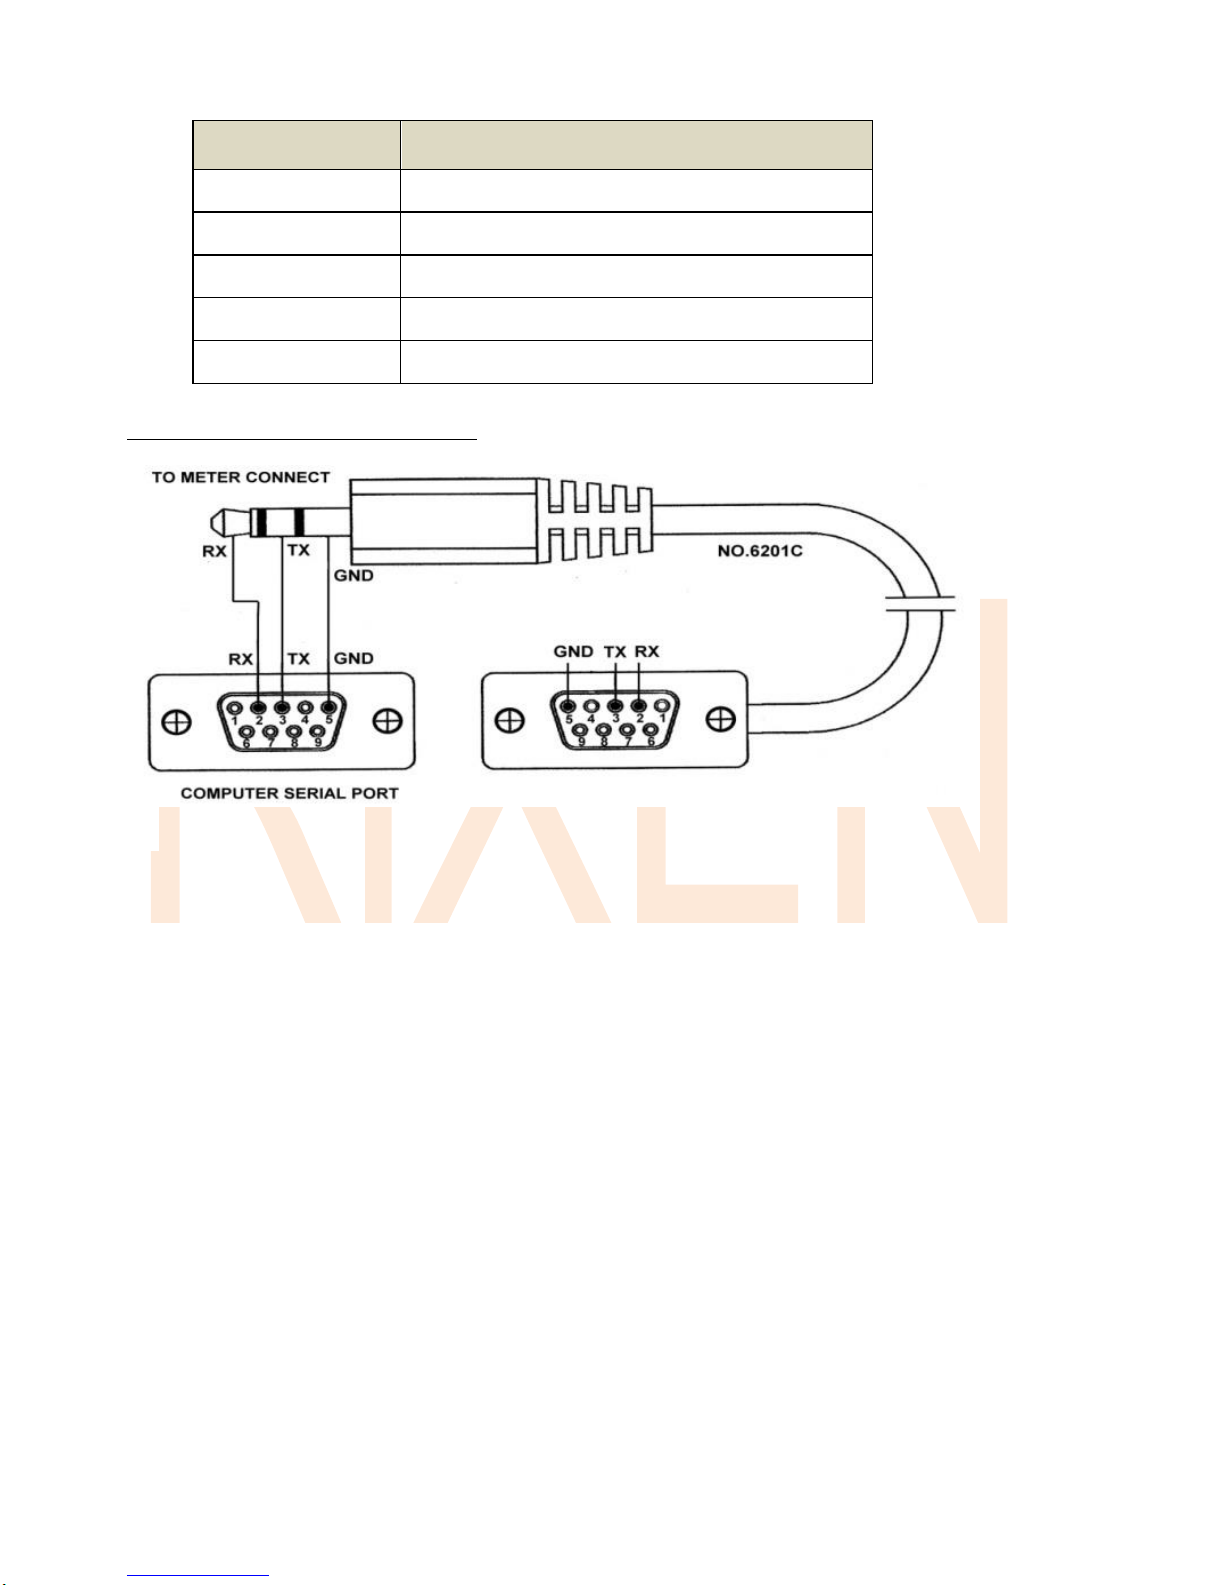
D. RS-232 connecting cable
■Precautions
1. This instrument has a waterproof function; please do not use it in a high temperature
Environment or with corrosive materials to avoid leakage or damage.
2. To avoid the problems that might occur when connecting to the computer, the Rixen
USB computer interface cable and windows software (Model No. TU-USB-C) is
recommended.
4. When the instrument shows power shortage warning, please immediately replace the
batteries to avoid incorrect readings.
5. When the instrument is not in use for a long time, please put the instrument and all
Accessories in the protective case, and kept it in a clean and dry environment, and please
avoid direct sunlight
6. If there are any operation questions or malfunction, please contact your local distributor
or our service department
-13
Address
Data name
0000h
Real-Time Humidity Data(Hold)
0001h
Real-Time Temperature Data(Hold)
0002h
Real-Time Dew Point Data(Hold)
0003h
Status
0004h
RCD readings

MEMO
-------------------------------------------------------------
--------------------------------------------------------------
--------------------------------------------------------------
--------------------------------------------------------------
--------------------------------------------------------------
--------------------------------------------------------------
--------------------------------------------------------------
--------------------------------------------------------------
--------------------------------------------------------------
Table of contents
Other Rixen Measuring Instrument manuals


