RJWC Neutrino 1340C User manual

Installation Manual
Neutrino LED Headlights with Halo
Vehicle Can-Am Renegade Gen 2 2012-2019
Also ts Maverick 1000R & Renegade Gen 1 2008-2012 Rev: 2.0
Page 01
This manual will guide you through the process of installing your
new model specific Neutrino LED Headlights
It is very important that you read this.
You will need the following tools
Torx screwdriver
size T10 and T20
Gloves Pliers
Hardware parts included for
the Renegade Gen 2
2 x Headlight adaptor
4 x Plastic washers
9 x Zip ties
14x Stainless torx bolts
14x Stainless m5 lock nuts
1 x Neutrino sticker
4 x Neutrino LED headlights
1 x Halo harness
2 x Thick RJWC stickers
7 mm and 10 mm
wrench

Installation Manual
Neutrino LED Headlights with Halo
Vehicle Can-Am Renegade Gen 2 2012-2019
Also ts Maverick 1000R & Renegade Gen 1 2008-2012 Rev: 2.0
Page 02
Make sure that you clean your bike carefully especially around
the factory headlights to get off as much dirt as possible. We
also recommend that you clean all the factory parts you remove
before starting installation of the new Neutrino LED headlights.
Same procedure on both right and left side Partial of this manu-
al shows an OE plastic front not installed on a vehicle just to
make it easier to see all the parts that have to be removed and
installed during the process.
Lets start the process!
Remove the OE contacts from the Halogen factory bulbs before
starting removing the factory headlights. Mark wich connector is
high and low beam on the OE connectors/cables.
NOTE HEADLIGHT FRAME IN THE
MANUAL IS THE RIGHT SIDE
(SEEN FROM THE DRIVERS SEAT)
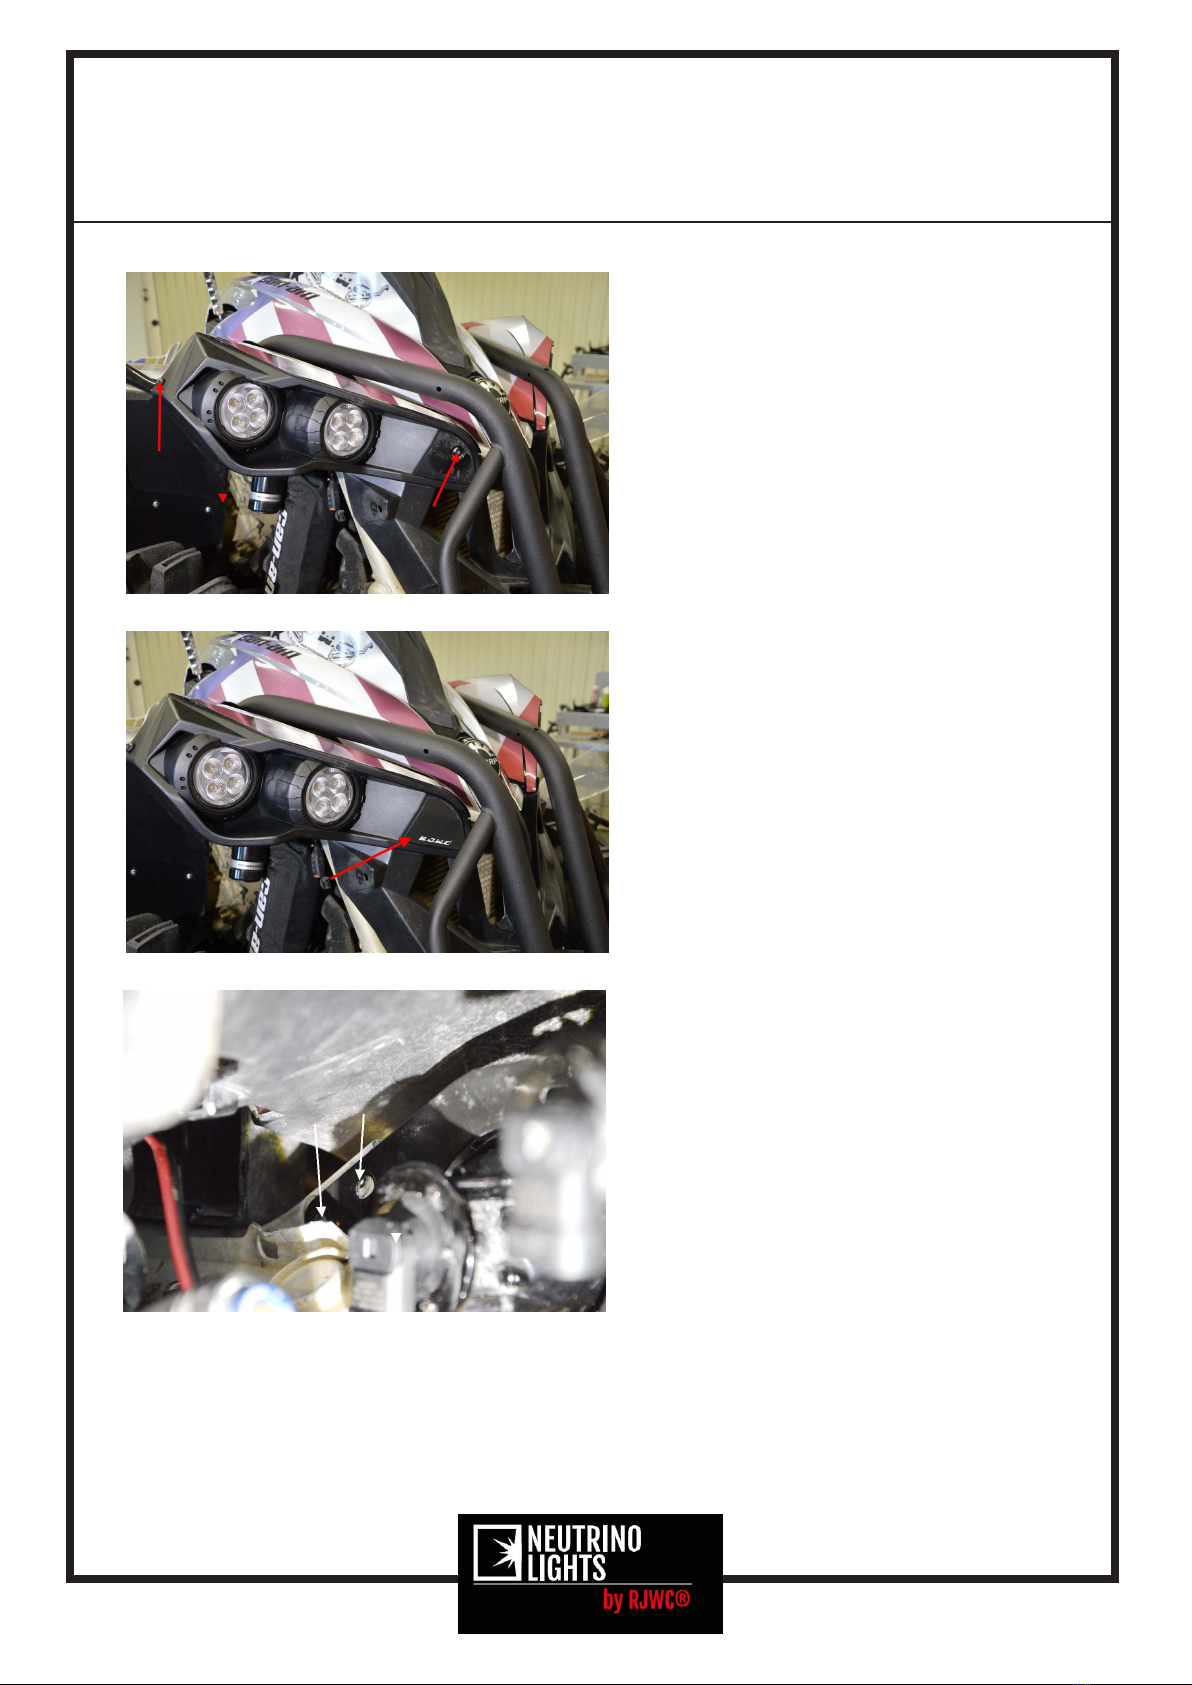
Remove the black sticker that
is covering this bolt hole we
have sent new replacement
RJWC stickers with the hard-
ware kit so you can throw the
OE ones in the trash, Remove
the bolt and nut.

Installation Manual
Neutrino LED Headlights with Halo
Vehicle Can-Am Renegade Gen 2 2012-2019
Also ts Maverick 1000R & Renegade Gen 1 2008-2012 Rev: 2.0
Page 03
Remove this bolt and nut
Remove the 2 bolts holding
the headlight support. These
bolts are a bit tricky to get
out. You can choose to only
remove the 3 screws in the
plastic frame if you are ha-
ving trouble getting the
bolts out. Use a 10 mm wrench
for the 2 bolts.
Headlight frame support
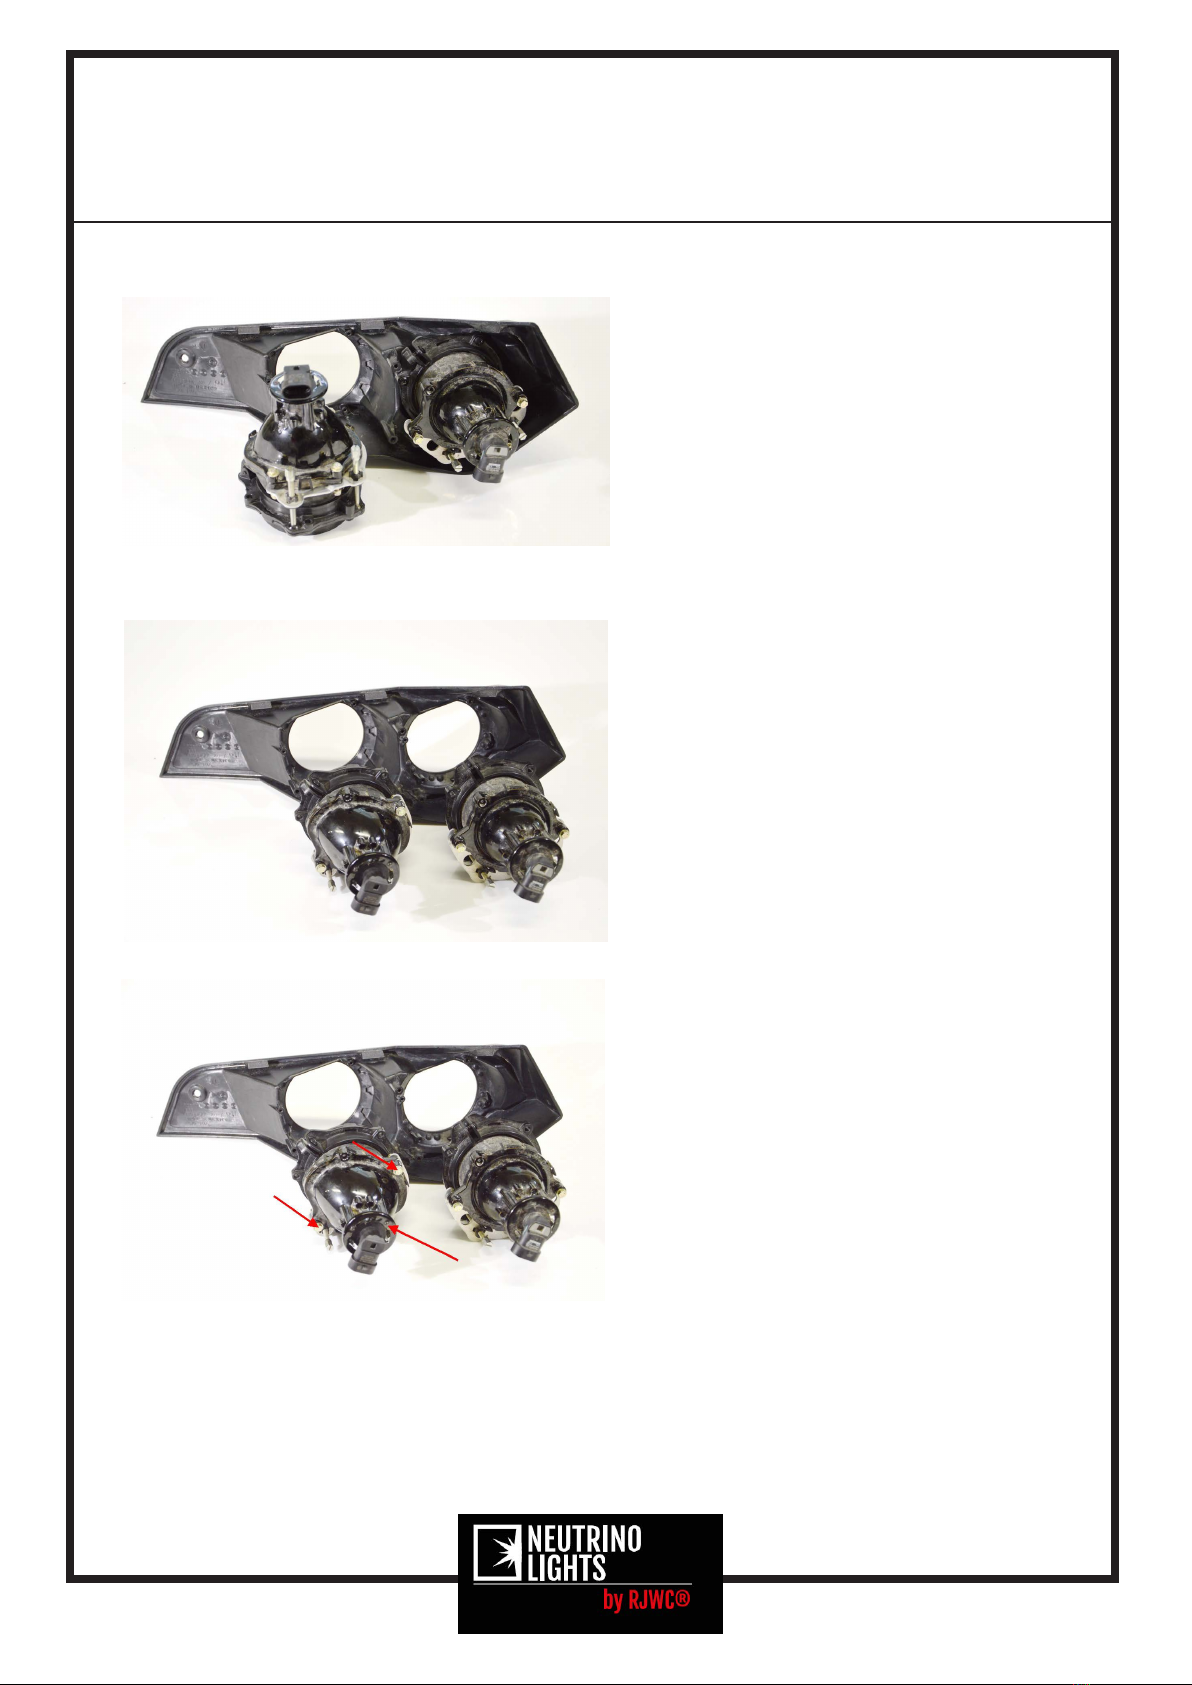
Start with the low beam remo-
ve the 3 screws holding the
plastic clamp adapters in
place make sure to just work
with one lamp at the time
Installation Manual
Neutrino LED Headlights with Halo
Vehicle Can-Am Renegade Gen 2 2012-2019
Also ts Maverick 1000R & Renegade Gen 1 2008-2012 Rev: 2.0
Page 04
Remove the low beam from the
plastic frame
Remove the high beam as well
make sure to mark each holder
for the lights with ”high
beam” and ”lowbeam” so you
remember wich one is going
where.
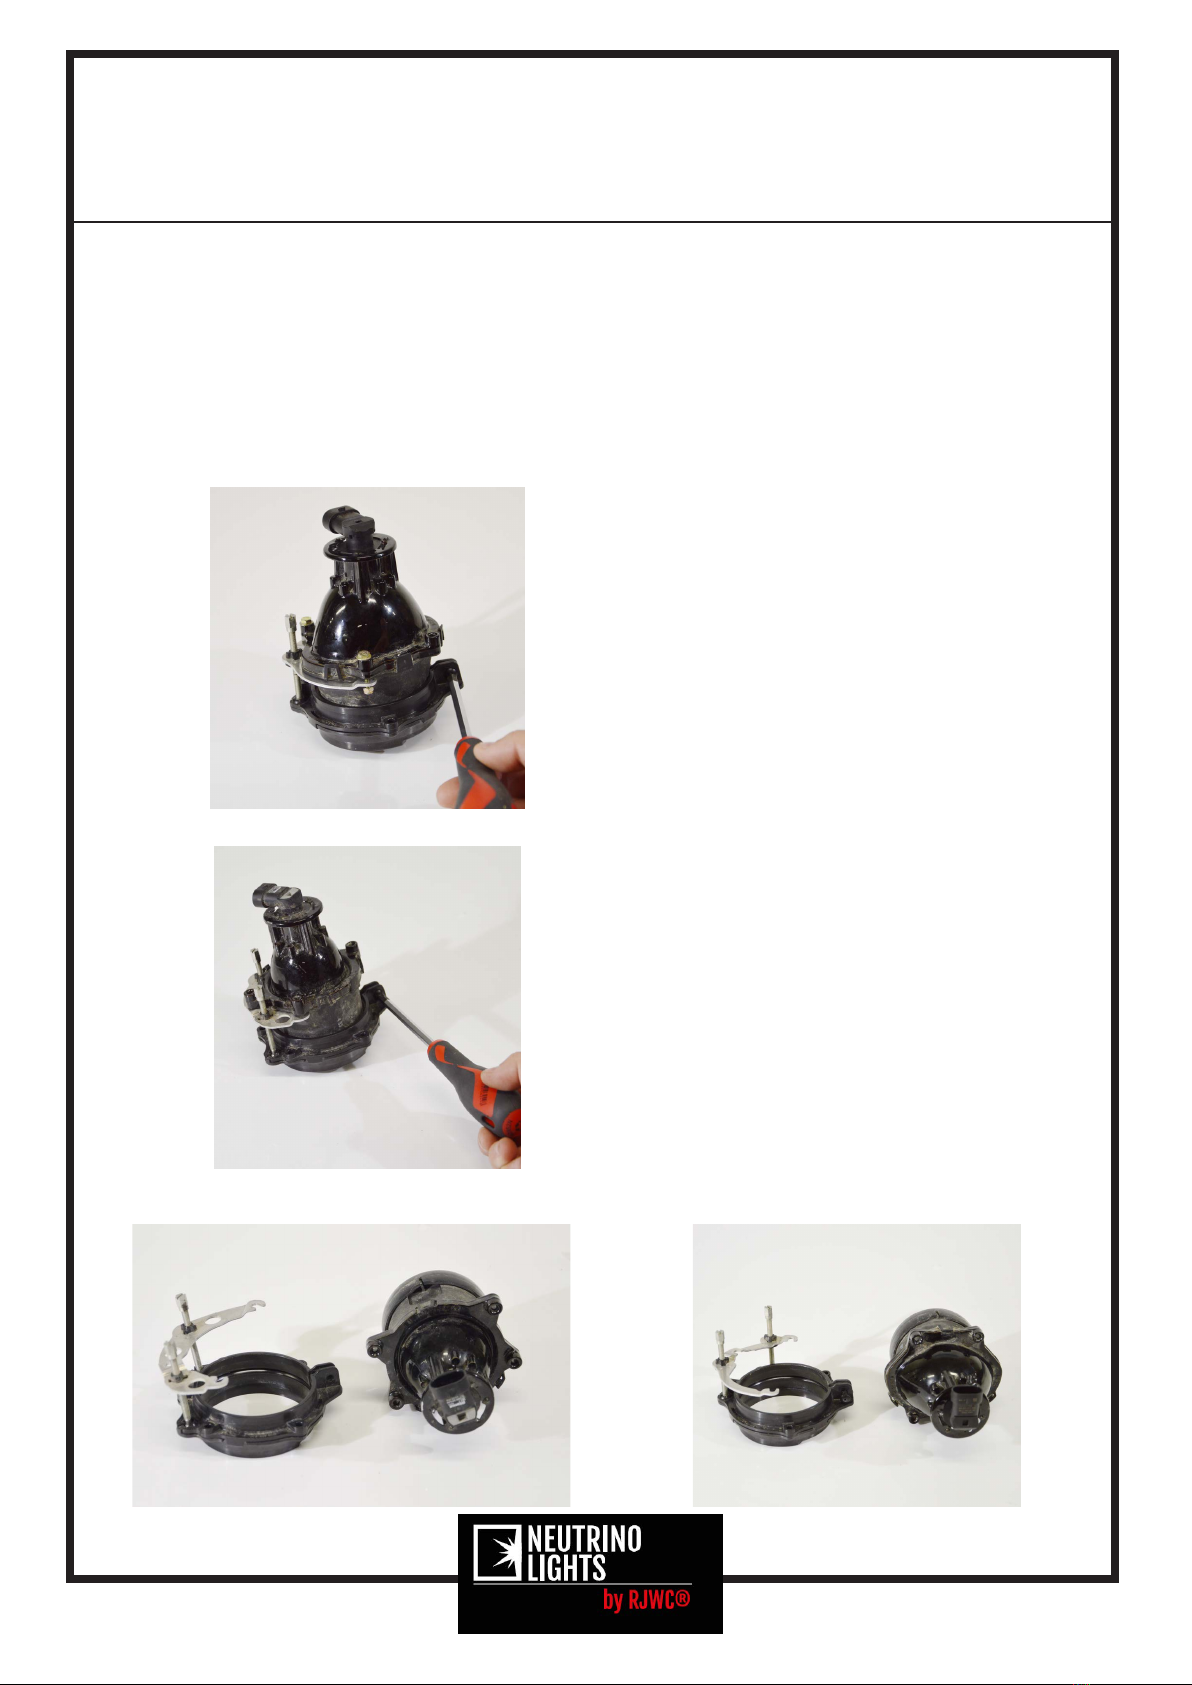
Start with the low beam light
and remove the 3 bolts and
nuts holding it in place.
Then do the same thing to the
high beam.
Installation Manual
Neutrino LED Headlights with Halo
Vehicle Can-Am Renegade Gen 2 2012-2019
Also ts Maverick 1000R & Renegade Gen 1 2008-2012 Rev: 2.0
Page 05
Now its time to install the Neutrino light that is going to be
installed in the high beam location. Check wich light support
frame you marked as high beam and make sure to use
that one.
NOTE! On the high beam light you does not use any Neutrino plas-
tic adapter
Remove the screw as the
picture shows on the lowbeam
plastic clamp
Remove the screw on the high
beam as well
Highbeam Lowbeam

Installation Manual
Neutrino LED Headlights with Halo
Vehicle Can-Am Renegade Gen 2 2012-2019
Also ts Maverick 1000R & Renegade Gen 1 2008-2012 Rev: 2.0
Page 06
Install the plastic adapter
on one of the Neutrino lights
and make sure each hole li-
nes up with the holes in the
light and the plastic tabs
are matching with the holes
(the adapter can only be in-
stalled in one way)
Red arrows shows the location
of the adapter
Install the headlight in the
plastic frame like the pictu-
re shows.
Install the plastic washers
like in the picture to sup-
port the aluminium tab
LOW BEAMS
Now its time to install the Neutrino lights in the plastic fra-
me/pod! NOTE THIS HEADLIGHT IS GOING TO FIT IN THE LOWBEAM SPOT
IN THE OE PLASTIC

Installation Manual
Neutrino LED Headlights with Halo
Vehicle Can-Am Renegade Gen 2 2012-2019
Also ts Maverick 1000R & Renegade Gen 1 2008-2012 Rev: 2.0
Page 07
Tighten the screws by using
an T20 Torx screw driver and
one 7 mm wrench
Re-install the screw that
locks the plastic clamp in
place. DO NOT OVERTIGHTEN IT
JUST NEED TO BE TIGHTEN BY
HAND.
Install the Neutrino light
(lowbeam location) as the
picture shows, it only fits
in one direction in the fra-
me. Install the OE screws.

Installation Manual
Neutrino LED Headlights with Halo
Vehicle Can-Am Renegade Gen 2 2012-2019
Also ts Maverick 1000R & Renegade Gen 1 2008-2012 Rev: 2.0
Page 08
Install the Neutrino light
like the picture shows, no
adapters and no washers is
being used on this one. Use
the T20 Torx and 7 mm wrench
to tighten this as well.
Install the screw back that
holds the plastic clamp
DO NOT OVERTIGHTEN IT.
Install the high beam with
the OE screws in the loca-
tions where the red arrows
is.
You can choose if you want to
install the steel
light frame support like on
the picture or notpre instal-
led
Installation Manual
Neutrino LED Headlights with Halo
Vehicle Can-Am Renegade Gen 2 2012-2019
Also ts Maverick 1000R & Renegade Gen 1 2008-2012 Rev: 2.0
Page 09
Re-install the connectors on the Neutrino lights, make sure you
install the correct connector on the light you want to use as
High or Low beam. You can choose wich lights you want to use as
high beam by switching the connectors.
Install the bolts and nuts
as the picture shows
Install the thick RJWC Stick-
er to cover the bolt
Install the bolts holding the
light frame support
Installation Manual
Neutrino LED Headlights with Halo
Vehicle Can-Am Renegade Gen 2 2012-2019
Also ts Maverick 1000R & Renegade Gen 1 2008-2012 Rev: 2.0
Page 10
Now its time to install the halo harness which is very simple.
The cable harness is made to fit both the Renegade and Outlander
wich makes it a bit to long for the Renegade. Just make a
loop on the cable and use the zip ties to secure it
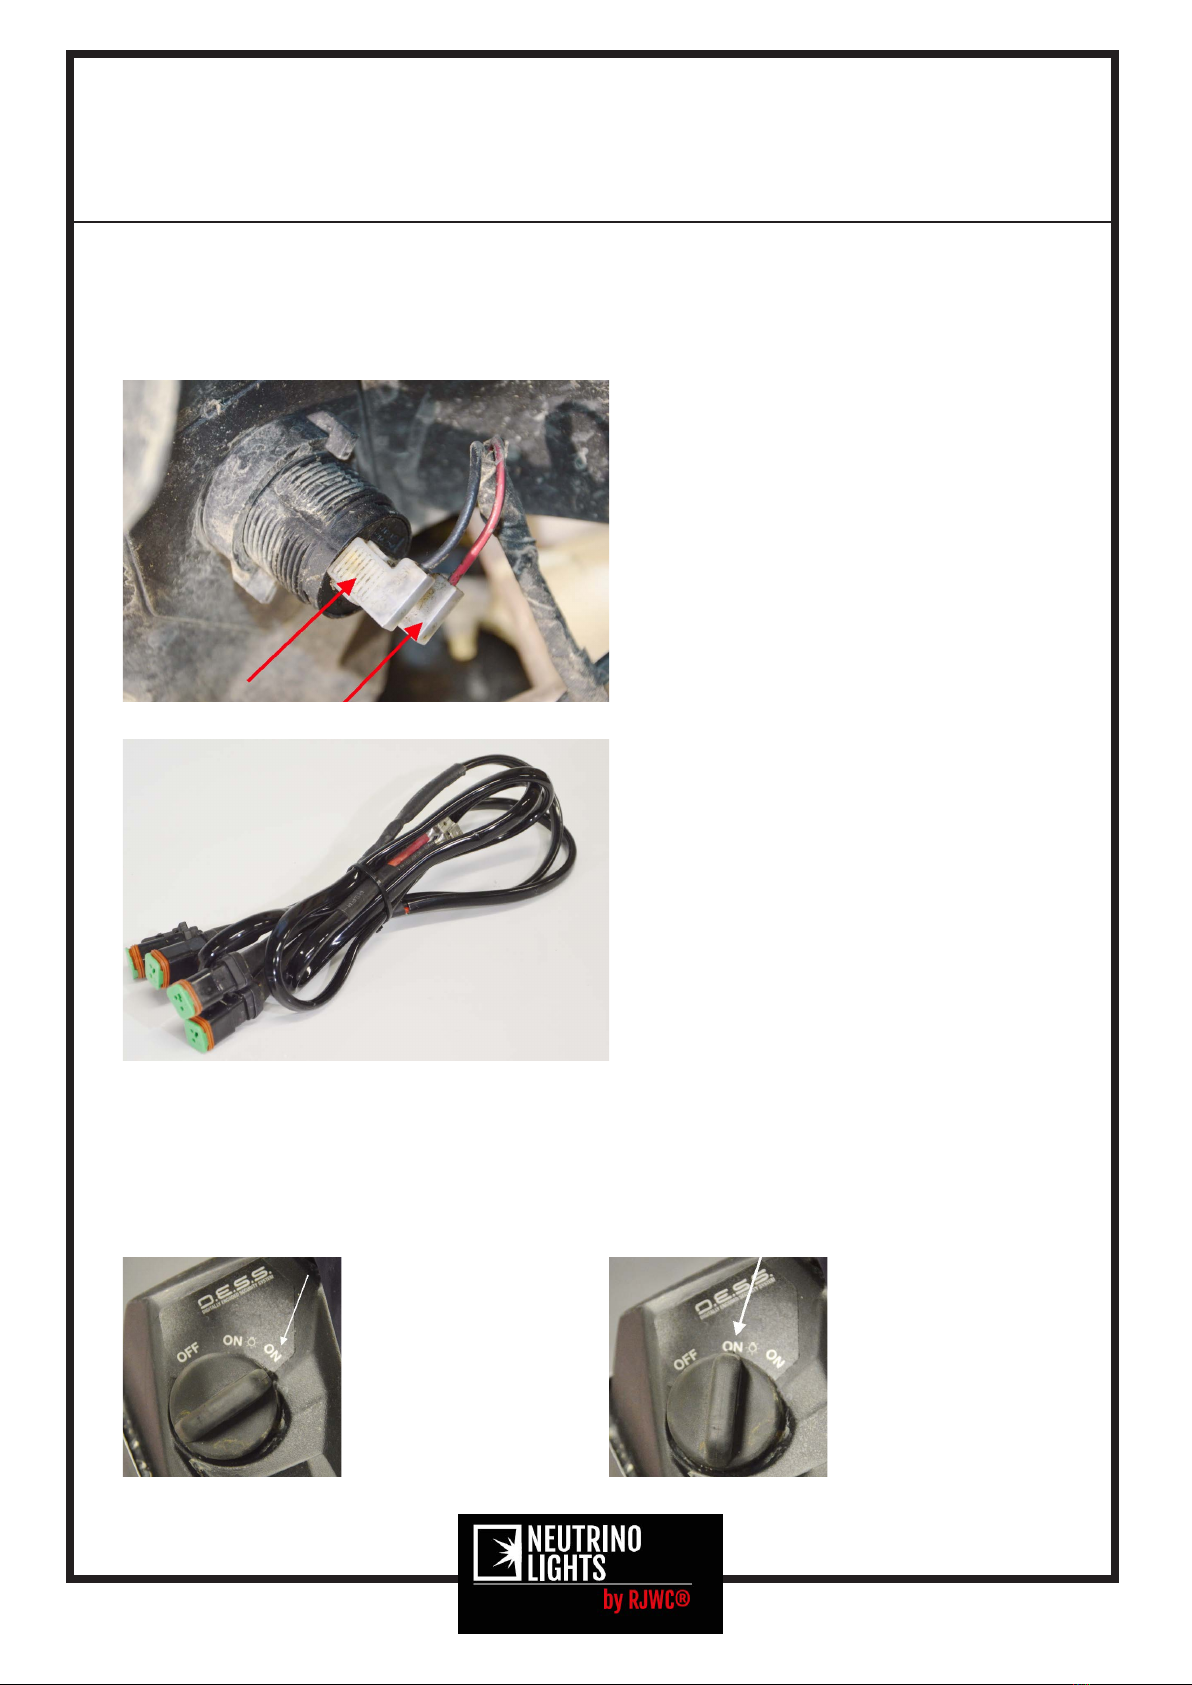
Use the 12v socket to connect
the halos, make sure to use
+ and ground correctly. The
halo cable have a 2 way fas-
ton connector on both the +
and - cable. Just remove the
stock cables install the halo
harness cables and then rein-
stall the oe cables on the
faston connector and you are
done.
Halo harness included
Each Neutrino light have a sealed Deutsch connector, use the 4
Deutsch connectors on the halo harness and connect them with
the ones on the lights , the right side will have 2 and the left
side 2 it does not matter how you choose to connect them because
they all have 12v+ when ignition is on.
If you only
want the ha-
los to be on
choose this
mode on the
key
If you want
to combine
the halo with
high or low
beam choose
this mode on
the key
Installation Manual
Neutrino LED Headlights with Halo
Vehicle Can-Am Renegade Gen 2 2012-2019
Also ts Maverick 1000R & Renegade Gen 1 2008-2012 Rev: 2.0
Page 11
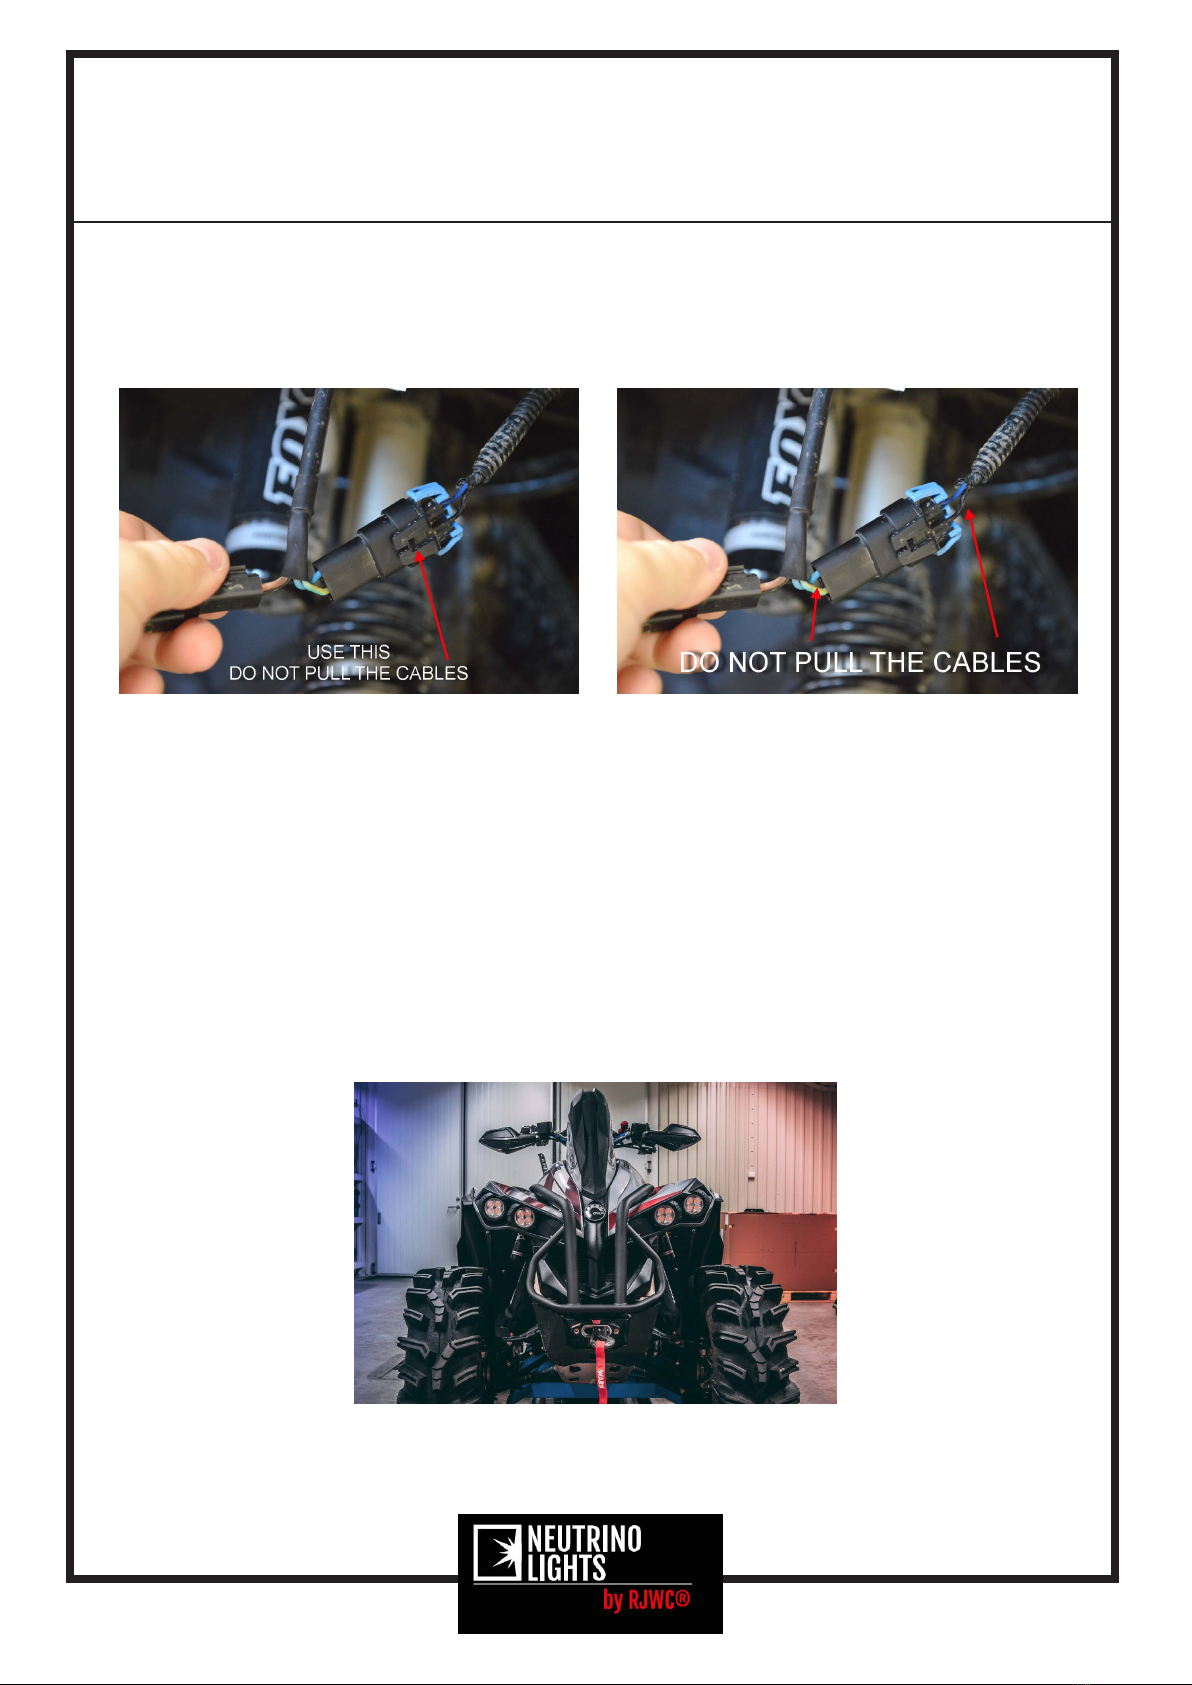
IMPORTANT INFO DO NOT USE FORCE TO REMOVE CONNECTORS FROM
EACHOTHER BY PULLING THE CABLES USE THE QUICK CONNECTORS SO YOU
DONT DAMAGE THE CABLES
IMPORTANT if you install these lights on a Maverick 1000 R you
need to extend the 12v+ halo cable to install it behind the 12v
socket (lighter socket)
For more information regarding the installation or products in
it’s entirety, contact the dealer you ordered the product from.
And make sure to register your product for the 2 year warranty
on the website! Scan the QR code on the box.

Installation Manual
Neutrino LED Headlights with Halo
Vehicle Can-Am Renegade Gen 2 2012-2019
Also ts Maverick 1000R & Renegade Gen 1 2008-2012 Rev: 2.0
Page 12
RJ Weld & Custom AB
Bullerleden 9
961 67 BODEN, SWEDEN
www.rjweldcustom.com
Other RJWC Automobile Accessories manuals


Popular Automobile Accessories manuals by other brands

WeatherTech
WeatherTech No-Drill MudFlap installation instructions

RITE-HITE
RITE-HITE VBR-300 Dok-Lok installation manual

Car-Interface
Car-Interface CI-DAB-CAN1-SK user manual

ARB
ARB RD121 Installation guides

Grizzly
Grizzly Tow Draw Bar G8731 instruction manual

Prorack
Prorack K915 Fitting Instructions for Basic Carrier


