Roberts PISA two CR9934 User manual

CR9934
PLLDualAlarm
ClockRadio
Please read this manual before use
ROBERTS
Sound for Generations

Contents ............................................................................1
Controls ..........................................................................2-3
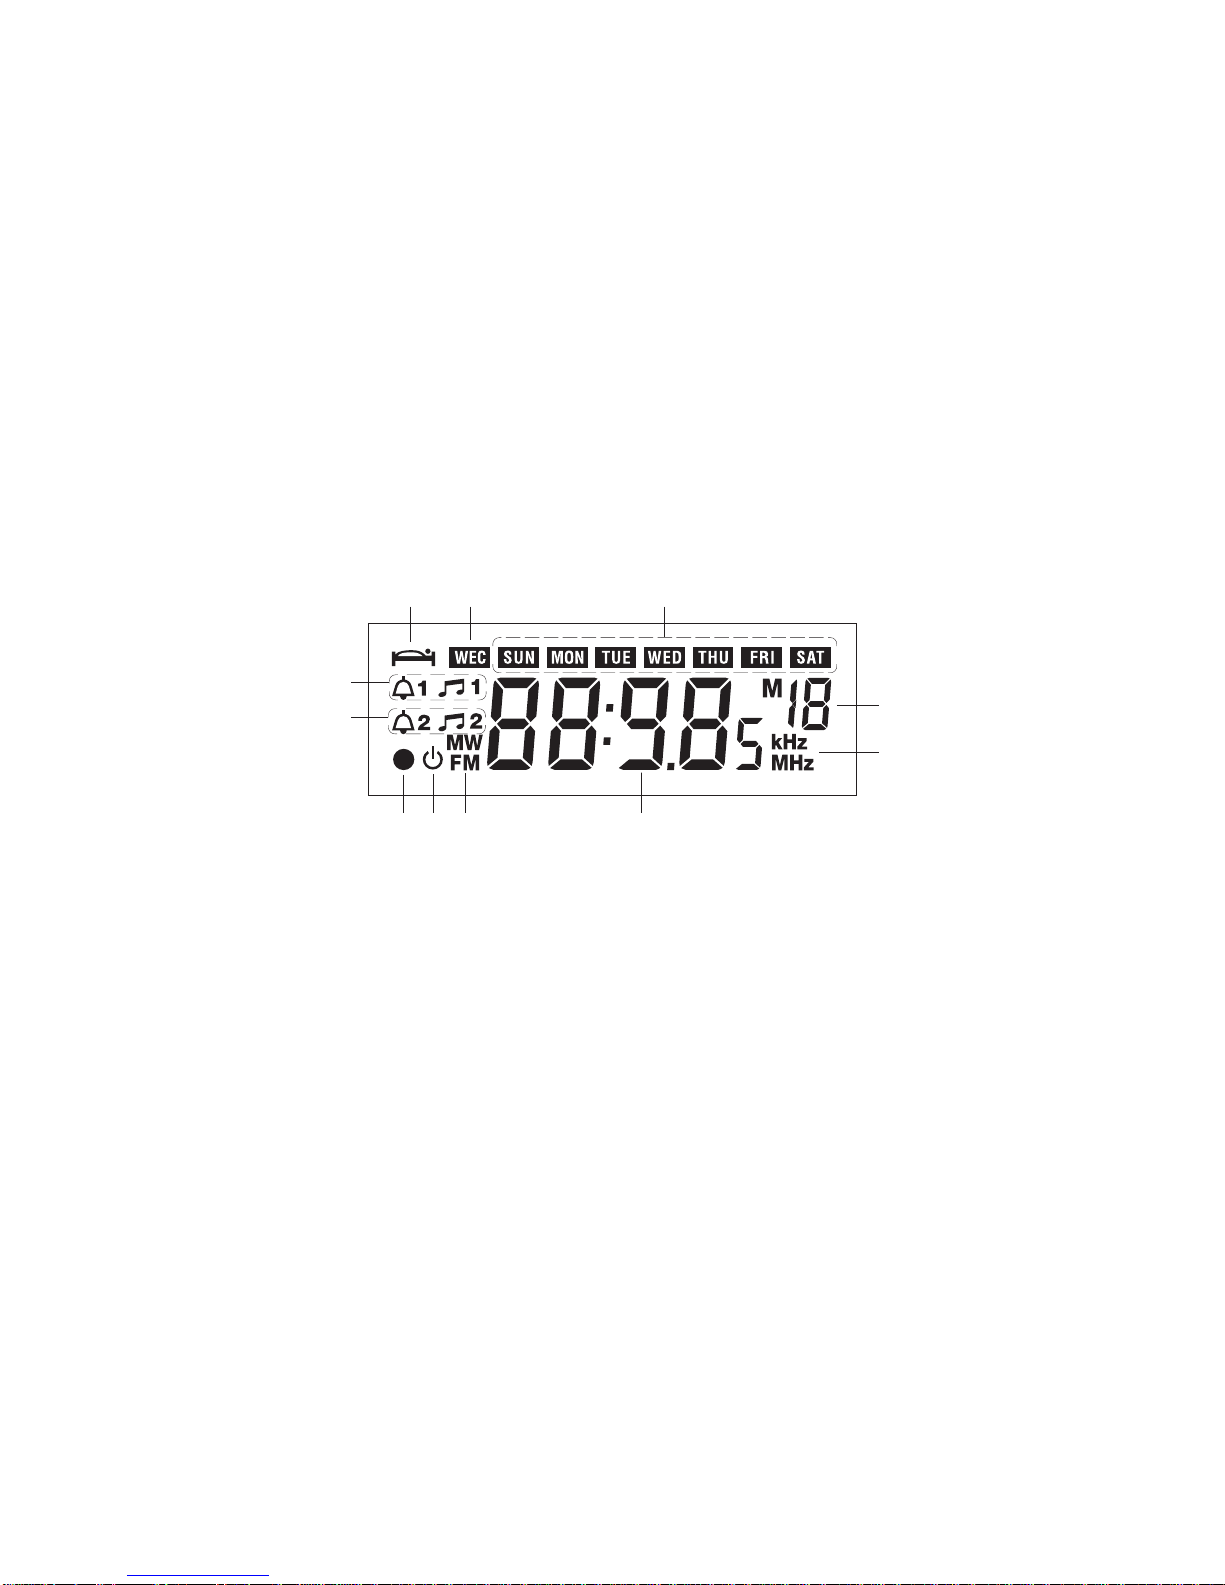
Display ...............................................................................4
Connecting to mains supply..............................................5
Display backlight ...............................................................5
Night light...........................................................................5
Setting the clock ................................................................6
Setting the day of week ......................................................6
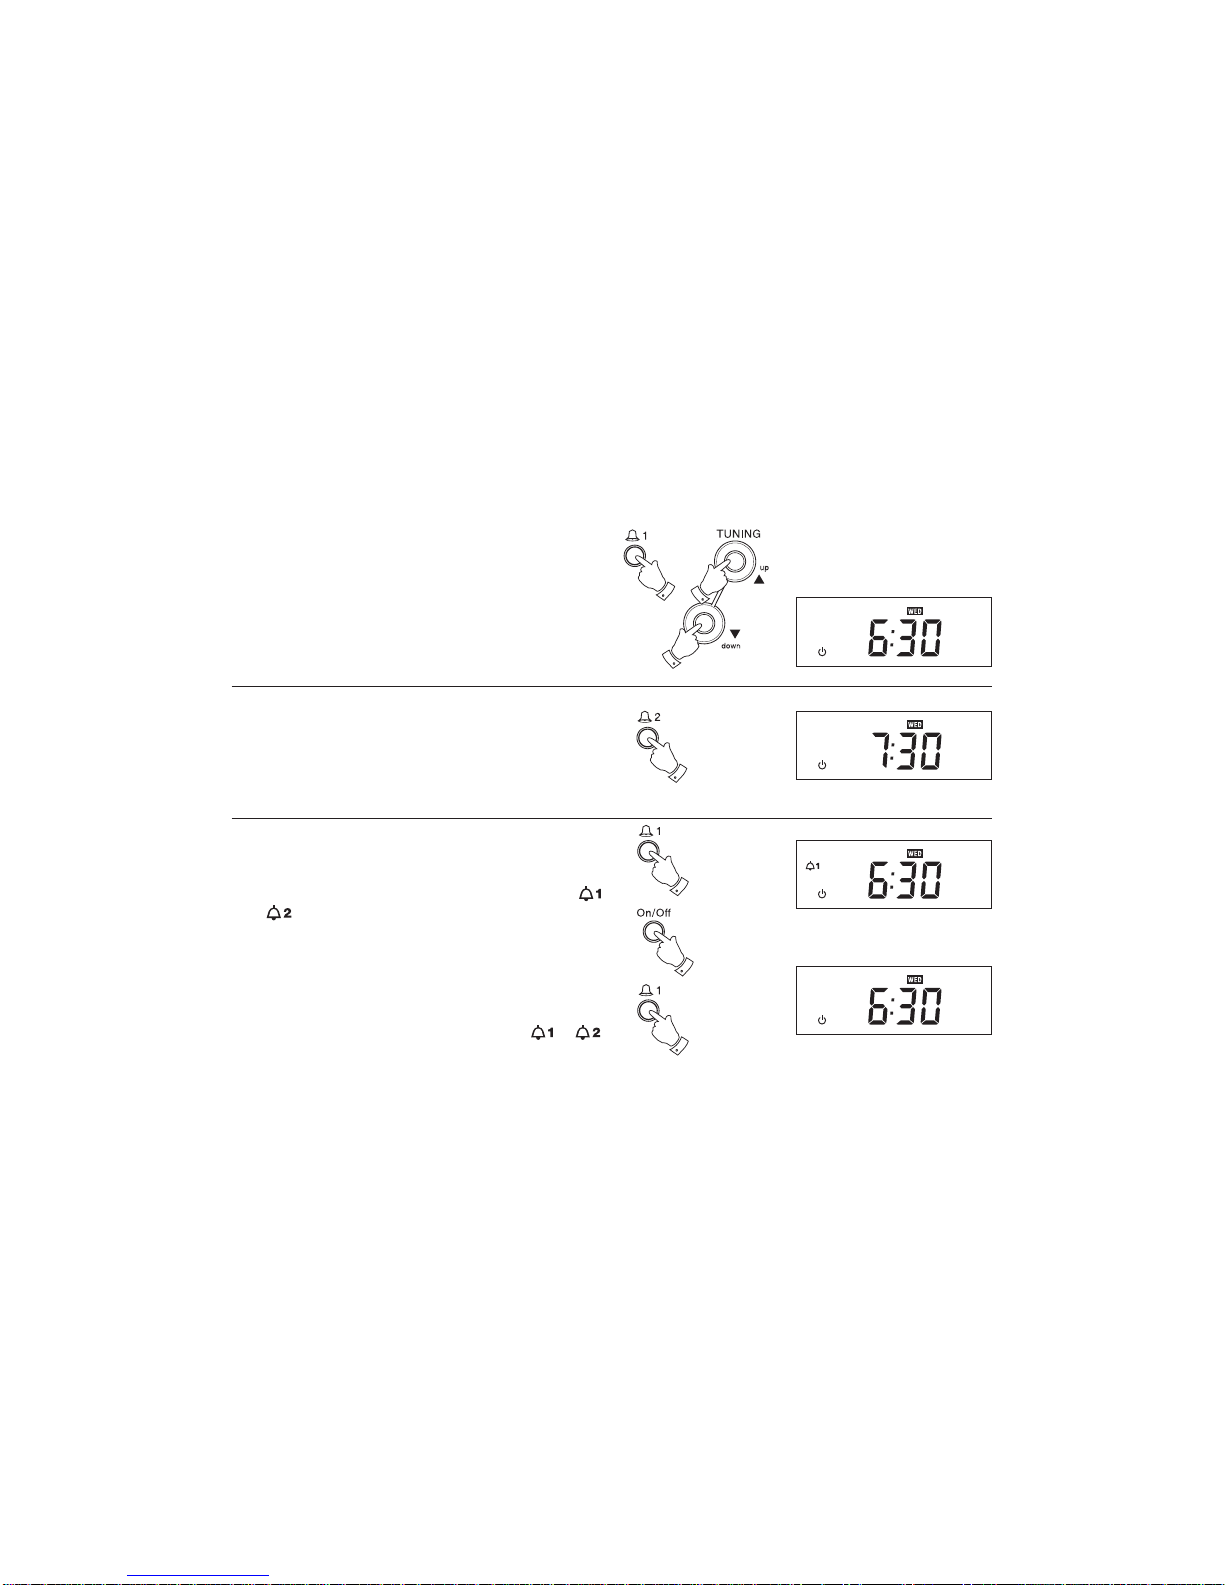
Setting the alarm time .......................................................7
Displaying the alarm time .................................................7
Waketo buzzer ..................................................................7
Wake to radio.....................................................................8
Snooze control...................................................................8
Sleep timer ........................................................................8
Weekend alarm cancel......................................................9
Operating your radio - search tuning .................................9
Operating your radio - manual tuning..............................10
Presetting stations ...........................................................11
Recalling a preset station ................................................12
Last station memory ........................................................12
Reset button.....................................................................12
Headphones ....................................................................13
Contents
Specifications ..................................................................13
Circuit features.................................................................13
General ............................................................................14
Guarantee ............................................................backpage
1

If you need any further advice, please call our Technical Helpline on :-
020 8758 0338 (Mon-Fri) 2
Controls
(Top)
1. Preset buttons
2. Weekend cancel button
3. On/Off button
4. Memory button
1
9. Night Light button
10. Band button
11. Sleep button
12. Tuning up button
5. Timebutton
6. Alarm 2 button
7. Snoozebutton
8. Alarm 1 button
13. Tuning down button
2
3
45
678910
11
12
13

3
Controls
(Leftside)
19.Volumecontrol
20. Batterycompartment(underside)
21. Reset button (inside battery compartment)
17 19
(Rightside)
17. Headphone socket
18. Dimmer switch (underside)
18 20
21

If you need any further advice, please call our Technical Helpline on :-
020 8758 0338 (Mon-Fri) 4
1. Alarm 2 indicators
2. Alarm 1 indicators
3. Sleep indicator
4. Weekend cancel indicator
5. Days of week indicators
6. Memory preset indicators
7. Frequency indicators
8. Frequency and time display area
9. Waveband indicators
10. Radio off indicator
11. Radio on indicator
Display
345
6
7
891011
2
1

5
Connecting to mains supply
1. Place your radio on a flat surface.
2. Plug the mains plug into a wall socket and switch on the wall socket.
Displaybacklight
Thedisplaybacklightcanalso be set to 3differentlevels,Lo,MedandHi.
1. SlidetheDimmerswitchlocatedontheundersideofyourclockradio
tothe requiredposition.
2. In addition to the dimmer switch a sensor located at the right side of
LCDdisplay automatically adjuststhe intensityof LCD displayto suit
roombrightness.
Night light
1. Press the Night Light button to adjust level of night light, press
once for dim light press once again for bright light and once again
to switch off.
The night light will provide a warm glow adequate to allow you to
move safely around the room.
1
1

If you need any further advice, please call our Technical Helpline on :-
020 8758 0338 (Mon-Fri) 6
Setting the clock
1. Press and hold down the Time button.
2. Whilst the Time button is held down set the time by pressing the
Up or Down buttons. The clock uses the 24 hour system e.g.
2:30pm is shown as 14:30
3. Release the Time button when clock setting is complete.
Setting the day of week
1. Press and hold down the Snooze button.
2. Whilst the Snooze button is held down set the day of week by
pressing the Up or Down buttons.
3. Release the Snooze button when day of week setting is complete.
1
2
23
2
2
1

7
Setting the alarm times
1. Press and hold down the Alarm 1 or Alarm 2 buttons.
2. Whilst the Alarm 1 or Alarm 2 button is held down set the alarm
time by pressing the Up or Down buttons. The clock uses the 24
hour system e.g. 2:30pm is shown as 14:30. At this stage disregard
symbols.
3. Release the Alarm button when alarm setting is complete.
Displaying the alarm time
1. Ensure that the radio is switched off.
2. Press the Alarm 1 or Alarm 2 buttons to display alarm times.
Release the buttons to return to normal clock time.
Wake to buzzer
1. Set the alarm time as previously described.
2. Press and release the Alarm 1 or Alarm 2 button until the
or symbol appears in the display.
3. At the preselected time the buzzer will switch on. The buzzer will
switch off automatically after 90 minutes. The buzzer alarm may be
switched off for 24 hours by pressing the On/Off button.
4. To permanently cancel the buzzer alarm repeatedly press and
release the Alarm 1 or Alarm 2 button until the or
symbols are removed from the display.
2
2
1
2
4
3

If you need any further advice, please call our Technical Helpline on :-
020 8758 0338 (Mon-Fri) 8
Snooze control
1. The radio or buzzer alarm can be silenced for 5 minutes by pressing
the Snooze button. This sequence can be repeated during the 90
minutes alarm period.
Sleep timer
Your clock radio can be set to switch off after a preset time has elapsed.
1. Press and hold down the button until the desired time is
reached (maximum 90 minutes in 10 minute steps). Your clock radio
will switch off after the sleep time has elapsed.
2. To cancel the sleep function before the preset time has expired,
press the On/Off button.
Wake to radio
1. Set the alarm time as previously described.
2. Press and release the Alarm 1 or Alarm 2 button until the
or symbol appears in the display.
3. At the preselected time the radio will switch on. The radio will switch
off automatically after 90 minutes. The radio alarm may be switched
off for 24 hours by pressing the On/Off button.
4. Topermanently cancel theradio alarmrepeatedly press andrelease
the Alarm 1 or Alarm 2 button until the or symbols
are removed from the display.
2
4
3
3
1
1

9
Operating your radio - search tuning
1. Switch on your clock radio by pressing the On/Off button.
2. Select the required waveband by pressing the Band button. The
waveband selected will appear in the display. On FM fully extend
the pigtail aerial from the rear of your clock radio. On MW rotate
your radio for best reception.
3. Press and hold down either the Tuning Up or Down buttons until
the frequency in the display begins to change rapidly. Release the
button.
4. Your radio will scan the selected waveband, stopping each time it
finds a station of sufficient strength. Adjust the Volume control
to the required setting.
5. To search for additional stations repeat the above procedure.
Search tuning may be stopped by a single press on either the
Tuning Up or Down buttons.
6. Press the On/Off button to switch off your radio.
Weekend alarm cancel
1. Your clock radio can be set to automatically cancel alarms at the
weekend.
2. Press the WEC button untilthe WEC symbol appears inthe display.
The alarm will now only sound on weekdays.
3. To switch off the weekend cancel function press the WEC button
until the WEC symbol is removed from the display
2
1
6
3
3
2
4
5
5
3

If you need any further advice, please call our Technical Helpline on :-
020 8758 0338 (Mon-Fri) 10
Operating your radio - manual tuning
1. Switch on your radio by pressing the On/Off button.
2. Select the required waveband by pressing the Band button. The
waveband selected will appear in the display. On FM fully extend
the pigtail aerial from the rear of your clock radio. On MW rotate
your radio for best reception.
3. A single press on either the Tuning Up or Down buttons will
change the frequency up or down. The frequency steps are:- FM
50kHz and MW 9kHz.
4. Adjust the Volume control to the required level.
5. Press the On/Off button to switch off your radio.
1
5
3
3
2
4

11
Pre-settingstations
You may store up to 10 different stations on FM and 5 for MW giving a
total of 15 preset stations.
1. Switch on your radio using the On/Off button.
2. Select the desired waveband using the Band button.
3. Tune into the required station using one of the tuning methods
previously described.
4. Press and release the Memo button, 'M' will flash in the display.
5. Whilst 'M' is flashing press one of the Preset buttons under which
you wish to store the station. Presets 6 to 10 are obtained by
pressing the Preset button twice.
6. Press the Memo button to store the station. The preset number will
now appear under 'Memory' in the display.
7. Repeat the above procedure for the remaining presets
8. Press the On/Off button to switch off your radio.
Note:Pre-setting ofstations canonly becarried outwhilst 'M' is flashing
in the display (8 seconds).
12
4
5
6
8

If you need any further advice, please call our Technical Helpline on :-
020 8758 0338 (Mon-Fri) 12
Recalling a preset station
1. Switch on your radio using the On/Off button.
2. Select the desired waveband using the Band button.
3. Press one of the Preset buttons to recall the station. Presets 6 to
10 are obtained by pressing the Preset button twice.
Last station memory
1. Yourclock radio providesan automatic laststation memoryfunction.
This function recalls the station that was playing when the radio was
switched off.
1
3
2
Reset button
If your clock radio fails to operate correctly, or some digits on the display
are missing or incomplete carry out the following procedure.
1. Switch off clock radio radio and remove the back up battery.
2. Withtheaidofasuitableimplement(theendofapaperclip)pressthe
reset button located inside the battery compartment for at least 5
seconds, this will reset the microprocessor, clock time and clear all
stations stored in preset memory.
Ifaproblempersistsourtechnicalhelplinestaff would be pleased tohelp
offerany assistance on operating the radio.
2

13
Headphones
1. A Headphone Socket (3.5mm) located on the left hand side of your
radio is provided for use with either headphones or an earpiece.
Inserting the headphone plug automatically mutes the internal
loudspeaker.
Specifications
Power Requirements
Mains AC 230 volts, 50Hz only
Batteries 2 x LR6 (AA size) for clock/memory
Frequency Coverage
FM 87.5 -108MHz
MW 531-1602kHz
CircuitFeatures
Loudspeaker 77mm8ohms
Output Power 500mW into 8ohms
Headphone socket 3.5mmdia
Aerial System FM Wire aerial
MW Built-in Ferrite aerial

If you need any further advice, please call our Technical Helpline on :-
020 8758 0338 (Mon-Fri) 14
Fuse
This apparatus must be protected by a 3A fuse (BS1362) in a 13A plug
(BS1363). If another type of plug is used a 5A fuse should be fitted in
the plug, adaptor or distribution board.
IFINDOUBT-CONSULTAQUALIFIEDELECTRICIAN.
Back-upbattery(notnecessaryfortheunittofunction)
Slide the battery cover catch in the direction of the arrow. Remove the
battery cover. Fit two LR6 (AA size) or equivalent batteries into the
compartment. Replace the battery cover.
The time and alarm settings will be retained during a temporary failure
of the AC mains supply. The display will not be operational. The display
will be extinguished to conserve battery life, but the memory will retain
details of preset stations, time and alarm time settings.
Ifyourclockradioisnottobeusedforaprolongedperiodoftime,remove
the battery to avoid damage by battery leakage.
The wire coloured BLUE must be
connectedto the terminalmarked N
or coloured BLACK.
Thewire colouredBROWN must be
connected to the terminal marked L
or coloured RED.
(Underside)
General
Do not allow this unit to be exposed to moisture (e.g. dripping or
splashing) or to temperatures exceeding 70 degrees centigrade. It is
recommended that the FM band be used wherever possible as better
results in terms of quality and freedom from interference will usually be
obtained than on the MW band.
Mainssupply
The CR9934 will operate from a supply of AC 230volts, 50Hz only.
For your convenience this product is supplied with a plug which is fitted
with a fuse of the appropriate rating. If the plug supplied is not suitable
for your socket outlet, it should be removed by unscrewing the plug top,
the terminal screws, and removing the cable.
The correct style of plug to suit your household together with a correctly
rated fuse should be fitted.
IFINDOUBT-CONSULTAQUALIFIEDELECTRICIAN
IMPORTANT.DO NOT makeanyconnectiontothelargerterminalwhich
is marked with the letter E or by the safety earth symbol or coloured
Green or Green-and-yellow.
The wires in the mains lead are coloured in accordance with the
following codes :-
BLUE - NEUTRAL BROWN - LIVE
As these colours may not correspond with the coloured markings
identifying the terminals in your plug, proceed as follows:-
The Nameplate is located on the underside of your clock radio.

Guarantee
Thisinstrumentisguaranteedfortwelve months fromthedateofdeliveryto the originalowneragainstfailuredue to faulty workmanshiporcomponent
breakdown, subject to the procedure stated below. Should any component or part fail during this guarantee period it will be repaired or replaced free
of charge.
The guarantee does not cover: 1. Damage resulting from incorrect use.
2. Consequential damage.
3. Receivers with removed or defaced serial numbers.
Procedure:
Any claim under this guarantee should be made through the dealer from whom the instrument was purchased. It is likely that your Roberts' dealer
will be able to attend to any defect quickly and efficiently, but should it be necessary the dealer will return the instrument to the company’s service
departmentfor attention.In theevent thatit isnot possibleto returnthe instrumentto theRoberts' dealerfrom whomit waspurchased, pleasecontact
Roberts Radio Technical Services at the address shown below.
These statements do not affect the statutory rights of a consumer.
ROBERTS RADIO TECHNICAL SERVICES DEPARTMENT
97-99WortonRoad
IsleworthMiddlesex
TW76EG
Technical Helpline:- 020 8758 0338 (Mon-Fri)
Issue 2
Table of contents
Other Roberts Clock Radio manuals

Roberts
Roberts CR9986 User manual

Roberts
Roberts CR966 User manual

Roberts
Roberts CR9900 User manual

Roberts
Roberts DreamDock 2 User manual

Roberts
Roberts PISA Four CR9936 User manual

Roberts
Roberts Ortus Charge User manual

Roberts
Roberts CR987 User manual

Roberts
Roberts CR9926 User manual

Roberts
Roberts DreamTime User manual

Roberts
Roberts CR2002 User manual

Roberts
Roberts CR9902 User manual

Roberts
Roberts CRD-37 User manual

Roberts
Roberts CR950 User manual

Roberts
Roberts CR9901 User manual

Roberts
Roberts CR9986 User manual

Roberts
Roberts ORTUS 2 User manual

Roberts
Roberts iDream CRD-42 User manual

Roberts
Roberts CR9951 User manual

Roberts
Roberts CRD-9 User manual

Roberts
Roberts CR9932 User manual