ROBLAN VIASOL User manual

www.roblan.com
INSTALLATION MANUAL | MANUAL DE INSTALACIÓN
ROBLAN EUROPA S.A.
Avda. de las Retamas 5. 45950
Casarrubios del Monte
Toledo, Spain
ROBLAN COLOMBIA S.A.S.
NIT. 900.748.926-0
ROBLAN AUSTRAL SPA
ROBLAN UK LTD
LED SOLAR | VIASOL
INSTALLATION MANUAL LED SOLAR
MANUAL DE INSTALACIÓN LED SOLAR
VIASOL
40W | 4800Lm | LiFePO4 battery pack, replaceable
32650, 9.6V/12000mAh
Luz fría. Cool white 4000K
VIASOL40F

INSTALLATION MANUAL | MANUAL DE INSTALACIÓN
www.roblan.com
LED SOLAR | VIASOL
706,1
Ø60
289,7
120˚
120˚
120˚120˚
BUTTON CONTROL:
Please press the button on the lamp to select working modes.
• Press 1st time for Mode A;
• Press 2nd time for Mode B;
• Press 3rd time for o.
REMOTE CONTROL:
Please press the button on the lamp rstly to activate the lamp,
then use remote control to adjust demanded working mode.
WORKING MODES
Press button on the lamp 1st time or on the remote control, the lamp
will automatically turn on at night and keep 60% brightness constantly for 4
hours (induction is invalid), then it turns to Sensor Mode.
Conguration
Mode B: Sensor Mode
After 4 hours working
Press button on the lamp 2nd time or on the remote control, the lamp will
automatically turn on with 100% full brightness when motion is detected in
the range ≤ 12mtrs, then turns to 30% brightness in 20 seconds of no motion.
MODOS DE FUNCIONAMIENTO
Mode A: Constant Lighting Mode
LED SOLAR | VIASOL | 40W | 4800Lm
# Product | # Producto VIASOL40F
WATT (W) 40W
LUMEN (Lm) 4800Lm
Color temperature (K)
Temperatura Color (K) 4000K
Batería | Battery LiFePO4 battery pack, replaceable
32650, 9.6V/12000mAh
Life hours (H) | Horas de vida (H) 30000
Protection level
Nivel de protección IP65
Beam angle (º)
Ángulo de apertura (º) 140x70º
Detection angle (º)
Ángulo de detección (º) 120º/8-12mtrs
Dimmable | Dimable YES | SI
Dimensions (LxWxH)
Dimensiones (LxWxH) 70,6x28,9x7,4cm
Installation Height
Altura de instalación 3-6mtrs
Material color | Color material Black | Negro
CONTROL CON EL BOTÓN:
Presione el botón de la lámpara para seleccionar un modo.
• Presione 1 vez para escoger el Modo A;
• Presione 2 veces para escoger el Modo B;
• Presione 3 veces para apagar.
CONTROL REMOTO:
Presione el botón de la lámpara para activarla, luego use
el mando para congurar el modo de funcionamiento.
Presione el botón de la lámpara 1 vez o en el mando, la lámpara se encenderá
automáticamente por la noche y mantendrá una intensidad del 60% de brillo
durante 4 horas (la inducción no es válida), luego cambiará al modo sensor.
Conguración
Modo B: Modo Sensor
Presione el botón de la lámpara 2 veces o en el mando, la lámpara se
encenderá automáticamente con una intensidad total del 100% de brillo cuando
detecte movimiento en un rango ≤ 12 metros, pasado 20 segundos sin detectar
movimiento volverá a reducir el brillo a 30%.
Modo A: Modo de Iluminación Constante
120˚
120˚
120˚120˚
Después de 4 horas en
funcionamiento

www.roblan.com
INSTALLATION MANUAL | MANUAL DE INSTALACIÓN
ROBLAN EUROPA S.A.
Avda. de las Retamas 5. 45950
Casarrubios del Monte
Toledo, Spain
ROBLAN COLOMBIA S.A.S.
NIT. 900.748.926-0
ROBLAN AUSTRAL SPA
ROBLAN UK LTD
LED SOLAR | VIASOL
1. Above working modes are factory default settings, user can re-set
it to: press button on the lamp 1st time for mode B and press 2nd
time for mode A, meanwhile also can select dierent working time
or brightness by remote control, after which it will automatically
become the latest default working mode.
2. Mode A and Mode B cannot be set to the Constant Lighting Mode
at the same time, nor can they be set to the Sensor Mode at the
same time.
3. The lamp has memory function. After lamp restarted, it will
continue to work in the latest default working mode.
Remind Recuerde
1. Los modos de funcionamiento anteriores son ajustes
predeterminados de fábrica, el usuario puede volver a congurarlos:
presione el botón de la lámpara 1 vez para el Modo B o presione 2
veces para el Modo A, mientras tanto puede congurar los tiempos
de funcionamiento y el brillo por control remoto, luego volverá
automáticamente al último modo predeterminado.
2. El Modo A y el Modo B no se pueden congurar en el modo de
iluminación constante al mismo tiempo, como tampoco se pueden
congurar a la vez en el modo sensor.
3. La lámpara tiene función de memoria. Después de reiniciar la
luminaria, continuará activa en el último modo de funcionamiento
predeterminado.
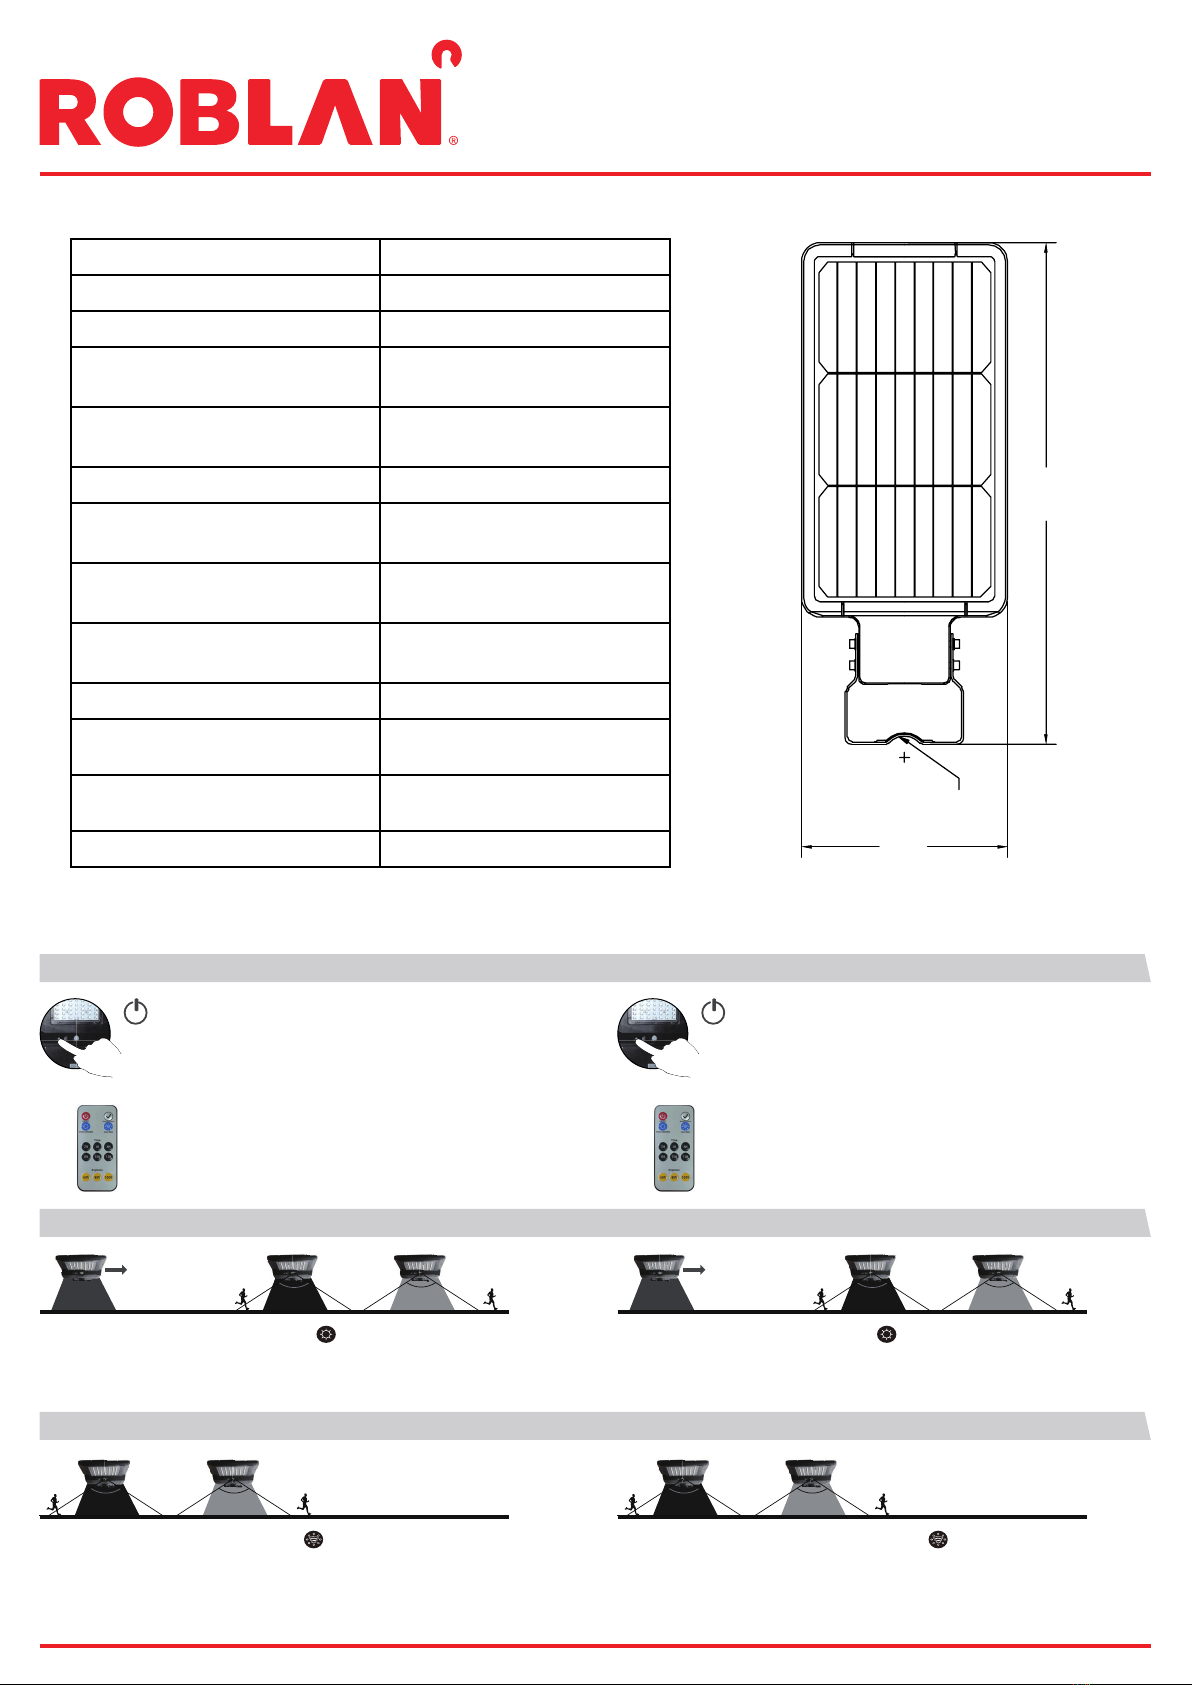
Remote Control Distance: 12Mtrs
DIY Working Time and Brightness by Remote Control HUM Tiempo de funcionamiento y brillo
Distancia de control remoto: 12 metros
2H 6H4H
8H 12H10H
Time
Brightnes s
ON/OFF Switch Confir m
Constant Lighting Mode Sensor Mode
Mode A (Constant Lighting Mode): time and brightness are both adjustable.
For example:
1. Press button “Constant Lighting Mode”.
2. Press button“Time 2H”.
3. Press button “Brightness 60%”.
The lamp will ash one time after press each button above, which indicates it’s set successfully as below:
Lamp automatically turns on at night and keep 60% brightness for 2hrs, then it turns to Sensor Mode.
Mode B (Sensor Mode): only brightness (when activated by induction) is adjustable.
For example:
1. Press button “Sensor Mode”.
2. Press button “Brightness 60%”.
The lamp will ash one time after press each button above, which indicates it’s set successfully as below:
Lamp automatically turns on with 60% brightness when motion is detected in the range ≤12mtrs, then turns
to weak brightness (30% of 60% brightness) in 20 seconds of no motion.
Modo A (Modo de Iluminación Constante): se puede congurar el tiempo y el brillo.
Por ejemplo:
1. Presione el botón “Modo de Iluminación Constante”.
2. Presione el botón “Tiempo 2H”.
3. Presione el botón “Brillo 60%”.
La lámpara parpadeará una vez después de presionar los botones anteriores, lo que indica que se conguró correctamente de la siguiente
manera: la luminaria se enciende automáticamente por la noche y mantiene un brillo del 60% durante 2 horas, luego cambia al Modo Sensor.
Modo B (Modo Sensor): solo el brillo (cuando es activado por inducción) es ajustable.
Por ejemplo:
1. Presione el botón “Modo Sensor”.
2. Presione el botón “Brillo 60%”.
La lámpara parpadeará una vez después de presionar los botones anteriores, lo que indica que se conguró con éxito de la siguiente
manera: la lámpara se enciende automáticamente con un 60% de brillo cuando detecta movimiento en un rango ≤12 metros, luego bajará la
intensidad a un brillo débil (30% del 60% de brillo) pasado 20 segundos sin detectar movimiento.

www.roblan.com
INSTALLATION MANUAL | MANUAL DE INSTALACIÓN
ROBLAN EUROPA S.A.
Avda. de las Retamas 5. 45950
Casarrubios del Monte
Toledo, Spain
ROBLAN COLOMBIA S.A.S.
NIT. 900.748.926-0
ROBLAN AUSTRAL SPA
ROBLAN UK LTD
LED SOLAR | VIASOL
1
5
3
2
4
ACCESSORIES | ACCESORIOS

www.roblan.com
INSTALLATION MANUAL | MANUAL DE INSTALACIÓN
ROBLAN EUROPA S.A.
Avda. de las Retamas 5. 45950
Casarrubios del Monte
Toledo, Spain
ROBLAN COLOMBIA S.A.S.
NIT. 900.748.926-0
ROBLAN AUSTRAL SPA
ROBLAN UK LTD
LED SOLAR | VIASOL
NOTICE | AVISO
1. The lamp button is power-o switch, lamp can get solar charged in any mode.
1. El botón de la lámpara es un interruptor de apagado, la lámpara puede cargarse con energía solar en cualquier modo.
2. This is a solar powered lamp, please install it in a location where can get enough sunshine.
2. Esto es una lámpara que funciona con energía solar, instale la luminaria en un lugar donde pueda recibir suciente luz del sol.
3. Please note the lighting time depends on the sunshine duration & weather.
3. Por favor tenga en cuenta que el tiempo de iluminación dependerá de la duración del sol y del clima.
4. Built-in intelligent IC is with over-charge, over-discharge and over-voltage protection.
4. El IC inteligente incorporado tiene protección contra sobrecarga, sobredescarga y sobretensión.
5. The lamp gets solar charged at day time, and light up automatically at dusk.
5. La lámpara se carga con energía solar durante el día y se enciende automáticamente al anochecer.
6. The lamp is equipped with an internal battery pack, which is replaceable. If any need, please contact seller for correct new battery pack.
6. La lámpara está equipada con una batería interna reemplazable. De ser necesario, comuníquese con el vendedor para obtener una
batería nueva compatible.
7. Non-professionals please do not disassemble the lamp.
7. Si no es un profesional por favor no desmonte la lámpara.
8. Please do not dispose the battery with household garbage to avoid explosion.
8. Por favor no deseche la batería junto con el resto de resíduos domésticos para evitar una posible explosión.
Please read and follow all instructions to operate.
Por favor lea y siga todas las instrucciones antes de manejar la luminaria.
Save this manual for future reference.
Guarde este manual para futuras consultas.

INSTALLATION MANUAL | MANUAL DE INSTALACIÓN
www.roblan.com
LED SOLAR | VIASOL
INSTALLATION A: STRAIGHT POLE | INSTALACIÓN A: POSTE RECTO
(Default installation method, accessories included) | (Método de instalación predeterminado, accesorios incluidos) |(Método de instalación
predeterminado, accesorios incluidos)
1. Before installation, make sure the 4 bottom screws are tightened.
1. Antes de instalar, asegúrese de que los 4 tornillos inferiores estén bien apretados.
2. Remove the gaskets of small U-shaped brackets, then insert them to lamp bracket across the straight pole.
2. Retire las juntas de los pequeños soportes con forma de U, luego insértelos en el soporte de la lámpara a través del poste recto.
3. Tighten the screws to x lamp onto the pole (applicable to the poles of Φ50-60mm).
3. Apriete los tornillos para jar la lámpara al poste (aplicable a postes de Φ50-60mm).
4. If any need, please loosen the screws at both sides of lamp to adjust the lamp angle, which is upward 20° and downward 10°adjustable,
then tighten the screws of the lamp.
4. De ser necesario, aoje los tornillos a ambos lados de la lámpara para ajustar el ángulo de la luminaria, la cual le permite una inclinación
de 20° hacia ariba y 10º hacia abajo, luego apriete los tornillos.
20°
10°
Loosen the screws
here to adjust angles.
1
4
3
2

INSTALLATION MANUAL | MANUAL DE INSTALACIÓN
www.roblan.com
LED SOLAR | VIASOL
1
4
3
2
INSTALLATION B: CURVED POLE | INSTALACIÓN B: POSTE CURVADO
(Default installation method, accessories included) | (Método de instalación predeterminado, accesorios incluidos)
1. Loosen the screws and remove the big U-shaped bracket.
1. Aoje los tornillos y retire el soporte grande con forma de U.
2. Loosen the bottom screws to match the pole.
2. Aoje los tornillos inferiores para que coincidan con el poste.
3. Install the lamp on the pole (applicable to the poles of Φ50mm).
3. Instale la lámpara en el poste (aplicable a postes de Φ50mm).
4. Adjust the lamp and balance it, tighten the four screws to lock the lamp.
4. Ajuste la lámpara y equilibre la inclinación, apriete los cuatro tornillos para jar la luminaria.

INSTALLATION MANUAL | MANUAL DE INSTALACIÓN
www.roblan.com
LED SOLAR | VIASOL
1
4
3
2
INSTALLATION C: WALL MOUNTED (OPTIONAL) | INSTALACIÓN C: MONTAJE EN PARED (OPCIONAL)
(Customers need to prepare 2pcs expansion screws M10*60mm themselves.) | (Los clientes necesitan disponer de 2pcs tornillos de expansión M10*60mm.)
Loosen the screws
here to adjust angles.
3-6M
20°
10°
Depth
60MM
1.Before installation, make sure the 4 bottom screws are tightened.
1. Antes de la instalación, asegúrese de que los 4 tornillos inferiores estén bien apretados.
2. Drill 2 holes of Φ14mm with a depth of 60mm and holes distance 104mm on the wall.
2. Taladre 2 agujeros de Φ14mm con una profundidad de 60mm y una distancia entre los agujeros de 104 mm en la pared.
3. Use 2 expansion screws to x the lamp on the wall.
3. Use 2 tornillos de expansión para jar la lámpara en la pared..
4. If any need, please loosen the screws at both sides of lamp to adjust the lamp angle, which is upward 20° and downward 10°adjustable,
then tighten the screws of the lamp.
4. De ser necesario, aoje los tornillos a ambos lados de la lámpara para ajustar el ángulo de la luminaria, la cual le permite una inclinación
de 20° hacia ariba y 10º hacia abajo, luego apriete los tornillos.
This manual suits for next models
1
Table of contents
Other ROBLAN Lighting Equipment manuals
Popular Lighting Equipment manuals by other brands

superbrightleds
superbrightleds FLD-CNL-60005-100W user manual

IMG STAGE LINE
IMG STAGE LINE LE-240 quick guide

WalimeXPro
WalimeXPro LED 500 instruction manual

WalimeXPro
WalimeXPro LED Round 200 instruction manual

Show Tec
Show Tec Archi Painter 24/8 Q4 manual

Lightmybricks
Lightmybricks 42125 installation guide