OPERATOR’S MANUAL
FREQUENTLY ASKED QUESTIONS:
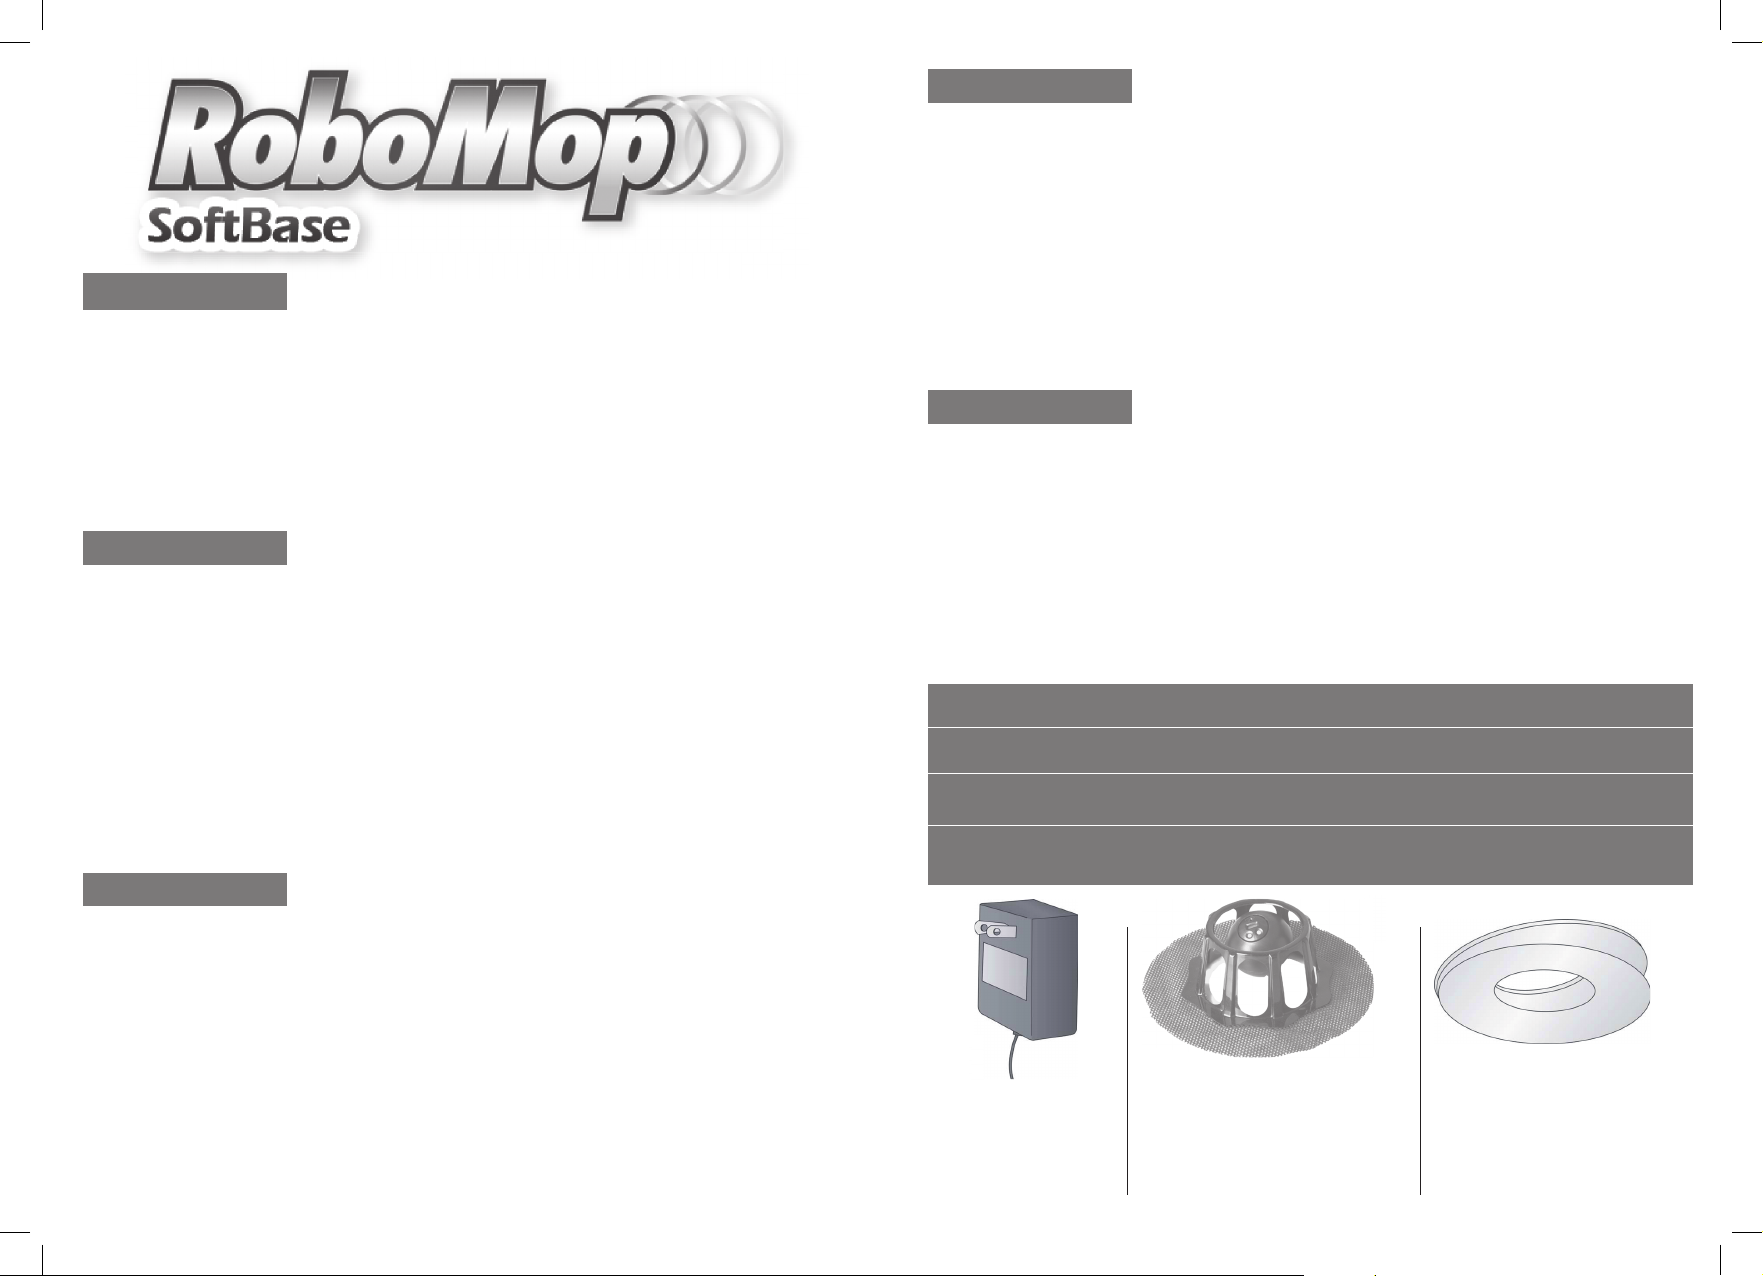
THIS SET INCLUDES THE FOLLOWING PARTS:
1 Cleaning Frame and 1 Robotic Ball
NOTE:
Read all safety and operating
instructions before operating
your new RoboMop.
1AC Battery Charger
8 Electrostatic Disposable Cloths
27
Q. My RoboMop gets stuck. What should I do?
A. Your RoboMop may occasionally get stuck, especially in rooms that
it has not cleaned before. If it does get stuck, RoboMop will try to free
itself by turning in different directions. If it cannot free itself, move or
block any object that RoboMop gets stuck on or under. Once the
problem areas have been amended, pick up your RoboMop and
reposition. Your RoboMop might get stuck for several reasons.
1. It is wedged or pinned between or under narrowly spaced objects.
2. RoboMop bumps into objects and repositions them in such a way
that an exit path no longer exists.
Q. My RoboMop Cleaning Frame has broken. What shall I do?
A. Please contact the local distributor through www.robomop.net.
Q. Are pets and children safe around RoboMop?
A. Children and pets should always be supervised around RoboMop for
optimal safety and cleaning performance.
Q. Does RoboMop clean corners and along the walls?
A. RoboMop cleans next to walls, most corners and other tough to
reach places.
Q. Will it go under kickboards, beds, and furniture?
A. RoboMop has been designed to fit under the kickboards in your
kitchen. If your bed or furniture is more than 8 cm off the floor, your
RoboMop will happily clean underneath.
Q. How long does it take to recharge the RoboMop?
A. Approximately 3-5 hours.
Q: Will RoboMop clean all floor surfaces?
A: RoboMop cleans hardwood, linoleum, tile, ceramic tile, marble,
granite and other hard floor surfaces.
5
RoboMop is designed to sweep the floors for you so you will have extra time to take care of
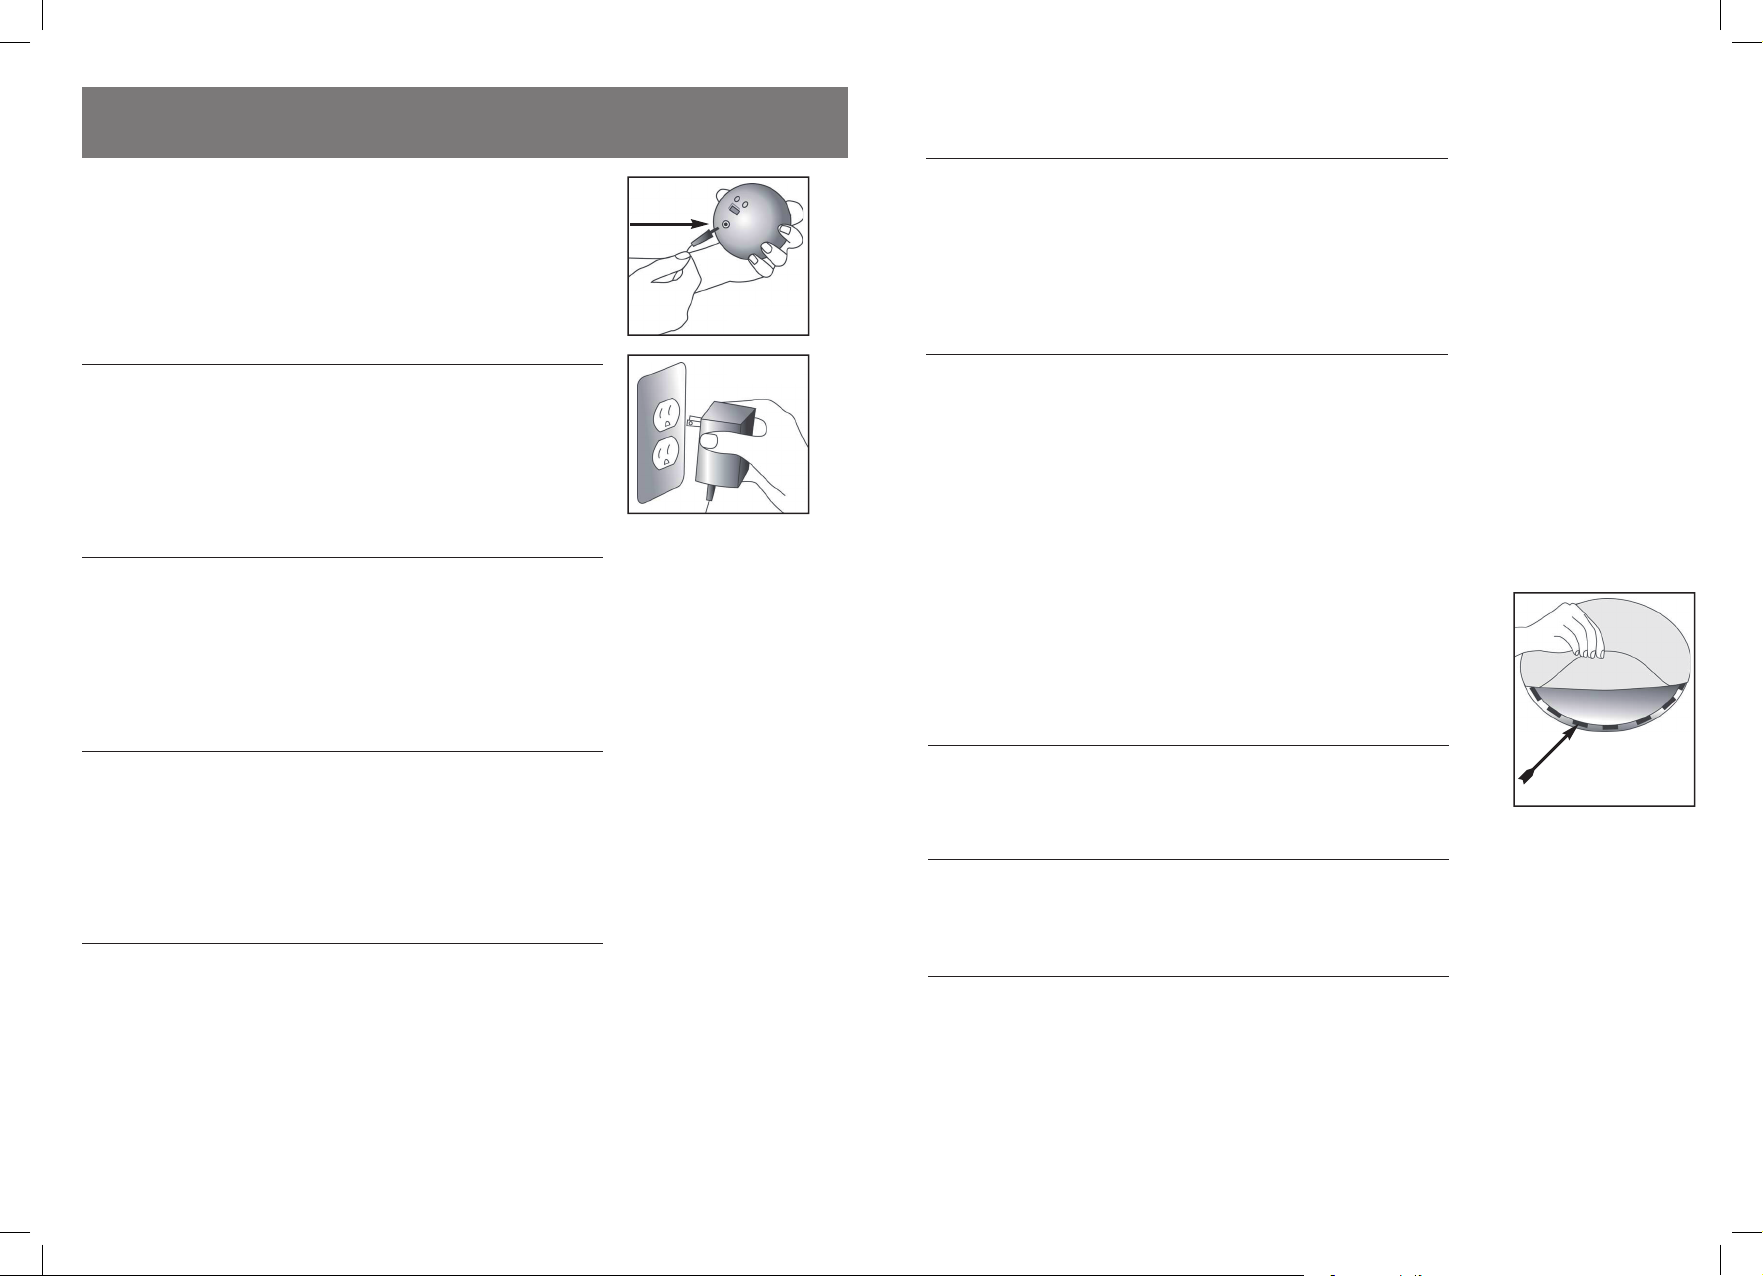
more important things or just sit back and relax. Simply attach an electrostatic and dust
absorbing pad, set the cleaning time on the robotic ball, place it in the cleaning frame and
watch RoboMop automatically sweep your floors. Using smart sensor technology, RoboMop
navigates smoothly and silently, cleaning dirty edges under the kitchen counter, in corners,
around walls and under furniture. The flexible edges will not damage furniture. It is great for
all your hard floor surfaces like wood floors, ceramic tile, granite, marble, and linoleum.
The VoltaWebTM dustpads are especially designed to attract and retain as much dust as
possible during the cleaning session. The dust attraction is obtained through the unique
composition of fibres in the cloth that generates static electricity though friction between the
pad and the floor surface. The pad itself is designed with microscopic dust pockets that
absorb and transport the dust into the centre of the textile. In this way it is possible for the
textile to attract even more dirt. When the pad is soiled, just remove it and toss it in the
trash.
Enjoy your RoboMop!
OPERATOR`S MANUAL:
RoboMop is designed to sweep the oors for you so you will have extra time to
take care of more important things or just sit back and relax. Simply attach an
electrostatic and dust absorbing pad, set the cleaning time on the robotic ball, place it in the cleaning frame and
watch RoboMop automatically sweep your oors. Using smart sensor technology, RoboMop navigates smoothly
and silently, cleaning dirty edges under the kitchen counter, in corners, around walls and under furniture.
The exible edges will not damage furniture. It is great for all your hard oor surfaces like wood oors, ceramic tile,
granite, marble, and linoleum. The VoltaWebTM dustpads are especially designed to attract and retain as much
dust as possible during the cleaning session. The dust attraction is obtained through the unique composition of
bres in the cloth that generates static electricity though friction between the pad and the oor surface. The pad
itself is designed with microscopic dust pockets that absorb and transport the dust into the centre of the textile.
In this way it is possible for the textile to attract even more dirt. When the pad is soiled, just remove it and toss it
in the trash. Enjoy your RoboMop!
BEDIENUNGSANLEITUNG:
RoboMop wurde entworfen, um an Ihrer Stelle den Boden zu wischen, so dass
Sie zusätzliche Zeit für wichtigere Dinge gewinnen oder auch nur, um sich hinzusetzen und auszuruhen. Legen Sie
einfach ein elektrostatisches Staubwischtuch auf, stellen Sie die Reinigungsdauer des Roboterballs ein, legen Sie
ihn in den Wischrahmen und sehen Sie zu, wie der RoboMop automatisch Ihren Boden wischt. Dank der Smart
Sensor-Technik bewegt sich der RoboMop ruhig und geräuschlos, um schmutzige Stellen unter der Küchenvitrine,
in Ecken, an den Wänden und unter Möbeln zu säubern. Die weichen Kanten schließen eine Beschädigung der
Möbel aus. RoboMop ist hervorragend geeignet für alle harten Bodenbeläge wie Holzböden, Keramik iesen,
Granit, Marmor und Linoleum.
Die VoltaWebTM-Staubwischtücher sind extra entworfen worden, um während eines Wischeinsatzes so viel Staub
wie möglich anzuziehen und festzuhalten. Die Staubanziehung wird durch die einzigartige Zusammensetzung der
Fasern im Wischtuch erreicht, die durch die Reibung zwischen Wischtuch und Boden elektrostatische Energie
erzeugen. Das Wischtuch selbst weist mikroskopisch kleine Staubtaschen auf, die den Staub absorbieren und in
die Mitte des Stoffes transportieren. Auf diese Weise kann das Wischtuch noch mehr Staub anziehen. Wenn das
Wischtuch verschmutzt ist, nehmen Sie es einfach ab und werfen es in den Müll.
Wir wünschen Ihnen viel Freude an Ihrem RoboMop!
MANUELDE L’UTILISATEUR:
RoboMop a été conçu pour balayer les sols de manière à vous donner plus
de temps pour des choses plus importantes ou tout simplement pour vous asseoir et vous reposer. Il suf t de xer
un frotteur électrostatique, qui absorbe les poussières, de régler le temps de nettoyage sur la boule robotique,
de la placer dans le cadre de nettoyage et de surveiller le RoboMop qui balaie automatiquement vos sols.
Recourant à la technologie d’un détecteur intelligent, RoboMop se déplace en douceur et en silence, pour
nettoyer les soins sales sous le plan de travail de la cuisine, dans les coins, autour des murs et sous les meubles.
Les bords souples n’endommagent pas les meubles. RoboMop est formidable pour toutes vos surfaces dures,
comme les planchers en bois, les carreaux en céramique, le granite, le marbre et le linoléum.
Les frotteurs antipoussières VoltaWebTM ont été spécialement conçus pour attirer et retenir la plus grande
quantité possible de poussières pendant le nettoyage. L’attraction des poussières est obtenue par la composition
unique des bres du tissu qui produit de l’électricité statique grâce au frottement réalisé entre le frotteur et la
surface du sol. Le frotteur propremenT dit est conçu avec des poches à poussières microscopiques qui absorbent
et transportent les poussières jusqu’au centre du textile. De cette manière, il est possible pour le textile d’attirer
encore plus d’impuretés. Une fois que le frotteur est souillé, il suf t de l’enlever et de le jeter à la poubelle.
MANUAL DEL USUARIO:
RoboMop está diseñado para barrer los suelos, de modo que usted pueda tener
tiempo libre para dedicarlo a asuntos más importantes o, simplemente, para sentarse y descansar. Sólo tiene
que colocar una mopa electrostática y que absorbe el polvo, con gurar el tiempo de limpieza en la bola robótica,
colocarla en el marco de limpieza y observar cómo RoboMop limpia los suelos automáticamente. Con la ayuda de
la tecnología de sensor inteligente, RoboMop se desplaza suavemente y en silencio, limpiando la suciedad bajo
los muebles de la cocina, en las esquinas, a lo largo de las paredes y bajo los muebles. Sus extremos exibles no
dañan los muebles. Resulta adecuado para todas las super cies, como suelos de madera, baldosas de cerámica,
granito, mármol y linóleo.
Las mopas para polvo VoltaWeb™ están diseñadas especialmente para atraer y retener todo el polvo posible
durante la sesión de limpieza. La atracción del polvo se obtiene mediante una composición de bras única del
tejido que genera electricidad estática por medio de la fricción entre la mopa y la super cie del suelo.
Dicha mopa incorpora unos atrapadores de polvo microscópicos que absorben y transportan el polvo hacia el
centro del tejido. De este modo, el tejido atrae incluso más suciedad. Cuando la mopa se ensucie, sólo tiene que
quitarla y tirarla a la papelera. Disfrute de su RoboMop!
GEBRUIKSAANWIJZING:
RoboMop werd ontwikkeld om de vloeren te poetsen in uw plaats. Zo heeft
u meer tijd om andere dingen te doen of u gewoon te ontspannen. Bevestig een elektrostatische en stofa-
bsorberende pad, stel de poetstijd in op de robotbal, plaats die in het poetsframe en kijk hoe RoboMop
automatisch uw vloeren reinigt. Dankzij de “Smart sensor”-technologie beweegt de RoboMop zacht en stil, poetst
alle vuile hoeken onder het keukenaanrecht, in hoekjes, rond de muren of onder het meubilair. De exibele
hoeken beschadigen het meubilair niet. De RoboMop is ideaal voor alle harde vloeroppervlakken, zoals
houten vloeren, keramische tegels, graniet, marmer en linoleum.
De VoltaWeb™stofpads zijn speciaal ontworpen om zoveel mogelijk stof aan te trekken en op te nemen tijdens het
poetsen. Het stof wordt aangetrokken door de unieke samenstelling van vezels in het doek, waardoor er statische
elektriciteit ontstaat door frictie tussen de pad en de vloer. De pad zelf bevat microscopische stofzakjes die het
stof absorberen en verplaatsen naar het midden van het textiel. Als de pad vuil is kan u die gewoon afnemen en
uitschudden in de vuilbak. Geniet van uw RoboMop!
THIS SET INCLUDES THE FOLLOWING PARTS:
DIESES SET UMFASST DIE FOLGENDEN TEILE:
ESTE CONJUNTO INCLUYE LAS SIGUIENTES PARTES:
DEZE SET BEVAT DE VOLGENDE ONDERDELEN:
NOTE: Read all safety and operating instructions before
operating your new RoboMop.
HINWEIS: Lesen Sie vor Inbetriebnahme Ihres RoboMops
aufmerksam die Sicherheits und Betriebsanweisungen durch.
NOTA: Lea todas las instrucciones de seguridad y de
funcionamiento antes de utilizar su nuevo RoboMop.
LET OP: Lees de veiligheid- en gebruiksaanwijzingen
vooraleer uw RoboMop te gebruiken.
OPERATOR’S MANUAL
FREQUENTLY ASKED QUESTIONS:
THIS SET INCLUDES THE FOLLOWING PARTS:
1 Cleaning Frame and 1 Robotic Ball
NOTE:
Read all safety and operating
instructions before operating
your new RoboMop.
1AC Battery Charger
8 Electrostatic Disposable Cloths
27
Q. My RoboMop gets stuck. What should I do?
A. Your RoboMop may occasionally get stuck, especially in rooms that
it has not cleaned before. If it does get stuck, RoboMop will try to free
itself by turning in different directions. If it cannot free itself, move or
block any object that RoboMop gets stuck on or under. Once the
problem areas have been amended, pick up your RoboMop and
reposition. Your RoboMop might get stuck for several reasons.
1. It is wedged or pinned between or under narrowly spaced objects.
2. RoboMop bumps into objects and repositions them in such a way
that an exit path no longer exists.
Q. My RoboMop Cleaning Frame has broken. What shall I do?
A. Please contact the local distributor through www.robomop.net.
Q. Are pets and children safe around RoboMop?
A. Children and pets should always be supervised around RoboMop for
optimal safety and cleaning performance.
Q. Does RoboMop clean corners and along the walls?
A. RoboMop cleans next to walls, most corners and other tough to
reach places.
Q. Will it go under kickboards, beds, and furniture?
A. RoboMop has been designed to fit under the kickboards in your
kitchen. If your bed or furniture is more than 8 cm off the floor, your
RoboMop will happily clean underneath.
Q. How long does it take to recharge the RoboMop?
A. Approximately 3-5 hours.
Q: Will RoboMop clean all floor surfaces?
A: RoboMop cleans hardwood, linoleum, tile, ceramic tile, marble,
granite and other hard floor surfaces.
5
RoboMop is designed to sweep the floors for you so you will have extra time to take care of
more important things or just sit back and relax. Simply attach an electrostatic and dust
absorbing pad, set the cleaning time on the robotic ball, place it in the cleaning frame and
watch RoboMop automatically sweep your floors. Using smart sensor technology, RoboMop
navigates smoothly and silently, cleaning dirty edges under the kitchen counter, in corners,
around walls and under furniture. The flexible edges will not damage furniture. It is great for
all your hard floor surfaces like wood floors, ceramic tile, granite, marble, and linoleum.
The VoltaWebTM dustpads are especially designed to attract and retain as much dust as
possible during the cleaning session. The dust attraction is obtained through the unique
composition of fibres in the cloth that generates static electricity though friction between the
pad and the floor surface. The pad itself is designed with microscopic dust pockets that
absorb and transport the dust into the centre of the textile. In this way it is possible for the
textile to attract even more dirt. When the pad is soiled, just remove it and toss it in the
trash.
Enjoy your RoboMop!
1 AC Battery Charger
1 WS - Batterieladegerät
1 Chargeur d’accus AC
1 Cargador de batería de CA
1 AC Batterijlader
1 Cleaning Frame and 1 Robotic Ball
1 Wischrahmen mit 1 Roboterball
1 Cadre de nettoyage et 1 boule robotique
1 marco de limpieza y una bola robótica
1 Poetsframe en 1 Robotbal robotique
5 Electrostatic Disposable Cloths
5 elektrostatische Einweg-Wischtücher
5 Chiffons électrostatiques
5 mopas electrostáticas desechables
5 elektrostatische wegwerppad
2 3