Robot Coupe Blixer 23 a User manual

24/03/2021
Blixer®23 a• Blixer®30 a• Blixer®45 a• Blixer®60 a
R 23 a• R 30 a• R 30 V.V. a• R 45 a• R 45 V.V. a• R 60 a
NEW
Register
your product
on line

www.robot-coupe.com
Register your product on line

2
24/03/2021
EU Declaration of Conformity
• the provisions of the following harmonized European standards and the
standards specifying the safety and hygiene requirements:
- EN ISO 12100:2010 Safety of machinery – General principles for
design,
- EN 60204-1:2006 Safety of machinery – Electrical equipment of
machines,
- EN 60529 Degrees of protection provided by enclosures (IP Code):
- IP 55 for the electric controls,
- IP 34 for the other parts of the machine,
• and according to the category of the apparatus, with the provisions of
the following harmonized European standards specifying the safety and
hygiene requirements:
- EN 454 ........................... Planetary Mixers,
- EN 1678........................ Vegetable Cutting Machines (and Juice Extractors),
- EN 12852.................... Food Processors and Blenders,
- EN 12853.................... Hand-Held Blenders and Whisks (Power Mixers),
- EN 13208.................... Vegetable Peelers,
- EN 13621.................... Salad Dryers,
- EN 14655.................... Baguette Slicers.
"R019"
Robot-Coupe®SNC declares that all the machines subject of these original
instructions, as well as their accessories and their packaging, comply with:
• the essential requirements of the following European directives and with
the corresponding national regulations :
- Directive "Machinery" 2006/42/EC,
- Directive "Low Voltage" 2014/35/EU,
- Directive "Electromagnetic Compatibility" 2014/30/EU,
- Directive "Reduction of Hazardous Substances in Electrical Equipment"
(RoHS) 2011/65/EU,
- Directive "Waste Electrical and Electronic Equipment"(WEEE)
2012/19/EU,
• Regulation (EC) No 1907/2006 (latest consolidated version)
«concerning the Registration, Evaluation, Authorisation and Restriction
of Chemicals (REACH)»and as such, no product, accessory and their
packaging sold by Robot-Coupe®SNC, contains any substance on the
European Chemical Agency (ECHA) candidate list and considered of
very high concern.
• Regulation (EC) No 1935/2004 «Materials and articles intended
to come into contact with food» modified by regulation (EC) No
596/2009.
• Regulation (EC) No 2023/2006 «Good manufacturing practice for
materials and articles intended to come into contact with food».
• Regulation (EU) No 10/2011 «Plastic materials and articles intended
to come into contact with food», as well as all relevant (EU) regulations
which modify, correct and/or rectify it, as at the date of this declaration,
the regulations (EU) No 1282/2011, 1183/2012, 202/2014,
865/2014, 2015/174, 2016/1416, 2017/752, 2018/79,
2018/213, 2018/831 and 2019/37.
Montceau-en-Bourgogne, on March 1st, 2019
Jean-Marie LOZANO
Director of Industrial Operations
Robot-Coupe®SNC - 12 avenue du Maréchal Leclerc – BP 134 – 71305 Montceau-en-Bourgogne Cedex - France

3
24/03/2021
SUMMARY
WARRANTY
IMPORTANT WARNING
YOU HAVE JUST PURCHASED A BLIXER®OR A
VERTICAL CUTTER MIXER Blixer®23 a• Blixer®30 a
Blixer®45 a• Blixer®60 a• R 23 a• R 30 a
R 30 V.V. a• R 45 a• R 45 V.V. a• R 60 a
ASSEMBLY
SWITCHING ON THE MACHINE
•Advice on electrical connections
•Control panel
•Powering up the machine
•Safety indicator lights
PRECAUTIONS FOR USE
•Emptying the bowl
•Wheels
•Blixer blade assembly
•Vertical cutter-mixer blades
MAXIMUM PROCESSING CAPACITIES
FITTING AND USING THE BLADE ASSEMBLY
OPERATING INSTRUCTIONS FOR THE VACUUM KIT R-VAC®
VERTICAL CUTTER MIXER OPTIONS
•Coarse serrated blades
•Fine serrated blades
•R-VAC®vacuum kit
EXAMPLES OF USE
CLEANING
•Bowl
•Blades
•Lid
MAINTENANCE
•Blades
•Axial tightness system
•V-ring seals
•Bowl seal
•Lid seal
•Blixer arm
ADJUSTMENT OF BOWL TILTING SYSTEM
DIAGNOSTIC SYSTEM
TECHNICAL SPECIFICATIONS
•Bowl capacities
•Weight
•Dimensions
•Working height
•Noise level
•Electrical data
SAFETY
STANDARDS
TECHNICAL DATA
•Motor sleeve replacement
•Electrical and wiring diagrams

4
24/03/2021
ROBOT-COUPE s.n.c., LIMITED WARRANTY
Your new ROBOT-COUPE appliance is war-
ranted to the original buyer for a period
of one year from the date of sale if you
bought it from ROBOT-COUPE s.n.c.
If you bought your ROBOT-COUPE product
from a distributor your product is cove-
red by your distributor’s warranty (Please
check with your distributor terms and
conditions of the warranty).
The ROBOT-COUPE s.n.c.limited warranty
is against defects in material and/or work-
manship.
The ROBOT-COUPE s.n.c.warranty is
given expressly and in lieu of all other
warranties, expressed or implied, for
merchantability and for fitness toward a
particular purpose and constitutes the only
warranty made by ROBOT-COUPE s.n.c.
France.
THE FOLLOWING ARE NOT COVERED
BY THE ROBOT-COUPE s.n.c.
WARRANTY :
1 - Damage caused by abuse, misuse, drop-
ping, or other similar damage caused by or
resulting from failure to follow assembly, opera-
ting, cleaning, user maintenance or storage ins-
tructions.
2 - Labour to sharpen and/ or replacements
for blades which have become blunt, chipped or
worn after a normal or excessive period of use.
3 - Materials or labour to replace or repair
scratched, stained, chipped, pitted, dented or
discoloured surfaces, blades, knives, attachments
or accessories.
4 - Any alteration, addition or repair that
has not been carried out by the company or an
approved service agency.
5 - Transportation of the appliance to or from
an approved service agency.
6 - Labour charges to install or test new attach-
ments or accessories (i.e., bowls, discs, blades, at-
tachments) which have been arbitrarity replaced.
7 - The cost of changing direction-of-rotation of
three-phase electric motors (Installer is responsible).
8 - SHIPPING DAMAGES. Visible and latent
defects are the responsibility of the freight car-
rier. The consignee must inform the carrier and
consignor immediately, or upon discovery in the
case of latent defects.
KEEP ALL ORIGINAL CONTAINERS AND
PACKING MATERIALS FOR CARRIER
INSPECTION.
Neither ROBOT-COUPE s.n.c. nor its affiliated
companies or any of its distributors, directors,
agents, employees, or insurers will be liable for
indirect damage, losses, or expenses linked to the
appliance or the inability to use it.

5
24/03/2021
RECOMMENDATIONS CONCERNING THE INSTALLATION OF VARIABLE-SPEED
APPLIANCES AND PERSONAL SAFETY
These recommendations apply to machines equip-
ped with an induction motor and a single-phase or
three-phase wobbulator.
NB:
-The electrical circuit and the protective devices
must comply with national regulations.
- The machine must be wired in by a qualified elec-
trician
Protecting your appliance
• Like all electronic devices, wobbulators in clude
components that are sensitive to electrostatic
discharges (ESDs). Before conducting any work
on these wobbulators, technicians must therefore
rid themselves of electrostatic charges.
• The machine must be disconnected from the
mains supply before any internal connection ope-
rations are carried out.
• Repeatedly switching on the appliance will cause
the wobbulator to overload and may result in its
destruction. After the machine has been switched
off, you must wait for 3 minutes before switching
it back on again.
50 or 60 Hz single-phase power supply
• The appliance runs on single-phase or three-
phase current as far as the variator, which turns
the current into variable frequency three-phase
current to supply the motor.
• You must connect the machine to a 200-240 V
/ 50 or 60 Hz single-phase alternating current
supply with an earthed socket. A higher voltage
will destroy the wobbulator.
• The earthed socket ensures operator safety.
Circuit interrupters ensuring user safety
Ground fault circuit interrupters (GFCIs) intended
for variable-speed appliances need to be selected
with great care in order to ensure operator safety.
GFCIs may be sensitive to alternating current (type
AC), impulse current (type A) or all currents (type
B).
Danger! Wobbulators feature a bridge-connec-
ted rectifier of the mains supply voltage. For this
reason, in the event of an earth contact, a
continuous fault current may fail to trip a differential
circuit breaker that is only sensitive to alternating
current (type AC).
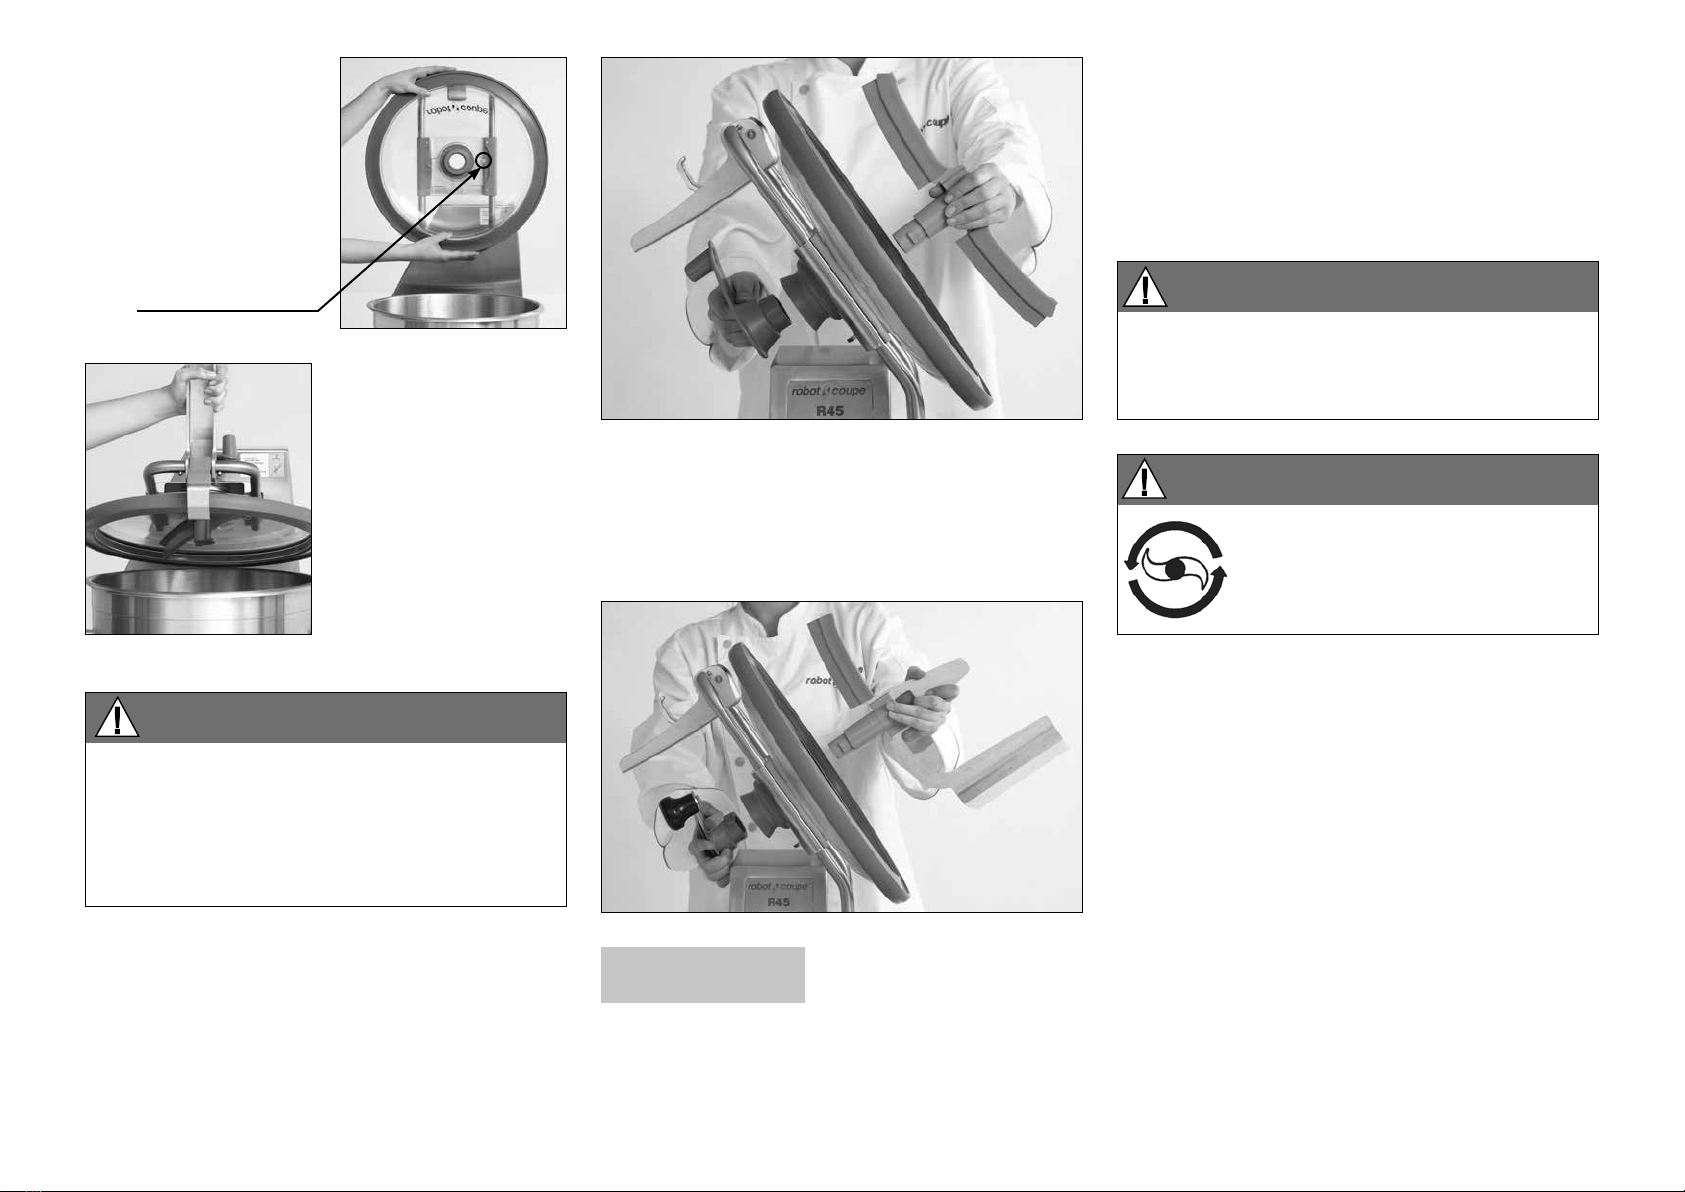
It is therefore advisable to use a GFCI that is
sensitive to impulse current (type A), identified by
the following symbol: or (B) .
Caution: sthese GFCIs may go under different
names, according to the manufacturer.
Appliances with wobbulators produce a fault
current on the earth wire. This current may be suffi-
cient to trip the differential circuit breaker unneces-
sarily. This may occur if :
• Several variable-speed appliances are connected
to the same GFCI.
• The appliance produces a fault current that is
above the GFCI’s actual trip threshold.
Caution: As there are manufacturing tolerances,
the actual trip threshold of a GFCI will be between
50% and 100% of its theoretical nominal threshold.
Should a problem arise, measure the fault current
and the GFCI’s actual trip threshold.
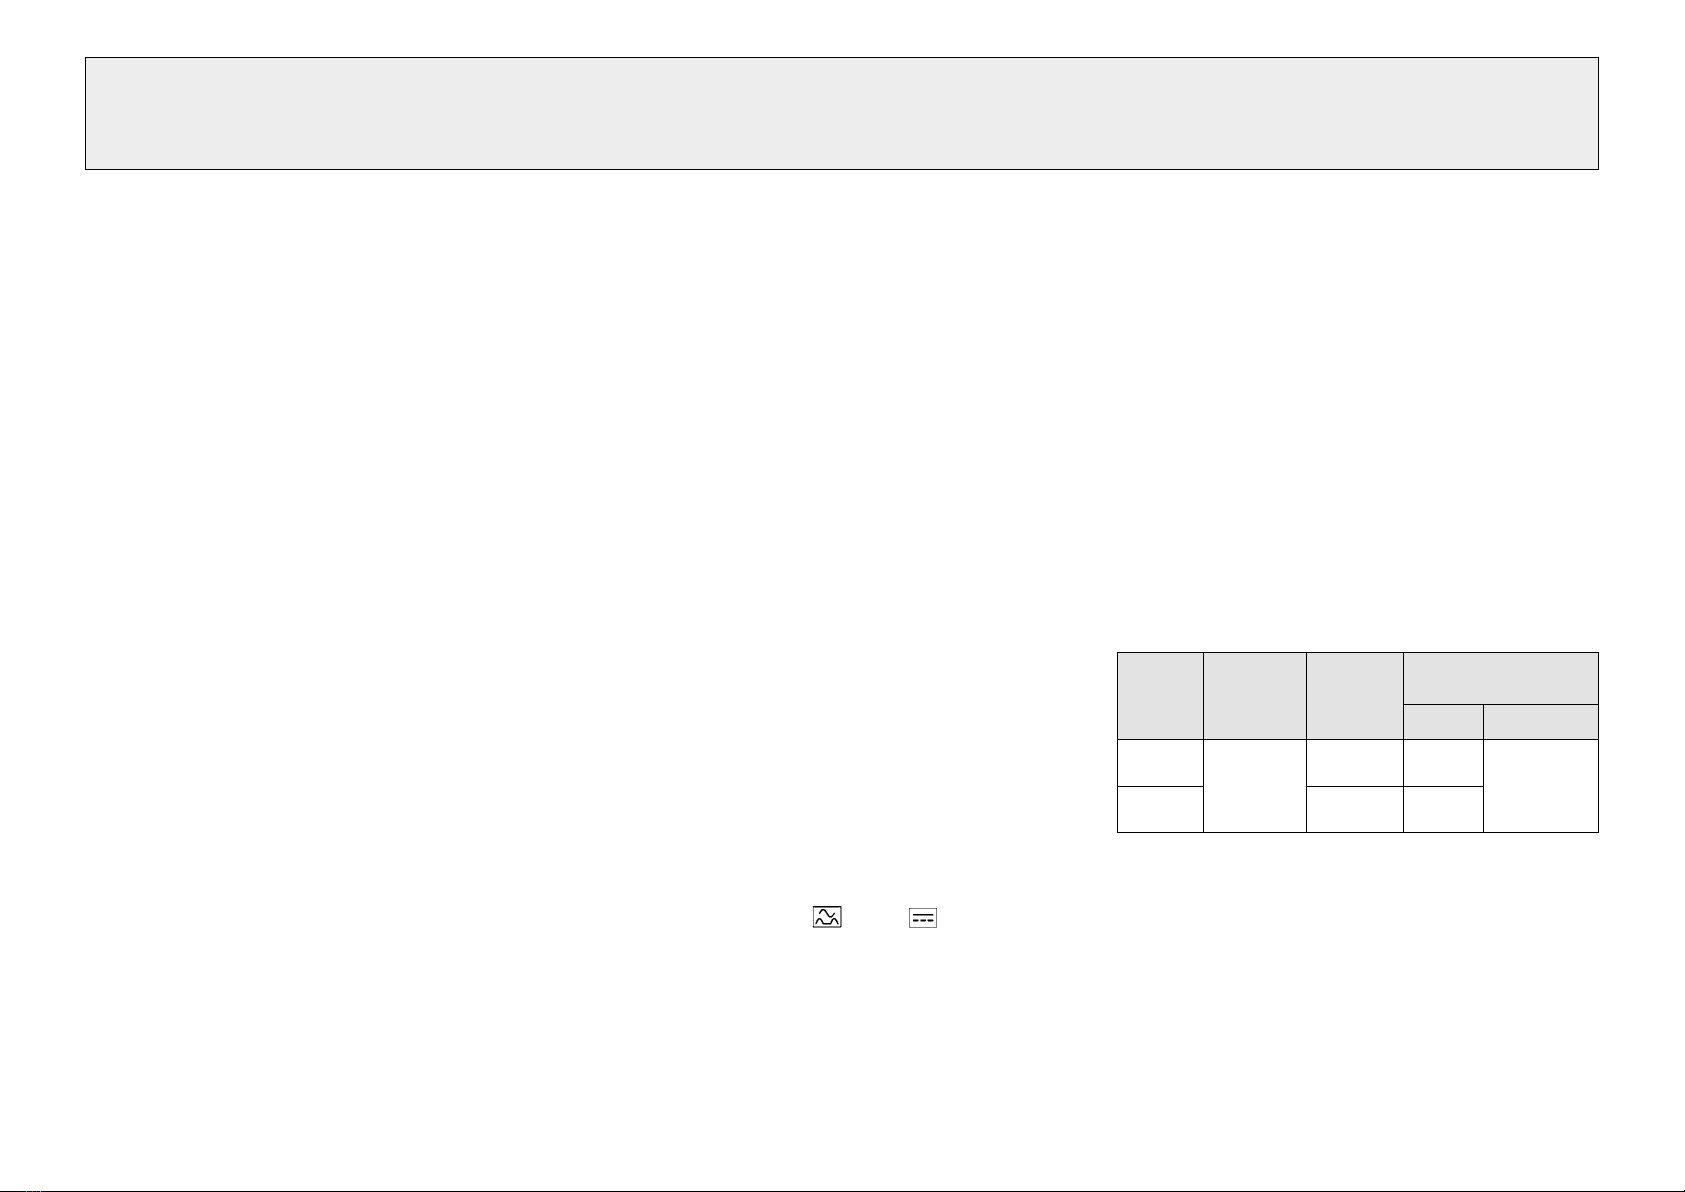
You can begin by consulting the characteristics of
your appliance in the table below:
*Connection instructions:
To protect users, it is vital to connect the R 30 V.V.
and R 45 V.V. machines to the mains supply via a
connection unit equipped with the above-mentioned
residual current device. They must not be connected
through a plug and socket.
Appliance Mains supply
Conductor
Cross-section
(mm2)
GFCI
(Ph + N or 3 Ph)
Gauge (A) Threshold (mA)
R 30 V.V. 380 - 440V
50 or 60 Hz
Three-phase
4 B 20 A min.
100 mA*
R 45 V.V. 6 B 32 A

6
24/03/2021
UNPACKING
• Carefully remove the equipment from the packaging
and take out all the boxes or packets containing
attachments or specific items.
• WARNING - some of the tools are very sharp e.g.
blades, discs... etc.
INSTALLATION
• We recommend you install your machine on a
perfectly stable solid base.
CONNECTION
• Always check that your mains supply corresponds
to that indicated on the identification plate on the
motor unit and that it can withstand the amperage.
• The machine must be earthed.
• With the three-phase version, always check that the
blade rotates in an anti-clockwise direction.
HANDLING
• Always take care when handling the blades, as
they are extremely sharp.
ASSEMBLY PROCEDURES
• Follow the various assembly procedures carefully
(see page 7) and make sure that all the attachments
are correctly positioned.
USE
• Never try to override the locking and safety
systems.
• Never insert an object into the container where the
food is being processed.
• Never push the ingredients down with your hand.
• Do not overload the appliance.
• Never switch the appliance on when it is empty.
• Wait until the blade comes to a complete stop
before opening the lid.
CLEANING
• As a precaution, always unplug your appliance
before cleaning it.
• Always clean the appliance and its attachments at
the end of each cycle.
• Never immerse the motor unit in water.
• For parts made from aluminum, use cleaning fluids
intended for aluminum.
• For plastic parts , do not use detergents that are too
alkaline (e.g., containing too much caustic soda or
ammonia).
• Robot-Coupe can in no way be held responsible for
the user’s failure to follow the basic rules of cleaning
and hygiene.
MAINTENANCE
• Before servicing the Blixer, it must be disconnected
from the power supply.
• Check the seals and washers regularly and ensure
that the safety devices are in good working order.
• It is particularly important to maintain and check
the attachments since certain ingredients contain
corrosive agents, e.g. citric acid.
• Never operate the appliance if the power cord
or plug has been damaged or if the appliance fails
to work properly or has been damaged in any way.
• Do not hesitate to contact your local Maintenance
Service if something appears to be wrong.
WARNING: In order to limit accidents such as electric shocks or personal injury, and in order to limit material damage due to misuse of the
appliance, please read these instructions carefully and follow them strictly. Reading the operating instructions will help you get to know your
appliance and enable you to use the equipment correctly. Please read these instructions in their entirety and make sure that anyone else who
may use the appliance also reads them beforehand. Our equipment is designed for professional use and must not be used by children under
any circumstances.
IMPORTANT WARNING WARNING
KEEP THESE INSTRUCTIONS IN A SAFE PLACE

7
24/03/2021
3
2
5
6
7
8
9
10
14
3) Place the blade
assembly on top of the
motor shaft.
Then lower it to the bot-
tom of the bowl by rota-
ting it.
Always check that
the blade assembly is
correctly positioned
at the bottom of the
bowl before placing the
ingredients you wish to process in the bowl.
Control panel
Transparent lid
Locking catch
Lid support arm
Handle
1
2
3
4
5
Bowl
Tilting lever
Motor unit
Wheels
Stainless-steel frame
6
7
8
9
10
ASSEMBLY
1) With the appliance
facing you, position the
bowl directly above the
motor shaft. Lower it so
that the bowl is centred
on its base.
2) Push down on the
handles, rotating the bowl
firmly in an anticlockwise
direction until it is locked
into position. The handles
should now be facing
you on either side of the
bowl.
YOU HAVE JUST PURCHASED A
BLIXER®OR A VERTICAL CUTTER
MIXER Blixer®23 a• Blixer®30 a
Blixer®45 a• Blixer®60 a•
R 23 a• R 30 a• R 30 V.V. a•
R 45 a• R 45 V.V. a• R 60 a
Our Blixers®and vertical cutter mixers are both
fabulous workhorses in the kitchen, and will satisfy
the needs of even the most demanding professionals.
It can be used to perform countless jobs that you
will gradually discover as you use it.
They boast two speeds: 1,500 and 3,000 rpm.
The vertical cutter mixer is designed to knead and
grind, chop meat and vegetables, produce fine-
textured stuffings and mousses, and much, much
more besides. Even the most time-consuming tasks
take less than 5 minutes to complete. For its part, the
Blixer®is ideal for making texture-modified meals.
Its numerous functions will open the door to a whole
new culinary world.
Thanks to your appliance's simple design,
all components requiring frequent handling for
maintenance or cleaning can be fitted and removed
with the greatest of ease.
For optimum convenience, this manual describes the
various fitting operations on a step-by-step basis.
It places special emphasis on explaining the
various actions that cause the motor to stop, as the
appliance is equipped with safety devices which
prevent access to the cutting assembly until it has
come to a complete standstill.
These instructions for use contain important
information that will enable you to make the very
most of your appliance.
We therefore recommend that you read this
carefully before using your appliance.
We have also included examples of a few
processing tasks to help you get the feel of your
new appliance and appreciate the full range of its
many useful features.

8
24/03/2021
SWITCHING
ON THE MACHINE
• ADVICE ON ELECTRICAL CONNECTIONS
The wiring must be installed by a qualified
electrician.
4) Clip the lid onto the
lid rest and turn it so that
the bosses are inside the
arm.
The logo should now
be facing you, lined up
with the handle, with the
safety magnet on the
right.
5) Check that the cone
is present and screwed
tightly in place. This
is essential for proper
placement of the lid.
6) To close the lid, fit the
locking catch over the
edge of the bowl and
push the handle down.
RISK OF ELECTROCUTION
The machine must be earthed.
The appliance is only insulated from the mains
supply when it is unplugged.
• LID-WIPER ASSEMBLY –
VERTICAL CUTTER-MIXER ONLY
Hold the lid wiper in one hand and the handle
in the other. Press the two parts together at the
centre of the lid, then turn the handle 45° in an
anticlockwise direction.
• BLIXER ARM ASSEMBLY - BLIXER®ONLY
Hold the blixer arm in one hand and the handle
in the other. Press the two parts together in the
centre of the lid, then rotate the handle 45° in an
anticlockwise direction.
DANGER: RISK OF INJURY
The blades are extremely sharp.
For this reason, always make sure you have
removed the blade assembly before doing
any job inside the bowl, such as cleaning or
emptying.
ROTATIONAL DIRECTION OF BLADE
If the blade turns in a clockwise direction, invert the
positions of two wires, as follows:
GREEN YELLOW is the earth,
DO NOT DISCONNECT
Swap either : the ➊and the ➋
the ➋and the ➌
the ➊and the ➌
ROBOT-COUPE appliances are fitted with the
following types of motor:
400 V / 50 Hz / 3
220 V / 60 Hz / 3
230 V / 50 Hz / 3
380 V / 60 Hz / 3
Switch on the appliance while
empty and without the blade. Check
that the motor shaft turns in an
anticlockwise direction.
Before plugging your appliance in, check that your
power supply voltage is the same as that indicated
on the motor identification plate.
If your appliance is not connected to the mains
via a plug and socket, it must be connected via an
insulating selector switch that can be padlocked.

9
24/03/2021
• CONTROL PANEL
- Dual-speed machines
- Variable-speed machines
“Off” button
green light
orange light
red light
Buttons for setting timer
screen
“On” button 1st speed (1500 rpm)
“On” button 2nd speed (3000 rpm)
Pulse control button 1st speed (1500 rpm)
“Off” button
“On” button
faster (+) button
slower (–) button
green "normal direction" indicator light
green "R-Mix direction" indicator light
orange light
red light
Buttons for setting timer
screen
• POWERING UP THE MACHINE
- Start-up
Stage 1
Each time the machine is powered up, the message
« Cx Fyy » will appear on the screen:
- « x» will be a figure between 0 and 7, corres-
ponding to the control board configuration.
- « yy » will be either "50" or "60", depending on
whether the power supply has a frequency of 50
or 60 Hz.
Example: an R 45 ("2" configuration) operated at 50 Hz will display
the following message:
The orange indicator light
will come on.
Stage 2
Open the lid, then close it again, to activate the
safety system. The orange light will remain on.
Stage 3
Press the “OFF” button, then release it. Make sure
you only do this when "0.00" or another duration is
displayed on the screen.
Stage 4
The orange light will go out
and the two green indicator
lights will come on. The ma-
chine is now ready to use.
WARNING:
If you try to start the machine during one of the
above stages by pressing the 1st or 2nd speed
“ON” button, or even the “pulse control” button,
nothing will happen. A troubleshooting message
(see table on page 20) will appear on the screen.
➟
+
Press
1 2 3

10
24/03/2021
• SAFETY INDICATOR LIGHTS:
For the dual-speed models:
Two green lights indicate that the machine is ready
to use.
For the variable-speed R 30 V.V. and R 45 V.V.
models:
One green light indicates that the machine is ready
to use in the direction that is indicated.
For all models:
- Orange light: the machine is powered up, but the
safety criteria have not all been met. The screen
will display a troubleshooting message (see table
on page 20).
- No lights: the machine is either not powered up,
has the wrong power supply, or has broken down.
- Red light:
❶The machine’s motor has reached
a temperature of 120 °C.
The motor will shortly cut out.
This light allows you to anticipate
the machine switching itself off
in the middle of a processing
task.
Wait for the red light to go out before embarking
on a fresh task.
❷The red and orange lights
will remain on until the
motor has cooled down.
You must wait until the red
and orange lights have gone
out and the green light has
come on before switching the
machine back on.
1
PRECAUTIONS FOR USE
• EMPTYING THE BOWL
1) Open the lid by
freeing the locking han-
dle. Release the tilting
lever by raising it.
2) Then tilt the bowl to
your left, keeping hold
of the handle on the
right.
3) Empty the bowl once
it is in the tilted position.
It is advisable to remove
the blade assembly
before tilting the bowl,
especially when proces-
sing liquid preparations.
2
+ + =
=+
- Standby
If the machine is left powered up but unused for
between 15 and 120 minutes, without any
movement of any of its electrical elements (safety
switch, "OFF" button, etc.), the green lights will go
out and the orange light will start to flash.
To quit standby:
- Extended standby
If the machine is left powered up but unused for
more than 2 hours, without any movement of any of
its electrical elements (safety switch, “OFF” button,
etc.), the green lights will go out and the orange
light will start to flash.
To quit extended standby:
or
or
or
or

11
24/03/2021
• VERTICAL CUTTER-MIXER BLADES
In order to ensure perfect cutting results, Robot-
Coupe has developed new, patented blade
profiles, designed to provide an optimum cutting
quality.
These blades, which are perfectly balanced in
order to avoid any vibration, are supplied with
three different types of edge.
Standard blade
Smooth edge for emulsions,
mousses and finely-chopped
meat and vegetables.
Optional blades:
Fine serrated edge for all
blending tasks and smooth
or fine-textured prepara-
tions.
Coarse serrated edge for
cake-making (grinding
almonds and hazelnuts,
making icing sugar), for
frozen goods and all hard
foodstuffs.
Smooth, "crescent-shaped"
3-blade assembly, supplied
as a standard attachment.
Distinctive feature: the
"crescent"blades make
it easier to mix and bind
ingredients.
A 2-blade assembly is used for processing small
quantities or liquid preparations. The 3-blade
assembly is used for maximum capacities with dry
ingredients.
To obtain the best results, it is important to set the
right spacing between the blades. Do not excess
maximum processing capacities (see following table).
MAXIMUM PROCESSING
CAPACITIES
• BLIXER®
TYPE OF PREPARATION R 23 R 30 R 45 R 60
Coarse chopping 10 kg 12 kg 18 kg 25 kg
Emulsion 11 kg 14 kg 24 kg 30 kg
Kneading (in kg of flour) 7 kg 8 kg 12 kg 18 kg
Grinding 5 kg 6 kg 9 kg 12 kg
Maximum processing
capacities
Blixer®
23 30 45 60
4 to
15 Kg
4 to
20 Kg
6 to
30 Kg
6 to
45 Kg
Liquid in 1st speed 16 20 30 40
• VERTICAL CUTTER-MIXER
• WHEELS
Your cutter can be supplied
with 3 retractable wheels
(exclusive to Robot-coupe)
which can be lowered or
raised simply by lifting each
leg. This makes it easy to
move the machine around
and thereby facilitates the cleaning of the working
surfaces.
To activate/deactivate the retractable wheels: each
leg must be raised in turn.
The wheels must only be deactivated when the
machine is turned on.
• BLIXER BLADE ASSEMBLY
In order to ensure perfect cutting results, Robot-
Coupe has developed new, patented blade profiles,
designed to provide an optimum cutting quality.
These blades - also available with serrated edges -
are perfectly balanced to avoid vibration.
Fine serrated edge for all
blending tasks and smooth or
fine-textured preparations.
Serrated 2-blade assembly
supplied as standard.
To achieve optimum results, it is important to adjust
the distance between the blades and respect the
maximum processing amounts (see table).

12
24/03/2021
Screw nut Wide spacer
BladeLocking spacer Narrow spacer
Blade shaft
POSITION 1 : With spacer between lower blade and blade shaft.
FITTING : • Fit the blades and spacers so that they are the right distance apart, according to the:
- type
- weight and
- volume of the foodstuffs to be processed.
POSITION 2 : No spacer between lower blade and blade shaft.
• For fine chopping and emulsions.
DISMANTLING : • Unscrew the screw nut
• Remove the spacers.
2-BLADE ASSEMBLY:
Position 1
Position 2
Correct positioning of
2-blade assembly (top view)
180°
FITTING AND USING THE BLADE ASSEMBLY
• BLIXER®ONLY

13
24/03/2021
2-BLADE ASSEMBLY :
We recommend you use the 2-blade assembly for processing small quan-
tities of up to half the maximum limit indicated (see page 11), with the
exception of liquid or blended preparations.
3-BLADE ASSEMBLY :
We recommend you use the 3-blade assembly for processing large quantities of
more than half the maximum limit indicated, with the exception of liquid or blended
preparations for which we strongly recommend you use the 2-blade assembly.
To obtain the best possible results with these types of preparation, we recommend
you use the lower speed (1500 rpm) only.
• VERTICAL CUTTER-MIXER ONLY
Position 1
Position 2
Correct positioning of
2-blade assembly
Position 1 Position 2
Correct positioning of
3-blade assembly
POSITION 1 : With spacer between lower blade and blade shaft.
• For coarse chopping.
FITTING : • Fit the blades and spacers so that they are the right distance apart,
according to the :
- type
- weight and
- volume of the foodstuffs to be processed.
POSITION 2 : No spacer between lower blade and blade shaft.
• For fine chopping and emulsions.
• For grinding and kneading.
DISMANTLING : • Unscrew the screw nut
• Remove the spacers.
Screw nut Wide spacer Narrow spacer BladeLocking spacer Blade shaft
180° 120°
120°

14
24/03/2021
3° CLIPPING ON THE BELL 4
- Take the bell in the hollow of your hand and press the pusher 7in with
your thumb.
- Slot it onto the section of tube 1protruding from the underside of the lid.
- Release the pusher 7.
- The pusher should return to its initial position. If it does not, gently press on
the bell and it will automatically click into place.
- Check that the bell is securely attached to the tube 1.
4° USING THE VACUUM KIT R-VAC®
- Connect up the vacuum pump to valve A, check that the latter is open
(lever in shaft of connector).
- Shut valve B(perpendicular lever).
1° ASSEMBLING THE VACUUM KIT R-VAC®
- Insert filter 2into body 3
- Screw the tube 1onto the body 3(the tube should pass through the body 3).
2° POSITIONING THE R-VAC®VACUUM KIT ON THE LID
- Sit the R-VAC®kit on top of the plastic cone 5, which should be screwed
onto the lid rest 6, with the lid holder 8in between. The lid (opaque white)
9slots onto the lid rest 6.
5° ADDING LIQUID TO THE MIXTURE
- Attach a tube to valve B.
- Immerse the other end of this tube in the liquid to be added.
- Open valve B slowly ; once the liquid has been added, shut valve B.
OPERATING INSTRUCTIONS FOR THE VACUUM KIT R-VAC®- VERTICAL CUTTER-MIXER ONLY
Keep an eye on
the position of the
O-ring seal when
fitting part 1.
Filter 2can
be cleaned.
NOTE
Preheat the vacuum pump (approx. 15 minutes) to check that both
it and the vacuum kit are working properly. Similarly, leave the
pump running for 15 minutes after completing the task in order to
evacuate the condensation.
9
5
8
6
4
7
Check that the
openings are in
the upper position
in order to position
nut 4.
B
1
2
3
4
A

15
24/03/2021
• R-VAC®VACUUM KIT
Your machine can
be equipped with a
vacuum kit.
Vacuum processing
gives incomparable
results for all types of
preparations, ranging
from fish mousses,
fine-textured stuffings
and vegetable terrines to foie gras and ganache.
Make sure you always use the opaque white lid
with the vacuum kit.
EXAMPLES
OF USE
• VERTICAL CUTTER-MIXER
The cutter will enable you to perform all your cutting
tasks in minimum time. We recommend therefore,
that you keep a close eye on the mixture in order to
obtain the desired results.
USES R 23
(kg)
R 30
R 30
V.V.
(kg)
R 45
R 45
V.V.
(kg)
R 60
(kg)
CHOPPING
• MEAT
Minced beef 10 12 18 25
Sausage meat / tomate stuffing 10 12 18 25
Terrine / saucisson 12 14 22 30
White pudding / liver mousse* 13 16 24 33
Smooth-textured mixtures (frankfurters) 8 10 14 18
• FISH
Puréed fish* 13 16 24 33
Fish stuffings* 13 16 24 33
• VEGETABLES
Garlic / parsely / onion / shallots half bowl volume
Soup / vegetable purées* 17 21 32 44
• FRUIT
Compotes / fruit purées 13 16 24 33
EMULSIFYING
Mayonnaise / aioli / taramasalata 13 16 24 33
Rémoulade sauce 13 16 24 33
Snail / salmon butter 8 10 16 27
KNEADING
Shortcrust / biscuit pastry 6 8 12 18
Flaky pastry 6 8 12 18
Pizza / bread dough 6 8 12 18
Brioche dough 5 6 9.5 12
VERTICAL CUTTER MIXER
OPTIONS
• COARSE SERRATED BLADES
The blade shaft can
be fitted with serrated
blades, which are used
mainly for:
- kneading (shortcrust
pastry, flan pastry,
almond paste, praline,
etc.).
- grinding (frozen foods,
shellfish, almonds, etc.).
• FINE SERRATED BLADES
The blade shaft can also
be fitted with micro-
toothed blades, which
are used mainly for
chopping herbs (e.g.
parsley) and blending.

16
24/03/2021
CLEANING
• BOWL
Once the bowl is empty, return it to its vertical
position, close the lid and run the machine at the
2nd speed (3,000 rpm). This will clear the blades
of any food residue. You can also preclean the
bowl by pouring in a few litres of hot water, then
running the machine for a few minutes at the 2nd
speed.
As all the electrical parts are watertight, this
machine is extremely easy to clean. It can be
washed daily with a hand shower spray (never use
a power washer).
If you are not intending to use your appliance for a
while, remember not to lock the bowl into position,
to avoid unnecessary wear of the seals.
• BLADES
The blade assembly must be taken apart in order to
thoroughly clean each part.
As a precaution, always unplug your appliance
before cleaning it (hazard of electrocution) and
handle the blades with care (hazard of injury).
WARNING
All metal parts should be wiped dry,
especially the blades, to prevent surface
oxidation.
IMPORTANT
These operations are vital for ensuring optimum
blade assembly hygiene.
The vertical cutter-mixer has numerous other
applications. The above quantities are given for
guidance only and may vary according to the
quality of ingredients or the recipe.
• BLIXER®
The Blixer will enable you to perform all your cutting
tasks in minimum time. We recommend therefore,
that you keep a close eye on the mixture in order to
obtain the desired results.
* In first speed only
HOSPITAL USES
SPOON FEEDING
• Minced foods: meat, fish
etc
. • Vegetable purees
• Mousses: vegetables, fish
etc
. • Compotes of stewed fruit
SEMI-LIQUID FEEDING
This simply entails diluting spoon-feeding preparations:
• Minced meat + gravy • Puree + liquid (broth, milk.
etc
.)
• Soups / creamed soups • Fruit compotes + syrup or water
LIQUID FEEDING (for use via tubes)
• Soups and any preparations that can be liquidized.
DELICATESSEN USES
• Butter mixtures: snail butter, salmon butter, anchovie butter…
• Sauces: green sauce, mayonnaise, remoulade, ailloli, emulsi-
fied sauces with tomatoes, cream, parsley…
• Vegetable mousses.
• Grinding:lobster, scampi, seashells...
PHARMACEUTICAL AND CHEMICAL
LABORATORY USES
•Grinding: herbs, seeds, powders, tablets....
• Mixing: homogeneization of creams, ointments, mixed
components, varied ingredients...
USES R 23
(kg)
R 30
R 30
V.V.
(kg)
R 45
R 45
V.V.
(kg)
R 60
(kg)
GRINDING
Almond paste 6 8 12 17
Praline 11 14 20 28
Seafood / crushed ice 5 6 9 12
Breadcrumbs 6 7 11 15
BLENDING
Liquid preparations* 16 20 30 40

17
24/03/2021
Dismantling the blade assembly
- Lift the blade assembly
out of the appliance.
- Remove the bowl.
- Place the blade remover
on the motor shaft.
- Put the blade assembly back in position.
- Loosen the screw using the stem.
- Dismantle the blade assembly by hand.
- To reassemble the blades, follow these instructions
in the reverse order.
- Make sure you tighten the screw properly after
reassembling the blades, in order to prevent the
latter coming loose.
• LID
For perfect hygiene, remove the washer, cone and
lid rest so that they can each be carefully cleaned.
We advise against putting them in the dishwas-
her. Instead, wash them by hand with a little was-
hing-up liquid.
If you are not intending to use your appliance for a
while, leave the lid open to avoid wear and tear of
the seals.
Removing the lid seal
➊ - Unhook the lid from the arm.
➋ - Put the lid the wrong way round on the bowl.
➌
-
Start to set the seal
at the hinge side. Hold
firmly the seal with the
thumb and the index
finger and insert it in the
lid groove.
12
4 5
➍
to
➐
-
Keep inserting the seal progressively on
both sides in order to join both hands.
➑
Clip the lid onto the lid
rest and turn it so that the
bosses are inside the arm.
8
6 7
MAINTENANCE
• BLADES
After each task, we strongly recommend you
sharpen the blades briefly with a sharpening stone,
especially after chopping parsley.
Sharpen them thoroughly once a month with the
fine-textured sharpening stone supplied with the
appliance.
The quality of the cut depends mainly on the
sharpness of your blades and their degree of
wear. The blades are wearing parts which should
be replaced from time to time, in order to ensure
constant quality of the finished product.
• AXIAL TIGHTNESS SYSTEM:
The tightness system
consists of a stainless
steel part ➊which
supports a stainless-
steel deflector ➋, a
seal ➌, a centring ring
➍and a flange ➎
which holds the parts
securely in place.
Check that your detergent is suitable for
cleaning the plastic parts. Certain washing
agents are too alkaline (e.g. high levels
of caustic soda or ammonia) and totally
incompatible with certain types of plastic,
causing them to deteriorate rapidly.
IMPORTANT
3
5
4
43
2
1

18
24/03/2021
• BOWL SEAL
The bowl seal, located between
the bowl and the bushing,
ensures that the bowl remains
watertight.
The bowl seal must be regularly
oiled, using food-grade silicone
lubricant.
This part must be replaced each year, as the
watertightness of the bowl depends on its degree of
wear and tear.
In order to make it easier for you to clean your
appliance, the bowl watertightness system is located
on the underside of the bowl.
As a result, there is a small area in which bits of
food may collect. The bowl seal must be cleaned
once a week.
• LID SEAL
he lid is designed to be completely watertight within
the limits set out on page 15 (see examples of use).
In order to ensure that it remains that way, you may
have to change the seal occasionally, depending on
how regularly you use your machine.
Bowl seal
• V-RING SEALS
In order to ensure that the motor remains
completely watertight, we recommend checking
the state of wear and tear of the lip seals every
three months and replacing them every 6 months
maximum.
When the seals are worn, liquid may first run into
the bearings, then reach the motor. If this happens,
the seals, the bearings and even the motor may
have to be replaced.
- Replacing the lip seals
10) Put the
deflector on first.
11) Check that
the seal has been
inserted properly.
12) Put the lip seal
on. Make sure it
facing the right way:
groove towards the
deflector.
13) Put the centring
ring on.
14) Put the flange
and screws back on.
15) Grease the lips
of the seal (food-
safe grease).
18) It’s done !16) The tightness
system is now as
good as new.
17) Put back the
bowl, pouring lip on
left hand side
7) The stainless steel
part has now been
dismounted.
8) The assembly
comprises 4 rings +
3 screws.
9) Remove the 3
screws and 4 rings.
5 4 3
1) Tools required 2) Remove the bowl 3) Remove the bowl
seal.
4) Unscrew the 3
screws.
5) Remove the
screws and washers.
6) Put the bowl
back, turn and pull
upwards.
1
2
1
2
Small
8 mm

19
24/03/2021
If you do not use your machine regularly, we
recommend that you leave the lid open when it is
not in use jobs to preserve all these features
• BLIXER ARM
The scraper arm is fitted with a small rubber paddle
and a silicone lid wiper which are wearing parts.
These are wearing parts, which therefore need to
be replaced from time to time in order to maintain
optimum efficiency. The wipers are easy both to
remove and to fit.
ADJUSTMENT OF
BOWL TILTING SYSTEM
- Applicable to: R 23, Blixer®23, R 30, Blixer®30,
R 45, Blixer®45, R 60, Blixer®60
When the lever which is turned clockwise to lock the
bowl in the tilted position is no working correctly, it
is time to adjust the tilting system.
- Tools required.
Flat
screwdriver
5 mm
Allen key
17 mm
socket spanner
- Procedure:
1
Unscrew the 3
screws from the cap
and remove.
Tool: Flat
screwdriver.
2
Unscrew the 3
headless screws so
the adjustment can
be made.
Tool: 5 mm
Allen key
3a
Place the lever at
about 45°.
Hold it in this
position during the
following operation
3b
Tighten the nut.
Tool: 17 mm
socket spanner
4
Put the 3 screws
back on and tighten.
Tool: 5 mm
Allen key
5
Check that the tilting
function is operating
correctly:
tighten/untighten.
Put the cap back on
then the 3 screws
and tighten.
Tool: Flat
screwdriver.
~ 45°
17 mm5 mm
Other manuals for Blixer 23 a
1
This manual suits for next models
9
Table of contents
Other Robot Coupe Commercial Food Equipment manuals

Robot Coupe
Robot Coupe CL55 User manual

Robot Coupe
Robot Coupe MP350Turbo User manual

Robot Coupe
Robot Coupe R100 User manual

Robot Coupe
Robot Coupe R 301 D Series User manual

Robot Coupe
Robot Coupe BLIXER 60 Quick start guide

Robot Coupe
Robot Coupe BLIXER 23 Quick start guide

Robot Coupe
Robot Coupe R8 User manual

Robot Coupe
Robot Coupe A Series User manual

Robot Coupe
Robot Coupe D Series User manual

Robot Coupe
Robot Coupe R60 Quick start guide