Rockford Fosgate DSR1 User manual

This DSR1 Is Pre-programed for
You.
All DSR1s that we ship are programed for ‘14 through ‘18 Harley Infotainment radios that only have the front channels enabled. If
you have a ‘19 or newer Harley with a GTS radio you will need to download our DSR1 setup file for the GTS radio. If you do not
have a factory radio simply hit the EQ reset button in the EQ section of the DSR1 app to set the EQ to flat. Then make what
adjustments you need. Other radio configurations like Ultra, CVO, etc. with four or more speakers will need alterations to the EQ
curve that we have set for you. The tune that we put on the DSR1 is free of charge and not guaranteed to be exactly what you need
for your particular situation. User/installer adjustments are required when using a DSR1. You are responsible for all adjustments in
your new audio system. Read the extensive information here and the articles we have published on our website and get to know
what adjustments are needed for your system.
● We have already updated to the latest firmware so there is no need to connect to your computer.
● This DSR1 is already setup for a typical install on a ‘14 & up Harley Davidson with a factory radio with 2 channel input
(front only). Therefore you will not need to go through the setup menu in the Perfect Tune app. The only reason to go
through the setup menu is if your system is not a ‘14 & up with factory radio and/or you are feeding the DSR1 with more
than just the front channels
● Use the “Basic Tune” EQ in the DSR1 app unless you know what you are doing in the “Advanced Tune” section. You
can find several articles about using the advanced tune at
https://www.americanhardbag.com/pages/installation-guides .
● Understand how the “Remote In & Remote Out” connections should be made before you install your DSR1. Improper
connection of the remote in/out can void your warranty.

Pre-Programed DSR1 Settings Overview
If your bike has a GTS radio (‘19 or newer) be sure to also read the next section below “‘19 & Up GTS Radio Instructions” as well
as this section.
This DSR1 can be used with old bikes, new bikes, with a factory radio or with an aftermarket radio. We have pre-programed this unit
for a ‘14 through ‘18 Harley with a factory radio and only 2 speaker outputs enabled and connected from the radio to the DSR1. 6
output channels of the DSR1 are activated (front, rear, sub) and will have signal output with just the two front inputs connected to
your radio. This is by far the most common settings needed for most users. These settings can easily be changed with the perfect
tune app but you should read
about these settings before you make changes.
DSR1 Pre-Programmed Details
Your DSR1 has a setup file pre-loaded on it called “14_6channel_Out_1.rfts”. This setup file sets all settings on the DSR1 to a
common and safe state.
INPUT/OUTPUT
Input
Front Channels Only
Input Sensitivity
High Level
Output
6 Channels (front, rear, sub)
Output Configuration
All settings can be changed in the “Basic tune” section, but do not make any changes in the “advanced” tune or “device setup”
unless you understand what you are doing.
RCA
Name in the app
Settings
Front Out
Front
Full range (no crossover) 31 point Anti-EQ for factory ‘14 & up Harley
Infotainment radios.
Rear Out
Rear
Full range (no crossover) 31 point Anti-EQ for factory ‘14 & up Harley
Infotainment radios.
Subwoofer Out
Subwoofer
Full range (no crossover) 31 point Anti-EQ for factory ‘14 & up Harley
Infotainment radios.
Crossovers
Use the crossovers built into your amplifiers unless you know what you are doing with the DSR1.
Customizing Equalization
The DSR1 has 2 equalizers. Basic and advanced. The advanced EQ is already set for you. Unless you know what you are doing, it
is recommended to leave this EQ alone. Use the 7 band basic EQ to make your adjustments to your taste.
‘19 & Up GTS Radio Instructions
The new GTS radio requires a different setup file than the ‘14 through ‘18 bikes. This file can be found on our website in the
“Installation Articles & Guides” section.
https://www.americanhardbag.com/pages/dsr1-files
Setup Wizard
The setup is a menu in the DSR1 app is where the initial input and output settings are made. We have already set these for both ‘14
through ‘18 factory radios as well as ‘19 & up factory radios. BEWARE! The setup wizard is simple to use but the default selections
that you are presented with are not the settings that we have set for you. They are the default settings. So if you go poking around in

the setup wizard you will inadvertently endup erasing our settings and going back to settings that are not correct for your bike.
Unless you need to make a change to the input/output setup do not open the wizard at all.
But if you do choose to open the setup wizard, these are the correct settings for a factory Harley
radio ‘14 through current year.
1. Stand Alone (Universal Harness)
2. High Level (Speaker)
3. Move the High/Low switch to “High”
4. Fronts Only (2-ch)
5. Verify physical connections for RCAs
6. Fronts+Rears+Sub
7. Not Connected
That’s it!
Very Important!
Factory Radio Connection
If you have a factory radio the remote input and remote output must be wired as shown below.
UPDATE for ‘14 & Up Harley Radios
We have found that ‘14 and up radios will emit a turn on pop even with the accessory circuit properly connected. This is because of
the unusually long boot time of the new Harley radios. Do not connect the solid blue wire to anything on these bikes with a
factory radio.
If Using an Aftermarket Radio
When using an aftermarket radio it is critical that you use the amplifier remote turn on wire (usually blue or blue with white stripe) to
trigger the DSR1. Do this by connecting the radio’s amplifier remote turn on wire to the DSR1 solid blue wire (remote in).
Some aftermarket radios will have both a blue wire and a blue/white stripe wire. If this is the case, the proper wire to use is the blue
with white stripe wire. The solid blue wire on these radios is for a power antenna and will not provide 12 volts unless in Am/Fm mode
(not good!).

Notice the connection point between the radio’s blue/white wire and the DSR1 solid blue wire. Most radios will have a Blue/white
wire. Never connect the radios Blue/white wire to the DSR1 blue/white wire. This will destroy the power supply of the DSR1 and
potentially the radio. This is not covered under warranty.
DSR1 Remote Out
The blue/white wire on the DSR1 should only be connected to the amplifier(s) remote input and never to a source of power (such as
the bikes accessory circuit or any output of the radio).
Turn On Pop
Turn on pop happens when the amplifier turns on too soon and another device on the bike (usually the radio or a DSP) then turns on
and emits the pop sound. This pop is then amplified by the amplifier and passed to the speakers. The way to avoid this is to delay
the remote turn on signal going to the amplifier. The DSR1 has a delayed output on the blue/white wire just for this reason. So if the
remote turn on wires are not connected properly as shown above, you can almost guarantee a nasty turn on pop will occur.
“I Wired It Correctly and Am Still Getting a Pop.”
Sometimes there is another relay or device outside of the audio system that creates a pop in the electrical system and it makes its
way through the audio system and out to the speakers after the amplifier has powered up. As you add more devices to your audio
system the timing and sequence of how each device powers up becomes more critical. This is just a fact of large scale audio
systems. Sometimes the delay built into the DSR1 is just not long enough. In either case the answer is to add a little more delay to
the remote turn on signal coming out of the DSR1 to the amplifier. If you have already tried the DC detect mode described above,
you may need to add a delay devise between the radio and the DSR1 as well. A very simple and cost effective way of doing this is
to use a Pac Audio TR4. This is a tiny simple 4 wire device the that connects to the existing wiring you already have. No additional
wires need to be run. Below is a wiring diagram for the TR4. A TR4 can be purchased for $18 (Shipped) if you need one. Just give
us a call 1(916) 823-5256.

Connect the Green wire to the DSR1 remote out wire (blue/white) and the blue wire of the TR4 to the amplifier(s) remote input wire.
Tag positive and ground (yellow & black) directly from the DSR1 power black and yellow power wires. Be sure to fuse the yellow
wire if you are getting power for the DSR1.
This will add an additional single second to the power up time of the amplifier. By this time all popping devices on the bike should be
done doing their thing and the electrical system will once again be silent.

DSR1 Installation Connections
First thing you want to do is sort through the DSR1 power/input harness. Decide which connections you will need to use.
A typical installation will only require that the front RCA inputs are used.
Heat shrink or tape off the ends of the remaining RCAs (Digital in, Aux,
& Rear Input). We recommend that you use bullet type connectors on
the remaining 4 wires. The industry standard for all connectors is that a
circuit supplying power or signal uses a female connector and a circuit
that receives power or signal uses a male connector. This is to avoid
electrical shorts when the connectors are not together.
● Put a female connector on the Blue/White wire. This wire is
the remote output. This wire goes to 12 volts when the DSR1 is powered
up and supplies that 12V signal to your amplifier(s) in order to switch on
the amplifier(s) when the DSR1 is powered up and to also switch the
amplifiers off when the DSR1 powers down. Never connect your
amplifiers remote-turn on directly to the radio or an accessory
source. Always use the Blue/White from the DSR1.
● Put male connectors on the 3 remaining wires (Blue (no
stripe), Yellow, Black).
Make your power connections. You will need to supply your DSR1 with a ground and battery connection. There are only two good
places to make these connections in the fairing of the bike.
1. Connect directly to the power terminals of your fairing mounted power amplifier. We often times include a fuse
holder with DSR1s when we ship them out. Never connect the DSR1 directly to a high amprage source (the
amplifier power terminal) without a fuse between the DSR1 and the power source.
2. Use our optional CB circuit harness to provide the DSR1 with power and ground. This is the easiest way and it
already has a fuse holder built in.
Above shows how to connect a standard fuse holder.
Left shows how to connect our optional CB circuit harness.
If using the CB harness, on the bike you will find the matching 12 pin plug behind the radio
to your left side. The harness will have a rubber plug in it and it will be the only harness on
the fairing that will fit.
Remote/Accessory Input (Blue wire with no stripe). Do Not Connect
On ‘14 & up Harleys this wire is not typically used. This wire in other applications would be
routed to an accessory circuit on the bike or in the case of an aftermarket radio it would be
connected to the remote output of the aftermarket radio. On ‘14 & up Harleys though the
factory radios make a pop sound when they power up. This pop sound is then passed to the
amplifier and then the speakers if the Blue wire of the DSR1 is connected. A great solution
to this issue is to not use the blue wire at all. The DSR1 has a feature called “DC detect”.
We enable DC detect on every DSR1 that we sell. The DC detect will listen for music signal

at the factory radio outputs and turn the DSR1 on automatically. Doing it this way delays the turn on of the DSR1 and consequently
the amplifier(s) just enough that it avoids the pop sound from the factory radio altogether. Problem solved. And one less wire to
connect. Put a female bullet connector on the male connector that you crimped onto the blue wire earlier and tie it back out of the
way so that you don’t mix it up with the Blue/White wire later on.
Connecting the Signal Input to the DSR1 from the Factory Radio
Locate the front signal plug and play harness. This harness has 2-Two pin black Molex
connectors on one end and RCA connectors on the other end. Connect the RCAs to the
White and Grey RCAs on the DSR1.
In the next few steps the connections are shown with the components outside of the bike for
clarity sake.
Signal Out from the DSR1 to the Amplifier(s)
In the picture below male-male RCA connectors are shown but on a bike you should always
use short length RCA patch cables. The male-male connectors like to come loose with
vibration. Even when taped up. Connect the front output from the DSR1 to the front input of
the amplifier.
Connect the rear output from the DSR1 to the rear input on the amplifier.
About the 8 DSR1 RCA outputs.
The DSR1 has many more outputs than are required for many
installations. The outputs are clearly labeled but the one that confuses
people the most is the Front Spare outputs. These are not used unless
you require all 8 channels of the DSR1. All 8 of the RCA outputs can
actually be used for any speaker that you want in the system. All 8
channels have the same abilities and can be configured the same. It is
wise however to use front for front, frear for rear .etc because in the
DSR1 app that you will be using later on you will want to easily keep
track of what's what.
Amplifier Output Connections to the Amplifier.
If using a Diamond Audio amplifier like the one pictured, be aware that the RCA input plugs have the same 4 pin connector on the
amplifier as the speaker output harnesses. It is easy to mix them up. The RCAs though go on the dial side of the amplifier and the
speaker outputs go on the power connection side of the amplifier.

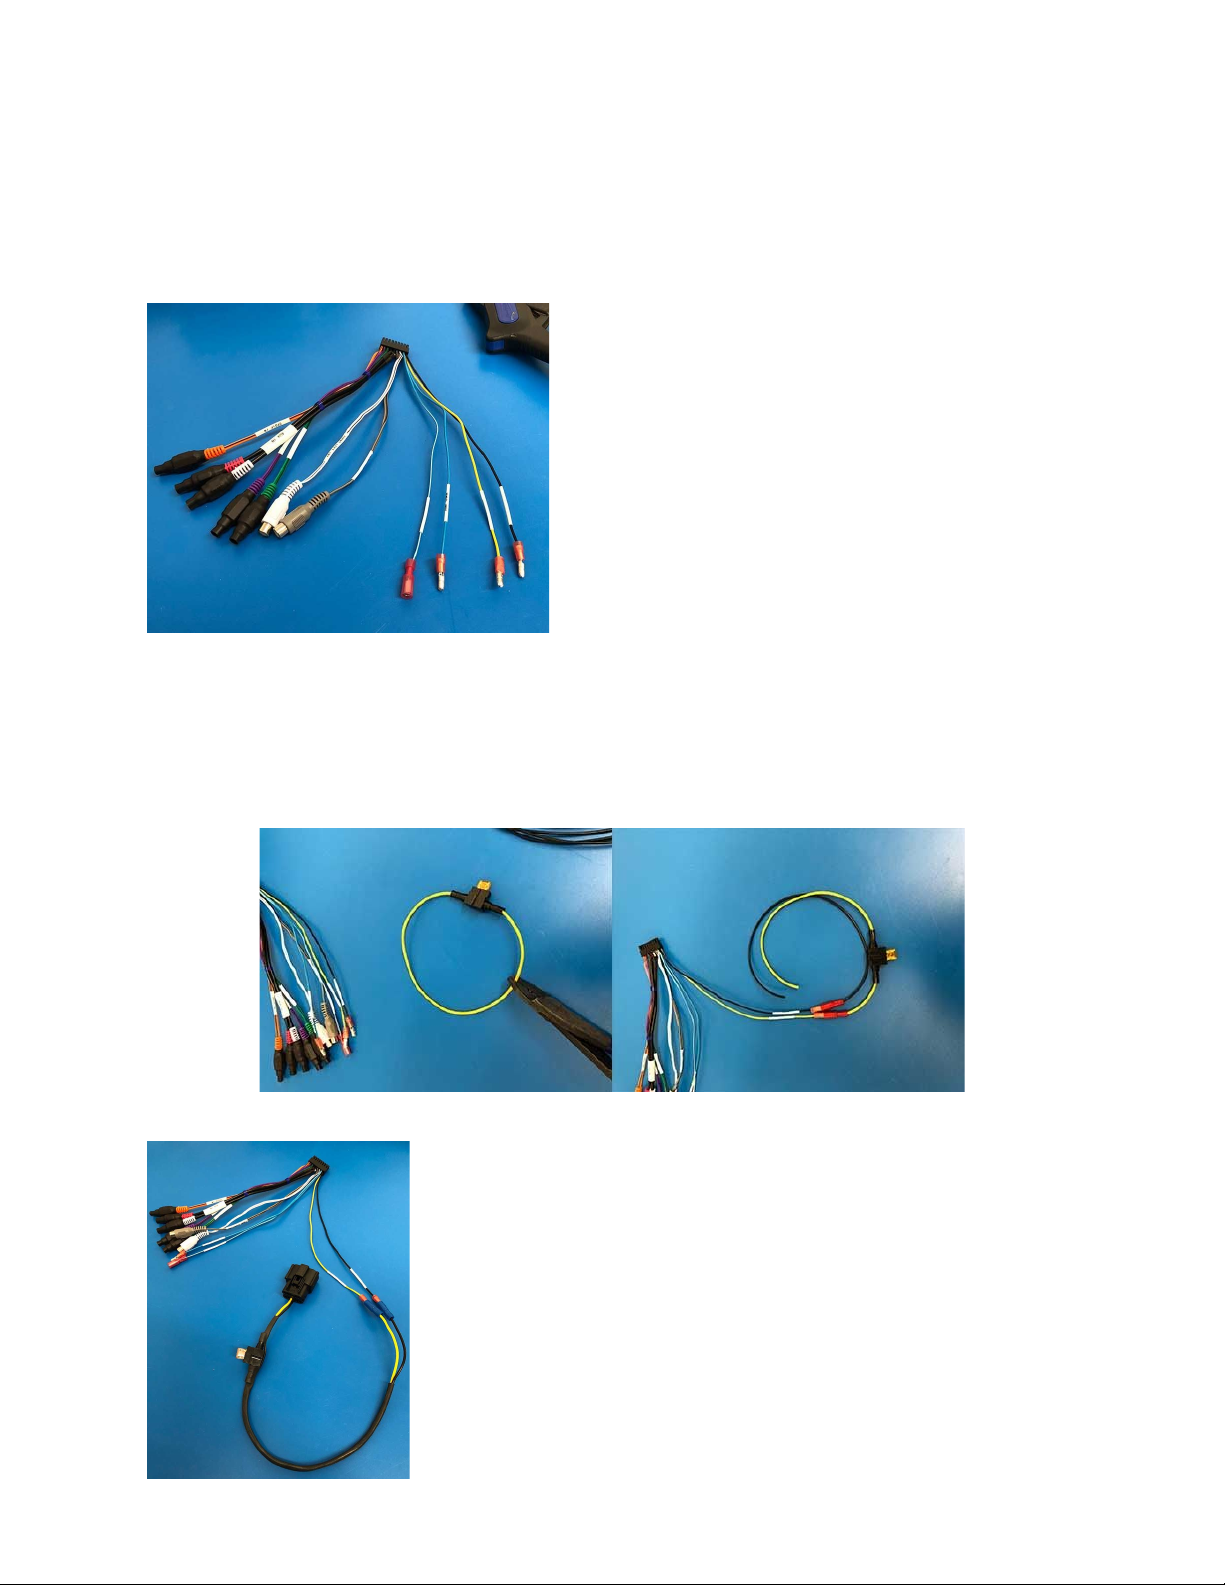
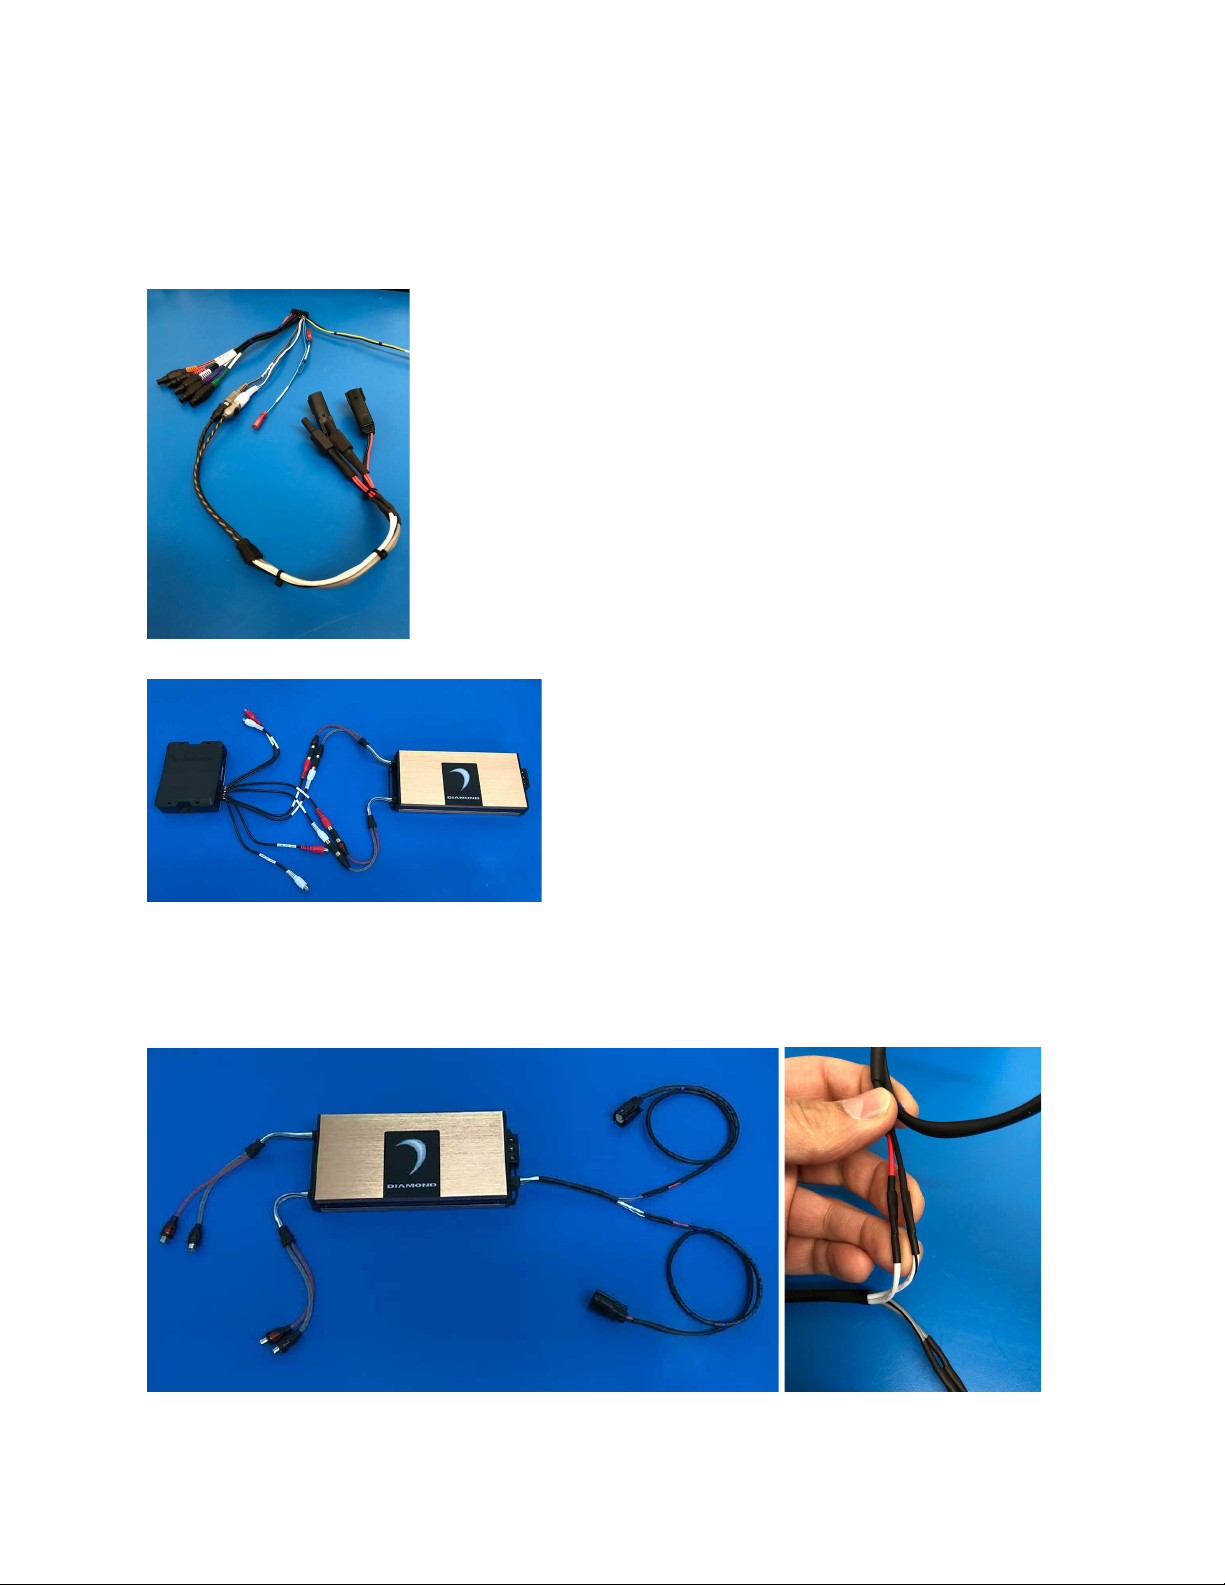
Use the harnesses that came with your plug and play signal harness labeled “Speaker Pod Harnesses”. On amplifiers that have
wired speaker outputs these harnesses you will need to do wire to wire connections. The female Molex connectors will plug directly
into your speaker pods in the fairing. It doesn’t get much easier than that!
That's it! The DSR1 is Now Connected.
Additional notes:
● For a bike that is a ‘14 through ‘18 year and only
came with 2 speakers from the factory, the DSR1 is already
programmed for you. You don’t need to plug it into a computer
and you don’t have any adjustments that you need to make. It’s
ready to go. Unless you want to launch the app and take the
time to learn how to make more adjustments with the DSR1
● For a bike that is a ‘19 we have a different
configuration file that you need to load for your bike. You still
do not need to connect your DSR1 to a computer! The new
file is loaded using the DSR1 app (Perfect Tune). It’s quick and
easy to load. Go to our website :www.AmericanHardBag.com, and navigate to our “Installation Articles & Guides”
section. There you will find an article that is named “How to Load DSR1 Setup Files”. Read the article. It’s short and has
pictures. Then go back to the “Installation Articles & Guides” page and find the article named “DSR1 Setup File
Downloads” to get the correct file for your bike.
● For bikes that came with more than 2 speakers from the factory and for all bikes that came with an amplifier from the
factory. The frequency curve of your radio is not the same as the bikes that came with only 2 speakers and no amplifier.
You have 2 good options for great sound. 1. Use the DSR1 the way it was designed to be used. Use the EQ to adjust the
sound so that the factory radios weird EQ curve is countered by the DSR1 adjustments that you make. This is how our
pre-programmed files work. 2. Have your bike flashed by a competent shop for 2 amplifiers and 8 speakers. Your best bet
will be to find a shop that has the flashing system from Techno Research. Rockford Fosgate dealers are offered a
program from Rockford where they supply the dealership with the Techno Research hardware and training. So a Rockford
dealer is a good place to start. For more information on this topic you can go to the support section on Rockford Fosgates
website www.RockfordFosgate.com and do a search for “Harley Flash” they have information there.
About our Harley DSR1 Compensation Files
Our files do two things.
1. They compensate for the horrible frequency response of the factory radio. Our files get your radio accurate to within a
single db (really accurate and great sounding).
2. The files configure the input and output settings for you. There is no need to go through the setup wizard in the DSR1 app
if using one of our DSR1 setup files. .
What the Files Don’t Do
Our files do not have crossover settings. The crossovers built into the DSR1 are spectacular. However, you should instead use the
crossovers built into your amplifier(s) unless you are an installer that is familiar with how to properly set crossovers that are as
complex as the awesome ones built into the DSR1.
Speakers on a bike should always have High pass crossovers turned on and set properly. For all speakers.
Setting Amplifier Gains
We get asked alot if the gains should be set within the DSR1. The answer is no. The DSR1 has trim levels for each channel as well
as a master volume control. These are intended to be used by an advanced user. All trim levels in the DSR1 should be turned all of
the way up and gain settings should be done at the amplifier(s). For more information about setting amplifier gains, go to the
“Installation Articles & Guides” section of our website and read the article ”Setting Amplifier Gains When Retaining a Factory
Harley Radio”.
Table of contents
Other Rockford Fosgate Motorcycle Accessories manuals

Rockford Fosgate
Rockford Fosgate Element Ready TMS69BL14 Guide

Rockford Fosgate
Rockford Fosgate Punch PMX-HD9813 User manual

Rockford Fosgate
Rockford Fosgate Punch PMX-HD9813 User manual

Rockford Fosgate
Rockford Fosgate R1-HD4-9813 User manual

Rockford Fosgate
Rockford Fosgate TMS69BL14 Guide

Rockford Fosgate
Rockford Fosgate R1-HD4-9813 User manual
Popular Motorcycle Accessories manuals by other brands

Oxford
Oxford HOTGRIPS PRO Adventure User information

yasuni
yasuni TUB807-D57 Assembly instructions

Suzuki
Suzuki GSX-S1000 INSTRUCTIONS FOR MOUNTING & USE

Rivco
Rivco GL18006-L2 installation instructions

KTM Power Parts
KTM Power Parts 69005283000 Information

KTM Power Parts
KTM Power Parts 78712916000 Information