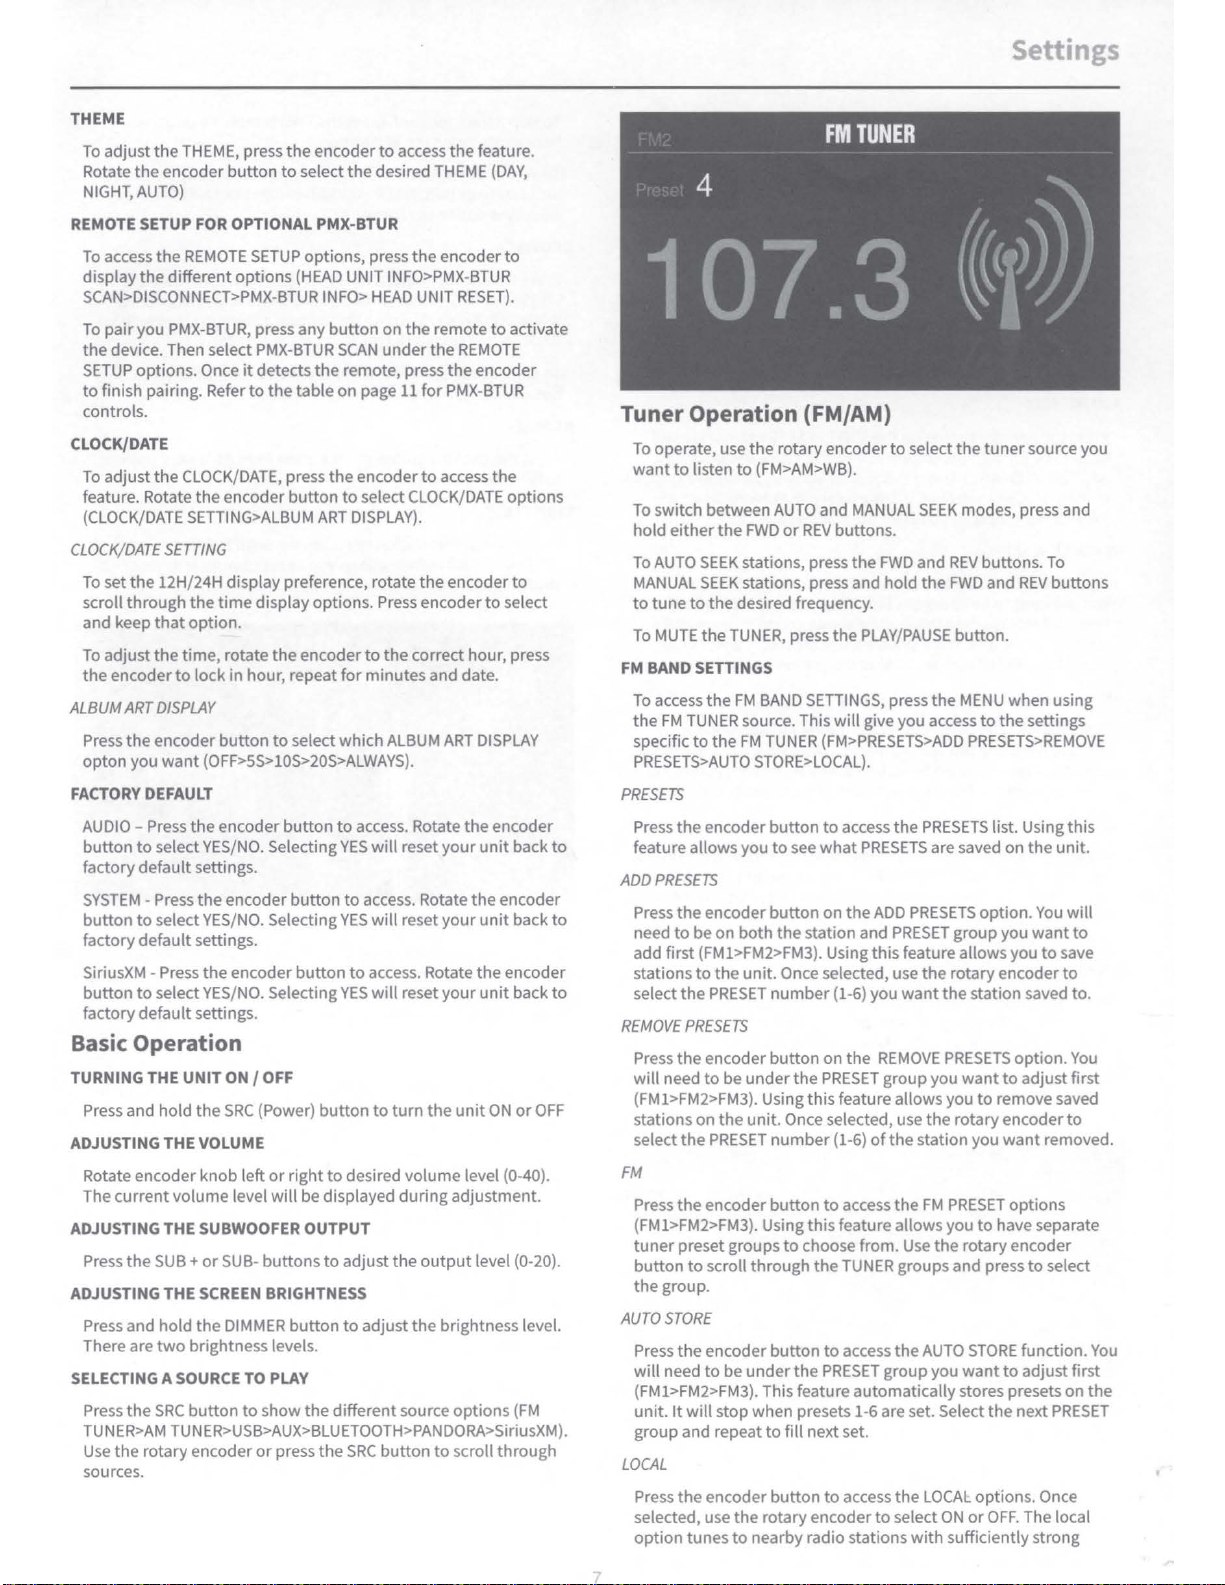
Rockford Fosgate Punch PMX-HD9813 User manual

TURN
OVER
1998-2013 Harley-Davidson®
PMX-HD9813 Radio Tuning Guide for
STAGE1, STAGE2 & STAGE3 Systems.
09-03-2019 Eric Russell
1220-72885-01-A
7 BAND EQ: FLAT
CROSSOVER:
FRONT HPF: 60Hz @ 12dB/Oct.
REAR HPF: 60Hz @ 12dB/Oct.
SUB LPF: APF
PUNCH EQ: GAIN 0
FLAT: Use on non-Rockford Fosgate systems.
STAGE1:
Upper Fairing
STAGE2:
Upper Fairing + Baglids
RADIO DEFAULTS
STAGE3:
Upper Fairing + TourPak
Upper Fairing + TourPak + Baglids INTERNAL AMPLIFIER: ON
HD9813RG-STAGE1
HD9813RG-STAGE2
HD9813RG-STAGE3
HD9813RGU-STAGE1
HD9813RGU-STAGE2
HD9813RGU-STAGE3
HD9813SG-STAGE1
HD9813SG-STAGE2
HD9813SG-STAGE3
HD9813SGU-STAGE1
HD9813SGU-STAGE2
HD9813SGU-STAGE3
AUDIO KIT PRESET:
These PMX-HD9813 tunings are
independently optimized ONLY
for Rockford Fosgate TMS speaker
systems due to their unique
frequency response. They are not
for use with other speaker brands.
1) Press & Hold MENU to
access SETTINGS.
2) Rotate VOLUME,
press to select AUDIO.
3) Rotate VOLUME, press to
select AUDIO KIT PRESET.
4) Radio will automatically
reboot & load preset.

TURN
OVER
1998-2013 Harley-Davidson®
TM400X4ad Amp Tuning Guide for PMX-HD9813
on STAGE2 & STAGE3 Systems.
For other radios, refer to Knowledge Base Answer ID #1355.
REAR INPUT LEVEL: 9:00 (1/4)
Matches the amp to the radio.
Tells the amp where to “clip.”
FRONT INPUT LEVEL: 8:00 to 9:00
When using baglids or TourPak,
reduce fairing speaker output
by trimming front gain so front
& rear are equally balanced.
FRONT & REAR EQUALIZER: 12:00
Works with PMX-HD9813 DSP
to provide exceptional
bass & treble response.
INPUT SWITCH: 4CH
Number of inputs to feed amp.
New harness supports
integrated 4-channel
front/rear audio.
Must use rear speaker
harness on PMX-HD9813.
CROSSOVER FREQUENCY: 50Hz
Tells amp what frequencies to pass.
Motorcycles use this as a “bass blocker”
to prevent subwoofer frequencies from
damaging fairing and baglid speakers.
(latched to HP/AP/LP switch)
CROSSOVER SWITCH: HP (High-Pass)
Type of crossover needed.
(works with crossover frequency dial)
[HP (High-Pass) allows frequencies above to pass]
[AP (All-Pass) allows all frequencies to pass]
[LP (Low-Pass) allows frequencies below to pass]
TURN-ON O.K.
blue remote wire not required
09-03-2019 Eric Russell
1220-72885-01-A
RADIO O.K.
no flash required
Rockford Fosgate
PMX-HD9813

DIGITAL MEDIA RECEIVER
FOR
1998-2013
HARLEV-
DAVI
DSON®
MOTORCYCLES
E~EN~
&<2}
READY
'"
LI
N
H®
PMX-HD9813
pandora
· [
IPX6]
Made
for
aiPhone
Installation & Operation

Introduction
DearCustomer,
Congratulations
on
your
purchase
of
the
world's
finest
brand
of
audioproducts.
At
Rockford Fosgate
we
are fanatics
about
musical
reproduction
at
its best,
and
we
are pleased you chose
our
product. Through years
of
engineeringexpertise, hand
craftsmanship and critical
testing
procedures,
we
havecreated a
wide
range
of
products
that
reproduce music
with
all
the
clarity
and richness
you
deserve.
For
maximum
performance
we
recommend
you
have
your
new
Rockford Fosgate
product
installed
by
an Authorized Rockford
Fosgate Dealer. Please read
your
warranty
and
retain
your
receipt
and
original
carton
for
possible
future
use.
Great
product
and
competent
installationsare
only
a piece
of
the
puzzlewhen
it
comes
to
your
system. Makesure
that
your
installerisusing100%
authentic
installation accessories
from
Rockford Fosgate
in
your
installation. Rockford Fosgate has
everything
from
RCA
cables
and
speaker
wire
to
power
wire
and
battery
connectors. Insist
on
it!
Afterall,
your
new
system deserves
nothing
but
the
best.
To
add
the
finishing
touch
to
your
new
Rockford Fosgate image,
order
your
Rockford accessories, which
include
everything
from
T-shirts
to
hats.
Visit
our
web
site
for
the
latest
information
on
all
Rockford
products;
www.rockfordfosgate.com
or,
in
the
U.S.
call 1-800-669-9899
or
FAX
1-800-398-3985. For
all
other
countries, call+001-480-967-3565
or
FAX
+001-480-966-3983.
Table
of
Contents
2
Introduction
3
Specifications
4 Design Features
5
Installation/Mounting
6-
10
Operation
Settings
Tuner
(AM/FM)
USB-iPod
AUX
(Auxiliary
Input)
Bluetooth
•
Pandora•
SiriusxM•
11
PMX-BTUR
Function
Table
12
-
13
Troubleshooting
14
-
53
French, Spanish, German &
Italian
54
Limited
Warranty
Information
If,
after
reading
your
manual,
you
still
have
questions
regarding
this
product,
we
recommend
that
you
see
your
Rockford Fosgate
dealer.
If
you need
further
assistance,
you
can call us
directly
at
1-800-669-9899. Besure
to
have
your
serial number,
model
number
and
date
of
purchase available
when
you
call.
Safety
This
symbol
with
"WARNING" is
intended
to
alert
the
user
to
the
presence
of
important
instructions.
~
WARNING
Failure
to
heed
the
instructions
could
result
in
severe
injury
or
death.
This
symbol
with
"CAUTION" is
intended
to
alert
the
user
to
the
presence
of
important
instructions. 4 CAUTION
Failure
to
heed
the
instructions
could
Ln
result
in
injury
or
unit
damage.
To
prevent
injury
and damage
to
the
unit,
please read and
follow
the
instructions
in
this
manual.
If
you
feel unsure
about
installing
this
system yourself, have
it
installed
by
a
qualified
Rockford Fosgate dealer.
Before installation,
disconnect
the
battery
negative(-)
terminal
to
prevent
damage
to
the
unit,
fire
and/or
possible injury.
FCC
Compliance
Statement
FCC
ID: 2AB7S-CW51P
This
equipment
has been tested
and
found
to
comply
with
the
limits
for
a Class B
digital
device,
pursuant
to
part
15
of
the
FCC
Rules. These
limits
are designed
to
provide
more
reasonable
protection
against
harmful
interference in a residential
installation.
Operation issubjected
to
the
following
two
conditions: (1) This
device
may
not
cause
harmful
interference,
and
(2)
the
device
must
acceptany interference received,
including
interference
that
may
cause undesired operation.
This
equipment
generates, uses,
and
can radiate radio
frequencyenergy and,
if
not
installed and used in accordance
with
the
instructions,
may
cause
harmful
interference
to
radio communications. However,
there
is
no
guaranteet
hat
interference
will
not
occur
in
a
particular
installation. If
this
equipment
does
cause
harmful
interference
to
radio
or
television
reception,which can be
determined
by
turning
the
equipment
off
and
on,
you
are encouraged
to
try
to
correct
the
interference
by
one
of
the
following
measures:
Reorient
or
relocate
the
receivi
ng
antenna.
• Increase
the
separation between
the
equipment
and receiver.
• Consult
your
Rockford Fosgate dealer.
~2019 Rockford'orpor"tion.
A1
Rigl·
ts
Reserve
C!.
"'
i'<C
1-t
.;7d os,matedlogoswhere
app1icable,
are
registered
trademark,, of Rockford r xporat1or
int~,
Unrtrd
States
and;o, other
COlmtries.
iPhone dnd f'od are tr
3C:
rrark,
ot
A~
>'le
Inc.,
registered '1 t~f
U.S.
and
o•h,•r countries.
The
Bluetc,ot
h'
word
mar~
and
loges
are
rei,.,tered
•rademurKs
:Jwned
by
Bluetootr SIi,.
inc
ind
dny ise
of
;,uch
mar~•
b~
lockford C0,por-t
OP
sunder
cePsE
All other
tradE
n,arks
are
thepropertyot their resptclive
0wner,
<;pe,
,f·c
·:
ons
sur.jecttt'
char1be
wrthout notice.
Mad, 'o,
Pc
d"
Jr
d
Made
'or Phc·,," rr>EJII that
an
electronic accessory
f,a.,
been
designed tocornec• specificallyt j iPod. criPh,,ne.
resped1velv,
<1nd
h;,s
L1een
ce,tified
by
he
devE
a.>
·rtu
rr,e
t Api;le
j:H'o1rY1~llC"
•tand;m!s.
.Apple
is
not1·e,ponsible
for
thf>
operation 0t this device
>1
ts
COf'fl!'i
Jncewrth safety
c~d
1egulato1y
standards.
PleasP
note t'J, • t •
•oc
of
t,1is
ac,e,•uryw •
11Pod
or
Prone
•1ay
attect wireless perforrn,mr,
Pandor',
Hu•
r-
,r•dora
hgt\
ond
\re
Pandora
t•
,de
Jre<,s
.:rr trademmk,
,,r
reg1st»red
tradE
11a,ks
of
Pandora
Med,a,
LLC
u, d
witr
permission.
Fa,
dor..i
11
°'"V
available1
~
·e•tilin countnes.
Please
v1s1t
h1tp:/iwww
L>andcra
..
·orr,/l<>g,11
ior
1ore
rnf,,n.,atioP
Sr
•s.
xf.,1
dnd allrelated niarksand
10~"<
-~,
'traden,ark,ot ~",
)(f1
Rad,o
!~, All rights
re,e1veo
2

Specifications
Model PMX-HD9813
OperatingVoltage
10.5V-16V
Fuse
Ra
tini 20A
Power
Output
25
WX4@4Ohms
RMS
50Wx4@2
Ohms
Peak
Max.
RCA
Output
Voltage 4V
Output
Impedance
soon
FrequencyResponse
20-
20kHz
FM
FrequencyRange
87.5MHz
-
107.9MHz
AM
Freque"lcyRange 530kHz-1710kHz
Tuner Presets
18
FM/
12AM
Clock 12:00/24Hour
Disp1ay
3"
ColorTFT
Bluetooth
3.0+EDR,
A2DP
1.3
USB
Compatibi
l
ity
2.0
USB
Capacity
32
GB
max,
255
Folders
max,
999
Songs
max
USBOutp
J
l.SA
iPhone
XS
Max
iPhone
7
iPhoneXS
iPhone
6s
Plus
iPhoneXR
iPhone6s
Made
for
iPhoneModel Names- iPhoneX iPhone6 Plus
iPhone8 Plus
iPhone6
iPhone8
iPhoneSS
iPhone7 Plus iPhoneSC
iPhone 5 I
Android
Compatibility
Bluetooth•
Only
I
Audio
Fi
e
Compatibility
MP3,
WMA,
FLAC
ASTM
D4329
IPX6
(Front
Face)
Certificatiors
IPX4
(Rear Chassis)
CISPR25
Class 3
EMI
FCC,
CE
RED,
IC
RCM
2006-2013 StreetGlide
1998-2013 Road Glide
Compat,bihty 1998-2013 Electra Glide
Not
compatible
with
factory
equipped
CB,
Headset, Satellite radio
systems
or
Rear Volume Controls
,,,,..,,,._ (
EA
2006
~<!'
..,
....
~~-::"
Powerratings on Rockford Fosgate source units conform
to
CEA
2006
industry
standards.
<»~
I These guidelines mean
your
source
unit's
output
power
ratings are
REAL
POWER
mi,........
numbNs,
not
inflat€'d rnarketing ratings
3 r •

Design
s:
02
taues
SRC
(Power) Button
This
button
allows
you
to
switch
between
sources
and
power
the
unit
ON
and
OFF.
PLAY/
PAUSE
button
Rotary Encoder
This
knob
is
for
adjusting
main
volume,
menu
navigation
and
setting
adjustments.
PRESET
buttons
Press
this
button
to
play
or
pause
your
music.
This
button
also
acts
asa MUTE
when
the
source is
in
AUX
& TUNER
mode.
These
buttons
allow
you
to
set
presets
and
allow
quick
access
to
them
once set. Press
and
hold
to
retain
the
channel
and
press
to
recall
the
channel.
MENU button
Press &
hold
for
5 seconds
to
access
the
main
menu
settings.
Pressing
will
give
you
access
to
the
settings
for
the
active source.
SUB Buttons
These
buttons
allow
you
to
adjust
the
subwoofer
output
UP
or
DOWN (0-20).
REV/
FWD
button
Use
this
button
to
skip
back
and
forward
through
channels
or
tracks
with
a press.
Holding
the
button
down
will
activate
manual
seek
mode.
4
DIMMER
button
Pressing
this
button
will
allow
you
to
select
between
the
two
brightness
values
for
the
display.
Fig.
l

•
Contents
, Source
Unit
RCA
Output
Harness
Installation
Considerations
, Installation&Operation
Manual
The
following
isa basic
list
of
tools
needed
for
installation:
• Volt/Ohm
meter
• T-25 Torx Bit
• Batterypost wrench •
3/16"
Allen Wrench
If
you feel unsure
about
installing
this
system yourself, have
it
installed bya qualified Rockford Fosgate dealer.
Before installation, disconnect
the
batterynegative(-) terminal
to
preventdamage
to
the
unit,
fire
and/or
possible injury.
For
your
specific radio installation,please refer
to
www.
rockfordfosgate.com/products/details/pmx-hd9813 for more
information.
If
installingthis
unit
in a motorcycle
that
no longerhas
the
factory
radio harnessand connectors
or
if
addingrear speakers
to
a
motorcycle
not
equipped
with
them, pleasecontact Rockford
Fosgate
to
purchase
the
harness
(part#
1130-72997-01).
I I
I I
Red
White
Red
White
(Aux In Right) Red
(Aux In Left) White
USB
SiriusXM
Rear
Output (Black)
F ront Output (Grey)
Aux Input (Red)
Installation/ Mounting
Mounting
This
unit
isa directplug and playreplacement
for
the
factory
radio.
1. Using
your
Torx tool, remove
the
fairingscrews securing
the
outer
fairing
to
the
bike. This
will
giveyou access
to
the
factory
radio.
2.
Remove
the
(4)
factoryscrews
that
are
holding
the
radio
in
place using
the
3/16"
alien tool.There are
(2)
on each side.
3.
Carefullyunplug
the
factory harness and antenna from
the
back
of
the
factory radio.
4.
Remove
the
radio
by
pulling
it
towards
the
front
of
the
motorcycle.
5.
Slide
the
PMX-HD9813
source
unit
into
the
factoryradio
mounting
holeand secure
with
existingfactory fasteners.
6.
Plug
the
factory harness and antenna
into
the
back
of
the new
unit.
7.
If
usinga non Rockford Fosgateamplifier, plug
the
RCA
harness
into
the
remainingsocket.
See
illus-LL
8.
If
usingan
AUX
to
plug
into
the
unit,
plug
the
RCA
harness
into
the
remainingsocket.
See
illus-
Ll.
9.
If
installinga SiriusXm Connect Tuner and antenna,you must
plug
the
SXV300
tuner
into
the
SiriusXm port.
See
illus1.1
10.
If
using
the
Rockford Fosgate amplified
kit,
please refer
to
the
video on www.rockfordfosgate.com/motorcycle
lL
Reinstall
the
fairing
onto
the
bike.
Remove
the
(2)
screws
to
access
RCA
harness plug.
Sub Output (Purple) Red
White
Remote Trigger (Blue/White)
illus.-1.1

Settings
SETTINGS
BALANCE
AUDIO >
VOLTAGE GAUGE 11V
BT
DEVICE
PAIRING >
Source
Unit
Settings
To access
the
source
unit's
settings, press and
hold
the
MENU
button
until
the
options
appear. Rotate
the
encoder
to
scroll
through
the
list
of
settings
and
then
press
the
encoder
button
to
select
the
setting
you
wish
to
change.
(BALANCE>FADER>AUDIO>VOLTAGE
GAUGE>BT
PAI
RI
NG>BEEP>TUNER REGION>SOFTWARE>THEME>REMOTE
SETUP>CLOCK/DATE>FACTORY
DEFAULT)
BALANCE
Press
the
encoder
button
to
access BALANCE
adjustment
settings.
Rotate
the
encoder
button
to
set
output
BALANCE.
FADER
Press
the
encoder
button
to
access
FADER
adjustment
settings.
Rotate
the
encoder
button
to
set
output
FADER.
AUDIO
To access
the
AUDIO settings, press
the
AUDIO
option
from
the
MENU
screen. Rotate
the
encoder
to
scroll
through
the
list
of
settings and
then
press
the
encoder
button
to
select
the
setting
you
wish
to
change. (7 BAND
EQ>CROSSOVER>PEQ>REAR
RCA>AUX
INPUT>SOU
RCE
GAi
N>I
NTERNALAMPLIFIER)
7BANDEQ
Press
the
encoder
button
to
access
the
7 BAND
EQ
settings. Use
the
rotary
encoder
to
scroll
through
the
EQ
settings. (FLAT>
ROCK> CLASSIC>ACOUSTIC> DANCE> ELECTRONIC> HIP-HOP
>
CUSTOM)
When
setting
up
the
CUSTOM
EQ,
press
the
encoder
button
to
set
the
first
frequency. Onceactive, rotate
the
encoder
to
adjust
the
frequency
settings. Press
encoder
button
again
to
access
the
nextfrequency. Repeat
until
all
EQ
settingsare
complete. Press
the
MENU
button
to
exit
and
go
back
up
one
level.
CROSSOVER
Press
to
access
the
CROSSOVER
settings. Use
the
rotary
encoder
to
select
the
crossoverzone
options
(FRONT>REAR>SUB).
Press
the
encoder
to
adjust
the
frequency
of
the
crossover
(60Hz>80Hz>120Hz>APF). Press
MENU
to
exit
and
go
back
up
one
level.
PUNCHEQ
Press
to
access
the
PUNCH
EQ
settings. Use
the
rotary
encoder
to
adjust
the
gain
output
(0-12). Press MENU
to
exit
and
go
back
up
one
level.
Punch
EQ
isan
on
board equalizer
with
up
to+
18dB@
45Hz
and/
or
up
to
+12dB
boost
at
12.SkHz
6
AUX
INPUT
RENAME
-To renameAUX, press
the
encoder
button
to
set
the
first
letter
of
the
new
name.
Onceactive, rotate
encoder
to
select
letters. Press
the
encoder
button
again
to
set
the
nextletter.
Repeat
until
AUX
has been renamed. Press MENU
to
exit
and
go
back
up
one
level.
ENABLE -Press
the
encoder
button
to
access
options.
Rotate
the
encoder
button
to
select
if
unit
isdiscoverable. (ENABLE>
DISABLE)
SOURCE
GAIN
To
adjust
the
level
of
device
input
gain,
scroll
through
the
inputs
(FM
TUNER>AM TUNER>USB>AUX1>AUX2>BLUETOOTH>PANDO
RA>SiriusXM>GLOBAL INPUT)
to
the
device
you
want
to
adjust,
press
the
encoder
button
to
access
the
gainsettings. Rotate
the
encoder
button
to
set
the
level
of
gain (-3dB> -2dB>
-ldB
>
0dB
>
+ldB
>
+2dB
> +3dB).
Selecting
the
GLOBAL INPUT
option
lets
you
adjust
all
source
attenuation
at
once (0dB>-3dB>-6dB>-9dB>-12dB>-15dB>-18dB).
INTERNAL
AMPLIFIER
Press
to
access
the
INTERNALAMPLIFIER
options.
Use
the
rotary
encoder
to
select
options
(ON>OFF). When
using
an
amplifier
to
power
your
speakers,select
OFF.
If
you
are
powering
your
speakers
directly
from
the
source
unit,
select
the
INTERNAL
AMPLIFIER
to
ON.
VOLTAGE GAUGE
To
display
the
vehiclevoltage, press
the
encoder
button
on
the
VOLTAGE
GAUGE
option.
BT
DEVICE PAIRING
Press
the
encoder
button
to
access
options
(DISCOVERABLE>
DEVICE).
DISCOVERABLE
Rotate
the
encoder
button
to
select
if
unit
is discoverable
for
pairing. (ENABLE> DISABLE) Once
enabled,
the
source
unit
is
now
discoverable and ready
for
pairing
to
your
mobile
device. Open
the
Bluetooth
settings
on
your
mobile
device
to
find
the
source
unit
labeled
"Rockford
PMX"
and
select.
DEVICE
Selecting
DEVICE
by
pressing
the
encoder
button
will
allow
you
to
rename
the
source
unit
with
up
to
16characters.
This
gives
you
the
ability
to
havea
unique
name
for
easy
identification
during
devicepairing. Press
the
encoder
button
to
select
the
letter
to
be
changed and
rotate
the
knob
to
change
the
value. Repeat process
until
desired
name
is reached.
BEEP
Press
the
encoder
button
to
access
the
BEEP
options.
Rotate
the
encoder
button
to
turn
system
beep
ON/
OFF.
TUNER
REGION
To
adjust,
press
the
encoder
button
to
access. Rotate
the
encoder
button
to
select
the
TUNER
REGION
of
your
preference.
(EUROPE
>USA>
RUSSIA> LATIN>ASIA> JAPAN> MIDEAST> AUSTRALIA)
SOFTWARE
VERSION
-Press
the
encoder
button
to
display
the
current
firmware
version
of
the
unit.
UPDATE
-Press
the
encoder
button
to
update
the
firmware.
Follow
the
instructions
on
the
screen
when
updating.

THEME
To
adjust
the
THEME, press
the
encoder
to
access
the
feature.
Rotate
the
encoder
button
to
select
the
desired THEME
(DAY,
NIGHT, AUTO)
REMOTE
SETUP
FOR
OPTIONAL PMX-BTUR
To access
the
REMOTE
SETUP
options,
press
the
encoder
to
display
the
different
options
(HEAD UNIT INFO>PMX-BTUR
SCAN>DISCONNECT>PMX-BTUR INFO>
HEAD
UNIT
RESET).
To
pair
you
PMX-BTUR, press
any
button
on
the
remote
to
activate
the
device. Then
select
PMX-BTUR
SCAN
under
the
REMOTE
SETUP
options.
Once
it
detects
the
remote,
press
the
encoder
to
finish
pairing. Refer
to
the
table
on
page 11
for
PMX-BTUR
controls.
CLOCK/DATE
To
adjust
the
CLOCK/DATE, press
the
encoder
to
access
the
feature. Rotate
the
encoder
button
to
selectCLOCK/DATE
options
(C
LOCK
/DATE SETTING>ALBUM
ART
DISPLAY).
CLOCK/DATE
SETTING
To
set
the
12H/24H
display
preference,
rotate
the
encoder
to
scroll
through
the
time
display
options.
Press
encoder
to
se
le
ct
and
keep
that
option.
To
adjust
the
time,
rotate
the
encoder
to
the
correct
hour,
press
the
encoder
to
lock
in
hour,
repeat
for
minutes
and date.
ALBUM
ART
DISPLAY
Press
the
encoder
button
to
select
which
ALBUM ART DISPLAY
opton
you
want
(OFF>SS>10S>20S>ALWAYS).
FACTORY
DEFAULT
AUDIO -Press
the
encoder
button
to
access. Rotate
the
encoder
button
to
selectYES/NO. Selecting
YES
will
reset
your
unit
back
to
factory
default
settings.
SYSTEM
-Press
the
encoder
button
to
access. Rotate
the
encoder
button
to
selectYES/NO. Selecting
YES
will
reset
your
unit
back
to
factory
default
settings.
SiriusXM -Press
the
encoder
button
to
access. Rotate
the
encoder
button
to
selectYES/NO. Selecting
YES
will
reset
your
unit
back
to
factory
default
settings.
Basic Operation
TURNING THE UNIT
ON/
OFF
Press and
hold
the
SRC
(Power)
button
to
turn
the
unit
ON
or
OFF
ADJUSTING THE
VOLUME
Rotate
encoder
knob
left
or
right
to
desired
volume
level (0-40).
The
current
volume
level
will
be
displayed
during
adjustment.
ADJUSTING THE
SUBWOOFER
OUTPUT
Press
the
SUB+
or
SUB-
buttons
to
adjust
the
output
level (0-20).
ADJUSTING THE
SCREEN
BRIGHTNESS
Press and
hold
the
DIMMER
button
to
adjust
the
brightness level.
Thereare
two
brightness
levels.
SELECTING
A
SOURCE
TO
PLAY
Press
the
SRC
button
to
show
the
different
source
options
(FM
TUNER>AM TUNER>USB>AUX>BLUETOOTH>PANDORA>SiriusXM).
Use
the
rotary
encoder
or
press
the
SRC
button
to
scroll
through
sources.
7
Settings
TunerOperation (FM/AM)
To operate, use
the
rotary
encoder
to
select
the
tuner
sourceyou
want
to
listen
to
(FM>AM>WB).
To
switch
between
AUTO and MANUAL
SEEK
modes, press
and
hold
either
the
FWD
or
REV
buttons.
To AUTO
SEEK
stations, press
the
FWD
and
REV
buttons.
To
MANUAL
SEEK
stations, press
and
hold
the
FWD
and
REV
buttons
to
tune
to
the
desired frequency.
To MUTE
the
TUNER, press
the
PLAY/PAUSE
button.
FM
BAND
SETTINGS
To access
the
FM
BAND SETTINGS, press
the
MENU
when
using
the
FM
TUNERsource.This
will
give
you
access
to
the
settings
specific
to
the
FM
TUNER
(FM>PRESETS>ADD
PRESETS>REMOVE
PRESETS>AUTO
STORE>LOCAL).
PRESETS
Press
the
encoder
button
to
access
the
PRESETS
list. Using
this
feature
allows
you
to
see
what
PRESETS
aresaved
on
the
unit.
ADD
PRESETS
Press
the
encoder
button
on
the
ADD
PRESETS
option.
You
will
need
to
be
on
both
the
station
and
PRESET
group
you
want
to
add
first
(FM1>FM2>FM3). Using
this
feature
allows
you
to
save
stations
to
the
unit.
Onceselected, use
the
rotary
encoder
to
select
the
PRESET
number
(1-6)
you
want
the
station saved to.
REMOVE
PRESETS
Press
the
encoder
button
on
the
REMOVE
PRESETS
option.
You
will
need
to
be
under
the
PRESET
group
you
want
to
adjust
first
(FM1>FM2>FM3). Using
this
feature
allows
you
to
remove
saved
stations
on
the
unit.
Onceselected, use
the
rotary
encoder
to
select
the
PRESET
number
(1-6)
of
the
station
you
want
removed.
FM
Press
the
encoder
button
to
access
the
FM
PRESET
options
(FM1>FM2>FM3). Using
this
feature
allows
you
to
have separate
tuner
preset
groups
to
choose
from.
Use
the
rotary
encoder
button
to
scroll
through
the
TUNER
groups
and
press
to
select
the
group.
AUTO
STORE
Press
the
encoder
button
to
access
the
AUTO
STORE
function.
You
will
need
to
be
under
the
PRESET
group
you
want
to
adjust
first
(FM1>FM2>FM3). Thisfeature
automatically
stores presets
on
the
unit.
It
will
stop
when
presets 1-6are set. Select
the
next
PRESET
group
and
repeat
to
fill
next
set.
LOCAL
Press
the
encoder
button
to
access
the
LOCAi:.
options.
Once
selected, use
the
rotary
encoder
to
select
ON
or
OFF.
The
local
option
tunes
to
nearby
radio
stations
with
sufficiently
strong

Operatinn
signals
for
good reception. In areaswhere reception is poor,
switching
to
distance
tuning
enables
the
unit
to
tune
in
to
more
distant
stations. Distance
tuning
is
the
default.
AM
BAND
SETTINGS
To access
the
AM
BAND
SETTINGS,
press
the
MENU
when
using
the
AM
TUNER source. This
will
give
you
access
to
the
settings
specific
to
the
AM
TUNER
(AM>PRESETS>ADD
PRESETS>REMOVE
PRESETS>AUTO
STORE>LOCAL).
PRESETS
Press
the
encoder
button
to
access
the
PRESETS
list. Using
this
feature allows
you
to
see
what
PRESETS
are saved
on
the
unit.
ADD
PRESETS
Press
the
encoder
button
on
the
ADD
PRESETS
option.
You
will
need
to
beon
both
the
station and
PRESET
group
you
want
to
add
first
(AM1>AM2).
Using
this
feature allows
you
to
savestations
to
the
unit.
Once selected, use
the
rotary
encoder
to
select
the
PRESET
number
(1-6)
you
want
the
station saved
to.
REMOVE
PRESETS
Press
the
encoder
button
on
the
REMOVE
PRESETS
option.
You
will
need
to
be
under
the
PRESET
group
you
want
to
adjust
first
(AM1>AM2). Using
this
feature
allows
you
to
remove saved
stations
on
the
unit.
Onceselected, use
the
rotary
encoder
to
select
the
PRESET
number
(1-6)
of
the
station
you
want
removed.
AM
Press
the
encoder
button
to
access
the
FM
PRESET
options
(AM1>AM2). Using
this
feature
allows
you
to
have separate
tuner
presetgroups
to
choose
from.
Use
the
rotary
encoder
button
to
scroll
through
the
TUNER
groups
and
press
to
select
the
group.
AUTO
STORE
Press
the
encoder
button
to
access
the
AUTO
STORE
function.
You
will
need
to
be
under
the
PRESET
group
you
want
to
adjust
first
(AM1>AM2). This feature
automatically
stores presets
on
the
unit.
It
will
stop
when presets 1-6are set. Select
the
next
PRESET
group
and repeat
to
fill
nextset.
LOCAL
Press
the
encoder
button
to
access
the
LOCAL
options. Once
selected, use
the
rotary
encoder
to
select
ON
or
OFF.
The
local
option
tunes
to
nearby
radio
stations
with
sufficiently
strong
signals
for
good reception. In areas where reception is poor,
switching
to
distance
tuning
enables
the
unit
to
tune
in
to
more
distant
stations. Distance
tuning
is
the
default.
USB (iPod) Operation
After
your
device isconnected
to
the
source
unit,
this
feature
allows
you
to
control
playback
from
your
device
directly
from
the
source
unit.
Select
the
USB
source
option
on
the
source
unit.
To
play
or
pause asong, press
the
PLAY/PAUSE
button.
8
To
skip
a
track
forward,
press
the
FWD
button.
To
skip
a
track
backwards, press
the
REV
button.
To access USBspecific settings, press
the
MENU
button
for
the
list
of
settings
(BROWSER>REPEAT>SHUFFLE).
Use
the
encoder
to
select
the
option
to
change.
BROWSER
Press
the
encoder
button
to
access
the
BROWSER
options
(PLAY
LISTS>ARTISTS>ALBUMS>GENRES>SONGS>COMPOSERS>AUDIO
BOOKS>PODCASTS).
Using
this
feature
allows
you
to
search
for
tracks
or
songs
by
different
types
of
categories.
To page/down, use
the
track
forward
and
track
backwards
buttons.
REPEAT
Press
the
encoder
button
to
access
the
REPEAT
feature
options
(OFF>ONE>ALL).
SHUFFLE
Press
the
encoder
button
to
access
the
SHUFFLE feature
options
(OFF>ALL). Thisfeature
allows
you
to
set
your
preference
on
shuffling
tracks
or
songs.
AUX Operation
After
your
deviceis plugged
into
the
source
unit,
this
feature
allows
you
to
play
music
from
your
device. Select
the
AUX
source
option
on
the
source
unit
and
use
your
plugged in device
to
control
song/track
selection,
PLAY/PAUSE
and
track
skip
FWD/
REV.
Note: Foruse
with
USB
or
AUX
input,
an
optional
auxiliary
input
port
(part#
PAUX
or
PMX-USBP(USB only))
may
be
mounted
in
the
fairing
or
a storage pocket.

Bluetooth• Operation
After
your
deviceis paired
to
the
source
unit,
this
feature
allows
you
to
control
playback
from
your
device
directly
from
the
source
unit.
Select
the
BLUETOOTH source
option
on
the
source
unit.
To
play
or
pause a song, press
the
PLAY/PAUSE
button.
To
skip
a
track
forward,
press
the
FWD
button.
To
skip
a
track
backwards, press
the
REV
button.
To access BLUETOOTH specificsettings, press
the
MENU
button
for
the
list
of
settings
(BROWSER>REPEAT>SHUFFLE).
Use
the
encoder
to
select
the
option
to
change.
BROWSER
Press
the
encoder
button
to
access
the
BROWSER
options
(PLAY
LISTS>ARTISTS>ALBUMS>GENRES>SONGS>COMPOSERS>AUDIO
BOOKS>PODCASTS). Using
this
feature
allows
you
to
search
for
tracks
or
songs
by
different
types
of
categories.
REPEAT
Press
the
encoder
button
to
access
the
REPEAT
feature
options
(OFF>ONE>ALL). This
feature
allows
you
to
set
your
preference
on
the
amount
of
times
a
track
or
song
will
repeat.
SHUFFLE
Press
the
encoder
button
to
access
the
SHUFFLE feature
options
(OFF>ALL). Thisfeature
allows
you
to
set
your
preference
on
shuffling
tracks
or
songs.
NOTE:
When
the
device is
initially
paired,
the
volume
on
the
device
will
be
roughly
at
half
volume.
You
will
need
to
turn
the
volume
all
the
way
up
on
the
connected device
prior
to
level
setting. The device
will
remain
at
maximum
volume
after
initially
setting
and
when
it
re-pairs
to
the
source
unit.
Operation
Pandora•
Thisfeature
allows
you
to
control
the
Pandora•
app
from
the
source
unit
directly
(Android users
will
have
to
use
Bluetooth
only,
iOS userscan use
both
USB
and
Bluetooth).You
will
need
to
start
the
Pandora•
app
on
your
devicefirst,
then
select
the
Pandora•
source
option
on
the
source
unit.
To use
the
"Thumbs
Up"
feature,
press
and
hold
the
SUB+
button.
To use
the
"Thumbs
down"
feature, press
and
hold
the
SUB -
button.
To
play
or
pause a song, press
the
PLAY/PAUSE
button.
To
skip
a
track
forward,
press
the
FWD
button.
To access Pandora•specific settings, press
the
MENU
button
for
the
list
of
settings (STATIONS>BOOKMARKS>STATIONS
MANAGE).
Use
the
encoder
to
select
the
option
to
change.
STATIONS
To adjust, press
the
encoder
button
to
access. Rotate
the
encoder
button
to
select
your
options
(SHUFFLE>SORT DATE/A-
Z>STATIONS). Selecting
the
SHUFFLE
option
will
shuffle
your
stations
and
selecting
the
SORT
feature
will
sort
your
stations
by
date
added
or
alphabetically.
You
can also select
your
saved
stations
directly
from
this
list.
BOOKMARKS
To BOOKMARK an
artist
or
track
that
is playing, press
the
encoder
button
to
display
your
BOOKMARK
options
(ARTIST>
TRACK).
Select
the
option
you
wish
to
use
for
bookmarking.
Pandora,
the
Pandora logo, and
the
Pandora
trade
dress are
trademarks
or
registered
trademarks
of
Pandora Media,
LLC.
Used
with
permission. Pandora is
only
available
in
certain countries.
Please
visit
http://www.pandora.com/legal
for
more
information.

Operation
SMx1 {(<Siriusxm>)}
SONG
TITLE
{(<
Slrlusxm
>))
\:--
; :
•,:.,:
.
·~
\
Si
riusxM·(US
and
Canada
on
l
y)
OnlySiriusxM•bringsyou
more
of
what
you love
to
listen to,
all
in one place. Get
over
140channels,
including
commerical-
free music plus
the
best
sports, news,
talk,
comedy
and
entertainment.Welcome
to
the
world
of
satellite radio. A
SiriusXM Connect
Tuner
and Subscription are required. For
more
information,
visitwww.siriusxm.com
ACTIVATING YOUR SiriusXM SUBSCRIPTION
Afterinstalling
your
SiriusXM ConnectTunerand antenna,
power
on
your
source
unit
and
select SiriusXM mode.
You
should be
able
to
hear
the
SiriusXM Previewchannel
on
Channel 1.
If
you
cannot hear
the
previewchannels, pleasecheck
the
installation
instructions
to
make
sure
your
SiriusXM Connect
Twuner
is
properly
installed.
Afteryou can hear
the
Previewchannel,
tune
to
Channel
Oto
find
the
Radio
ID
of
your
tuner. In
addition,
the
Radio ID is located
on
the
bottom
of
the
SiriusXM ConnectTunerand itspackaging.
You
will
need
this
number
to
activate
your
subscription. Write
the
number
down
for
reference.
Note:
the
SiriusXM Radio
ID
does
not
include
the
lettersI,
0,
Sor
F.
In
the
USA,
you can activate
on
line
or
by
callingSiriusXM Listener
care:
Visit www.siriusxm.com/activatenow
• Call SiriusXM ListenerCare
at
1-866-635-2349
ForCanadian Subscriptions, please contact:
• Visit www.siriusxm.ca/activatexm
Call
XM
CustomerCare
at
1-877-438-9677
As
part
of
the
activation process,
the
SiriusXM satellites
will
send
an activation message
to
your
tuner. When
your
radio detects
that
the
tuner
has received
the
activation message,
your
radio
will
display:
"Subscription
Updated". Once subscribed, you can
tune
to
channels
in
your
subscription plan. Note,
the
activation
processusuallytakes10
to
15 minutes,
but
may
take
up
to
an
hour.Your radio
will
need
to
be powered
on
and receiving
the
SiriusXM signal
to
receive
the
activation message.
SETTINGS
To
access
the
SiriusXM
SETTINGS,
press
the
MENU
when using
the
SiriusXM source.This
will
giveyou access
to
the
settings
specific
to
SiriusXM
(SXM>PRESETS>ADD
PRESETS>REMOVE
PRESETS>CHANNELS>CATEGORY).
SiriusXM
PRESET
BANDS
(SXM)
Press
the
encoder
button
to
access
the
SiriusXM
PRESET
options
(SXM1>SXM2>SXM3). Using
this
feature allowsyou
to
have
separatesatellite preset
groups
to
choose from.
Use
the
FWD
and
REV
buttons
to
scroll
through
the
TUNER
groups.
10
PRESETS
Press
the
encoder
button
to
access
the
PRESETS
list. Using
this
feature
allows
you
to
see
what
PRESETS
aresaved
on
the
unit.
ADD
PRESETS
Press
the
encoder
button
on
the
ADD
PRESETS
option.
You
will
need
to
be
on
both
the
channel
and
PRESET
group you
want
to
add first (SXM1>SXM2>SXM3). Using
this
feature
allows
you
to
save channels
to
the
unit.
Onceselected, use
the
rotary
encoder
to
select
the
PRESET
number
(1-6) you
want
the
channelsaved to.
REMOVE
PRESETS
Press
the
encoder
button
on
the
REMOVE
PRESETS
option.
You
will
need
to
be
under
the
PRESET
group
you
want
to
adjust
first
(SXM1>SXM2>SXM3)
. Using
this
feature
allows
you
to
remove
saved channels
on
the
unit.
Once selected, use
the
rotary
encoder
to
select
the
PRESET
number
(1-6)
of
the
channelyou
want
removed.
CHANNEL
Press
the
encoder
button
on
the
CHANNEL
option
to
select
this
feature. Thisfeature displays a
complete
listing
of
channels.
CATEGORY
Press
the
encoder
button
on
the
CATEGORY
option
to
select
this
feature. Thisfeature
allows
you
to
search channels based
on
their
CATEGORY
type
.
DIRECT
TUNING
Press
the
encoder
button
on
the
DIRECT
TUNING
option
to
select
this
feature. This feature
allows
you
to
directly
tune
to
a channel
if
you
already
know
the
channel
number. Rotate
the
encoder
until
you reach
the
desired
nuumeral
and press
to
enter
your
selection.
Repeat
until
the
channel
number
iscompleted.
PARENTAL
CONTROLS
Press
the
encoder
button
on
the
PARENTAL
CONTROL
option
to
select
this
feature. This feature
allows
you
to
easily
lock
and
unlock
channels
with
mature
content.
To
turn
this
feature on,
press
the
encoder
on
PARENTAL
CONTROLS
to
select.
You
will
be
asked
to
enter
a code
to
activate
it.
Enter
"1111"
for
your
code.
Once
the
code isentered correctly,
this
will
giveyou access
to
the
PARENTAL
CONTROL
features
(LOCK
CHANNELS>CHANGE
MY
CODE).
Use
the
encoder
knob
to
scroll
through
the
options
and
press
to
select.
LOCK
CHANNELS
Press
the
encoder
button
on
the
LOCK
CHANNELS
option
to
select
this
feature. This feature
allows
you
to
selectcertain channels
to
be locked
out
for
listening. When
trying
to
listen
to
locked
channels, you
will
need
to
enter
the
correctaccess code
to
listen
to
them.
Use
the
rotary
encoder
to
input
code.
CHANGE
MY
CODE
Press
the
encoder
button
on
the
CHANGE
MY
CODE
option
to
reset
the
PARENTAL
CONTROL
access code. Use
the
rotary
encoder
to
input
the
code.

PMX-BTUR
Ft
nction
Table
PMX-HD9813 Control
PhoneControl
USB/MP3/WMA
AUX-IN
iPhone/iPod
BT
Audio
SlriusXM
Short
Press
Long
Press
Short
Press
Long
Press
Short
Press Long
Press
Short
Press
Long
Press
Short
Press
Long
Press
Short
Press Long Press
Volume+
Ramp
Volume+ Volume+
Ramp
Volume+ Volume+
Ramp
Volume+ Volume+ Ramp
Volume+
Volume+
Ramp
Volume+
Volume+ Ramp
Volume+
Volume-
Ramp
Volume
-
Volume-
Ramp
Volume -Volume -
Ramp
Volume
-Volume-
Ramp
Volume
-Volume-
Ramp
Volume -Volume-
Ramp
Volume
-
Play/
Pause Hands
Free•
Play/
Pause MUTE(Enter)
Play/
Pause MUTE(Enter) MUTE (Enter)
(Enter) (Enter)
Previous
Rewind
Previous
Rewind
Previous
Rewind
Previous
Rewind
Previous
Rewind
Previous
Rewind
Next
Fast Forward Next Fast Forward Next Fast Forward
Next
Fast
Forward
Next
Fast Forward Next FastForward
Call
Answer'/
Call
Reject•
SRC/
Power
Off
SRC/
Power
Off
SRC
/ PowerOff
SRC/
PowerOff
SRC/
Power
Off
Call
Hang
Up•
Siri" Power
On
Power
On
Power
On
Power
On PowerOn
•
iOSOnly
11

Troubleshooting
Symptom/
Advisory
Source
unit
does
not
turn
on.
Tunerfails
to
tune
any
stations
Unable
to
tune
stations
in
seek
mode
USB
device
cannot
be inserted
-
~-----
USB
deviceis
not
recognized
Nosound heard
with
the
display
"No
File"shown
Sound skips
or
is noisy
MP3
is
not
playingback
Bluetooth source
volume
is
lower
than
other
sources
Diagnosis
Basic
Blown
fuse
Motorcycle's
ignition
is
off
Voltage applied
to
Red
wire is
not
between 10.5&16
volts
or
there
is
no
voltage present
Unit
is
not
properly
grounded
Radio
Tuner
No antenna
or
disconnected
or
open connection incable
You
are
in
a weaksignal area
USBDevices
The USB device has been inserted
in
the
wrong
direction
The
USB
device
connector
isbroken
The
USB
device isdamaged
Connectorsare loose
No MP3/WMA files are stored
on
the
USB
device
MP3/WMA files are
not
created
properly
AUX
Writing
error
occurred.The
MP3
format
is
not
compatible.
Bluetooth
Bluetooth
from
device is
not
at
maximum
volume
12
Remedy
Check fuse
of
the
unit,
replace
with
correct
rating.
If
connected
following
the
instructions,
the
unit
will
not
operate
with
ignition
off.
Check battery, connectionsand fuses and repair
or
replace
as
necessary.
If
voltage is
above+
16volts,
have
the
electricalsystem inspected
by
an authorized
servicecenter.
Check
wiring
and repair
as
necessary.
Check
all
connections and repairas necessary.
Makesure
the
tuner
LOC
mode
is off. Add
optional
antenna
(part#
PMX-ANT)
Reversing
the
connection
direction
of
the
USB
device,
try
reinserting.
Replace
with
a
new
USB device.
Disconnect
USB
device and reconnect.
If
the
device is
still
not
recognized,
try
replacing
with
a
different
USB
device.
USB
does
not
work
with
Android devices.
Storethese files
properly
on
the
USB
device.
USB
does
not
work
with
Android devices.
Use MP3/WMA files
that
areencoded correctly.
Makesure
MP3
has been
written
in a supported
format
Turn
the
volume
on
the
device
to
maximum
level

CheckAntenna
CheckTuner
No Signal
Subscription Updated
Channel
Not
Available
Channel
Not
Subscribed
Channel Locked
SiriusXM
The radio has detected a fault
with
the
SiriusXM antenna. The antenna
cable
may
be
either
disconnected
or
damaged.
Theradio is having
difficulty
communicating
with
the
SiriusXM
ConnectTuner. The
tuner
may
be
disconnected
or
damaged.
The SiriusXM ConnectTuner is
having
difficulty
receiving
the
SiriusXM satellitesignal.
The radio has detected a change in
your
SiriusXM subscription status.
Press
the
encoder
button
to
clear
the
message.
The channel
that
you
have
requested is
not
a valid SiriusXM
channelorthechannelthatyou
were listening
to
is no longer
available.
You
may
alsosee
this
message
briefly
when first
connectinga new SiriusXM Connect
Tuner.
The channel
that
you
have
requested is
not
included in
your
SiriusXM subscription package
or
the
channel
that
you were listening
to
is
no
longerincluded in
your
SiriusXM subscription package.
Troubleshooting
Verify
that
the
antenna cable is connected
to
the
SiriusXM ConnectTuner
Inspect
the
antenna cable
for
damageand kinks.
Replace
the
antenna
if
the
cable is damaged.
SiriusXM products are available
at
your
localcaraudio
retailer
or
on
line
at
www.shop.siriusxm.com
Verify
that
the
SiriusXM ConnectTunercableis
securelyconnected
to
the
radio
Verify
that
your
vehicle is outdoors
with
a clearview
of
the
sky.
Verify
that
the
SiriusXM magnetic
mount
antenna is
mounted
on
a metal surface
on
the
outside
of
the
vehicle.
Move the SiriusXM antennaaway
from
any
obstructions.
Inspect
the
antenna cable
for
damageand kinks.
Consult
the
SiriusXM ConnectTuner installation
manual
for
more
information
on
antenna installation.
Replace
the
antenna
if
the
cable isdamaged. SiriusXM
productsare available
at
your
localcaraudio retailer
or
on
line
at
www.shop.siriusxm.com.
Visitwww.siriusxm.com
or
call866-635-2349 in
the
USA
or
877-438-9677 inCanada
if
you havequestions
about
your
subscription.
Visit
www
.siriusxm.com
for
moreinformation
about
the SiriusXM channel lineup.
Visitwww.siriusxm.com
or
call866-635-2349 in
the
USA
or
877-438-9677 in Canada
if
you havequestions
about
your
subscription package
or
would
like
to
subscribe
to
thischannel.
The channel
that
you
have requested is Locked
by
the
radio Parental Controlfeature.
See
page
10
for
more
information
on
the
Parental Control feature and
how
to
access locked channels.
13

.,
Rockford Corporation offers a limited warranty
on
Rockford Fosgate products on
the
following terms:
Length
of
Warranty
POWER
Amplifiers- 2
Years
BMw• Direct FitSpeakers - 2
Years
PUNCH•
&
PRIME®
Amplifiers
-1
Year
Speakers, Signal Processors,Accessories and Capacitors
-1
Year
All marine,motorcycle,
motorsport
products- 2
Years
Any Factory Refurbished
Product-
90 Days (receipt required)
What
is
Covered
Warranty
Thiswarranty applies
only
to
Rockford Fosgate productssold
to
consumers by authorized Rockford Fosgate dealers
in
the
United States
of
America. Products purchased
by
consumers
from
an Authorized Rockford Fosgate Dealerin
another
country
are covered
only
by
that
country's Distributorand
not
by
Rockford Corporation.
Who is Covered
This
warranty
covers
only
the
originalpurchaser
of
Rockford
product
purchased
from
an authorized Rockford Fosgate dealerin
the
United
States. In
order
to
receive service,
the
purchaser
must
provide Rockford
with
a copy
of
the
receiptstating
the
customername, dealername,
product
purchased and date
of
purchase.
Productsfound
to
be defective
during
the
warranty period
will
be repaired
or
replaced (with a
product
deemed
to
be equivalent)
at
Rockford's discretion.
Whatis
Not
Covered
1. Damage caused byaccident,abuse,
improper
installation, operations, theft,
water
(on non-ElementReady products).
2.
Any cost
or
expense related
to
the
removal
or
reinstallation
of
product.
3.
Service performed byanyone
other
than
Rockford
or
an authorized Rockford Fosgate service center.
4.
Any
product
which has had
the
serial
number
defaced, altered,
or
removed.
5. Subsequentdamage
to
other
components.
6. Any
product
purchased outside
the
U.S.
7. Any
product
not
purchased
from
an authorized Rockford Fosgate dealer. Refer
to
rockfordfosgate.com dealerlocator
for
more detail.
Limit
on
Implied
Warranties
Anyimplied warranties includingwarranties
of
fitness
for
use and merchantabilityare
limited
in
duration
to
the
period
of
the
express
warrantyset
forth
above. Somestates
do
not
allow limitationson
the
length
of
an implied warranty, so
this
limitation
may
not
apply. No
person isauthorized
to
assume
for
Rockford Fosgate any
other
liability
in connection
with
the
sale
of
the
product.
How
to
Obtain Service
Pleasecall1-800-669-9899
for
Rockford CustomerService.
You
must
obtain an
RA#
(Return Authorization number)
to
return
any
product
to
Rockford Fosgate.
You
are responsible
for
shipment
of
product
to
Rockford.
EU
Warranty
This
product
meets
the
current
EU
warranty
requirements,
see
your
Authorized dealer
for
details.
54

I-'
N
w
0
I
--1
0
N
~
w
I
0
I-'
I
CJ
-Installation assistance available at: -
www.rockfordfosgate.com/rftech
600 South Rockford
Drive•
Tempe,Arizona 85281 United States
Direct: (480) 967-3565 • Toll Free: (800) 669-9899
rockfordfosgate.com
Other manuals for Punch PMX-HD9813
1
Table of contents
Other Rockford Fosgate Motorcycle Accessories manuals

Rockford Fosgate
Rockford Fosgate Punch PMX-HD9813 User manual

Rockford Fosgate
Rockford Fosgate Element Ready TMS69BL14 Guide

Rockford Fosgate
Rockford Fosgate R1-HD4-9813 User manual

Rockford Fosgate
Rockford Fosgate DSR1 User manual

Rockford Fosgate
Rockford Fosgate R1-HD4-9813 User manual

Rockford Fosgate
Rockford Fosgate TMS69BL14 Guide