manuals.online logo
Brands
  1. Home
  2. •
  3. Brands
  4. •
  5. Rockler
  6. •
  7. Indoor Furnishing
  8. •
  9. Rockler Salice GRP21290 User manual

Rockler Salice GRP21290 User manual

1
Salice 165° 11⁄4" Overlay
Face Frame Pie Corner
Hinge Kit Instructions
Vertical Positioning of Hinges
Although Euro-style concealed hinges allow for vertical
adjustment, the mounting plate must line up with the hinge arm if
the two are to snap together and provide the maximum possible
adjustment range. The easiest way to accomplish this is to mark
aligning horizontal centerlines on both the doors and the cabinet
face frame. You need to consider the amount of the doors’ overlay
or inset when calculating the centerline positions for the doors.
1. For the top hinge, measure down from the top of the cabinet
opening to the desired mounting location (typically 2"-3") and
use a combination square to mark the horizontal centerline on
the inside edge of the face frame. (For the bottom hinge,
measure up from the bottom of the cabinet opening.)
Note: Be sure your hinge positions will provide adequate
clearance for any pullouts.
2. To determine the centerline location on the door, start with
the distance you measured in Step 1 and add the amount
the door will overlap at that edge.
3. Use the values calculated for the top and bottom hinge
locations in Step 2 and mark the horizontal centerlines on
the back of the door. Compare the distance between the lines
on the cabinet with the distance between the lines on the
door to verify.
Note: Building a bi-fold door system requires installing two pairs
of hinges — 165˚ frameless cabinet hinges (the larger pair) and
bi-fold door hinges. The 165˚ hinges attach to the side of the
cabinet and to Door 1. The bi-fold hinges connect to Door 1
and Door 2.
This system also requires using two sacrificial pieces of scrap
wood to drill the unique “half-moon” pocket for the recessed
mounting plates in the face frame.
23140
Hinge Finish Tab Cup
Diameter
Cup
Depth
Minimum Door
Thickness
Maximum Door
Thickness Adjustments Gap Clip-on
Mounting
Minimum
Reveal
Salice Pie
Corner Kit Nickel 4mm 35mm 11mm 15mm (.59") 19mm (.75") 3-way cam .7mm Yes 1.5mm
2
Installing Hinges on Door 1
1. Refer to the Door 1 Diagram to mark drilling locations for
the hinge cup holes and mounting screw holes on the door.
2. Using a 35mm Forstner bit, drill a hole 11mm deep for the
hinge cup, taking care to keep the bit as square as possible
to the door.
Note: For fast, easy and accurate location and drilling of
hinge cup holes, we recommend using the JIG IT Deluxe
Concealed Hinge Drilling System (53420, sold separately)
along with a Rockler 35mm Long-Shank Forstner Bit (10117,
sold separately). For those using a drill press, a dedicated
JIG IT setup block is available (58223, sold separately).
3. Drill pilot holes for the screws, taking care not to drill all
the way through the door.
4. Position the hinge cup in the hole and use the included
screws to secure in place.
5. Repeat Steps 2-4 at other hinge location(s).
Installing Mounting Plates On Face Frame
1. Refer to Face Frame Diagram to mark drilling locations
for the hinge plate mounting screws on the inside edge
of the face frame.
2. Drill pilot holes for the mounting screws.
Note: For fast, easy and accurate location and drilling of
mounting plate pilot holes, we recommend using the “Cabinet”
side of JIG IT Hinge Plate Template E (55909, sold separately)
along with a Rockler/Insty-Drive #6 Self-Centering Bit (68991,
sold separately).
3. Extend the centerline from the inside edge of the face
frame across the front of the face frame.
4. Clamp a sacrificial piece of the same thickness edge to
edge on the face frame at the mounting location and
extend the centerline onto the sacrificial piece.
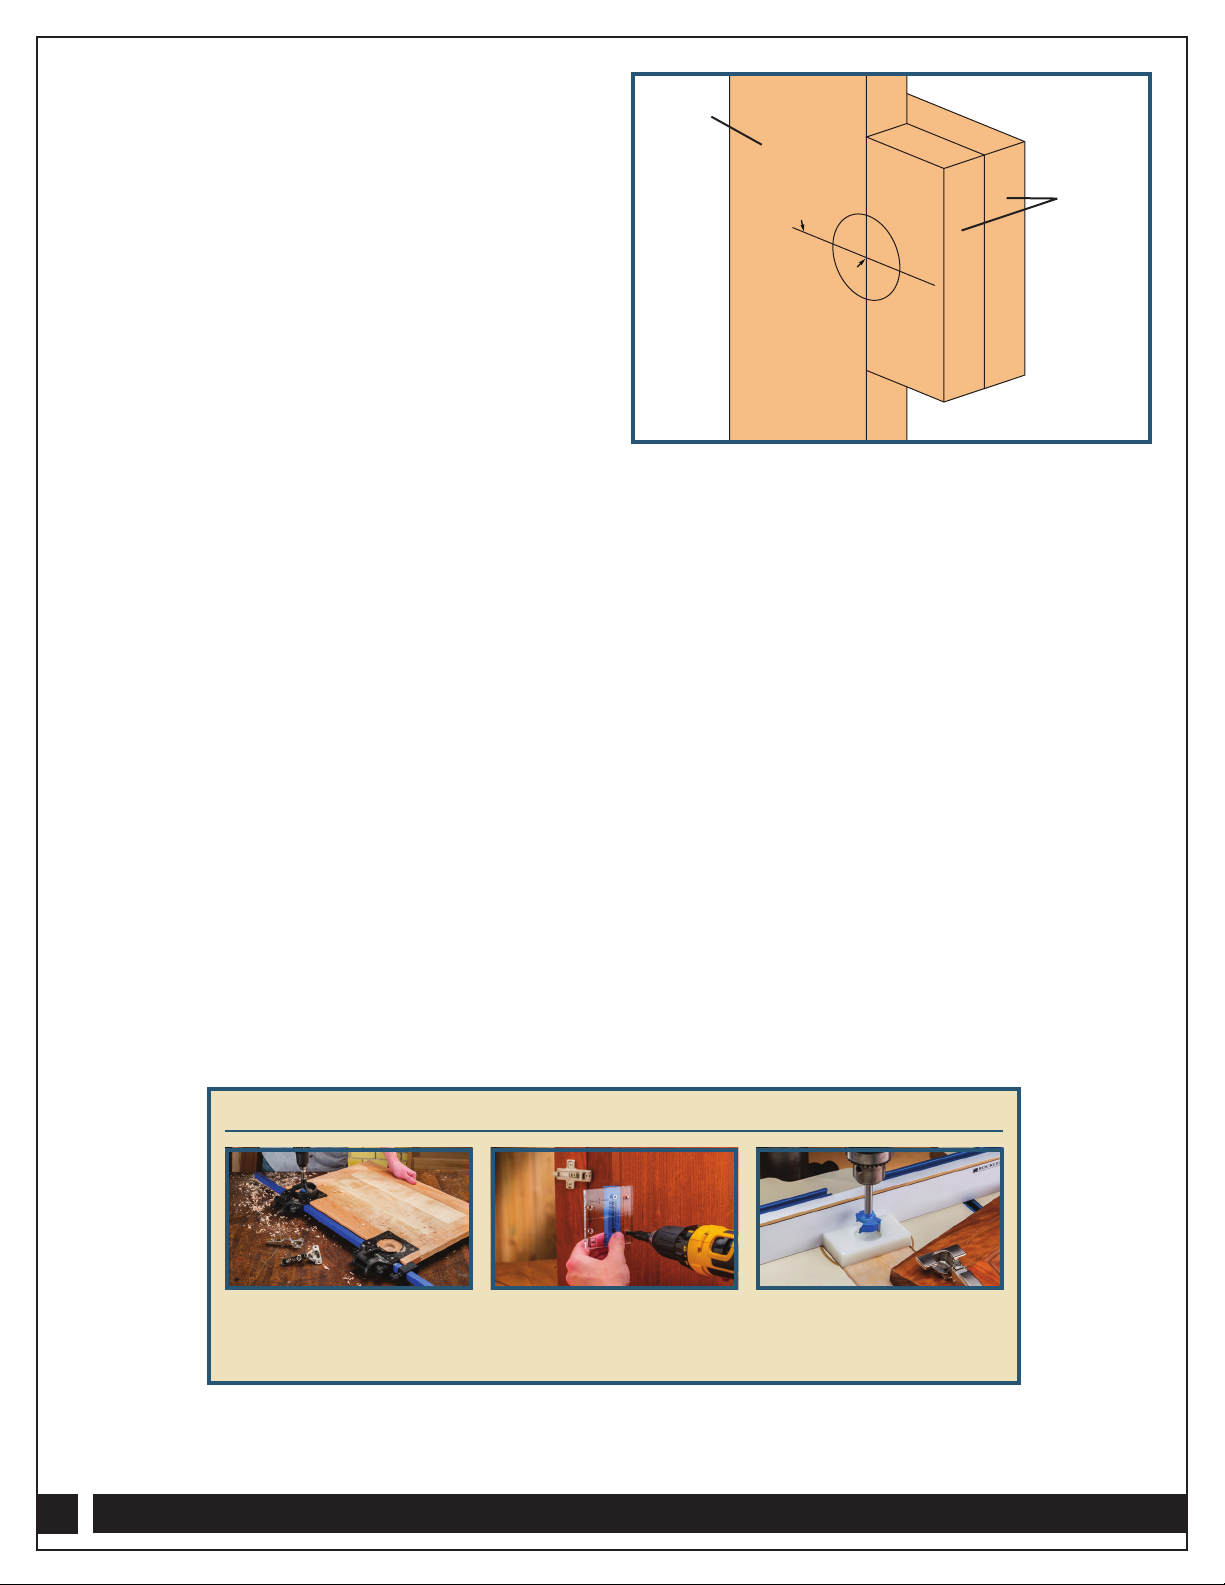
5. Center the tip of a 35mm Forstner bit on the centerline
and the intersection of the pieces, then drill a hole all the
way through, taking care to keep the bit as square as
possible to the face frame. Fig. 1.
Note: Clamp an additional sacrificial piece behind the face
frame to prevent tear-out.
Check Rockler.com for updates. If you have further questions, please
contact our Technical Support Department at 1-800-260-9663
or support@rockler.com
6. Remove the sacrificial pieces and use the included screws
to install the recessed mounting plate.
7. Repeat Steps 1-6 at other hinge location(s).
Installing Mounting Plates on Door 2
1. Refer to the Door 2 Diagram to mark drilling locations for
the hinge plates (or use “Door” side of Plate Template E.)
2. Drill pilot holes for the mounting screws, taking care not to
drill all the way through.
3. Use the included screws to secure the mounting plates
onto Door 2.
4. Mount the doors by clipping the hinge arms onto the
mounting plates.
Face
Frame
Sacrifical
Pieces
Centerline
Center
Mark
Fig. 1
OPTIONAL ACCESSORIES
JIG IT®Deluxe Concealed
Hinge Drilling Jig
53420
JIG IT®Template E
Door Hinge Jig
55909
JIG IT®4mm Hinge Cup
Drill Press Drilling Jig
58233
3
Distributed by Rockler Companies, Inc.
©2015 Rockler Woodworking and Hardware
23140
Rev 09/15
45
4
Face
Frame
All measurements are in millimeters.
Door 1 Diagram
9.5
Tab Center
Mark
Centerline
Face
Frame
Diagram
Door 1 Door 2
Inside Edge
of Door Inside Edge
of Door
4
48
28
32
Tab
Center
Mark Centerline
Door 2 Diagram
Turning this screw clockwise adjusts the
door down; counterclockwise, up.
Turning this screw clockwise adjusts the
door inward; counterclockwise, outward.
Height Adjustment Depth Adjustment Lateral Adjustment
Turning this screw clockwise adjusts
the door to the right; counterclockwise,
to the left.
Cup Depth Diagram
11
35
Door
Cabinet
Face Frame GapGap
Gap and Reveal
Reveal
21.59.521.5 9.5
Door 1
Door 2
Door 1
Door 2
Door 1
Door 2

This manual suits for next models

1

Other Rockler Indoor Furnishing manuals

Rockler Salice GRP40159 User manual

Rockler

Rockler Salice GRP40159 User manual

Rockler Blum 55894 User manual

Rockler

Rockler Blum 55894 User manual

Rockler Salice 58927 User manual

Rockler

Rockler Salice 58927 User manual

Rockler Blum GRP2283 1 User manual

Rockler

Rockler Blum GRP2283 1 User manual

Rockler Salice 56534 User manual

Rockler

Rockler Salice 56534 User manual

Rockler 50487 User manual

Rockler

Rockler 50487 User manual

Rockler Blum GRP40163 User manual

Rockler

Rockler Blum GRP40163 User manual

Rockler Blum GRP5832 1 User manual

Rockler

Rockler Blum GRP5832 1 User manual

Rockler Blum 55840 User manual

Rockler

Rockler Blum 55840 User manual

Rockler Centerline 3612 Series User manual

Rockler

Rockler Centerline 3612 Series User manual

Rockler Blum 23554 User manual

Rockler

Rockler Blum 23554 User manual

Rockler Blum 170 Face Frame User manual

Rockler

Rockler Blum 170 Face Frame User manual

Rockler Deluxe Murphy User manual

Rockler

Rockler Deluxe Murphy User manual

Rockler Blum 81018 User manual

Rockler

Rockler Blum 81018 User manual

Rockler Blum 55879 User manual

Rockler

Rockler Blum 55879 User manual

Rockler Blum BLUMotion GRP31256 1 User manual

Rockler

Rockler Blum BLUMotion GRP31256 1 User manual

Rockler GRP2325 1 User manual

Rockler

Rockler GRP2325 1 User manual

Rockler 38606 User manual

Rockler

Rockler 38606 User manual

Rockler Complete Router Table User manual

Rockler

Rockler Complete Router Table User manual

Rockler Blum GRP5832 1 User manual

Rockler

Rockler Blum GRP5832 1 User manual

Rockler KV 8071EZ SEriEs User manual

Rockler

Rockler KV 8071EZ SEriEs User manual

Rockler Salice GRP40159 User manual

Rockler

Rockler Salice GRP40159 User manual

Rockler Blum BLUMotion 34807 User manual

Rockler

Rockler Blum BLUMotion 34807 User manual

Rockler Blum GRP10843 1 User manual

Rockler

Rockler Blum GRP10843 1 User manual

Popular Indoor Furnishing manuals by other brands

Regency LWMS3015 Assembly instructions

Regency

Regency LWMS3015 Assembly instructions

Furniture of America CM7751C Assembly instructions

Furniture of America

Furniture of America CM7751C Assembly instructions

Safavieh Furniture Estella CNS5731 manual

Safavieh Furniture

Safavieh Furniture Estella CNS5731 manual

PLACES OF STYLE Ovalfuss Assembly instruction

PLACES OF STYLE

PLACES OF STYLE Ovalfuss Assembly instruction

Trasman 1138 Bo1 Assembly manual

Trasman

Trasman 1138 Bo1 Assembly manual

Costway JV10856 manual

Costway

Costway JV10856 manual

moss DESIGN Caisson Credenza Assembly instructions

moss DESIGN

moss DESIGN Caisson Credenza Assembly instructions

Aquaglide FULL DECK 15.0 owner's manual

Aquaglide

Aquaglide FULL DECK 15.0 owner's manual

AREBOS AR-HE-SW30 user manual

AREBOS

AREBOS AR-HE-SW30 user manual

Till-Hilft Fulda 87005.330 Assembly instructions

Till-Hilft

Till-Hilft Fulda 87005.330 Assembly instructions

Twoey Outside 2010 quick start guide

Twoey Outside

Twoey Outside 2010 quick start guide

Hettich Easys 200 operating instructions

Hettich

Hettich Easys 200 operating instructions

The bedboss RELAX 404 Series owner's manual

The bedboss

The bedboss RELAX 404 Series owner's manual

Oeseder Möbelindustrie Bern 991 720 Assembly instructions

Oeseder Möbelindustrie

Oeseder Möbelindustrie Bern 991 720 Assembly instructions

Costway HW68469 user manual

Costway

Costway HW68469 user manual

Next ALIX A27743 Assembly instructions

Next

Next ALIX A27743 Assembly instructions

BROSA Hans Assembly guide

BROSA

BROSA Hans Assembly guide

Prodigg MINIKA PBA015T-FUR installation manual

Prodigg

Prodigg MINIKA PBA015T-FUR installation manual

manuals.online logo
manuals.online logoBrands
  • About & Mission
  • Contact us
  • Privacy Policy
  • Terms and Conditions

Copyright 2025 Manuals.Online. All Rights Reserved.