Rompa 21891 User manual

1. Product Name
Aroma Nebulizer
2. Product Code
21891
3. Colour
As shown
4. Brief Description
Add your own essential oil and the scent is dispersed in your room whilst making the
air moist.
5. Contents
1 x Aroma Nebuliser
1 x Power jack and adapter
6. Snoezelen® Stimulations
Olfactory
Visual

7. Best Use
Use indoors on a flat, stable surface. Lovely used in darkened environments to enjoy the
visual effects. However, it is effective in light environments as the function is essentially to
diffuse aroma.
8. Compatible ROMPA® Products
Aromatherapy Kit 14032
Smell Box 52084
Top up oils –(calming) 16607
Top up oils –(Relaxing) 17008
9. Starting Up
Choose a suitable location indoors.
Set up the diffuser with water and chosen scent.
Attach power adapter and plug item into mains using set up instructions below.
Decide how the diffuser is to be used (e.g. with or without lighting) and control it
according to need.
10. Detailed Description
Add your own essential oil and the scent is dispersed in your room whilst making
the air moist. Easy to clean and use. The mist is visual as is the light, which can be
set to off, constant glow or intermittent flash settings. Quiet operation. Will
automatically shut-off when the water runs out.
11. Safety
Use indoors, in dry environments.
Please read all the following safety information before each use
ALWAYS SUPERVISE THE USE OF THIS PRODUCT

Remove all packaging and either store this in a safe place out of reach of clients or
dispose of this responsibly. Plastic bags and wrapping can be hazardous to children
and vulnerable people.
Keep away from sources of heat, sparks, open flame and hot surfaces. Do not smoke
near the unit.
Keep and store the unit in a safe and dry place.
Avoid dropping the unit, especially into water or other liquids.
If it falls over, disconnect the main power supply immediately.
Pour out the remaining water and unplug the unit after use.
Keep the unit out of reach of children and vulnerable people.
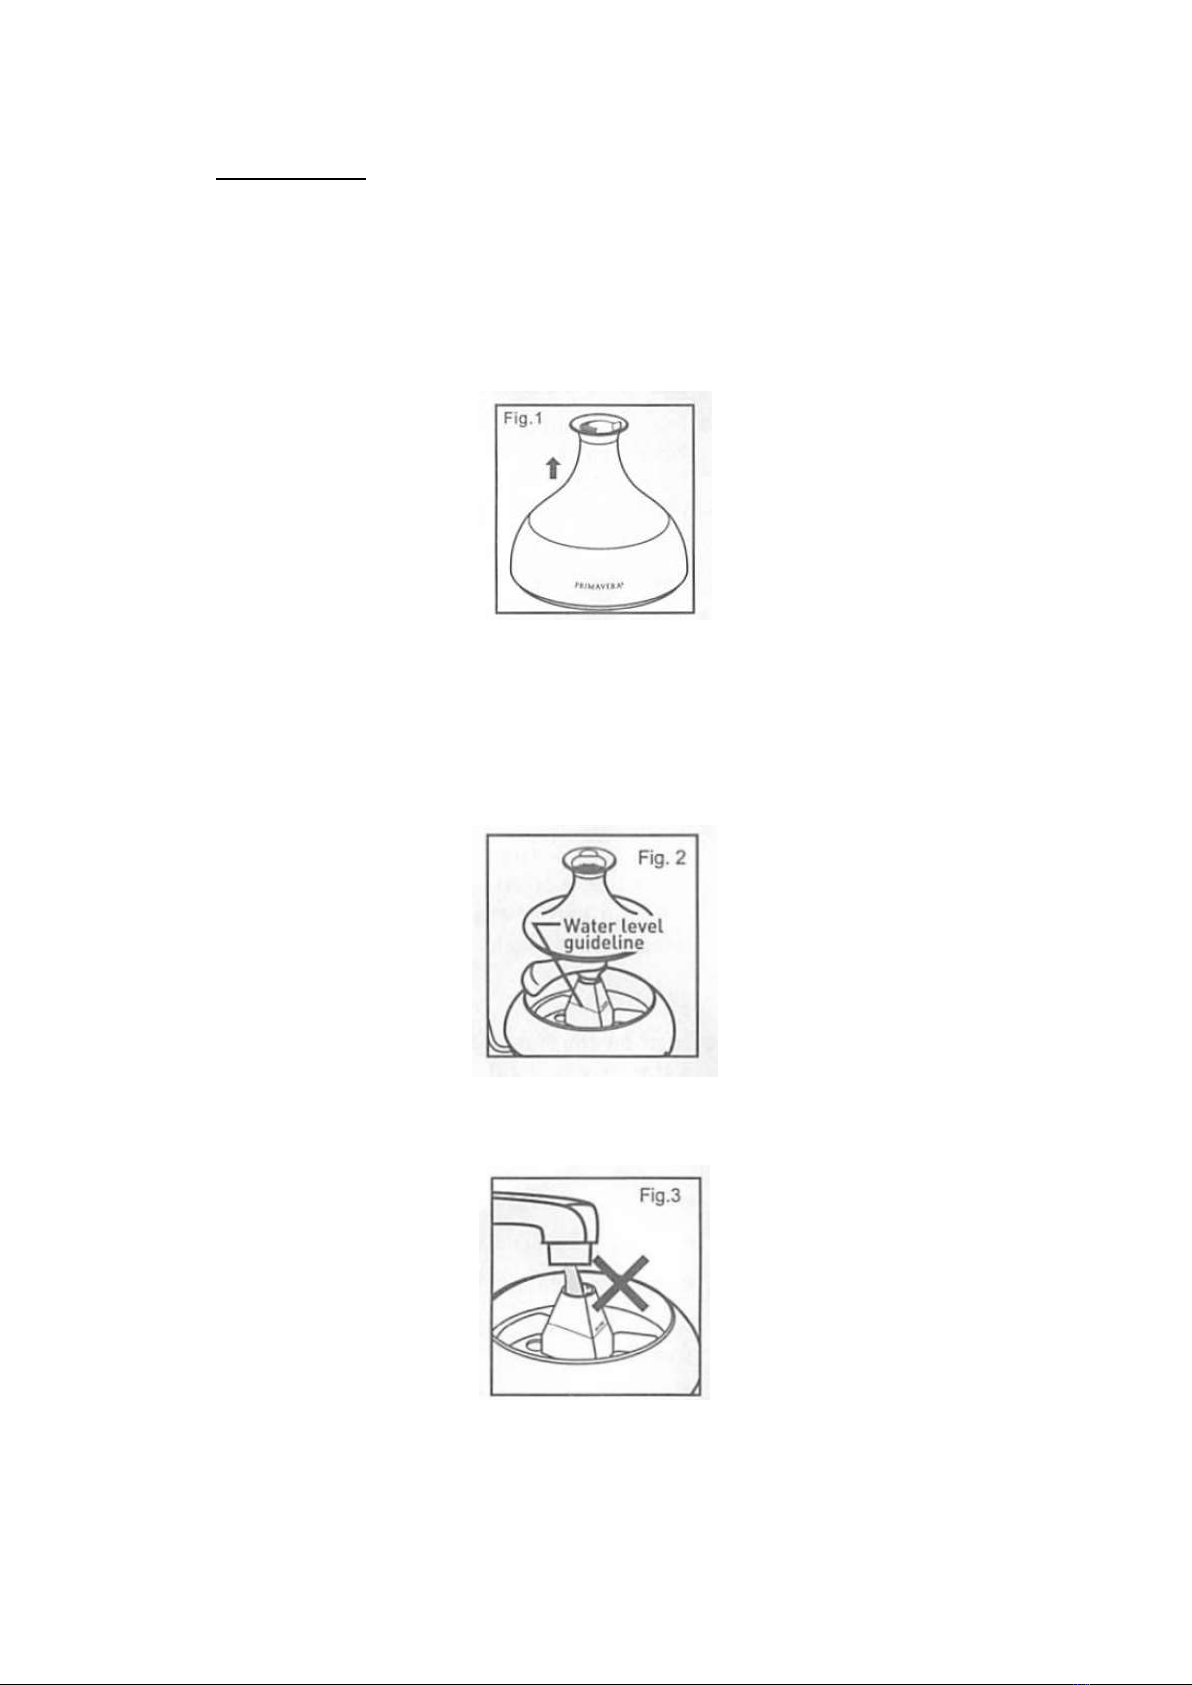
Unplug from the power source and mains before filling the Diffuser with water.
Do not operate without water. Turn off the unit when the tank is empty.
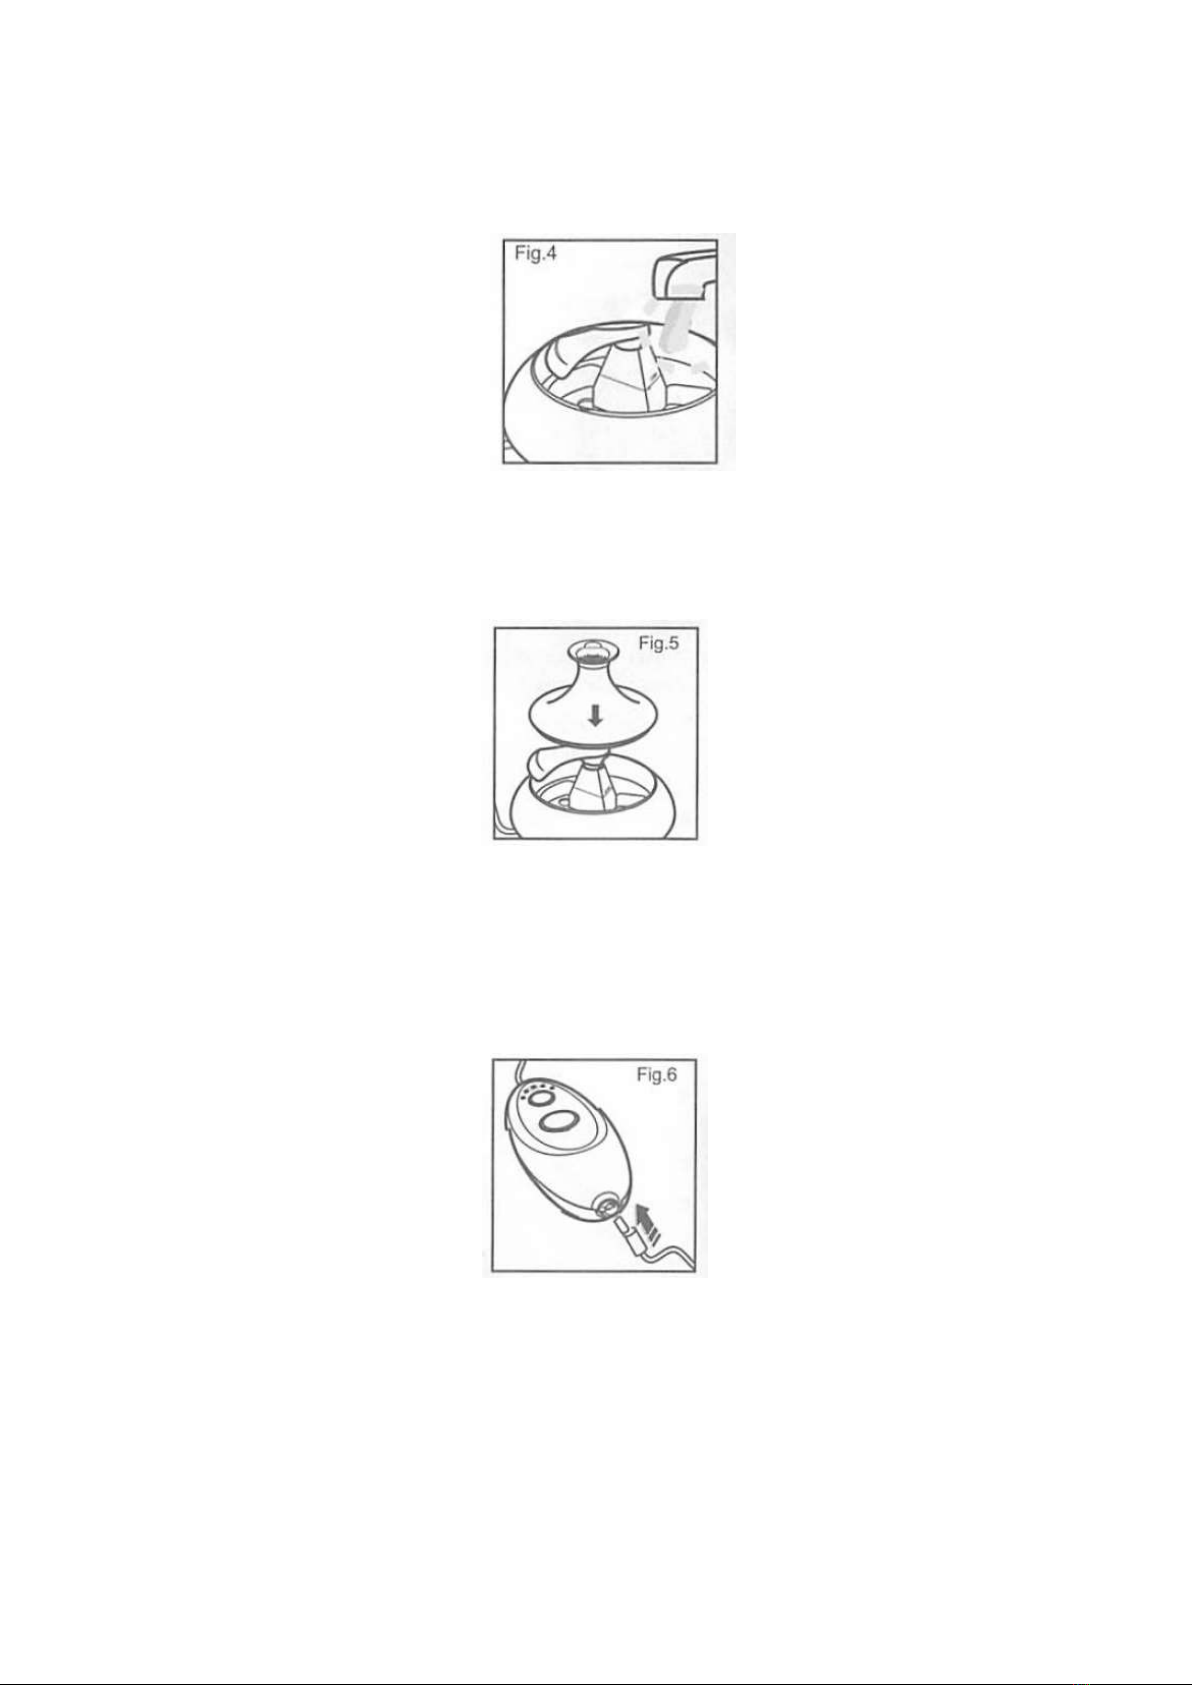
Never fill the water cavity directly from the water tap as this may damage the unit.
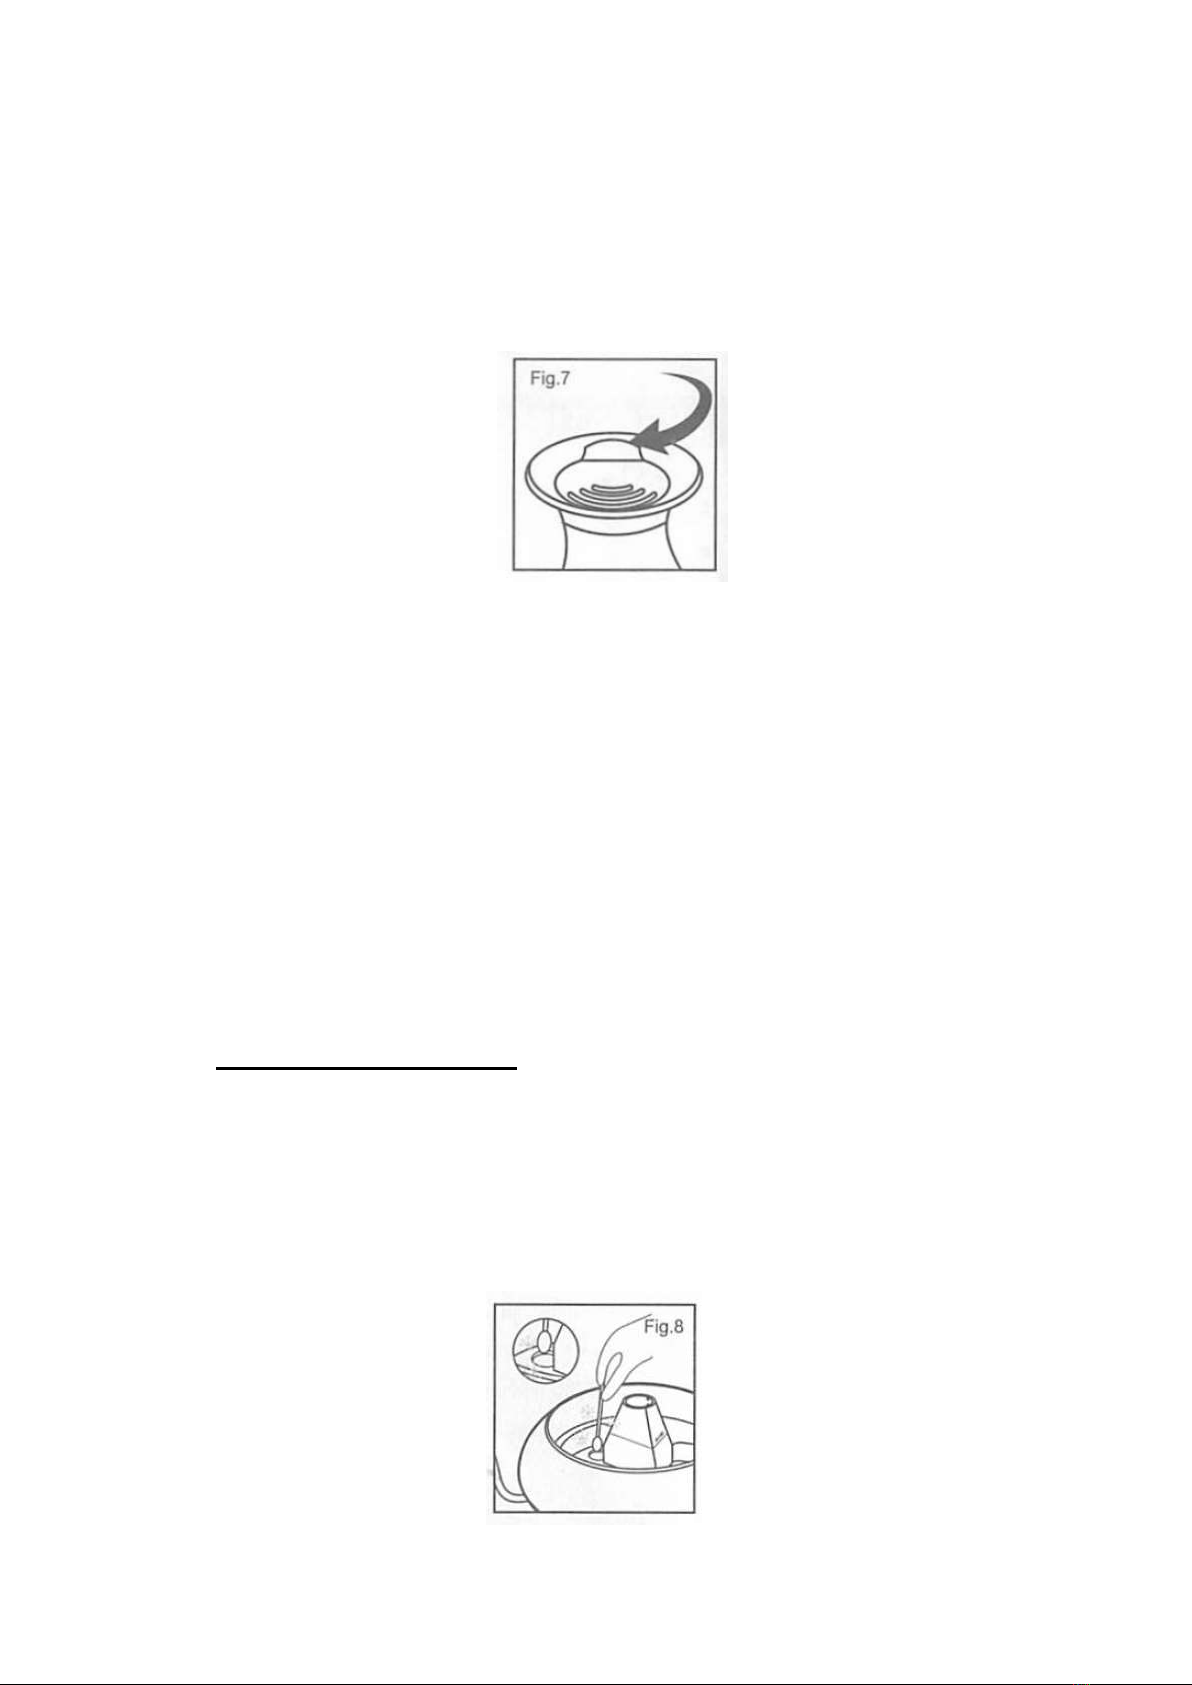
For aromatherapy, add 2-3 drops of essential oil into the water cavity.
Use of good quality essential oil is recommended.
Operate the device on a flat surface to reduce risk of tipping it over.
When the appliance is in operation, do not open the body case, otherwise water will
spill out.
Switch off the unit and unplug the power jack from the control unit before moving or
cleaning the unit.
Do not touch the ultrasonic transducer while the unit is plugged in as burns could
result.
Do not immerse the unit in water or other liquids. Never fill the water cavity with
alcohol, other chemicals or corrosive fluid which may cause damage to the unit.
This appliance is intended for household use only. Use the unit only for its intended
use as described in this instruction manual. Do not use attachments or power
sources etc that are not included in the contents of this product.
There are no user serviceable parts –please do not disassemble the unit.
Turn on the humidifier only after the upper casing is attached, otherwise the water
may spill out and enter the appliance.
When the humidifier is switched on, do not relocate the unit. If you want to relocate
the humidifier, switch off the unit first and detach it form the power source as
mentioned above, remove the water from the water cavity and then the unit is free
to be moved safely.
Never pour essential oil on any part of the plastic casing other than the water cavity.
If this happens, wipe the essential oil droplet at once with a damp cloth.
After 2-4 hours of operation, rest the appliance for 30 minutes. This will help to
maintain the appliance and ensure longevity.
Do not get liquid in eyes, on skin, or clothing.
Please note the hazard notes on the label or the instructions of the aroma and
essential oils or blends used.

12. Technical Specification
Size: 18cm diameter x 17cmH
Power: 24V AC/DC adapter
Tank Capacity: Up to 6 hours (2 misting levels)
Lighting: Constant or variable (LED effect)
Ultrasonic frequency: 1.700.00Hz
Transformer (in): 230V. 50Hz
Transformer (out): 24V constant 750mA
Output Power: 14.5W
Weight: 440g
Cable Length: 1.8m

13. Installation
Operation instructions:
Do not operate without water. Turn off the unit when the water cavity is empty.
Detach the upper casing from the base unit
Place the humidifier on a firm surface in an upright position. Then pull the body
casing upward to open the unit as shown (Fig 1)
Place the body casing downward on the base unit. When well attached, the edge of
the body casing should match well with the edge of the base unit.
Fill the water cavity with tap water until the water level is right above the water level
guideline (approximately 200ml). Never overflow and do not use distilled water and
iced water. Otherwise, the generation of mist may be affected (Fig 2)
Never add water directly to the air chimney (Fig 3)

To remove water from the water cavity, pour out along the direction of the water
pourer (shown in Fig 4)
For aromatherapy, add a few drops of essential oil into the water cavity of the base
unit. Never add to the transducer directly.
Attach the upper casing back to the base unit properly (as described above and
shown in Fig 5)
Connect and detach the Power Source
To connect the humidifier to the power source, connect the power jack of the AC/DC
power adaptor to the control unit first, then connect the AC/DC power adaptor to
the power socket. When the appliance is on, there should be a lit blue light right
above the small button of the control unit as shown (Fig 6)
To detach the humidifier from the power source
Detach the AC/DC power adapter from the power socket first, the blue light right
above the small button of the control unit will turn off. Then detach the power jack
of the AC/DC power adapter from the control unit.

Use of buttons
Power button (for misting control)
Press this button and hold for one second, the humidifier will turn on. You will see
the LED lights turn on and mist coming out of the top. This is now in “high” misting
mode. Press once to switch to “low” intensity. Rotate the nozzle to adjust eh mist
direction (Fig 7)
To turn off the humidifier, press the power button and hold for one second.
LED Control Button (for lighting control)
Press this button to switch between the lighting modes 1. Flashing, 2. Glowing
continuously, 3. Switch off. You may press the lighting button to switch on the
light only. That means that lighting and misting can be operated separately.
Operating Time
At full capacity, approximately 200ml, the humidifier will generate mist for 2-4
hours continuously. The timer will switch off the humidifier automatically after 2
hours use in “high” mist level or 4 hours in “low” mist level. Should water run out
earlier than the timer, probably owing to low relative humidity or temperature,
the humidifier will switch off by itself as a safety feature.
14. Care and Maintenance
CAUTION: Always switch off the appliance and disconnect the power cord from the
electrical outlet before cleaning.
Empty the water cavity. Wipe with a soft, damp cloth.
Each week, with a cotton wipe, wipe the metal part of the ultrasonic transducer and
water shortage protection sensor at the bottom of the water tank with sanitary
alcohol (Fig 8)

Do not wipe the outer casing with sanitary alcohol as this might remove the paint on
the casing. Use mild detergent instead.
After using for 15-20 days, if the appliance does not spray mist or sprays little mist,
clean the transducer and Water Shortage Protection Sensor (item 8 in diagram in
Technical Specification) as in previous step.
Switch off, unplug the unit and pour out all of the water from the water cavity after
use. Dry the appliance thoroughly before storage.
Clean the appliance after long periods of storage.
15. Troubleshooting
Problem
Probable Cause
Remedy
No mist generated or mist
intensity is weaker than before
No water of very little water in
cavity.
Switch of the humidifier. Fill the
water cavity with water and try
again.
Water cavity overflowed
Switch off the humidifier and pour
out excess water.
The upper casing is not attached
properly to the base unit.
Switch off the humidifier. Detach
the upper casing and reassemble it
with the base unit again according
to the above mentioned guideline.
The 2 or 4 hours of operation
period is complete.
Press and hold the power button
again to restart the unit.
Distilled water or cold water has
been used in the unit.
Replace with tap water or mineral
water of room temperature.
Water shortage protection sensor
and/or ultrasonic transducer not
cleaned properly and covered
with dirt.
Please clean item carefully,
following instructions above.
The power jack is not connected
firmly with control unit, or the
AC/DC adaptor is not connected
firmly with the mains.
Please re-check to ensure all
power connections are done
properly.
Water leaks out from the unit
The humidifier is shaken
accidentally and water spilled out
unexpectedly.
Switch off the unit, detach the
power cord and dry the unit
thoroughly before re-use.
Wind blows the mist back to the
humidifier and mist condenses on
the surface.
Reposition the humidifier to
accommodate the wind blow
direction.
Further copies of these instructions can be downloaded at www.rompa.com
We hope you find our instructions invaluable. If you have any suggestions for improving
them further your comments will be greatly received –please contact us at
AROMA NEBULIZER 21891, December 2015,
Copyright ROMPA® Ltd
Table of contents