manuals.online logo
Brands
  1. Home
  2. •
  3. Brands
  4. •
  5. Roper Rhodes
  6. •
  7. Bathroom Fixture
  8. •
  9. Roper Rhodes Cypher Unit WM Parts list manual

Roper Rhodes Cypher Unit WM Parts list manual

2
B
C
A
Locate the hangers onto the
wall mounting plates. Wall
hangers not only tighten the
unit against the wall (Screw
A) but also offer up/down
adjustment to fine-tune the
fixing position (Screw B).
Finally fold over flap C to
conceal the adjustment
screws on the wall hanger.
1
Mark the location of each of the wall mounting
plates ensuring that they are positioned inside the
sidewalls of the vanity unit. We would recommend
the height is set such that the overall height
including the basin is 860mm. For each mounting
plate drill two holes in the marked positions using a
8mm drill bit to a depth of 55mm.
Customer Services, Roper Rhodes Ltd, Brassmill Lane Trading
Estate, Bath, BA1 3JF
Tel:01225 303 900 | Fax: 01225 448 877
Email: [email protected] | Web: www.roperrhodes.co.uk
Installation Procedure:
Cypher Unit WM Installation & aftercare instructions
Please retain for future reference
RR-CYPWM REV : 060813
Before You Start
It is recommended that the unit and basin are secured to a suitably reinforced wall to ensure stability. The wall plugs supplied are only suitable for
solid stone/brick walls. For plasterboard walls use specialist wall plugs along with supplementary wall strengthening as units can be very heavy. Seek
advice from a specialist about the suitability of fixings to be used.
Wear suitable eye protection when drilling. Take care when using power tools near water - the use of a residual current device (RCD) is
recommended. Beware of hidden pipes or cables. Take care when drilling tiled surfaces as the drill might slip. Use a piece of masking tape to prevent
the drill from wandering.
Fascia Adjustment
To make adjustment 1 (Up and Down) turn screw A (see drawing 4)
To make adjustment 2 (Left and Right) turn screw B (see drawing 4)
To make adjustment 3 (Tilt in and out) turn screw C (see drawing 5)
Rotate plastic cover.
Fascias may require adjustment for correct alignment. If adjustment is required follow instructions below.
A
B
C
2
21
1
3
3
34
5
Customer Services, Roper Rhodes Ltd, Brassmill Lane Trading
Estate, Bath, BA1 3JF
Tel:01225 303 900 | Fax: 01225 448 877
Email: [email protected] | Web: www.roperrhodes.co.uk
Installation Procedure:
Cypher Unit WM Installation & aftercare instructions
Please retain for future reference
RR-CYPWM REV : 060813
Replacement Components
Furniture Aftercare Instructions
As with all wooden furniture, this product should be treated with care.
We recommend...
Wipe away any water splashes or condensation after use. Excessive exposure to water will deteriorate the furniture.
All bathrooms should be well ventilated with a suitable extractor fan.
Clean with a soft damp cloth only.
Use a wax free polish if one must be used.
For removal of lime scale deposits use a suitable proprietary cleaner
Do not scrub or scour
Do not use abrasive cleaning
agents
Please DO NOT...
Should you require any replacement components for this product please contact Roper Rhodes using the contact details below.
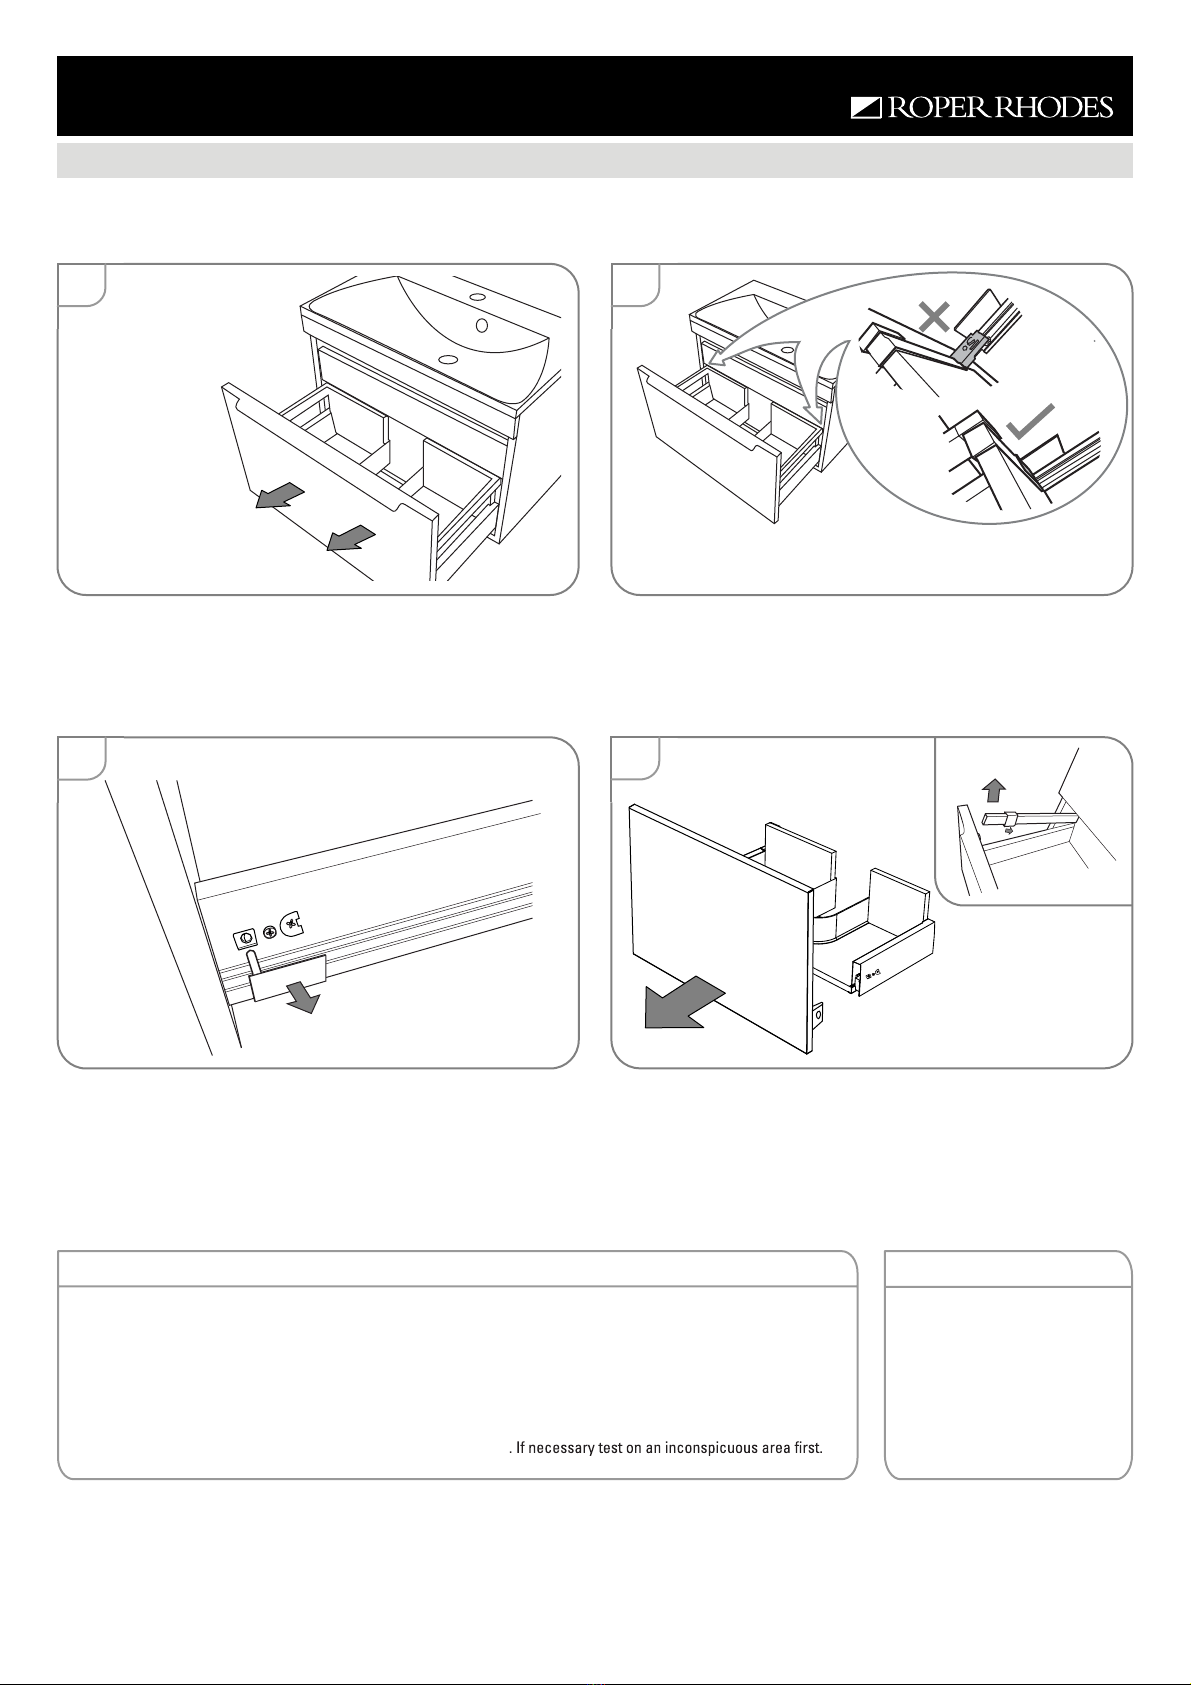
Removing the Drawer
To remove the drawer, please follow the instructions below:
8
Remove the plastic covers completely
from both sides of the drawer.
6
Fully extend the
drawer.
While supporting
both the front and
back of the drawer,
pull the drawer
forwards with a
short sharp pull until
it is fully removed
from the runners.
Fitting the Basin
Once the basin has been plumbed in, finish by securing to the washstand using a silicone sealant (not supplied).
When re-fixing the drawer back to the runners, ensure that they click
into position on both sides and the back of the runner is flush with the
back of the drawer on both sides (see Fig.9).
7
Removing the Fascia
If it is faulty or damaged, the fascia can be removed and replaced. To remove the fascia please follow the instructions below:
9
Release both rails from the drawers
first (see right) then pull the fascia
away from the body of the drawer.
To return the fascia, locate the
bottom fixings into the sides of the
drawer and re-fix the plastic
covers. Then re-fix the rails on both
sides of the drawers.

Other Roper Rhodes Bathroom Fixture manuals

Roper Rhodes 8401WSC User manual

Roper Rhodes

Roper Rhodes 8401WSC User manual

Roper Rhodes Cirrus User manual

Roper Rhodes

Roper Rhodes Cirrus User manual

Roper Rhodes DC14025 User manual

Roper Rhodes

Roper Rhodes DC14025 User manual

Roper Rhodes NEUTRON 8901WSC-SF User manual

Roper Rhodes

Roper Rhodes NEUTRON 8901WSC-SF User manual

Popular Bathroom Fixture manuals by other brands

Hans Grohe Croma Select S 180 2jet 26522400 Assembly instructions

Hans Grohe

Hans Grohe Croma Select S 180 2jet 26522400 Assembly instructions

Sanela SLSN 06 Instructions for use

Sanela

Sanela SLSN 06 Instructions for use

Cooke & Lewis Beloya 3663602944720 Assembly

Cooke & Lewis

Cooke & Lewis Beloya 3663602944720 Assembly

Kohler K-8013 Installation and care guide

Kohler

Kohler K-8013 Installation and care guide

KEUCO Edition 400 21503 171351 Instructions for use

KEUCO

KEUCO Edition 400 21503 171351 Instructions for use

Turin TU-SD-979-48-35 Installation and owner's manual

Turin

Turin TU-SD-979-48-35 Installation and owner's manual

Bradley s19314 series Installation

Bradley

Bradley s19314 series Installation

Glacier bay 67092W-6A01 Installation and care guide

Glacier bay

Glacier bay 67092W-6A01 Installation and care guide

GRE AR1030 instruction manual

GRE

GRE AR1030 instruction manual

Porcelanosa noken PURE LINE 100189688 manual

Porcelanosa

Porcelanosa noken PURE LINE 100189688 manual

Streamline CAST IRON SINK Series Owner's manual and installation guide

Streamline

Streamline CAST IRON SINK Series Owner's manual and installation guide

Ponte Giulio G55JASN110 Assembly instructions

Ponte Giulio

Ponte Giulio G55JASN110 Assembly instructions

Excellent SHIRO Assembly instructions

Excellent

Excellent SHIRO Assembly instructions

Pressalit Dania R22000 manual

Pressalit

Pressalit Dania R22000 manual

Hans Grohe Logis Fine 240 71258 1 Series Installation/User Instructions/Warranty

Hans Grohe

Hans Grohe Logis Fine 240 71258 1 Series Installation/User Instructions/Warranty

Glacier bay HD873X-3004 Installation and care guide

Glacier bay

Glacier bay HD873X-3004 Installation and care guide

DUSCHY 5304 installation manual

DUSCHY

DUSCHY 5304 installation manual

Blaufoss Blackline EXPO installation guide

Blaufoss

Blaufoss Blackline EXPO installation guide

manuals.online logo
manuals.online logoBrands
  • About & Mission
  • Contact us
  • Privacy Policy
  • Terms and Conditions

Copyright 2025 Manuals.Online. All Rights Reserved.