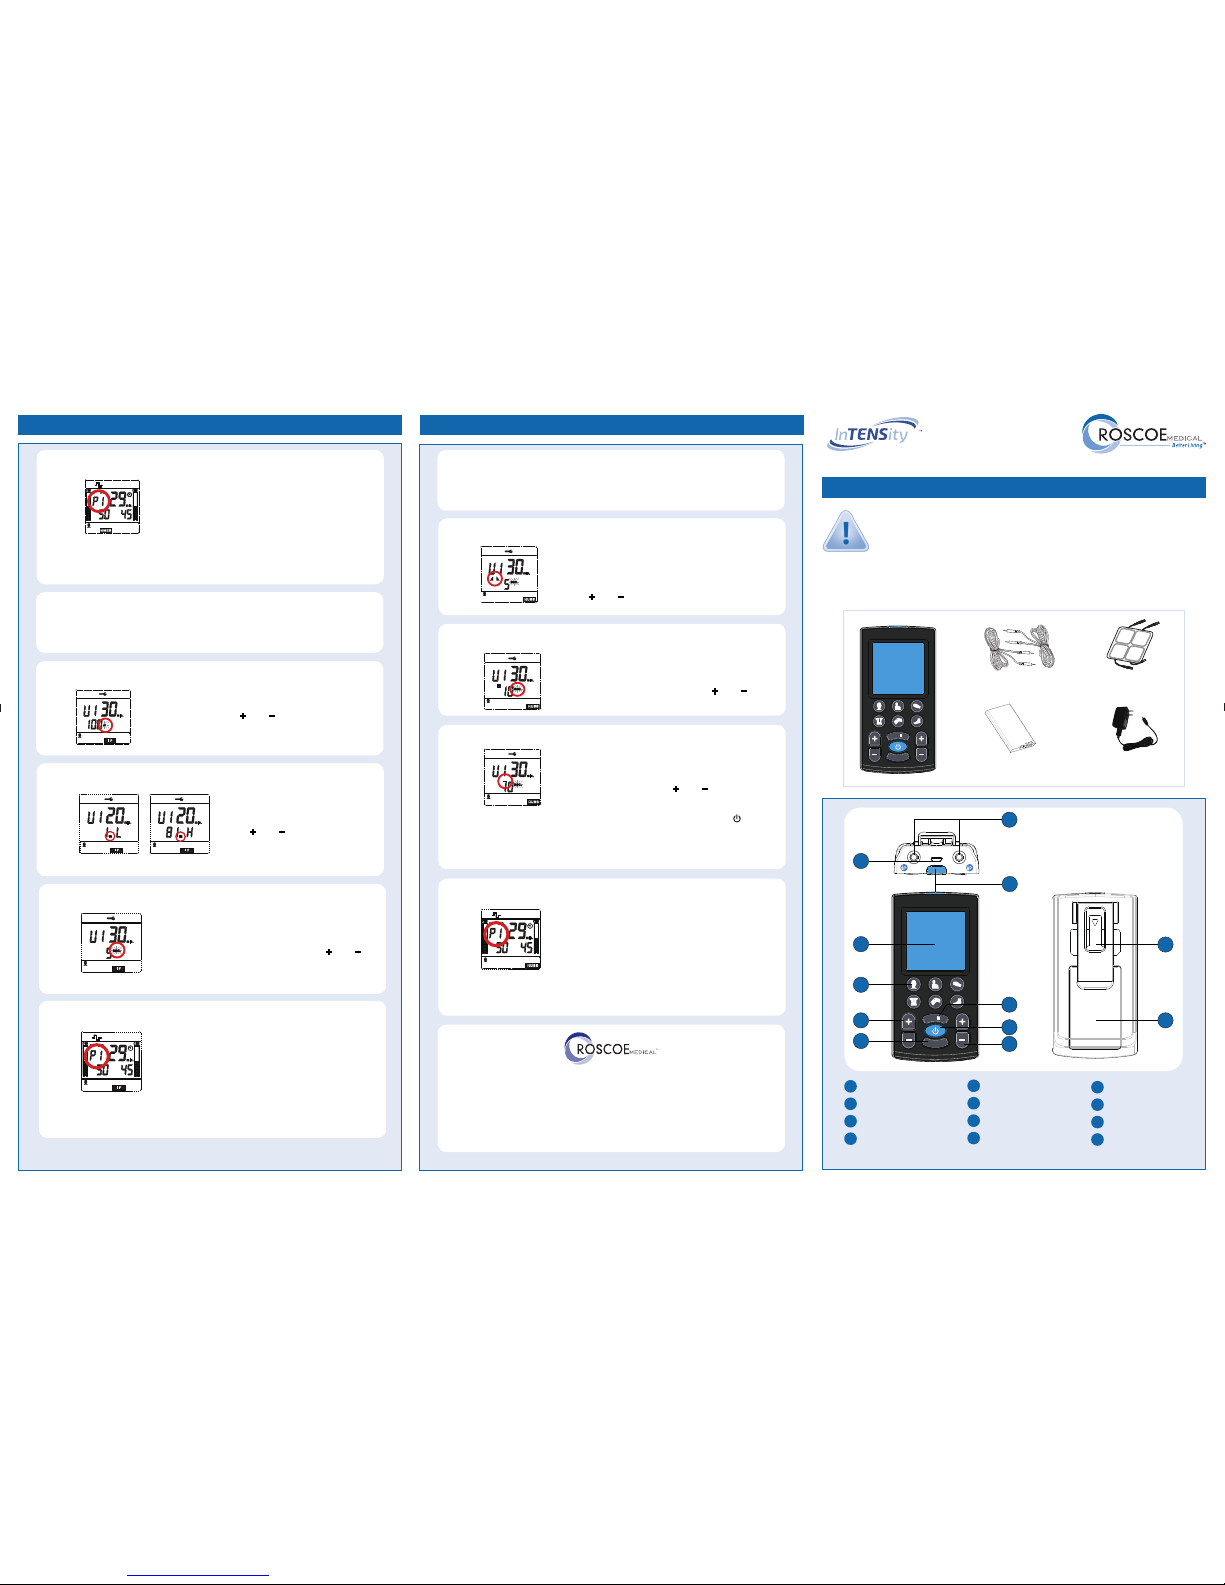
manuals.online logo
Brands
  1. Home
  2. •
  3. Brands
  4. •
  5. Roscoe Medical
  6. •
  7. Fitness Equipment
  8. •
  9. Roscoe Medical Select Combo II User manual

Roscoe Medical Select Combo II User manual

2CONNECT LEAD WIRES
Make sure the device is completely
turned OFF. Take the pads out of the
sealed package; insert the lead wire
pin into the electrode pigtail. Make
sure no bare metal is exposed.
Insert the lead wires into the
output sockets located at the top
of the device.
Note: If only using one channel, only
plug in 1 lead wire.
3TURNING THE DEVICE ON OR OFF
Press the [ ] button to turn the device“ON”or“OFF”.
If there is an immediate need to pause treatment,
press the [ M/II ] button to pause treatment.
Press it again to continue treatment or press [ ]
to stop treatment and go back to the home screen.
6TENS  SET PULSE RATE
8
7
TENS  SET PRESET PROGRAMS —P1 & P2
Select Treatment Mode
Press [ M/II ] button to select the TENS treatment
mode. Select the body part which you want to
treat. Press the body part button until the LCD
displays program “P1” or “P2” like the screen
on the left.
To set your treatment time refer back to Step 5.
To start your treatment refer back to Step 7.
5
9
SETTING THE MANUAL PROGRAM —U1
NMES —SETTING THE MANUAL PROGRAM —U1
Never remove the self-adhesive electrodes from the
skin while the device is turned on!
WARNING: Device will not work while charging. Device is
partially charged upon receipt. If the electrodes are not placed
rmly on the skin or the device has not connected with the lead
wires securely, and the output intensity level is equal or greater
than 10mA, the intensity will stop automatically.
IMPORTANT!
Select Treatment Mode & Body Part
Press [ M/II ] button to select the TENS/NMES/IF or
RUSS treatment mode. Select the body part which
you want to treat. Then press the body part button
until the LCD displays program “U1” like the rst
screen on the left.
Set Treatment Time
Press [ S] button to enter treatment time and the
“min.” will ash. Press [ +] or [ −] button to adjust
the treatment time.
To set your NMES Manual Program refer back to Step 5,
then return to Step 10.
Set Pulse Rate
Press [ S] button to enter the pulse rate and
the “Hz” will ash. Press [ +] or [ −] button to
adjust pulse rate.
1INSERT BATTERY
Press down on the belt clip to
release it. Remove the battery cover
and insert the battery as shown in
the diagram. Replace the battery
cover and belt clip.
1
2
3
4
5
6
7
12
11
10
9
8
LCD DISPLAY
Waveform Mode
Home Screen
Set Mode
Output: Start, Pause or Lock
Channel 1 intensity level
Compliance Meter (hours)
Output Intensity of Channel 1
Body Part Selection
Treatment Time (minutes)
Low-Battery Indicator
Load Indicator
Compliance Meter Mode
1
2
3
4
6
10
5
9
7
11
8
12
QUICK REFERENCE GUIDE  SELECT COMBO II PAGE 2 QUICK REFERENCE GUIDE  SELECT COMBO II PAGE 3 QUICK REFERENCE GUIDE  SELECT COMBO II PAGE 4
S
M/
Select Combo II
4SELECT THERAPEUTIC BODY PART
There are 6 therapeutic body part buttons available:
neck, shoulder, hand, low back, knee and foot. Each
therapeutic part has 3 programs – P1, P2 and U1.
Total of 72 programs.
TENS  PULSE WIDTH & START TIME
Pulse Width
Press [ S] button to enter the pulse width and the
“µs”will ash. Press [ +] or [ −] button to adjust the
pulse width.
Start Treatment
Press [CH1+] or [CH2+] to increase the output
intensity of channel 1 and/or channel 2. Press
[CH1−] or [CH2−] to decrease the output
intensity of channel 1 and/or channel 2.
When done, press [ S] or [ ] to conrm and return
to the home screen.
10 NMES —SET PULSE WIDTH & PULSE RATE
Set Pulse Rate
Press [ S] button to enter the pulse rate and
the “Hz” will ash. Press [ +] or [ −] button to
adjust pulse rate.
Pulse Width
Press [ S] button to enter the pulse width and the
“µs”will ash. Press [ +] or [ −] button to adjust the
pulse width.
11 NMES —SET RAMP UP TIME
12 NMES —SET CONTRACTION TIME
Set Ramp Up/Down Time
Press [ S] button to set the ramp up and down
time and the “sec.” will ash and you will see
the image circled in red on the screen to the left.
Press [ +] or [ −] adjust the treatment time.
Set Contraction Time
Press [ S] button to set the contraction time
and the “sec.” will ash along with the symbol
circled in red to the left. Then press [ +] or [ −]
button to adjust the time.
Set Relaxation Time
Press [ S ] button again to set the relaxation time and
the “sec.” will ash along with the symbol circled in
red to the left. Then press [ +] or [ −] button to adjust
the time.
After you nished settings, press [ S] or [ ] button
to conrm, the device will back to standby status.
To set your treatment time refer back to Step 5.
To start your treatment refer back to Step 7.
13 NMES —SET RELAXATION TIME
QUICK REFERENCE GUIDE PAGE 1
Select Combo II
Model: DI2195
1
2
Top
Side Front Back
3
4
5
6
7
8
9
10
11
LCD Display
Body Part Selection
Channel 1 Intensity Buttons
Set Button
Power Button
Channel 2 intensity buttons
Pause Button
LED Charging Indicator Light
LeadWire Output Sockets
Battery compartment cover
Belt Clip
USB Charging Port
1
2
3
4
5
6
7
8
9
10
11
12
The purpose of this guide is to assist you in correctly operating your InTENSity™
Select Combo II TENS/NMES/IF/RUSS (DI2195) unit. This device should only be
used under the continued supervision of a licensed physician. This guide is not
intended to replace or substitute the InTENSity™ Select Combo II Instruction
Manual. PLEASE READ THE INSTRUCTION MANUAL COMPLETELY BEFORE
USING THIS DEVICE. Read, understand and practice the IMPORTANT SAFETY
PRECAUTIONS AND WARNINGS found on pages 6 – 12 of your user manual.
Always follow the operating instructions prescribed by your healthcare provider.
S
M /
CH1CH2
1
2
3
46
5
7
8
9
11
10
12
Select Combo II
ELECTRODES
4 PADS
WALL CHARGER
& USB CABLE
LEAD WIRES
1 PAIR
Li RECHARGEABLE
BATTERY
S
M /
Select Combo II
QUICK REFERENCE GUIDE  SELECT COMBO II PAGE 5 QUICK REFERENCE GUIDE  SELECT COMBO II PAGE 6
14 NMES —SET PRESET PROGRAMS —P1 & P2
Select Treatment Mode
Press [ M/II ] button to select the NMES treatment
mode. Select the body part which you want to
treat. Press the body part button until the LCD
displays program “P1” or “P2” like the screen
on the left.
To set your treatment time refer back to Step 5.
To start your treatment refer back to Step 7.
Manufactured for:
Roscoe Medical
21973 Commerce Parkway
Strongsville, Ohio 44149
Ph: (800) 3-ROSCOE (376-7263)
www.roscoemedical.com
TM
16 SET PULSE WIDTH
Pulse Width
Press [ S] button to enter the pulse width and the
“µs”will ash. Press [ +] or [ −] button to adjust the
pulse width.
IF —SET PRESET PROGRAMS —P1 & P2
RUSS —SET PRESET PROGRAMS —P1 & P2
17 SET PULSE BEAT LOW & HIGH
18 SET CYCLE TIME
Set Pulse Beat (Low & High)
Press [ S] button to enter the pulse
beat and the “Hz”will ash.
Press [ +] or [ −] button to adjust
pulse beat.
Set Cycle Time
Press [ S] button to set the cycle time and the“sec.”
will ash and you will see the image circled in red
on the screen to the left. Then press [ +] or [ −]
button to adjust the treatment time.
19
24
Select Treatment Mode & Body Part
Press [ M/II ] button to select the IF treatment
mode. Select the body part which you want to
treat. Press the body part button until the LCD
displays program “P1” or “P2” like the screen
on the left.
To set your treatment time refer back to Step 5.
To start your treatment refer back to Step 7.
Select Treatment Mode & Body Part
Press [ M/II ] button to select the RUSS treatment
mode. Select the body part which you want to
treat. Press the body part button until the LCD
displays program “P1” or “P2” like the screen
on the left.
To set your treatment time refer back to Step 5.
To start your treatment refer back to Step 7.
15
20
IF —SETTING THE MANUAL PROGRAM —U1
RUSS —SETTING THE MANUAL PROGRAM —U1
To set your IF (Interferential) Manual Program refer back to Step 5,
then return to Step 16.
To set your RUSS (Russian) Manual Program refer back to Step 5,
then return to Step 21.
21 RUSS —SET RAMP UP TIME
22 RUSS —SET CONTRACTION TIME
Set Ramp Up/Down Time
Press [ S] button to set the ramp up and down
time and the “sec.” will ash and you will see
the below image circled in red on the screen.
Press [ +] or [ −] adjust the treatment time.
Set Contraction Time
Press [ S ] button to set the contraction time
and the “sec.” will ash along with the symbol
circled in red to the left. Then press [ +] or [ −]
button to adjust the time.
Set Relaxation Time
Press [ S ] button again to set the relaxation time and
the “sec.” will ash along with the symbol circled in
red to the left. Then press [ +] or [ −] button to adjust
the time.
After you nished settings, press [ S] or [ ] button
to conrm, the device will back to standby status.
To set your treatment time refer back to Step 5.
To start your treatment refer back to Step 7.
23 RUSS —SET RELAXATION TIME

Other Roscoe Medical Fitness Equipment manuals

Roscoe Medical InTENSity 5000 Hybrid User manual

Roscoe Medical

Roscoe Medical InTENSity 5000 Hybrid User manual

Roscoe Medical TENS 7000 User manual

Roscoe Medical

Roscoe Medical TENS 7000 User manual

Roscoe Medical Twin Stim Plus 3rd Edition User manual

Roscoe Medical

Roscoe Medical Twin Stim Plus 3rd Edition User manual

Roscoe Medical TOP TENS DT6030 User manual

Roscoe Medical

Roscoe Medical TOP TENS DT6030 User manual

Roscoe Medical TENS 7000 User manual

Roscoe Medical

Roscoe Medical TENS 7000 User manual

Popular Fitness Equipment manuals by other brands

Insportline Power Tower PT250 user manual

Insportline

Insportline Power Tower PT250 user manual

TAG S-Line 756 manual

TAG

TAG S-Line 756 manual

Inflight Fitness Liberator Assembly instructions

Inflight Fitness

Inflight Fitness Liberator Assembly instructions

Stamina BioFLEX 1700 owner's manual

Stamina

Stamina BioFLEX 1700 owner's manual

Wilson Electronics STADIUM GLASS BS7200 owner's manual

Wilson Electronics

Wilson Electronics STADIUM GLASS BS7200 owner's manual

CAP FM-FLDIP Assembly instructions

CAP

CAP FM-FLDIP Assembly instructions

SSG Leg Developer instructions

SSG

SSG Leg Developer instructions

Crivit 285684 Operation and safety notes

Crivit

Crivit 285684 Operation and safety notes

SPALDING M6611341 owner's manual

SPALDING

SPALDING M6611341 owner's manual

Hoist Fitness HD-3300 owner's manual

Hoist Fitness

Hoist Fitness HD-3300 owner's manual

Cortex BH-8 owner's manual

Cortex

Cortex BH-8 owner's manual

Finnlo 3960 owner's manual

Finnlo

Finnlo 3960 owner's manual

SteelFlex CBP-300 owner's manual

SteelFlex

SteelFlex CBP-300 owner's manual

SPORTSTECH BRT50 manual

SPORTSTECH

SPORTSTECH BRT50 manual

Compex performance manual

Compex

Compex performance manual

Hydrow Hydrow user guide

Hydrow

Hydrow Hydrow user guide

Adidas SPORTS OLYMPIC BENCH manual

Adidas

Adidas SPORTS OLYMPIC BENCH manual

stilum 551012401 Mounting instructions

stilum

stilum 551012401 Mounting instructions

manuals.online logo
manuals.online logoBrands
  • About & Mission
  • Contact us
  • Privacy Policy
  • Terms and Conditions

Copyright 2025 Manuals.Online. All Rights Reserved.