Rosewill RHPC-19001 User manual

1
PRODUCT DIAGRAM
Thank you for purchasing a Rosewill Pressure Cooker.
Please read the instruction manual before use and retain for future reference.
RHPC-19001
4
5
6
7
8
9
10
11
12
18
13
14
15
16
17
1. Lid Release Button
2. Float Valve (external view)
3. Power Cord
4. Pressure Limiting Valve
5. Handle
6. Lid Rest Tab
7. Lid
8. 304 Stainless Steel
Inner Pot
9. Condensation Cup
10. Outer Pot
11. Lid Rest (lid latches onto
either side of handle)
12. Main Body Handles
13. Upper Ring
14. Control Panel
15. Main Body
16. Heating Plate
17. Sensor
18. Bottom Ring
19. Filter
20. Silicone Gasket
21. Float Valve (internal view)
22. Float Valve Seal Ring
23. Measuring Cup
24. Serving Spatula
1
2
3
24
19
20
21
22
23

2
The cooker is plugged in, but still no programs are selected. Ready to use/
choose a program.
Your cooker is preheating.
Timer indicating how much time is still left, used for Cook Time, Delay Start or
KEEP WARM function.
Preheating SAUTE is over.
Yogurt program is complete and ready for Pasteurizing.
Pasteurizing in progress.
Lid is not locked in place.
CONTROL PANEL DESCRIPTION
LCD Display Descriptions
The LCD display uses icons, words and numbers to depict time, pressure levels, modes,
cooking progress and messages.
Pressure Level Indicator:
Low or High
Mode Indicator:
Low, Normal, or More
Time & Message Display:
Depicts cook time or messages
Progress Indicator:
Displays progress stage
(Pre-heating, Cooking, or Keep Warm)
Sound Indicator:
Sound ON/OFF
Press and hold
the "KEEP WARM/
CANCEL" Key for 3
seconds to turn
sound OFF.
Press and hold
the "KEEP WARM/
CANCEL" Key for 3
seconds to turn
sound ON.
Delay Start
Icon
Pre-Heating
Icon
Pressurized
Icon
Keep Warm
Icon

3
LCD Display Descriptions
4
5
6
7
8
9
10
11
12
13
14
1
2
3
18
16
20
22
23
15
17
19
21
1-17. Cooking Presets
18. Delay Start Function
19. Pressure Level Button
20. Adjust Button
21. Keep Warm/Cancel
22. Start Button
23. Menu Knob (central dial for program
selection and system settings)

4
Short Cord Purpose
NOTE:
A short power cord is provided to reduce the risk of personal injury resulting from becoming
entangled in or tripping over a longer cord. Longer power-supply cords or extension cords are
available and may be used if care is exercised in their use. If an extension cord is used:
1. The marked electrical rating of the extension cord should be at least as great as the electrical
rating of the product;
2. The extension cord should be arranged so that it will not drape over the countertop or
tabletop where it can unintentionally be pulled on or tripped over by children or pets.
Pressure Seal Ring/Silicone Gasket Assembly
Always ensure the Silicone Gasket is securely tted onto the metal Y-shaped ring in the interior
of the Lid. Make sure the crease in the Silicone Gasket meets with the outside of the Y-Ring all
the way around. Then place the Y-Ring and Silicone Gasket back into the Lid making sure the
hole in the center of the Y-Ring's cross-section is lined up with the metal pin in the center of the
Lid. Press down rmly until the Y-Ring is secured onto the Lid.
FEATURES
Multifunctional Pressure Cooker
1. Multiple functions for cooking, stewing, braising and simmering.
2. Cooking will be done automatically by selecting the different menu choices on the unit.
3. The pressure cooker also has its own memory. During interruptions such as a power failure,
the unit will automatically resume the cooking cycle when power returns.
Power Saving and Rapid Cooking Time
By using high pressure and high temperatures, food is cooked much more rapidly. This reduces
the cooking time and consumption of power. For example:
when cooking rice, this pressure cooker will save up to 20% of the electricity and up to 15% of
the time when compared to a conventional rice cooker. When cooking stew, soups or braising
meats, this cooker will save more than 40% of time and more than 45% of power compared to
a conventional slow cooker. Cooking can also be done at high altitudes.
Preserves Nutrients and Promotes Healthy Eating
Airtight cooking methods preserve nutrients and original avors of food.

5
Pressure Cooker Lid Markings
Please note the "Open" and "Close" markings on the rim of the pressure cooker body and the
“ ” on the rim of the Lid. To properly close and secure the pressure cooker Lid, always line up
the “ ” marking on the Upper Ring with the “ ” on the rim of the Lid.
Condensation Cup Assembly
The Condensation Cup is the clear plastic piece that snaps into the back side of the pressure
cooker. Attach condensation cup in rear of the unit until it locks into place.
Pressure Limiting Valve Warning
WARNING: To avoid serious injury, always use tongs or a long kitchen tool to set the valve to
Venting.
CAUTION, HOT STEAM: Keep hands and face away from the pressure limiting valve when
rotating to Venting.

6
UNPACKING AND ASSEMBLY
Before First Use
1. Remove packaging materials such as cardboard, plastics or Styrofoam and discard
appropriately.
2. Clean all the parts by wiping with a soft damp cloth or sponge and dry thoroughly.
3. Clean the cooking pot in the dishwasher or with warm soapy water. Rinse, towel or air-dry
and place in the pressure cooker.
Lid Assembly
1. How to open the lid:
Hold the handle rmly while pushing down on the red lid release button, turn the lid counter-
clockwise until it loosens and lift vertically; the lid can stand on the Lid Rest Tab.
Note: For new units, the seal of the Lid may be slightly stronger than normal and may be
slightly difcult to unlock. Once the Lid has been opened and closed several times, it will
loosen up.
2. How to close the lid:
Observe the Silicone Gasket ring inside the Lid and ensure that it is tted into the lid all the way
around.
Caution:
• If the rubber seal ring is damaged, do not use the pressure cooker. Contact Rosewill Tech
Support to repair or replace.
• To lock Lid in place, remove any food residue from the cooking pot’s Upper Ring to ensure
a proper seal. Take the Lid off the Lid Rest, hold the Handle and close it downwards at the
“Open” Lid position. Turn clockwise until you reach the “Close” Lid position; a clamping

7
OVERVIEW
Cooking Pot Markings
Inside the removable cooking pot are two sets of
markings. One side is marked "2/3 MAX PRESSURE
COOK", which indicates the maximum ll line when
cooking any food, other than rice, in the pressure
cooker. The other marking is “CUP” and is used
when cooking rice. When pressure cooking rice,
never ll the pressure cooker with water past the 6
cup marking.
1. Open lid, remove cooking pot from pressure
cooker and add food and liquids.
NOTE: The total volume of food and liquid must
not exceed 2/3 of the capacity of the cooking pot.
For foods such as dried vegetables and beans, or
rice and grains, the total volume must not exceed
1/2 the capacity. Overlling may clog the pressure
limit valve, which can cause excess pressure to
develop. Always use at least 1/2 cup liquid when
pressure cooking.
WARNING: To avoid a serious burn injury when
cooking foods other than rice, never exceed the
2/3 mark of the combined volume of liquids and
solids.
2. Ensure the inner receptacle, where the Heating
Plate is located, is clean and dry before inserting
2/3
1/2
sound can be heard.
• To ensure you are properly closing the lid, line up the “Open” and “Close” markings on the Lid
and pressure cooker body.
Water Test
To ensure correct assembly of the Silicone Gasket before the rst use, it is recommended to
read the following instructions and ll the Inner Pot with water to the 2/3 line and program to
pressure cook for 30 minutes. Once completed, pour out the water, rinse and towel dry the
Inner Pot. The pressure cooker is now ready for use.
Lid Safety Lock System
Note: This unit has a built-in safety feature that prevents all functions from activating if the Lid
is not properly locked/secured into place.
Cooking presets cannot be selected if the Lid is not properly locked/secured into place. The
display will show "Lid" and continuously beep until the Lid is properly closed. You will not be
able to select a cooking function.
This prevents the unit from cooking without the lid being properly secured. The SAUTE function
will still work, as this function does not use the Lid.

8
OPERATION AND FUNCTIONS
With the lid securely locked in place, unit on and the LCD displayed, select the button for the
desired cooking function by reading the following instructions:
• There are 17 menu functions pre-programmed in your pressure cooker—RICE, SOUP, EGGS,
MEAT/STEW, BEAN/CHILI, POULTRY, MULTIGRAIN, BEEF, STEAM, PORRIDGE, PORK/RIBS,
DESSERT, RISOTTO, VEGETABLES, SAUTE, YOGURT, SLOW COOK.
• The default times are programmed for quick and easy cooking for small portions of food less
than 3 pounds. When cooking food more than 3 pounds, use the Custom Manual function.
Each of the default times is programmed to detect the weight of food being cooked and how
much liquid is inside the pot during the cooking cycle.
• The unit will automatically build up pressure, cook the food and go to KEEP WARM when
cooking is complete.
the Inner Pot into the pressure cooker. Adjust the pot left and right to ensure optimal contact
between the Inner Pot and the Heating Plate.
3. “Close” and lock the lid.
4. Adjust the Pressure Limiting Valve to the “Sealing” position and ensure that the Float Valve
sinks.
5. When adjusting the Pressure Limiting Valve to either the "Sealing" or the "Venting" positions,
line up the marking on the Pressure Limiting Valve with the arrow on the Handle as shown in
gure.
6. Plug the power cord into the pressure cooker and then into the wall outlet. The LCD display
will show “OFF”.

9
After Selecting A Menu Button
1. Turn the Menu Knob to select one of the preset functions. Then, select one mode among
“Less”, “Normal” and “More” via the ADJUST button. The Default Cook Time will display for
the selected setting.
For example:
If RICE is selected, the display will show OO 12. The cook time can be adjusted by rotating
the dial after you select desired menu function and press the dial once.
2. Once you press START, the LCD screen will display OO XX and the unit will begin heating.
3. As the unit heats up and pressure builds, the Float Valve will rise. The amount of liquid
and other ingredients in the pressure cooker determines the length of time needed for full
pressure to build—generally 5 to 40 minutes.
4. If you use the same rice example, while the unit is building up pressure, the LCD display
will show “ON”. The Pre-Heating Icon will illuminate. The LCD screen will not begin to
countdown until the pressure has built up to capacity. Once it begins to pressure cook, the
Pressurized Icon will illuminate. The LCD display will show P:12 and begin countdown.
5. The raised Float Valve indicates you are cooking under pressure. The Lid is now locked and
cannot be opened.
NEVER ATTEMPT TO OPEN THE LID WHILE PRESSURE COOKING.
Menu Select Functions
1. Select one of the menu functions and press START.
2. Follow the instructions below after selecting a menu button.
FUNCTIONS DEFAULT COOK TIME COOK TIME RANGE
Rice 12 Minutes 1-99 Minutes
Soup 15 Minutes 1-99 Minutes
Eggs 5 Minutes 1-99 Minutes
Meat/Stew 35 Minutes 1-99 Minutes
Bean/Chili 30 Minutes 1-99 Minutes
Poultry 15 Minutes 1-99 Minutes
Multigrain 40 Minutes 1-99 Minutes
Beef 35 Minutes 1-99 Minutes
Steam 15 Minutes 1-99 Minutes
Porridge 15 Minutes 1-99 Minutes
Pork/Ribs 18 Minutes 1-99 Minutes
Risotto 35 Minutes 1-99 Minutes
Dessert 40 Minutes 1-99 Minutes
Vegetables 15 Minutes 1-99 Minutes
SAUTE 30 Minutes NA
Yogurt 8 Hours 6-24 Hours
Slow Cook 6 Hours 0.5-9.5 Hours

10
Auto KEEP WARM Feature
When cooking has completed, the pressure cooker will beep and automatically switch to
KKEEP WARM function, except after the YOGURT function. The KEEP WARM indicator light
and KEEP WARM icon will illuminate and the display will show 00:00; it will display how
long the pressure cooker has kept warm. After 24 hours, the pressure cooker will automatically
switch to “OFF”.
NOTE:
It is not recommended that the KEEP WARM setting be used for more than 4 hours. The quality
and texture of food will begin to change after 1 hour on KEEP WARM. A bit of condensation in
the upper ring during KEEP WARM is normal. To set the pressure cooker to KEEP WARM, press
the KEEP WARM button until the display shows 00:00.
To Reset Or Cancel
User can reset or cancel any function at any time by pressing the KEEP WARM/CANCEL button
until it shows “OFF”.
Removing Lid After Pressure Cooking
When the pressure cooking cycle has completed, the unit will
automatically switch to KEEP WARM. At this point, you may release
in either way—Natural Pressure Release or Quick Pressure Release.
1. Natural Release:
Following pressure cooking, allow the unit to remain on KEEP
WARM.
The pressure will begin to drop—time for pressure to drop depends on the amount of liquid in
the cooker and the length of time that pressure was maintained. Natural Release can take from
15 to 30 minutes.
During this time, cooking continues so it is recommended for certain cuts of meats, soups, rice
and some desserts. When pressure has fully released, the Float Valve will drop and the Lid will
unlock to open. With a safety feature, the Lid will not open unless all pressure is released. Do
not force the Lid open. If the Lid feels tight, please allow additional time for pressure to fully
release before attempting to open the Lid.
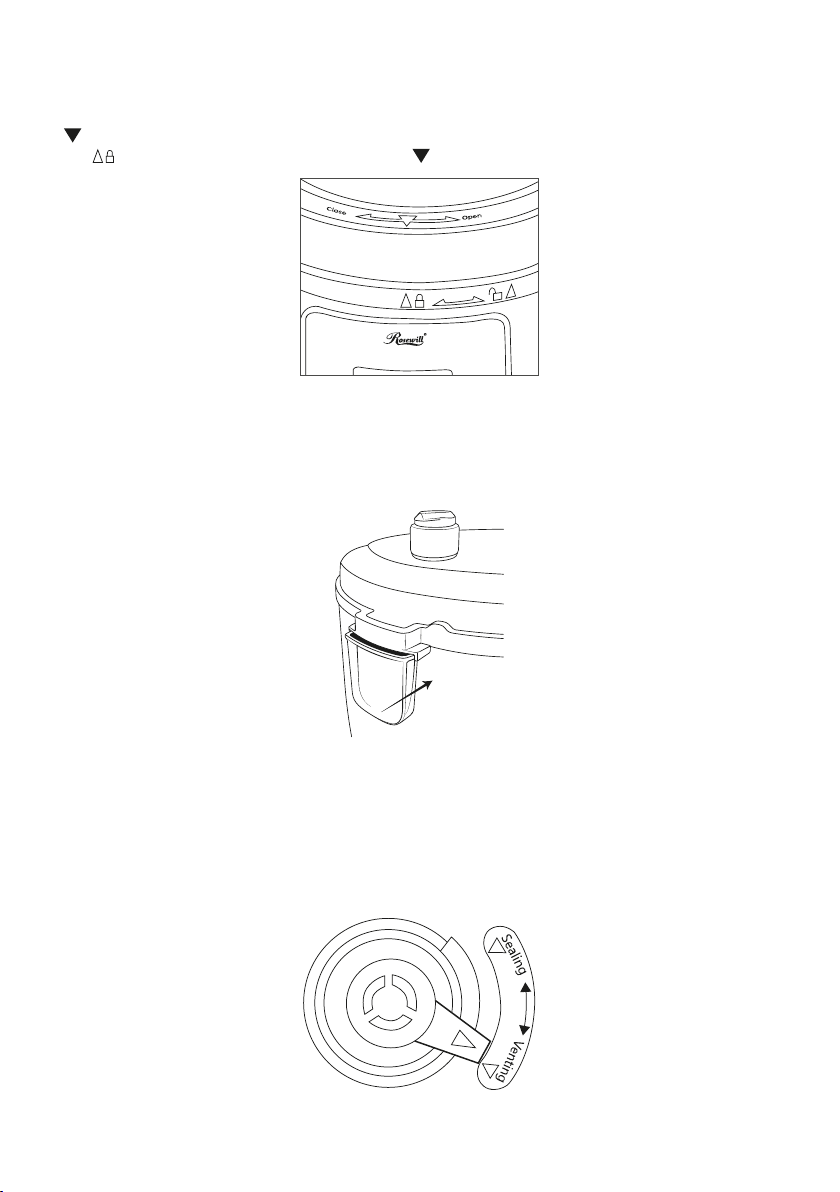
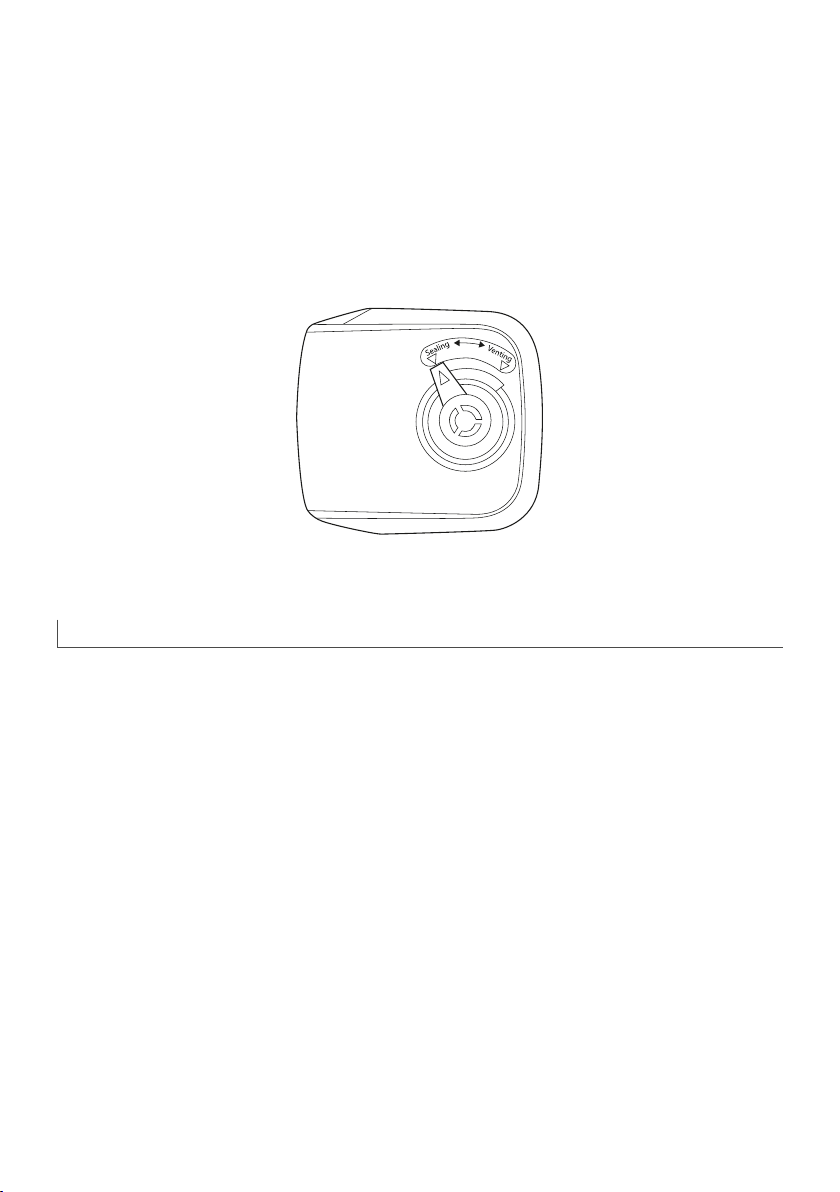
2. Quick Release (recommended for foods that should be Medium or Medium-Rare):
Following pressure cooking, the cooker will beep 3 times and go to KEEP WARM. Press the
CANCEL button. Using an oven mitt or long utensil, carefully turn the Pressure Limiting Valve to
the “Venting” position to release pressure until the Float Valve sinks.
NOTE: You cannot adjust the Pressure Limiting Valve to the “Venting” position immediately after
using the PORRIDGE and SOUP functions. It is crucial that the Float Valve sinks before any
attempts are made to open the Lid.
CAUTION, HOT STEAM—RISK OF SCALDING: USE TONGS OR A LONG UTENSIL TO
TURN THE VALVE. KEEP HANDS AND FACE AWAY FROM PRESSURE LIMITING VALVE.
How To Use the SAUTE Function
This setting allows cooking over high heat without the Lid. Before pressure cooking, most
recipes will benet from the golden color, richer avors and moist results gained from
SAUTEing.
To SAUTE your meats or vegetables prior to pressure cooking:

11
How To Use The YOGURT Function
Making yogurt is simple and fun using your pressure cooker. All you need is some milk and a bit
of active cultures yogurt. The process consists of two parts:
1. Pasteurizing the milk and culturing the yogurt.
2. Complete the following steps to make yogurt.
Step One: Pasteurize
1. Place the Inner Pot inside the base and plug in your pressure cooker. The LCD screen will
display “OFF”.
2. Pour milk into the Inner Pot according to your recipe.
3. Lock the lid in place and turn the pressure limiting valve to ”Sealing”.
4. Select YOGURT. Press ADJUST to switch cooking mode until the LCD screen shows “boil”
and ashes.
5. Once you press START, the LCD screen will display a solid “boil”.
6. When cooking is complete, the pressure cooker will beep and the LCD screen displays “Yogt”.
Remove the Inner Pot with milk, place pot on a wire rack and cool until milk reaches 109°F
Step Two: Making Yogurt Cultures
1. Stir active cultures into warm milk according to your recipe. Return Inner Pot to pressure
cooker base.
2. Lock the Lid in place. Turn the vent position to “Sealing”.
1. Remove Lid from unit.
2. Add oil or butter as directed in your recipe and then place food into the Inner Pot.
3. Select the SAUTE function. Press START button.
4. Stir or turn food as needed until desired color and consistency is reached.
5. Press the CANCEL button if you want to cancel the SAUTE function before the timer nishes
counting down.
Allow the unit to rest 2-3 minutes after canceling the SAUTE function before beginning to
pressure cook. If the unit will not begin pressure cooking, allow it to cool for a longer period
after SAUTEing before selecting another function.
How to Use the SLOW COOK Function
1. Prepare desired food and place into Inner Pot.
2. Place the Lid onto the pressure cooker and turn it clockwise to lock it in place. Adjust the
pressure limiting valve to “Venting” position.
3. Plug the power cord into a 120V power outlet.
4. Select the SLOW COOK function and the display will show the default time of 06:00. Increase
or decrease the SLOW COOK time in 30-minute increments using the knob.
NOTE: The longest SLOW COOK time allowed is 9.5 hours.
5. Press the START button to begin the cooking cycle.
• The unit may take between 5-20 minutes to reach optimal temperature before beginning
countdown.
• When cooking is complete, the cooker will beep and automatically go to KEEP WARM.

12
3. Select YOGURT; default displays an 8-hour timer on the LCD screen. Press START button.
4. When cooking is complete, the pressure cooker beeps several times and the LCD screen
displays “Yogt”. Transfer yogurt to containers and refrigerate as directed by your recipe.
How To Use The DELAY START Function
If you wish to program your pressure cooker to automatically cook prepared food at a later
time, you can program the pressure cooker to delay cooking by up to 24-hours.
CAUTION:
It is not recommended to use the DELAY START function to cook foods that may spoil. Leaving
raw foods inside the pressure cooker for long periods of time prior to cooking may result in the
food spoiling. Cook food that can be left out such as rice, beans, grains or other foods that will
not spoil.
This setting is used in combination with the menu functions and the manual setting function.
1. Prepare desired food and place into cooking pot.
2. Secure the Lid onto the unit, turn it clockwise to lock it in place.
3. Make sure the Pressure Limiting Valve is set to the “Sealing” position.
4. Plug the power cord into a 120V power outlet.
5. Press the DELAY START button. The DELAY START indicator icon will illuminate, the
screen will show 0:30 which is equal to 30 minutes of delay time. Press the DELAY START
button again to set your delay time. The maximum delay period is 24-hours. The time that
displays on the LCD screen shows how long the user wants the unit to wait before the
cooking process begins.
6. Example: If you wish to program the pressure cooker to automatically turn on in 3-hours,
press the DELAY START button until the LCD screen displays 3:00.
7. After programming your delay time, select the desired function.
8. Once the pressure cooker completes its countdown, the unit will begin operation of the
cooking sequence of the chosen selection.
Follow instructions under “Removing Lid After Pressure Cooking” to nish the cooking process.
IMPORTANT SAFETY PRECAUTIONS
• Read all instructions before use.
• Do not leave appliance unattended during operation.
• Do not touch hot surfaces; use handles or knobs.
• Close supervision is necessary when the pressure cooker is used near children.
• Do not allow children to operate under any circumstance.
• Do not place the pressure cooker in a heated oven.
• Extreme caution must be used when moving a pressure cooker containing hot liquids.
• Do not use pressure cooker for reasons beyond its intended use.
• Never immerse product in water or other liquids.
• This appliance cooks under pressure. Improper use may result in scalding or injury.
• Ensure unit is properly closed before operating. See “Operation and Functions”.

13
• Do not ll the unit over 2/3 full. When cooking foods that expand during cooking, such as
rice or dried vegetables, do not ll the unit over 1/2 full. Overlling may increase the risk of
clogging the vent pipe, resulting in excessive pressure inside the unit. Failure to follow these
guidelines can result in injury to person(s) and/or damage to the unit.
• Be aware that certain foods, such as applesauce, cranberries, pearl barley, oatmeal or other
cereals, split peas, noodles, macaroni, rhubarb or spaghetti can foam, froth, sputter and clog
the pressure release device (steam vent). These foods should not be cooked in a pressure
cooker.
• Always check the pressure release device for possible clogging before use.
• Do not open the pressure cooker until the unit has cooled and all internal pressure has
been released. If the handles are difcult to push apart, this indicates that the cooker is
still pressurized—do not force it open. Any pressure in the cooker can be hazardous. See
“Operation and Functions”.
• Do not use this pressure cooker for pressure frying with oil.
• Do not place the product near ammable materials or use in a humid environment.
• Do not damage the Silicone Gasket and do not replace it with anything other than the
replacement designated for this unit.
• Do not tamper with the Steel Ring in the Lid (7) using any tools or external forces. If the Steel
Ring is damaged, please stop using immediately and replace the Lid.
• Clean the Filter (19) regularly to keep the appliance clean.
• Never apply weight on the Pressure Limiting Valve (4) nor replace it with anything not intended
for use with this unit.
• The surface of contact between the Inner Pot (8) and the Heating Plate (16) should always be
clean. Do not use the Inner Pot with other heating sources. Do not replace the Inner Pot with
a container other than what is recommended by the manufacturer.
• Food should not be kept warm for more than 4 hours in order to maintain the freshness of the
food. The pressure cooker should not be used for more than 6 hours continuously. Serious
injury and/or damage may occur if any safeguards are ignored.
• If steam releases around the Lid (7) during the cooking process, please unplug from the power
supply immediately, let cool, remove contents and return the product to the manufacturer for
exchange or repair. The Pressure Discharging Device has activated. This is a safeguard to
alert the user that the Pressure Limiting Device is malfunctioning.
• If there is any malfunction of the cooker during the cooking process, please stop using the
device and return to the manufacturer for repair or exchange.
• Do not let cord hang over edge of table or counter, or touch hot surfaces.
• Unplug from outlet when not in use and before cleaning. Allow to cool before putting on or
taking off parts.
• Do not operate this appliance with a damaged cord or plug, or after it malfunctions or has
been damaged in any manner. Do not disassemble the product nor replace with parts not
intended for this unit.
• Always attach plug to appliance rst, then plug cord into the wall outlet. To disconnect, turn
any controls off, then remove plug from wall outlet.
• Do not use outdoors. Do not place on or near a hot gas or electric burner, or in a heated oven.
• The use of accessory attachments not recommended by the appliance manufacturer may
cause injuries.

14
CLEANING THE PRESSURE COOKER
1. Always make sure the pressure cooker is unplugged, depressurized and completely cooled
down before dismantling.
2. Use a non-abrasive sponge or damp wash cloth to clean the outer body. Never immerse the
outer body in any liquids or pour liquid into it.
3. Remove the Condensation Cup and rinse it thoroughly and let dry. Clean the inner main
body and Upper Ring with a damp sponge or wash cloth.
4. Remove the pressure limiting valve by gripping and rmly pulling upwards. Rinse with warm
water and dry.
5. Clean the Lid with warm soapy water, including the Silicone Gasket, Filter, Vent, Float Valve
and let dry thoroughly.
6. A small metal lter on the underside of the Lid below the Pressure Limiting Valve can be
easily removed to clean.
7. Let parts dry completely before reassembling.
8. Wash the Inner Pot, Wire Rack and allow to air-dry or use a towel.
9. Store the Inner Pot inside of the pressure cooker, then store pressure cooker in a cool, dry
location.
10. Do not store pressure cooker with Lid on tightly. This saves on Silicone Gasket wear and
tear.
11. NOTE: Any other servicing should be performed by an authorized service representative or
from the original manufacturer or distributer.
Safety Warning
There is a potential risk of re, electric shock or injury to persons if the product is not used as
instructed. Protection against electric shock is assured only if the main power cord is connected
to a properly grounded 120V/60 Hz power receptacle.
• This product is to be used in dry indoor environments only and is not intended for commercial
use; for household use only.
• All parts and accessories for this appliance must be used properly according to the instructions.
All parts and accessories must be the original provided from manufacturer. All other parts or
accessories that are not intended for use with this appliance are strictly prohibited.
• The use of an extension cord, power adapter or other electric devices are not recommended.

15
TROUBLESHOOTING
LED Error Indicator
If any of the below error codes appear on the pressure cooker display, unplug the power cord
and re-plug after 10 minutes. If the error code remains, contact Rosewill Tech Support.
Indicator Code Problems/Causes
E1 Open Circuit of the Sensor
E2 Short Circuit of the Sensor
E3 Overheating
E4 Signal Switch Malfunction
NOTE:
• When moving the pressure cooker, hold the unit by its handles.
• Keep out of reach of infants and young children.
• Do not use any other lid.
• Do not touch the lid or stainless steel surfaces while heating or cooking.
Pull up
Press down
How to Clean the Filter
To clean the lter, remove it by pulling vertically. To re-attach, simply line up the lter and press
down to secure.

PACKAGE CONTENTS
1 x Glass Lid 1 x Stainless Steel Egg
Steam Rack
1 x Silicone Gasket
1 x Silicone Mitts 1 x Recipe Book
Technical Support Information
[email protected] 1-800-575-9885
Please register your product at www.rosewill.com
for complete warranty information and support for
your product. RHPC-19001_A
SPECIFICATIONS
Power Supply AC 120V/60 Hz
Rated Power 1000W
Capacity 6 Quarts
Pressurized Working Temperature 110° - 118°C (230° - 244°F)
Table of contents
Other Rosewill Electric Pressure Cooker manuals