Rossmax Suction Tester is a portable and easy-to-use device that allows the users to quickly
check the performance of the pump of a suction unit. Power source is not required for
Suction Tester during operation and the test result is easy to read and interpret. Suction
Tester consists of an oil vacuum gauge, ow meter, PVC tubing and stainless steel stand.
This device is used to check the working conditions of the pump, and you are able to
check:
1. Maximum (free) air ow
2. Maximum vacuum
Parts name/location
Introduction
0
10
0
5
10
15
20
25
30
20
30
40
50
60
70
76 cm Hg
in Hg
0
10
0
5
10
15
20
25
30
20
30
40
50
60
70
76 cm Hg
in Hg
0
10
0
5
10
15
20
25
30
20
30
40
50
60
70
76 cm Hg
in Hg
0
10
0
5
10
15
20
25
30
20
30
40
50
60
70
76 cm Hg
in Hg
0
10
0
5
10
15
20
25
30
20
30
40
50
60
70
76 cm Hg
in Hg
0
10
0
5
10
15
20
25
30
20
30
40
50
60
70
76 cm Hg
in Hg
0
10
0
5
10
15
20
25
30
20
30
40
50
60
70
76 cm Hg
in Hg
0
10
0
5
10
15
20
25
30
20
30
40
50
60
70
76 cm Hg
in Hg
0
10
0
5
10
15
20
25
30
20
30
40
50
60
70
76 cm Hg
in Hg
0
10
0
5
10
15
20
25
30
20
30
40
50
60
70
76 cm Hg
in Hg
0
10
0
5
10
15
20
25
30
20
30
40
50
60
70
76 cm Hg
in Hg
0
10
0
5
10
15
20
25
30
20
30
40
50
60
70
76 cm Hg
in Hg
0
10
0
5
10
15
20
25
30
20
30
40
50
60
70
76 cm Hg
in Hg
0
10
0
5
10
15
20
25
30
20
30
40
50
60
70
76 cm Hg
in Hg
0
10
0
5
10
15
20
25
30
20
30
40
50
60
70
76 cm Hg
in Hg
0
10
0
5
10
15
20
25
30
20
30
40
50
60
70
76 cm Hg
in Hg
0
10
0
5
10
15
20
25
30
20
30
40
50
60
70
76 cm Hg
in Hg
0
10
0
5
10
15
20
25
30
20
30
40
50
60
70
76 cm Hg
in Hg
0
10
0
5
10
15
20
25
30
20
30
40
50
60
70
76 cm Hg
in Hg
0
10
0
5
10
15
20
25
30
20
30
40
50
60
70
76 cm Hg
inHg
0
10
0
5
10
15
20
25
30
20
30
40
50
60
70
76 cm Hg
in Hg
0
10
0
5
10
15
20
25
30
20
30
40
50
60
70
76 cm Hg
in Hg
0
10
0
5
10
15
20
25
30
20
30
40
50
60
70
76 cm Hg
in Hg
0
10
0
5
10
15
20
25
30
20
30
40
50
60
70
76 cm Hg
inHg
0
10
0
5
10
15
20
25
30
20
30
40
50
60
70
76 cm Hg
inHg
0
10
0
5
10
15
20
25
30
20
30
40
50
60
70
76 cm Hg
in Hg
0
10
0
5
10
15
20
25
30
20
30
40
50
60
70
76 cm Hg
in Hg
0
10
0
5
10
15
20
25
30
20
30
40
50
60
70
76 cm Hg
in Hg
0
10
0
5
10
15
20
25
30
20
30
40
50
60
70
76 cm Hg
inHg
0
10
0
5
10
15
20
25
30
20
30
40
50
60
70
76 cm Hg
in Hg
0
10
0
5
10
15
20
25
30
20
30
40
50
60
70
76 cm Hg
in Hg
0
10
0
5
10
15
20
25
30
20
30
40
50
60
70
76 cm Hg
in Hg
0
10
0
5
10
15
20
25
30
20
30
40
50
60
70
76 cm Hg
inHg
0
10
0
5
10
15
20
25
30
20
30
40
50
60
70
76 cm Hg
inHg
0
10
0
5
10
15
20
25
30
20
30
40
50
60
70
76 cm Hg
in Hg
0
10
0
5
10
15
20
25
30
20
30
40
50
60
70
76 cm Hg
in Hg
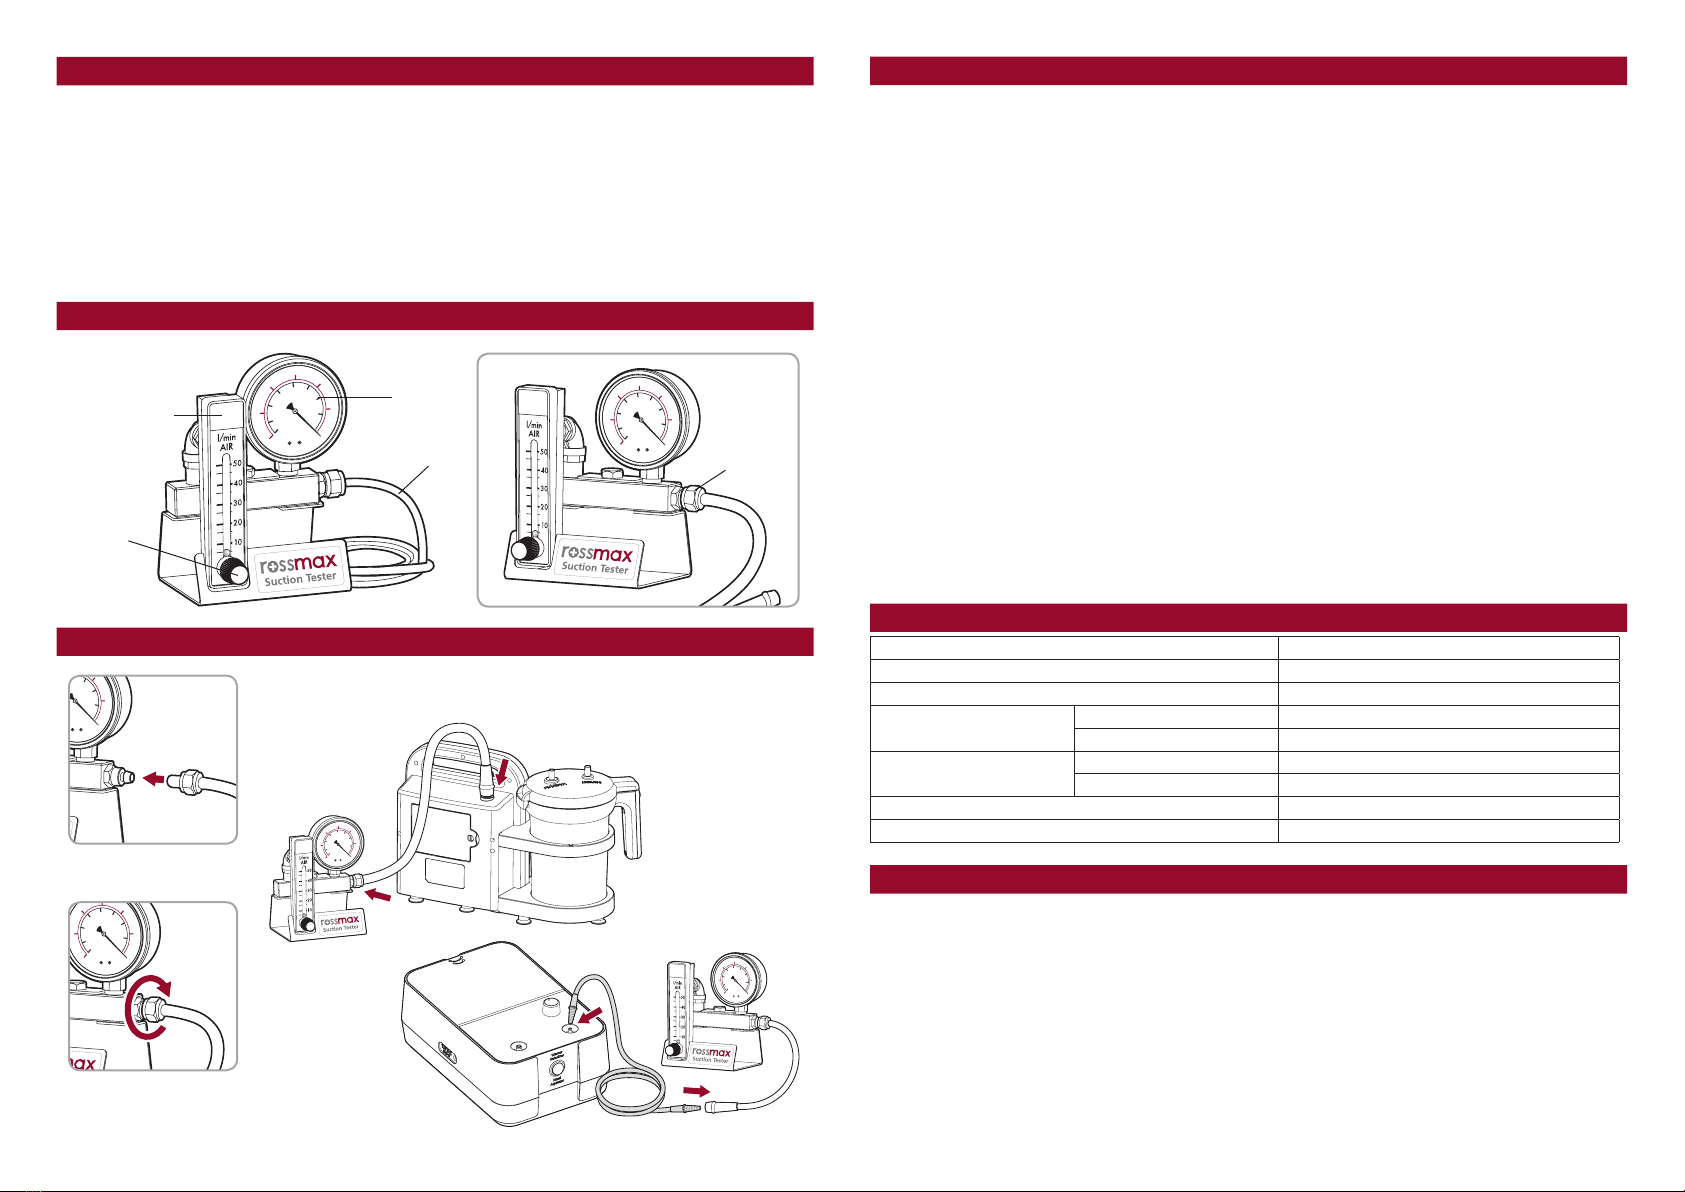
Flow meter
Regulator
Vacuum
gauge
PVC tubing
Insert PVC tubing
into connector
(1) Suction tester with Suction unit
(2) Suction tester with NK1000 (Nasal Aspirator)
Screw the nut
securely
Installation
Operation procedures
Cautions and maintenance
Specications
0
10
0
5
10
15
20
25
30
20
30
40
50
60
70
76 cm Hg
in Hg
0
10
0
5
10
15
20
25
30
20
30
40
50
60
70
76 cmHg
inHg
0
10
0
5
10
15
20
25
30
20
30
40
50
60
70
76 cm Hg
in Hg
0
10
0
5
10
15
20
25
30
20
30
40
50
60
70
76 cm Hg
in Hg
0
10
0
5
10
15
20
25
30
20
30
40
50
60
70
76 cm Hg
in Hg
0
10
0
5
10
15
20
25
30
20
30
40
50
60
70
76 cmHg
inHg
0
10
0
5
10
15
20
25
30
20
30
40
50
60
70
76 cmHg
inHg
0
10
0
5
10
15
20
25
30
20
30
40
50
60
70
76 cm Hg
in Hg
0
10
0
5
10
15
20
25
30
20
30
40
50
60
70
76 cm Hg
in Hg
0
10
0
5
10
15
20
25
30
20
30
40
50
60
70
76 cm Hg
in Hg
0
10
0
5
10
15
20
25
30
20
30
40
50
60
70
76 cmHg
inHg
0
10
0
5
10
15
20
25
30
20
30
40
50
60
70
76 cm Hg
in Hg
0
10
0
5
10
15
20
25
30
20
30
40
50
60
70
76 cm Hg
in Hg
0
10
0
5
10
15
20
25
30
20
30
40
50
60
70
76 cm Hg
in Hg
0
10
0
5
10
15
20
25
30
20
30
40
50
60
70
76 cmHg
inHg
0
10
0
5
10
15
20
25
30
20
30
40
50
60
70
76 cmHg
inHg
0
10
0
5
10
15
20
25
30
20
30
40
50
60
70
76 cm Hg
in Hg
0
10
0
5
10
15
20
25
30
20
30
40
50
60
70
76 cm Hg
in Hg
1. Check maximum (free) air ow
Step 1: Turn the regulator of ow meter anticlockwise around 2~3 circles.
Step 2: Insert the other end of PVC tubing into the air inlet of the suction unit.
Step 3: Power on the suction unit.
Step 4: Keep the suction unit running for 30 seconds to warm up.
Step 5: Adjust air ow and set the level of vacuum at 0 cmHg by turning the
regulator of ow meter.
Step 6: Check the air ow rate.
Step 7: Turn off the suction unit.
Step 8: Disconnect the PVC tubing from suction unit.
2. Check maximum vacuum
Step 1: Turn the regulator of ow meter anticlockwise around 2~3 circles.
Step 2: Insert the other end of PVC tubing into the air inlet of the suction unit.
Step 3: Power on the suction unit.
Step 4: Keep the suction unit running for 30 seconds to warm up.
Step 5: Set the air ow rate at 0 L/min by turning the regulator of ow meter
clockwise completely.
Step 6: Check the values on the vacuum gauge.
Step 7: Turn off the suction unit.
Step 8: Disconnect the PVC tubing from suction unit.
Power source No need
Operating temperature 0 ~ 54ºC
Storage temperature -10 ~ 60ºC
Air ow scale 0~50 L/min
accuracy ±4% of full scale
Vacuum scale 0~-76 cmHg
accuracy ±2.5% of full scale
Weight 730g
Dimension 120(L) x 105(W) x 145(H) mm
Connector
(1)
(2)
1. This device should be used with suction unit only.
2. Place the device and suction unit on a at, horizontal surface while in use.
3. Turn the regulator slowly to avoid possible damage.
4. Do not completely unscrew regulator stem.
5. Do not attempt to disassemble the device.
6. Avoid excessive vibration, physical impact and dropping.
7. Do not store the device in direct sunlight, high temperature or humidity.
8. Keep the device away from static electricity.


