manuals.online logo
Brands
  1. Home
  2. •
  3. Brands
  4. •
  5. Rotaid
  6. •
  7. Medical Equipment
  8. •
  9. Rotaid SOLID PLUS User manual

Rotaid SOLID PLUS User manual

INSTALLATIEHANDLEIDING •GUIDE D’INSTALLATION •INSTALLATION MANUAL
MONTAGEANLEITUNG •MANUALE DI INSTALAZIONE •MANUAL INSTALACÍON
INSTRUKCJA MONTAŻU
R O T A I D S O L I D P L U S
PARTS-LIST
4x 8mm Plug
4x Tapping screw 5,5x60
2x DIN screw M6
2x AAA Battery
Only for alarmed version
SCREW SET:
Installation manual
User guide
Drilling Template
HDPE backplate
Alarm (if ordered)
Cabinet cover
Screw set
IN THE BOX YOU WILL FIND:
Drilling Template
Nadat u de locatie heeft bepaald kunt u middels de achterwand de vier bevestigingsgaten markeren. Gebruik
de pluggen en bevestig vervolgens de achterplaat middels de meegeleverde schroeven en ringen.
Marquez ensuite l’emplacement des quatre trous de montage en vous servant de la paroi arrière comme
gabarit. Insérez les chevilles et fixez la paroi arrière au moyen des vis et des rondelles fournies.
Nachdem die Montagestelle festgestellt worden ist, können Sie durch die Grundplatte die vier Befestigungslöcher
markieren. Bitten benutzen Sie Dübel und montieren Sie die Grundplatte mit den mitgelieferten Schrauben und
Ringen.
Mark the 4 holes for drilling and use the screws and rings for fixation.
Fissate la piastra posteriore alla parete tramite le quattro viti lunghe ed i relativi anelli in dotazione.
Sujete el plafón posterior a la pared mediante los 4 tornillos largos y sus arandelas.
Po określeniu miejsca zamocowania oznacz przez ściankętylnącztery otwory montażowe. Wkręć kołki
rozporowe, a następnie przymocuj tylnąpłytę używając dostarczonych śrub i podkładek.
Bevestig nu de kap aan de achterwand via de nylon band met behulp van een inbussleutel (5mm).
Fixez le couvercle à la paroi arrière par la bande de nylon à l'aide d’une clé Allen (5 mm).
Sie können jetzt die Haube durch den Nylonriemen mit Hilfe eines 5 mm Inbusschlüssels an der Grundplatte
befestigen.
With the back plate fixed to the wall, now use an Allen key (5mm) to firmly attach the nylon belt to the back
plate.
Una volta fissata la piastra posteriore alla parete, usate una brugola di 5mm per connettere la cinghia alla piastra
posteriore. Assicuratevi che la cinghia di nylon sia saldamente collegata.
Con el plafón posterior asegurado a la pared, utilice una llave Allen (5 mm) para sujetar la cinta al plafón posterior.
Asegúrese de que la cinta de nilón está firmemente sujetada.
Przymocuj okap do ścianki tylnej przez taśmę nylonową używając klucza imbusowego (5mm).
Nadat u de kap heeft gemonteerd kunt u via de 2 bouten uw ideale hangpositie bepalen voor uw AED. Nadat u
de juiste positie heeft bepaald kunt u beide bouten in de verscheidene gaten draaien. Draai door tot deze niet
meer verder kunnen.
Après le montage du couvercle, vous pouvez ajuster la position du DEA au moyen des 2 boulons. Après en
avoir déterminé la position définitive, repérez les trous qui conviennent et vissez-y les boulons à fond.
Nachdem die Haube und Riemen montiert sind können Sie durch die zwei Bolzen die ideale Aufhänge Position
Ihres AED feststellen. Bitte sorgen Sie dass die Bolzen bis zum Anschlag festgedreht werden.
After attaching the cover and belt, now please use both long bolts to find the perfect position for you AED.
Please make sure the bolts are firmly screwed into the block.
Dopo aver fissato la cinghia, usate entrambi i bulloni per trovare la posizione più idonea ove collocare il vostro
DAE. Assicuratevi che entrambi i bulloni siano connessi saldamente al blocco di alluminio.
Tras sujetar la cinta, por favor utilice ambos soportes para encontrar la posición perfecta para su desfibrilador.
Asegúrese de que los soportes están firmemente sujetos al bloque de aluminio.
Po zainstalowaniu okapu, określ idealnąpozycjęzawieszenia AED używając 2 śrub. Po ustaleniu właściwej
pozycji, umieść obie śruby w dwóch otworach, a następnie wkręćobie śruby do oporu.
U kunt nu de kap op de achterwand draaien door deze enigszins schuin te plaatsen en tegen de klok in te draaien.
U draait vervolgens met de klok mee, totdat u niet meer verder kunt draaien. Indien correct geplaatst zal de
ijzeren haak aan de onderzijde door de kap vallen.
Vous pouvez maintenant poser le couvercle sur la paroi arrière en le tenant légèrement incliné et en le tournant
dans le sens inverse des aiguilles d’une montre. Tournez-le ensuite à fond dans le sens des aiguilles d’une
montre. Si le couvercle est correctement positionné, le crochet en fer sortira par le bas.
Sie können nun die AED in den Schrank platzieren. Sie benutzen den Griffam Gerät oder Tasche für die Hängung.
Die Haube kann jetzt auf die Grundplatte gedreht werden, indem Sie die Haube ein Wenig schräg anordnen und
gegen den Uhrzeigersinn biss zum Anschlag festdrehen. Die Haube ist korrekt geplatzt wenn der Edelstahl-Haken
an der Unterseite durch die Öffnung in der Haube fällt.
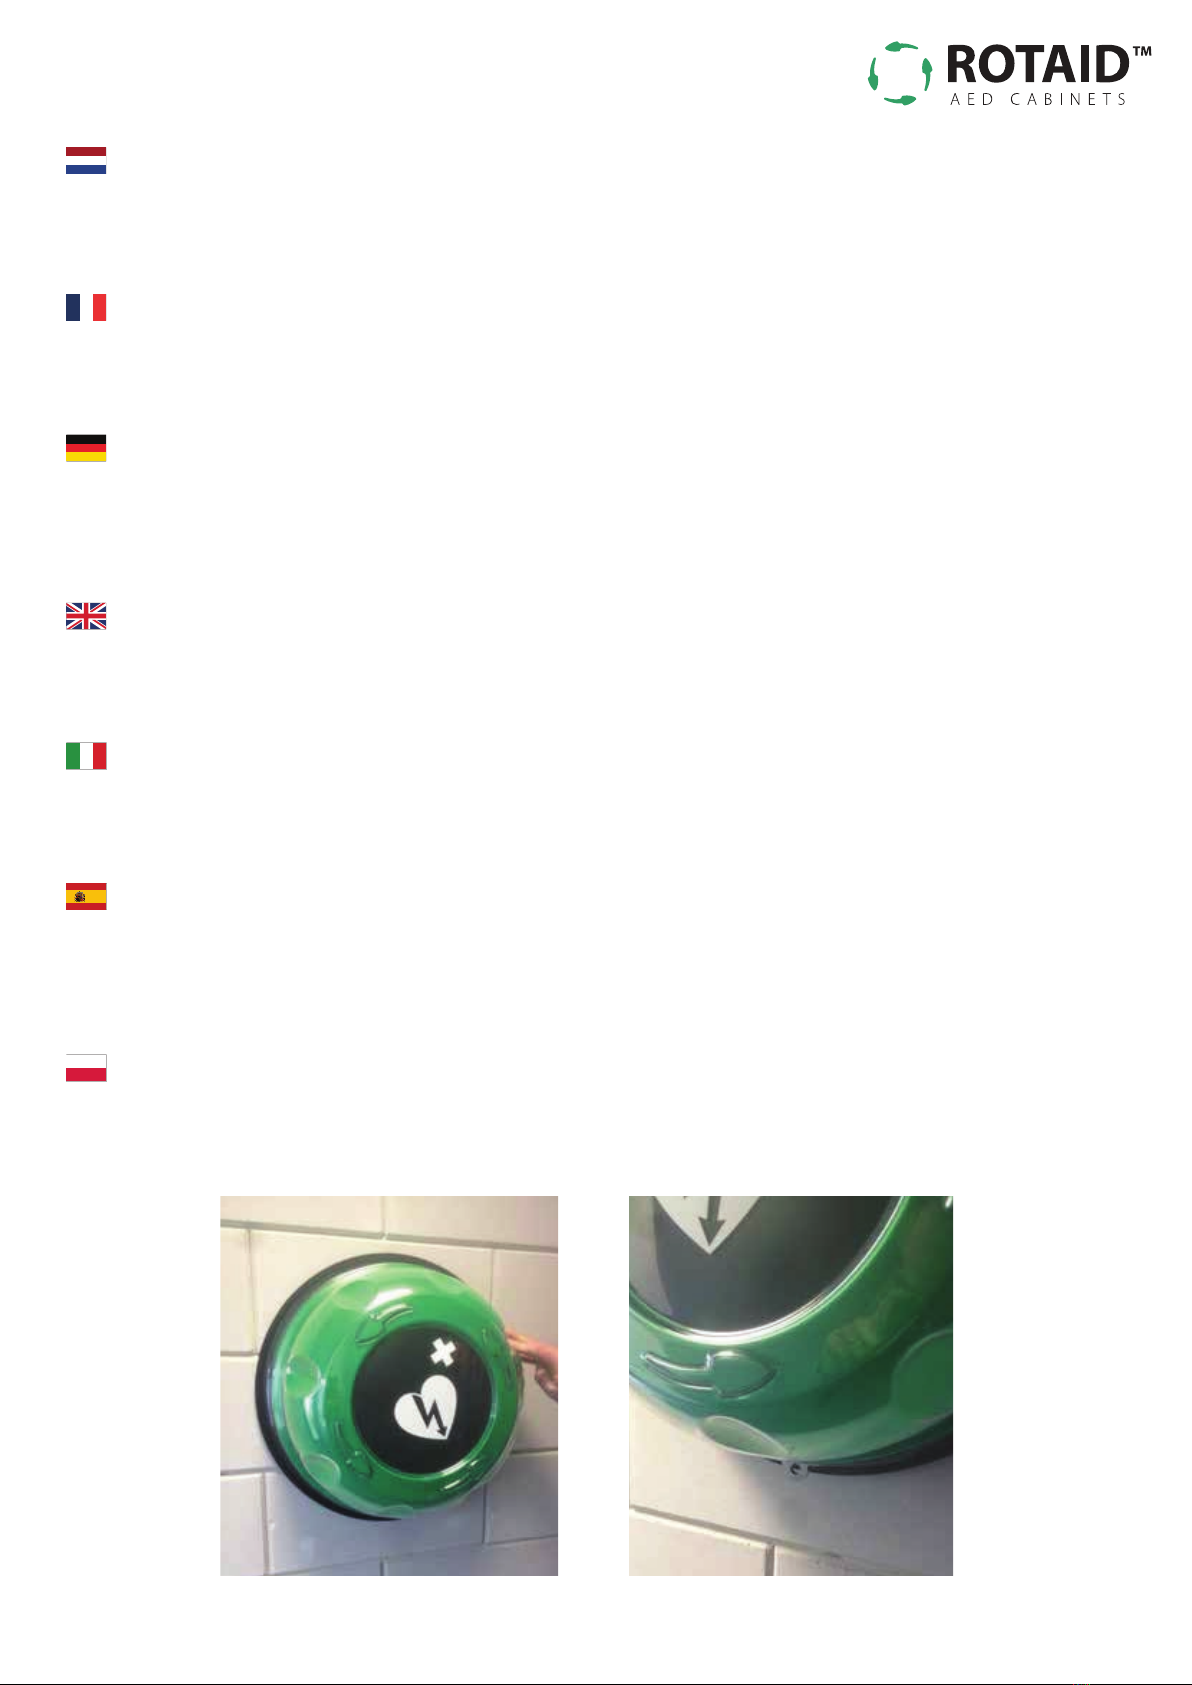
You can now place the AED into the cabinet by using its handle or carrying case handle. Please rotate the cover
on the back plate by starting slightly counterclockwise and rotate to the left until the cover reaches the stop.
When correctly placed, the hook on the bottom of the cabinet falls through the cover.
Potete adesso ruotare il coperchio sulla piastra posteriore. Posizionatelo in senso leggermente antiorario sulla
piastra posteriore e poi ruotatelo in senso orario per quanto possibile. Una volta raggiunto il posizionamento
corretto, il gancio presente sul fondo della teca cade attraverso l'apposita fessura del coperchio.
Ahora ya puede girar la cubierta sobre el plafón posterior. Coloque la cubierta ligeramente girada hacia la izquierda
sobre los enganches del plafón posterior, y gire en el sentido de las agujas del reloj tanto como pueda. Cuando
queda correctamente cerrada, el enganche en la parte inferior de la vitrina puede salir a través del agujero de la
cubierta realizado con este fin.
Teraz przykręć okap do ścianki tylnej, umieszczając go w pozycji skośnej oraz obracając w lewo. Następnie
kręć w prawo, ażdo oporu. Jeśli okap zostałprawidłowo umieszczony, żelazny hak opadnie na dół(przez okap).
Uw Rotaid Solid Plus is klaar voor gebruik!
Votre Rotaid Solid Plus est maintenant prêt à l'emploi!
Ihr Rotaid Solid Plus ist jetzt fertig zum Gebrauch!
Your Rotaid Solid Plus is now ready for use!
La vostra teca Rotaid Solid Plus è ora pronta all'uso!
¡Su vitrina Rotaid Solid Plus ya está preparada para ser usada!
Twój Rotaid Solid Plus jest gotowy do użycia!

Other manuals for SOLID PLUS

4

Other Rotaid Medical Equipment manuals

Rotaid 24/7 User manual

Rotaid

Rotaid 24/7 User manual

Rotaid SOLID PLUS HEAT User manual

Rotaid

Rotaid SOLID PLUS HEAT User manual

Rotaid SOLID PLUS User manual

Rotaid

Rotaid SOLID PLUS User manual

Rotaid SOLID PLUS User manual

Rotaid

Rotaid SOLID PLUS User manual

Rotaid SOLID PLUS User manual

Rotaid

Rotaid SOLID PLUS User manual

Rotaid SOLID PLUS User manual

Rotaid

Rotaid SOLID PLUS User manual

Rotaid TOTEM User manual

Rotaid

Rotaid TOTEM User manual

Rotaid SOLID PLUS HEAT User manual

Rotaid

Rotaid SOLID PLUS HEAT User manual

Popular Medical Equipment manuals by other brands

Masimo Rad-G Operator's manual

Masimo

Masimo Rad-G Operator's manual

Gima 34257 quick start guide

Gima

Gima 34257 quick start guide

Covidien ForceTriad Quick reference card

Covidien

Covidien ForceTriad Quick reference card

mychway SR-MJ3201 user manual

mychway

mychway SR-MJ3201 user manual

Yuwell YX3 Series quick start guide

Yuwell

Yuwell YX3 Series quick start guide

FREEWAY S180E Mobile Hoist user manual

FREEWAY

FREEWAY S180E Mobile Hoist user manual

Physio Control LIFEPAK 20 quick guide

Physio Control

Physio Control LIFEPAK 20 quick guide

Handicare SystemRoMedic SupportStraps user manual

Handicare

Handicare SystemRoMedic SupportStraps user manual

Invacare Alegio NG user manual

Invacare

Invacare Alegio NG user manual

Microlife BP W70 BT user manual

Microlife

Microlife BP W70 BT user manual

Karl Storz 11301 D1 instruction manual

Karl Storz

Karl Storz 11301 D1 instruction manual

TLM CrossoverPlus/26 quick start guide

TLM

TLM CrossoverPlus/26 quick start guide

OREX PcCR 1417 ACL4 instruction manual

OREX

OREX PcCR 1417 ACL4 instruction manual

Parker Healthcare ATOM V-808 Cleaning instructions

Parker Healthcare

Parker Healthcare ATOM V-808 Cleaning instructions

DeVilbiss DV54 AutoAdjust CPAP Series owner's manual

DeVilbiss

DeVilbiss DV54 AutoAdjust CPAP Series owner's manual

Thuli Tables 300 Stationary owner's manual

Thuli Tables

Thuli Tables 300 Stationary owner's manual

Siem Nova 6110-A1 MAX User and maintenance manual

Siem Nova

Siem Nova 6110-A1 MAX User and maintenance manual

Hadeco Smartdop XT operating manual

Hadeco

Hadeco Smartdop XT operating manual

manuals.online logo
manuals.online logoBrands
  • About & Mission
  • Contact us
  • Privacy Policy
  • Terms and Conditions

Copyright 2025 Manuals.Online. All Rights Reserved.