Royal Catering RCNK-4 User manual

WWW.CATERINGROYAL.DE
RCNK- 4
RCNK-4-GN
RCNK- 6
BEDIENUNGSANLEITUNG
NUDELKOCHER
USER MANUAL
PASTA MAKER
INSTRUKCJA OBSŁUGI
WARNIK DO MAKARONU
ISTRUZIONI D‘USO
CUOCIPASTA
MODE D‘EMPLOI
CUISEUR À PÂTES
MANUAL DE INSTRUCCIONES
COCEDOR DE PASTA

Deutsch
English
Polski
Italiano
Français
Español
3
6
10
14
18
22
Inhalt | Content | Contenu | Contenido | Treść
WWW.CATERINGROYAL.DE
I. EINFÜHRUNG:
Der elektrischen Nudelkocher ist unser neues elektrisches Produkt, wobei nur
fortschrittliche Technologie zum Einsatz kommt. Der komplette Körper beseht aus
hochqualitativem Edelstahl in einer luxuriösen und optisch ansprechenden Ausfüh-
rung.
Die Nudelkocher sind ausgestattet mit hochqualitativen elektrischen Elementen,
die energiesparend und zugleich sehr sicher sind. Durch die neueste Generation an
Thermostaten ist eine konstante Hitze garantiert. Der Nudelkocher ist einfach zu
bedienen und zugleich hochqualitativ und langlebig, somit ist er bestens geeignet für
den alltäglichen Gastronomiebereich. Die Royal Catering Nudelkocher vereinen ein
Hoch an Qualität mit einem Maximum an Sicherheit und zeichnen sich besonders
durch ihre einfache Handhabung aus.
II.TECHNISCHES DATENBLATT
3
Modell RCNK-4 RCNK-4-GN RCNK-6
Spannung (V) 230
Frequenz (Hz) 50
Leistung (kW) 2x1.5 3x1 3x1
Abmessungen LxBxH (mm) 415*495*260 590*495*260 590*495*260
Gewicht (kg) 11 14.5 14.5
Heizbereich (⁰C) 30-110
III. HAUPTELEMENTE
1. Ablasshahn
2. Betriebskontrollleuchte, Heizungskontrollleuchte
3. Thermostatregler (Einstellen derTemperatur)
1
2
3

4 5
Was tun im Problemfall?
Kontaktieren Sie IhrenVerkäufer und bereiten Sie folgende Angaben vor:
• Rechnungs- und Seriennummer (letztere nden Sie auf dem Typenschild)
• Ggf. ein Foto des defekten Teils
• Ihr Servicemitarbeiter kann besser eingrenzen, worin das Problem besteht, wenn
Sie es so präzise wie möglich beschreiben. Formulierungen wie z.B. „das Gerät
heizt nicht“ können missverständlich sein, und bedeuten, dass das Gerät zu wenig
oder eben gar nicht heizt. Dies sind aber zwei verschiedene Fehlerursachen!
• Geben Sie stets den Zustand der Leuchten an, da dies die Diagnose erleichtert:
Geht die grüne Leuchte an , wenn Sie das Gerät einschalten? Geht die orangene
Leuchte an, wenn Sie die Temperatur einstellen?
Je detaillierter Ihre Angaben sind, umso schneller kann Ihnen geholfen werden!
ACHTUNG: Öffnen Sie niemals das Gerät ohne Rücksprache mit dem
Kundenservice. Dies kann zu einem Garantieverlust führen!
IV . BEDIENUNGSANLEITUNG
Vor dem Benutzen, überprüfen Sie bitte, ob die Stromquelle in Konformität mit dem
Datenschild des Gerätes steht und das es ggf. richtig geerdet ist. Es ist verboten ex-
plosive Gegenstände (wie z.B. Gasaschen) in die Nähe des Gerätes zu stellen. Und
bitte platzieren Sie das Gerät in einem Umfeld mit guterVentilation.
1. ZumVerarbeiten der Nudeln füllen sie den Behälter zur Hälfte mit Wasser.
2. Drehen Sie dasThermostat auf die Position “0“. Stecken Sie nun den Stromste-
cker ein und das grüne Lämpchen leuchtet auf. Stellen Sie nun die gewünschte
Temperatur ein (im Uhrzeigersinn drehen), das orange Lämpchen leuchtet auf
und der Heizstab fängt an sich zu erhitzen. Ist die gewünschte Temperatur er-
reicht erlischt die orange Leuchte. Das Thermostat hält nun die gewünschteTem-
peratur und schaltet den Heizstab automatisch ein und aus um die Temperatur zu
halten und Energie zu sparen. Nun können Sie mit dem kochen beginnen.
3. Dazu benutzen Sie die mitgelieferten Körbe. Legen Sie Nudeln in das Objekt in
den Korb und senken Sie Ihn in dasWasser.Wenn Sie die Nudeln gekocht haben,
hängen Sie den Korb bitte auf den Nagel um das überschüssigeWasser abtropfen
zu lassen.
4. Bitte denken Sie immer daran, dass Thermostat nach dem kochen auf die Position
“0“ zu stellen (gegen den Uhrzeigersinn) und den Stromstecker rauszuziehen.
V. REINIGUNG
1. Drehen Sie dieTemperatur auf 0 und trennen Sie das Gerät vom Stromnetz.
2. Warten Sie, bis das Wasser sich abgekühlt hat.
3. Lassen Sie das Wasser ab.
4. Reiben Sie den Behälter mit einem Tuch sauber und trocken.
5. Achten Sie darauf, dass kein Wasser an das Kontrollpanel kommt.
6. Füllen Sie das Gerät mit Wasser, bevor Sie es das nächste Mal benutzen!
Zuwiderhandlungen können zu Schäden am Gerät und zumVerlust der Garantie füh-
ren!
VI.ACHTUNG
1. Es ist verboten die Heizstäbe imTrockenen zu erhitzen.
2. Sie sollten den Stromstecker nach jedem Betrieb rausziehen um unnötige Unfälle
zu verhindern.
3. Falls das Gerät nicht mehr funktioniert, bitte niemals selber öffnen, sondern in
Absprache mit uns entweder zurücksenden oder einen geeigneten Elektrofachbe-
trieb damit beauftragen.
VII. REGELMÄSSIGE PRÜFUNG DES GERÄTES
Prüfen Sie regelmäßig, ob Elemente des Gerätes Beschädigungen aufweisen. Sollte dies
der Fall sein, wenden Sie sich an IhrenVerkäufer, um Nachbesserungen vorzunehmen.

WWW.CATERINGROYAL.DE
USER MANUAL
PASTA MAKER
RCNK- 4
RCNK-4-GN
RCNK- 6
I. INTRODUCTION:
The electric pasta maker is our new electric - thermal product, which was designed
and made in accordance with the newest technology. It was adjusted to the popular
international style; made of high quality stainless steel and it is very attractive and
luxury.The electric pasta maker is equipped with the top quality electric elements,
which are safe and energy – saving.Thanks to the newest thermostat technology,
constant temperature is ensured.The pasta maker is easy for use, high quality device
with long service life and therefore is the best for daily use in the Gastronomy sec-
tor.
The pasta makers from Royal Catering are high quality, maximum safe and extremely
easy for use devices.
II.TECHNICAL PARAMETERS
Modell RCNK-4 RCNK-4-GN RCNK-6
Voltage (V) 230
Frequency (Hz) 50
Power (kW) 2x1.5 3x1 3x1
Dimensions (mm) 415*495*260 590*495*260 590*495*260
Weight (kg) 11 14.5 14.5
Temperature range (⁰C) 30-110
III. MAIN ELEMENTS
1. drain tap
2. power and heating lights
3. the thermostat (temperature setting)
1
2
3
7

8 9
• If relevant, a picture of the damaged, broken or defective part
• It will be easier for your customer service clerk to determinate the source of
the problem if you make a detailed and precise description of the matter.A void
formulations like “the device doesn´t heat”, which may mean that it doesn´t heat
enough or even not at all.Though, those two possibilities have a different causati-
on!
• Still indicate the performance of the lights to facilitate the diagnosis: Does the
green light get on when you turn on the device? Does the orange light turn on
when you set the temperature?
The more detailed your information, the quicker the customer service will be able to
answer your problem rapidly and efciently!
CAUTION: Never open the device without the authorization of your customer ser-
vice.This can lead to a loss of warranty!
IV. MANUAL INSTRUCTION
Before use, please make sure that the working voltage of the equipment (on the
techplate)matching the power supply and if the device is properly grounded. It is for-
bidden to store the explosive or ammable objects (gas bottles) near the device. The
device should be stored in rooms with good ventilation.
1. In order to prepare the pasta, please ll the tank to its half capacity.
2. Turn the thermostat knob to position „0“. Plug in the power, green light will turn
on. Please set the desired temperature (by turning the thermostat knob clockwi-
se), the orange control light will turn on and the heating element will start wor-
king.When the desired temperature will be reached, the orange light will turn off.
The thermostat will maintain the desired temperature by turning on and off the
heating element.This is for maintaining the temperature and for energy saving.
You can start cooking.
3. In order to start cooking, please use attached baskets. Put the noodles into the
basket and then put the basket into the water.After cooking, baskets should be
hang on the hooks to drain the water from the noodles.
4. It must be remembered that after work, the thermostat must be switched into
„0” position (by turning the thermostat anticlockwise) and pull of the plug.
V. CLEANING AND MAINTENANCE
1. Turn temperature to 0 and unplug the machine from the power.
2. Allow machines water to cool down.
3. Drain water into container.
4. Wipe clean with cloth.
5. Please ensure no access water near controls.
6. FILL MACHINE WITH WATER BEFORE NEXT OPERATION
Failure to do this will burn out the element and void warranty.
IV.WARNING
1. It is forbidden to turn on the power with dry heating elements.
2. After each use, remove the plug from the socket to avoid unnecessary accidents.
3. If the device does not work, please do not open it, just return it to us for prior
consultation or consult with the electric specialist.
VII. REGULAR CONTROL OF THE DEVICE
Control regularly that the device doesn´t present any damage. If it should be the case,
please contact your customer service to solve the problem.
What to do in case of problem?
Please contact your customer service and join following information:
• Invoice number and serial number (the latest is to be found on the technical
plate on the device)

WWW.CATERINGROYAL.DE
INSTRUKCJA OBSŁUGI
WARNIK DO MAKARONU
11
RCNK- 4
RCNK-4-GN
RCNK- 6
I. WSTĘP:
Elektryczny warnik do makaronu jest naszym nowym elektrotermicznym produktem,
który został zaprojektowany i stworzony dzięki najnowszej technice. Przystosowany
jest do popularnego międzynarodowego stylu; jest w całości wykonany z wysokiej ja-
kości stali szlachetnej i cechuje się luksusowym i wizualnie atrakcyjnym wykonaniem.
Warnik do makaronu wyposażony został w najwyższej jakości elementy elektryczne,
które są jednocześnie energooszczędne i bezpieczne. Dzięki najnowszej generacji
termostatów zapewnione jest utrzymanie stałej temperatury. Warnik do makaronu
jest łatwy w obsłudze, jest to jednocześnie urządzenie wysokiej jakości cechujące się
długą żywotnością, dlatego też nadaje się najlepiej do codziennego użytku w branży
gastronomicznej.
Warnik do makaronu rmy Royal Catering łączy w sobie wysoką jakość i maksimum
bezpieczeństwa i wyróżnia się szczególnie prostą obsługą.
II. PARAMETRY TECHNICZNE
Model RCNK-4 RCNK-4-GN RCNK-6
Napięcie (V) 230
częstotliwość (Hz) 50
Moc (kW) 2x1.5 3x1 3x1
Wymiary (mm) 415*495*260 590*495*260 590*495*260
Waga (kg) 11 14.5 14.5
Zakres temperatury (⁰C) 30-110
III. GÓŁWNE ELEMENTY
1. kranik spustowy
2. lampki kontrolne zasilania i grzania
3. pokrętło termostatu (nastawianie temperatury)
1
2
3

12 WWW.CATERINGROYAL.DE 13
VII. REGULARNA KONTROLA URZĄDZENIA
Należy regularnie sprawdzać, czy elementy urządzenia nie są uszkodzone. Jeżeli ele-
menty te będą uszkodzone, to należy zwrócić się do sprzedawcy z prośbą o ich na-
prawę.
Co należy zrobić w przypadku pojawienia się problemu?
Należy skontaktować się ze sprzedawcą i przygotować następujące dane:
• Numer faktury oraz numer seryjny (nr seryjny podany jest na tabliczce znamio-
nowej).
• Ewentualnie zdjęcie niesprawnej części.
• Pracownik serwisu jest w stanie lepiej ocenić, na czym polega problem, jeżeli
opiszą go Państwo w sposób tak precyzyjny, jak jest to tylko możliwe. Sformu-
łowania, takie jak np. „urządzenie nie grzeje“ mogą być dwuznaczne i oznaczają
zarówno, że urządzenie grzeje za słabo lub w ogóle nie grzeje. Są to jednak dwie
różne przyczyny usterek!
• Prosimy podawać zawsze informacje o stanie lampek kontrolnych, gdyż w znacz-
nym stopniu ułatwi to diagnozę: Czy w momencie załączenia urządzenia, zapala
się zielona lampka kontrolna? Czy w momencie ustawiania temperatury zapala się
pomarańczowa lampka kontrolna?
UWAGA: Nigdy nie wolno otwierać urządzenia bez konsultacji z serwisem klienta.
Może to prowadzić do utraty gwarancji!
IV. INSTRUKCJA OBSŁUGI
Przed rozpoczęciem użytkowania, proszę sprawdzić, czy źródło prądu jest zgodne z
tabliczką znamionową urządzenia i czy urządzenie jest uziemione (jeśli to konieczne).
Zabrania się przechowywania przedmiotów wybuchowych (takich jak np. butle z ga-
zem) w pobliżu urządzenia. Należy przechowywać urządzenie w pomieszczeniach z
dobrą wentylacją.
1. W celu przygotowania makaronu proszę napełnić zbiornik wodą do około poło-
wy jego objętości.
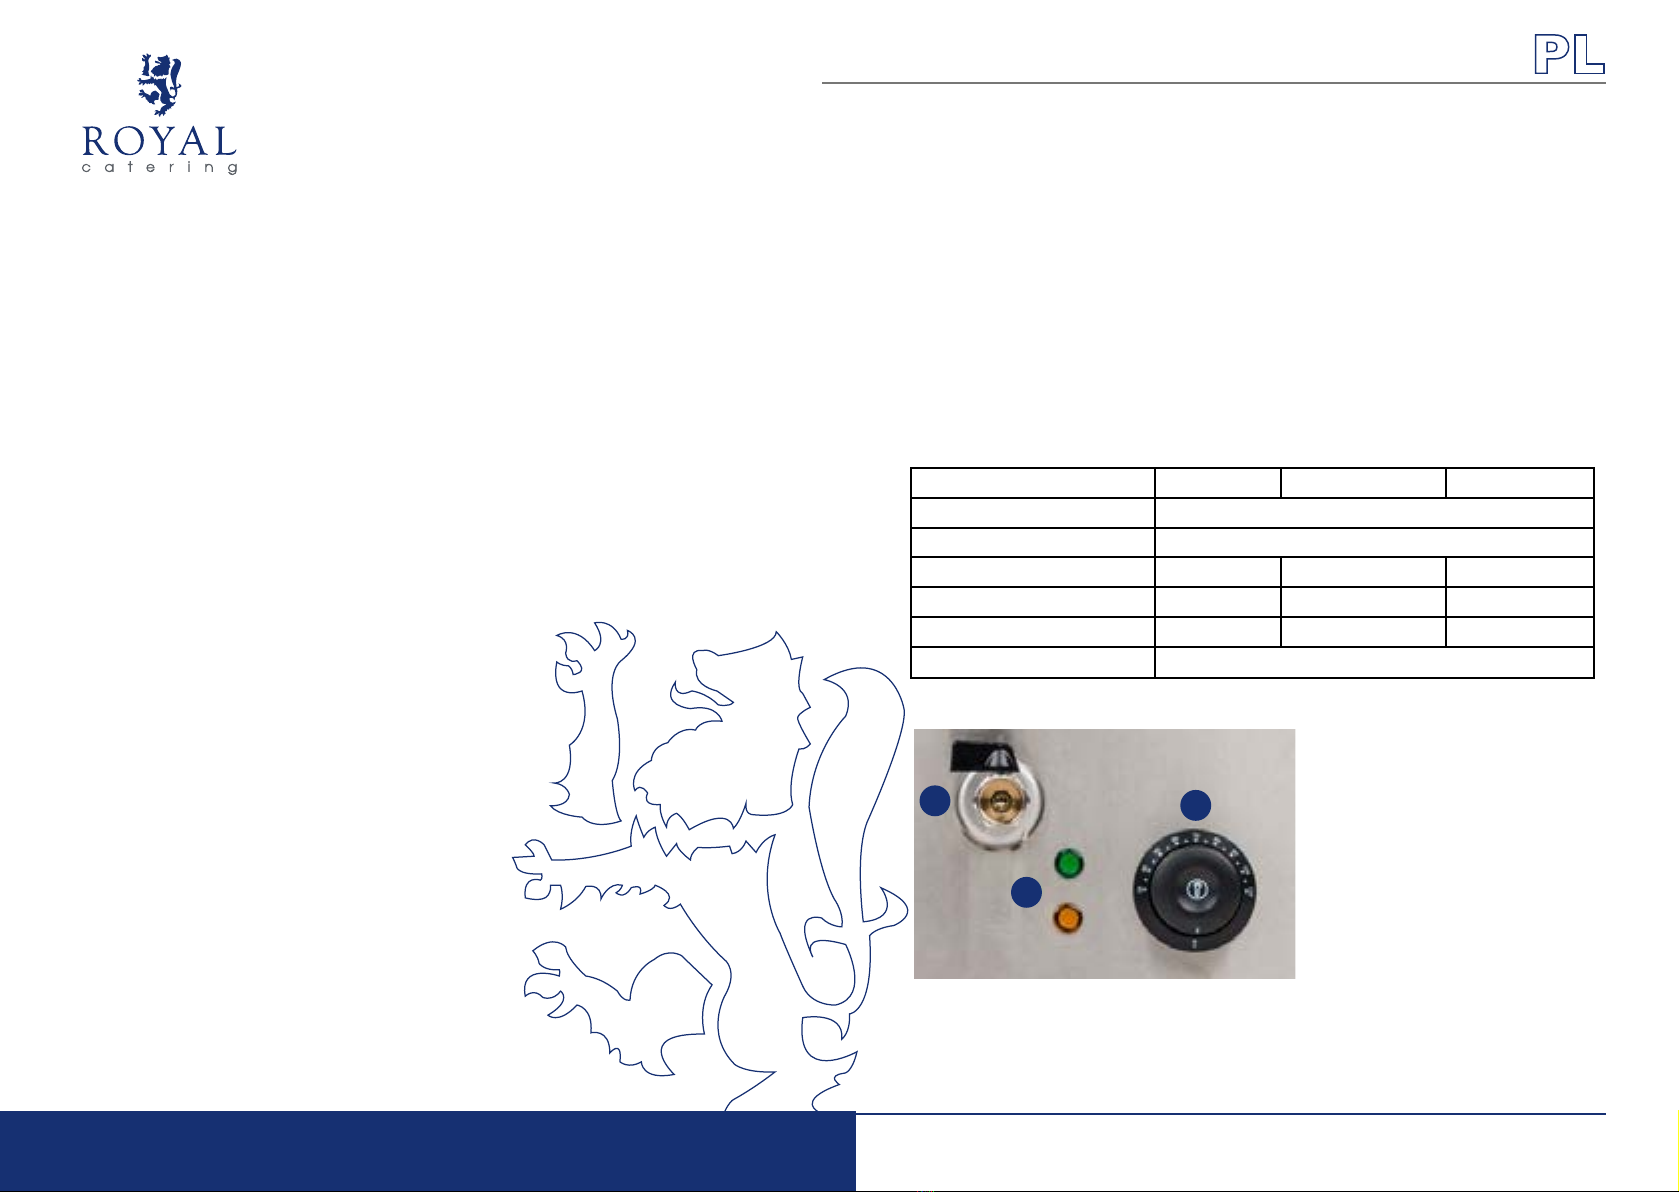
2. Proszę przekręcić termostat na pozycję „0“. Podłączyć wtyczkę, zaświeci się zie-
lona lampka. Proszę ustawić pożądaną temperaturę (kręcąc pokrętłem według
ruchu wskazówek zegara), zapali się pomarańczowa lampka, a grzałka zacznie się
nagrzewać. W momencie, kiedy zostanie osiągnięta pożądana temperatura poma-
rańczowa lampka wyłączy się. Termostat utrzymuje pożądaną temperaturę, auto-
matycznie włączając i wyłączając grzałkę, żeby utrzymać temperaturę i oszczędzić
energię. Możecie Państwo zacząć gotować.
3. W tym celu proszę użyć dostarczonych koszy. Włożyć makaron do kosza, a na-
stępnie opuścić kosz do wody. Po ugotowaniu makaronu, należy powiesić kosz na
wieszaczkach, żeby odsączyć nadmiar wody.
4. Należy pamiętać o tym, aby po zakończeniu gotowania ustawić termostat na
pozycję „0“ (w kierunku przeciwnym do ruchu wskazówek zegara) i wyciągnąć
wtyczkę.
V. CZYSZCZENIE I KONSERWACJA
1. Przekręcić temperaturę na 0 i odłączyć urządzenie od sieci.
2. Odczekać aż woda w zbiorniku ostygnie.
3. Spuścić wodę.
4. Wytrzeć zbiornik szmatką do czysta i do sucha.
5. Zwrócić uwagę, żeby do panelu kontrolnego nie dostała się woda.
6. Napełnić urządzenie wodą przed następnym użyciem!
Działanie niezgodne z instrukcją może prowadzić do szkód na urządzeniu i utraty
gwarancji
VI. UWAGA
1. Zabrania się podgrzewać suche grzałki.
2. Po każdym użyciu należy wyjąć wtyczkę z gniazdka, aby uniknąć niepotrzebnych
wypadków.
3. Jeżeli urządzenie nie działa, proszę nigdy samodzielnie nie otwierać, tylko odesłać
do nas po wcześniejszej konsultacji lub zlecić to specjalistycznemu zakładowi
elektrycznemu

WWW.CATERINGROYAL.DE
ISTRUZIONI D‘USO
CUOCIPASTA
RCNK- 4
RCNK-4-GN
RCNK- 6
I. INTRODUZIONE:
Il cuocipasta elettrico si aggiunge alla nostra vasta gamma di prodotti realizzati con
l`impiego della piu` moderna tecnologia. Il corpo dell`apparecchio e‘ in acciaio inox
di alta qualita‘ ed e‘ dotato di un elegante alloggiamento esterno.
I cuocipasta sono stati costruiti con elementi elettrici qualitativamente pregiati, sicuri
e a basso consumo energetico. Grazie all`uso dell`ultima generazione di termosta-
ti, l`apparecchio garantisce un calore costante. Il cuocipasta e‘ facile e semplice da
utilizzare. E` uno strumento d`alta qualita‘ e molto durevole, adatto per l`utilizzo
quotidiano nel settore della gastronomia. I cuocipasta di Royal Catering racchiudono
in se‘ qualita‘ e sicurezza elevate e sono facili da utilizzare.
II. SCHEDA TECNICA
Modello RCNK-4 RCNK-4-GN RCNK-6
Tensione (V) 230
Frequenza (Hz) 50
Potenza (kW) 2x1.5 3x1 3x1
Dimensioni LxBxH (mm) 415*495*260 590*495*260 590*495*260
Peso (kg) 11 14.5 14.5
Temperatura (⁰C) 30-110
III. ELEMENTI PRINCIPALI
1. Scarico
2. Spia di funzionamento, spia di controllo riscaldamento
3. Regolatore del termostato (per impostare la temperatura)
1
2
3
15

16
IV. ISTRUZIONI D‘USO
Prima dell`utilizzo si prega di vericare che la fonte di energia elettrica sia conforme
alla scheda dati dell`apparecchio e che la messa a terra sia stata effettuata corretta-
mente. È` vietato utilizzare l`apparecchio in prossimità di elementi potenzialmente
esplosivi (come ad esempio bottiglie di gas). Si prega di utilizzare l`apparecchio in un
luogo con sufciente aerazione.
1. Riempire il contenitore d`acqua per meta‘.
2. Girare il termostato sulla posizione “0 “.Attaccare la spina di corrente e la spia
verde di accensione si illuminera‘. Impostare adesso la temperatura voluta (girare
in senso orario), la spia arancione si illumina e gli elementi riscaldanti inizieranno
a riscaldarsi. Quando la temperatura desiderata è stata raggiunta, la spia aran-
cione si spegne. Il termostato ora possiede la temperatura desiderata e attiva e
disattiva automaticamente la pompa di calore in modo da mantenere la tempera-
tura e risparmiare energia. Ora potete cominciare a cucinare.
3. Per cucinare si prega di utillizzare i cestelli compresi nel contenuto di spedizione.
Mettere la pasta nel cestello e immergerlo nell`acqua. Una volta cucinata la pasta,
lasciate scolare e asciugare il cestello.
4. Dopo aver cucinato, si prega di impostare il termostato sulla posizione “0“ (giran-
do in senso antiorario) e di staccare la spina di corrente.
V. PULIZIA
1. Impostare la temperatura a 0 e staccare il cavo di corrente dall`apparecchio.
2. Attendere che l`acqua si sia raffreddata e
3. farla deuire.
4. Asciugare il contenitore con un panno pulito e asciutto.
5. Assicurarsi che il pannello di controllo non venga a contatto con l´acqua.
6. Riempire il cuocipasta d`acqua prima di utilizzarlo nuovamente.
Si prega di rispettare regole di utilizzo dell`apparecchio per non perdere la garanzia!
IV. N.B.
1. È proibito riscaldare gli elementi riscaldanti in luoghi asciutti.
2. Dopo ogni utilizzo togliere lo spinotto dalla presa di corrente per evitare inci-
denti inevitabili.
3. In caso in cui l`apparecchio non funzionasse piu`, si prega di non aprirlo e smon-
tarlo da solo ma di rimandarlo a noi o di farlo controllare da uno specialista del
settore.
VII. CONTROLLARE REGOLARMENTE L‘APPARECCHIO
Vericare regolarmente che i pezzi dell‘apparecchio non possiedano danni. In caso ri-
leviate dei danni contattate il vostro venditore per effettuare le modiche necessarie.
17
Cosa fare in caso si verichino problemi?
Contattare il venditore e fornire i seguenti dati:
• Numero di fatturazione e numero di serie (li troverete sulla targhetta del dispo-
sitivo)
• Fornire una foto del pezzo difettoso
• Provvedete a descrivere il problema che avete riscontrato nel modo piu` preciso
possibile in modo che il servizio clienti sia in grado di circoscrivere il problema
e di risolverlo. Descrizioni del tipo „l‘apparecchio non riscalda “ possono essere
ambigue e signicare che l`apparecchio si riscalda troppo poco o che non si ris-
calda per niente. Queste sono tuttavia cause di due disfunzioni ben diverse del
cuocipasta!
• Comunicare sempre la condizione delle spie per facilitare la diagnosi: Si illumina la
spia verde quando accendete l`apparecchio? Si illumina la spia arancione quando
impostate la temperatura?
Piu` dettagliate sono le informazioni da voi fornite, maggiore e‘ l`aiuto che possiamo
fornirvi!
N.B.: Non aprire o smontare mai l`apparecchio senza l`autorizzazione del servizio
client,i per non perdere la garanzia.

WWW.CATERINGROYAL.DE
MODE D‘EMPLOI
CUISEUR À PÂTES
RCNK- 4
RCNK-4-GN
RCNK- 6
I. INTRODUCTION
Le cuiseur à pâtes électrique est l‘un de nos tous nouveaux articles et dispose d‘une
technologie ultra-moderne. La structure est composée d‘acier inoxydable de grande
qualité et offre un design élégant pour votre cuisine professionnelle.
Les cuiseurs à pâtes sont équipés avec des composants électriques de qualité, éco-
nomes en énergie et qui garantissent une sécurité optimale. Un thermostat nouvelle
génération maintient et garantit une chaleur constante. Le cuiseur à pâtes est un ap-
pareil facile à utiliser, solide et durable. C‘est donc l‘outil parfait pour une utilisation
quotidienne en cuisine professionnelle. Les cuiseurs Royal Catering associent qualité
et sécurité pour un confort de travail optimal.
II. FICHE TECHNIQUE
Modèle RCNK-4 RCNK-4-GN RCNK-6
Tension (V) 230
Fréquence (Hz) 50
Puissance (kW) 2x1.5 3x1 3x1
Mesures Lxlxh (mm) 415*495*260 590*495*260 590*495*260
Poids (kg) 11 14.5 14.5
Plage de chauffe (°C) 30-110
III. ÉLÉMENTS PRINCIPAUX
1. Robinet de vidange
2. Voyant lumineux pour le fonctionnement, voyant lumineux pour le contrôle de la
température
3. Régulateur du thermostat (ajuster la température)
1
2
3
19

20
IV. MODE D‘EMPLOI
Veuillez vérier avant utilisation, que l‘alimentation est conforme à celle prévue pour
l‘appareil (voir étiquette) et, si tel est bien le cas, qu‘il est correctement raccordé à la
terre. Il est formellement interdit de laisser ou de déposer des objets explosifs (com-
me p. ex. des bouteilles de gaz) à proximité de l‘appareil. Celui-ci doit, par ailleurs,
toujours être utilisé dans une pièce aérée et bien ventilée.
1. Pour la cuisson des pâtes et des nouilles, le récipient doit être rempli à moitié
avec de l‘eau.
2. Tournez le thermostat sur la position „0“. Insérez maintenant la che dans la pri-
se électrique, le voyant vert doit s‘allumer. Sélectionnez la température souhaitée
(en tournant dans le sens des aiguilles d‘une montre), le voyant orange clignote
et la canne commence à chauffer. Lorsque la température souhaitée est atteinte,
le voyant orange s‘éteint. Le thermostat a atteint la température souhaitée et
allume et éteint par alternance la canne pour maintenir la température tout en
économisant l‘énergie.Vous pouvez maintenant commencer à cuire les pâtes.
3. Utilisez pour ce faire le panier fourni à la livraison. Mettez les pâtes/nouilles
à l‘intérieur et plongez le panier dans l‘eau. Lorsque la cuisson est terminée,
vous pouvez suspendre le panier sur le clou prévu à cet effet, an de le laisser
s‘égoutter.
4. N‘oubliez jamais de replacer le thermostat sur la position „0“ (dans le sens inver-
se des aiguilles d‘une montre) après la cuisson et de débrancher l‘appareil.
V. NETTOYAGE
1. Tournez la température sur 0 et déconnectez l‘appareil du réseau.
2. Attendez que l‘eau se soit refroidie avant de vider l‘appareil.
3. Frottez le récipient avec un chiffon sec et propre.
4. Veillez à ce que l‘eau ne touche pas le panneau de commande.
5. N‘oubliez pas de remplir le récipient avec de l‘eau lors de la prochaine
utilisation!
Le non-respect de ces instructions peut endommager l‘appareil et provoquer une
perte de garantie!
IV.ATTENTION
1. Ne faites jamais chauffer l‘appareil à sec.
2. L‘appareil devrait être débranché après chaque utilisation an d‘éviter des acci-
dents inutiles.
3. Si l‘appareil ne fonctionne plus, ne l‘ouvrez jamais vous-même, mais contactez-
nous pour que nous puissions vous conseiller.
VII. EXAMEN RÉGULIER DE L‘APPAREIL
Contrôlez régulièrement le bon état des différents éléments de l‘appareil. Si un élé-
ment devait être abîmé, contactez le vendeur an de trouver une solution.
21
Que faire en cas de problème?
Prenez contact avec votre vendeur et préparez les éléments suivants:
• Vos numéros de série et de facture (que vous trouverez sur la plaque signalé-
tique)
• Une photo de l‘élément endommagé (si tel est le cas)
• Plus vos descriptions seront précises, plus votre conseiller sera en mesure de
comprendre le problème et de vous aider à le résoudre. Les formulations trop
générales comme p. ex. „l‘appareil ne chauffe pas“ peuvent conduire à des ma-
lentendus (l‘appareil chauffe trop? pas assez?) Les causes des défauts peuvent en
effet être différentes selon le problème!
• Indiquez toujours l‘état/le fonctionnement (ou non) des voyants lumineux an
de faciliter le diagnostic: La lumière verte s‘allume-t-elle, lorsque vous mettez
l‘appareil en circuit? Le voyant orange s‘allume-t-il lorsque vous sélectionnez une
température?
Plus détaillées seront vos indications, plus rapidement nous pourrons vous aider!
ATTENTION: N‘ouvrez jamais l‘appareil sans l‘accord du service client. Cela peut
entraîner une perte de garantie!

WWW.CATERINGROYAL.DE
MANUAL DE INSTRUCCIONES
COCEDOR DE PASTA
RCNK- 4
RCNK-4-GN
RCNK- 6
I. INTRODUCCIÓN
El cocedor de pasta eléctrico es una de nuestras novedades, en el hemos incorpora-
do los últimos avances tecnológicos. El bastidor, fabricado en acero inoxidable, con-
ere a este dispositivo un diseño muy elegante.
Este dispositivo está equipado con los más modernos componentes eléctricos, que
combinan seguridad y ahorro energético. Los termostatos de última generación inte-
grados en estos dispositivos, garantizan un suministro térmico constante. Este cuece
pastas es muy fácil de utilizar, a la vez que duradero, lo cual lo convierte en una solu-
ción ideal en la restauración. Los cocedores de pasta de Royal Catering le seducirán
no solo por su calidad y seguridad, sino también por su facilidad de uso.
II. INFORMACIÓN TÉCNICA
Modelo RCNK-4 RCNK-4-GN RCNK-6
Voltaje (V) 230
Frecuencia (Hz) 50
Potencia (kilovatios) 2x1.5 3x1 3x1
Dimensiones LxAxA (mm) 415*495*260 590*495*260 590*495*260
Peso [kg] 11 14.5 14.5
Rango de temperatura (°C) 30-110
III. COMPONENTES PRINCIPALES
1. Grifo de vaciado
2. Indicador de funcionamiento, Indicador de control del calentamiento
3. Regulador del termostato (ajuste de la temperatura)
1
2
3
23

24
IV. MANUAL DE INSTRUCCIONES
Antes de usar este dispositivo, compruebe que el suministro eléctrico es compatible
con los datos técnicos de la placa y que el enchufe tiene toma de tierra. Está termi-
nantemente prohibido colocar objetos explosivos (p. ej. bombonas de gas) cerca de
este cocedor. Le rogamos ubique esta máquina en un lugar con buena ventilación.
1. Par cocer la pasta llene el contenedor de agua hasta la mitad.
2. Ponga el termostato en posición „0“. Enchufe el dispositivo a la corriente y el pi-
loto verde se encenderá. Seleccione la temperatura deseada (en sentido horario);
el piloto naranja se encenderá y la resistencia empezará a calentarse. Una vez que
se haya alcanzado la temperatura seleccionada, el piloto naranja se apagará. En
ese momento, el termostato ha alcanzado la temperatura de trabajo y la resisten-
cia se apaga, para ahorrar energía y mantener la temperatura constante, con lo
cual podrá empezar a cocer la pasta.
3. Para ello, utilice los cestillos suministrados, colocando la pasta en su interior y
sumergiéndolos en el agua. En cuanto la pasta esté en su punto, cuelgue el cestillo
del enganche posterior, para poder escurrir el exceso de agua.
4. Recuerde siempre de poner el termostato en posición „0“ y de desenchufar el
dispositivo tras su uso.
V. LIMPIEZA
1. Coloque la temperatura a „0“ y desenchufe el aparato del suministro eléctrico.
2. Espere a que el agua se haya enfriado.
3. Vacíe el agua del cocedor de pasta.“
4. Limpie el recipiente con un trapo seco y limpio.
5. Tenga precaución de no verter agua sobre el panel de control.
6. Asegúrese de llenar el recipiente de agua antes de volver a utilizarlo.
¡No respetar estas instrucciones puede conllevar daños en el aparato y la perdida de
la garantía!
VI. NOTA
1. Está prohibido calentar la resistencia en seco (sin agua en el recipiente).
2. Se recomienda desenchufar el dispositivo tras cada uso, para evitar accidentes
innecesarios.
3. En caso de que el aparato no funcionara, no lo intente abrir usted mismo. Pónga-
se en contacto con nuestro servicio post-venta o con un técnico cualicado.
VII. COMPROBACIONES REGULARES A REALIZAR EN EL DISPOSITIVO
Compruebe periódicamente que los componentes del equipo no estén dañados. En
caso de avería, diríjase al vendedor para solucionar el problema.
25
¿Qué hacer en caso de problemas?
Póngase en contacto con el vendedor y prepare la siguiente información:
• Número de factura o de serie (éste último lo encontrará en la placa de informa-
ciones técnicas en el dispositivo)
• En caso de necesidad, tome una foto de la pieza averiada.
• Cuanto más detallada sea la información que nos aporte, más rápido y exacto
podrá ser el diagnóstico de nuestro servicio post-venta. Informaciones como p.
ej.: „el dispositivo no calienta“ pueden ser confusas y signicar que el equipo no
calienta nada o que calienta muy poco. Lo cual puede tener origen en 2 causas
diferentes.
• Indíquenos por favor el estado de los pilotos luminosos, lo cual nos ayuda a sim-
plicar el diagnóstico, p.ej.: cuando enciende el dispositivo, se enciende el piloto
verde? Se enciende el piloto naranja cuando selecciona la temperatura deseada?
¡En cuanto más detallada sea la informacion, más rápida será la solución!
Atención: Nunca abra el equipo sin consultar previamente a nuestro servicio post
-venta. ¡Esto puede conllevar la pérdida de la garantía!

26 27
DE
Hiermit bestätigen wir, dass die hier in dieser Anleitung aufgeführten Geräte
CE-konform sind.
EN
We hereby certify that the appliances listed in this manual are CE compliant.
FR
Par la présente, nous conrmons que les appareils présentés dans ce mode d´emploi
sont conformes aux normes Ce.
PL
Niniejszym potwierdzamy, że urządzenia opisane w tej instrukcji są zgodne z
deklaracją CE.
IT
Con la presente documentazione si certica che i dispositivi descritti all´interno del
manuale sono conformi alle vigenti norme CE.
ES
Por la presente conrmamos que los dispositivos detallados en este manual son
conformes con las normativas de la CE.

WWW.CATERINGROYAL.DE
Hersteller an Verbraucher
Sehr geehrte Damen und Herren,
gebrauchte Elektro- und Elektronikgeräte dürfen gemäß europäischer Vorgaben [1] nicht zum unsortierten Siedlungsabfall
gegeben werden, sondern müssen getrennt erfasst werden. Das Symbol der Abfalltonne auf Rädern weist auf die Notwendigkeit
der getrennten Sammlung hin. Helfen auch Sie mit beim Umweltschutz. Sorgen Sie dafür, dieses Gerät, wenn Sie es nicht mehr
weiter nutzen wollen, in die hierfür vorgesehenen Systeme der Getrenntsammlung zu geben.
In Deutschland sind Sie gesetzlich [2] verpichtet, ein Altgerät einer vom unsortierten Siedlungsabfall getrennten Erfassung
zuzuführen. Die öffentlich - rechtlichen Entsorgungsträger (Kommunen) haben hierzu Sammelstellen eingerichtet, an denen
Altgeräte aus privaten Haushalten ihres Gebietes für Sie kostenfrei entgegengenommen werden. Möglicherweise holen die
rechtlichen Entsorgungsträger die Altgeräte auch bei den privaten Haushalten ab.
Bitte informieren Sie sich über Ihren lokalen Abfallkalender oder bei Ihrer Stadt- oder Gemeindeverwaltung über die in Ihrem
Gebiet zur Verfügung stehenden Möglichkeiten der Rückgabe oder Sammlung von Altgeräten.
[1] RICHTLINIE 2002/96/EG DES EUROPÄISCHEN PARLAMENTS UND DES RATES
ÜBER ELEKTRO- UND ELEKTRONIK - ALTGERÄTE
[2] Gesetz über das Inverkehrbringen, die Rücknahme und die umweltverträgliche Entsorgung
von Elektro- und Elektronikgeräten (Elektro- und Elektronikgerätegesetz - ElektroG).
Umwelt- und Entsorgungshinweise
CONTACT
emaks spółka z ograniczoną
odpowiedzialnością sp.k.
Ul. Dekoracyjna 3
65-155 Zielona Góra
Nr. kom.: +48 506 06 05 74
Po zakończeniu okresu użytkowania nie wolno usuwać niniejszego produktu poprzez normalne odpady komunalne, lecz należy
go oddać do punktu zbiórki i recyklingu urządzeń elektrycznych i elektronicznych. Informuje o tym symbol, umieszczony na
produkcie, instrukcji obsługi lub opakowaniu.
Zastosowane w urządzeniu tworzywa nadają się do powtórnego użycia zgodnie z ich oznaczeniem. Dzięki powtórnemu użyciu,
wykorzystaniu materiałów lub innym formom wykorzystania zużytych urządzeń wnoszą Państwo istotny wkład w ochronę
naszego środowiska.
Informacji o właściwym punkcie usuwania zużytych urządzeń udzieli Państwu administracja gminna.
For the disposal of the device please consider and act according to the national and local rules and regulations.
This manual suits for next models
2
Table of contents
Languages:
Other Royal Catering Pasta Maker manuals