RTI QAT User manual

www.driair.com | www.rti-pbe.com(800) 521-9200 @RTiPBE @rti_pbe
RTi-QAT Quality Air Test Kit w/ Digital Hygrometer
Rev. 9/2017
Save thousands of dollars by identifying the three (3) major causes of renish problems:
• Inadequate compressed air supply
• Compressed air humidity
• Particulate and/or oil contamination
A few minutes spent testing your air supply will save your business thousands of dollars by avoiding renish problems.
COMPRESSED AIR SUPPLY
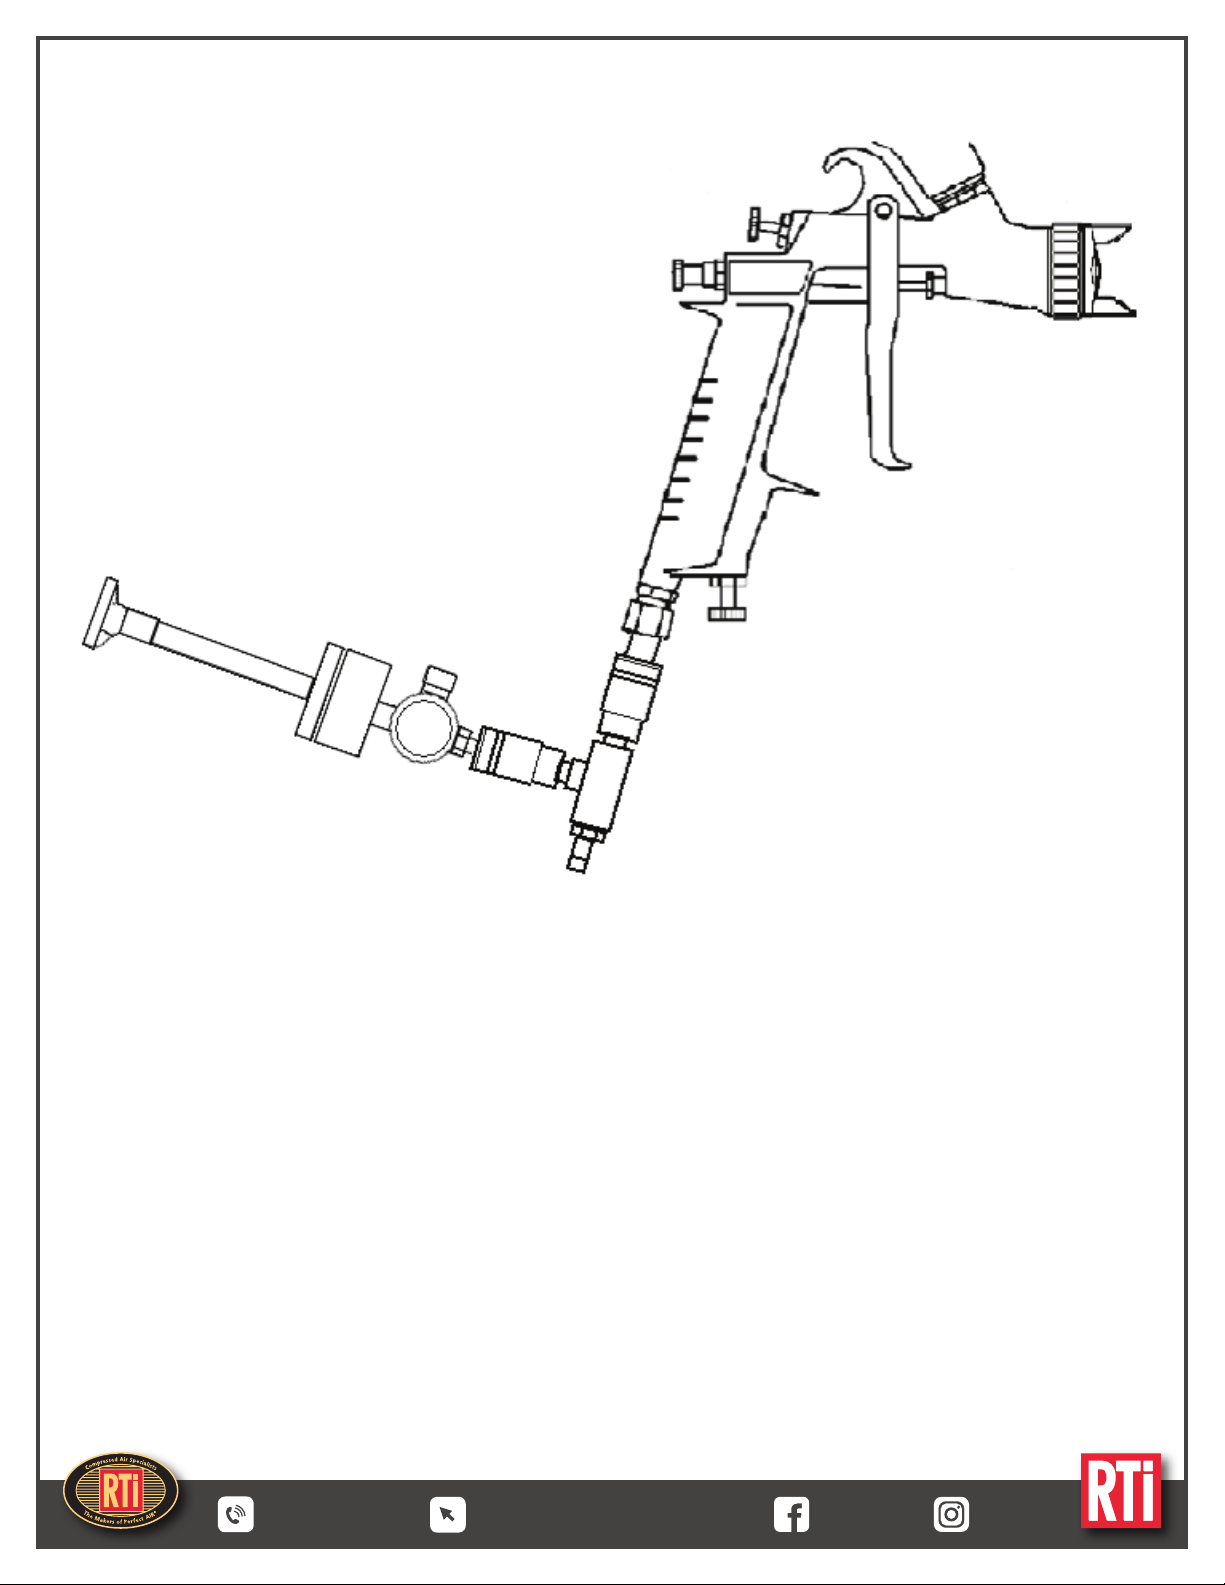
Using RTi’s special high volume air adjusting valve (this test is intended to give four elements of information
concerning compressed air).
1. Static air pressure at the gun.
2. Dynamic air pressure at the gun.
3. Air pressure drop from the compressed air source to the point of use.
4. Adequate or inadequate compressed air supply.
PROCEDURE FOR THE TEST:
1. Static air pressure at the gun:
• Attach the air valve to the gun.
• Connect the air supply to the air valve
• Read the gauge. This reading will be the static reading (make a note of the reading).
2. Dynamic air pressure at the gun:
• Set the fan and the material control knobs in the wide-open position.
• For the dynamic reading depress the trigger to the full back position or to the material stroke.
• While the trigger is in the full back position, read the gauge (make a note of the reading).
3. Air pressure drop from the compressed air source to the point of use:
• Subtract the dynamic reading from the static reading. The total is the pressure drop from the compressed air
source to the point of use.
4. Adequate or inadequate compressed air supply:
• While the gun is set in the wide-open position and the trigger in the full back position, set the gauge at the
desired pressure. Hold this for two minutes.
• If there is no pressure drop, there is adequate compressed air to operate that particular spray gun.
• If the gun is unable to maintain the needed air pressure, DO NOT ATTEMPT TO SPRAY. Spraying with
inadequate air can only lead to unsatisfactory renish work.
COMPRESSED AIR HUMIDITY
TO TEST HUMIDITY LEVEL:
1. Install humidity gauge manifold into RTi-QAT housing. Turn on tester.
2. Connect RTi-QAT to air supply at location you want to test.
3. Adjust regulator until the pressure gauge is at 50 PSI.
4. Let run until gauge stabilizes (the number displayed is compressed air humidity).
COMPRESSED AIR HUMIDITY (CAH):
A. The gauge assembly only needs to be tightened until you feel it touch the o-ring.
B. Disconnect the air supply before unscrewing the gauge manifold.
C. CAH less than 10% at 70°F or less than 3% for waterborne for most paint applications.
For trouble free renish applications, CAH is best at 0, but allowable up to 10% for solvent.
RTi-QAT Quality Air Test Kit w/ Digital Hygrometer

www.driair.com | www.rti-pbe.com(800) 521-9200 @RTiPBE @rti_pbe
RTi-QAT Quality Air Test Kit w/ Digital Hygrometer
Rev. 9/2017
HUMIDITY GAUGE:
To Turn On: Press and release ON button.
To Turn Off: Wait 5 minutes (gauge automatically turns off) or press and hold ON button until it turns off.
Notes:
A. To read temperature or dew point: Press and release ON button to switch from Compressed Air Humidity to
temperature. Press and release ON button once again to switch to the dew point temperature or press and
release again to return to CAH. All specs are to be read in Fahrenheit.
B. To change battery: Insert coin into either slot and turn coin to lift the display assembly from the gauge housing.
Slide the button battery out. Insert new battery with the + side showing. Battery life is approximately 200 hours.
The battery icon shows one black segment when the battery is getting low. The gauge uses three AAA batteries.
COMPRESSED AIR CONTAMINATION
THE VALUE OF CLEAN AIR:
The RTi-QAT system also enables you to easily test the quality of the air in compressed air lines, lters, hoses and
related equipment. Clean dry air, free from humidity, oil, and particulate contamination, is essential for many
professional applications, especially painting. The RTi-QAT system isolates contaminants as small as .45 micron (less
than 20 millionths of an inch) and thereby permits close inspection to determine the source of the problem. Testing
takes only minutes but can prevent or solve contamination problems, which could cost thousands of dollars.
TO TEST FOR CONTAMINATION:
1. Clean Housing: Look into housing assembly and air passage. Use a cotton swab or clean cloth and solvent to
wipe out any contamination.
2. Install Filter: Place a new white test lter (use lter only once) onto the lid’s bronze lter support and install o-ring
to hold lter in place. Screw lid onto housing assembly until you just feel the o-ring being compressed.
Note: Insert only the white test lter; the paper serves as a lter divider. Bronze lter support is permanent and
never needs to be removed.
3. Close regulator: Turn control knob to reduce pressure setting.
4. Set to 20-35 PSI: Connect AQTK to desired checkpoint in the compressed air supply and turn the regulator knob
until 20-35 PSI is indicated on the pressure gauge.
5. Test 5 minutes or more: Turn regulator knob to reduce pressure to 0, disconnect AQTK from the air line, unscrew
the lid and remove the lter.
6. Inspect Filter: Place the lter on a at surface and then place the 30x microscope on top of the lter; and turn on
light. Focus to identify particulate. The integral 8x magnier can also help identify the contaminate. After testing,
place lter in clear storage bag and record test conditions for future comparisons. Wipe inside of RTi-QAT
housing, clean before storage.
WARNING - Read All Operator’s Instructions prior to using the RTi-QAT Quality Air Test Kit. Failure to
operate this equipment in accordance with the manufacturers’ instructions can result in physical harm.

www.driair.com | www.rti-pbe.com(800) 521-9200 @RTiPBE @rti_pbe
RTi-QAT Quality Air Test Kit w/ Digital Hygrometer
Rev. 9/2017
HUMIDITY TESTING PROCEDURE
1. Adjust pressure to the tester to 50 PSI.
2. Set tester to dew point (once on, push ON button twice).
3. Use phone app (Calculator of Air for iPhone, or Michell Instruments for Android) to convert dew point into paint
company standard (or 70°F) air temperature.
4. In phone app, enter 70°F for temperature on the tester and insert dew point number from the tester and hit the
equals (=) sign to obtain the compressed air humidity (CAH) number. If app is not available, use attached Wet
Bulb chart to nd CAH.
5. Record humidity number and compare to paint company specications.
Humidity needs to be below 10% for solvent and below 4% for water at 50 PSI.
EXAMPLE OF TESTING PROCEDURE
The below list is a sample of readings and procedures that is used to nd the CAH in your airlines using our QAT kit.
1. Plug in tester.
2. Set pressure at 50 PSI.
3. Run until stabilizes.
4. Measure dew point from tester: (41°F)
5. Go to app, input 70°F to comply with paint company
standards and enter the dew point and hit enter to
calculate humidity (write it down).
6. If phone app is not available, use attached Wet
Bulb chart to gure humidity at 70°F.
7. Enter humidity reading from app or Wet Bulb data
from chart to get actual humidity:
24.96% CAH in air lines.
Below is an example of the “Calculator of Air”
app available for iPhone
Below is an example of the “Michell Instruments”
app available for Android

www.driair.com | www.rti-pbe.com(800) 521-9200 @RTiPBE @rti_pbe
RTi-QAT Quality Air Test Kit w/ Digital Hygrometer
Rev. 9/2017
UNIVERSAL CLIP-TYPE LED CELLPHONE MICROSCOPE
INSTALLATION AND USE OF UNIVERSAL CLIP-TYPE MICROSCOPE:
1. Clip universal clip-type microscope onto cellphone, move microscope eye lens to aim at camera lens on
cellphone back, then x them.
2. Open cellphone and bring up camera app, enlarge or shrink pictures to appropriate size, then pull focusing
barrel up and down until the clearest images are obtained.
3. Rotate the threaded end of microscope eye lens counter-clockwise to dismantle microscope for separate use.
OPERATING INSTRUCTION OF MICROSCOPE:
1. Put sample on a at surface.
2. Place microscope vertically with object lens (B) facing downwards.
3. In time of insufcient light, rotate battery cover (D) counter-clockwise, aim the arrow on battery cover at the
lighting sign on battery compartment, and turn on LED lamp (F). Rotate battery cover clockwise, aim the arrow on
battery cover at the ultraviolet currency detecting sign on battery compartment, and turn on LED ultraviolet lamp.
Rotate battery cover arrow to aim at closing sign on battery compartment, then turn off LED lamp.
4. View objects through eye lens (A).
5. If images are not clear, pull focusing barrel (C) up and down until the clearest images are obtained.
REPLACEMENT OF BATTERIES:
1. Rotate the arrow sign on battery cover counter-clockwise to aim at the dot sign (●) on battery compartment, then
open battery cover (D).
2. Take three old LR1130 batteries from battery compartment (E), then put three new LR1130 batteries inside,
with anode facing upwards and cathode downwards.
3. Aim the arrow sign on battery cover at the dot sign (●) on battery compartment, then press battery cover slightly,
and rotate it clockwise to closing sign to close battery cover.
Cellphone Universal Clip
Battery Cover (D)
Eye Lens (A)
Focusing Barrel (C)
Object Lens (B) LED Lighting/LED Currency Detecting Lamp (F)
Battery Compartment (E)

Rev. 9/2017
www.driair.com | www.rti-pbe.com(800) 521-9200 @RTiPBE @rti_pbe
RTi Compressed Air Audit Sheet
Size (HP):
Tank (Gal):
Type:
Drained: Y N (circle one)
When:
How often:
Recommendations:
Air Tests:
Air Compressor:
Location:
Compressed Air Dew Point:
Compressed Air Humidity @ 70°F:
Contaminants:
Type:
Air Flow Test (Pass/Fail):
Location:
Compressed Air Dew Point:
Compressed Air Humidity @ 70°F:
Contaminants:
Type:
Air Flow Test (Pass/Fail):
Piping, Hoses & Couplers:
Material Type: Hose Size: 1/4" 15/16" 3/8"
Size:
No. of Drains/Drops:
Filtered: Y N (circle one)
System: Dead End or Loop (circle one)
ACFM Requirements:
ACFM:
Filters:
Refrigerated Dryer:
Filter Elements:
Desiccant Dryers:
Gun Filters:
Drained: Y N (circle one) How Often:
Date of Last Change: How Often:
Y N
Y N
Y N
Y N
Brand you’re using:
Company Name:
Address:
City, State, Zip Code:
Phone:
Date:
Email:
Distributor:
Contact Person:
Name of Representative: Date:
**In order to make our air audit procedures more efcient and provide more in depth results for the shops, you can download an app on your phones
called “Calculator of Air”. You need to input 2 lines. The rst is temperature which will always be 70° F (paint company recommended temperature).
The second is the dew point from your QAT tester. Push enter and you will see the wet bulb number. This is a more accurate reading for the compressed
air humidity percentage (CAH).

www.driair.com | www.rti-pbe.com(800) 521-9200 @RTiPBE @rti_pbe
RTi-QAT Quality Air Test Kit w/ Digital Hygrometer
Rev. 9/2017

www.driair.com | www.rti-pbe.com(800) 521-9200 @RTiPBE @rti_pbe
RTi-QAT Quality Air Test Kit w/ Digital Hygrometer
Rev. 9/2017
Proper Hookup for Testing Membrane Units
Membrane units sold in the market have not been able to keep up with the air used when spraying
paint. Because of this we are recommending doing the compressed air humidity test like this:
1. When testing membrane drying units you should use this setup to test Compressed Air
Humidity.
2. Set the pressure on the QAT regulator @ 50 PSI.
3. Hook the spray gun as shown and have the pressure on the gun set at what the painter uses to
spray most of their paint finishes.
4. Pull the trigger on the gun and check the reading on the digital read out as the air is flowing
through the gun.
5. Watch reading until it quits moving. Paint Companies want less than 10% on solvent and less
than 3% on waterborne finishes
This reading will give you an accurate reading of Compressed Air Humidity produced while spraying
paint.
Most units we have tested in the field range between 5‐15% suppression from incoming Compressed Air
Humidity into the membrane dryer. Average shop readings are around 38%, meaning these units are not
performing to meet Paint Company Specs.
ALL FINISHES PERFORM BEST @ 0‐3% COMPRESSED AIR HUMIDITY
PROPER HOOKUP FOR TESTING MEMBRANE UNITS
Membrane units sold in the market have not been able to keep up with the air used when spraying paint. Because of
this we are recommending doing the compressed air humidity test. Refer to the previous pages on how to test.
This reading will give you an accurate reading of compressed air humidity that is produced while spraying paint.
Most units we have tested in the eld range from 5-15% suppression from incoming CAH into the membrane dryer.
Average shop reading are around 38%, meaning these units are not performing to meet paint company specications.
Table of contents
Other RTI Test Equipment manuals