Zugriff ohne Sicherheitszertifikat
Der Zugriff auf das Gerät erfolgt über das Protokoll ‚https‘. Da der
Accesspoint kein eigenes Sicherheitszertifikat besitzt, wird die Ver-
bindung beim Aufruf über den Browser zunächst als unsicher ein-
gestuft. Insofern müssen Sie diese Verbindung explizit zulassen und
ggf. für den weiteren Zugriff eine Ausnahmeregelung einrichten. Die
Vorgehensweise ist abhängig vom jeweiligen Browser.
Genaue Informationen zum Zugriff auf einen Accesspoint ohne
Sicherheitszertifikat finden Sie ebenfalls im zuvor erwähnten
Download-Bereich.
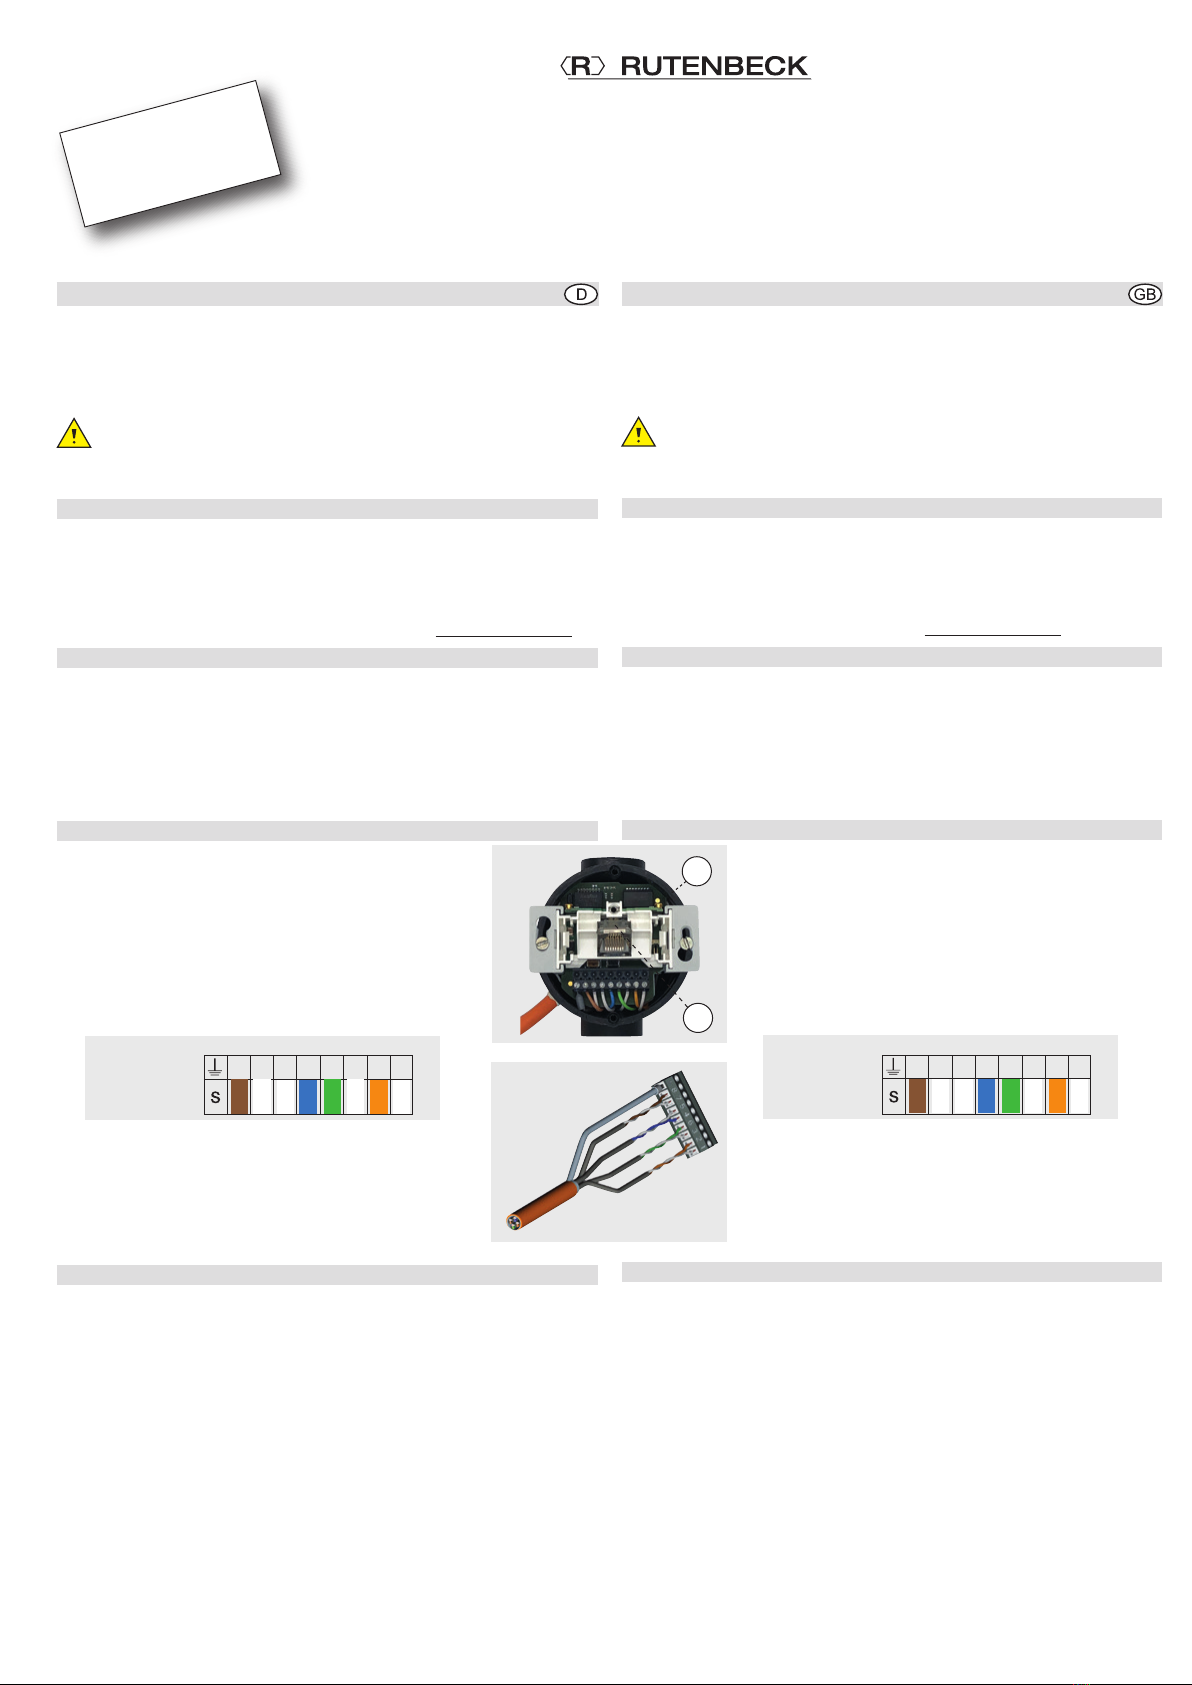
Beleuchtete Buchse
Zwei farbig leuchtende LED geben Informationen zur Funktion bzw.
zum Zustand der WLAN / LAN-Funktion:
- Blau leuchtende LED = WLAN
dauernd leuchtend = WLAN aktiv
- Orange leuchtende LED = LAN
dauernd leuchtend = LAN aktiv, ohne Verbindung
blinkend = LAN aktiv, mit Verbindung
Individualisierung / Datenschutz
Direkt bei der ersten Inbetriebnahme sollten aus Gründen
des Datenschutzes, aber auch aus Gründen der Netzwerk-
sicherheit folgende Einstellungen individualisiert und doku-
mentiert werden.
Werkseinstellung geändert auf
admin Gerätepasswort
192.16 8.0.5 IP-Adresse
255.255.255.0 Subnetz-Maske 255.255.255.0
Rutenbeck WLAN SSID
wireless123 WLAN Schlüssel
Accesspoint Betriebsart
Reset
Platzieren Sie im Bedarfsfall den Reset-Magneten (optionales Zube-
hör, Art.-Nr.: RM, 392 000 10) im rechten Winkel zur Abdeckung.
Sie haben folgende Möglichkeiten:
- Reset
Platzieren Sie den Reset-Magneten für die Dauer von zwei bis fünf
Sekunden am Gerät – der Start des Reset wird durch die blau blin-
kende LED bestätigt.
- Werkseinstellung
Platzieren Sie den Reset-Magneten für die Dauer von fünf bis zehn
Sekunden am Gerät – der Start in Werkseinstellung wird durch die
orange blinkende LED bestätigt.
CE-Erklärung
Wir, die Wilhelm Rutenbeck GmbH & Co. KG erklären in
unserer alleinigen Verantwortung, dass sich dieses Gerät
in Übereinstimmung mit den grundlegenden Anforderungen
und relevanten Vorschriften der zutreffenden EU-Richtlinien
2014/30/EU, 2014/53/EU, 2011/65/EU befindet.
Die vollständige CE-Konformitätserklärung finden Sie unter
www.rutenbeck.de im Download-Bereich.
Entsorgung
Das nebenstehende Symbol weist auf die getrennte Samm-
lung von Elektro- und Elektronikgeräten hin. Dieses Gerät
sowie alle im Lieferumfang enthaltenen Elektronikteile dürfen
gemäß europäischer Richtlinien und deutschem Elektro- und
Elektronikgesetz nicht über den Hausmüll entsorgt werden.
Bringen Sie dieses Gerät nach Ende seiner Nutzung zu
einem zuständigen Sammelsystem für elektrische und elekt-
ronische Altgeräte.
Erstinbetriebnahme (Fortsetzung) Initial start-up (Continued)
Access without security certificate
The access to the device is via the ‘https’ protocol. Because the
access point does not have its own security certificate, the connec-
tion is initially classified as insecure when accessed via the browser.
So you must explicitly permit this connection and, if necessary, set
up an exception rule for further access. The procedure depends on
the respective browser.
Please refer to the download area mentioned above to find precise
information on how to access an access point without a security
certificate.
Illuminated socket
Two colour luminous LEDs provide information regarding the function
or state of the WLAN / LAN function:
- Blue LED = WLAN
Constantly illuminated = WLAN active
- Orange LED = LAN
Constantly illuminated = LAN active
not connected Flashing = LAN active, connected
Personalisation / data protection
For reasons of data protection, but also for reasons
of network security, the following settings should be
individualised and documented directly on initial
start-up.
Factory setting modified
admin Device password
192.16 8.0.5 IP address
255.255.255.0 Subnet mask 255.255.255.0
Rutenbeck WLAN SSID
wireless123 WLAN key
Accesspoint Mode
Reset
If necessary, position the reset magnet (optional accessory, Art. no.:
RM, 392 000 10) at a right angle to the cover. There are two possi-
bilities:
- Reset
Position the reset magnet on the device for between 2 and 5
seconds – reset start is confirmed via the blue flashing LED.
- Factory settings
Position the reset magnet on the device for between 5 and 10
seconds – start of the works settings is confirmed via the orange
flashing LED.
CE - Declaration of confirmity
We, Wilhelm Rutenbeck GmbH & Co. KG, declare under our
sole responsibility that this device is in conformity with the
essential requirements and the relevant regulations of the
applicable EU-directives (2014/30/EU, 2014/53/EU,
2011/65/ EU ).
The complete Declaration of Conformity is available in the Download
Section at www.rutenbeck.com
Disposal
The adjacent symbol indicates separate waste collection for
electrical and electronic devices. In accordance with EU-
directives, all electrical and electronic devices with this sym-
bol must be disposed in the corresponding separate waste
collections and not in the domestic waste. This device as well
as all the electronic parts included in the delivery may not be
disposed in the regular household waste but must be brought
to a competent collection site after end of its use.


 installation guide")
