Ryobi RBV2400VPG User manual

ELECTRIC MULCHING BLOWER / VAC
OPERATOR’S MANUAL
RBV2400VPG

1
3
13
12
14
4
5
6
7
8
9
10
11
2
Fig. 1
Fig. 2

Fig. 3
Fig. 6
Fig. 5
Fig. 4
PULL
Fig. 3a
Fig. 3b

Fig. 11
Fig. 8
Fig. 9
Fig. 12
Fig. 10
Fig. 7

1
English
1
English
1
English
GENERAL SAFETY RULES
WARNING
Read and understand all instructions. Failure to
follow the warnings and instructions may result in
electric shock, fire and serious injury.
Save all warnings and instructions for future
reference
1) Training
Read the instructions carefully. Be familiar with the
controls and the proper use of the appliance.
Never allow children to use the appliance.
Never allow people unfamiliar with these instructions
to use the appliance. Local regulations may restrict the
age of the operator
The operator or user is responsible for accidents or
hazards occurring to other people or their property.
2) Preparation
While operating the appliance, always wear substantial
footwear and long trousers.
Do not wear loose clothing or jewellery that can be
drawn into the air inlet. Keep long hair away from the
air inlets.
Wear protective goggles while operating.
To prevent dust irritation the wearing of a face mask
is recommended.
Before using, check the supply and extension cord for
signs of damage and aging. Do not use the appliance
if the cord is damaged or worn.
Never operate the appliance with defective guards or
shields, or without safety devices, for example debris
collector in place.
Only use a weather proof extension cord fitted with
coupler according to IEC 60320-2-3.
3) Operation
Always direct the cord to the rear away from the
appliance.
If a cord becomes damaged during use, disconnect
the supply cord from the mains immediately. Do not
touch the cord before disconnecting the supply.
Do not carry the appliance by the cord.
Disconnect the appliance from the mains supply
ywhenever you leave the machine;
ybefore clearing a blockage;
ybefore checking, cleaning or working on the
appliance;
yif the appliance starts to vibrate abnormally.
Operate the appliance only in daylight or in good
artificial light.
Do not overreach and keep your balance at all times.
Always be sure of your footing on slopes.
Walk, never run.
Keep all cooling air inlets clear of debris.
Never blow debris in the direction of bystanders.
4) Maintenance and storage
Keep all nuts, bolts and screws tight to be sure the
appliance is in safe working condition.
Check the debris collector frequently for wear or
deterioration.
Replace worn or damaged parts.
Use only genuine replacement parts and accessories.
Store the appliance only in a dry place.
The blower/vacuum should be used with a Residual
Current Device (RCD) with a tripping current of not more
than 30mA.

SYMBOLS
Some of the following symbols may be used on your tool. Please study them and learn their meaning.
Proper interpretation of these symbols will allow you to operate the tool more safely and effectively.
SYMBOL NAME EXPLANATION
Safety Alert Precautions that involve your safety.
Long Hair Risk of long hair being drawn into air intake.
Vacuum Door Do not run unit while vacuum door is unsecured.
Loose Clothing Risk of loose clothing being drawn into air intake.
Class II Construction Double-insulated construction.
Wet Conditions Alert Do not use in the rain or leave outdoors while it is raining.
Read Operator's Manual To reduce the risk of injury, user must read and understand
operator's manual before using this product.
Switch Off Remove plug from mains before cleaning or maintenance.
Wear eye protection Wear eye protection when operating this equipment.
Keep bystanders away Keep all bystanders at least 15 m away.
The following signal words and meanings are intended to explain the levels of risk associated with this product.
SYMBOL SIGNAL MEANING
DANGER Indicates an imminently hazardous situation, which, if not avoided, will result
in death or serious injury.
WARNING Indicates a potentially hazardous situation, which, if not avoided, could result
in serious injury.
CAUTION Indicates a potentially hazardous situation, which, if not avoided, may result
in minor or moderate injury.
CAUTION (Without Safety Alert Symbol) Indicates a situation that may result in property
damage.
4
English

SERVICE
WARNING
To avoid serious personal injury, do not attempt
to use this product until you read thoroughly
and understand completely the operator's
manual. Save this operator's manual and review
frequently for continuing safe operation and
instructing others who may use this product.
WARNING
The operation of any power tool can result in
foreign objects being thrown into your eyes,
which can result in severe eye damage. Before
beginning power tool operation, always wear
safety goggles or safety glasses with side shields
and a full face shield when needed. Always use
eye protection.
SAVE THESE INSTRUCTIONS.
SPECIFICATIONS
SPECIFICATIONS RBV2400VPG
Voltage 220-240V~ 50Hz
Power 2400W
Air velocity 185~237km/h
Air volume 10~16m3/min
Mulching ratio 10:1
Dust bag capacity 45L
Vibration level < 25m/s2
DESCRIPTION
1. Shoulder strap
2. Rear handle
3. On/Off Switch
4. Speed control dial
5. Front handle
6. Motor housing
7. Nozzle
8. Guide wheels
9. Patio head
10. Dust bag
11. Blower / vac mode selection lever
12. Power cable & plug
13. Live tool indicator
14. Dust bag holder
ASSEMBLY
ATTACHING THE NOZZLE (Fig.2)
CAUTION
Do not operate the product without the two
sections of the nozzle (7) assembled.
■ The nozzle (7) comes in two sections. Assemble the
sections by slotting them together as shown in Fig.2
Ensure the sections have clicked into place and are
aligned properly.
Fasten the sections together at the top and at the
bottom, with screws provided.
■ Slide the assembled nozzle into the motor housing
(6). With the latches at the top and at the bottom, lock
the nozzle in place.
ATTACHING AND REMOVING THE DUST BAG
(10) (Fig.3 & 4)
CAUTION
Do not use the Blower/Vac in the vacuum mode
without the dust bag (10) in place.
■ Latch the front of the dust bag holder (14) to the front
of the dust exhaust and then lift the dust bag handle
side until the dust bag holder secures to the housing.
See Fig.3
■ Hang the strap at the front of the dust bag to the
bottom of the nozzle. See Fig.4
■ When removing the dust bag, detach the strap at
the front of the dust bag from the nozzle first, then
press the release on the dust bag holder and gently
dislodge the dust bag off the motor housing.
ASSEMBLY
SHOULDER STRAP(1) (Fig.3)
■ Attach the metal fixture of the shoulder strap to the
hole just in front of the ON/OFF switch.
■ Adjust the shoulder strap to a length comfortable for
your use.
OPERATION
■ Plug the Blower/Vac into the mains supply. The
LiveTool indicator (13) will light up.
Note: To reduce the risk of injury, safety switches are
installed in the nozzle. The Blower/Vac cannot be
turned on unless the nozzle is attached.
5
English

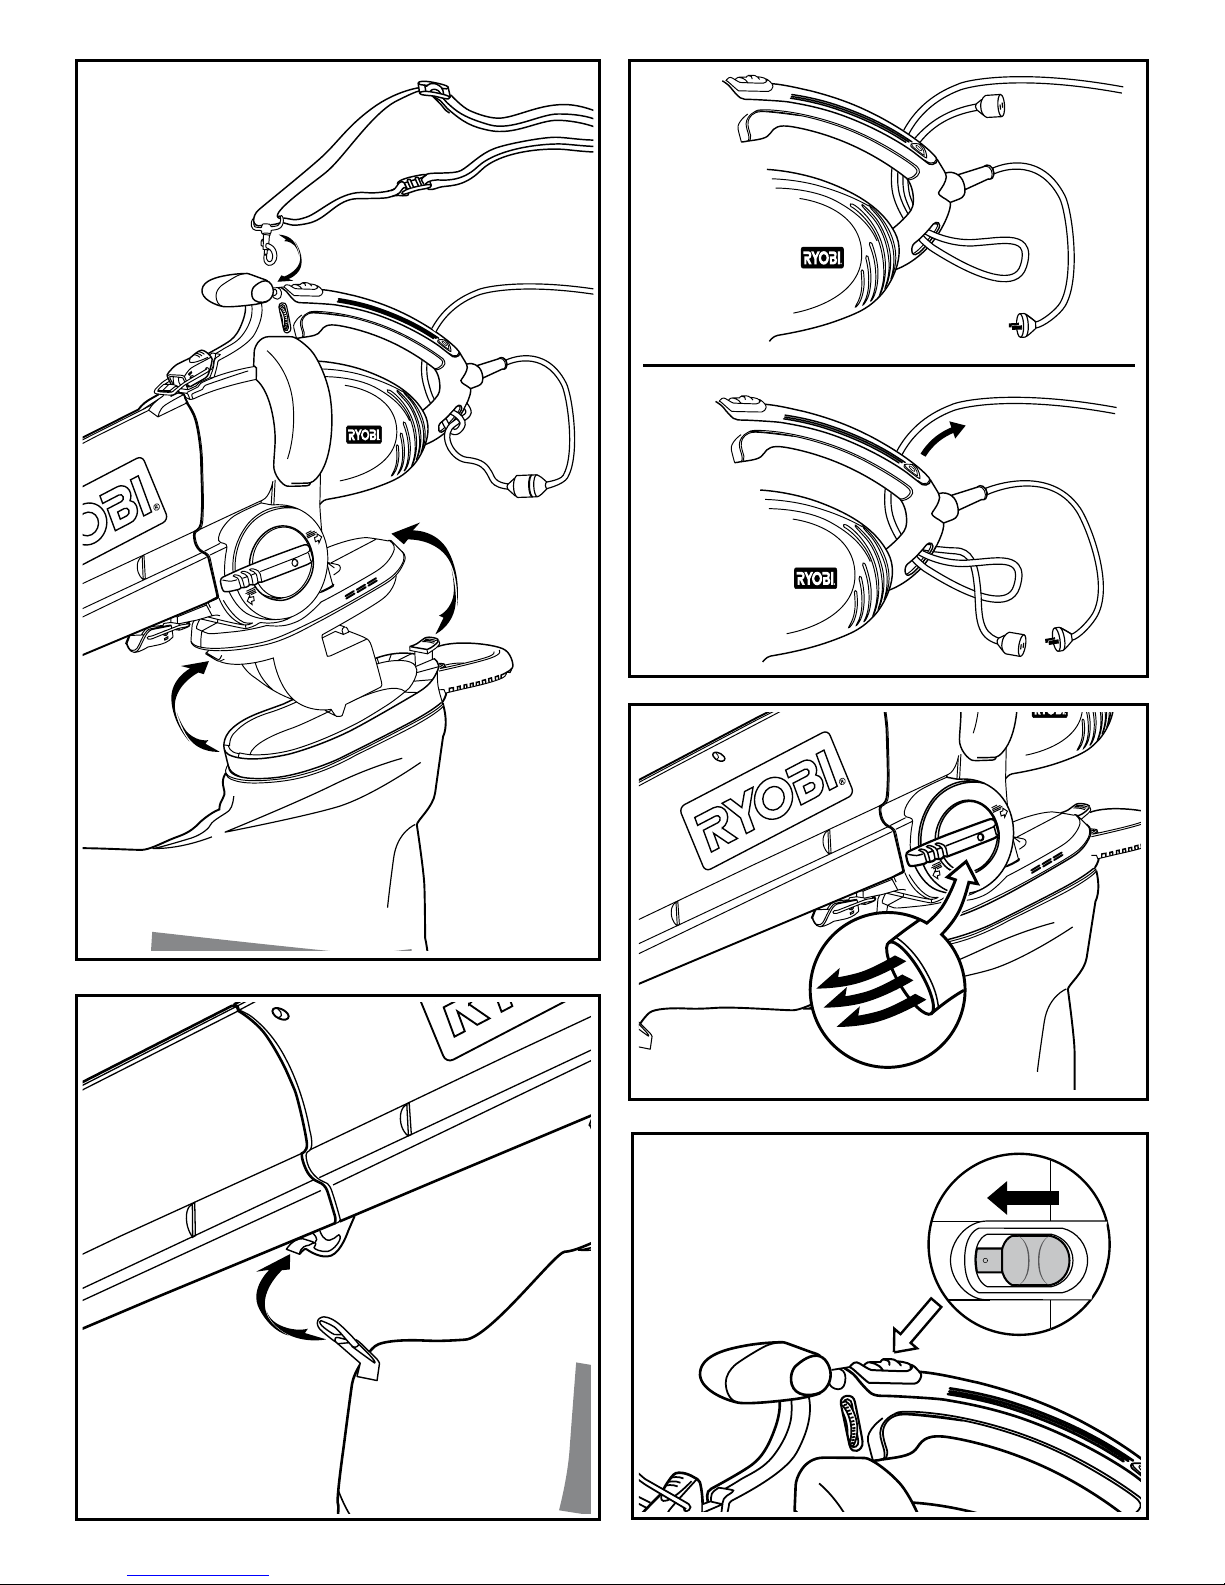
EXTENSION CORD (Fig.3)
■ Use an appropriate extension cord, see “GENERAL
SAFETY RULES” for recommended cord.
■ Loop the extension cord through the extension cord
retainer slot. See Fig 3a.
■ Tie the extension cord and pull tight. See Fig 3b.
■ Secure the extension cord to the plug of the blower
vac as shown in fig 3.
OPERATING AS A BLOWER
■ Set the mode selection lever (11) to the position
showing the arrow pointing forward. Ensure the lever
has clicked into place and is rotated to the furthest
point. See Fig.5
■ Push the switch (3) to turn power on. See Fig.6
■ Hold the Blower/Vac as shown in Fig.7, and sweep
from side to side with the nozzle a few inches above
the ground or floor. Move the Blower/Vac slowly, while
accumulating a pile of debris.
■ Use the blower on walls as shown in Fig.8.
OPERATING AS A VACUUM
■ Set the mode selection lever (11) to the position
showing the arrow pointing backward. Ensure the
lever has clicked into place and is rotated to the
furthest point. See Fig.9
■ Make sure the dust bag is fitted properly.
■ Push the switch (3) to turn power on. See Fig.6
■ Position the suction mouth on the area to be cleared.
■ Hold the Blower/Vac with the nozzle close to ground
as shown in Fig.10, tilting the nozzle slightly, and use
a sweeping action to collect light debris. The debris
will flow in to the dust bag. Things such as leaves
and small twigs will be mulched as they pass through
the fan housing, allowing the dust bag to hold a lot of
debris.
■ When the dust bag gets full, suction will noticeably
decrease. Turn off and unplug the Blower/Vac before
emptying the dust bag.
WARNING
When the impeller in the motor housing is clogged
with twigs, nylon bags, etc. turn off and unplug
the Blower/Vac, remove the nozzle and then the
obstruction carefully.
SPEED CONTROL
The speed of the unit can be varied using the dial(4) in
front of the handle.
■ Rotate the dial counterclockwise to set higher speed
and clockwise for lower speed. See Fig.11
PATIO HEAD (9)
The patio head (9) increases the area of suction when
the unit is being used in vacuum mode.
■ Slot the patio head into the nozzle until it is fully in.
See Fig.12
■ Use the patio head wheels to roll the Blower/Vac over
the area being cleaned, in similar posture as for a
vacuum cleaner.
EMPTYING THE DUSTBAG
WARNING
Wear eye protection and face shield to limit your
exposure to dust and debris.
■ Turn off and unplug the Blower/Vac from the mains.
■ Empty the contents via the zip at the bottom of the
bag.
■ Alternatively, detach the dust bag from the motor
housing and empty through the top.
MAINTENANCE
MAINTENANCE AND STORAGE
■ Take care of your machine and clean it regularly for
long-lasting efficiency and performance.
■ When you have finished work, remove the dust bag,
turn it upside down and clean it thoroughly.
■ Use only a warm damp cloth and soft brush to clean
your machine. Do not use petrol, turpentine, lacquer
or paint thinner, dry cleaning fluids or similar products.
MAINTENANCE AND STORAGE
■ If vacuum power decreases and the dust bag is
empty, clean the shredding chamber carefully.
■ Prior to storing your Blower / Vacuum after use, check
to ensure the product is not clogged with dirt or debris
and that the blow / vacuum mode selection lever is
operating smoothly. Keep all nuts, bolts and screws
tight to be sure your machine is in a safe working
condition. Use only Ryobi replacement parts and
accessories.
CLEANING THE DUST BAG
■ Empty the dust bag after each use to avoid
deterioration and obstruction of the air flow which will
reduce the performance of the unit.
■ Clean the dust bag as needed. With eye protection
6
English

on, turn the dust bag inside out after initial emptying
and vigorously shake out the dust and debris.
DISPOSAL
Waste electrical products should not be disposed
of together with household waste. Please recycle
where facilities exist. Check with your local
authority or retailer for recycling advice.
7
English

TECHTRONIC INDUSTRIES (AUSTRALIA) PTY. LTD.
Level 1, 660 Doncaster Road,
Doncaster, Victoria 3108,
Australia
Tel: 1300 361 505 Fax: 1800 807 993
TECHTRONIC INDUSTRIES N.Z. LIMITED
Auckland: 27 Clemow Drive, Mt Wellington, N.Z.
Tel: (09) 573 0230 Free Call: 0800 279 624 Fax: (09) 573 0231
Contact during normal business hours.
Subject to the guarantee condition below, this Ryobi
tool (hereinafter called “the product”) is guaranteed by
TECHTRONIC INDUSTRIES AUSTRALIA PTY
LIMITED (hereinafter called “the Company”) to be free
from defects in material or workmanship for a period
of 24 months from the date of original purchase
covering both parts and labour. Under the terms of
this guarantee, the repair or replacement of any part
shall be the opinion of the Company or its authorised
service centre. Should service become necessary
during the warranty period, the owner should contact
the customer service HELPLINE 1300 361 505 or
contact the retailer from whom the product was
purchased.
In order to obtain guarantee service, the owner must
present the sales docket and Guarantee Certificate to
confirm date of purchase. This product is sold by the
dealer or service centre as principal and the dealer
has no authority from the Company’s behalf except as
herein contained or herein referred to.
Guarantee Conditions
This guarantee only applies provided that the product
has been used in accordance with the manufacturer’s
recommendations under normal use and reasonable
care (in the opinion of the Company) and such
guarantee does not cover damage, malfunction or
failure resulting from misuse, neglect, abuse, or used
for a purpose for which it was not designed or is not
suited and no repairs, alterations or modifications
have been attempted by other than an authorised
service centre. This guarantee will not apply if the tool
is damaged by accident or if repairs arise from normal
wear and tear. The Company accepts no additional
liability pursuant to this guarantee for the costs of
travelling or transportation of the product or parts to
and from the service dealer or service centre - such
costs are not included in this guarantee.
Certain legislation, including the Trade Practices Act,
1974 (as amended) and other state and territorial laws
give rights to the buyer and impose liability on the
seller in certain circumstances. Nothing herein shall
have the effect of excluding, restricting or modifying
any condition, guarantee, right or liability imposed, to
the extent only that such exclusion, restriction or
modification would render any term herein void.
Table of contents
Other Ryobi Blower manuals

Ryobi
Ryobi RY18BLXD-150 User manual

Ryobi
Ryobi RY40401 User manual

Ryobi
Ryobi RY40404VNM User manual

Ryobi
Ryobi RBV26B User manual

Ryobi
Ryobi RY08420B User manual

Ryobi
Ryobi RBV3000CESV-01 User manual

Ryobi
Ryobi RBV36B User manual

Ryobi
Ryobi RY09973 User manual

Ryobi
Ryobi RBL30MVB User manual

Ryobi
Ryobi RY42102 User manual

Ryobi
Ryobi RY36BPXA User manual

Ryobi
Ryobi RY18BLXA User manual

Ryobi
Ryobi P2102 User manual

Ryobi
Ryobi P2107VN User manual

Ryobi
Ryobi P21012 User manual

Ryobi
Ryobi RBL1820J User manual

Ryobi
Ryobi R18XBLV20 User manual

Ryobi
Ryobi RY404010 User manual

Ryobi
Ryobi RY40402 User manual

Ryobi
Ryobi RBL26GN User manual