EnglishDeutsch
 logo
Brands
  1. Home
  2. •
  3. Brands
  4. •
  5. Saab
  6. •
  7. Automobile Accessories
  8. •
  9. Saab 9-3 M03- User manual

Saab 9-3 M03- User manual

Other manuals for 9-3 M03-

1

This manual suits for next models

1

Other Saab Automobile Accessories manuals

Saab 12 797 660 User manual

Saab

Saab 12 797 660 User manual

Saab 12829250 User manual

Saab

Saab 12829250 User manual

Saab 400 126 413 User manual

Saab

Saab 400 126 413 User manual

Saab 32 025 907 User manual

Saab

Saab 32 025 907 User manual

Saab 400 108 262 User manual

Saab

Saab 400 108 262 User manual

Saab 9-3 User manual

Saab

Saab 9-3 User manual

Saab 400 106 662 User manual

Saab

Saab 400 106 662 User manual

Saab 9-3 M03- User manual

Saab

Saab 9-3 M03- User manual

Saab B205 User manual

Saab

Saab B205 User manual

Saab 12 787 155 User manual

Saab

Saab 12 787 155 User manual

Saab 32 025 888 User manual

Saab

Saab 32 025 888 User manual

Saab 400 126 488 User manual

Saab

Saab 400 126 488 User manual

Saab 9000 User manual

Saab

Saab 9000 User manual

Popular Automobile Accessories manuals by other brands

James Baroud Odyssey user guide

James Baroud

James Baroud Odyssey user guide

Motorola i50sx owner's manual

Motorola

Motorola i50sx owner's manual

Yakima 9MM STANDARD BIKE MOUNT instructions

Yakima

Yakima 9MM STANDARD BIKE MOUNT instructions

Feniex T3 instruction manual

Feniex

Feniex T3 instruction manual

Kia E8300-4D000 manual

Kia

Kia E8300-4D000 manual

Brink 756843 installation instructions

Brink

Brink 756843 installation instructions

Whispbar K085W Fitting instructions

Whispbar

Whispbar K085W Fitting instructions

v.link CI-VL2-PC-HSD manual

v.link

v.link CI-VL2-PC-HSD manual

Viking Stack-Rack Assembly and use instructions

Viking

Viking Stack-Rack Assembly and use instructions

Aries 203015 installation manual

Aries

Aries 203015 installation manual

Choetech AT0005 user manual

Choetech

Choetech AT0005 user manual

ZZ2 ZZAIR-PRO instruction manual

ZZ2

ZZ2 ZZAIR-PRO instruction manual

Holman 4A80L installation guide

Holman

Holman 4A80L installation guide

Thule 2075 parts manual

Thule

Thule 2075 parts manual

Motorola T325 quick start guide

Motorola

Motorola T325 quick start guide

TAUBENREUTHER 16-3950 FITTING INSTRUCTION

TAUBENREUTHER

TAUBENREUTHER 16-3950 FITTING INSTRUCTION

DV8 FBJL-02 Product installation manual

DV8

DV8 FBJL-02 Product installation manual

Prorack K1163 manual

Prorack

Prorack K1163 manual

https://manuals.online logo
https://manuals.online logoBrands
  • About & Mission
  • Contact us
  • Privacy Policy
  • Terms and Conditions

Copyright 2026 Manuals.Online. All Rights Reserved.

Saab 9-3 M03-
900 Installation instructions
SCdefault
MONTERINGSANVISNING ·INSTALLATION INSTRUCTIONS
MONTAGEANLEITUNG ·INSTRUCTIONS DE MONTAGE
SITdefault
Saab 9-3 M03-
Engine/cabin heater
Accessories Part No. Group Date Instruction Part No. Replaces
12 787 161 9:87-42 Jun 02 12 788 928
2 12 788 928
Saab 9-3 M03-
Heater mounting kit
1 Petrol heater
2 Holder
3 Exhaust system
4BoltM6x100
5 Nut M8 (x3)
6 Nut M6 (x2)
7 Coolant hoses/pipes
8Bolt
9 Hose clip (x3)
10 Fuel Pump
11 Cable tie (x20)
12 Protective cover, petrol pump
13 Bracket, fuel pump
14 Vibration damper
15 Clamp
16 Nut M6 (x2)
17 Screw (x2)
18 Joint hose
19 Joint hose
20 Hose clip, fuel line (x4)
21 Hose
22 Hose clip (x2) (One is mounted on hose (21))
F920A011
5 24
89
7
3
1
6
11
20
16
12 10 13 17
15
1814
19
21 22
12 788 928 3
Saab 9-3 M03-
Fuel line kit
1 Fuel line (pump-heater)
2 Fuel line (tank to pump)
F920A012
12
4 12 788 928
Saab 9-3 M03-
Electrical connection kit
Wiring harness
F920A013
12 788 928 5
Saab 9-3 M03-
Important
WARNING
Work on the heater involves dismantling the vehi-
cle fuel system and emptying the fuel tank. When
carrying out the work the following points should
therefore be observed:
·Provide good ventilation! Use approved extrac-
tors for removing fuel fumes if they are availa-
ble.
·Use protective gloves! Prolonged contact with
fuel can cause skin irritation.
·Keep a class BE fire extinguisher close at
hand. Observe the risk of sparks, e.g. in con-
nection with breaking electrical circuits, short
circuiting, etc.
·Smoking is absolutely forbidden.
·Use protective goggles.
Important
The flexible bellows on the forward section of the
exhaust system must not be bent more than 5°
from its neutral alignment. This means that if the
forward section is hanging free, the bellows must
not be bent further than the amount already
caused by the weight of the system.
Excessive loading of the pipe can lead to residual
deformations in the components which can cause
noise, leakage and eventually failure.
6 12 788 928
Saab 9-3 M03-
Preparations
Reduction of fuel pressure
1 Let the engine idle.
2 Remove fuse No. 2 (fuel pump) from the electri-
cal centre located in front of the battery in the
engine compartment.
3 When the engine has stopped the ignition key
must be turned to the OFF position.
4 Refit the fuse.
Emptying the fuel tank
The fuel tank is not fitted with a drain plug. Where
work on the fuel system requires emptying of the
fuel tank this is done with an emptying unit via the
filler pipe.
Before emptying read carefully through the instruc-
tions supplied with the emptying unit.
Important
Pay attention to cleanliness when working on the
fuel system. Prevent dirt from entering the tank
and fuel lines.
Be careful not to damage the non-return valve in
the fuel tank when inserting and removing the suc-
tion pipe of the emptying unit.
12 788 928 7
Saab 9-3 M03-
1 Disconnect the negative battery cable.
2 Remove the cap from the expansion tank.
3 Raise the car.
4 Remove the bolts from the forward section of
the exhaust system.
5 Remove the exhaust system.
6 Place a receptacle under the engine, open the
drain plug on the bottom of the coolant pump
and drain the coolant.
F920A014
6
4
5
5
5
5
8 12 788 928
Saab 9-3 M03-
7 Unplug the connector at the front of the fuel tank
and detach the wiring harness from its mounting.
8 Place a pillar jack under the fuel tank and undo
the tank mounting straps.
9 Separate the fuel lines using tool 83 95 261 and
plug the fuel line tank connections in order to
prevent fuel spill.
10 Remove the filler pipe hose from the fuel tank.
11 Carefully lower the fuel tank until the joint in the
carbon filter vent hose becomes accessible.
Separate the joint in the carbon filter vent hose
and the joint in the fuel filler vent hose.
12 Lower the fuel tank completely and lift away to a
work bench.
13 Mark the position of the hole where the heater
fuel pipe is to be inserted.
14 Drill a 10.5 mm hole in the tank.
15 Push the fuel pipe into the tank until the seal
locates against the tank and fasten the pipe to
the other fuel lines with a cable tie on each side
of the fuel line holder.
16 Remove the hose which is connected to the fuel
filler pipe ( the hose clip must be split with a saw)
and fit the hose from the set.
Tightening torque 4 Nm (3 lbf ft)
17 Place the fuel tank on a pillar jack, lift the tank
slightly and connect the fuel filler vent hose. Lift
the fuel tank completely and connect the
remaining fuel lines.
18 Fit the fuel tank mounting straps.
Tightening torque 24 Nm (18 lbf ft)
19 Plug in the connector at the front of the fuel tank
and fit the wiring harness into its mounting.
20 Fit the drain plug in the bottom of the coolant
pump.
21 Lower the vehicle until it is just over the floor.
Important
Be careful to prevent drill swarf from falling into the
tank.
F920A015
94mm
37mm
15
14
10 11
8
8
79
12 788 928 9
Saab 9-3 M03-
22 Unplug the connector from the air mass sensor,
separate the intake hose and remove the air fil-
ter cover. Remove the hose from the air filter
cover (if such a hose is fitted).
23 Remove from the turbo intake pipe the small
hose to the control valve (APC valve) and the
hose to the carbon filter vent-valve. Remove the
intake pipe.
24 Remove the heat shield from the turbo compres-
sor (two screws and a catch).
25 Remove the coolant hoses from the connections
to the heat exchanger and remove from the ther-
mostat housing the hose which is nearest to the
expansion tank.
26 Fit the heater mounting bracket to the bulkhead.
Tightening torque 24 Nm (18 lbf ft)
Using benzine, clean an area between the sus-
pension strut mounting bolts on the top of the
right-hand suspension turret nearest to the
engine. Remove the extra label from the heater
and affix it to the cleaned area.
Important
Retain the hose clip, it is required for re-assembly.
F920A016
2322 23 24
22
26
26
26
22
23
25
Important
Under no circumstances may this label conceal
any part of another label or plate.
10 12 788 928
Saab 9-3 M03-
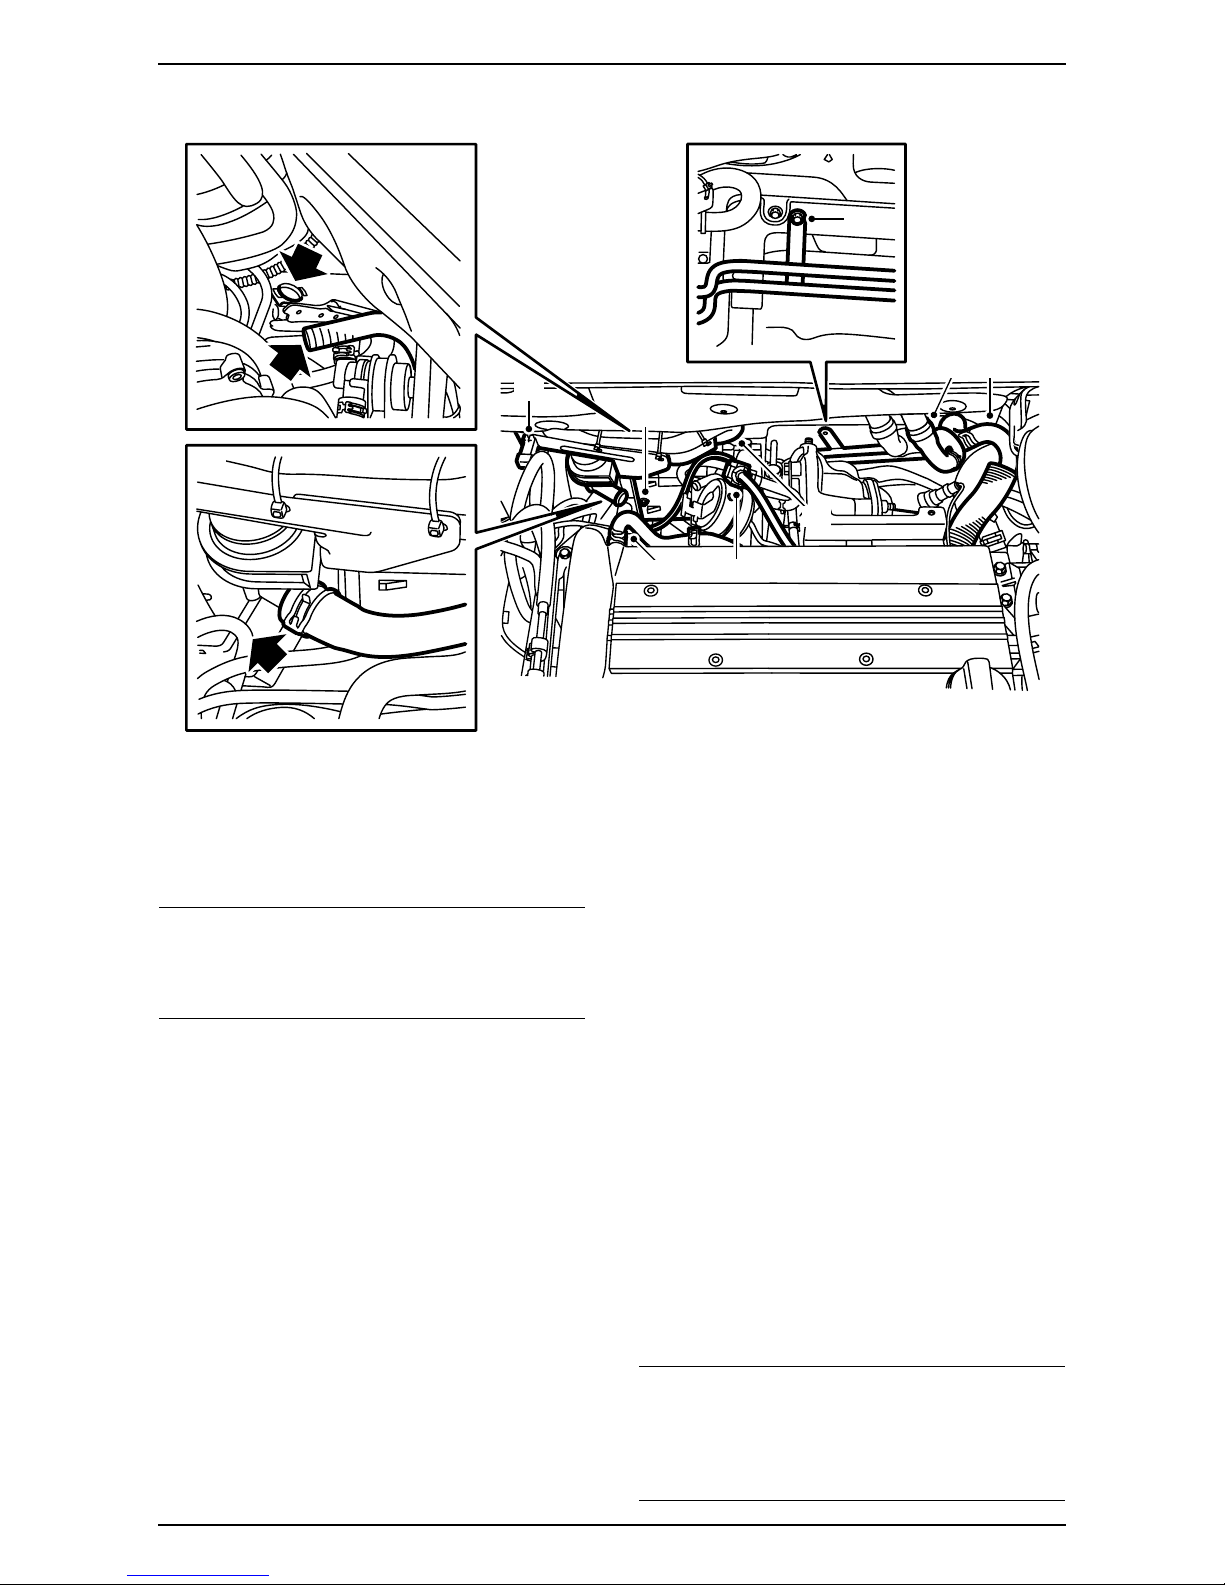
27 Fit the hose clips (including the old clip) onto the
new coolant hoses. Connect the hose/pipe
assembly between the thermostat housing con-
nection and the heat exchanger connection
nearest to the expansion tank. Do not screw the
assembly to the bulkhead.
28 Connect the other coolant hose to the heat
exchanger connection.
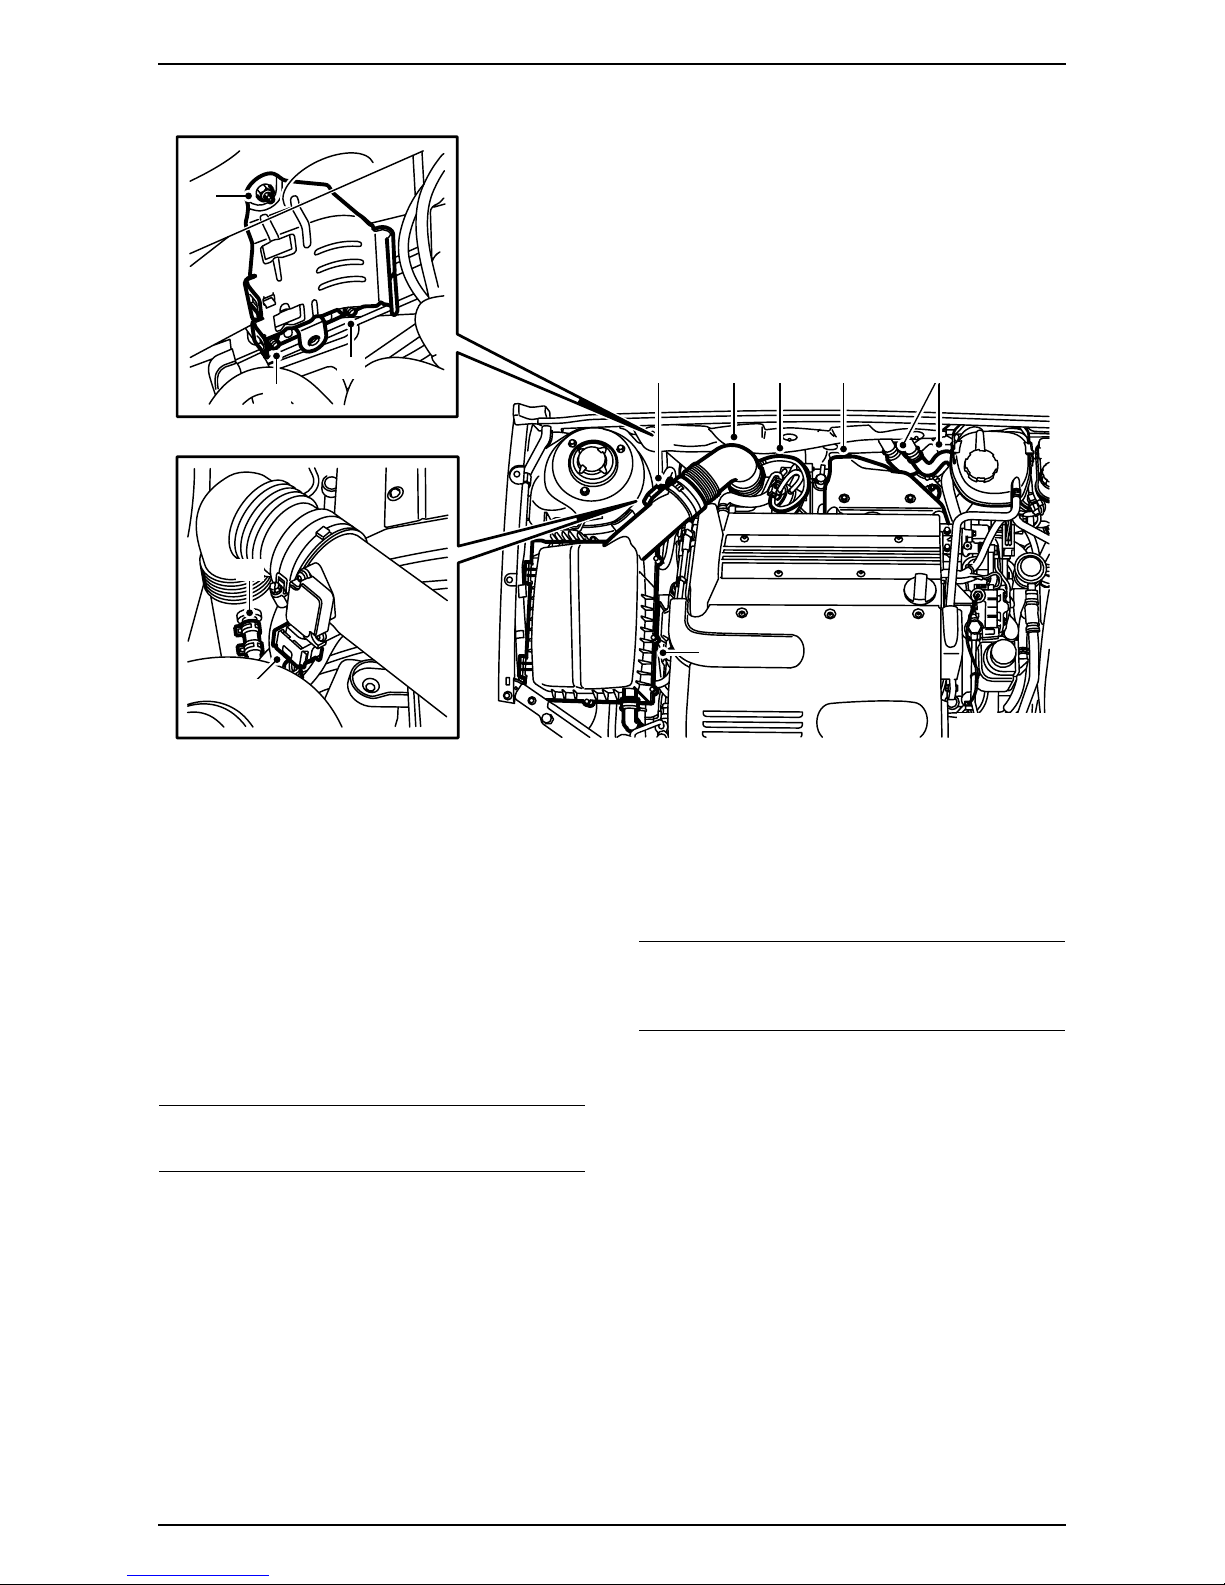
29 Remove the control valve (APC valve) and
remove the crankcase ventilation hose from the
turbo compressor.
30 Remove the plugs from the heater inlet and out-
let ports. Push aside the cable tie holding the
heater connector and detach the connector from
its mounting on the heater.
31 Protect the suspension turret and from above
manoeuvre the heater into place on its mount-
ing.
Tightening torque 9 Nm (6.5 lbf ft)
Bend the connector mounting back into its orig-
inal shape.
32 Fit the connector into its mounting and reposi-
tion the cable tie around the connector.
33 Connect the lower coolant hose to the heater
and tighten the hose clip.
34 Connect the upper coolant hose to the heater
and tighten the hose clip.
35 Attach the coolant pipe mounting to the brake
pipe cover plate on the bulkhead.
36 Connect the crankcase ventilation hose to the
turbo compressor and fit the control valve (APC
valve)
37 Connect the inlet hose of the heater to the fixing
in the hole in the longitudinal frame member.
Important
The heat shield on the hose should be slid towards
the thermostat housing so that the hose clip fits
into the cut-out in the heat shield.
F920A017
32
34
35
31
28 27
29 29
36
37
Note
The connector mounting can be bent slightly to
facilitate assembly.
Important
Check that the drainage hose is free from the
intake hose. If the wiring harness channel on the
heater is severely bent the drainage can be affect-
ed.