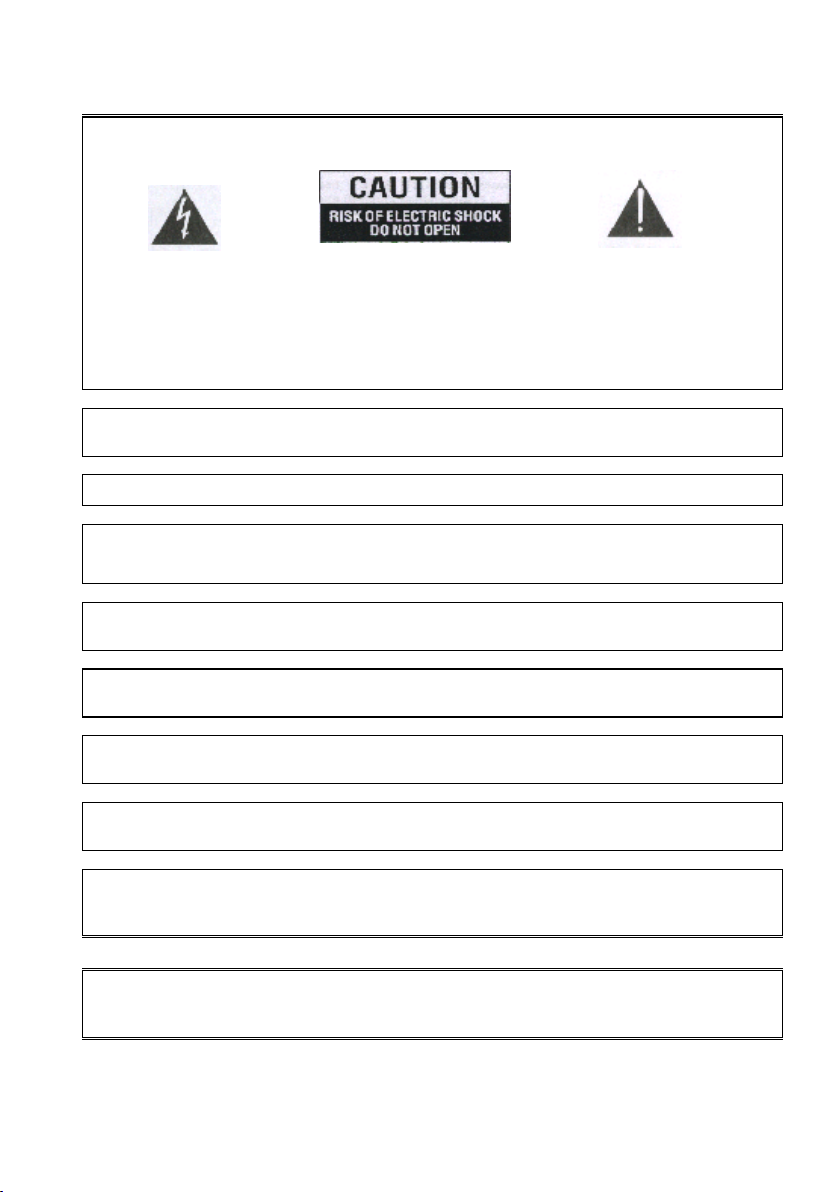
SAB Nova 3300 FTA User manual

SAB Nova 3300 FTA
User Manual

1
Safety Precaution
CAUTION:
The lightning flash with
arrowhead symbol, within an
equilateral triangle, is intended
to alert the user to "dangerous
voltage" and to prevent from a
risk of electric shock.
Warning:
To reduce the risk of electric
shock, don't open the cabinet.
Refer servicing to qualified
personnel only.
The exclamation point within an
equilateral triangle is intended to
alert the user to important
operating and maintenance
(servicing).
WARNING: Do not use this STB where contact with / or immersion in water is a possibility. Do not use
near flower vase, washbowls, kitchen sinks, laundry tubs, swimming pools, etc.
WARNING: Do not put the candle or lamp stand on the cabinet; otherwise, there is the danger of fire.
WARNING: The unit should be connected
to a power supply only of the type described in the operating
instructions or as marked on the unit. If you are not sure of the type of power supply (for example, 120 or
230 V) to your home, consult your local dealer or local power company.
WARNING: This product installs diodes. Do not open the cabinet or touch any parts in the inner
mechanism. Consult your local dealer for technical service if the opening is required.
Note: To ensure proper use of this product, please read thi
s User manual carefully and retain for
further reference.
Unit Cleaning: After the unit power is turned off, you can clean the cabinet, panel and remote control
with a soft cloth lightly moistened with a mild detergent solution.
Attachments: Never add any attachments and/or equipment without the manufacturer consent; as
such additions may result in the risk of fire, electric shock, or other personal injury.
Locating: Slots and openings in the cabinet are provided for ventilation to protect it from overheating.
Do not block these openings or allow them to be blocked by placing the STB on a bed, sofa, or other
similar surface, nor should it be placed over a radiator or heat register.
Power-Cord Protection: Place the power-supply cord out of the way, where it will not be walked on.
Please take special attentions to cords at plugs, convenience receptacles, and the point where they exit
from the unit.

2
Object and Liquid Entry: Never put objects of any kind into this STB through openings, as they may
touch dangerous voltage points or short-out parts that could result in a fire or electric shock. Never spill
any liquid on the STB.
Note: Moisture may be formed on the lens In the following conditions:
When the unit is suddenly moved from cold environment or an air-condition room to a warm place.
Immediately after a heater has been turned on.
In a steamy or very humid room.
If the moisture forms inside the unit, it may not operate properly. To correct this problem, turn on the
power and wait about two hours for the moisture to evaporate.
Parts Replacement: When the unit parts need to be replaced, user should make sure the service
technician use the replacement parts specified by the manufacturer or having the same characteristics
as the original part. Unauthorized replacement may put the unit In the risk of fire, electric shock or other
hazards.
Safety Check: After all the maintenances and repairs are done, user is required to request the service
technician to conduct the overall safety check to ensure the machine is In the proper condition.
Environment protection
ATTENTION !
Your product is marked with this symbol. It means that the used electrical and electronic products should
not be mixed with general household waste. There is a separate collection system for these products.

3
CONTENTS
SAFETY PRECAUTION ........................................................................................ 1
ENVIRONMENT PROTECTION.......................................................................... 2
1. FRONT PANEL .................................................................................................. 4
2. REAR PANEL ..................................................................................................... 4
3. CONNECTING YOUR SYSTEM....................................................................... 5
4. REMOTE CONTROLLER................................................................................. 6
5. SATELLITE SETTING ...................................................................................... 8
6. TV CHANNEL EDITOR..................................................................................... 9
7. SYSTEM INSTALLATION ................................................................................ 9
8. TV INSTALLATION......................................................................................... 10
9. PARENTAL CONTROL................................................................................... 11
10. UPDATE & BACK-UP.................................................................................... 11
11. FACTORY SETTING ..................................................................................... 12
12. SPECIFICATIONS.......................................................................................... 13

4
1. Front Panel
1 Remote Sensor: Detect infrared signal from remote control unit
2 RS232: To transfer the data to another STB or PC by RS-232 cable
3 USB Connector: USB 2.0 Host, connect to USB hard disk or flash disk
4 POWER: DC 12V 1.5A power supply.
2. Rear Panel
Please refer to the diagram above for all possible connections of your receiver
Do not connect the unit to the mains socket until all other connections have been made and checked.
Your configuration may vary depending on model.
1. INPUT (LNB IN 13/18V 500mA MAX) : Connect the coaxial cable from LNB of your Dish.
2. AV OUT : Used to connect video and audio.
3. HDMI: Audio and Video output socket for TV set with HDMI Input Jack only.

5
3. Connecting Your System
There are some ways to connect the receiver to your existing TV system. We recommend using one of
the following cases for the best result:
1. If you have a high definition television set, you should use a HDMI cable for best result. Plug one end of
the cable into the HDMI socket on the receiver and the other end into the matching socket on your
television. In this case, you do not have to make audio connections because the HDMI connector can
output stereo audio or Dolby digital audio.
2. Connect one end of RCA cable to the RCA jack on the back of the receiver and the other end to a RCA
jack on your TV.
Finally connect the coaxial cable from the LNB to the Input on the receiver.
TV with Motorized System (DiSEqC 1.2 / USALS)
Connect one end of your coaxial cable to the LNB IN connector on the receiver and the other end to the
Receiver connector on the DiSEqC 1.2 / USALS motor.
Connect the coaxial cable from the LNB to the LNB connector on the DiSEqC 1.2 / USALS motor.
All our receivers are designed to be DiSEqC 1.0 / DiSEqC 1.2 /USALS compatible.
This allows multiple antennas to be connected to the receiver at the same time.
If you have two or more fixed antennas or LNBs, we recommend you use a DiSEqC 1.0 switch. Connect
the coaxial cable from the first LNB to the LNB 1 or LNB A input connector of the DiSEqC switch. Do the
same for any other LNBs that you have.
Connect one end of a coaxial cable to the RF output connector of the DiSEqC switch,
Connect the other end to Input on the receiver.

6
4. Remote Controller

7
1.POWER: To switch ON/OFF the receiver power supply.
2.MUTE: To mute or restore the sound
3.RED, GREEN, YELLOW, BULE KEYS: Multi-function keys in menu mode.
4.SUB-T:To show subtitle on the channel which has subtitle information.
5.ASPECT:To switch the video output aspect ratio to 4:3 or 16:9.
6.FB/FF: To play back or forward faster.
7.PREV: To change into the previous play.
8.NEXT: To change into the next play.
9.PLAY/PAUSE: to pause and play the file when you press play / pause key.
10.STOP: To stop the current play or to stop the current record.
11.REC: To record of the channel.
12.USB: The shortcut key to the USB menu.
13.FIND: Enter into a menu to search the channel you want.
14.ZOOM: To magnify a certain area on the images
15.TXT: To open teletext page on the channel which has teletext information.
16.PIP; this is the fuction about picture in picture.
17.MENU: Display the main menu or return to the previous one.
18.INFO: The shortcut key to the information menu.
19.OK: To carry out the selection and enter into chosen menu.
20.CH Up/Dn: Turn to the next or previous channel and to move the highlight bar for selecting options
to upward or downward on the menu.
21.VOL +/-: To adjust the sound volume up or down and to move the highlight bar for selecting options
to right or left on the menu.
22.PAGE +/-: To move up the cursor to the next or previous page in the menu or channel list.
23.FAV: The shortcut key to favorite menu.
24.EXIT: To exit from the menu or pop-up window or cancel the present running functions.
25.EPG: The shortcut key to the EPG menu.
26.AUDIO : Selects the audio mode among Left / Right / Stereo / Mono
27.NUMBER KEYPAD: To select TV/Radio channel and enter to programming parameters by the
numeric keys and to input the character by the alphabetical keys.
28.RECALL: To return to the previously viewed channel.
29.TV/RADIO: To switch between TV and RADIO.

8
5. Satellite Setting
You can press Red key to set SAT/TP Manager. Press Green key to start channel search.
1. Satellite: In this item, press [Left/Right] key can switch Satellites and press [OK] key can enter satellite
list for you to select directly
2. LNB Freq: In this item, press [Left/Right] key can select the parameter. Option is
5150,5750,9750,10600,10750,11300,11475,17250,18250,19250,20250,21200,5150/5750,
9750/10600, 9750/107500 and MDU-1,MDU-2,MDU-3,MDU-4
3. DiSEqC1.0/1.1: You can use [Left/Right] key to switch options. There are several options for your
selection:
DiSEqC1.0: NONE,1/4,2/4,3/4,4/4,ToneburstA, ToneburstB
DiSEqC1.1: NONE,1/16,2/16,…,16/16
4. 22K: You can use [Left/Right] key to switch “ON / OFF”. When this item is switched to “ON”, receiver
will receive TV and radio input signal from 22K port. If the item is switched to “Off”, the receiver will
receive all signal from 0 K port
Notice!
When you choose LNB type “****/****”, you can not modify 22K.
5. Polarity: In “Polarity” item, [Left/Right] key to switch “OFF、18V、13V、13/18V” functions
6. Motor:You can use [Left/Right] key to set Antenna type by Motor
7. Unicable:You can use [Left/Right] key to set unicable enable or none
Motor Setting:
When select Motor Type: USALS
If you select “DiSEqC1.2”, “Local
Longitude / Local Latitude” is not
available. It will show the screen
like left
When the highlight on the mode
item,You can use [Left/Right] key
to set Motor function

9
6. TV Channel Editor
By Moving the highlight on the Channel, you can use [Up/Down] key to select TV Channel Editor、Radio
channel editor 、EPG and Favorite.
1. RENAME [Red Key]: To edit the channels name
2. LOCK [Green Key]: To lock the channels which you want to lock.
(1) It will display a dialogue to ask you to input password. The default password is “0000”. If you input the
correct password you can see a “lock mark” in the right side of the highlighted channel.
(2) After save and exit menu, STB will request you to input the password while you want to watch the
locked channel.
3. DEL [Yellow Key]: To delete the channel
4. SKIP [Blue Key]: Press blue key to select the channels you want to skip.
5. FAV [FAV Key]: To select the channel which you want to add in the Favorite List
6. Satellite [F1 Key]: Press F1 key to switch the channel list with the different satellite
7. MOVE [F2 Key]: To move the channel to the position you want to place.
8. SORT [F3 Key]: By pressing F3 key, you can list up the channels by 4 kinds of sorting ways.
7. System Installation
By pressing [Menu] and selecting “system” item, and move the UP/Down key to select Language, OSD
style, time, TV setup, Adv Timer Parental Lock, Update & Backup ,Factory setting.

10
1. OSD Language: To select menu languages, the selections of languages include: English, French,
German, Russian, Arabic, Portuguese, Turkish, Spanish, Polish, Italian and etc.
2. Audio Language: Some channels have more than one audio language for choosing; by this function
you can set the first audio for this channel. If the playing channel has the same audio as the “First Audio”
you set, system will play this audio language as default. If the channel hasn’t the suited audio language,
then the system will compare automatically with second audio language.
3. Subtitle Language: You can set the subtitle language
When you entry to OSD Setting Menu, you can set Banner Display timer / OSD Transparency.
When you entry to Time Menu, you can see: Sleep time, Summer Time, Set Time, Set Date, Time Zone
and GMT usage.
8. TV Installation
When you enter to “TV System” menu, you can set TV Saturation, TV Contrast, TV Brightness, Auto
Switch Off, Standby Mode, Digital Audio output, TV Resolution, Video Output, TV Mode and TV Format.
1. TV Saturation: Press [Left/Right] KEY
to set TV saturation
2. TV Contrast: Press [Left/Right] KEY to
set TV contrast
3. TV Brightness: Press [Left/Right] KEY
to set TV brightness
4. Auto Switch Off: OFF/3 Hours/4 Hours/
5 Hours
5. Standby Mode: Fake/Real
Sleep time: When you set a sleep
timer and the time arrive, the system
will enter to standby automatically.
It will switch the mode between Sleep
Timer Off /15/30/45/60/90/120
minutes.
GMT Usage: Select On or Off.
1. If you select GMT Off, you can
adjust the current Date and time
2. If you select GMT On, you can
adjust the “Time Zone”: To switch
“Time Zone” value and the range
are “-12:00 ~ +12:00” increase
each half hour progressively.
Banner display timer: support
always、1s~3s~5s~10s~30s and
always
OSD Transparency: There are 8
levels of transparency

11
6. Digital audio output: To set the both SPDIF and HDMI’s digital audio output mode. It has options:
LPCM and RAW
<->1080i_50Hz<->AUTO<->1080p_50Hz.
7. TV resolution: You can switch video resolution circularly by the sequence 576i <-> 576P
<->720p_50Hz
8. Video Output: To set video output mode RCA (CVBS) / SCART(CVBS)/ SCART(RGB)/ YCbCr(YUV)/
HDMI
9. TV Mode: you can switch the TV output mode by NTSC /Auto/ PAL
10. TV Format: You can switch the screen aspect ratio mode. Now we provide below options: 4:3 LB/4:3
PS/16:9 LB/16:9 FIT
9. Parental control
When first enter this menu, you should input the password. Default password is “0000”.
10. Update & Back-up
By pressing [Menu] and selecting “Setup” item, and press OK key enter to update & backup menu when
the highlight on the upgade & backup items
Image upgrade:you can download new software to this
receiver by external USB memory device(the upgrade file
format support “*ssu”)
Image backup:store the software backup to USB memory
device.
When you enter to “Backup by USB” menu, you can store
the changed parameters and searched channels and etc.
1. Insert the external USB memory device to USB slot of
this receiver.
2. You can select the file or add the new file to backup
1. Change Password: To change
password. You can input the new
password in this item by using number
keys directly. After you filled in 4 digital
numbers, the highlight will auto skip to
confirm Password and ask you to input
the new password again.
2. Lock Type: No Block/Total
Block/05/06/…/18
3. Channel Lock: In order to enter to the
locked channels, you should input the
password. The locked channels mark
will show up a popup message on the
screen and ask for the password.
4. Menu Lock: If set ON, in order to enter
some certain menu, you should enter the
password.

12
software
11. Factory setting
When you press [OK] key in the
“Factory Setting” item:
1. It will show a warning message to
inquiry you “Notice:This will delete
all your data,Are you agree?”.
2. If you select “Yes” option, the all
revised parameters of the receiver
will reset to default value. Please
carefully to using this function.
3. In step 1, select “No” or press [Exit]
key can draw back from this item
and without saving.

13
12. Specifications
Tuner
Demodulator Mode
QPSK,8PSK,16APSK
Frequency Range
950~2150MHz
RF Input Connector
F-Female
Video
Video Decoding
ISO/IEC 11172-2 MPEG1,ISO/IEC 13818-2 MPEG2
MP@HL,ISO/IEC 14496 MPEG4 compliant Support SP@L3
to ASP@L5,ISO/IEC 14496-10 AVC high profile@level 4.1
main profile@level 4.1
Video Output
CVBS(video format @ 576i or 480i)
HDMI 1.3(video format default @ Auto), support HDCP
Video Resolution
1080p/i 720p/i 576p/i 480p/i
Aspect Ratio
4:3 16:9
Audio
Audio Decoding
MPEGI layer1/2, MPEGII Layer II,
Audio mode
Mono/Stereo/Left/Right
Subtitle
DVB Subtitle and Teletext Subtitle
Teletext
EBU Teletext
Front Panel
RS232
Serial Port for Software Upgrade
AV out
Used to connect any external any external video and audio.
USB port
USB 2.0 Port for Multimedia Player, and Software
Upgrade/Backup
Rear Panel
Input
Receives the Signal from Satellite Antenna
AV out
Used to connect any external any external video and audio.
HDMI Connector
High-Definition Multimedia Interface V1.3
Accessories
RCU
IR RC3 / Other on Request (38kHz)NEC
Batteries
2 x AAA Type
User Manual
English, Dutch, German
AV Cable
1
IR Extender Cable
1
Power
DC Input Range
12V 1.5A
Power Consumption
Max.20W
Physical Specification
Operating Temperature
0
℃
-40
℃
Storage Temperature
-10℃-65℃

Gebruikers-
handleiding

WAARSCHUWING:
Plaats deze STB niet op plaatsen waar contact met /of onderdompeling
in water mogelijk is. Niet gebruiken in de buurt van bloemenvazen, wasbakken, gootstenen,
(zwem)baden, etc.
WAARSCHUWING
: Plaats geen kaars of lamp op de receiver
, dit kan tot bandgevaar
leiden
.
WAARSCHUWING:
Het apparaat moet worden aangesloten op de stroomvoorziening
van het type dat in de handleiding of op de apparaat beschreven staat. Als u niet zeker
bent van het type voeding (bijvoorbeeld 120 of 230 V) raadpleeg dan uw
energieleverancier.
WAARSCHUWING:
Dit product bevat diodes. Maak de behuizing niet open of raak de
onderdelen in het inwendige mechanisme niet aan. Raadpleeg de technische dienst van uw
lokale dealer indien opening is vereist.
Koppelingen:
Maak nooit koppelingen aan het apparaat zonder toestemming van de
fabrikant; koppelingen kunnen resulteren in risico’s als brand, elektrische schokken of
andere verwondingen.
Lokaliseren: De sleuven en openingen in de behuizing zijn bedoeld voor ventilatie om
oververhitting te voorkomen. Laat deze openingen niet blokkeren of toestaan dat ze worden
geblokkeerd door het plaatsen van de STB op een bed, bank of ander soortgelijk oppervlak,
noch zou het boven een radiator of andere warmtebron moeten worden geplaatst
Bescherming van het netsnoer:
Plaats het netsnoer uit de weg, waar niet zal worden
gelopen. Let op snoeren en stekkers, stopcontacten en het punt waar ze uit het
apparaat komen.
Voorwerpen en vloeistof: Steek nooit voorwerpen van welke aard dan ook in de STB. Dit
kan leiden tot gevaarlijke spanning of kortsluiting, wat kan resulteren in brand of een
elektrische schok. Mors geen vloeistof op de STB.
Onderdelen vervangen: Wanneer onderdelen moeten worden vervangen, moet de gebruiker
ervoor zorgen dat de onderhoudstechnicus alleen gebruik maakt van de onderdelen van
fabrikant of onderdelen die dezelfde kenmerken hebben als het originele onderdeel.
Ongeautoriseerde vervanging kan leiden tot brand, elektrische schokken of andere gevaren
.
Veiligheidscontrole: Nadat onderhoud en reparaties zijn uitgevoerd is de gebruiker zelf
verantwoordelijk om de servicemonteur te verzoeken een algehele veiligheidscontrole uit te
voeren om ervoor te zorgen dat de apparaat in goede conditie verkeerd.
bescherming van het milieu
Dit apparaat mag niet bij uw algemeen huishoudelijk afval. De schadelijke
stoffen uit klein chemisch afval (KCA) vormen een probleem als ze op de
stortplaats of de afvalverbranding terecht komen. Omdat klein chemisch afval
heel divers is (van schoonmaakmiddelen tot batterijen en verf) zijn er aparte
stromen voor verwerking. Bewaar de verschillende producten dus apart, en
lever ze apart in. Een deel van de materialen is geschikt voor hergebruik. De
rest wordt onder speciale omstandigheden verbrand of gestort.

Inhoud
Gebruikers-
..............................................................1
VERKLARING VAN OVEREENSTEMMING
...........4
1. Voorpaneel
..........................................................4
2. Achterpaneel
.......................................................4
3. Aansluiten van uw Systeem
..............................5
4. Afstandbediening
................................................6
5. Satelliet Setting
...................................................8
6. TV Kanalen bewerken
.........................................9
7. Systeem Installatie
..............................................9
8. TV Installatie
......................................................10
9. Ouderlijke controle
...........................................11
10. update & back-up
............................................12
12. Specifications
..................................................13

VERKLARING VAN OVEREENSTEMMING
De fabrikant verklaart hierbij de conformiteit van dit product met de geldende richtlijnen
en normen.
1. Voorpaneel
1. Remote Sensor:Detecteert infraroodsignaal vanuit de afstandsbediening
2. RS 232 seriële aansluiting :Om gegevens te verplaatsen naar een andere ontvanger of
computer via een RS-232 kabel
3. USB:USB 2.0, bedoeld voor usb stick of schijf
2. Achterpaneel
1. Invoer (LNB IN 13/18V 500mA MAX) : Verbindt de coaxiale kabel van uw lnb van uw
schotel
2. AUDIO R/L :Bedoeld voor externe audio versterker of systeem
.
3. HDMI :Audio en Video uitgang voor tv via een hdmi aansluiting

3. Aansluiten van uw Systeem
Er zijn 2 manieren om uw receiver aan te sluiten op uw tv. Wij adviseren u om een van de
volgende manieren te hanteren:
1. Als u beschikt over een HD televisieset, wordt u geadviseerd om een hdmi kabel te
gebruiken.
Zorg ervoor dat de HDMI kabel is aangesloten van de ontvanger aan de uw televisie. In dit
geval, hoeft u geen audio-aansluitingen te maken, dit omdat de HDMI-connector stereo audio
of Dolby digital audio.2 aan kan.
2. Sluit het RCA-kabel aan op de RCA-aansluiting van uw ontvanger aan het RCA-
aansluiting van uw TV

4. Afstandbediening
Table of contents
Languages:
Other SAB TV Receiver manuals