SAC TURBO-MAX 6056 User manual

QUALITY PEOPLE, QUALITY PRODUCTS
Sioux Automation Center, Inc.• 877 1st Ave NW • Sioux Center, IA 51250
PH: (712-722-1488) • Toll Free: 1-866-722-1488
www.siouxautomation.com
ASSEMBLY
CALIBRATION
OPERATION
REPLACEMENT PARTS
READ COMPLETE MANUAL CAREFULLY
BEFORE ATTEMPTING OPERATION
4/16/08
MON600170,
Rev A
TURBO-MAX
6056 TRUCK
OPERATORS MANUAL

Page 2
GENERAL INFORMATION
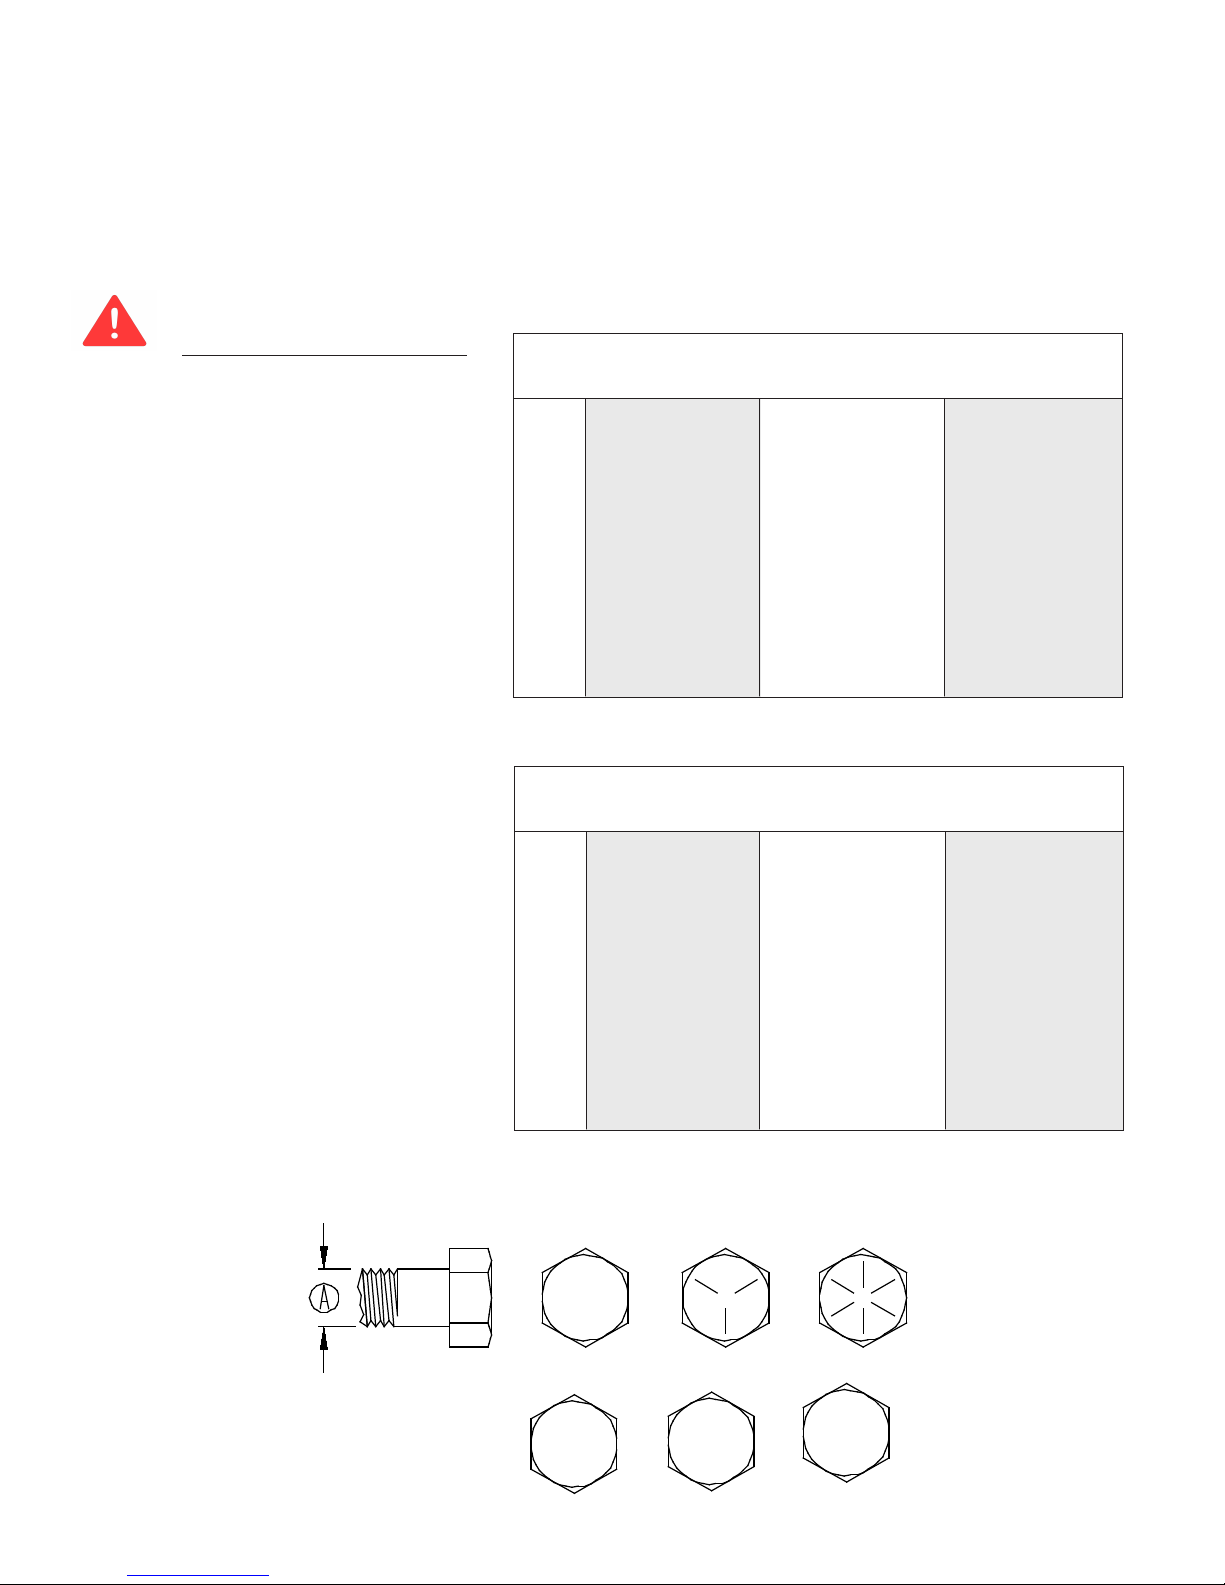
1. Unless otherwise specied, high-strength (grade5)
(3radial-lineheadmarkings)hexheadboltsareused
throughoutassemblyofthispieceofequipment.
2. Whenever terms “LEFT” and“RIGHT” areusedinthis
manualitmeansfromapositionbehindwagonboxand
facingforward.
3. When placing a parts order, refer to this manual for
properpartnumbersandplaceorderbyPART NO. and
DESCRIPTION.
4.Readassemblyinstructionscarefully.Study
assemblyproceduresandallillustrationsbeforeyoubegin
assembly.Notewhichpartsareusedineachstep.This
unitmustbeassembledinpropersequenceorcomplica-
tions will result.
WARNING: TO AVOID PERSONAL INJURY OR DEATH, OBSERVE FOLLOWING
INSTRUCTIONS:
Neveroverloadmixer.Ratingofgearorratingoftires,whicheverisless.
Ensurethatanybodypresentisclearbeforeapplyingpowertoanymachineryusedinconjunc-
tionwithwagonboxorwhenmovingbox.
Neverallowanyonein,near,oronmixingchamberduringmixing,transporting,orunloading
offeed.
ThankyouforpurchasingaTurbo-MaxMixerTruck.Wefeelyouhavemadeawisechoiceandhopeyouarecompletelysatis-
edwithyournewpieceofequipment.YournewTurbo-MaxMixerTruckisadurable,efcientandeasytouseunit.Proper
careandusewillresultinmanyyearsofservice.
INTRODUCTION
Table of Contents
GeneralInformation ......................................................................................................................................................................... 2
Safety,SignalWords....................................................................................................................................................................... 3
EquipmentSafetyGuidelines........................................................................................................................................................... 4
LightingandMarking........................................................................................................................................................................ 4
SafetySignCare .............................................................................................................................................................................. 4
TireSafety ........................................................................................................................................................................................ 5
BeforeOperation.............................................................................................................................................................................. 5
During Operation.............................................................................................................................................................................5-7
Following Operation ......................................................................................................................................................................... 7
HighwayandTransportOperations.................................................................................................................................................7-8
PerformingMaintenance .................................................................................................................................................................. 8
BoltTorque ....................................................................................................................................................................................... 9
Mixer Setup ..................................................................................................................................................................................... 10
Mixer Operation............................................................................................................................................................................. 11-12
InspectionsandAdjustments .......................................................................................................................................................... 13
LubricationSchedule....................................................................................................................................................................... 14
Decal Location ................................................................................................................................................................................ 15
OilbathAssembly ............................................................................................................................................................................ 16
Reel&AugerAssembly................................................................................................................................................................... 17
FinalAssembly ..............................................................................................................................................................................18-19
Options............................................................................................................................................................................................ 20
DischargeBreakdown
SlideTray ................................................................................................................................................................................... 21
SlideTray(usedonserial#) ...................................................................................................................................................... 21
HydraulicBreakdown
ElectricSelectorValveforSlideTray .......................................................................................................................................... 22
SwitchboxAssembly
ToggleSwitchAssembly.............................................................................................................................................................. 23
JoystickAssembly ....................................................................................................................................................................... 23
DrivelineAssembly........................................................................................................................................................................24-25
GeneralSpecications .................................................................................................................................................................... 26
Warranty.......................................................................................................................................................................................... 27

Page 3
SAFETY, SIGNAL WORDS
SAFETY
TAKE NOTE! THIS SAFETY ALERT SYMBOL FOUND THROUGHOUT THIS
MANUAL IS USED TO CALL YOUR ATTENTION TO INSTRUCTIONS INVOLVING YOUR
PERSONAL SAFETY AND SAFETY OF OTHERS. FAILURE TO FOLLOW THESE
INSTRUCTIONS CAN RESULT IN INJURY OR DEATH!
THIS SYMBOL MEANS
ATTENTION
BECOME ALERT
YOUR SAFETY IS INVOLVED!
SIGNAL WORDS
Note:useoffollowingsignalwordsDANGER, WARNING,and
CAUTIONwithsafetymessages.Appropriatesignalwordfor
eachhasbeenselectedusingfollowingguidelines:
DANGER:
Indicates an imminently hazardous situation that, if not
avoided, will result in serious injury or death. This signal
wordistobelimitedtomostextremesituationstypicallyfor
machinecomponentswhich,forfunctionalpurposes,cannot
beguarded.
WARNING:
Indicatesapotentiallyhazardoussituationthat,ifnotavoided,
couldresultinseriousinjuryordeath,andincludeshazards
thatareexposedwhenguardsareremoved.Itmayalsobe
usedtoalertagainstunsafepractices.
CAUTION:
Indicatesapotentiallyhazardoussituationthat,ifnotavoided,
mayresultinminorormoderateinjury.Itmayalsobeused
toalertagainstunsafepractices.
Ifyouhavequestionsnotansweredinthismanual,requireadditionalcopies,orifyourmanualisdamaged,pleasecontact
yourdealerorSiouxAutomationCenterInc.,8771stAveNW,SiouxCenter,IA51250,ph:(712)722-1488or
Toll Free: 1-866-722-1488, Fax: (712) 722-1487 http://www.siouxautomation.com

Page 4
SAFETY...YOU CAN LIVE WITH IT
EQUIPMENT SAFETY GUIDELINES
Everyyearmanyaccidentsoccurwhichcouldhavebeenavoidedbyafewsecondsofthoughtandamore
carefulapproachtohandlingequipment.You,theoperator,canavoidmanyaccidentsbyobservingthefollowing
precautionsinthissection.Toavoidpersonalinjury,studythefollowingprecautionsandinsistthoseworking
withyou,andyouyourself,followthem.
Inordertoprovideabetterview,certainillustrationsinthismanualmayshowanassemblywithasafetyshield
removed.However,equipmentshouldneverbeoperatedinthiscondition.Keepallshieldsinplace.Ifshield
removalbecomesnecessaryforrepairs,replaceshieldpriortouse.
Replaceanycaution,warning,dangerorinstructionsafetydecalthatisnotreadableorismissing.Location
ofsuchdecalsisindicatedinthisbooklet.
Donotattempttooperatethisequipmentundertheinuenceofalcoholordrugs.
Reviewsafetyinstructionswithallusersannually.
Operatorshouldbearesponsibleadult. DO NOT ALLOW PERSONS TO OPERATE OR ASSEMBLE
THIS UNIT UNTIL THEY HAVE DEVELOPED A THOROUGH UNDERSTANDING OF SAFETY
PRECAUTIONS AND HOW IT WORKS.
Donotpaintover,remove,ordefaceanysafetysignsorwarningdecalsonyourequipment.Observeall
safetysignsandpracticeinstructionsonthem.
Neverexceedlimitsofapieceofmachinery.Ifitsabilitytodoajob,ortodososafelyisinquestion DON’T
TRY IT.
LIGHTING AND MARKING
Itistheresponsibilityofcustomertoknowlightingandmarkingrequirementsoflocalhighwayauthoritiesand
toinstallandmaintainequipmenttoprovidecompliancewithregulations.Addextralightswhentransporting
atnightorduringperiodsoflimitedvisibility.
Lightingkitsareavailablefromyourdealerorfrommanufacturer.
SAFETY SIGN CARE
• Keepsafetysignscleanandlegibleatalltimes.
• Replacesafetysignsthataremissingorhavebecomeillegible.
• Replacedpartsthatdisplayedsafetysignsshouldalsodisplaycurrentsafetysigns.
• Safetysignsareavailablefromyourdistributor,dealerpartsdepartment,orfactory.
How to install safety signs:
• Besurethatinstallationareaiscleananddry.
• Decideonexactpositionbeforeyouremovebackingpaper.
• Removesmallestportionofsplitbackingpaper.
• Aligndecaloverspeciedareaandcarefullypresssmallportionwithexposedstickybackinginplace.
• Slowlypeelbackremainingpaperandcarefullysmoothremainingportionofdecalintoplace.
• Smallairpocketscanbepiercedwithapinandsmoothedoutusingpieceofdecalbackingpaper.

Page 5
TIRE SAFETY
• Failuretofollowproperprocedureswhenmountingatireonarimcanproduceanexplosionwhichmay
resultinaseriousinjuryordeath.
• Donotattempttomountatireunlessyouhaveproperequipmentandexperiencetodojob.
• Inatingorservicingtirescanbedangerous.Wheneverpossible,trainedpersonnelshouldbecalledto
serviceand/ormounttires.
• Alwaysorderandinstalltiresandwheelswithappropriatetypeandloadcapacitytomeetorexceed
anticipatedweighttobeplacedontheequipment.
REMEMBER
Yourbestassuranceagainstaccidentsisacarefulandresponsibleoperator.Ifthereisanyportionofthis
manualorfunctionyoudonotunderstand,contactyourlocalauthorizeddealerormanufacturer.
BEFORE OPERATION:
• Carefullystudyandunderstandthismanual.
• Donotwearloose-ttingclothingwhichmaycatchinmovingparts.
• Alwayswearprotectiveclothingandsubstantialshoes.
• Itisrecommendedthatsuitablehearingandeyeprotectionbeworn.
• Operatormaycomeincontactwithcertainmaterialswhichmayrequirespecicsafetyequipmentrelativeto
handlingofsuchmaterials.
• Keepwheelandlugnutstightenedtospeciedtorque.
• Assurethattrucktiresareinatedevenly.
• Giveunitavisualinspectionforanyloosebolts,wornparts,orcrackedwelds,andmakenecessaryrepairs.
Followmaintenancesafetyinstructionsincludedinthismanual.
• Besuretherearenotoolslyingonorinequipment
• Donotuseunituntilyouaresurethatareaisclear,especiallyaroundchildrenandanimals.
• Don’thurrylearningprocessortakeunitforgranted.Easeintoitandbecomefamiliarwithyournewequipment.
• Practiceoperationofyourequipmentanditsattachments.Completelyfamiliarizeyourselfandotheroperators
withitsoperationbeforeusing.
• Makesurethatbrakesareevenlyadjusted(ifequippedwithbrakes).
• Fastenyourseatbeltpriortostartingtheengine.
DURING OPERATION
• Bewareofbystanders,PARTICULARLY CHILDREN! Alwayslookaroundtomakesurethatitissafeto
startengineoftowingvehicleormoveunit.Thisisparticularlyimportantwithhighernoiselevelsandquietcabs,
asyoumaynothearpeopleshouting.
• NO PASSENGERS ALLOWED-Donotcarrypassengersanywhereonorintractororequipment.

Page 6
DURING OPERATION
• Keephandsandclothingclearofmovingparts.
• Donotclean,lubricate,oradjustyourequipmentwhileitismoving.
• Whenhaltingoperation,evenperiodically,setvehiclebrakes,disengagePTO,shutoff
engine,and remove ignition key.
• Beespeciallyobservantofoperatingareaandterrain.Watchforholes,rocks,orotherhiddenhazards.Always
inspect area prior to operation.
-DONOToperatenearedgeofdrop-offorbanks.
-DONOToperateonsteepslopesasoverturnmayresult.
-Operateupanddown(notacross)intermediateslopes.Avoidsuddenstartsandstops.
• Pickthemostlevelpossibleroutewhentransportingacrosselds.Avoidedgesofditches,gullies,andsteep
hillsides.
• Beextracarefulwhenworkingoninclines.
• Maneuvertruckatsafespeeds.
• Avoidoverheadwiresorotherobstacles.Contactwithoverheadlinescouldcauseseriousinjuryordeath.
• Avoidloosegravel,rocks,andholes;theycanbedangerousforequipmentoperationor
movement.
• Allowforunitlengthwhenmakingturns.
• Donotwalkorworkunderraisedcomponentsorattachmentsunlesssecurelypositionedandblocked.
• Keepallbystanders,pets,andlivestockclearofworkarea.
• Operatetowingvehiclefromoperatorsseatonly.
• Neverstandalongsideofunitwithenginerunningorattempttostartengineand/oroperatemachinewhile
standingalongsideofunit.
• Neverleaverunningequipmentunattended.
• Asaprecaution,alwaysrecheckhardwareonequipmentfollowingevery100hoursofoperation.Correctall
problems.Followmaintenancesafetyprocedures.
• Neverhandfeedmaterialsintomixerwhileitisrunning.Rotatingaugersinsidemixermaynotbevisiblefrom
theloadingpoint,andmaycutorgrabhands,clothing,ormaterialbeingloaded,causingsevereinjury.
Alwaysstoptractorenginebeforehandloadingmaterials.
• Nonotallowoperationofthisunitbyinexperiencedorunqualiedpeople.Keepallunqualifedpeopleaway
frommixerduringoperation.Operatorsofthisunitmustbealertandusegoodjudgementatalltimes.Operator
shouldnotclimbonladderoranypartofthemixerwhenloading,mixing,ordischargingmaterial.
• Besuretheinsideofthemixerisclearofanyobstructionbeforeoperatingandthatallshieldsareinplace.This
includesanytruckanddrivelineshields.Repairorreplaceanydamagedormissingshielding.Exposedshafting
cangrabhandsandclothingandcuasesevereinjuryordeath.

Page 7
• Usecautionwhenworkingaroundthedischargearea.Stayclearofslidetray.Thisiscontrolledfromthetruck
andcouldoperatewithoutwarning,creatingpinchpointswhichcouldcausesevereinjuryordeath.Always
disengagethePTO,stopthetruck’sengineandremovethetruck’segnitionkeybeforeworkingclosetothe
dischargearea.
• Neverattempttoreleasejammedmaterialsorcleanmaterialsfromanyareaofthemixerordischargechutewith
outdisengagingthePTOandstoppingthetruck’senginerst.Movingpartscanbehiddenbymaterials,and
stoppedpartscanstartunexpectedly,causingsevereinjury.AlwaysdisengagethePTO,stopthetruck’sengine
andremovethetruck’signitionkeybeforeattemptingtoremovejammedmaterialortocleanthemixer.
• Neverputarmsorfeetinsideunit,powerchute,ordischargedooropening,norclimbonorinthemixerwhileitis
running.NEVERallowanyonetopositionthemselvesoverornearthetopofthemixerwhileitisrunning.
Rotatingaugers,andsprocketscangrabclothingorcreatepinchpointswhichcancausesevereinjuryordeath
totheoperatororbystanders.AlwaysdisengagethePTOandturnofftruckenginesothatthemixercannot
beaccidentallyturnedonwhileinspecting,servicing,repairing,orcleaningthemixer.
• FollowingoperationdisengagePTO,setbrakes,shutoffengineandremove ignition key.
• Storeunitinanareaawayfromhumanactivity.
• Donotparkequipmentwhereitwillbeexposedtolivestockforlongperiodsoftime.Damageandlivestockinjury
couldresult.
• Donotpermitchildrentoplayonoraroundstoredunit.
• Makesureallparkedmachinesareonahard,levelsurfaceandengageallsafetydevices.
• Wheelchocksmaybeneededtopreventunitfromrolling.
FOLLOWING OPERATION
HIGHWAY AND TRANSPORT OPERATIONS
• Ifequipmentisgoingtobetransportedonapublichighway,alwaysfollowstateandlocalregulations.Besureto
checkwithlocallawenforcementagenciesforyourownparticularregulations.theenduserisresponsiblefor
federal,stateandlocalvehiclesafetyregulationcomplaince(ex:requirementsforweight,lighting,etc.)
• Adoptsafedrivingpractices:
- Keepbrakepedalslatchedtogetheratalltimes. NEVER USE INDEPENDENT BRAKING WITH
MACHINE IN TOW, LOSS OF CONTROL AND/OR UPSET OF UNIT CAN RESULT.
- Alwaysdriveatasafespeedrelativetolocalconditions,ensurethatyourspeedislowenoughforan
emergencystop.Keepspeedtoaminimum.
- Reducespeedpriortoturnstoavoidriskofoverturning.
- Alwayskeeptruck’stransmissioningeartoprovideenginebrakingwhengoingdownhill.Donotcoast.
- Donotdrinkanddrive!
Complywithstateandlocallawsgoverninghighwaysafetyandmovementoffarmmachineryonpublicroads.
Useapprovedaccessorylighting,agsandnecessarywarningdevicestoprotectoperatorsofothervehicleson
highwayduringtransport.Varioussafetylightsanddevicesareavailablefromyourdealer.
Planyourroutetoavoidheavytrafc.
•
•
•

Page 8
Beasafeandcourteousdriver.Alwaysyieldtooncomingtrafcinallsituations,includingnarrowbridges,inter-
sections, etc.
Beobservantofbridgeloadratings.Donotcrossbridgesratedlowerthangrossweightatwhichyouareoperat-
ing.
Watchforobstructionsoverheadandsidetosidewhiletransporting.
Alwaysoperateequipmentinapositiontoprovidemaximumvisibility.Makeallowancesforincreasedlengthand
weightofequipmentwhenmakingturns,stoppingunit,etc.
•
•
•
•
Goodmaintenanceisyourresponsibility.Poormaintenanceisaninvitationtotrouble.
Makesurethereisplentyofventilation.Neveroperateengineinaclosedbuilding.Exhaustfumesmaycause
asphyxiation.
Beforeworkingonthismachine,stopvehicle,setbrakes,shutoffengineandremove ignition key.
Alwaysusesafetysupportandblockwheels.Neveruseajacktosupportmachine.
Alwaysusepropertoolsorequipmentforjobathand.
Useextremecautionwhenmakingadjustments.
Followtorquechartinthismanualwhentighteningboltsandnuts.
Neveruseyourhandstolocateahydraulicleakonattachments.Useasmallpieceofcardboardorwood.Hydraulic
uidescapingunderpressurecanpenetrateskin.
Openingsinskinandminorcutsaresusceptibletoinfectionfromhydraulicuid.Without immediate medi-
cal treatment, serious infection and reactions can occur.
Whendisconnectinghydrauliclines,shutoffhydraulicsupplyandrelieveallhydraulicpressure.
Replace all shieldsandguardsafterservicingandbeforemoving.
Afterservicing,besurealltools,partsandserviceequipmentareremoved.
Donotallowgreaseoroiltobuilduponanystepsorplatform.
Whenreplacingbolts,refertoownersmanual.
Refertobolttorquechartforheadidenticationmarking.
Wherereplacementpartsarenecessaryforperiodicmaintenanceandservicing,genuinefactoryreplacement
partsmustbeusedtorestoreyourequipmenttooriginalspecications.Manufacturerwillnotclaimresponsibility
foruseofunapprovedpartsoraccessoriesandotherdamagesasaresultoftheiruse.
Ifequipmenthasbeenalteredinanywayfromoriginaldesign,manufacturerdoesnotacceptanyliabilityforinjury
orwarranty.
Areextinguisherandrstaidkitshouldbekeptreadilyaccessiblewhileperformingmaintenanceonthisequip-
ment.
•
•
•
•
•
•
•
•
•
•
•
•
•
•
•
•
•
•
PERFORMING MAINTENANCE

Page 9
BOLT TORQUE
TORQUE DATA FOR STANDARD NUTS, BOLTS, AND CAPSCREWS.
Tightenallboltstotorquesspeciedinchartunlessotherwisenoted.Checktightnessofboltsperiodically,using
boltchartasguide.Replacehardwarewithsamegradebolt.
NOTE:Unlessotherwisespecied,high-strengthGrade5hexboltsareusedthroughoutassemblyofequipment.
Bolt Torque for Standard bolts *
GRADE 2 GRADE 5 GRADE 8
“A” lb-ft (N.m) lb-ft (N.m) lb-ft (N.m)
1/4” 6 (8) 9 (12) 12 (16)
5/16” 10 (13) 18 (25) 25 (35)
3/8” 20 (27) 30 (40) 45 (60)
7/16” 30 (40) 50 (70) 80 (110)
1/2” 45 (60) 75 (100) 115 (155)
9/16” 70 (95) 115 (155) 165 (220)
5/8” 95 (130) 150 (200) 225 (300)
3/4” 165 (225) 290 (390) 400 (540)
7/8” 170 (230) 420 (570) 650 (880)
1” 225 (300) 630 (850) 970 (1310)
Torque gures indicated are valid for non-
greasedornon-oiledthreadsandheadsunless
otherwisespeced.Therefore,donotgreaseor
oilboltsorcapscrewsunlessotherwisespeci-
edinthismanual.Whenusinglocking
elements,increasetorquevalues
by5%.
*GRADEorCLASSvalueforboltsandcap-
screwsareidentiedbytheirheadmarkings.
Torque Specications
CLASS 8.8 CLASS 9.8 CLASS 10.9
“A” lb-ft (N.m) lb-ft (N.m) lb-ft (N.m)
6 9 (13) 10 (14) 13 (17)
7 15 (21) 18 (24) 21 (29)
8 23 (31) 25 (34) 31 (42)
10 45 (61) 50 (68) 61 (83)
12 78 (106) 88 (118) 106 (144)
14 125 (169) 140 (189) 170 (230)
16 194 (263) 216 (293) 263 (357)
18 268 (363) -- -- 364 (493)
20 378 (513) -- -- 515 (689)
22 516 (699) -- -- 702 (952)
24 654 (886) -- -- 890 (1206)
Bolt Torque for Metric bolts *
GRADE-2 GRADE-5 GRADE-8
8.8 10.9
9.8
CLASS 8.8 CLASS 9.8 CLASS 10.9

Page 10
MIXER SETUP
Checkforproperassembly,adjustment,andlubrication.Checktoseethatthereisadequateoilintheoilbath.If
powerchuteisused,oiltherollerchains.Checkallboltandsetscrewsaretight.
Besureallshieldsareproperlyinplace.
Checkforandremoveanyforeignobjectsinthemixerhopperanddischargeopening.
Checktoseethatdrainplugsareinstalledandthedoorisclosed.
Besurenooneisinsidethemixer.
• Test run the mixer.
•Makesuremixerisempty,thenstartthemixer.
•RunforatleastveminutesatratedPTORPM.
•Raiseandlowerthedoorandoperatethechute/slidetrayseveraltimes.
•Disengagethemixerandturnoffthetractorengineandremovedriveline.
•Checkthemixerdrivecomponentstobesuretheyarenotabnormallyhot.
If any of these items are not running as indicated, immediately repair or contact your service
representative.
•
•
•
•
•
MIXER RUN-IN
Toadjusttheheightofthepowerchute,changethelengthofthelinkchainsonthesidesofthechute.Forbest
performance,theunloadingheightshouldbesetatthelowestheightpossible.Thedischargetip-offonthepower
chuteshouldbeadjustedforcorrectmagnetanddischargeangle.Removeorloosentheupperbolts,pivotthe
tipofftothedesiredanglesandreinstallorretightenallbolts.
•
POWER CHUTE ADJUSTMENT (OPTIONAL)
Toavoidpersonalinjury:Thehopperoormaybeslipperyandtheaugercanspinunexpectedlywhenstepped
on.Usecautionwhensteppingorstandinginsidetheunit,placeaprotectivecoverovertheaugerknives
whenworkinsidetheboxisrequired.
MIXER OPERATION
AlwaysrefertoEquipmentSafetyGuidelines&BeforeOperationsectionsofthismanualbeforeoperatingthismixer.
TheTurbo-MaxMixerwasdesignedforblendingdairyandbeefrations.Mostcommonlyusedingredients,including
limitedamountsofdrystemhay,canbemixedquicklyanduniformlyinthismixer.Ifyouhavequestionsregarding
yourfeedrationorhaveotherapplications,pleasecontactSiouxAutomationCenter,Inc.
TheTurbo-MaxMixermixingperformancecanvarygreatlyaccordingtothedifferencesinmaterials,loadingse-
quence,mixingspeed,andunloadingmethods.
•
•
GENERAL
Whenthemixerisinoperationithasmanymovingpartswhichcouldcausesevereinjuryordeathtopersons
comingincontactwiththeseparts.Tohelpavoidseriousaccidents,pleasereadandunderstandthismanual.
•
SAFETY

Page 11
Do not load hay without otherdrycommoditiesinthemixerrsttoactasacarrieror“lubricant”.
Do not overload hay content,SiouxAutomationCenterInc.recommendsupto15%-20%ofhaybyweight
intheload.Exceedingthispercentagecandecreasemixingperformanceorcouldpotentiallydamagemixerand
causeprematurewearondrivelinecomponents.
•
•
LIMITATIONS
Do not use tough hay (20%-60%moisture)Alwaysusedcured,dryhay.Wethay,foreignobjectsoroverload-
ingmaycausebindinganddamagetothemixer.
Keep in mind the overall size of the mixertoallowclearancethroughdoorways.
•
•
WARNINGS
Themixercanmixanaverageloadin3to5minutes.Duetothisshortmixingtime,thereisnormallynoreason
torunthemixerduringloadingexcepttolevelthematerialsortobreakuphay.
•
MIXING TIME
Whendecidingwhenandhowfasttooperatethemixer,factorssuchasingredientsbeingused,thethorough-
nessofthemix,andthetimeavailabletomixmustbeconsidered.Normalmixingspeedis3/4tofullPTO
speed.
DonotexceedratedPTOspeed.WhenthemixerisoperatedfasterthanratedPTOspeedthestrainonthedrive
trainandmixerisgreatlyincreased.
•
•
MIXING SPEED
• ThefollowingfeedmaterialsrequiresomepreparationorprocessingtobemixedintheMaxi-Mixer.
• ALL LONG AND UNCURED GRASSES
• ROUND BALES, LARGE SQUARE BALES
• SMALL SQUARE BALES
MATERIALS REQUIRING PREPERATION
Always use cured dry hay. Toughhaycancausewrapping,bindinganddamagetomixerandcanadversely
effectthemixingperformance.Thefollowingaresomeexamplesthatcontributetotoughhayconditions:High
moisturecontent,Highgrasscontent,Highdensitybales,Outdoorstorage,Useofhaypreservatives,andEx-
cessive stem length.
•
HAY QUALITY
ManydifferentkindsofmaterialscanbemixedwiththeTurbo-MaxMixer,buteachtypehasitsownuniquechar-
acteristics.
DonotexceedratedPTOspeed.WhenthemixerisoperatedfasterthanratedPTOspeedthestrainonthedrive
trainandmixerisgreatlyincreased.
FORAGES- Choppedhay,cornsilage,andnelychoppedcropresiduecanbemixedinthemixer.Wetand
heavyforagesaddedinlargevolumesmayrequiremorepowertomix.
GRAINS- Ground,rolled,aked,andwholecerealgrains,minerals,andconcentrates,areallveryeasilymixed,
andcanimprovethemixingperformanceoftheothermaterials.
LIQUIDS- Supplementsandliquidfatcanbeblendedinthemixer.Someoperatorspreferaddingliquidsinto
theemptymixer,andothersaddliquidsontopofgrainsorroughage.Stickyliquidssuchasmolassestendto
increasethepowerrequirements.
•
•
•
•
•
MATERIAL THAT CAN BE LOADED DIRECTLY INTO THE MIXER
MIXER OPERATION

Page 12
• Prior to loading, check mixer for foreign objects and be sure door is fully closed.
1. Load Commodities
Addingingredientslikecorn,soybeanmeal,cottonseed,etc.willactasacarrieror“lubricant”ifhayis
includedintheration.
Iftherearefewcommoditiesintheration,substitutingcornsilageorhaylageispreferred.
Fillmixerbetween1/3-1/2fullbyvolumeincommoditiesandforagebeforeaddingthehaytotheration.
Thiswillallowenoughroomforthehaytoexpandandbringfeedlevelupsothetopaugercanassistin
processing.
2. Load Hay
Loadprocessedhay.Withthemixerrunningat3/4tofullPTOspeed,proceedloadingthesmallsquare
balepiecesortubgroundhayintothemixer.Donotexceed15%-20%ofhaybyweight.
3. Finish Loading Commodities
Finishloadinganyotheringredientstocompletetherationinorderofleastbindingingredienttomost
binding.Example:drycommoditiesrst,cornsilagesecond,haylagelast.
4. Finish Loading Wet Commodities
Anyotherwetfeedsmaybeaddedatthistime.
5. Add Liquid Ingredients
• Ifrationincludeswater,additlast.Addingwateratthebeginningwillcausethehaytobind.
NOTE: DO NOT OVERLOAD MIXER! Overloadingcausesexcessivehorsepowerrequirements,increasedstrain
ondrivelineandpoormixerperformance.
•
•
•
•
•
•
LOADING AND MIXING
MIXER OPERATION
Donotoverloadmixer!Overloadingcausesexcessivehorsepowerrequirements,increasedstrainonmixerdrive-
lineandpoormixerperformance.
ThedesignoftheTurbo-MaxMixerrequiresthattherebeadequatespacetoallowthefeedtomoveinandaround
thereelchamber.Ifthereeliscompletelycovered,itcannotefcientlymixthematerials.Thereelcrosstubes
shouldalwaysbevisibleatthetopoftheirrotationtoallowthismixingspace.
•
•
FILL LEVEL
Aftertherationhasbeenthoroughlymixed,openthemixerdoortobeginunloading.Ifthemixerisequipped
withapowerchute,thechutemustberunningbeforethemixerdoorcanbeopened.Thecombinationofthe
dischargedooropeningandthemixerspeeddeterminestheowoffeedfromthemixer.Thedoormustbe
openedfarenoughtopreventseparationofmaterials,optionaldoorowcontrolplatesareavailabletohelppre-
ventseparation.Tostoptheowoffeed,closethedoor,(turnoffthepowerchute)thenshutoffthemixer.
TheTurbo-MaxMixercanbeequippedwitheitherapowerchute,oraslidetraytoassistinthedeliveryof
feed.Thechuteandtrayheightsareadjustedwithhydrauliccylinders,butthechainstopsprovidedonpower
chutesshouldbeadjustedsothatthechuteclearsallbunks,obstacles,etc.
•
•
UNLOADING

Page 13
INSPECTION AND ADJUSTMENTS
IMPORTANT!READBEFOREOPERATINGMIXER.ITISTHERESPONSIBILITYOFTHE
OWNERTOMARESURETHEMIXERISSETUPPROPERLY.THEFOLLOWINGRECOM-
MENDATIONS SHOULD BE HELPFUL
Roller Chain Tightenerssotheyapplysufcientspringtensiontokeeprollerchainsrunningsmoothly(As
ageneralrulethethicknessofanickelshouldtbetweenthespringcoils).Thechainwillformgroovesinthe
tightenerblocks.Thesegrooveshelptokeepthechainsinproperalignment,andtheblocksneednotbeturned
unlesstherollerportionofthechainhaswornintotheblock.
Roller Chains forwear,properalignmentandtension.Adjustorreplaceifnecessary.Rollerchainconnector
linkswhichpassoverpolyethylenetightenerblocksmusthavethelegsofthecotterpinstrailingtothedirection
ofrotation.
Safety Decals forreadability.Ifanysafetydecalsareremoved,obstructed,orotherwisenotunderstandable,
theyshouldbereplacedimmediately.Keepalldecalscleanandvisible.
Safety Shielding tobesureallshieldingisinplaceandfunctionsproperly.Replacealldamagedormissing
shieldingimmediately-seepartspagesformoreinformation.
Bolts and Set Screws afterafewhoursofuseandeachmonththereafter.Tightenifnecessary.
Reel Wipersplasticstripswhichhelpmaterialcleanoutofthereelhopper.Ifthestripsbecomebentback,they
canbeunboltedandturnedaroundorreplacedtoimprovecleanout.
Upper Auger Knivescanbeturnedoverforuseonanewcuttingedgeandshouldbeperiodicallysharpened,
orreplacediftheyarenolongersufcientlybreakingupmaterial.
Lower Auger Round Knives canberotatedseveraltimesbeforesharpeningorreplacementisrequired.
Rain can accumulate inmixerifstoredoutside,alwaysremovedrainplugsonhopperendstoallowunitto
draincompletelyandreplacedrainplugsbeforenextuse.
Freezing Weather thePTOshieldrequiresextragreasetopreventfreezing.Snowcanaccumulateinmixer
ifstoredoutside,alwaysremovedrainplugsonhopperendstoallowunittodraincompletelyandcheckhopper
forsnoworicebuildupbeforeoperatingunit.Thawandremoveanyobstructionandreplacedrainplugsbefore
next use.
IMPORTANT: WHEN WELDING ON THIS UNIT: DoNOTallowthecurrenttoowthroughthebearings,
rollerchains,orscaleweighbars.Grounddirectlytotheitembeingwelded.ALWAYSdisconnectweighbarcords
fromscaleindicatorbeforewelding.
•
•
•
•
•
•
•
•
•
•
INSPECT AND ADJUST
Scale Indicator: Refertotheelectronicscaleoperatorsmanualforadjustmentinformation.Theoperator’s
manualfortheElectroicScalesshouldbekeptwiththismanual.Additionalscalemanualsmaybeobtained
through Sioux Automation Center, Inc.
Load Cells: Shouldbekeptclean,dryandlubricatedtoinsuredependabiltiy.
Normal Scale Activity: Somewarmupscale“drift”mayoccurafterthescaleisturnedonbutshouldzero
balancewithin10-15minutes.Scalemayzeroshiftovernightduetotemperaturechanges.
•
•
•
ELECTRONIC SCALES

Page 14
It is extremely important that the following lubrication schedule be followed:Bearings:useagood
qualitymultipurposegrease.Replacealldamagedormissinggreasezerksimmediately.Alwayscleanzerks
beforeusinggreasegun.Pumpthegreaseinslowlyuntilaslightbeadformsaroundthebearingseals.Once
amonthchecklinesandconnectionsongreasebanksforleaks.
Oilbath Oil:Useagoodhighqualityuniversaloil.Useanoilthatmeetsorexceedshydraulicoilgrade.Fill
tothetoploweroilbathrollerchains.Changeyearlyorwhenevercontaminated.
Before operating a new mixer,therollerchainsshouldbeliberallylubricatedandthentheunitoperatedun-
derano-loadcondition.Thisbreak-inperiodwillallowtherollerchainstobethoroughlylubricatedandthus
minimizeheat-upduringoperation.
•
•
•
LUBRICATION

Page 15
DECAL LOCATION

Page 16
OILBATH ASSEMBLY
12
18
20
19
17
13
15
1
3
69
5
2
4
78
10
14
11
16
23
29 28
24
26
21
25
22
27
10
29
ITEM# QTY. PART# DESCRIPTION
1 1 TM08009 SPROCKET(140B96
2 1 MON300071 SPROCKET(140C16)
3 1 MON300072 SPROCKET(140B18)
4 1 TM08012 SPROCKET(140B30)
5 1 TM03052 SPROCKET(100B58)
6 1 MON300073 SPROCKET(100B21)
7 1 TM08014 SPROCKET(100B58)
8 1 MON300049
MON300050
SPROCKET(100B22-540RPM)
SPROCKET(100B12-1000RPM)
9 2 MON300009 PILLOWBLOCK(1.75”)
10 4 TM00202 PILLOWBLOCK(2.44”)
11 1 MON300051 PLASTIC BEARING (5”)
12 2 MON300047 PILLOWBLOCK(3.50”)
13 1 MON300014 PLASTIC BEARING (3.44”)
14 1 MON300052 DRIVE SHAFT
15 1 MON300053 JACKSHAFT
16 1 MON300054 REEL DRIVE SHAFT
17 1 MON300055 TOP AUGER DRIVE SHAFT
18 1 MON300056 BOTTOM AUGER DRIVE SHAFT
ITEM# QTY. PART# DESCRIPTION
19 1 MON300015 REEL IDLER SHAFT
20 2 MON300057 AUGER IDLER SHAFT
21 1 MON300058 TAPERLOCKHUB(4Z2)
22 2 MON300059 TAPERLOCKHUB(Y1)
23 1 MON300048 TAPERLOCKHUB(Y2)
24 1 MON300027 CHAIN TIGHTNER TOP AUGER
25 1 MON300028 CHAIN TIGHTNER BOTTOM AUGER
26 4 MON300026 TIGHTNERBLOCK
27 2 TM03102 TIGHTNER CHAIN
28 2 TM03179 TURNBUCKLETIGHTNER
29 2 MON300029 TIGHTNER SPRING

Page 17
REEL & AUGER ASSEMBLY
ITEM# QTY. PART# DESCRIPTION
1 2 MON300060 REELBACKPLATE
2 7 SAC14689 FLIGHTING BOTTOM AUGER (RH)
3 4 MON102205 DISCHARGE PADDLE BOTTOM AUGER
4 1 MON700975 BOTTOM AUGER
5 23 MON300018 KNIFEBOTTOMAUGER(ROUND)
6 4 MON102200 BOTTOM AUGER FLANGE
7 2 MON300061 POLY RING
8 1 MON700974 TOP AUGER
9 1 SAC14688 FLIGHTING BOTTOM AUGER (LH)
10 83 MON300012 KNIFETOPAUGER(SICKLESECTION)
11 9 SAC14687 FLIGHTING TOP AUGER (RH)
12 2 TM03130 REEL FLANGE
13 6 MON300011 REEL ARM TENSION SPRING
14 3 MON300110 REEL ARM
15 4 MON102237 RUBBER WIPER BLADE 30”
16 2 MON102258 RUBBER WIPER BLADE 119”
17 4 MON102240 WIPER SUPPORT BAR 30”
18 2 MON102261 WIPER SUPPORT BAR 119”
19 83 MON300013 KNIFEBACKPLATE
20 1 MON700986 REEL
ITEM# QTY. PART# DESCRIPTION
21 1 MON300063 CHAIN COUPLER
22 1 TM11009 DRIVELINE SHAFT
23 4 MON300009 PILLOWBLOCKBEARING
24 1 TM08038 OILBATH DOOR
25 10 MON300064 OILBATH DOOR LATCH
26 2 MON300079 DOORGASSHOCK
27 4 MON102246 PIPE1/2X4-1/4
28 2 MON700981 TUBE,REEL,6056
29 8 BLT12X6NC BLT,HEX,1/2,6,NC,G5
30 16 WSH12FLAT WSH,FLAT,1/2
31 8 WSH12LOCK WSH,LOCK,1/2
32 8 NUT12NC NUT,HEX,1/2,NC,G5
12
18
20
19
17
13
15
1
3
6
9
5
2
4
7
8
10 14
11
16
21
26
22
24
19
23
22
25
1
6
7
6
6
13
12
23
23
23
26
12
17
15
16
18
13
20
27
14
28
29
30
31
32

Page 18
FINAL ASSEMBLY

Page 19
FINAL ASSEMBLY

Page 20
• Allowsaccuraterationweightwhileloading.
• Refertothemanufacturesoperatormanualforyourspecicscaleoptionoperationandmaintenance.
ELECTRONIC SCALES
• Wheelsandtiresshouldbesizedtosupportthegrossweightoftheloadedmixer.
WHEELS AND TIRES
OPTIONS
Table of contents
Other SAC Truck manuals