manuals.online logo
Brands
  1. Home
  2. •
  3. Brands
  4. •
  5. SAFARI
  6. •
  7. Automobile Accessories
  8. •
  9. SAFARI SS667HF User manual

SAFARI SS667HF User manual

Other SAFARI Automobile Accessories manuals

SAFARI SS650R User manual

SAFARI

SAFARI SS650R User manual

SAFARI SS18HF User manual

SAFARI

SAFARI SS18HF User manual

SAFARI SS35R User manual

SAFARI

SAFARI SS35R User manual

SAFARI SS25R User manual

SAFARI

SAFARI SS25R User manual

SAFARI SS662HF User manual

SAFARI

SAFARI SS662HF User manual

Popular Automobile Accessories manuals by other brands

Magneti Marelli AC161 Installation instruction

Magneti Marelli

Magneti Marelli AC161 Installation instruction

FDI uEZ GUI Start here

FDI

FDI uEZ GUI Start here

JCROffroad JT Install instructions

JCROffroad

JCROffroad JT Install instructions

Rostra VOXXElectronics 250-1930 owner's guide

Rostra

Rostra VOXXElectronics 250-1930 owner's guide

TOP VEHICLE TECH GR3FORD5 installation manual

TOP VEHICLE TECH

TOP VEHICLE TECH GR3FORD5 installation manual

Safe Fleet PRIME DESIGN AR-2000-BLK manual

Safe Fleet

Safe Fleet PRIME DESIGN AR-2000-BLK manual

Skoda Fabia Combi 5J Fitting instructions

Skoda

Skoda Fabia Combi 5J Fitting instructions

Camcar 40077 Al Mounting instructions

Camcar

Camcar 40077 Al Mounting instructions

Camcar 40089 AL Mounting instructions

Camcar

Camcar 40089 AL Mounting instructions

Impac Tradesman 2000 installation manual

Impac

Impac Tradesman 2000 installation manual

DVB OFFROAD BRSB-01 installation manual

DVB

DVB OFFROAD BRSB-01 installation manual

Safari Snorkel SS385HF installation guide

Safari Snorkel

Safari Snorkel SS385HF installation guide

ULTIMATE SPEED 279746 Assembly and Safety Advice

ULTIMATE SPEED

ULTIMATE SPEED 279746 Assembly and Safety Advice

SSV Works DF-F65 manual

SSV Works

SSV Works DF-F65 manual

ULTIMATE SPEED CARBON Assembly and Safety Advice

ULTIMATE SPEED

ULTIMATE SPEED CARBON Assembly and Safety Advice

Witter F174 Fitting instructions

Witter

Witter F174 Fitting instructions

WeatherTech No-Drill installation instructions

WeatherTech

WeatherTech No-Drill installation instructions

TAUBENREUTHER 1-336050 Installation instruction

TAUBENREUTHER

TAUBENREUTHER 1-336050 Installation instruction

manuals.online logo
manuals.online logoBrands
  • About & Mission
  • Contact us
  • Privacy Policy
  • Terms and Conditions

Copyright 2025 Manuals.Online. All Rights Reserved.

Copyright Safari 4x4 Engineering Pty Ltd Melbourne Victoria Australia – www.safari4x4.com.au
Page 1 of 12
SS667HF
SAFARI V-SPEC SNORKEL
MITSUBISHI PAJERO SPORT QE
2.4L Turbo Diesel (4N15 Engine) Built: Oct 2015 onwards
20/04/2018
Parts List
ITEM
PART NO.
DESCRIPTION
QTY
1
535-133-000
BODY - SNORKEL (SS667HF)
1
2
000-135-800
3 ½" AIR RAM ASSEMBLY
1
3
535-032-000
BRACKET - UPPER MOUNTING
1
4
000-002-100
BOLT - HEX - 6mm x 1.0 x 14mm (SEMS)
2
5
000-951-300
SCREW - S/T - 4.2mm x 16mm - S/S
3
6
000-960
INSERT - PLASTIC
3
7
000-110
STUD - 8mm x 1.25 x 25mm - S/S
5
8
000-311-300
WASHER - BODY - 8mm x 30mm - S/S
5
9
000-205-300
NUT - NYLOC - 8mm x 1.25mm - S/S
5
10
530-023-000
ADAPTOR - AIR CLEANER INLET
1
11
000-958-450
POP RIVET - 4.8mm x 21mm
2
12
535-024-000
HOSE - AIR ENTRY
1
13
000-909
CLAMP - HOSE - 80/100mm
1
14
000-910
CLAMP - HOSE - 90/110mm
1
15
000-914/B
CLAMP - HOSE - SIZE 56 (BLACK)
1
16
535-017-000
TEMPLATE - GUARD PANEL
1
Copyright Safari 4x4 Engineering Pty Ltd Melbourne Victoria Australia – www.safari4x4.com.au
Page 2 of 12
SS667HF
SAFARI V-SPEC SNORKEL
MITSUBISHI PAJERO SPORT QE
2.4L Turbo Diesel (4N15 Engine) Built: Oct 2015 onwards
Installation Guide
Fitment to:
• Right Hand Side
Fitting Time:
• 150min
Special Tools:
• 114mm Hole Saw
• Step Drill
• 5.0mm & 6.0mm Drill Bits
• Pop Rivet Gun
• Sikaflex 227 Adhesive Sealant
• Loctite 243 (thread lock)
• Masking Tape
• Touch-up paint
Prior to commencing the installation, it is the installer's responsibility to verify that all
components and particularly the template (Item 16) are correct.
1
Remove the following in accordance with the factory service manual:
• Air Cleaner Assembly
• RHS Mud Flap
• RHS Guard Liner
• RHS Guard Insulator
Copyright Safari 4x4 Engineering Pty Ltd Melbourne Victoria Australia – www.safari4x4.com.au
Page 3 of 12
2
Remove and discard:
• Air Deflector
3
Using a sharp knife remove
and discard the perforated
section from the guard panel
template (item 16) as shown.
Copyright Safari 4x4 Engineering Pty Ltd Melbourne Victoria Australia – www.safari4x4.com.au
Page 4 of 12
4
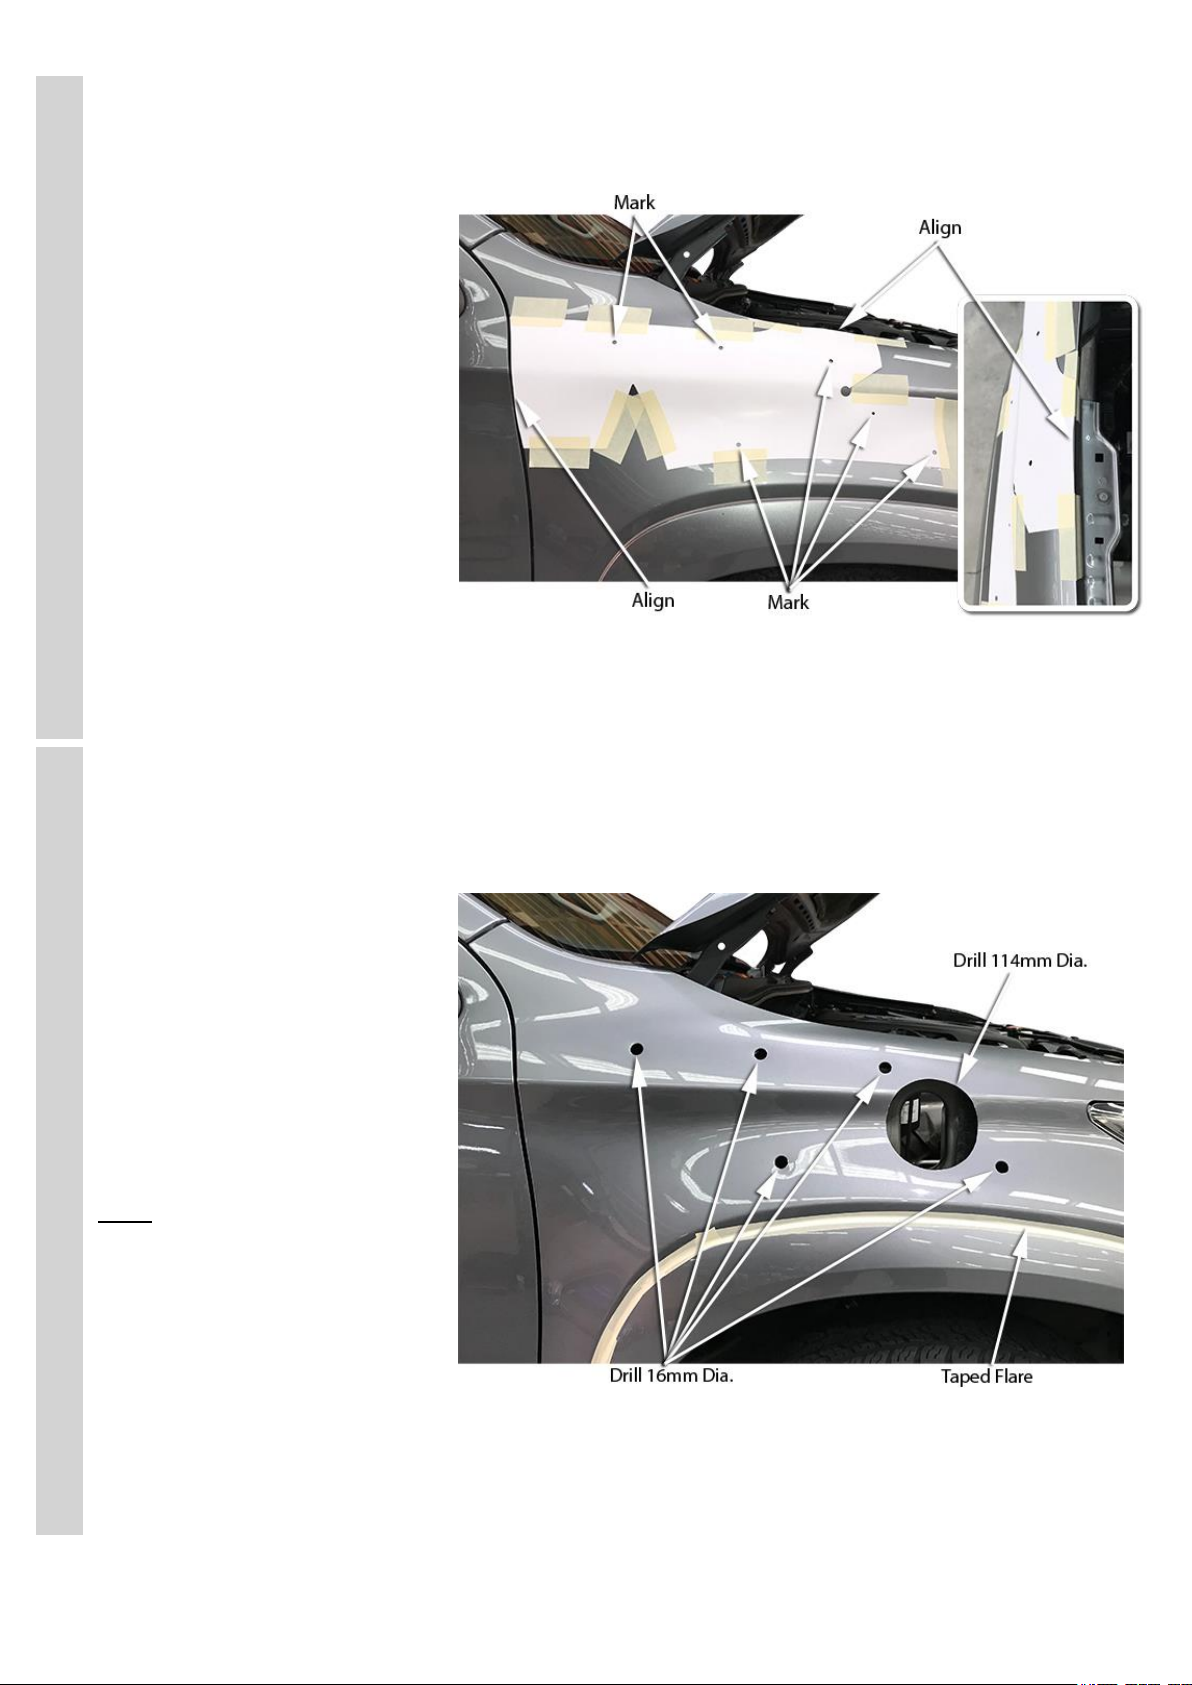
Align the guard panel
template (Item 16) to the
upper and rear edges of the
RHS guard panel as shown.
Tape the template to the
guard panel with masking
tape.
Mark all hole positions with a
felt tip pen.
Remove the template.
5
Drill a pilot hole for each of
the marked hole positions.
Use a 114mm diameter hole
saw to drill the snorkel body
outlet hole.
Use a step drill to drill the
five mounting holes to 16mm
diameter.
Deburr and paint all holes.
Hint: If the vehicle is fitted
with flares, place masking
tape over the join between
the flare and guard panel
prior to drilling to prevent
any swarf from entering
the join.
Copyright Safari 4x4 Engineering Pty Ltd Melbourne Victoria Australia – www.safari4x4.com.au
Page 5 of 12
6
Install the upper mounting
bracket (Item 3) to the
snorkel body (Item 1) with
hex bolts (Item 4).
Apply Loctite 243 to each of
the stainless steel mounting
studs (Item 7) and install the
studs finger tight into the
snorkel body (Item 1)
mounting inserts as shown.
7
Place a strip of masking tape
along the A-pillar panel.
Carefully install the snorkel
body (Item 1) to the guard
panel.
With the snorkel body
correctly positioned on the
vehicle, accurately mark the
position of the upper
mounting bracket (Item 3)
onto the masking tape.
Note: open/close the front
door and check the
clearance between the
door rubber and hex bolts
(item 4). If necessary raise
the position of the snorkel
body on the A-pillar to
achieve adequate
clearance.
Copyright Safari 4x4 Engineering Pty Ltd Melbourne Victoria Australia – www.safari4x4.com.au
Page 6 of 12
8
Remove the snorkel body
(Item 1) from the vehicle and
remove the upper mounting
bracket (Item 3) from the
snorkel body.
Position the upper mounting
bracket (Item 3) onto the A-
pillar and align the bracket
with the marked bracket
outline.
Mark the three mounting
hole positions with a felt tip
pen.
9
Drill a pilot hole at each of
the three marked positions,
drilling through both the A-
pillar panel and inner panel.
Drill both the A-pillar panel
and inner panel holes to
6mm.
Drill the three A-pillar panel
holes to 8mm diameter with
a step drill or 8mm drill bit.
Deburr and paint holes.
Copyright Safari 4x4 Engineering Pty Ltd Melbourne Victoria Australia – www.safari4x4.com.au
Page 7 of 12
10
Install the plastic inserts
(Item 6) into the 8mm
diameter holes in the A-
pillar.
Secure the upper mounting
bracket (Item 3) to the A-
pillar with three self-tapping
screws (Item 5).
11
Remove and discard the air
intake duct from the air
cleaner base.
Copyright Safari 4x4 Engineering Pty Ltd Melbourne Victoria Australia – www.safari4x4.com.au
Page 8 of 12
12
Measure and mark two hole
positions on the air cleaner
base inlet approximately
10mm in from the end of the
air cleaner base inlet and
23mm (long side) and 15mm
(short side) down from the
radius of the inlet as shown.
Drill the two marked hole
positions using a 5.0mm drill
bit.
13
Install the air cleaner inlet
adaptor (item 10) into the air
cleaner base inlet, drill the
two 5.0mm holes through
the air cleaner base and into
the air cleaner inlet adaptor.
Remove the adaptor and
deburr the holes.
Copyright Safari 4x4 Engineering Pty Ltd Melbourne Victoria Australia – www.safari4x4.com.au
Page 9 of 12
14
Apply adhesive sealant to
the inside of the air cleaner
base inlet and the outside of
the air cleaner inlet adaptor
(item 10).
Install the air cleaner inlet
adaptor into the air cleaner
base inlet.
Using the pop rivets (item
11) secure the inlet adaptor
to the air cleaner base.
Apply sealant over the pop
rivets to seal the pop rivets.
Clean-up excess sealant to
ensure a neat finish.
15
INSTALLER OPTION :
The air cleaner base
contains a drain valve as
shown. The drain valve can
permit water to enter the air
intake.
Safari advises that the drain
valve should be sealed to
ensure a watertight
installation.
Copyright Safari 4x4 Engineering Pty Ltd Melbourne Victoria Australia – www.safari4x4.com.au
Page 10 of 12
16
From inside the engine bay,
squash and install the air
entry hose (item 12) through
the hole in the inner guard
panel.
Loosely install the 80/100mm
hose clamp (item 13) onto
the end of the air entry hose
inside the engine bay and the
90/110mm hose clamp (item
14) to the snorkel end of the
air entry hose.
17
Re-install the air cleaner
base, guiding the air cleaner
inlet adaptor into the air entry
hose, fasten the air cleaner
housing using standard
mounting bolts.