Sagem My103L User manual

USER MANUAL
My103L


INDEX
ANATOMY....................................................1
INSTALLATION............................................2
1. SIM Card...................................................................2
2. Battery.......................................................................3
BASICS........................................................5
1. Turn it on/off.............................................................5
2. Make a call ................................................................5
3. Answer a call.............................................................6
4. Display.......................................................................6
5. Text input...................................................................8
6. Phone lock .................................................................9
7. Auto key lock...........................................................10
8. Language.................................................................10
MENU MAP................................................11
TECHNICAL INFORMATION.....................14
SAFETY INFORMATION............................16


ANATOMY
Left soft key Right soft key
Navigation key
Call key
End key
Power on/off
Battery door
4pin slot

INSTALLATION
1. SIM Card
①. Push the hook of the battery door on the back
of phone.
②. Slide down and detach the battery door
③. Insert SIM card into the SIM slot in the right
direction.
Caution: Don’t bend or scratch your SIM card. Keep it away
from static electricity, water and dirt.

2. Battery
④. Connect the battery plug with the slot of phone.
Caution: The plug and slot have the direction and it
will be connected only in the right direction.
⑤. Lay the battery and close the door
Caution: New battery is not fully charged.

⑥. Connect the DC adapter with Phone and plug
the DC adapter into your power outlet.
⑦. Insert the plug of DC adapter into the slot of
Phone.

BASICS
1. Turn it on/off
To turn on your phone, press and hold
“End key” for a few seconds or until
the display turns on. If prompted, enter
your 4-digit PIN code.
Caution: If you enter an incorrect PIN code 3 times in a row,
your SIM card is disabled and your display shows SIM
Blocked. Contact your service provider.
To turn off your phone, press and hold “End key” for
a few seconds
2. Make a call
1) Enter phone number which you want to call.
2) Press “Call key” to make a call.
Tip: In some menus like Phonebook, Message, Call log, etc.
which have individual phone number, Press “Call key”
directly to make a call.
3. Answer a call
When your phone rings, just press “Call key”
If the phone mode is set to “Any Key Answer”, pressing any
key will answer to the coming call.
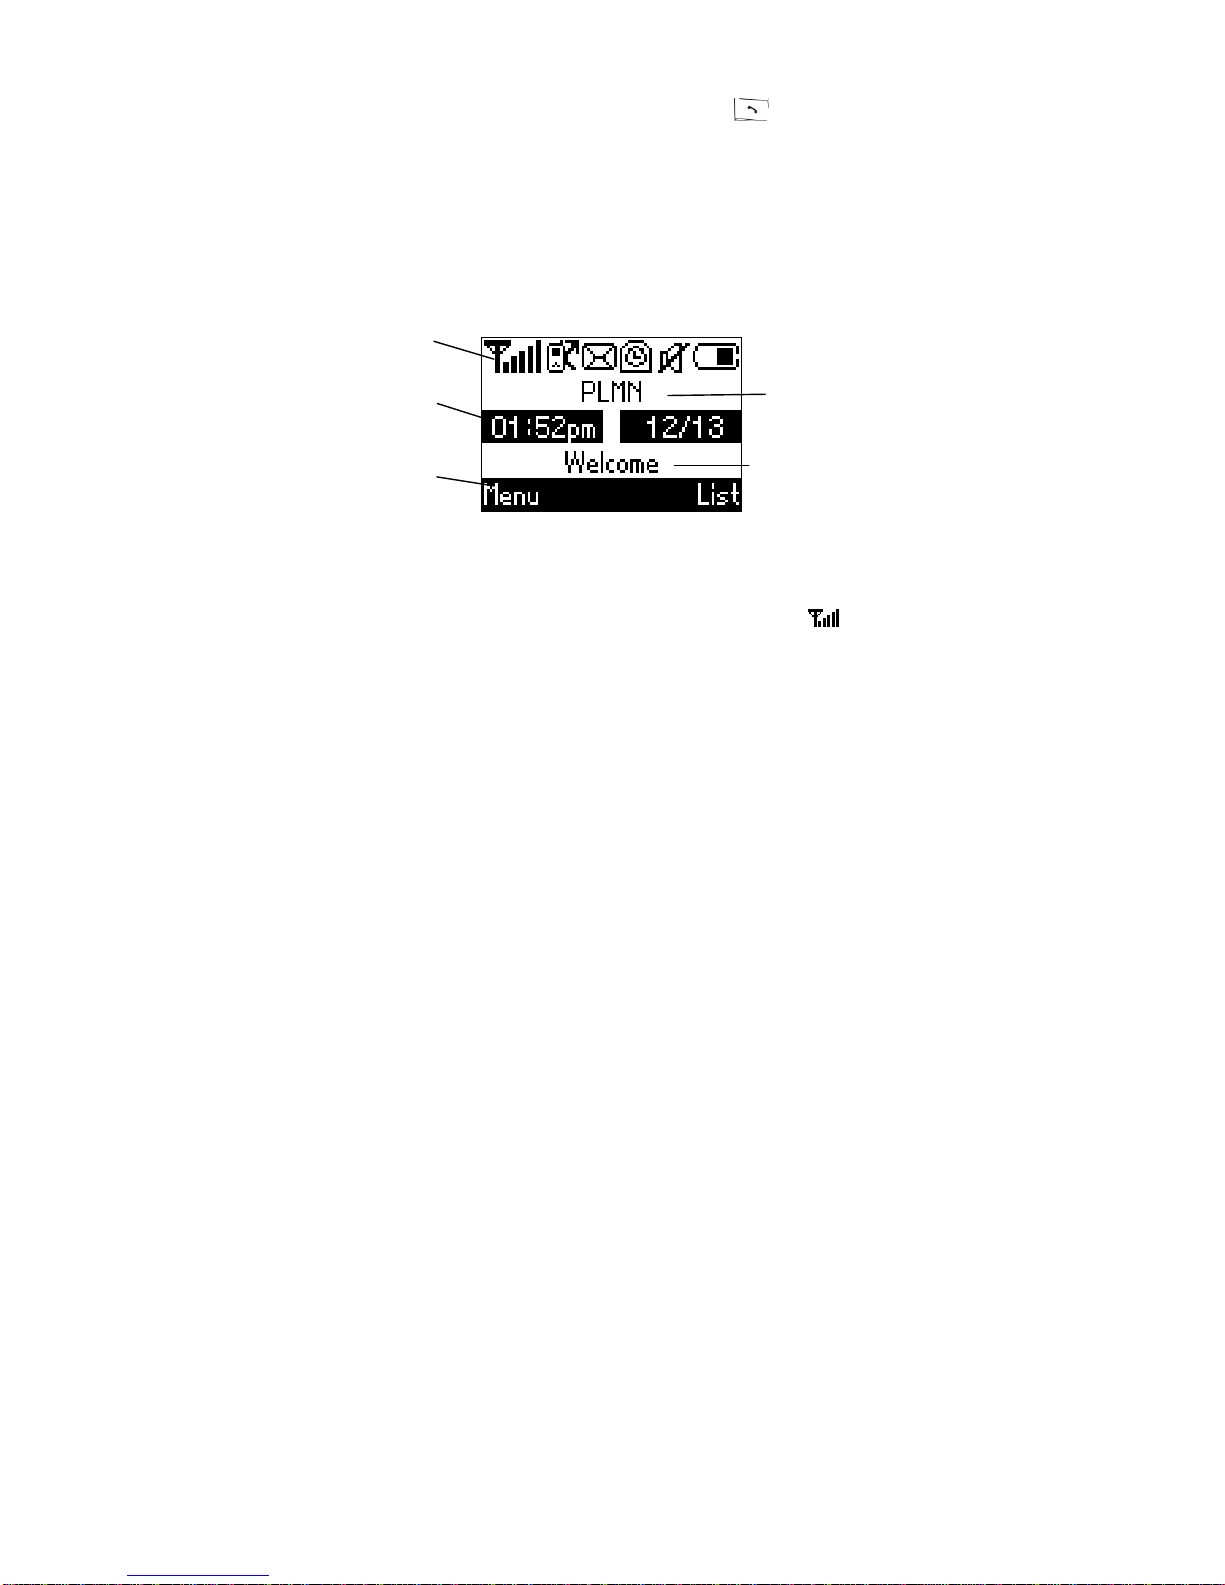
4. Display
The display shows when you turn on the phone
[Status indicator]
1) Signal strength indicator
- Vertical bars show the strength of network connection.
2) Network indicator
- Shows network status.
Status indicators
Time & Date
Soft keys
PLMN
Greeting text
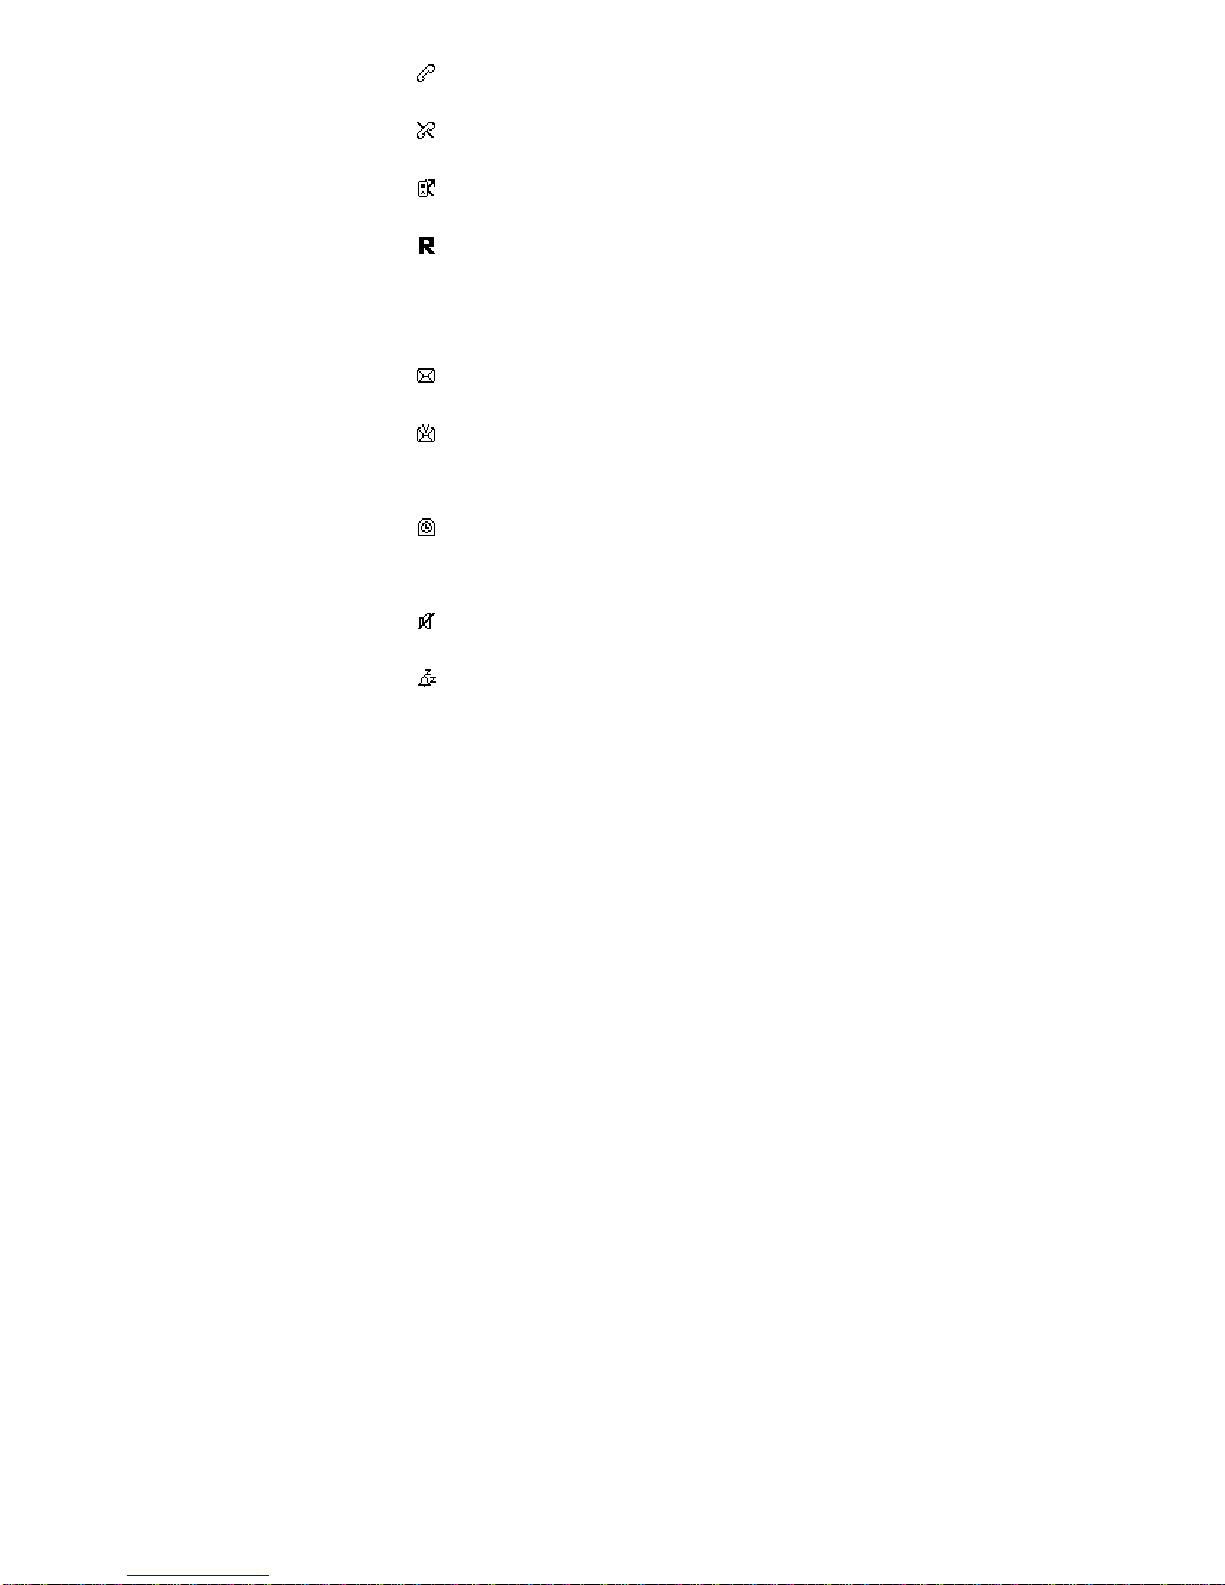
: In use of call
: Cannot make or receive calls
: Network forwarding
: Roaming (outside of home area)
3) Message indicator
- Shows when you receive a new message.
: Text message
: Voice message
4) Alarm indicator
: Alarm is active
5) Ring-tone indicator
: ring-tone volume set to zero
: Manner mode
6) Battery level indicator
- shows the battery charging level.
: Full battery
: Low battery
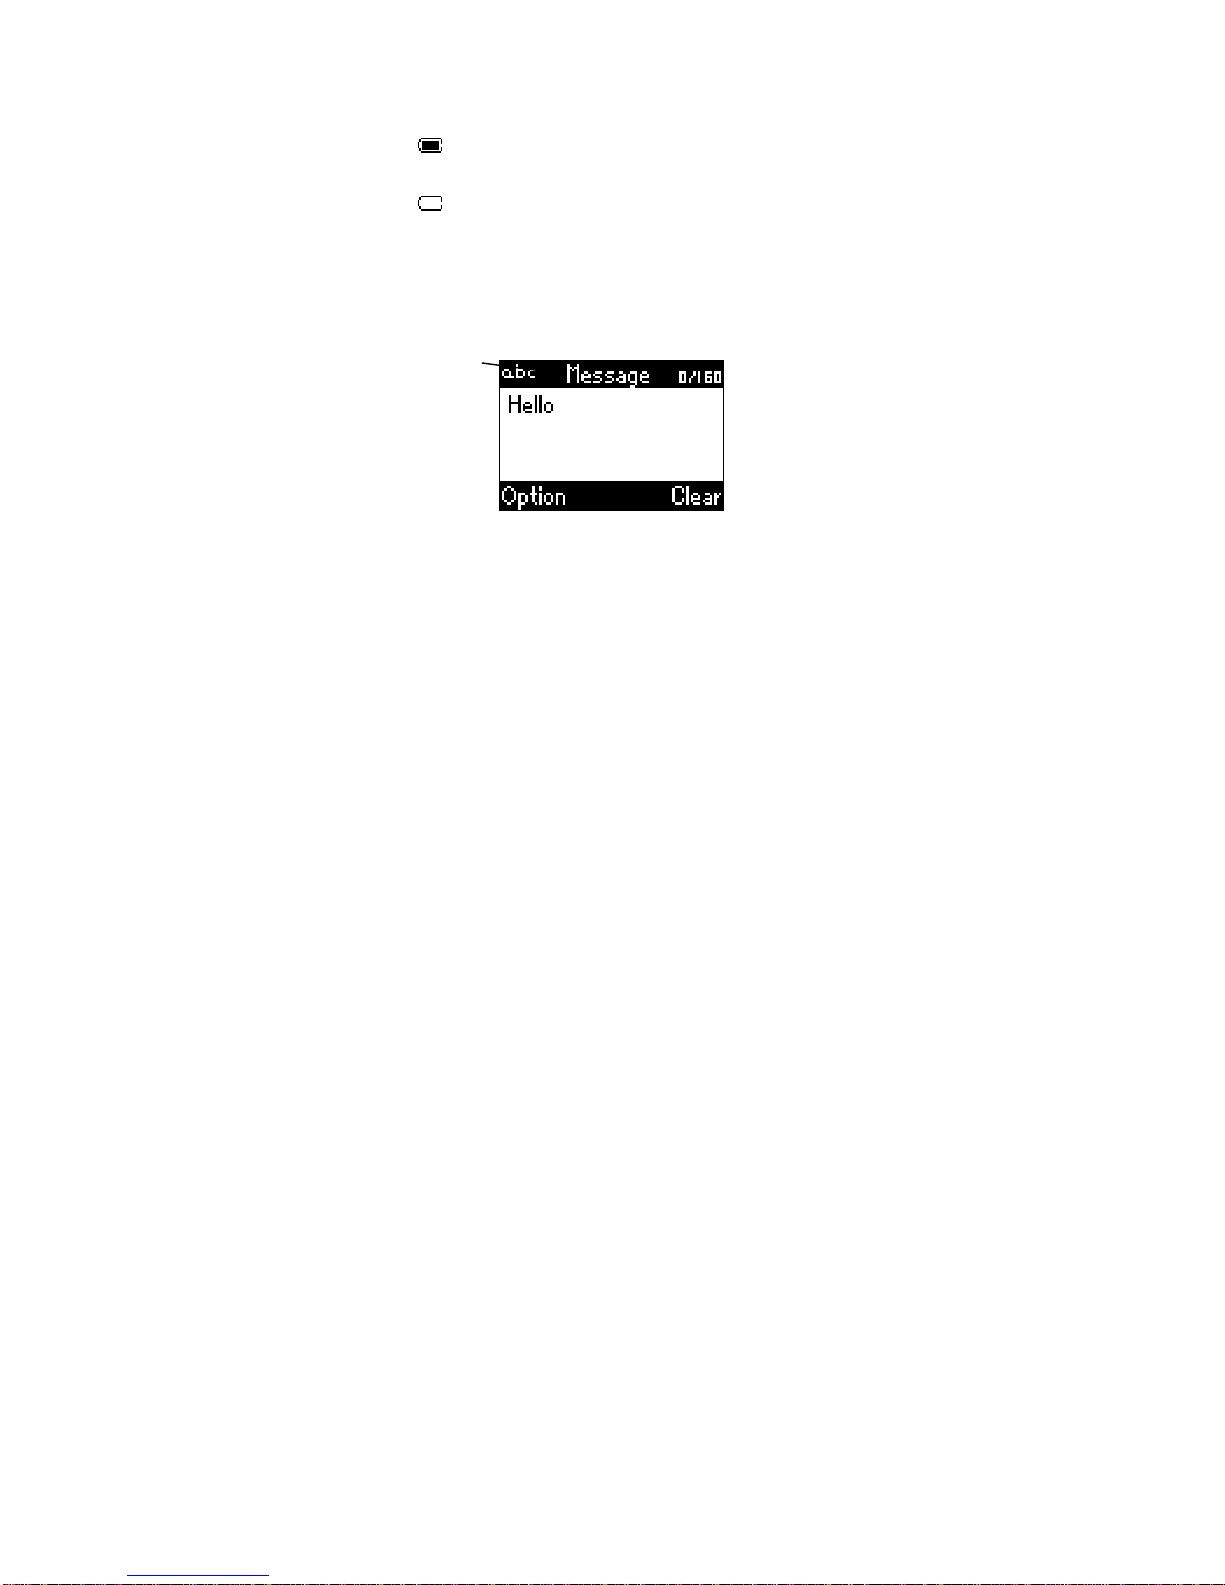
5. Text input
Text input is used for creating message, editing phonebook
entry, changing idle banner, etc.
zTo change the input mode, press Pound key(#) to
toggle in numeric mode, upper letter mode and lower
letter mode.
zTo input Symbol, press Star key(*) to change the input
mode.
zTo input common symbol, press 1 key to input several
common symbols.
Input mode

Tip: If you want to input the different language with the
current language setting, you have to change “language”
setting first.
6. Phone lock
You can lock your phone to prohibit others from using the
phone.
Phone lock is neither SIM card lock nor SIM lock by the
operator.
[Change Password]
Entering: “Left soft key” > “Security Setup” >
“Change Phone PW”
Tip: The original PW is “0000”
[Turn phone lock on/off]
Entering: “Left soft key” > “Security Setup” >
“Phone Lock”
Tip: If phone lock is on, you need to enter the phone PW,
whenever phone turn on.
[unlock the phone]

Press and hold “pound key” for a few second, then
enter your PW.
7. Auto key lock
You can lock your phone to prevent accidental key presses.
[Setting auto key lock]
Entering: “Left soft key” > “Security Setup” >
“Auto Key Lock”
[unlock key]
Pressing any key will pup up a window. And then press and
hold “pound key” for a few second.
8. Language
If the language setting is “Automatic”, It will depends on SIM
card setting.
Entering: “Left soft key” > “Settings” >
“Phone Settings” > “Language”

MENU MAP
1. Phone Book
1. Browse
2. Create
3. Memory Status
4. Delete all entries
5. My Number
2. Message
1. Write Message
2. Inbox
3. Outbox
4. Drafts
5. Voice Mail
1. Number
2. Delete
3. Connect to Voice Mail
6. Broadcast Message
1. Receive Mode
2. Languages
7. Message Settings
1. Service Center Number
2. Expire Period
3. Massege Type
4. Status Report
5. Alert Period
8. Template
9. Memory Status
3. Call Log
1. Incoming Call
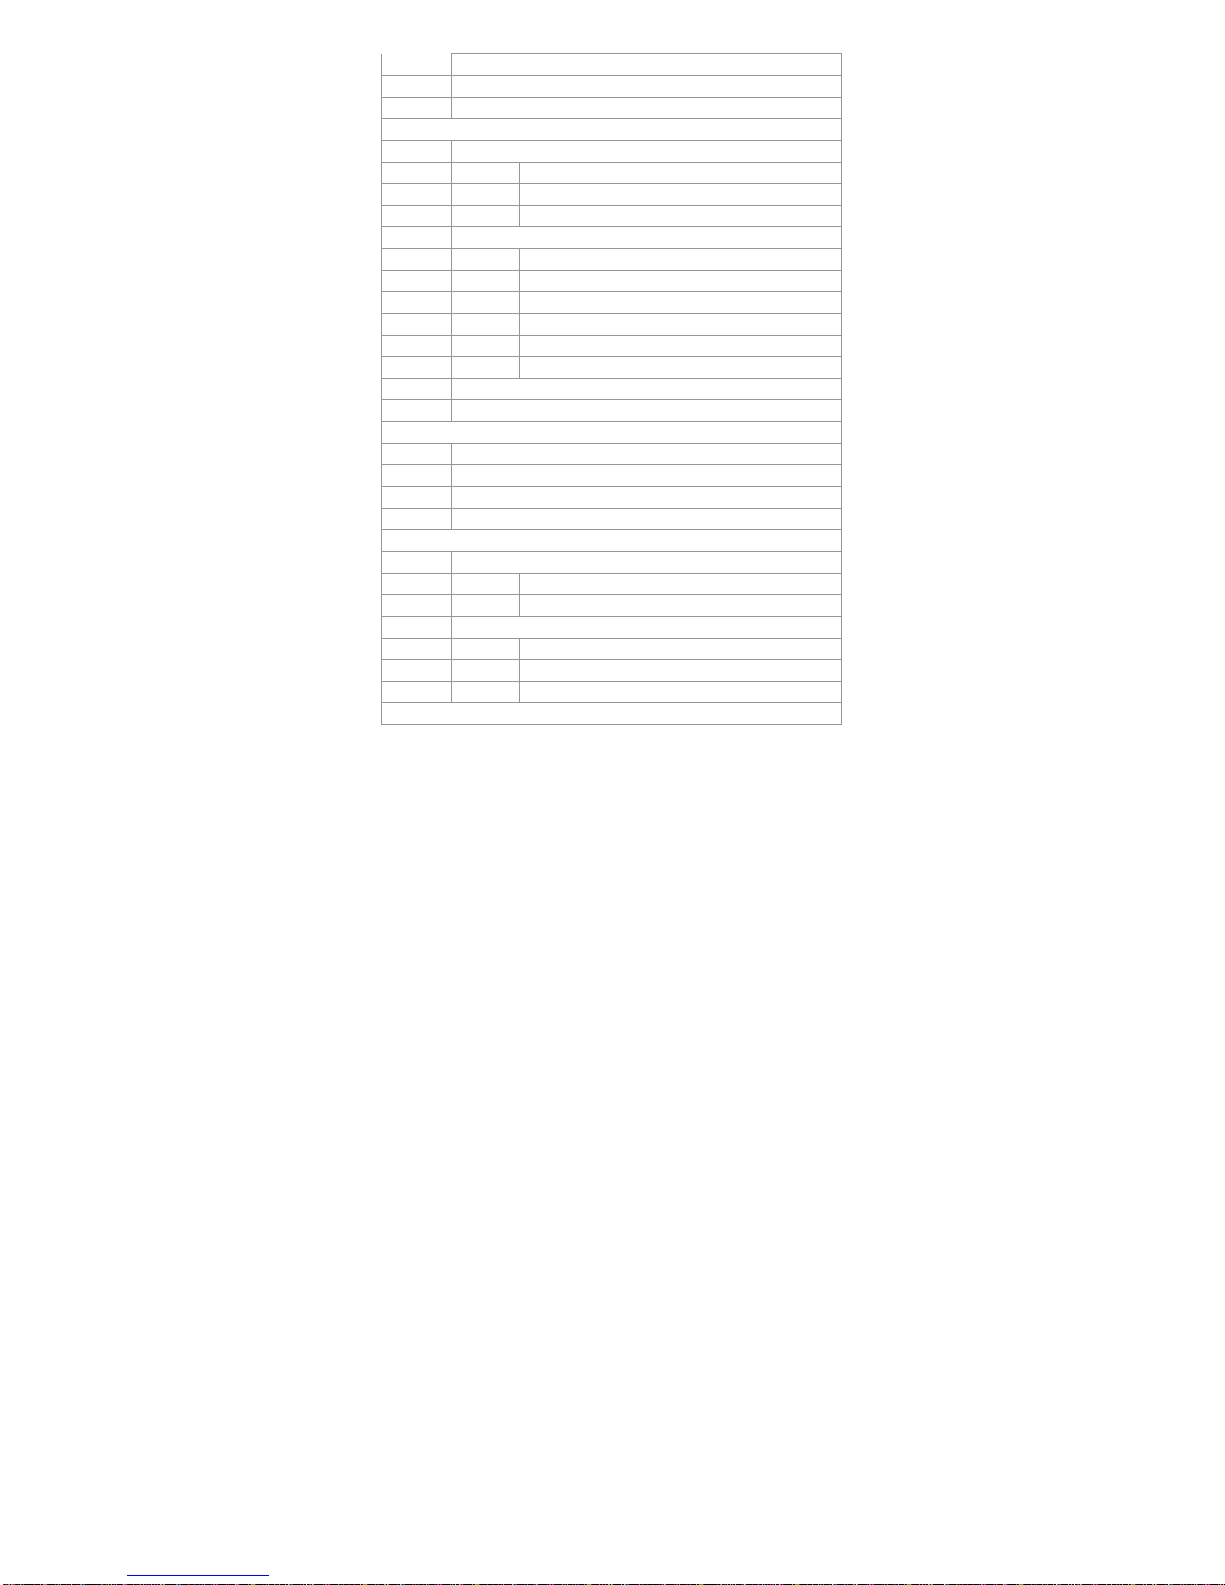
2. Outgoing Call
3. Missed Call
4. Call Duration
4. Settings
1. Phone Settings
1. Clock Settings
2. Language
3. Answer Mode
2. Call Setup
1. Call Divert
2. Call Barring
3. Call Waiting
4. Auto Redial
5. Caller ID
6. Line Select
3. Network Setup
4. Factory Default
5. Security Setup
1. SIM PIN
2. Phone Lock
3. Auto Key Lock
4. Change Password
6. Tone
1. Tone Setup
1. Incoming Call
2. Message Tone
2. Volume
1. Call
2. Ring Tone
3. Keypad Tone
7. Display

1. Idle Display
1. Clock and Date
2. Idle Text
2. Contrast
3. LCD Backlight
8. Accessories
1. Alarm
2. Calculator
3. Calendar
9. SIM Tool Kit

TECHNICAL INFORMATION
This wireless phone meets the government’s requirements for
exposure to radio waves.
Your wireless phone is a radio transmitter and receiver. It is
designed and manufactured not to exceed limits for exposure to
radio frequency (RF) energy set by the Federal Communications
Commission (FCC) of the U.S. Government. These limits are part of
comprehensive guidelines and establish permitted levels of RF
energy for the general population. The guidelines are based on
standards that were developed by independent scientific
organizations through periodic and thorough evaluation of scientific
studies. The standards include a substantial safety margin designed
to assure the safety of all persons, regardless of age or health.
The exposure standard for wireless fixed phoned employs a unit of
measurement known as the Specific Absorption Rate, or SAR. The
SAR limits set by the FCC are 1.6W/kg. Tests for SAR are
conducted using standard operating positions accepted by the FCC
with the phone transmitting as its highest certified power level in all
tested frequency bands.
Although the SAR is determined at the highest certified power level,
the actual SAR level of the phone while operating can be well below
the maximum value. This is because the phone is designed to
operate at multiple power levels so as to use only the power
required to reach the network. In general, the closer you are to a
wireless base station, the lower the output power.

While there may be differences between the SAR levels of various
phones and at various positions, they all met the governmental
requirements for safe exposure. Please note that improvements to
this product model could cause differences in the SAR value for later
products; in all cases, products are designed to be within the
guidelines.
Technical Specification
Weight 59.7g (0.131 lbs)
Size Handset: 104.5 x 45 x 12.8mm(4.11” x
1.77” x 0.5”)
Wireless Network GSM 850 & 1900
Frequency Range Tx : 824 ~ 849 MHz, 1850 ~ 1910 MHz
Rx : 869 ~ 894 MHz, 1930 ~ 1990 MHz
Backup Battery Li-ion battery pack.
This device complies with part 15 of the FCC Rules. Operation is
subject to the following two conditions:
(1) This device may not cause harmful interference, and
(2) this device must accept any interference received, including
interference that may cause undesired operation.
The Highest SAR Values for this model phone when tested for use
on the body were 1.42mW/g.
For body worn operation, this phone has been tested and meets
FCC RF exposure guidelines when used whit an accessory that
contains no metal and that positions the handset a minimum of
1.5cm from the body. Use of other accessories may not ensure
compliance with FCC RF exposure guidelines

SAFETY INFORMATION
IMPORTANT INFORMATION ON SAFE AND EFFICIENT
OPERATION. READ THIS INFORMATION BEFORE USING YOUR
PHONE.
EXPOSURE TO RADIO FREQUENCY (RF) ENERGY
Your phone contains a transmitter and a receiver. When it is ON, it
receives and also sends out radio frequency (RF) signals. When you
communicate with your phone, the system handling your call
controls the power level at which your phone transmits.
Your Manufacturer phone is designed to comply with local regulatory
requirements in your country concerning exposure of human beings
to RF energy.
OPERATIONAL PRECAUTIONS
To assure optimal phone performance and make sure human
exposure to RF energy is within the guidelines set forth in the
relevant standards; always adhere to the following procedures.
Do NOT store it in cold area or hot area. Normal operation
temperature is between 0°C(32°F) and 40°C(104°F)
APPROVED ACCESSORIES
Use of accessories not approved by Manufacturer, including but not
limited to batteries and travel adaptors, may cause your phone to
exceed RF energy exposure guidelines.
Table of contents
Other Sagem Cell Phone manuals


Sagem
Sagem MY210X User manual

Sagem
Sagem MYZ5 Guide

Sagem
Sagem My X-5 User manual

Sagem
Sagem MYH-10 Series User manual

Sagem
Sagem myC-3b User manual

Sagem
Sagem MC-300 Series User manual

Sagem
Sagem MYV-76 User manual

Sagem
Sagem SG341I User manual

Sagem
Sagem MYMOBILE TV User manual

Sagem
Sagem MY 302X User manual


