Sailrite Leatherwork Manual


Table of Contents
Leatherwork Safety ����������������������������������� 1
Machine Damage Prevention��������������������� 2
Workhorse®Safety Precautions ���������������� 3
Changing Motor Rotation�������������������������� 4
Workhorse Speed Settings������������������������ 5
Preparing to Sew��������������������������������������� 6
Choosing Thread Size �����������������������������������6
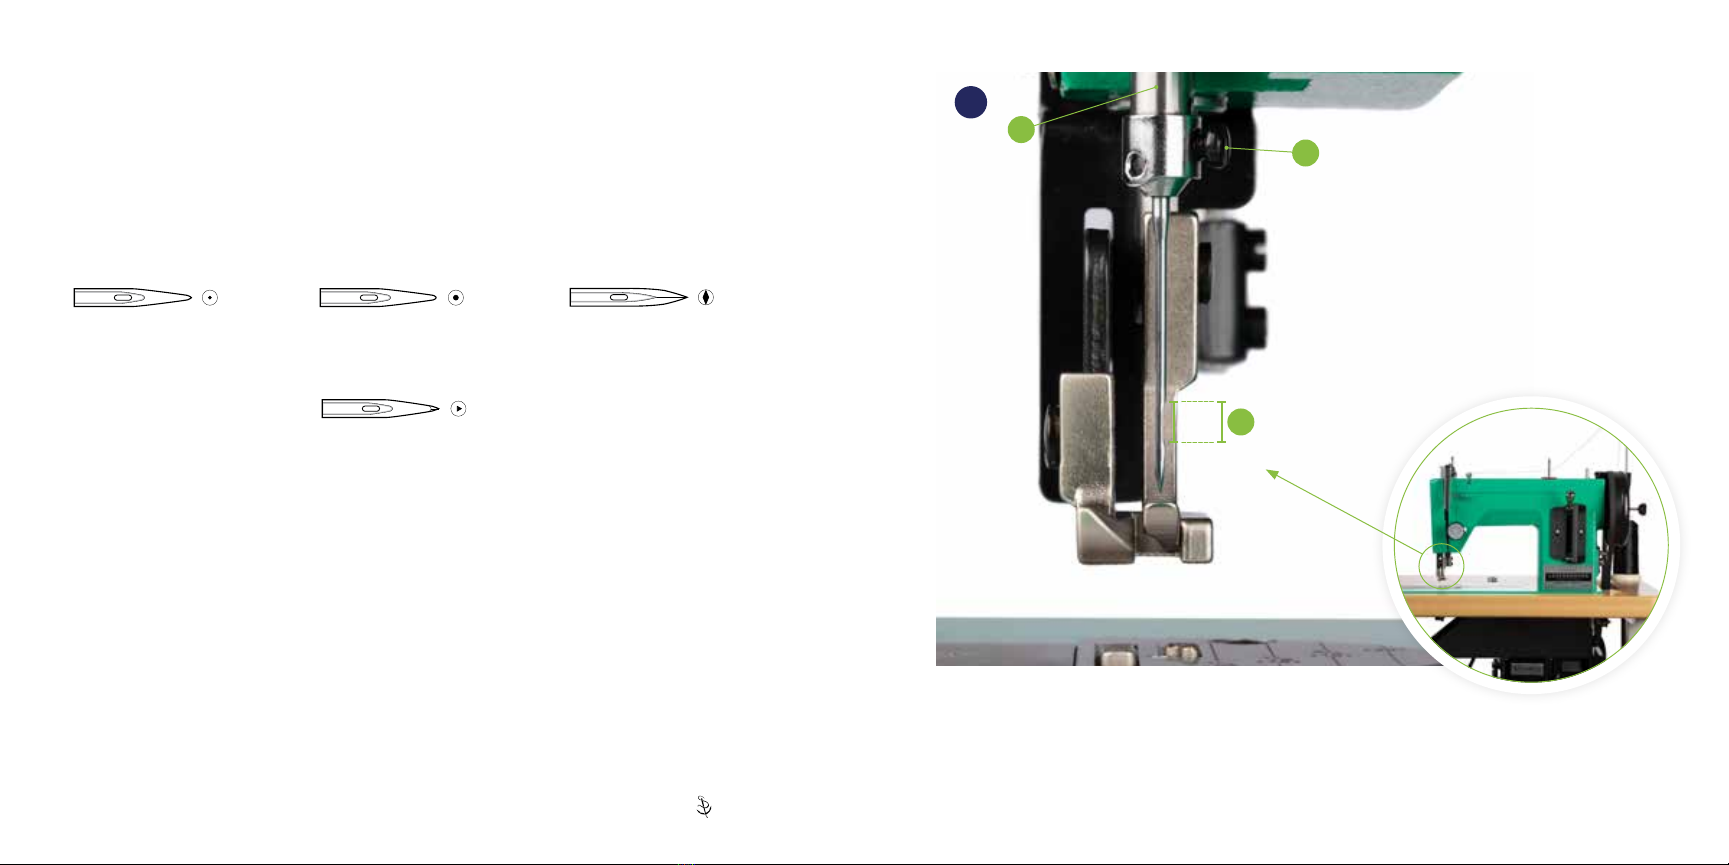
Needles���������������������������������������������������������7
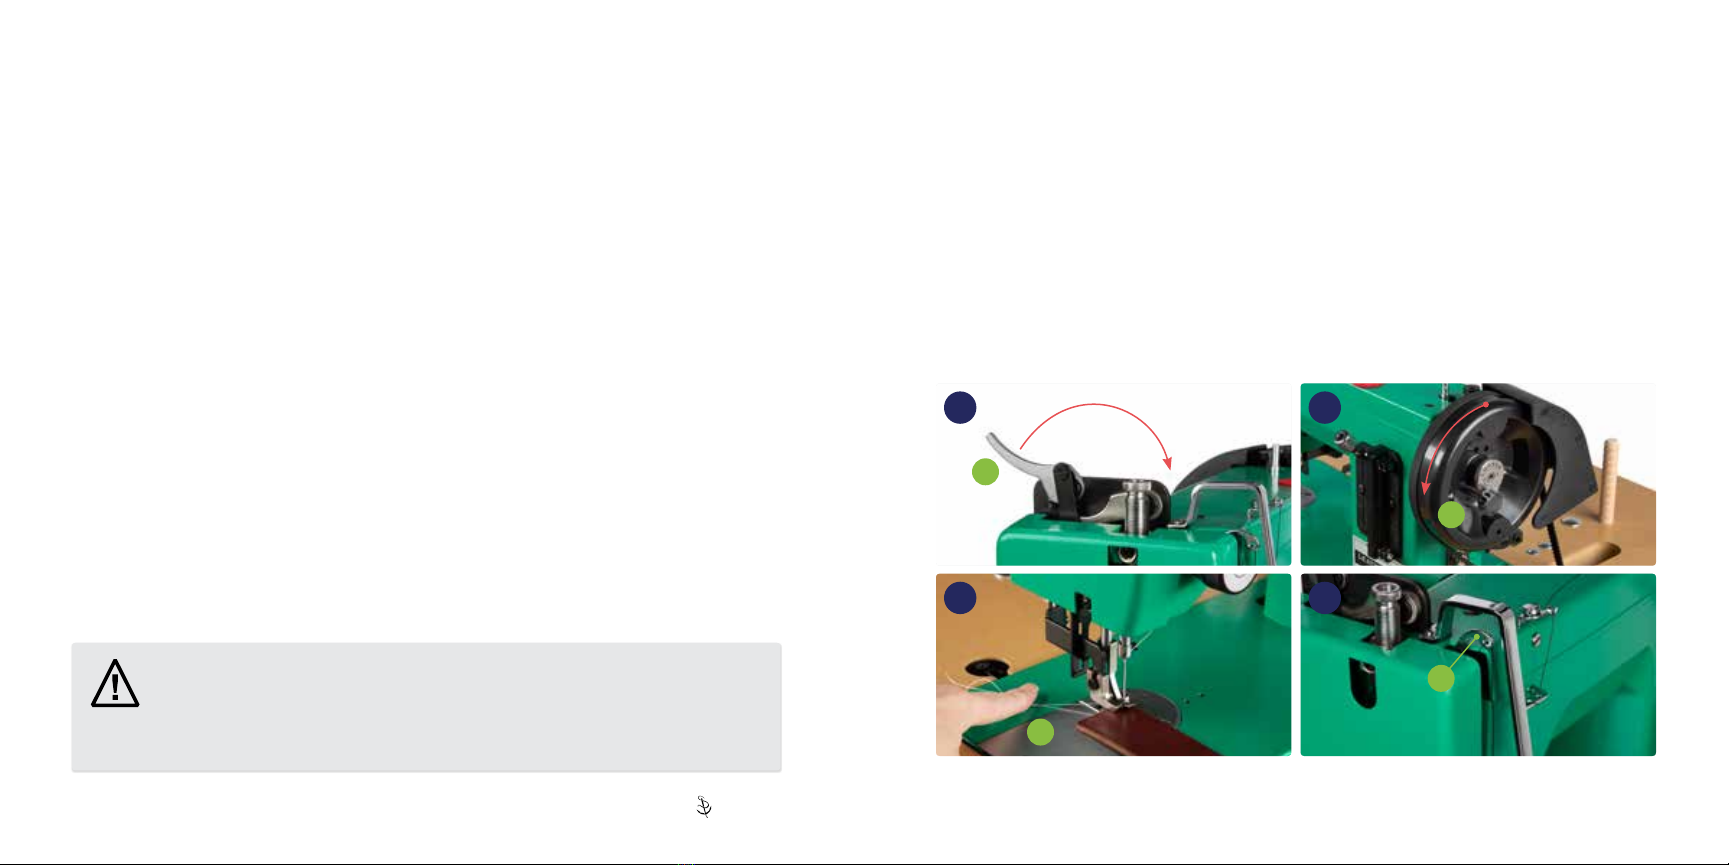
Winding Bobbins �������������������������������������������9
Threading the Machine�������������������������������� 11
Removing & Installing Bobbin Case�������������13
Installing Bobbin in Bobbin Case �����������������14
Picking Up Bobbin Thread ���������������������������15
Using the Leatherwork ���������������������������� 16
Starting to Sew��������������������������������������������16
Regulating Stitch Length �����������������������������18
Sewing in Reverse ��������������������������������������18
Setting Equal Forward &
Reverse Stitch Length ���������������������������������18
Turning Corners ������������������������������������������18
Thread Tension Adjustment �������������������������19
Advanced Thread Tension Adjustment���������20
Adjusting Presser Foot Tension �������������������21
Removing Material From Under
the Presser Foot������������������������������������������21
Sewing Fabric ���������������������������������������������22
Leatherwork Maintenance ����������������������� 23
Lubrication ��������������������������������������������������23
Troubleshooting the Leatherwork����������� 27
Proper Needle Orientation & Installation������27
Replacing Take-Up Spring ���������������������������28
Belt Issues ��������������������������������������������������29
Material Surface Is Being Damaged ������������29
Clutch Will Not Disengage���������������������������30
Removing the Hook to Clean the Shuttle
Race Guide Shaft & Free Thread Jams �������30
Skipped Stitches������������������������������������������31
Thread Issues ���������������������������������������������33
Needle Issues ���������������������������������������������37
Bobbin Winding Issues ��������������������������������38
Leatherwork Timing ������������������������������� 39
Schematics���������������������������������������������� 49
Specifications ����������������������������������������� 63
Warranty �������������������������������������������������� 68
Sew like a pro with Sailrite®
For in-depth information on use and
maintenance of your new Leatherwork®
Sewing Machine, please refer to our free
video at Sailrite�com/leatherwork-use or
search #300526XHT at Sailrite�com�

1 | Sailrite�com Leatherwork®Guidebook | 2
Leatherwork Safety
Please observe the following when using your Sailrite®sewing machine:
• Do not operate in conditions where you or
the machine are or may become wet�
• Operatethemachineonarm,level
surface with adequate room for safe
operation�
• Observe caution when placing your hands,
other body parts or clothing near any moving
parts including but not limited to the walking
foot, needle, balance wheel and belts�
• Do not run the machine without its covers in
place�
• Do not stop the movement of the balance
wheel with your hands�
• Always use the proper voltage required for
the motor�
• Do not drop the machine�
• Do not pull yourself toward the table when
using the machine as this is a tip-over
hazard�
• Wear protective eyewear when sewing
• Wear shoes when operating the foot pedal�
• Provide supervision when allowing others to
use the machine�
• Donotusethemachinearoundammable
materials�
• Do not use a plug adapter or extension cord
that bypasses the ground pin�
• Always rotate the balance wheel by
grabbing the top of the wheel and rotating
toward the front of the machine�
• Wire the light in a manner that keeps the
cord clear of belts and other moving parts�
WARNING: This product can expose you to chemicals including Nickel (Metallic), which is
known to the State of California to cause cancer� For more information go to
www�P65Warnings�ca�gov�
CHOKING HAZARD: Small parts� Not for children under 3 years� CONTAINS FUNCTIONAL SHARP
POINT� Adult supervision recommended�
Leatherwork Machine Damage Prevention
To prevent damage and keep your machine running
smoothly, please observe the following when sewing:
• Lower the presser foot before sewing (A)�
• Always rotate the balance wheel toward you (B)�
• Trapyourthreadswhenbeginningtosewtoavoidarat’snestoftangledthread(C)�
• Take-up arm (D) should be at top of stroke before lifting the foot to remove application�
• Withthemachinethreaded,don’toperatethemachinewithoutfabricunderthefoot.
B
C
1
3
2
4
D
A

3 | Sailrite�com Leatherwork®Guidebook | 4
Workhorse®Servo Motor Safety Precautions
TheWorkhorseServoMotorisdesignedspecicallyforsewingmachinesand
is not warranted for other uses� Please follow the guidelines below to prevent
injury or damage to the motor/sewing machine�
• Conrmtheshaftofthemotorrotates
counterclockwise before operating the
sewing machine (See p� 4 “Changing Motor
Rotation” if the shaft rotates clockwise)�
• Do not operate the machine without the belt
covers installed�
• Do not touch any moving parts when
operating the Workhorse Servo Motor�
• Remove foot from the treadle when turning
the power ON�
• Turn the motor power switch OFF before
replacing or threading the sewing machine
needle�
• Turn the motor power switch OFF when
leaving the machine�
• When performing maintenance on the
sewing machine, turn the motor power
switch to the OFF position and remove the
power cord from the wall�
• To avoid injury or damage to the motor,
do not alter or tamper with the internal
components of the motor�
• Donotcoverthemotor’sventilation;itcan
cause the motor to overheat�
Changing Motor Rotation
Make sure the motor is always running in a counterclockwise direction (A)�
If the balance wheel is spinning the opposite direction from (5), follow the instructions below to
reverse the direction�
1� Turn motor on� The standby screen will show a “P” with a rotating dash�
2� Press the “P” button four times until the LED display reads “n3�”
3� Press the “S” button multiple times to select between “0” and “1�”
4� Select “1” and the motor will run clockwise�
5� Select “0” and the motor will run counterclockwise (this is the setting the motor should be on)�
6� Press the “P” button to save the selection of “0�”
7� Turn motor off then on�
A
5 6

5 | Sailrite�com Leatherwork®Guidebook | 6
THREAD SIZE TEX SIZE NEEDLE SIZE
Gen� Purpose N/A #10 or #12
V-30 30 #12 or #14
V-46 45 #14 or #16
V-69 70 #16 or #18
V-92 90 #18 or #20
Sailrite®Lifetime (PTFE) 90 #14 or #16 (Mesh Fabric)
#18 or #20 (Dense Fabric)
Preparing to Sew
Choosing Thread Size
When sewing leather, the thread size used is generally selected for its aesthetic
look� In such cases, simply match the needle to the thread using the chart below�
If the needle or thread breaks during sewing, then it is necessary to go up in
size� If getting the desired thread tension is not possible (knot constantly shows
on the bottom) this is indicative of the thread and needle being too large�
For woven textiles, use our needle and thread recommendations available online in our “Thread & Needle Recommendation
Guide.”Youcanndtheguideoneveryfabricdetailpageorbysearching#300032XHTatSailrite.com.
SPEED SETTING WORKHORSE SPM
5 45
6 55
7 64
8 73
9 82
10 91
11 100
12 110
13 119
14 128
15 137
16 146
17 155
18 165
19 174
20 183
21 192
22 201
23 210
24 220
25 229
26 238
27 247
28 256
29 265
30 275
31 284
32 293
33 302
34 311
35 320
36 330
37 339
38 348
39 357
40 366
41 375
42 385
43 394
44 403
45 412
1� Turn motor on� The standby screen will
show a “P” with a rotating dash�
2� Press the “P” button and the display will turn
to “n0�”
3� Repeatedly press the “S” button until the
desired top-end speed is shown (5-45)�
4� Press the “P” button to save the indicated
speed�
Change the Workhorse®
Top-End Speed Settings
7

7 | Sailrite�com Leatherwork®Guidebook | 8
Round Point needles are
used for canvas and soft
leather� Serv7 needles are
modiedRoundPointneedles
that have a humped scarf to
prevent skipped stitches and
reduce needle breakage�
Ball Point needles are
specicallydesignedforuse
with knit or stretchy materials�
SD1 needles are optimized
for sewing heavy, dense
assemblies�
DI needles are ideal
for working with dry, heavy or
hard leather�
Needles
Leatherwork Sewing Machines require 135x17 needles sizes #10 to #22 or
135x16 (DI) leather needles, all available at Sailrite®� A size #20 needle is
used for most medium to heavy sewing�
Needle Types
Needle Installation
Leatherwork needles are round on top, unlike home sewing machine needles� As a result, proper
installation must be exercised carefully� Improperly installed needles are the main reason users
call for help�
The needles have two distinct sides� One side has
a long channel or groove running the length of the
needle, and the other side has a short scarf (A)
(i�e�, a carved-out area) just above the needle eye�
When installed, the scarf (A) should face toward
the right as you face the front of the machine�
Ensure the needle is pushed all the way up into
the needle bar (B) before tightening screw (C)�
Round Point
CAUTION: If the needle is inserted the wrong
way, the machine will skip stitches and break
thread�
AScarf
BNeedle bar
CNeedle screw
A
8
B
C

9 | Sailrite�com Leatherwork®Guidebook | 10
I
H
J
Winding Bobbins
FG
Disengage the Clutch
To disengage the machine (for bobbin winding),
pull the Posi-Pin®(A) out of the balance wheel
(B)� The balance wheel will now rotate without
operating the machine� Push the pin into the hole
at the center of the Posi-Pin nut (C) to store�
Engage the Clutch
To continue sewing, push the Posi-Pin (A)
through one of the holes in the balance wheel
(D) (any will work)� While maintaining light
pressure on the Posi-Pin, rotate the balance
wheel (E) until the Posi-Pin locks into one of
the holes in the bushing that the balance wheel
rides on� Push the Posi-Pin all the way in�
Rotation of the balance wheel will now cause
the machine to function�
Thread the Bobbin
on the Machine:
1� Thread comes off top of cone (F) to Thread
Stand arm (G)�
2� Pass through thread post (H)�
3� Wrap around bobbin tensioner (I)�
4� Run under and up through a hole in top of
bobbin (J)� Place bobbin on post and push
totheright.Holdontothreadtailbrieyand
power machine with the clutch disengaged
to wind bobbin� Stop after several rotations
andcutthethreadtailoffushwiththe
bobbin side�
5� Continue winding until the bobbin is full�
Then remove the bobbin from the winder
post by pushing the post to the left and
pulling the bobbin off� Cut the thread�
It’s faster to wind while you sew!
Run thread to the bobbin winder from an
extra cone of thread� Simply place the
second cone beside the primary cone and
lead the thread up through the same guides�
Follow normal bobbin winding instructions
but do not disengage the clutch�
CAUTION:Donotoverllbobbinandforceinto
bobbin case or the machine will not function
correctly�
E
B
C
A
A
9
D

D
E
G
H
J
F
I
K
Threading the Machine
1� Thread comes off top of cone (A) to
Thread Stand arm (B)�
2� Pass the thread through one hole in the
thread post (C) (most direct route to bobbin
tensioner) (D)� For home sewing, use the
post to hold the thread spool (p� 22)�
3� Pass through pig tail of bobbin tensioner (D)�
4� Loop through ear holes going down
through the rightmost hole, skipping
middle hole, and bringing thread around
front and down again through the leftmost
hole (E)�
5� Thread through upper tension (shown
without cover knob) (F)� Make sure lift
lever (G) is raised up to release tension
plates so thread can pass through� Be
sure to catch the hooked spring end with
the thread last�
6� Pass through take-up arm (right to left)
(H) and then under end cover (I)�
7� Pass through the needle bar thread
guide hole (J) and then down through
the needle eye from left to right (K)�
C
B
A
11 | Sailrite�com Leatherwork®Guidebook | 12
10

13 | Sailrite�com Leatherwork®Guidebook | 14
Removing & Installing
Bobbin Case
The bobbin case (B) is located
on the underside of the machine
beneath the presser foot (11)�
Removing — Lift the spring-loaded lever (E)
and pull the bobbin case out� With the lever held
open, the bobbin is captive in the bobbin case�
Release the lever and the bobbin will fall out�
Installing — Pull and hold the spring-loaded
lever outward to keep the bobbin from falling
out and push the case onto the axle of the gib
hook (F).Thengerofthebobbincase(G)
shouldtintotheretainingring’snotch(H)�
If the lever (E) is held up until the bobbin
case is completely installed, the lever, when
released, will lock onto the axle and there will
be no clicking sound� If the lever is released
before the bobbin case is pushed completely
in place, there is a clicking sound when the
caseispushedallthewayon.Thengerof
the bobbin case will drop into the notch in the
hook’sretainingring(H)� Bobbin thread should
loosely dangle�
BG
H
E
I
11
Installing Bobbin
in Bobbin Case
1� Insert a threaded bobbin (A) into the bobbin
case (B) as shown in image (12)�
2� Hold the tail of the thread while pushing the
bobbin into the bobbin case�
3� Pull the thread through the slit (C) in the
edge of the bobbin case�
4� Continue pulling the thread under the
tension plate (D)�
5� Snap thread into position under tension
plate and pull out about 12 to 18 inches of
thread, checking for consistent tension�
6� Holding the case with a view of the bobbin,
the bobbin should turn clockwise when pulling
on the thread tail (13)� If it is not, take the
bobbinoutandipitover.
ABobbin
BBobbin Case
CSlit
DTension Plate
ESpring-Loaded Lever
GFinger
ITension Adjustment Screw
12
A
B
D
G
CI
E
13
F

Leatherwork®Guidebook | 1615 | Sailrite�com
Picking Up Bobbin Thread
1� Hold the needle thread loosely to the right (14)� Grab the top of the balance wheel and rotate
toward the front of the machine (19) until the needle moves down and then back up�
2� As the needle nears its highest point, pull the needle thread gently� The bobbin thread should
come up through the needle hole, with the needle thread, in the form of a loop (15)�
3� Pass a small instrument (pen, seam ripper, screwdriver, etc�) under the presser foot from right to
left to pull the thread out away from the machine (16)�
NOTE: If the bobbin thread does not appear when the needle is lowered and raised, check to
make sure 5 to 6 inches of bobbin thread is hanging loosely from the bobbin case and repeat
steps 1-3 again�
4� Completed setup should look similar to (17).Nowyou’rereadytosew!
14 15 16 17
Using the Leatherwork
Leatherwork Sewing Machines arrive tuned and optimized for sewing
leather� If you want to sew other materials, you will need to make
adjustments� Refer to “Sewing Fabric” section (p� 22)�
Starting to Sew
1� Plug the machine into an outlet and switch
the Workhorse®Servo Motor on�
2� Use the lift lever (18) to raise (A) and
lower (B) the presser foot onto the
material�
3� The thread ends from the needle and the
bobbin should be behind the foot as you
start to sew� Hold them down with your
finger for the first few stitches for proper
tension�
4� To mark your starting position, you may
want to rotate the balance wheel by hand
(D) until the needle is buried in the leather�
NOTE: Always rotate the balance wheel
by grabbing the top of the wheel and
rotating down toward you (19)�
5� Press the treadle to begin sewing and
releasethetrappedthreadsaftertherst
few stitches�
ARaise B Lower
CPressure Regulating Thumbscrew
DO NOT operate the machine when threaded
without material under the presser foot (and foot
lowered)� The machine will most likely “lock up”
and be inoperable until the resulting thread jam
is cleared�
19
A B
D
C
18

17 | Sailrite�com Leatherwork®Guidebook | 18
the machine for 2-3 stitches to see if the length
suits your project� For a shorter stitch length,
loosen the top thumbscrew (A), lower it and the
lever (C), then retighten the thumbscrew and
operate the machine for another 2-3 stitches�
If happy with the results, roughly position the
bottom thumbscrew stop (B) in a mirrored
position to the top stop (20)� Operate the machine
for 6-8 stitches in forward� With the needle
at its lowest position, pull and hold the Feed
Regulator Lever (C) down until it hits the bottom
thumbscrew stop� Operate the machine for
another 6-8 stitches to see if the needle enters
the previous penetrations made� If not, readjust
the bottom stop and repeat the process until the
hole pattern is adjusted�
Turning Corners
Turn the balance wheel toward you until the
needle is at its lowest point and then rises about
1/8 inch (3mm)� Then, lift the presser foot (p� 16,
18), rotate the material to the new direction (the
needle acts as an axis), drop the foot, and start
sewing in the new direction�
DO NOT attempt to change sewing directions
when the machine is at rest with the needle
positioned mid-stroke� This will cause a skipped
stitchorneedledeection.
Rotating the leather/fabric while the machine
is at rest with the presser foot down may bend
the needle�
Regulating Stitch Length
The EZ Set™ Stitch Length Plate (20) sets both
forward and reverse stitch length� To set the stitch
length, loosen the two thumbscrews (A), slide
the posts up or down, and tighten the screws�
The thumbscrew stops (B) restrict the movement
of the Feed Regulator Lever (C), which is spring
loaded to always rest against the upper stop�
Sewing in Reverse
Position the needle fully up or fully down and
push the Feed Regulator Lever (C) all the way
down� Hold the lever down until reverse sewing
is completed� The lever is spring loaded and will
return to its forward position when you release it�
When the machine is operating at 1/4 speed or
faster,reversecanbeengagedonthey.
DO NOT rotate the balance wheel in the wrong
direction� Always rotate the balance wheel by
grabbing the top of the wheel and rotating down
toward you (p� 16, 19)�
Setting an Equal Forward
& Reverse Stitch Length
The notch lines on the EZ Set Stitch Length
Plate are for reference only� Remove the thread
from the eye of the needle, lift the foot (p� 16,
18), and place scrap material or card stock
paper under the foot� Lower the foot and operate
20
Forward Feed
Reverse Feed
0mm B
C
A
+6mm
Longest
Forward
-6mm
Longest
Reverse

19 | Sailrite�com Leatherwork®Guidebook | 20
Thread Tension Adjustment
The correct combination of thread tension (21)
results in a stitch that looks identical on both sides of
the material (i�e�, the knots of the stitches are pulled
into the fabric and are no more visible on the top
than on the bottom)�
If knots are visible on both the top and bottom
material surfaces, this is an indication that the thread
size is too large for the material being sewn�
The upper tension knob (22) can be loosened
or tightened to adjust tension� Rotating the knob
clockwise or toward the “+” will increase upper
tension, pulling the knot to the top of the sewn
application (24)� Rotating the knob counterclockwise
or toward the “-” will decrease upper tension,
allowing the knot to be pulled to the bottom of the
sewn application (25)�
When the presser foot is lifted, the upper tension
disks are pushed apart� This releases the top thread
tension so leather can be removed from under the
machinefootwithoutghtingthreadtension.
DO NOT lift the presser foot when the upper tension
knob is less than a 1/2 turn from maximum (turned
snugly clockwise) (23)� This amount of tension
should never be required�
If upper tension is tightened all the way down,
raising the presser foot may bend the lever inside
the machine that separates the disks, preventing the
disks from opening correctly�
Knots centered — PERFECT STITCH
22
23
21
NOTE: Decorative cap removed�
Knots visible on bottom
Knots pulled to top
24
25
Advanced Thread
Tension Adjustment
Before moving on, please reference
p� 6 to ensure proper needle and
thread size are being used for your
application�
Tension changes to the bobbin thread should
only be made when upper tension changes alone
do not solve stitch tension� In general, bobbin
tension requires just about a 2 ounce drag on
the thread (similar to what you feel when pulling
dentalossoffaspool).
If knots are pulled to the top (24)andyoucan’t
loosen the upper tension knob (22) any more,
remove the bobbin case from the machine and
increase the bobbin case tension by tightening
the tension adjustment screw (p� 14, I)� Tighten
in 1/4 increments, testing the drag on the
thread after each 1/4 turn until proper tension
is achieved�
If the knots are pulled to the bottom (25) and
youcan’ttightentheuppertensionknob(22)
any more, remove the bobbin case from the
machine and decrease the bobbin case tension by
loosening the tension adjustment screw (p� 14, I)�
Loosen in 1/4 increments, testing the drag on the
thread after each 1/4 turn until proper tension is
achieved�

21 | Sailrite�com Leatherwork®Guidebook | 22
1� Use an appropriate thread�
Home sewing machine thread should be
used in clothing or general home sewing�
Nylon thread is often preferred for interior
upholstery� Polyester is used for outdoor
applications and rugged bag work�
2� Select an appropriately sized needle�
Match the thread weight to the needle size (p�
6)� New machines ship with a 135x16 #20 DI
needle installed�
3� Adjust pressure on the foot�
Too much pressure when sewing lighter
fabrics can scuff the material� Too little will
prevent the machine from feeding properly�
See “Adjusting Presser Foot Tension” (p� 21)�
4� Ensure proper thread tension�
Knots should be centered in fabric (no more
visible on the top of the sewn application
than on the bottom)� See “Thread Tension
Adjustment” (p� 19)�
5� If using small spool of thread, check for
clockwise rotation of the thread spool�
When placing home sewing machine spools
on the thread post (29), be sure the thread
spool is turning in a clockwise manner to
ensure the post it rides on is tightened, not
loosened�
Removing Material From
Under the Presser Foot
1� Stop the machine with the take-up arm (B)
at its uppermost position�
2� Raise the feet with the lift lever (C)�
3� Pull the material straight back to remove it
from under the foot (28)� It may be helpful
to rock the balance wheel forward and back
to free the thread�
4� Cut the two threads to free the material,
leaving at least an 8-inch length of thread
coming out of the machine�
More than two threads? See p� 36�
2826 27
Adjusting Presser Foot Tension
The amount of downward pressure put on the
material by the presser foot is controlled by the
Pressure Regulating Thumbscrew (A)� This screw
compresses a long coil spring above the presser
foot� Turn the screw clockwise to increase the
downward foot pressure (26)� Turn the screw
counterclockwise to decrease the foot pressure (27)�
When sewing a thick leather assembly, set the
regulating thumbscrew to be very loose� To do
this, turn the thumbscrew until it comes free of the
machine and then rethread it about three complete
rotations� Even with this setting, downward foot
pressureissignicantbecausethethicknessof
the material will raise the feet higher than normal,
creating substantial spring compression�
The sewn assembly may be so dense that the
needle’sextractionovercomesthepresserfoot’s
downward force� If this is the case, you may notice
the assembly popping up and down while being
sewnandyoumaybeskippingstitches.Toxthis,
you will need to increase the pressure by screwing
the thumbscrew down further�
CB
Sewing Fabric
Several of the same characteristics that make the Leatherwork great for leather also make the machine
perfect for upholstery fabrics, canvaswork and most home fabrics� However, as a heavy-duty machine,
the Leatherwork is not ideal for sewing very light and delicate fabrics like silk, light sheers or chiffon�
Use this simple checklist before sewing fabrics:
A
29

Lubrication Points
Top side lubrication points
30
Leatherwork Maintenance
Lubrication
Themachinewasthoroughlyoiledpriortoshipment.Oilallmetal-to-metalworkingpartsfrequently!
Sailrite recommends Super Lube®synthetic oil for oiling and maintaining the Leatherwork
Sewing Machine� With regular use, Super Lube will help your machine operate more
smoothly, last longer and sew more quietly�
Afteroiling,brieysewwithscrapmaterialtopreventsoilingyourwork.
For good maintenance of your machine, you should oil it approximately every 8 hours of use, before
it is put in storage, or anytime the machine sounds like it is running roughly�
23 | Sailrite�com Leatherwork®Guidebook | 24

Left end and back side
lubrication points
31 Underside lubrication points32
Leatherwork®Guidebook | 2625 | Sailrite�com

Leatherwork®Guidebook | 2827 | Sailrite�com
Troubleshooting the Leatherwork
UsethisnextsectionasaguidetobetterunderstandyourLeatherworkandtohelpne-
tune and resolve common sewing machine problems�
A
33
Replacing Take-Up Spring
If you are getting inconsistent stitch tension or if your thread looks loose and sloppy near the tension
assembly under operation, check your take-up spring (J).Ifthewirehookhasbrokenoff,you’llneed
to replace the take-up spring� To do this, disassemble the Upper Tension Assembly� Keep track of
how the parts are removed as they will be replaced in the same manner (34)�
1� Pull the cover knob (C) straight off (wiggle a
bit if needed)�
2� Unscrew and remove the threaded
knob (D)�
3� Remove the big spring (E), the spring
holder (F), the two tension disks (Gand H),
and the keyway washer with pip (I)�
4� Remove the old take-up spring (J) by
pulling it straight out�
5� Slide the new take-up spring over the core
post (K) so that the pip on the back faces
in toward the machine and the straight arm
of the spring faces down (approximately at
a6o’clockposition).Pushthespringinall
the way�
6� Spin the arm of the spring clockwise past
the slot in the plastic core�
7� While holding the spring arm in place, slide
the keyway washer (I) back onto the core
with the pip facing in, so the take-up spring
arm rests on the metal pip of the washer�
8� Replacethersttensiondisk(H) with the
convex side facing out� Add the second
tension disk (G) with the concave side
facing out�
9� Replace the spring holder (F) with the
concave side facing out and the spring (E)�
Screw the threaded knob (D) back on the
post and add the cover knob (C)�
34
L K J I H G F E D C
Proper Needle Orientation
& Installation
When installing a new needle, make sure the
needle is inserted in the correct direction� With
the front of the machine facing you, the scarf or
carved-out area (A) of the needle should face to
the right� Push the needle all the way up into the
needle bar, then tighten the needle screw (B)�
B

29 | Sailrite�com Leatherwork®Guidebook | 30
Removing the Hook to Clean the Shuttle Race
Guide Shaft & Free Thread Jams
Perform these steps with care:
1� Move the needle to its highest point�
2� Remove the bobbin case/bobbin�
3� Turn each lever (K) one half turn
away from the retaining ring (L)�
4� Pull the axle of the hook to remove
retaining ring (L) and hook (M)�
5� Gently remove the accumulated lint and
thread from the retaining ring (L), hook
(M) and driver (N)� Use a small brush to
clean the parts or blow out the debris�
6� Replace hook (M) opposite driver
(N)� The hook just rests in place�
Be sure the axle is facing out�
7� Replace retaining ring (L) so that both
pins are under the black levers (K)
when turned� The polished side of the
retaining ring should be facing out�
8� Replace the bobbin and bobbin
case before beginning to sew�
Belt Issues
The belts slip or come off the
pulleys:
If belts stretch after prolonged use and start
to slip cogs, you may need to adjust the
belt tension� If the longer belt (A) requires
adjustment,itshouldbedonerst.Movethe
Idler Pulley (B) down to tighten the long belt�
To do so, loosen the pulley shaft (C)using the
box wrench provided and slide the pulley on its
bracket (35)� Tighten when done�
To adjust the shorter belt (D), loosen the screw
(E) in the curved slot above the motor (pulley
end) in the aluminum bracket (35)� Pivoting the
motor back will tighten the belt between the
motor and the Idler Pulley�
N
K
M
L
Material Surface Is Being Damaged
Surface marring is damage to leather and other delicate material surfaces� The Leatherwork
Sewing Machine has a special knurled surface foot and feed dog to reduce marring� To further
avoid marring, reduce the amount of pressure down on the presser feet by nearly unthreading the
Pressure Regulating Thumbscrew from the machine� See “Adjusting Presser Foot Tension” (p� 21)�
35
E
D
A
B
C
Clutch Will Not Disengage
Iftheclutchwillnotdisengage,rstremovethereversethreadedPosi-Pin®nut (p� 10, C) from the
balance wheel (p� 10, B)� Remove the balance wheel� Polish and lubricate the Posi-Pin bushing shaft
that the balance wheel rides on� Slide the balance wheel back on and screw the reverse threaded
Posi-Pin nut down�
36

31 | Sailrite�com Leatherwork®Guidebook | 32
Skipped Stitches
A skipped stitch means the gib hook is not
catching the thread consistently� There are
a number of causes for skipped stitches�
Start with step 1 and stop as soon as the
problem is resolved�
1� Incorrectly Installed, Bent or Dirty Needle
A bent needle will cause skipped stitches
because the loop is not where the gib hook
(p� 30, M) “expects” it to be� Adhesive residue
on the needle will cause the thread to stick to
the needle instead of moving through the eye
to form a loop�
Make sure your needle is installed correctly
(p� 27), is not bent or damaged, and is free of
any residue from sewing adhesive material�
Fouled needles may be cleaned with rubbing
alcohol� Bent or damaged needles must be
replaced�
2� Turning Corners Correctly
You can turn gentle corners while sewing
at slow, consistent speeds� If motion is
stopped and a change of direction is
desired, position the needle at its lowest
point then continue rotation until the needle
comes up 1/8 inch� Stop and lift the foot
to twist the sewn assembly and make a
direction change� Drop the presser feet and
continue sewing� Follow these directions to
avoid badly tensioned corner stitches and
reduce the chance of a skipped stitch�
3� Not Enough Foot Pressure
Materials like dense, vegetable tanned
leather, can make the withdrawal of the
needlefromthematerialdifcult.
If the presser foot is being lifted as the needle
comes out of the leather, the loop that the
needle forms will be too small�
Increase the downward pressure on the
presser foot by tightening the Pressure
Regulating Thumbscrew (p� 21, 26)�
37
4� Burred/Damaged Shuttle Gib Hook or Retaining Ring Cap Spring
A machine crash or needle strike to the Shuttle Gib Hook (A) or Retaining Ring Cap Spring (B) may
result in a burr or damage, which can cause the thread to snag�
Removeanyburrsbypolishingthemwithemerypaperoranele.Ifbadlydamaged,replace
with a new Retaining Ring Cap Spring (#1603), and/or a new Shuttle Gib Hook (#9601)�
5� Machine Has Gone Out of Timing
If skipped stitches continue, the machine has probably gone out of timing� The timing is checked by
determining the relationship of the needle to the gib hook point�
To reset the timing on your Leatherwork, follow the steps outlined on p� 39 “Leatherwork Timing�”
Burred/
Damaged
Area
Burred/Damaged Area
>Retaining Ring Cap Spring
>Shuttle Gib Hook
38
B
A

33 | Sailrite�com Leatherwork®Guidebook | 34
Thread Issues
Thread is shredding,
balling or breaking
There are a number of causes for
breaking thread� Start with step 1 and
stop as soon as the problem is resolved�
1� Thread/needle combination too small for
material being sewn� See p� 6�
2� Make sure thread is not snagging
anywhere from the cone/spool to the
needle�
3� Wrong Needle Type
Use of the wrong needle type can
contribute to thread shredding issues�
Always use a leather “diamond point”
needle when sewing dry, heavy or hard
leather�
Refer to p� 7 for more information�
4� Incompatible Needle Size & Thread
Weight
If the thread is too thick or thin for the needle it
will not pass through the needle eye to form a
loop and will instead ball at the needle� Check
the compatibility of the needle size and thread
weight (p� 6)�
39
5� Replace the needle, making sure installation is correct� See p� 8�
6� Burred Shuttle Gib Hook or Retaining Ring Cap Spring
A machine crash or needle strike to the Shuttle Gib Hook (A) or Retaining Ring Cap Spring (B) may
result in a burr or damage which can cause the thread to snag�
Removeanyburrsbypolishingthemwithemerypaperoranele.Ifbadlydamaged,replace
with a new Retaining Ring Cap Spring (#1603) and/or new Shuttle Gib Hook (#9601)�
7� Machine Has Gone Out of Timing
If the machine is out of timing it may cause the gib hook point to cut or shred the thread� To reset the
timing on your Leatherwork, follow the steps outlined on p� 39 “Leatherwork Timing�”
Burred/
Damaged
Area
Burred/Damaged Area
>Retaining Ring Cap Spring
>Shuttle Gib Hook
40
B
A

35 | Sailrite�com Leatherwork®Guidebook | 36
There are thread loops on the
underside of the leather/fabric
A tangle on the bottom side of the
application means there is not enough
upper tension� More than likely, the
thread is not being pulled snugly
between the tension disks (p� 28, 34 H
and G) on the Upper Tension Assembly
or is not between them at all�
1� Lift the presser foot to push the two upper
tension disks apart�
2� Firmly pull the thread against the center
shaft between the disks�
3� Drop the presser foot� The disks should
close on the thread creating plenty of
tension� Gently pull on the thread to feel the
tension�
4� If this did not solve the problem, pull the
cover knob off the Upper Tension Assembly
and turn the knob found underneath to the
point where its outer surface has three
threads of the tension post showing� Then
repeat steps 1-3�
Thread loops could also be caused by a burr
on the Retaining Ring Cap Spring (p� 34, 40 B)�
Remove any burrs by polishing them with emery
paperoranele.Ifbadlydamaged,replace
with a new Retaining Ring Cap Spring (#1603)�
Thread pulls out of the needle eye
when starting to sew
Conrmthattheneedleeyeisthreadedfrom
left to right (p� 11, 10 K)� Then pull out a longer
threadtailandtrapitwithyourngertothebed
of the sewing machine (A)� Release the thread
tailaftertherstfewstitches.
A rat’s nest forms in the rst few
inches of sewing and then clears up
Eliminate this issue by trapping the thread tails
(A) from the needle and the bobbin as you
start to sew�
41
When stopping to turn a corner,
the machine skips a stitch
At the corner, bury the needle to the bottom
of its travel and allow it to rise 1/8 inch� In this
spot, raise the presser foot and then pivot the
work on the needle to change sewing direction�
Drop the foot to continue sewing� Follow this
process to achieve the best quality corner stitch
and minimize the skipping of stitches at turns�
When removing fabric from under
the machine it pulls hard and
three strands of thread come up
through the throat plate
This usually happens when fabric is being
removed during the middle of a stitch cycle�
The hook under the machine still has a loop of
thread around it�
Before removing fabric from under the machine,
manually turn the machine forward until the
take-up arm (p� 11, 10 H) has just passed the
top of its travel� This allows the hook to release
the thread loop and proper upper tension to be
appliedtonishthestitch.
42
43
A
Table of contents
Other Sailrite Sewing Machine manuals

Sailrite
Sailrite Leatherwork 3978-00 User manual

Sailrite
Sailrite Ultrafeed LSZ-1 User manual

Sailrite
Sailrite ULTRAFEED LSZ Manual

Sailrite
Sailrite ULTRAFEED LS Manual

Sailrite
Sailrite Ultrafeed LS-1 Manual

Sailrite
Sailrite Ultrafeed Plus User manual

Sailrite
Sailrite Fabricator User manual

Sailrite
Sailrite Craftool Pro Stitch Master Manual

Sailrite
Sailrite Fabricator User manual