SAKI RA-019 AF User manual

USER MANUAL
Smart 12.7-Quart Air Fyer
Questions or Concerns?
Model: RA-018 AF
Mon-Fri, 9:00 am-6:00 pm PST/PDT

Table of Contents
Package Contents
Specifications
Important Safeguards
Key Safety Points
General Safety
While Air Frying
Plug and Cord
Getting to Know Your Device
Display Diagram
Before First Use
Setting Up
Test Run
SAKI Smart App Setup
Using Your Smart Air Fryer Oven
Preheating
Air Frying
Cooking Guide
SAKI Smart App Features
Accessories
Care and Maintenence
Troubleshooting
Warranty Information
Customer Support
Package Contents
Specifications
1 x 12.7 Quart Air Fryer
3 x Mesh Racks
1 x Drip Tray
1 x Rotsserie Sha
1 x Rotating Basket
8 x Skewers
1 x Removal Tool
1 x Recipe Book
1 x Quick Start Guide
1 x User Manual
01
02
03
04
05
06
07
08
09
10
11
12
13
14
15
16
17
18
19
20
21
22
23
12.7-Quart Air Fryer
Model: RA-018 AF
Power Supply:
Rated Power:
Temperature Range:
Time Range:
Dimensions:
Weight:
Capacity:
AC 120V, 60Hz
1700W
150 - 400 °F
60 - 204 °C
1 - 60 min
375 x 322 x 409 mm
5.8 kg
12.7 gt / 12 L

General Safety
• Never immerse the Main Unit Housing, which
contains electrical components and heating elements,
in water. Do not rinse under the tap.
• Closely supervise children near your air fryer.
• Unplug when not in use, and before cleaning. Allow
to cool before putting on or taking off parts. Contact
Customer Support.
•Do not use the third-party replacement parts or
accessories, as this may cause injuries.
• Do not use outdoors.
• Do not place on or near a hot gas or electric burner,
or in a heated oven.
• Be extremely cautious when moving your air fryer if it
contains hot oil or other hot liquids.
• Do not clean with metal scouring pads. Metal
fragments can break off the pad and touch electrical
parts, creating a risk of electric shock.
• Do not place anything on top of the appliance.
• Do not use your air fryer for any purpose other than
described in this manual.
• Not for commercial use. Household use only.
While Air Frying
• NEVER fill any cooking vessel with oil or liquid of
any kind. This unit cooks with hot air only.
• Never use your air fryer without the parts in place.
• Do not place paper, cardboard, non-heat-resistant
plastic, or similar materials into your unit. You may use
parchment paper or foil.
• Never put baking or parchment paper into the unit
without food on top. Air circulations can cause paper
to li and touch heating coils.
• Always use heat-safe containers. Be extremely
cautious if using containers that are not metal or glass
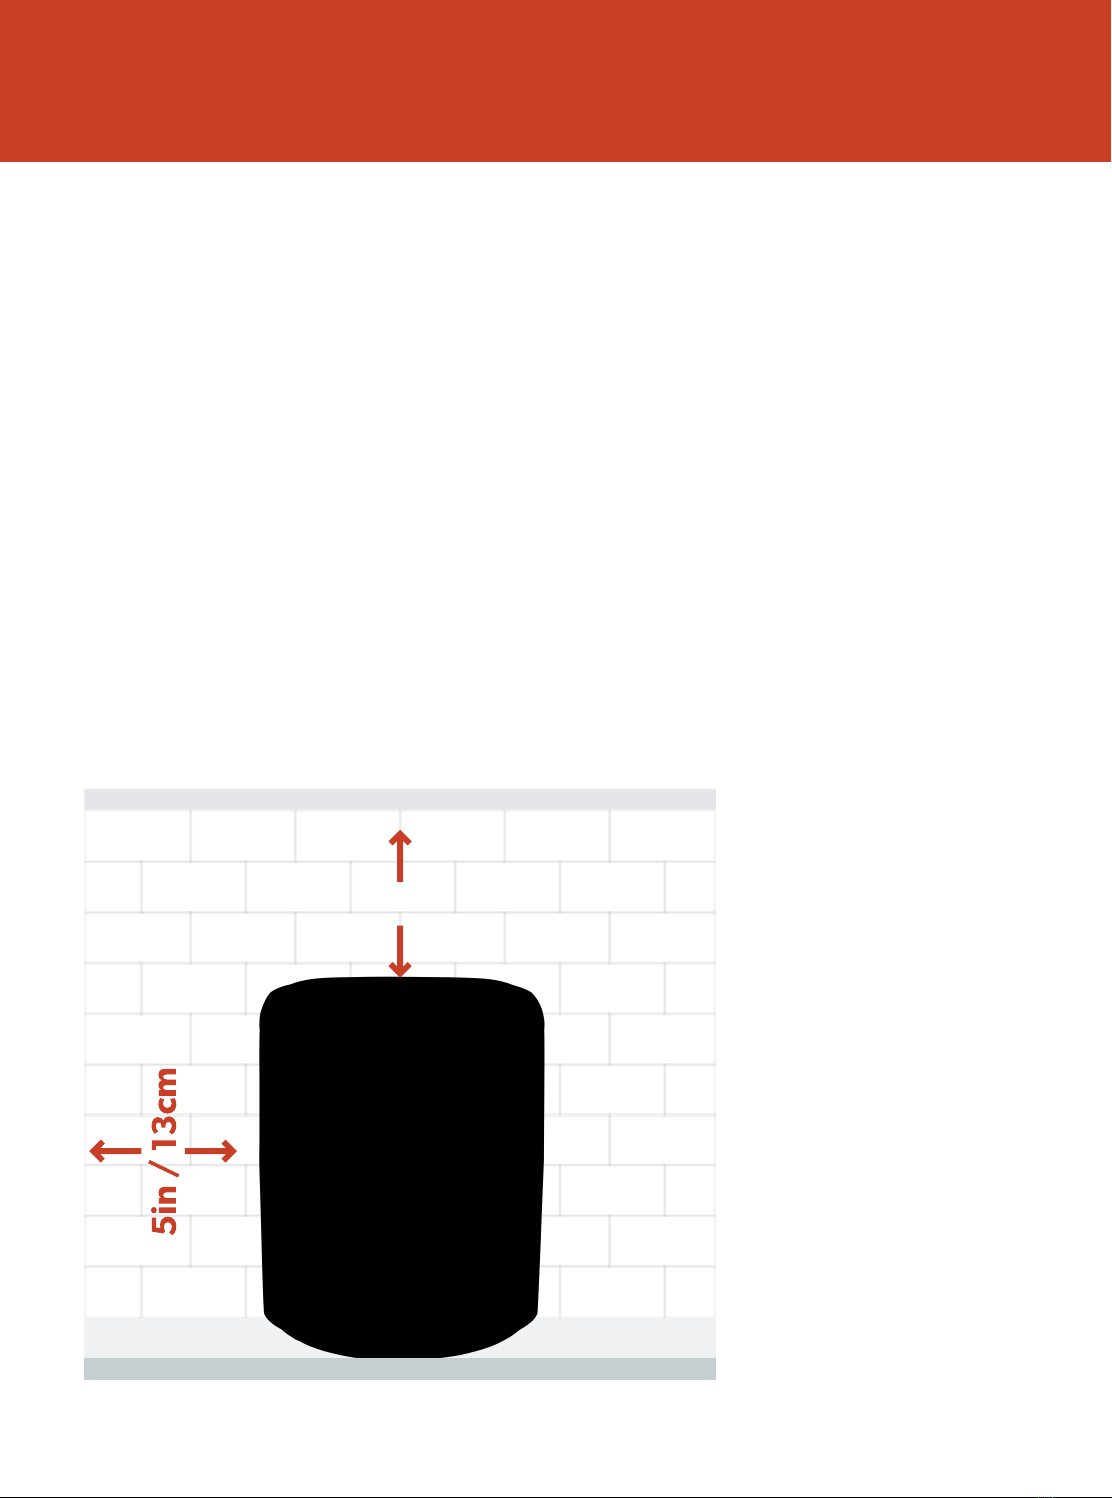
• Keep your unit away from flammable materials. Use
on a flat, stable, heat-resistant surface away from heat
sources or liquid.
• Immediatelyturn off and unplug your unit if you see
dark smoke coming out. White smoke is normal,
causedby heating fat or food splashing, but dark
smoke means that food is burning or there is a circuit
problem. Wait for smoke to clear before opening the
cover. If the cause was not burnt food, contact
Customer Support.
• Do not leave your unit unattended while in use.
Plug & Cord
• This appliance has a polarized plug (one blade is
wider than the other). To reduce the risk of electric
shock, this plug is intended to fit into a polarized
outlet only one way. If the plug does not fit fully into
the outlet, reverse the plug. If it still does not fit,
contact a qualified electrician. Do not attempt to
modify the plug in any way.
• Keep the power cord away from hot surfaces. Do
not plug in the power cord or operate the Unit
controls with wet hands.
• Your air fryer should only be used with 120V, 60 Hz
electrical systems. Do not plug into another type of
outlet.
Electromagnetic Fields (EMF)
This appliance complies with all standards regarding
electromagneticfields (EMF). If handled properly and
according to the instructions in this user manual, the
appliance is safe to use based on scientific evidence
available today.
120V - 60Hz 220 - 240V
SAVE THESE
INSTRUCTIONS

GETTING TO KNOW YOUR SMART AIR FRYER OVEN
Your SAKI Smart Air Fryer Oven uses rapid 360° air circulation technology to cook with little-to-no
oil for quick, crispy delicious food with up to 85% fewer calories than deep fryers. With
user-Friendly, one-touch controls, nonstick mesh racks, and an intuitive, safe design, the SAKI
Smart Air Fryer Oven is the star of your kitchen.
Air Fryer Oven Diagram
1. Top Lid
2. Control Panel
3. Rails
4. Switch
5. Handle
6. Window
7. Lock
8. Sliding Chute
1
3
4
5
6
7
8
2

GETTING TO KNOW YOUR SMART AIR FRYER OVEN
Accesories Diagram
1 x Drip Tray 1 x Removal Tool 1 x Rotating Basket
1 x Rotisserie Sha 8 x Skewers 3 x Mesh Racks

Chicken
Steaks Preheat
Bacon
Tempereture
+ Button
Tempereture
- Button
Play / Pause
Time
+ Button
Light
Button
Rotisserie
Button
Time
- Button
On/Off Button WIFI Indicator
VegetablesFrench Fries
Seafood
DISPLAY DIAGRAM
Note:
• When you press a button to use a function or program, it will turn blue to show that it’s active. Pressing again will
deselect the function or program.
• To save or reset presets, see Preset setting
Presets
Control Panel

SAKI SMART APP SETUP
1. To download the SAKI Smart App, scan the QR code or search "SAKI Smart" in the Apple
App Store or Google Play Store.
Note: For Android users, choose "Allow" to use SAKI Smart.
2. Open the SAKI Smart App. If you already have an account tap Log In. To create a new
ccount, tap Sign Up.
Note: You must create your own SAKI Smart account to use third-part services and products. These wil not work with
guest account. With SAKI Smart account, you can also allow your family and friends to control your smart air fryer.
3. Tap + icon at the top and select your smart air fryer.
4. Follow the in-app instructions to set up your smart air fryer.
Note: You can use the SAKI Smart app to use connect your smart air fryer to Amazon Alexa or Google Assistant
Note: See the SAKI Smart App Connection Guide for detailed explanation.
Scan the QR code or download from the app store or google play store

BEFORE FIRST USE
Setting Up
1. Remove all packaging and temporary stickers from the air fryer.
2. Place the air fryer oven on a stable, level, heat-resistant surface. Keep away from areas that
can be damaged by steam (such as walls or cupboards).
Note: Leave 5 in / 13 cm of space behind and above the air fryer oven. Leave enough room to open the cover.
1. Open the cover to remove all packaging materials, labels, and stickers.
2. Wash all parts and accessories used in the cooking process with warm soapy water.
NOTE: Only the accessories are dishwasher safe.
3. Wipe the inside and outside of the cooking unit with a clean moist cloth.
5in / 13cm

Note: See the SAKI Smart App Connection Guide for detailed explanation.
Temperature Time Temperature Time
400 °F / 204°C 5 minutes 360 °F / 182°C 4 minutes
390 °F / 199°C 5 minutes 350 °F / 177°C 4 minutes
380 °F / 193°C 5 minutes 340 °F / 171°C 4 minutes
370 °F / 188°C 4 minutes 330 °F / 166°C
and below
3 minutes
USING YOUR SMART AIR FRYER
Temperature Time Temperature Time
400 °F / 204°C 5 minutes 360 °F / 182°C 4 minutes
390 °F / 199°C 5 minutes 350 °F / 177°C 4 minutes
380 °F / 193°C 5 minutes 340 °F / 171°C 4 minutes
370 °F / 188°C 4 minutes 330 °F / 166°C
and below
3 minutes

How To Use
Connect the appliance to a power source, and it enters standby mode with a beep. All the indica-
tors on the control panel will flash once.
Power On / Off
• Tap the Power Button to turn on the appliance with a beep. All the indicators on the control
panel will light up.
• Tap it again to turn off the appliance. When it is off, the fan will continue working for 20
seconds.
Light Control
When the appliance is on, press the Light Button to turn on / off the light.
Preheat the Oven
When the appliance is on, press the Preheat Button to turn if needed.
Choose the Cooking Mode
1.When the unit is on, tap the Mode Button to choose the cooking mode as desired. The corre-
sponding mode indicator will light up. The LCD display will show the cooking temperature and
cooking time alternatively, with the latter counting down by the minute.
2.When the mode is selected, press the Power Button to start the cooking process. Or you can
wait for 3 seconds, and cooking will begin automatically. The Working Indicator will keep flash-
ing once cooking is started.
3.Open the Window during a cooking process. The oven will pause working. Close it again, and
the appliance will resume working under the last remaining time and temperature.
Note: ap the Rotating Button to start rotating if the rotisserie sha or basket is used for more even result.
GET STARTED

Note: Dehydrate Function
Time Range: 1-24 hours
Temperature Range: 90°F-400°F
Set the Cooking Time
Tap the Time + / - Buttons to increase/decrease the cooking time with a difference of 1 minute in
each tap.
Set the Cooking Temperature
Tap the Temperature + / - Buttons to change the cooking temperature.
Kindly Reminder:
Tap and hold the + / - Buttons to increase/decrease the cooking time and temperature
continuously.
DEFAULT COOKING TIME AND TEMPERATURE
Cooking Mode Temperature Cooking Time
French Fries
Steaks / Chops
Fish
Chicken
Bacon
Vegetables
400°F (200°C)
350°F (177°C)
325°F (163°C)
370°F (185°C)
400°F (205°C)
320°F (160°C)
15min
25min
15min
40min
10min
10min

RECOMMENDED COOKING TIME AND TEMPERATURE
Temperature
Time
Amount
Food Recommendations
Thin Frozen Fries
Thick Frozen Fries
Homemade Fries
Homemade Potato Wedges
Homemade Potato Cubes
Hash Browns
Potato Gratin
Steak
Pork Chops
Hamburger
Sausage Roll
Chicken Drumsticks
Chicken Breast
Spring Roll
Frozen Chicken Nuggets
Frozen Fish Sticks
Mozzarella Sticks
Stuffed Vegetables
Cake
Quiche
Muffins
Sweet Snacks
Frozen Onion Rings
1.5-3 cups
1.5-3 cups
1.5-3.5 cups
1.5-3.5 cups
1.5-3 cups
1 cup
2 cups
1/4-11lb
1/4-11lb
1/4-11lb
1/4-11lb
1/4-11lb
1/4-11lb
1/4-11lb
1/4-11lb
1/4-11lb
1/4-11lb
1/4-11lb
1.25 cups
1.5 cups
1.25 cups
1.5 cups
1 lb
15 -16 mins
15-20 mins
10-16 mins
18-22 mins
12-18 mins
15-18 mins
15-18 mins
8-12 mins
10-14 mins
7-14 mins
13-15 mins
18-22 mins
10-15 mins
15-20 mins
10-15 mins
6-10 mins
8-10mins
10 mins
20-25 mins
20-22 mins
15-18 mins
20 mins
15 mins
400° F (200° C)
400° F (200° C)
400° F (200° C)
360° F (182° C)
360° F (182° C)
360° F (1400° F )
400° F (200° C)
360° F (182° C)
360° F (182° C)
360° F (182° C)
400° F (200° C)
360° F (182° C)
360° F (182° C)
400° F (200° C)
400° F (200° C)
400° F (200° C)
360° F (182° C)
360° F (182° C)
360° F (182° C)
360° F (182° C)
400° F (200° C)
360° F (182° C)
400° F (200° C)
Add 1/2 tbsp. oil
Add 1/2 tbsp. oil
Add 1/2 tbsp. oil
Use oven-ready
Use oven-ready
Use oven-ready
Use oven-ready
Use baking tin
Use baking tin
oven dish
Use baking tin
Use baking tin
oven dish

Use the Accessories
Please choose the proper accessories as per
the ingredients to be cooked.
Pull the handle to open the window and
install the accessories as instructed below.
Mesh Racks
Slide the mesh racks into the upper two
sliding chutes for dehydration or to cook
crispy snacks/reheat items like pizza.
Drip Tray
Slide the drip tray into the lowest sliding
chute to collect the dripping oil and residue
for easier cleaning of the oven.
Rotisserie Sha
It is used to roast a whole chicken and relatively large pieces of meat.
1. Pass the sha through the length of the whole chicken.
2. Mount the meat forks onto the sha and insert them into the meat.
3. Fix the forks with the screws.
4. Toggle the Switch to the right. Place the rotisserie sha onto the rails push it into the Lock
position.
5. Release the Switch and lock the sha into place.

Rotisserie Basket
1. Toggle the Switch to the right. Place the rotisserie sha onto the rails push it into the Lock
position.
2. Release the Switch and lock the basket into place.
3. Use the removal tool to remove the basket to avoid scalding.
12
3 4
1 2

Skewers
It is used together with skewer racks to wear
meat, fish, vegetables, and other ingredi-
ents.
Warning
Skewers and other accessories are relatively sharp due to functional requirements. Please pay
special attention during use, and take appropriate protection when necessary. When cooking is
done, the temperature of the accessories is very high. Do not touch directly to prevent scalding.
Please keep the accessories properly to prevent children from coming into contact with them.
3

COOKING GUIDE
Cooking with the Rotisserie Air Fryer
1.Place the ingredients on Air Flow Rack, one of the Rotisserie accessories, or in the Rotating
Mesh Basket.
2.Put the Air Flow Rack, Rotating Mesh Basket, or Rotisserie Spit into the unit and shut the air fryer
door. Plug the power cord into the 120V, dedicated outlet.
3.When Rotating Mesh Basket or Rotisserie and food is in place, press the Power Button once
(page 8)
4.Select a Preset function as shown on page 8 or manually set the Temperature and then the Time
(page 8 fig.4,5,6,7). Refer to the detailed Control Panel instructions on page 8.
5.Press the Power Button to begin the cooking cycle.
NOTE: You may open the air fryer door to view the rotisserie at any time during the process to check the progress.
NOTE: Consult the Charts in this manual or the Recipe Guide to determine the correct settings.
Tips
• Foods that are smaller in size usually require a slightly shorter cooking time than large ones.
• Large quantities of food only require a slightly longer cooking time than smaller quantities.
• "Flipping” or turning smaller-sized foods halfway through the cooking process assures that all the pieces are evenly
fried.
• Misting a bit of vegetable oil on fresh potatoes is suggested for a crispier result. When adding a little oil, do so just
before cooking.
• Snacks normally cooked in the air fryer can also be cooked in the Rotisserie air fryer.
• Use the pre-made dough to prepare filled snacks quickly and easily. The pre-make dough also requires a shorter
cooking time than homemade dough.
• Place a baking tin or air fryer dish in the Rotisserie air fryer when baking a cake or quiche. A tin or dish is also
suggested when cooking fragile or filled foods.
• You can use the Rotisserie air fryer to reheat foods. Simply set the temperature to 300 °F.
Important
Removing the Cooked or Hot Food
When removing cooked or hot food, use the Rotisserie
Fetch Tool.
Or Mitts. Fetch Tool can also use with Rotisserie Spit.
Warning
•During the cooking process, the Rotating Mesh Basket and other
accessories will become very hot. When you remove it to check
on the progress, make sure you have a trivet or a heat-resistant
surface nearly to set it down on. NEVER place the Rotating Mesh
Basket directly on a countertop or table.
•Cooking accessories will get hot during the air frying process.
Wear mitts and handle with care to AVOID INJURY.

MORE FUNCTIONS
Overheat Protection
Should the inner temperature control system fail, the overheating protection system will be
activated, and the Unit will not function. Should this happen, Unplug the power cord. Allow time
for the UNIT to cool Completely before restarting or storing.
Automatic Shut-off
The appliance has a built-in “shut-off” device, that will automatically shut down the unit when the
Timer LED reaches zero. You can manually switch off the appliance by selecting the Power Button.
The fan will continue running for 20 seconds to “cool down” the unit.
Electric Power
If the electrical circuit is overloaded with other Appliances, your new Unit may not operate prop-
erly. It should be operated on a dedicated electrical circuit.
Electromagnetic Fields(EMF)
This appliance complies with all standards regarding electromagnetic fields (EMF). If handled
properly and according to the instructions in this user manual, the appliance is safe to use based
on scientific evidence available today.
Pausing
Press to pause cooking. The air fryer will stop heating, and press again to resume cooking.

SAKI SMART APP FEATURES
The SAKI Smart app allows you to access
additional smart air frying functions, such as
listed below.
Remote Control
• All smart air fryer functions can be
controlled remotely, including starting
cooking.
• Cooking progress can be monitored from
a distance.
Preset Customization
• For a faster cooking experience, a custom
preset can be created.
• The time that Shake Reminder appears
during the cooking process can be custom-
ized via the SAKI Smart app.
Custom Cooking Programs
• Multiple presets can be combined to make
your own customized cooking programs.
In-App Recipes
• Pre-programmed recipes made by the
SAKI recipe development team are available
in the app. Just click the recipe, and all the
cooking time and temperature will be auto-
matically ready to cook.
• You can also create and save your custom
recipes.
Third-Party Voice Control
• Compatible with Amazon Alexa and
Google Assitant for voice commands.
SmartWatch Notifications
• Also compatible with Apple Watch for
push notifications when your food is ready.

CARE & MAINTENANCE
Do not immerse
in water.
Cleaning
Clean the air fryer oven aer each use. Unplug the power cord from the wall socket and be sure
the appliance is thoroughly cooled before cleaning.
• The accessories are dishwasher safe but never use abrasive cşeaning materials or utensils on
their surfaces to avoid scratches.
• Soak thecaked-on food in warm, soapy water for easy removal.
• Wipe the outside of the appliance with a warm cloth damped with mild detergent.
• Clean the inside of the appliance with a warm nonabrasive sponge damped with mild deter-
gent.
• If necessary, remove unwanted food residue from the control panel with a cleaning brush.
Storage
1. Unplug the appliance and let it cool thoroughly.
2. Make sure all components are clean and dry.
3. Place the appliance in a clean, dry place.

TROUBLESHOOTING
Problem Possible cause Solution
The oven does not work The appliance is not plugged in. Plug the power cord into the wall socket.
The ingredients fried with the
air oven are not done
You have not turned on the Unit
by setting the cooking time and
temperature.
The product window is not
closed properly
Set the temperature and time as instructed.
Check that window is closed.
The ingredients are fried
unevenly
Too much amount of food. Reduce the amount of food for single cooking.
Setting temperature too low. Set the temperature higher
White smoke comes out of
the appliance
When tray is used to make food,
the tray position is not adjusted. During cooking adjust the tray position appropriately.
Fresh fries are not crispy
You are preparing greasy
ingredients.
When you fry greasy ingredients in the air fryer, a large
amount of oil will leak into the pan. The oil produces
white smoke and the pan may hear up more than usual.
This does not affect the appliance or the end result.
All lights glass and error code
appears on the display
The pan still contains grease
residues from previous use.
The crispiness of the fries
depends on the amount of oil and
water in the fries.
Contact Customer Care Team
White smoke is caused by grease heating up in the pan.
Make sure you clean the pan properly aer each use.
Broken circuit of the thermal sensor.
Make sure you dry the potato sticks properly before you
add the oil.
Cut the potato sticks smaller for a crispier result.
Add slightly more oil for a crispier result.
Short circuit of the thermal sensor.
Contact Customer Care Team
Table of contents
Other SAKI Kitchen Appliance manuals