manuals.online logo
Brands
  1. Home
  2. •
  3. Brands
  4. •
  5. Salda
  6. •
  7. Ventilation Hood
  8. •
  9. Salda SMARTY 2R SLIMLINE User manual

Salda SMARTY 2R SLIMLINE User manual

Ragainės g. 100
Šiauliai LT-78109, LITHUANIA
+370 41 540 415
offi[email protected]
COOKER HOOD FOR SMARTY 2R UNIT
EN OPERATING INSTRUCTIONS
www.salda.lt
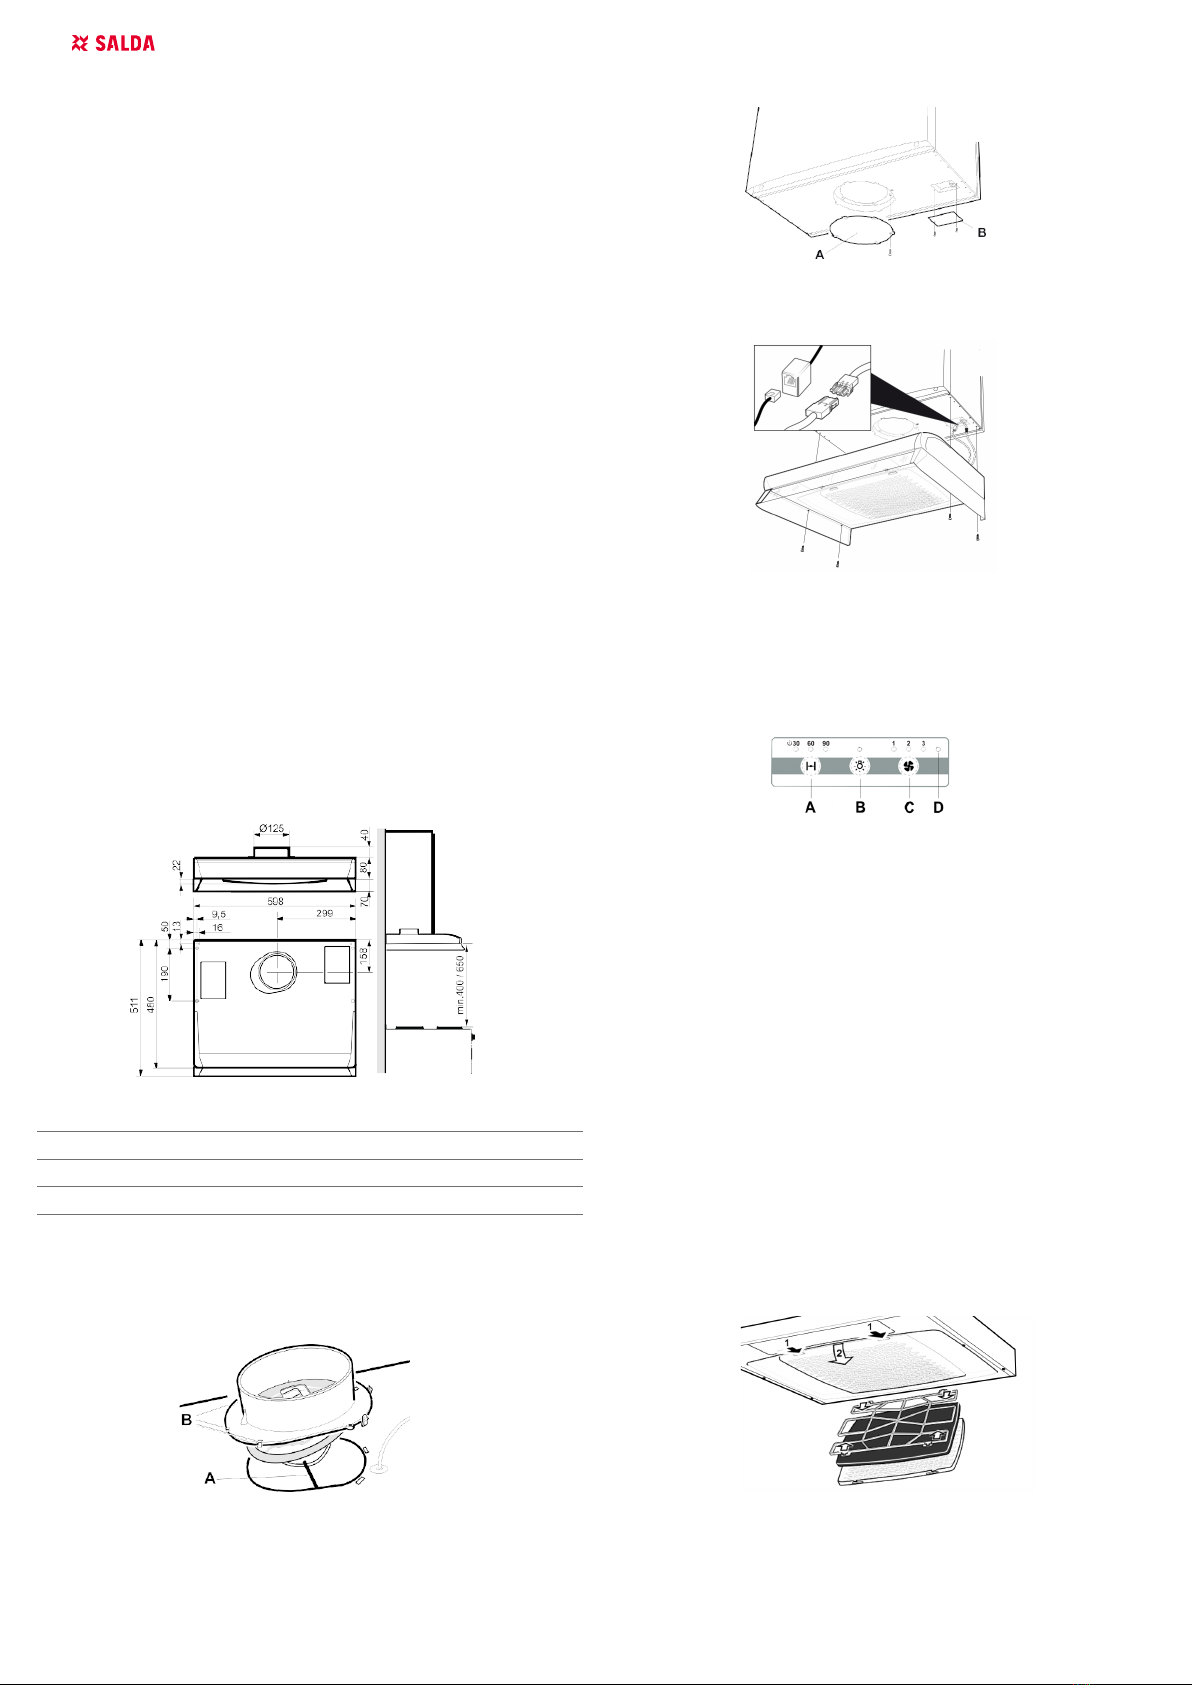
a damp cloth and washingup liquid. Replace the lter cassette and press it
upwards so that it clicks into place.
3.2.2. CHANGING THE FLUORESCENT TUBE
Fig. 7
The lamp lens can be removed by pressing the snap retainers in the direction
shown by the arrow; see Fig. 7. The uorescent tube is now accessible for
replacing.
4. WARRANTY
1. All equipment manufactured in our factory is checked in operating condi-
tions and tested befor delivery. Test protocol is supplied together with the unit.
The equipment is shipped in good working order and condition to the direct
client. The unit is warrantied for the period of 24 month from the invoice date.
2. If equipment is found to have been damaged during transportation, a claim
should be made against carrier, as we assume no responsibility for such
damage.
3. This warranty does not apply:
3.1. when transportation, storage, installation and maintenance instruc-
tions of the unit are violated;
3.2. when the equipment is improperly maintained, mounted - inadequate
maintenance;
3.3. when the equipment without our knowledge and permission has been
upgraded or unskilled repairs were made;
3.4. when the unit was used not for its original purpose.
3.5. Company SALDA UAB is not responsible for potential loss of property
or personal injury in cases where AHU is manufactured without a control
system and the control system will be installed by the client or third parties.
The manufacturer’s warranty does not cover devices that will be damaged
by installing the control system.
4. This warranty does not apply at these malfunction cases:
4.1. mechanical damage;
4.2. damage caused by entering outside objects, materials, liquids;
4.3. damage caused by natural disaster, accident (voltage change in the
electricity network, lightning, etc..).
5. The company assumes no liability for its products either directly or indirect-
ly damage, if the damage is caused by failure to comply with installation and
mounting regulations, deliberate or careless users or third-party behavior.
These conditions are readily discernable when the equipment is returned to
our factory for inspection.
If the direct client determines that equipment is found to be faulty, or a break-
down occurred, he should inform the manufacturer within ve working days
and deliver the equipment to manufacturer. Delivery costs should be covered
by customer.
Manufacturer reserves the right to change this technical pass-
port any time without prior notice, if some typographic errors
or inaccurate information is found, as well as after improving
the apps and/or the devices. Such changes will be included
in the new issues of the technical passport. All illustrations
are just for information and thus may di󰀨er from the original
device.
4.1. LIMITED WARRANTY COUPON
Warranty term
24-month warranty*
I received complete package and technical manual of the product ready for
usage. I have read warranty terms and conditions and agree with them:
....................................................................................................................................................
Customer’s signature
*refer to WARRANTY CONDITIONS
Dear User, we appreciate your choice and do hereby guarantee that all venti-
lation equipment manufactured by our Company is inspected and thoroughly
tested. An operational and high-quality product is sold to the direct buyer and
MAN000299
MAN000299
shipped from the territory of the factory. It is provided with a 24-month
warranty since invoice issue date.
Your opinion is important to us, thus we always look forward to hearing
your comments, feedback, or suggestions regarding technical and op-
erational characteristics of the Products.
In order to avoid any misunderstandings, please read the instructions
for installation and operation of the product as well as other technical
documents of the product carefully. The number of the Limited War-
ranty Coupon and serial number of the product specied on the silver
identication sticker attached to the housing must match.
The Limited Warranty Coupon shall be valid provided that the seller’s
stamps and records are clear. It is prohibited to change, delete, or re-
write the data specied on it in any manner – such a coupon shall be
invalid.
With this Limited Warranty Coupon the manufacturer conrms one’s
obligations to implement the imperative requirements established by
eective laws on protection of consumer rights in the event of identi-
cation of any defects of the products.
The manufacturer reserves the right to refuse provision of free war-
ranty servicing in cases when the warranty conditions listed below are
disregarded.
1. SAFETY INSTRUCTIONS
Carefully read these instructions of use and the installation guide, in particular
the safety instructions, before you install and begin using the product.
Save these instructions for later use or for the party who may take over the
product after you.
Make sure you unplug the product prior to any form of cleaning or care.
Diversion of exhaust air shall be carried out in accordance with instructions
issued by the appropriate authority.
Exhaust air may not be directed into ues that are used for fumes from, for
example, gas, wood or oil-burning stoves, replaces, etc.
The distance between the cooker and the product must be at least 40 cm.
For gas cookers, the distance should be increased to 65 cm. If a higher
mounting height is recommended by the gas cooker manufacturer, this
should be taken into account.
In order to avoid a potential hazard, installation, replacement of cables or
other types of connection should be carried out by a qualied professional.
Flambéing underneath the product is not allowed.
There must be su󰀩cient air in the room when the hood is to be used at the
same time as products that use energy sources other than electricity, i.e.,
gas hobs, gas, wood or oil-burning stoves or replaces, etc.
The product may be used by children from 8 years of age and persons with
mental, sensory or physical impairment, or a lack of experience and knowl-
edge, if they are informed on how the product is to be used.
Children should not be allowed to play with the product. Cleaning and main-
tenance of the product must not be performed by children without supervi-
sion.
Accessible parts of the product may become hot in conjunction with cooking.
The risk of a re spreading increases if cleaning is not carried out as often
as is recommended.
2. INSTALLATION
Cooker hood for mounting under unit. The cooker hood is equipped with a
uorescent tube and polyester lter. Installation, use, care, maintenance etc.,
are described in these instructions.
2.1. TECHNICAL INFORMATION
Fig. 1
Width 60 cm
Other measurements see Fig. 1
Electrical installation 230 V ~ earthed
Lighting Fluorescent tube11 W, socket 2G7
2.2. INSTALLATION
Fixing parts, screws for mounting, etc., are supplied with the cooker hood.
2.2.1. INSTALLING THE DAMPER.
Fig. 2
A duct connector with damper is provided inside the hood.
Position the damper axle “A” in the loop under the damper lid; see Fig. 2. En-
sure that the clips “B” engage under the edge of the plate. Press the connector
into position until the snap locks is xed.
2.2.2. MOUNTING THE COOKER HOOD
Fig. 3
Unscrew the cover of the connecting sleeve, Fig. 3 A, and the electrical con-
nections, Fig. 3 B.
Fig. 4
Connect the cooker hood cables to the unit, see. Fig. 4. Mount the hood with
four screws.
3. INSTRUCTIONS FOR USE
3.1. FUNCTION SWITCH
Fig. 5
A. Timer function for damper.
Press once. Damper remains open for 30 mins.
Press twice. Damper remains open for 60 mins.
Press three times: Damper remains open for 90 mins.
Press again. Damper closes.
The damper closes automatically after 30/60/90 minutes and the ventilation
unit returns to normal ventilation, speed 2.
B. Lighting.
C. Speed of the ventilation unit’s fans. No timing of selected speed except
when using the timer function for the damper.
D. Fault indicator lamp.
If the fault indicator lamp glows or blinks, consult the user manual for the
unit.
Open the damper while cooking. Adjust the speed of the ventilation unit’s fans
depending on the type of food you are cooking. It is a good idea to open the
damper a short while before and after cooking, in order to avoid the spread of
odours in the room.
3.2. CARE AND MAINTENANCE
3.2.1. CLEANING
The cooker hood should be cleaned with a damp cloth and washing-up liquid.
The lter must be cleaned approximately twice a month, with normal usage.
Fig. 6
Remove the lter cassette by pressing on the clips on the front edge. Dismantle
the lter cartridge and remove the lter cloth by loosening the retainer,Fig. 6.
Squeeze the lter cloth in warm water mixed with washing-up liquid. The lter
cassette (with lter) can also be washed in the dishwasher. The interior of the
cooker hood should also be cleaned a few times a year. Wipe the interior with
EN SMARTY 2R COOCKER HOOD v2020.1

Other manuals for SMARTY 2R SLIMLINE

1

Other Salda Ventilation Hood manuals

Salda RIRS ECO 3.0 Series Guide

Salda

Salda RIRS ECO 3.0 Series Guide

Salda RIS 2500PE EKO 3.0 User manual

Salda

Salda RIS 2500PE EKO 3.0 User manual

Salda RIS 400VE EKO Instruction manual

Salda

Salda RIS 400VE EKO Instruction manual

Salda KF T120 Series Guide

Salda

Salda KF T120 Series Guide

Salda SMARTY 2R SLIMLINE User manual

Salda

Salda SMARTY 2R SLIMLINE User manual

Salda RIRS 350PW EKO 3.0 User manual

Salda

Salda RIRS 350PW EKO 3.0 User manual

Salda RIS 400PW 3.0 Instruction manual

Salda

Salda RIS 400PW 3.0 Instruction manual

Salda VEKA INT W EKO User manual

Salda

Salda VEKA INT W EKO User manual

Salda RIRS 350PE EKO 3.0 User manual

Salda

Salda RIRS 350PE EKO 3.0 User manual

Salda RIS 700PE 3.0 Instruction manual

Salda

Salda RIS 700PE 3.0 Instruction manual

Salda VSA 220 M 3.0 Guide

Salda

Salda VSA 220 M 3.0 Guide

Salda RIS 1200PE EKO 3.0 User manual

Salda

Salda RIS 1200PE EKO 3.0 User manual

Salda RIRS EKO 3.0 400 VE Instruction manual

Salda

Salda RIRS EKO 3.0 400 VE Instruction manual

Salda RIS 260VE 3.0 Instruction manual

Salda

Salda RIS 260VE 3.0 Instruction manual

Popular Ventilation Hood manuals by other brands

Miele DAS 4630 Operating and installation instructions

Miele

Miele DAS 4630 Operating and installation instructions

Kaiser A64 user manual

Kaiser

Kaiser A64 user manual

Zanussi ZHV64750BA user manual

Zanussi

Zanussi ZHV64750BA user manual

Residentia Air Volution AUM52PS user manual

Residentia

Residentia Air Volution AUM52PS user manual

Monogram ZV900 owner's manual

Monogram

Monogram ZV900 owner's manual

Franke FME 407 user manual

Franke

Franke FME 407 user manual

Siemens LB 958 M Series User manual and installation instructions

Siemens

Siemens LB 958 M Series User manual and installation instructions

Best Fluttua Instructions for use

Best

Best Fluttua Instructions for use

Awoco RH-R06-G30 instruction manual

Awoco

Awoco RH-R06-G30 instruction manual

Franke TIBER user manual

Franke

Franke TIBER user manual

Smeg KPFA9RD Instruction booklet

Smeg

Smeg KPFA9RD Instruction booklet

Galvamet i-HOOD Installation, operating and maintenance instructions

Galvamet

Galvamet i-HOOD Installation, operating and maintenance instructions

IKEA KULINARISK 304.432.04 manual

IKEA

IKEA KULINARISK 304.432.04 manual

bora Professional PKA3 operating instructions

bora

bora Professional PKA3 operating instructions

Summit SEH1524 instruction manual

Summit

Summit SEH1524 instruction manual

Finlux FX 6211 W user manual

Finlux

Finlux FX 6211 W user manual

ElectrIQ eiQCURV60EN user manual

ElectrIQ

ElectrIQ eiQCURV60EN user manual

Cata CHP100SS manual

Cata

Cata CHP100SS manual

manuals.online logo
manuals.online logoBrands
  • About & Mission
  • Contact us
  • Privacy Policy
  • Terms and Conditions

Copyright 2025 Manuals.Online. All Rights Reserved.