Salente Ario User manual

Ario
INSTRUCTION MANUAL –PRESSURE COOKER PART
Before operating your new appliance,
Please read all instructions carefully and keep for future reference
WWW.SALENTE.CZ

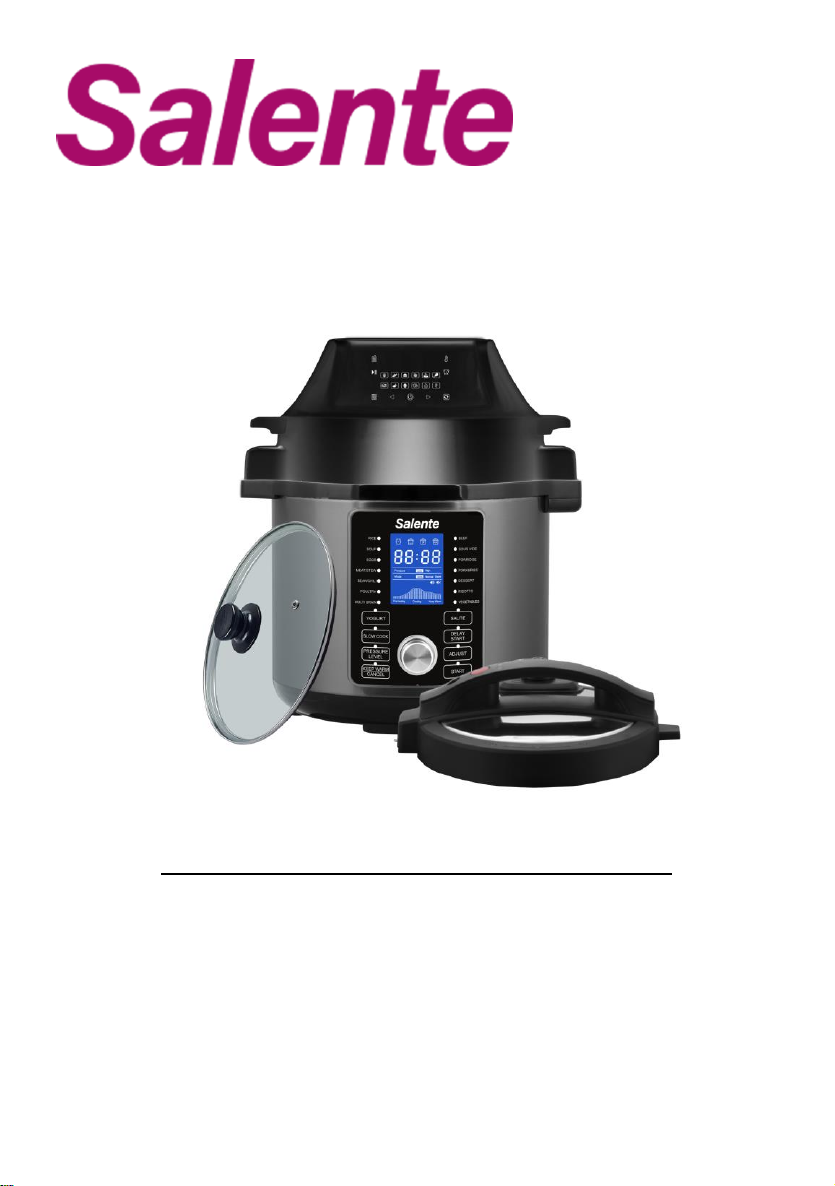
IMPORTANT SAFEGUARDS
When using pressure cookers, basic safety precautions should always be followed:
1. Read all instructions before operation.
2. Do not operate while unattended.
3. Do not touch hot surfaces. Use handles or knobs.
4. Close supervision is necessary when the pressure cooker is used near children.
5. DO NOT allow children to operate under any circumstance.
6. Do not place the pressure cooker in a heated oven.
7. Extreme caution must be used when moving a pressure cooker containing hot liquids.
8. Do not use pressure cooker for other than intended use.
9. Never immerse product in water or other liquids.
10. This appliance cooks under pressure. Improper use may result in scalding injury.
11. Make certain unit is properly closed before operating. See” Operating Instructions”.
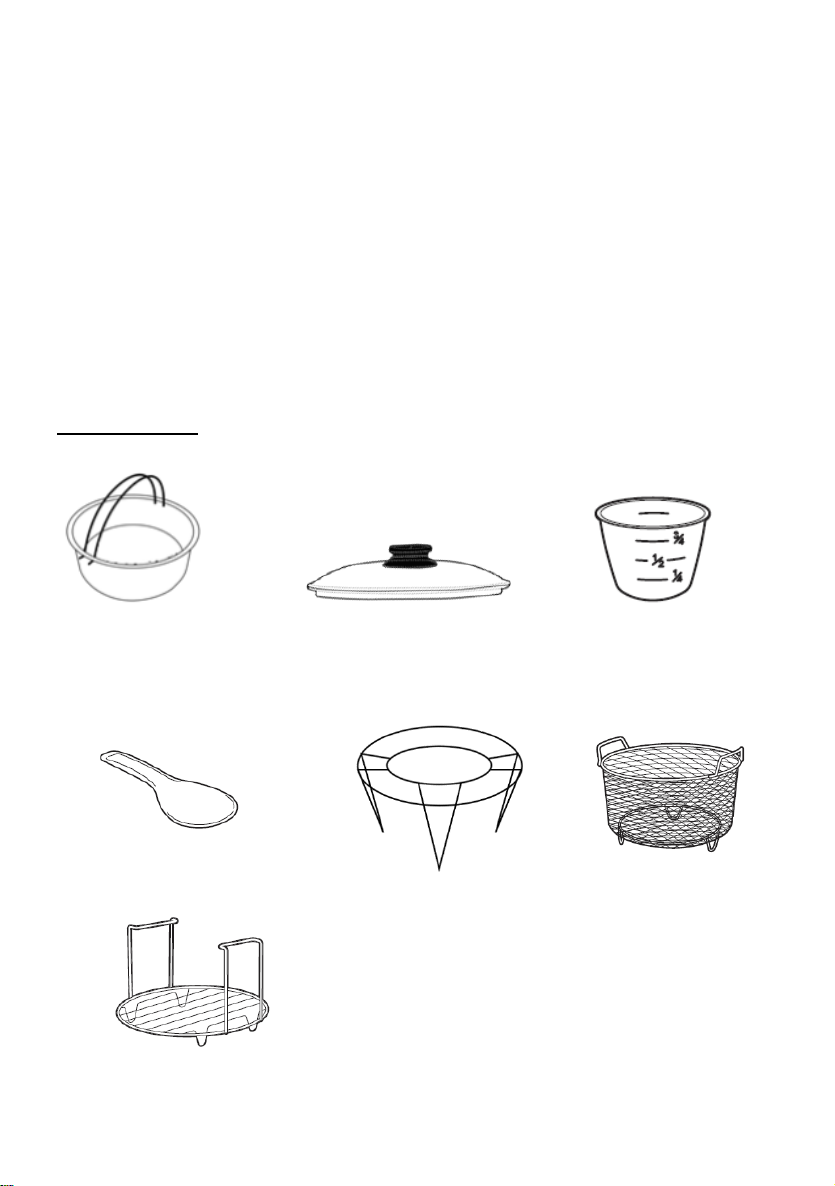
12. Do not fill the unit over 2/3 full. When cooking foods that expand during
cooking, such as rice or dried vegetables, do not fill the unit over 1/2 full. Over-
filling may increase the risk of clogging the vent pipe resulting in excessive pressure
in unit. Failure to follow this procedure can result in injury to person(s) and/or
damage to the unit.
13. Be aware that certain foods, such as applesauce, cranberries, pearl barley, oatmeal or
other cereals, split peas, noodles, macaroni, rhubarb, or spaghetti can foam, froth, and
sputter, and clog the pressure release device (steam vent). These foods should not be
cooked in a pressure cooker.
14. When the normal operating pressure is reached, turn the heat down so all the liquid
which creates the steam does not evaporate.
15. Always check the pressure release devices for clogging before use.
16. Do not open the pressure cooker until the unit has cooled and all internal pressure has
been released. If the handles are difficult to push apart, this indicates that the cooker is
still pressurized –do not force it open. Any pressure in the cooker can be hazardous. See

Operating Instructions.
17. Do not use this pressure cooker for pressure frying with oil.
18. DO NOT place the product near flammable materials or use in a humid environment.
19. DO NOT damage the Seal Belt and DO NOT replace it with anything other than the
replacement belt designated for this unit.
20. DO NOT tamper with the Steel Ring in the Lid (2) with any tools or external forces.
If the Steel Ring is damaged, please stop using immediately and replace the Lid.
21. Clean the Filter (17) regularly to keep the cooker clean.
22. NEVER use additional weight on the Pressure Limiting Valve (3) or replace the
Pressure Limiting Valve (3) with anything not intended for use with this unit.
23. The surface of contact between the Inner Pot (6) and the Electronic Heater (14)
should always be clean. DO NOT use the Inner Pot with other heating sources. DO NOT
replace the Inner Pot with a container other than what is recommended by the
manufacturer.
24. Food should not be kept warm for more than 4 hours in order to maintain the
freshness of the food. The pressure cooker should not be used for more than 6 hours
continuously. Serious Injury and/or damage may occur if any safeguards are ignored.
25. If steam releases around the Lid (2) during the cooking process, please unplug from
the power supply immediately, let cool, remove contents and return the product to the
manufacturer for exchange or repair. The Pressure Discharging Device has activated. This
is a safeguard to alert the user that the Pressure Limiting Device is malfunctioning
26. If there is any malfunction of the cooker during the cooking process, please stop
using the device and return to the manufacturer for repair or exchange.
27. Do not let cord hang over edge of table or counter, or touch hot surfaces.
28. Unplug from outlet when not in use and before cleaning. Allow to cool before putting
on or taking off parts.
29. Do not operate this appliance with a damaged cord or plug or after it malfunctions or
has been damaged in any manner. Bring it to a qualified technician for examination,
repair or electrical or mechanical adjustment. DO NOT disassemble the product, or
replace parts with parts not intended for this unit.

30. Always attach plug to appliance first, then plug cord into the wall outlet. To
disconnect, turn any control to off, then remove plug from wall outlet.
31. Do not use outdoors.
32. Do not place on or near a hot gas or electric burner, or in a heated oven.
33. Any other servicing should be performed by an authorized service representative.
34. The use of accessory attachments not recommended by the appliance manufacturer
may cause injuries.
SAVE THESE INSTRUCTIONS FOR HOUSEHOLD USE ONLY
GROUNDING INSTRUCTIONS: This appliance must be grounded. The plug must be
plugged into an outlet which is properly installed and grounded.
Warning: Improper use of the grounded cord can result in the risk of electric shock.
Consult a qualified electrician if necessary. Do not attempt to defeat this safety feature by
modifying plug.
A short power-supply cord is provided to reduce the hazards resulting from entanglement
or tripping over a longer cord. If it is necessary to use an extension cord, it should be
positioned such that it does not drape over the counter or tabletop where it can be pulled
on by children or tripped over and:
1) Use only with appropriate cable for this load.
2) The marked rating of the extension cord must be equal to or greater than the rating of
this appliance. The electrical rating is listed on the bottom of this unit
ABOUT YOUR PRESSURE COOKER
This pressure cooker uses advanced technology so you and your family can enjoy the
benefits of better, faster and healthier cooking. Your pressure cooker seals in steam to
cook hotter and faster while maintaining important nutrients for healthier meals. Cooking
fast and with less water saves vital natural resources and energy! It’s the easiest pressure
cooker to use on the market. It may seem like a complicated unit but rest assured, this
pressure cooker is simple to use, makes meals quick and easy, and overall it saves you
money! Please accept our thanks for purchasing our Pressure Cooker and Enjoy!
SAFETY WARNING: There is a potential risk of fire, electric shock or injury to persons
if the product is not used as instructed. Protection against electric shock is assured only if

the main power cord is connected to a properly grounded 220 –240 V | 50Hz power
receptacle.
• This product is to be used in DRY INDOOR environments only, and is NOT intended
for commercial use.
• All parts and accessories for this appliance must be used properly according to the
instructions. All parts and accessories must be the original provided from manufacturer.
All other parts or accessories that is not intended for use with this appliance is strictly
prohibited.
• The use of an extension cord, power adapter or other electric devices is highly not
recommended.
LED ERROR INDICATOR:
If any of the below error codes appear on the pressure cooker display, unplug the power
cord and re-plug after 10 minutes. If the error code remains, contact the manufacturer for
a replacement part.

PARTS IDENTIFICATION
1. Handle
2. Lid
3. Pressure Limiting Valve
4. Float Valve (external view)
5. Float Valve (internal view)
6. Inner Pot
7. Outer Pot
8. Main Body Handles
9. Upper Ring
10. Control Panel
11. Power Cord
12. Condensation Cup
13. Main Body
14. Heating Plate
15. Bottom Ring
16. Seal Ring for Float Valve
17. Filter
18. Rubber Seal Ring
19. Sensor
20. Lid Rest (lid latches
onto either side handle)
21.Tab for Lid Rest

22.Lid Release Button
23.Stainless Steel Basket
24.Tempered Glass Lid
25.Measuring cup
26.Spoon
27. Rack
28. Air fryer basket
29. Steam Rack
ACCESSORIES
25
23
27
24
26
28
29

HOW TO USE THE CONTROLPANEL
A-FOOD MENU: Use these Knob to select a Menu function, Press START button begin
the cooking cycle.
B-YOGURT FUNCTION: Including two steps, Pasteurize and Culture .
C-SLOW COOK BUTTON: Use this button to select Slow cook program.
D-PRESSURE LEVEL BUTTON: Use this button to select pressure cooking level, Low
Pressure or High Pressure.
E-KEEP WARM/CANCEL BUTTON: Use this button to set the Pressure Cooker to Keep
Warm. The Pressure Cooker will automatically set itself to Keep Warm after cooking.
Also press this button to Cancel ANY function at ANY time.
F-SAUTE BUTTON: Use this button to select Sauté program.
A
B
D
E
F
G
H
I
C
J

G-DELAY START BUTTON: Delay cooking at 30-minute increments; press to increase
delay time
H-ADJUST: Press to adjust for quantity of ingredients; toggle between Less, Normal, and
More. NOTE: Cook time is correlated with quantity of ingredients
I-CONTROL KNOB: Turn to cycle through cooking presets or adjust cook time. Press to
adjust the time of a selected preset
J-LCD DISPLAY
The LCD display uses icons, words, and numbers to depict time, pressure levels, modes,
cooking progress and messages.
1) Delay Start Icon 2) Pre-Heating Icon 3) Pressurized Icon 4) Keep Warm Icon
Time & message Display
Pressure Level Indicator
Mode Indicator
Progress Indicator
Sound Indicator: display whether sound ON or OFF, Safety alerts never turn OFF
Turn the sound OFF: Press the KEEP WARM/CANCEL button at least 3s until the icon
change to icon
Turn the sound On: Press the KEEP WARM/CANCEL button at least 3s until the icon
change to icon
1
2
3
4

Common Messages
GLASS LID ASSEMBLY
**Your Pressure Cooker is equipped with a Tempered
Glass Lid that can be used with the SLOW COOK and
WARM functions. Please do not use this Glass Lid with
any other functions on this Pressure Cooker.
Assembly of the Knob on the Glass Lid will require a
Screwdriver (not included).
Follow the diagram on the left (Figure 6) to assemble the
knob on the Glass Lid.
1. Handle
2. Handle Base
3. Glass Lid Body
4. Silicon Gasket
5. Gasket
6. M4 Screw
RUBBER SEAL RING ASSEMBLY
Always ensure the Rubber Seal Ring
(18) is securely fitted onto the metal
Y-shaped ring in the interior of the
Lid (2). Make sure the crease in the
Rubber Seal Ring (18) meets with
the outside of the Y- Ring all the
way around.
Figures 1-2

Then place the Y-Ring and Rubber Seal Ring (18) back into
the Lid (2) making sure the hole in the center of the Y-Ring's
cross-section is lined up with the metal pin in the center of the
Lid (2). Press down firmly until the Y-Ring is secured onto
the Lid (2) (Figures 1- 2).
PRESSURE COOKER LID MARKINGS
Figure 3
Please note the "OPEN" and "CLOSE" markings on the rim of the pressure cooker body
(13) and the“ ”on the rim of the Lid (2). To properly close and secure the pressure
cooker Lid (2), always line up the "CLOSE" marking on the Upper Ring (9) and the
“ ”on the rim of the Lid (2) (Figure 3).
CONDENSATION CUPASSEMBLY
The Condensation Cup is the clear plastic piece that snaps into
the back side of the pressure cooker as shown in Figure 4. Place
condensation cup in rear of the unit until it locks into place; it is
part 12 in the diagram on page 6.
Figure 4
PRESSURE LIMITING VALVE WARNING
WARNING: Avoid serious injury. Always use tongs or a long
kitchen tool to set the valve to VENTING (Figure 5).
CAUTION HOT STEAM: KEEP HANDSAND FACE
AWAY FROM THE PRESSURE LIMITING VALVE
WHEN ROTATING TO VENTING.
Figure 5
BEFORE FIRST USE
1. Remove packaging materials such as cardboard, plastics or Styrofoam and discard
appropriately.

2. Clean all the parts by wiping with a soft damp cloth or sponge and dry thoroughly.
3. Thoroughly clean the cooking pot in the dishwasher or with warm soapy water. Rinse,
towel or air-dry, and place in the pressure cooker.
LIDASSEMBLY:
1. How to open the lid: Hold the
handle (1) firmly while pushing
down on the red lid release button
(22), turn the lid (2) clockwise
until it loosens and lift vertically
(Figures 6-7); Figures 6-8
the lid (2) can stand on the Lid Rest (20) (Figure 8).
Note: For new units, the seal of the Lid (2) may be slightly stronger than normal and may
be slightly difficult to unlock. Once the Lid (2) has been opened and closed several times,
it will loosen up.
2. How to close the lid: Observe
the Rubber Seal Ring (18) inside
the Lid (2) and ensure that it is
fitted onto the lid all the way
around.
Figures 9-11
(Caution: If the rubber seal ring is damaged, do not use the pressure cooker. Contact
Customer Service to repair or replace).
To lock Lid (2) in place, remove any food residue from rim of Upper Ring (9) of cooking
pot to ensure a proper seal. Take the Lid (2) off the Lid Rest (20) (Figure 9), hold the
Handle (1) and close it downwards at the Opened Lid position (Figure 10). Turn counter-
clockwise until you reach the Closed Lid position (Figure 11). (A clamping sound can be
heard).
Note: To ensure you are properly closing the lid (2), line up the OPEN and CLOSE
markings on the Lid (2) and Main Body (13).

WATER TEST
For the first use, to ensure correct assembly of the Rubber Seal Ring (18),it is
recommended to read the following instructions and fill the Inner Pot (6) with water to
the 2/3 line and program to pressure cook for 30 minutes. Once completed, pour out the
water. Rinse and towel dry the Inner Pot (6). The pressure cooker is now ready for use.
LID SAFETY LOCK SYSTEM
*Note: This unit has a built-in safety feature that prevents all functions from activating if
the Lid (2) is not properly locked/secured into place.
Acooking function cannot be selected if the Lid (2) is not properly locked/secured into
place. The display will show "LID" and continuously beep until the Lid (2) is properly
closed. You will not be able to select a cooking function.
This is to prevent the unit from cooking without the lid being properly secured. The Saute
function will still work as this function does not use the Lid (2).
INSTRUCTIONS FOR USE
COOKING POT MARKINGS
Inside the removable cooking pot are two sets of markings. One side is marked "2/3
MAX PRESSURE COOK", which indicates the maximum fill line when cooking any
food, other than rice in the pressure cooker. The other marking is MAX RICE CUP and is
used when cooking rice. When pressure cooking rice, never fill the pressure cooker with
water past the 6 cup marking.
1. Open lid, remove cooking pot from pressure cooker
and add food and liquids.
NOTE: The total volume of food and liquid must not
exceed 2/3 of the capacity of the cooking pot (Figure
12). For foods such as dried vegetables and beans, or
rice and grains, the total volume must not exceed 1/2
the capacity (Figure 13). Overfilling may clog the
pressure limit valve, which can cause excess pressure
to develop. Figure 12 - 13
Always use at least ½ cup liquid when pressure cooking.

WARNING: To avoid a serious burn injury when cooking foods other than rice, never
exceed the Figure 13 2/3 MAX PRESSURE COOK mark of the combined volume of
liquids and solids (Figure 12 - 13).
Be certain the inner receptacle, where the heating plate
(14) is located, is clean and dry before inserting the Inner
Pot (6) into the pressure cooker and adjust the pot left and
right to ensure optimal contact between the Inner Pot and
the heating plate (14) (Figure 14)
Figure 14
3. Close and "LOCK" the lid.
4. Adjust the Pressure Limiting Valve (3) to the “Sealing” position, and ensure that the
Float Valve (4) sinks.
5. When adjusting the Pressure Limiting Valve (3) to either the
" Sealing " or the " Venting " positions, line up the marking on
the Pressure Limiting Valve (3) with the arrow on the Handle
(1) as shown in Figure 15.
6. Plug the power cord into the pressure cooker and then into
the wall outlet. The LCD display will show 00:00 - OFF.
Figure 15
OPERATING INSTRUCTIONS
With the lid securely locked in place, unit on and the LCD displayed, select the button for
the desired cooking function by reading the following instructions.
There are 18 Menu functions programmed for your pressure cooker. They are Oatmeal,
Soup/Broth, Poultry, Yogurt, Egg, Bean/Chili, Rice, Pressure Cook, Meat/Stew, Dessert,
Slow Cook, Steam, Saute, Multigrain, Beef, Porridge, Pork & ribs, Risotto, Vegetables.
The default times are programmed for quick and easy cooking for small portions of food
less than 3lbs. When cooking food that is more than 3lbs. Use the Custom Manual
function. Each of the default times is programmed to detect the weight of food being
cooked and how much liquid is inside the pot during the cooking cycle. The unit will

automatically build up the pressure, cook the food and go to Keep Warm when cooking is
complete.
COOKING PRESET
QUANTITY (ADJUST)
COOK TIME (MIN.)
MANUAL TIME SETTING
Rice
Less
8
1 to 99 min .
Normal
12
More
15
Soup
Less
12
1 to 99 min .
Normal
15
More
20
Eggs
Less
4
1 to 99 min .
Normal
5
More
6
Meat/Stew
Less
20
1 to 99 min .
Normal
35
More
45
Bean/Chili
Less
25
1 to 99 min.
Normal
30
More
40
Poultry
Less
10
1 to 99 min.
Normal
15
More
25
Multig rain
Less
20
1 to 99 min .
Normal
40
More
45
Beef
Less
30
Normal
35

Beef
More
40
1 to 99 min.
Steam
Less
2 hours
1 to 4 hours
Normal
More
Porridge
Less
12
1 to 99 min.
Normal
15
More
20
Pork & Ribs
Less
13
1 to 99 min.
Normal
18
More
25
Dessert
Less
25
1 to 99 min.
Normal
40
More
50
Risotto
Less
20
1 to 99 min.
Normal
35
More
45
Vegetables
Less
10
1 to 99 min.
Normal
15
More
20
Yogurt
Less
24 hours
6 to 24 hours
Normal
8 hours
More
Boil
Slow cook
Less
30 min .
0.5 to 9.5 hours
Normal
6 hours
More
9 hours 30 min.
Sauté
N/A
30
N
/
A
N/A
N/A

AFTER SELECTING A MENU BUTTON
1.The Default Cook Time will display for the selected setting. For example, if Rice is
selected, the display will show 00 12.
2. Push the button START.
The Pre-heating Icon will illuminate.
3. As the unit heats up and pressure builds, the Float Valve will rise. The amount of liquid
and other ingredients in the pressure cooker determines the length of time needed for full
pressure to build - generally 5 to 40 minutes.
4. Using the same Rice example, while the unit is building up pressure the LCD display
will show ON. Once it begins to pressure cook, the Pressurized Icon will illuminate.
The LCD display will show a solid 00:12 and begin countdown.
5. The raised Float Valve indicates you are cooking under pressure. The lid is now locked
and cannot be opened.
YOU SHOULD NEVER ATTEMPT TO OPEN THE LID WHILE PRESSURE
COOKING.
AFTER SELECTING PRESSURE LEVEL
The PRESSURE LEVEL button is used in combination with the Menu buttons.
The default working pressure is High pressure, the "PRESSURE LEVEL" button toggles
the pressure setting between“High Pressure”(50-60KPa) and“Low Pressure”(30-40KPa)
for the pressure cooking functions. Using Soup as an example, first select the Soup and
set the pressure cooking time, the Soup indicator will blink and High pressure indicator
will be highlight, press the Pressure Level once, the Low pressure indicator will light up.
The working pressure will be high pressure if you press the Pressure Level button twice.
Follow steps 3-5 from chapter AFTER SELECTING AMENU BUTTON
AUTO-KEEPWARM FEATURE
When cooking has completed, the pressure cooker will beep and automatically go to keep
Warm function. The Keep Warm indicator light and the Keep Warm icon will
illuminate and the display will show 66. After 24 hours the cooker will automatically

switch to OFF.
and texture of food will begin to change after 1 hour on keep Warm. Abit of condensation
in the upper ring during keep Warm is normal.
TO RESET OR CANCEL
User can reset or cancel any function at anytime by pressing the Keep Warm/Cancel
button until the display shows 00:00 - OFF.
REMOVING LID AFTER PRESSURE COOKING
When the pressure cooking cycle has completed, the unit will automatically switch to
keep Warm. At this point you may release pressure in one of two ways - Natural Pressure
Release or Quick Pressure Release.
1. Natural Release: Following pressure cooking, allow the unit to remain on keep Warm.
The pressure will begin to drop - time for pressure to drop depends on the amount of
liquid in the cooker and the length of time that pressure was maintained. Natural Release
can take from 15 to 30 minutes.
During this time cooking continues so it is recommended for
certain cuts of meats, soups, rice, and some desserts. When
pressure has fully released, the Float Valve (4) will drop (Figure
16) and the lid will unlock to open. As a safety feature, the lid
will not open unless all pressure is released. Do not force the lid
open. If the lid feels tight, please allow additional time for
pressure to fully release before attempting to open the lid.
Figure 16
Quick Release (recommended for foods that should be Medium or Medium-Rare):
Following pressure cooking the cooker will beep and go to keep Warm. Press the keep
Warm/Cancel button and the display will show 00:00 - OFF. Using an oven mitt or long
utensil, carefully turn the Pressure Limiting Valve (3) to the “Venting” position to release
pressure until the Float Valve (4) sinks.
NOTE: You cannot adjust the Pressure Limiting Valve to the “Venting” position
immediately after cooking, when using functions such as porridge or, soup. It is
IMPORTANT that the Float Valve (5) sinks before any attempts are made to open the

lid.(Figure 14)
CAUTION HOT STEAM –RISK OF SCALDING: USE TONGS OR LONG
UTENSIL TO TURN THE VALVE. KEEP HANDS AND FACE AWAY FROM
PRESSURE LIMITING VALVE (3)
HOW TO USE THE SAUTÉ FUNCTION
This setting allows cooking over high heat, without the lid, before pressure cooking.
Before Pressure Cooking, most recipes will benefit from the golden color, richer flavors
and moist results gained from Sauteing. To Saute your meats or vegetables prior to
pressure cooking:
1. Remove Lid (2) from unit.
2. Add oil or butter as directed in your recipe.
3. Press the SAUTÉ button. Then you press START button. The LCD will display ON.
4. Stir or turn food as needed until desired color and consistency is reached.
5. Press the KEEP WARM/CANCEL button if you want to cancel the SAUTÉ function
before the timer finishes counting down.
-3 minutes after canceling the SAUTÉ function before
beginning to pressure cook. If the unit will not begin pressure cooking, allow it to cool
for a longer period after SAUTÉING before selecting another function.
HOW TO USE THE YOGURT FUNCTION
Making Yogurt is simple and fun using your pressure cooker. All you need is some milk
and a bit of active culture yogurt! The process consists of two parts: Pasteurizing the milk
and culturing the yogurt. Complete the following steps to make yogurt:
Pasteurize
1. Place the steel pot inside the base and plug in your pressure cooker. The LCD screen
will display 00:00 - OFF.
2. Pour milk into the steel pot according to your recipe.
3. Lock the lid in place and turn the steam vent handle to Sealing.
4. Select Yogurt. Press ADJUST to switch to More; the LCD screen will flash Boil.

5. Press START button.
6. When cooking is complete the cooker beeps and the LCD screen displays Yogt.
7. Remove steel pot with milk place pot on a wire rack and cool until milk reaches 43 ℃
Culture
Stir active culture into warm milk according to your recipe. Return steel pot to pressure
cooker base.
1. Lock the lid in place. The steam vent handle can be turned to either Sealing or Venting.
2. Select Yogurt; press ADJUST until Normal displays with an 8 hour timer on the LCD
screen. Use the knoble to adjust cooking time.
3. Press START and the LCD screen will display the timer (the yogurt timer will start and
count down).
4. When cooking is complete the pressure cooker beeps several times and the LCD screen
displays Yogt. Transfer yogurt to containers and refrigerate as directed by your recipe.
HOW TO USE THE SLOW COOK FUNCTION:
1. Prepare desired food and place into Inner Pot (6).
2. Use the Glass Lid on the unit when slow cooking.
NOTE: The SLOW COOK function cooks without pressure.
3. Select SLOW COOK function and the display will show the default SLOW COOK
time of 06:00. Press + and - to adjust cooking time.
NOTE: The longest SLOW COOK time allowed is 9.5 hours.
5. Press START and the LCD screen will display ON to indicate that the pressure cooker
is preheating.
5. The unit may take between 5~20 minutes to reach temperature before beginning count
down.
6. When cooking is complete, the cooker will beep and automatically go to KEEP
WARM. The display will show 66 during KEEP WARM.
7. The KEEP WARM icon will illuminate. Press CANCEL to end the operation.
Other manuals for Ario
4
Table of contents
Other Salente Electric Pressure Cooker manuals
Popular Electric Pressure Cooker manuals by other brands

Klarstein
Klarstein 10028679 manual

Tower Hobbies
Tower Hobbies T16007 Safety and instruction manual

Chefwave
Chefwave Swap Pot CW-AFPC01 manual

Hawkins
Hawkins Contura Black XT instruction manual

Bravetti
Bravetti Euro-Pro PC104 Use and care instructions

Scarlett
Scarlett Silver Line SL-1529 instruction manual