Salton AF2085 User manual

Instruction Booklet
Model: AF2085

IMPORTANT SAFEGUARDS
When using electrical appliances, basic safety precautions should always
be followed including the following:
1. Read all instructions.
2. DO NOT touch hot surfaces. Use handles or knobs.
3. To protect against electrical hazards, do not immerse cord, plugs, or
the appliance in water or other liquid.
4. Close supervision is necessary when any appliance is used by or near
children. Do not allow children to play with the appliance.
5. This appliance is not intended for use by persons (including children)
with reduced physical, sensory or mental capabilities or lack of
experience and knowledge, unless they have been given supervision
or instruction concerning the use of the appliance by a person
responsible for their safety.
6. Unplug from outlet when not in use and before cleaning. Allow to
cool before putting on or taking off parts, and before cleaning the
appliance.
7. DO NOT operate any appliance with a damaged cord or plug or
after the appliance malfunctions, or has been damaged in
any manner. Return appliance to Salton for examination, repair or
adjustment.
8. The use of accessories or attachments not recommended by Salton
maycausere,electricshockorinjury.
9. DO NOT use outdoors.
10.DO NOT let cord hang over edge of table or counter, or touch hot
surfaces.
11.DO NOT place on or near a hot gas or electric burner, or in a heated
oven.
12.Extreme caution must be used when moving an appliance containing
hot oil or other hot liquids.
13.Alwaysattachplugtoappliancerst,thenplugcordintothewall
outlet.
14.To disconnect, turn any control to “OFF”, then remove plug from wall
outlet.
15.DO NOT use appliance for other than intended use.
16.DO NOT leave unit unattended while in use.
17.DO NOT open the main housing of the product. All servicing should
be performed by an authorized service representative.
18.DO NOT insert oversized foods or utensils into the oven as they may
createareorriskofelectricshock.
2

19.CAUTION: To reduce the risk or electric shock, cook only in the
provided removable container.
20.Use on a heat resistant and even surface. Keep at least 6” (15 cm)
awayfromwallsandanyotherammableitems.
21.When the appliance stops working, the Air Fryer may still be warm for
a period of time. Do not touch before it is completely cooled.
22.Ensure that the Drawer pan is fully closed and the Drawer Pan handle
locked securely, while the Air Fryer is in operation.
CAUTION: After hot air frying, the Drawer Pan and the cooked food
is hot. Extreme caution must be used when handling the hot Air Fryer
Drawer Pan.
SAVE THESE INSTRUCTIONS
HOUSEHOLD USE ONLY
POLARIZED PLUG
This appliance has a polarized plug (one blade is wider than the other).
Toreducetheriskofelectricshock,thisplugwilltinapolarizedoutlet
onlyoneway.Iftheplugdoesnottfullyintheoutlet,reversetheplug.
Ifitstilldoesnott,contactaqualiedelectrician.Donotmodifythe
plug in any way.
DESCRIPTION OF PARTS
1. Frying Rack (not shown)
2. Drawer Pan
3. Drawer Pan Handle
4. Digital Display
5. Main Body
6. Power Cord
266
4
3
5
F
3

BEFORE FIRST USE
1. Read all instructions carefully and keep them for future reference.
2. Remove all packing material or labels on the product.
3. Remove any manufacturing residue left.
NEVER IMMERSE THE MAIN HOUSING IN WATER OR ANY
OTHER LIQUID.
4. Wash the Frying Rack and the Drawer Pan in warm soapy water with
a non-abrasive sponge and dry thoroughly.
NOTE: ONLY the Frying Rack can be washed in the dishwasher on
the TOP RACK ONLY
5. Wipe the inside and outside of the product with a damp cloth.
6. This Air Fryer is a fat-free fryer that uses hot air heating technology.
Never pour oil or fat into the Air Fryer.
NOTE:Duringrstuse,theAirFryermayemitaslightodorand
smoke. This is normal.
DIGITAL DISPLAY
1. ON/OFF button
2. Temperature. To use this feature, press this button (2) and then press
the “+” or “-” to increase or decrease the temperature.
3. Timer. Adjust the cooking time by pressing this button (3) and
pressing the “+” or “-” to increase or decrease the cooking time.
4. “+” will increase the cooking temperature or cooking time.
5. “-” will decrease the cooking temperature or cooking time.
6. Menu button. Press this button (6) to choose the desired preset
function (8)
7. Digital Display. Shows cooking time and temperature.
8. Preset functions. Please see the table below for default cooking
time and cooking temperature for each preset function listed below.
This table is used as a guideline, and you may wish to increase or
decrease cooking time and/or temperature, based on the volume of
food being cooked.
4
1 2 3 47 5 6
8

AUTOMATIC SHUT-OFF
This appliance is equipped with a timer. When the timer has reached 0,
the appliance will emit a “beep” sound and will shut off automatically. To
manually turn off the appliance, press the ON/OFF button.
HOW TO USE
1. PlacetheAirFryeronaat,levelheatresistantsurface.Placeaway
from walls and other appliances. It is recommended to leave a
minimum of 6 inches (15 cm) of space between the Air Fryer and
nearby objects.
2. Ensure that the power cord is not touching any hot surface.
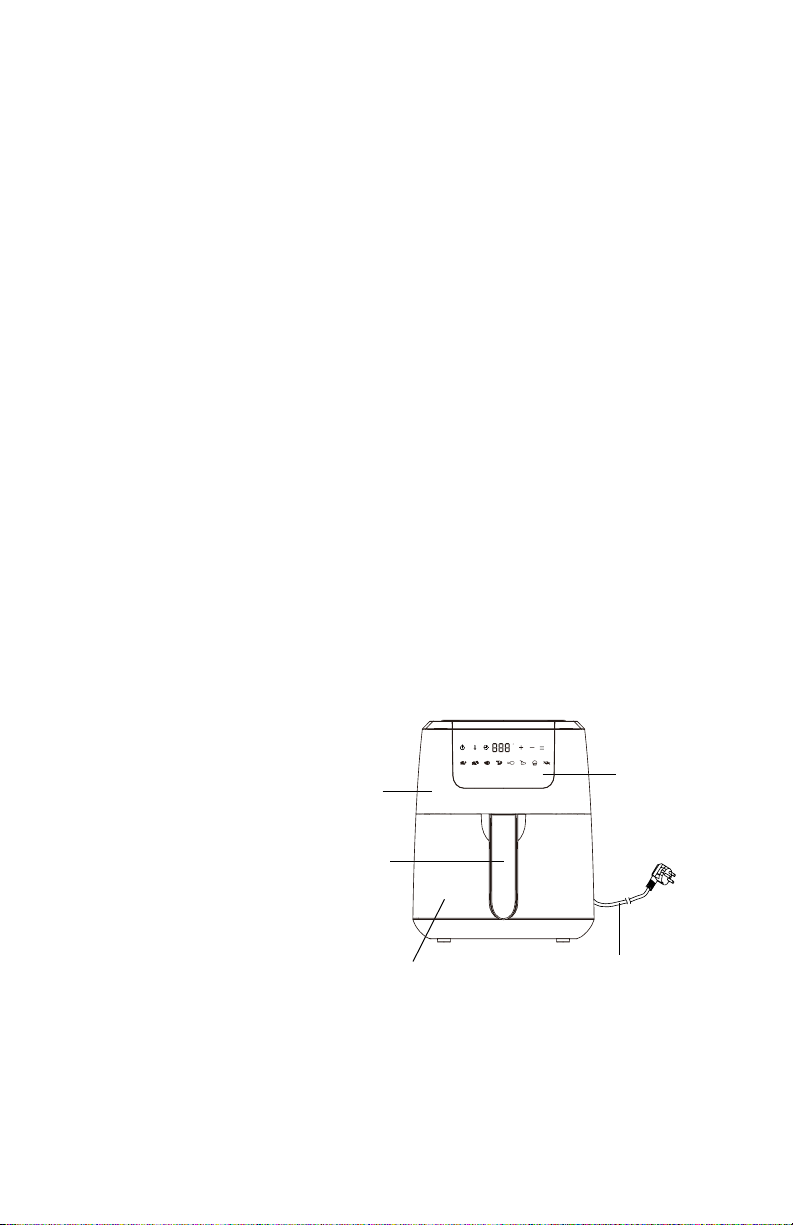
3. Carefully remove the Drawer Pan from the Main Body by grasping the
Handle.Placeonaat,cleansurface.
IMPORTANT: Never place food directly into the Drawer Pan without
the Frying Rack. Always ensure the Frying Rack is inside the Drawer
Pan.
Never place objects on top of the Main Body as this will block the air
owandreducetheefciencyofthehotairheating.
4. Place the Frying Rack into the Drawer Pan.
5. Place your desired ingredients onto the Frying Rack.
TIP:DonotoverllDrawerPanwithfood.Toensurepropercooking
andaircirculation,NEVERllthefryingbasketovertheMAXllline.
IMPORTANT: If cooking food that may expand, make sure the
cookedcapacitywillnotexceedtheMAXllline.
6. Slide the Drawer Pan back into the Main Body of the Air Fryer.
7. Insert the plug into a 120V AC wall outlet.
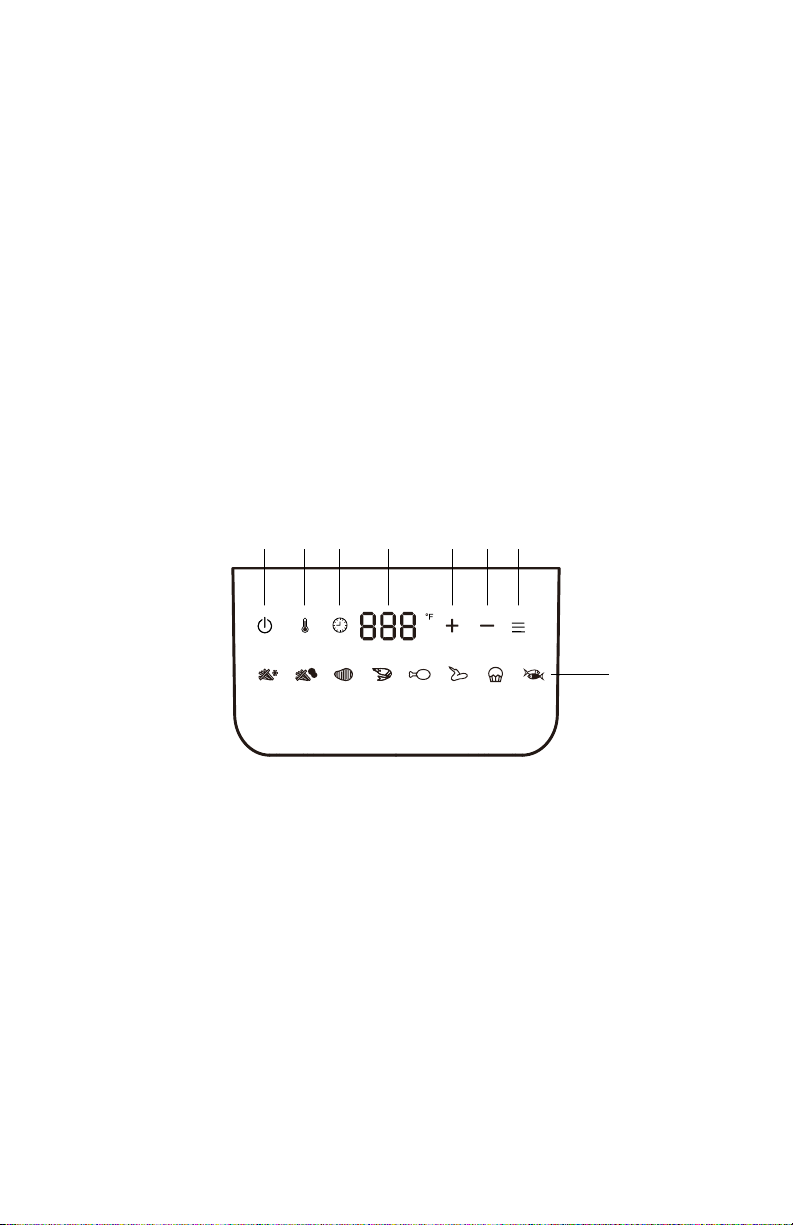
8. Press the ON/OFF button to turn on the appliance.
9. To manually set the temperature, press the menu button, followed by
the temperature button. Increase or decrease the temperature by
pressing the “+” or “-” buttons. To set the timer, press the timer button
followed by the “+” or “-” button to increase or decrease the time.
Press the ON/OFF button to begin cooking.
10.Preset functions. To use one of the 8 preset functions, press the
menubuttonuntilthedesiredfunctionashes.Youcanverifythe
preset temperature and cooking time of the selected function by
pressing the temperature and timer buttons respectively. NOTE:
If you wish to adjust the temperature or timer for any of the preset
functions, ensure the desired preset function has been selected and
adjust the temperature by pressing the temperature button, followed
by “+”/”-”. To adjust the timer, press the timer button followed by
“+”/”-” . To begin cooking, press the ON/OFF button. The desired
preset function will then be illuminated on the display and the timer
will begin to countdown. When the timer reaches 0, the appliance
will beep and automatically shut off. NOTE: You may increase 5

or decrease the timer or temperature by selecting the timer or
temperature functions, followed by the “+”/”-”. It is not required to
press the ON/OFF button after increasing or decreasing the time or
temperature during the cooking cycle.
11.Excess oil drippings from food will be collected in the bottom of the
Drawer Pan.
WARNING: Extreme caution is required when handling the Drawer Pan.
NOTE: The Air Fryer can be turned OFF at any time by pressing the
ON/OFF button.
12.Certain foods may require shaking or turning halfway through the
cooking process (please refer to the Cooking Guide). To shake or turn
your ingredients, pull out the Drawer Pan using the handle from the
Main Body. Shake or turn the ingredients using non-metallic utensils
and replace the Drawer Pan back in the Main Body.
13.A “beep” will sound when the cooking time has expired and the Air
Fryer will turn OFF automatically.
14.Shake the Drawer Pan and check food for even cooking and
browning. If you require additional air frying time, adjust the
temperature and set the timer for 5 minute increments until you reach
the desired results.
15.It is best to allow cooked food to rest for approximately 1 minute
before removing the Drawer Pan from your Air Fryer.
16.EnsureyourAirFryerisonaatandheatresistantsurfacebefore
removing the Drawer Pan from the Main Body.
CAUTION: Always use oven mitts when handling your Air Fryer.
17.Remove the Drawer Pan and empty the ingredients in a serving bowl
or plate.
CAUTION: When removing the Drawer Pan keep hands and face
away from the opening to avoid hot air or steam.
NOTE: Do not turn the Drawer Pan and Frying Rack over completely
as any excess oil that has been collected at the bottom will also be
poured out with the ingredients.
18.Promptly return the Drawer Pan and continue with subsequent
batches. The Air Fryer is instantly ready to be used again.
HELPFUL HINTS
• Smaller foods require shorter cooking times than larger foods.
• Shaking or turning ingredients halfway through will improve results
and ensure for even cooking and doneness.
• Wiping excess moisture from food before cooking encourages
browning and avoids excess smoke.
• Air fry freshly breaded items in small batches to ensure food does not
touch,whichallowsevenairow.
• The Air Fryer can also be used to reheat food. Set the temperature to
300ºF for up to 10 minutes.
6

• For best results, when cooking naturally high fat foods, such as
chicken wings or sausages, it may be necessary to empty excess oil
or fat from the frying basket drawer between batches.
• To obtain crispier homemade fries, add a little oil immediately prior to
cooking.
PRESET FUNCTIONS
FUNCTION
DEFAULT
COOK TIME
DEFAULT
COOK TEMP
ADJUSTABLE
TEMP RANGE
ADJUSTABLE
TIME RANGE
Fries (frozen) 15 mins 400°F 150-400°F 1-90 mins
Fries (fresh) 25 mins 400°F 150-400°F 1-90 mins
Steak 25 mins 360°F 150-400°F 1-90 mins
Shrimp 12 mins 320°F 150-400°F 1-90 mins
Chicken 20 mins 370°F 150-400°F 1-90 mins
Wings 15 mins 360°F 150-400°F 1-90 mins
Bake 25 mins 320°F 150-400°F 1-90 mins
Fish 15 mins 330°F 150-400°F 1-90 mins
PLEASE NOTE:
The USDA recommends meat and poultry be cooked to the following
internal temperatures to be sure any harmful bacteria has been killed.
FOOD SUGGESTED INTERNAL
TEMPERATURE
Ground Turkey/Chicken 165˚F/74˚C
Ground Lamb, Pork, Veal 160˚F/71˚C
Fresh Beef, Veal, Lamb 145˚F/63˚C
Fresh Pork 160˚F/71˚C
Re-heating meat & poultry 165˚F/74˚C
IMPORTANT NOTE: ALWAYS CHECK THE RESULTS WITH AN
INSTANT READ THERMOMETER BEFORE SERVING, ESPECIALLY
WHEN COOKING LARGE PIECES OF MEAT.
7

CARE AND CLEANING
1. Ensure that the appliance is OFF.
2. Unplug from the wall outlet.
3. Allow the appliance to cool completely before cleaning. Metal parts
willretainresidualheatforasignicanttimeaftertheappliancehas
been turned off. Always take great care to ensure that the appliance
has cooled completely.
4. The Inner Housing, Drawer Pan and Frying Rack have a non-stick
coating. Do not use metal kitchen utensils or abrasive cleansers or
cleaning products as this may damage the non-stick coating.
5. The Drawer Pan can be placed in the dishwasher TOP RACK ONLY.
6. WARNING: Do not wash or immerse the Main Housing, in water
or any other liquid or in the dishwasher.
7. The outer surface of the Main Housing can be cleaned by wiping with
a damp cloth. Dry with a soft cloth.
8. Clean the inside of the Air Fryer with a non-abrasive sponge
dampened in warm soapy water. Wipe with a clean cloth and allow to
dry completely.
9. Before storing make sure the Air Fryer is unplugged and all parts are
clean and dry.
10.All servicing, other than cleaning, should be performed by an
authorized service representative. See Warranty section.
8

A short supply cord is provided to reduce the hazards of becoming
entangled in or tripping over a long cord. Extension cords may be used
if care is exercised in their use. If an extension cord is used, the marked
electrical rating of the detachable power-supply cord or extension cord
should be at least as great as the electrical rating of the appliance. If
the appliance is of the grounded type, the extension cord should be a
grounded 3-wire cord. The extension cord should be arranged so that
it will not drape over the counter top or table top, where it can be pulled
on by children or tripped over.
This warranty does not include the cost of shipping, which is to be borne by the
customer.
LIMITED WARRANTY
**The original sales receipt is the only acceptable proof of purchase**
Salton Appliances (1985) Corp. warrants that this appliance shall be free from
defects in material and workmanship for a period of two (2) years from the date
of original purchase. Salton Appliances (1985) Corp. at its sole discretion during
this warranty period, will repair or replace a defective product or issue a refund.
Any refund to the purchaser will be at a pro-rated value based on the remaining
period of the warranty. All liability is limited to the amount of the purchase price.
This warranty covers normal domestic usage and does not cover damage which
occurs in shipment or failure which results from alteration, accident, misuse,
abuse, glass breakage, neglect, improper maintenance, use contrary to the
operating instructions or commercial use. This warranty is not available to
retailers or other commercial purchasers or owners.
9

Contact one of our many Service Centers found on our website
www.salton.com/customer-care
For added protection, we suggest that you use an insured delivery service with
tracking information when returning your product. Salton Canada will not be held
responsible for in-transit damage or for packages that are not received.
This warranty does not include the cost of shipping, which is to be borne by the
customer.
To contact our Customer Service Department:
Salton Appliances (1985) Corp.
81A Brunswick,
Dollard-des-Ormeaux, Quebec H9B 2J5
Canada
Telephone: 514-685-3660 (Ext. 226)
E-mail: [email protected]
Fax: 514-685-8300
www.salton.com
Securely package and return the appliance to us. Please enclose:
• Original proof of purchase
• The completed form below with a $12.50 Return Shipping & Handling fee –
either a cheque, money order or credit card (A personal cheque will delay return
shipping by 2-3 weeks)
TO OBTAIN PROMPT WARRANTY SERVICE:
or
Name
Address
City Prov/State Postal/Zip Code
Daytime Phone No. Email
Product defect:
Type of payment Cheque/Money Order Visa MasterCard
Name on card Expiry Date CSV No
Card No.
□ □ □
Table of contents
Other Salton Fryer manuals

Salton
Salton SFP60 User manual

Salton
Salton DF1233 User manual

Salton
Salton DF-1114 User manual

Salton
Salton SDF35 Installation guide

Salton
Salton DF1240BK User manual

Salton
Salton DF1240 User manual

Salton
Salton DF1539 User manual

Salton
Salton AF1870 User manual

Salton
Salton SAF12 Installation guide

Salton
Salton AF2090 User manual