Salton KM-40 User manual

Model : KM-40
®
professional mixer
Booklet KM-40 v1.indd 14 2005/10/28 14:29:12

IMPORTANT SAFEGUARDS
When using electrical appliances, basic safety precautions should always be
followed including the following:
1. Read all instructions.
2. Do not touch hot surfaces. Use handles or knobs.
3. To protect against electrical hazards, do not immerse cord, plugs,
or the appliance in water or other liquid.
4. Close supervision is necessary when any appliance is used by
or near children.
5. Unplug from outlet when not in use and before cleaning. Allow to cool
before putting on or taking off parts, and before cleaning the appliance.
6. Avoid contacting moving parts.
7. Do not operate any appliance with a damaged cord or plug or after the
appliance malfunctions, or has been damaged in any manner. Return
appliance to Salton for examination, repair or adjustment. See Warranty.
8. The use of accessories or attachments not recommended by Salton may
cause fire, electric shock or injury.
9. Do not use outdoors.
10. Do not let cord hang over edge of table or counter, or touch hot surfaces.
11. Do not place on or near a hot gas or electric burner, or in a heated oven.
12. Keep hands, hair, clothing, as well as spatulas and other utensils away
from beaters and dough hooks during operation to reduce the risk of
injury to persons, and/or damage to the mixer.
13. To disconnect, turn the control to OFF, then remove plug from wall outlet.
14. Unplug before inserting or removing parts.
15. Remove beaters and dough hooks from the mixer before washing.
16. Do not use appliance for other than intended use.
17. Do not leave unit unattended while in use.
2
HOUSEHOLD USE ONLY
SAVE THESE INSTRUCTIONS
Booklet KM-40 v1.indd 15 2005/10/28 14:29:12

POLARIZED PLUG
This appliance has a polarized plug (one blade is wider than the other). To
reduce the risk of electric shock, this plug will fit in a polarized outlet only one
way. If the plug does not fit fully in the outlet, reverse the plug. If it still does
not fit, contact a qualified electrician. Do not modify the plug in any way.
DESCRIPTION OF PARTS
1. Mixer Base
2. Mixer Head
3. Bowl Speed Dial
4. Mixer Head Tilt Button
5. Mixer Speed Dial
6. Accessory Release Button
7. BeaterWhisks
8. Dough Hooks
9. Stainless Steel Bowl
10. Power On Indicator Light
INTRODUCTION
The Salton Professional Mixer is an advanced mixing system that uses twin
motor, 3-way beating action. One motor is located in the Mixer Head and
powers the individual beaters or dough hooks, turning each in the opposite
direction. One of 10 speeds can be used. The other motor, located in the Base,
drives the bowl at High or Low speed. Together this 3-way action provides
more powerful and uniform mixing results.
BEFORE FIRST USE
1. Unpack and remove all parts and packaging materials from the carton.
2. DO NOT plug the power cord into any outlet before reading these
instructions and ensuring that the Mixer Speed Dial is in the ‘Off’ position.
3. Wash the Bowl, BeaterWhisks, Dough Hooks and Spatula in warm, soapy
water. Rinse and dry thoroughly.
3
1
3
4
5
10
2
6
8
9
7
Booklet KM-40 v1.indd 16 2005/10/28 14:29:13

4. Wipe the Mixer Base and Head with a clean, damp cloth.
Dry thoroughly with a soft cloth.
NOTE: DO NOT use harsh detergents or abrasive cleansers on any part
of the appliance. DO NOT immerse the Base or power cord and plug in
water or any other liquid.
HOW TO ASSEMBLE / DISASSEMBLE
IMPORTANT: Before inserting and removing accessories or raising or
lowering the Mixer Head, switch off the mixer and remove the plug from
the electrical outlet.
Assembling the Bowl
To install the Bowl place the bottom of the Bowl on the turntable in the Base.
Turn the Bowl clockwise until it locks into position with a click.
Disassembling the Bowl
To remove the Bowl turn counter-clockwise and lift away from the Base.
Assembling the BeaterWhisks and Dough Hooks
Push the BeaterWhisks and Dough Hooks into the accessory sockets on the
underside of the Mixer Head until they click into place.
NOTE:
1. The BeaterWhisk with the plastic nodules on the base should be in
the socket closest to the front of the machine.
2. Both the BeaterWhisks and Dough Hooks have different left and
right hand parts and must be pushed into the appropriate left and
right hand sockets. Both parts can only be locked in place if they are
in the correct sockets. If only one locks in place, it is in the wrong side.
3. You may need to twist the attachments slightly to engage them in
position prior to pushing them into place.
Disassembling the BeaterWhisks and Dough Hooks
To remove the BeaterWhisks and Dough Hooks hold them loosely with one hand
while pressing the Accessory Release Button. The Accessory Release Button does
not eject the accessories but will allow them to be removed by hand.
NOTE: The Bowl and Accessories can only be removed when the Mixer Head
is raised.
4
Booklet KM-40 v1.indd 17 2005/10/28 14:29:13

Raising or Lowering the Mixer Head
Press the Mixer Head Tilt Button and raise or lower the Mixer Head until it
clicks into place.
HELPFUL HINTS
1. The Mixer and Mixing Bowl are each driven separately by different
motors and their speeds can be individually adjusted.
2. The Mixer Speed Dial is the ‘ON/OFF’ switch for both the Mixer Head
and the Bowl. It is also the speed control for the Mixer Head.
3. The Power On indicator light is also the mixing speed indicator. To
select the mixing speed turn the Dial until the required speed is
aligned with the Indicator Light.
HOW TO USE
1. Position the Base on a level, dry and stable work surface next to a
120 volt A.C. outlet. Ensure that the Mixer Speed Dial is in the ‘Off’ position.
2. Depress the Mixer Head Tilt Button and raise the Mixer Head until it locks
in the raised position.
3. Install the Bowl and BeaterWhisks or Dough Hooks.
4. Ingredients may be added at this time.
5. While pressing the Mixer Head Tilt Button, lower the Mixer Head until it
clicks into place.
6. Plug the Mixer into the outlet. The Power On indicator light will be lit
indicating that power is connected.
7. Select the Mixer speed by slowly turning the Mixer Speed Control Dial to
the desired speed. Select the Bowl speed.
8. Upon completion of mixing, turn the Mixer Speed Dial to the ‘Off’ position.
NOTE: The Power On indicator light will be lit until the power cord is
unplugged from the outlet.
9. Unplug the power cord.
10. Depress the Mixer Head Tilt Button and raise the Mixer Head until it locks
into the raised position.
11. Press the Accessory Release Button and remove the accessories.
12. Remove the Bowl from the Base.
5
Booklet KM-40 v1.indd 18 2005/10/28 14:29:13

HINTS FOR MIXING
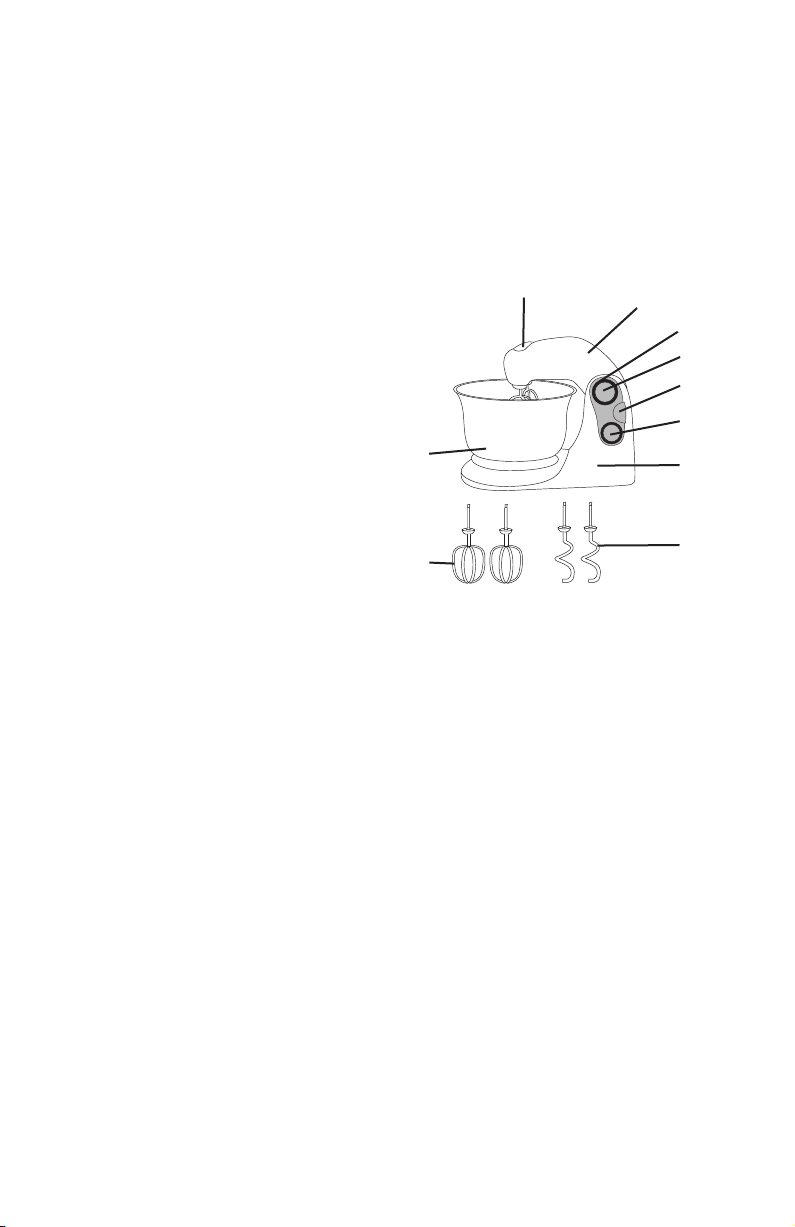
1. The BeaterWhisks are used for most mixing tasks. Speeds 7 – 10 should
be used for creaming and whipping of meringues, mayonnaise etc.;
speeds 4 – 7 for cake mixes; speeds 2 – 5 for biscuit mixes. The lowest
speed should be use to fold in dry ingredients.
2. The Dough Hooks are used for heavier doughs such as yeast dough and
short crust pastry. Speeds 1 – 2 should be used to start mixing then
increase speed to 3, 4 or 5 as the ingredients combine. As the dough ball
forms, lower the mixer speed to 1 – 2.
3. The Mixing Bowl automatically turns on when the Mixer Speed Dial is
turned on and should normally be used on the low speed setting. For
light mixes requiring maximum mixing performance such as mayonnaise
and meringue, the higher bowl speed is recommended as this passes the
mixture through the BeaterWhisks for faster results. For large volumes,
the bowl speed should be reduced to low, especially for thick mixtures.
CARE AND CLEANING
Before cleaning the Salton Professional Mixer, ensure that the power cord
is unplugged from the electrical outlet.
1. Remove BeaterWhisks, Dough Hooks and Bowl.
2. Wipe the Mixer Base and the power cord with a damp cloth. Dry with
a soft cloth. DO NOT immerse the Mixer Base or power cord and plug
in water or any other liquid.
3. DO NOT use harsh detergents or abrasive cleansers on any part of the
appliance.
4. Wash the BeaterWhisks, Dough Hooks and Bowl in warm soapy water. Dry.
The BeaterWhisks and Dough Hooks can also be washed in the dishwasher.
5. Store the Mixer in a dry accessible place. Place the BeaterWhisks and
Dough Hooks in the Bowl. Do not store the accessories in a drawer with
other kitchen utensils as they may become damaged.
6. DO NOT wind the power cord around the Mixer Base as the residual
heat from the motor may damage the cord.
6
Booklet KM-40 v1.indd 19 2005/10/28 14:29:13

RECIPES
White Bread
1 package .25 oz (8 g) dry yeast
1 tbsp. (15 ml) sugar
1 cup (250 ml) lukewarm water
3/4 cup (180 ml) lukewarm milk
3 ozs. (60 g) butter, melted
4 cups (1L) flour
1 tsp (5 ml) salt
1. Combine the first five ingredients in a small bowl and allow to stand in
a warm place until mixture begins to froth. About 10 minutes.
2. Inset dough hooks into the mixer head. Sift flour and salt into the
mixing bowl.
3. With the bowl speed set on low start the mixer at speed 1 or 2, gradually
add yeast mixture. Knead on speed 4 or 5 for 3 to 4 minutes or until
the dough forms a smooth ball. Mixture will be wet and sticky. Remove
dough from bowl using a spatula.
4. Place dough in a greased bowl, turning once to grease the top of the
dough. Cover and let rise in a warm place until doubled in size, about
40 – 50 minutes.
5. Punch down, fold sides to centre and turn the dough over. Remove the
dough from the bowl and place onto a well-floured surface. Lightly knead
dough with palm of your hands until smooth and elastic.
6. Cut dough in half and shape into two loaf pans. Cover loosely with plastic
wrap and allow to rise in a warm place until doubled in size. About
30 – 40 minutes. Preheat oven to 400°F (200°C).
7. Bake for approximately 30 minutes. Baked loaves sound hollow
when tapped.
7
Booklet KM-40 v1.indd 20 2005/10/28 14:29:13

1
Variations:
Breadsticks
1. Follow steps 1 – 5 from the White Bread recipe above.
2. Cut dough into 8 portions. In each portion cut 3/8” (1 cm) length slices.
3. Cut each slice into 3/8” (1 cm) strips and roll into thin long sticks.
4. Place onto a baking tray lined with parchment paper. Brush breadsticks
with milk and sprinkle with poppy or sesame seeds or sea salt..
5. Bake at 400°F (200°C) for 15 minutes or until dry and crisp and golden
brown.
Bread Rolls
1. Follow steps 1 to 5 in the White Bread recipe above.
2. Cut the dough into 12 portions and roll each portion into an even soft ball.
3. Place each ball of dough onto a baking tray lined with parchment paper.
Cover in plastic wrap and allow to double in size, about 20 – 40 minutes.
Brush with eggwash (a mixture of egg yolk and tepid water) and sprinkle
with a mixture of poppy and sesame seeds.
4. Bake at 400°F (200°C) for 15 – 20 minutes.
Vanilla Sponge Cake
4 eggs, at room temperature
2/3 cup (170 ml) superfine sugar
1/3 cup (85 ml) custard powder
1/2 tsp. (5 ml) vanilla extract
2/3 cup (170 ml) all-purpose flour
1 tsp (5 ml) baking powder
1. Grease and flour 2 - 8” (20 cm) cake pans. Preheat oven to 350°F
(180°C).
2. Place the egg whites and sugar in the mixing bowl and with the bowl
speed set on high, start mixing on speed 9 – 10 for about 8 minutes or
until very thick and creamy.
3. Stop the mixer and remove the BeaterWhisks and bowl from the mixer.
4. Triple sift the dry ingredients. With a spoon or spatula fold in the sifted
mixture. Do not over-beat as you will loose the air bubbles.
8
Booklet KM-40 v1.indd 21 2005/10/28 14:29:14

1
5. Spoon the mixture evenly into the 2 prepared cake pans and bake for
approximately 15 minutes or until the sponge comes away from the sides
of the pan.
6. Once cooked run a knife around the sides of the cake. Turn onto a cooling
rack and gently tap the bottom of the pan to loosen the cake. Allow the
cake to cool before using.
7. To serve, cut into two layers and spread the middle with jam or whipped
cream. Place the top layer on the cake. Top with sifted icing sugar or more
whipped cream. Cut into wedges and serve with fresh berries.
Banana Cake
6 oz. (180 g) butter, cut in pieces, room temperature
1-1/2 cups (375 ml) sugar
2 eggs
2-1/4 cups (560 ml) all-purpose flour
1/2 tsp. (3 ml) salt
1 tsp. (5 ml) cinnamon
1/2 tsp. (3 ml) nutmeg
1/2 cup (125 ml) buttermilk
1 tsp. (5 ml) white vinegar
1 tsp. (5 ml) vanilla extract
1-1/2 cups (375 ml) banana, very ripe and mashed
1. Preheat oven to 350°F (180°C). Grease and flour a 8” (20 cm) Bundt pan.
2. With the bowl speed set on high, beat butter and sugar on mixing speed
7 – 8 until well combined. Add eggs, one at a time, beating well between
each addition.
3. Reduce bowl speed to low and mixing speed to 1 – 2. Add 1/2 the sifted
dry ingredients and 1/2 the buttermilk at a time. Mix in the vinegar and
vanilla. Add bananas and mix until combined.
4. Pour mixture into the prepared pan and bake for about 40 minutes or
until cooked when tested with a skewer.
5. Allow cake to cool in pan for 5 minutes before transferring to a wire
rack to cool.
9
Booklet KM-40 v1.indd 22 2005/10/28 14:29:14

1
Butter Frosting
8 oz. (250 g) butter or margarine, softened
3 cups (750 ml) icing sugar
2 – 3 tbsp. (30 – 45 ml) milk
1-1/2 tsp. (8 ml) vanilla (optional)
1. Place butter or margarine in the mixing bowl.
2. With the bowl speed set on high, beat on mixing speed 4 – 5 until light
in colour
3. Reduce bowl speed to low and mixing speed to 1 and mix in remaining
ingredients until combined.
CHOCOLATE CHIP COOKIES
4 ozs. (125 g) butter, softened
1/2 cup (125 ml) brown sugar, firmly packed
1/2 cup (125 ml) sugar
1 tsp. (5 ml) vanilla extract
1 egg
1-3/4 cups (430 ml) flour
1 cup (250 ml) chocolate chips
1. Preheat oven to 350°F (180°C). Line 2 cookie sheets with parchment
paper.
2. Place butter, sugars and vanilla in the mixing bowl. With the bowl speed
set on high, set the mixing speed to 1 – 2 until the butter starts to break
up and combine with the sugars. Increase the mixing speed to 7 and mix
until light and creamy.
3. Add egg and vanilla. Mix until well combined. Reduce mixing speed to 1
and add flour and chocolate chips.
4. Roll tablespoon amounts into balls and place onto the cookie sheet. Press
lightly with the back of a fork. Ensure that the cookies are well spaced to
allow for spreading.
5. Bake in oven for about 10 – 13 minutes or until golden brown. Do not
overcook. Cool on wire racks.
10
Booklet KM-40 v1.indd 23 2005/10/28 14:29:14

1
CREPES
1-1/2 cups (375 ml) all purpose flour
pinch salt
2 eggs
1-1/4 cups (310 ml) milk
1 tbsp. (15 ml) oil
1. Sift flour and salt into mixer bowl.
2. Set the bowl speed on low. In a small bowl, combine eggs and milk then
add to mixing bowl. Start mixing with the mixer speed on 1. Increase
speed to 5 and beat well to remove any lumps.
3. Mix in oil and allow to stand for 1 hour.
4. Grease heated skillet. Pour about 1/3 cup (85 ml) of batter into the skillet
to make each crepe.
5. Cook quickly until lightly brown. Turn and brown other side. Sprinkle with
lemon juice and sugar. Roll and serve hot.
WAFFLES
2 cups (500 ml) all-purpose flour
2 eggs, separated
2/3 cup (170 ml) milk
1/2 cup (125 ml) water
3 ozs. (90 g) butter, melted
2 tbsp. (30 ml) fine sugar
1. Preheat waffle maker.
2. Using the mixing bowl combine sifted flour, egg yolks, milk, water and
butter. Set the mixing bowl speed on high and the mixing speed on 5.
Mix until smooth. Transfer to a large bowl. Wash and dry the mixing bowl
and BeaterWhisks.
3. Using the clean mixing bowl and with the bowl speed set on low, beat
egg whites on mixing speed 10 until soft peaks form. Gradually add the
sugar and beat until the sugar is dissolved.
4. Fold the egg white mixture into the batter.
5. Follow the directions to cook waffles included with your waffle maker.
11
Booklet KM-40 v1.indd 24 2005/10/28 14:29:14

1
Meringues
2 egg whites
3 ozs. (90 g) fine sugar
3 ozs. (90 g) icing sugar
1. Preheat oven to 250°F (120°C). Line two cookie sheets with
parchment paper.
2. Place the egg whites in the mixing bowl. Set the bowl speed on low and
beat egg whites on speed 10 until stiff but not dry.
3. With the mixer on speed 10 gradually add fine sugar.
4. Reduce mixing speed to 1 and fold in icing sugar. Mix until stiff and shiny.
5. Using a star shaped nozzle on a piping bag, pipe small meringues
onto the prepared cookie sheet. If you do not have a piping bag,
use two teaspoons.
6. Bake for 10 minutes, reduce heat to 200° F (100° C) and continue cooking
for 20 – 25 minutes.
12
Booklet KM-40 v1.indd 25 2005/10/28 14:29:14

A short supply cord is provided to reduce the hazards of becoming entangled
in or tripping over a long cord. Extension cords may be used if care is exercised
in their use. If an extension cord is used, the marked electrical rating of the
detachable power-supply cord or extension cord should be at least as great as
the electrical rating of the appliance. If the appliance is of the grounded type,
the extension cord should be a grounded 3-wire cord. The extension cord
should be arranged so that it will not drape over the counter top or table top,
where it can be pulled on by children or tripped over.
LIMITED WARRANTY
Salton Canada warrants that this appliance shall be free from defects in material
and workmanship for a period of one year from the date of purchase. During
this ‘in-warranty’ period, defective products will be repaired or replaced at the
discretion of the retailer and/or Salton Canada. A defective product should be
returned to the original place of purchase within the retailer’s stipulated return/
exchange period*. If you do not wish or are unable to have a defective product
replaced under warranty by the retailer, Salton Canada will repair or replace the
defective product without charge. You may contact us for assistance by mail,
e-mail, fax or telephone as listed below.
This warranty covers normal domestic usage and does not cover damage which
occurs in shipment or failure which results from alteration, accident, misuse,
abuse, glass breakage, neglect, commercial use or improper maintenance.
To ensure prompt ‘in-warranty’ service be sure you have an original proof of
purchase. You may be asked to return the product to us along with a description
of the defect and your address, zip/postal code.
For repairs not covered by the warranty, please contact us for assistance.
13
SALTON CANADA
Customer Service Department
81A Brunswick, Dollard-des-Ormeaux,
Quebec, Canada H9B 2J5
Website: www.salton.com
E-mail: [email protected]
Fax: 514-685-8300
Tel: 514-685-3660
®
* Return/exchange policies at each retailer vary and may differ from the Salton Canada
1 year limited warranty period.
Booklet KM-40 v1.indd 26 2005/10/28 14:29:14
Table of contents
Other Salton Mixer manuals

Salton
Salton Masha PM1324 User manual

Salton
Salton KM1390 User manual

Salton
Salton Elite SESM16 Installation guide

Salton
Salton DM-11 User manual

Salton
Salton KM-386 User manual

Salton
Salton KM25 User manual

Salton
Salton KM-1078 User manual

Salton
Salton SSBM09 User manual

Salton
Salton SSBM11 Installation guide