Salton KM25 User manual

pro-mixer
Instruction Booklet
Model: KM25
®
Booklet_KM25_EN.qxd:Salton Booklet 7/27/11 3:23 PM Page 1

IMPORTANT SAFEGUARDS
When using electrical appliances, basic safety precautions should always be
followed including the following:
1. Read all instructions.
2. Do not touch hot surfaces. Use handles or knobs.
3. To protect against electrical hazards, do not immerse cord, plugs,
or the appliance in water or other liquid.
4. Close supervision is necessary when any appliance is used by
or near children.
5. Unplug from outlet when not in use and before cleaning. Allow to cool
before putting on or taking off parts, and before cleaning the appliance.
6. Avoid contacting moving parts.
7. Do not operate any appliance with a damaged cord or plug or after the
appliance malfunctions, or has been damaged in any manner. Return
appliance to Salton for examination, repair or adjustment. See Warranty.
8. The use of accessories or attachments not recommended by Salton may
cause fire, electric shock or injury.
9. Do not use outdoors.
10. Do not let cord hang over edge of table or counter, or touch hot surfaces.
11. Do not place on or near a hot gas or electric burner, or in a heated oven.
12. Keep hands, hair, clothing, as well as spatulas and other utensils away
from beaters and dough hooks during operation to reduce the risk of
injury to persons, and/or damage to the mixer.
13. Unplug before inserting or removing parts.
14. Remove beaters and dough hooks from the mixer before washing.
15. Do not use appliance for other than intended use.
16. Do not leave unit unattended while in use.
2
HOUSEHOLD USE ONLY
SAVE THESE INSTRUCTIONS
KM-25 Booklet v03 7/23/04 5:45 PM Page 15

POLARIZED PLUG
This appliance has a polarized plug (one blade is wider than the other).
To reduce the risk of electric shock, this plug will fit in a polarized outlet only
one way. If the plug does not fit fully in the outlet, reverse the plug. If it still
does not fit, contact a qualified electrician. Do not modify the plug in any way.
INTRODUCTION
The Salton Pro-Mixer is an advanced mixing system that uses twin motor,
3-way beating action. One motor is located in the Hand Mixer and powers
the individual beaters, turning each in the opposite direction. One of
10 speeds can be used.
The other motor, located in the Base, drives the bowl at High or Low speed.
Together this 3-way action provides more powerful and uniform mixing results.
Important: Please read these instructions before using your Salton
Pro-Mixer and keep in a safe place for future reference.
DESCRIPTION OF PARTS
1. Stand/Base
2. Bowl Speed Dial
3. Hand Mixer Release Button
4. Tilt Button
5. Mixer Head
6. Boost Control
7. HI (high) LO (low) Speed Switch
8. 5-Speed Switch
9. Eject Button
10. Hand Mixer
11. Attachment Socket
12. Stainless Steel Bowl
13. Beaters
14. Dough Hooks
3
13
2
6
3
1
97
8
10 5
4
14
11
12
KM-25 Booklet v03 7/23/04 5:45 PM Page 16

Hand Mixer Controls
Eject Button: This button effortlessly releases the Beaters or Dough
Hooks for cleaning.
5-Speed Switch: The 5 speeds of this control become 10 when
used in conjunction with the HI/LO Speed Switch.
The ‘0’ setting is ‘Off’.
HI/LO Speed Switch: Change the 5 speeds from LO range to HI range. See
Mixing Guide below.
Boost Control: Pressing this button temporarily changes the speed to
maximum of the range no matter what the setting.
Press and hold this button for a short boost of extra
power. Do not depress this button for longer than 30
seconds.
Base Controls
Bowl Speed Dial: For optimum mixing, adjust the speed of the Bowl rotation
by selecting either LO (low speed) or HI (high speed) as required. In position
‘0’ (Off), the bowl does not rotate. NOTE: It is best to begin with the Bowl
speed set at LO to ensure that light ingredients stay inside the Bowl.
BEFORE FIRST USE
1. Unpack and remove all parts and packaging materials from the carton.
2. DO NOT plug the power cord into any outlet before reading these
instructions and ensuring that the 5-Speed Switch and Bowl Speed
Dial are both set to ‘0’ (Off).
3. Wash the Bowl, Beaters, Dough Hooks and Spatula in warm, soapy water.
Rinse and dry thoroughly.
4. Wipe the Base and Hand Mixer with a clean, damp cloth. Dry thoroughly
with a soft polishing cloth.
NOTE: DO NOT use harsh detergents or abrasive cleansers on any parts
of the appliance. DO NOT immerse the Base, Hand Mixer or power cord
and plug in water or any other liquid.
4
KM-25 Booklet v03 7/23/04 5:45 PM Page 17

HOW TO ASSEMBLE/DISASSEMBLE
The Salton Pro-Mixer can be used as a stand mixer (Ill. 1)
or hand mixer (Ill.2). Before assembling or disassembling
make sure the power cord is unplugged and the speed
control is at ‘0’ on the Mixer and Bowl Speed is on ‘Off’.
To connect the Hand Mixer to the Mixer Head
Press and hold the Tilt Button on the Mixer Head. Lift
the Head upward until it locks into the tilt position (Ill 3).
Position the rectangular holes in the back of the Hand Mixer
over the 2 retaining prongs in the Mixer Head.
Press down on the Hand Mixer until it clicks (locks) into
place (Ill. 4). The Mixer Head is still in the raised position.
To lower, press and hold the Tilt Button while gently
lowering the Hand Mixer down fully until it clicks into
position (Ill. 5).
To disconnect the Hand Mixer from
the Mixer Head
Raise the Mixer Head into the tilt position as described above.
Once the Mixer Head is in the tilt position you can remove the
Hand Mixer by pressing the Hand Mixer Release Button and
sliding the Hand Mixer up and away from the Mixer Head.
To install the Bowl
Place the bottom of the Bowl on the turntable in the Base. Turn the Bowl
clockwise until it locks into position with a click.
To remove the Bowl
Turn the Bowl counter-clockwise and lift away from the Base.
5
Ill.1
Ill.2
Ill.3
Ill.4
Ill.5
KM-25 Booklet v03 7/23/04 5:45 PM Page 18

Inserting the Beaters
Insert the notched end of either beater into either Attachment Socket. Twist
in a counter-clockwise direction while pushing to position the beater notch
properly in the socket. The beater should locate firmly in the socket with a
noticeable click. Repeat with the other beater.
Inserting the Dough Hooks
The Dough Hook with the red plastic spacer should be positioned in the socket
on the right side of the Mixer. (NOTE: The inside of the socket has a red plastic
insert.) Insert the other Dough Hook into the left socket. Twist counter-clock-
wise until it clicks into position.
Removing the Beaters or Dough Hooks
With the Power Cord unplugged, tilt the Mixer Head back and loosely grasp
the spindles of the attachments. Press the Eject Button and the attachments
will be released into your hand.
Hints:
•It is easier to install or remove the Bowl when the Hand Mixer is detached
from the Base.
•Make sure the attachments are properly inserted into the correct Sockets
to obtain optimum mixing results.
HOW TO USE
STAND MIXER
1. Position the Base on a level, dry and stable work surface. Ensure that
the Speed Switch and Controls are all in the ‘0’ (Off) position.
2. While depressing the Tilt Button, raise the Head until it locks
in the raised position.
3. Install the Bowl onto the Base.
4. Connect the Hand Mixer to the Mixer Head.
5. Insert the appropriate attachments in the Hand Mixer Sockets.
6
KM-25 Booklet v03 7/23/04 5:45 PM Page 19

6. Ingredients may be added at this time.
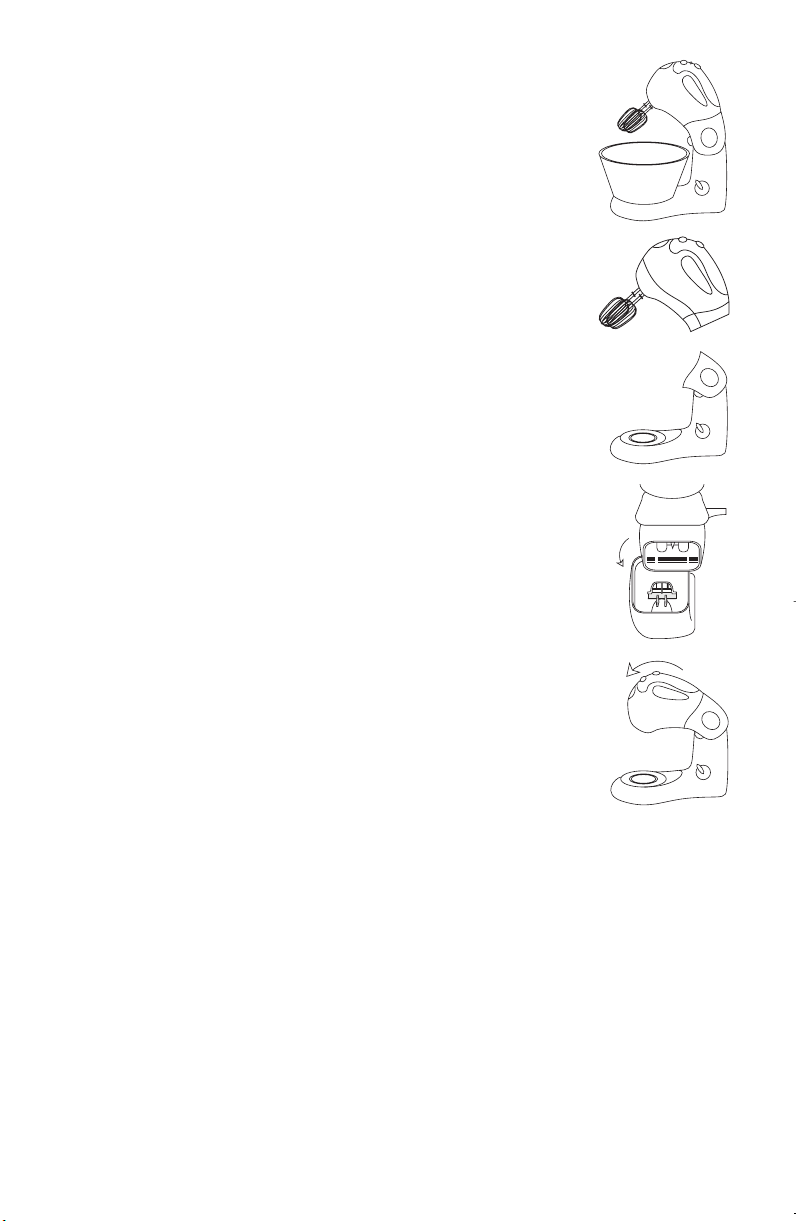
7. While pressing the Tilt Button, lower the Mixer Head until it clicks into place.
8. Plug the Stand Mixer into a 120 Volt wall outlet.
9. Select the Hand Mixer speed and then the Bowl speed. Always set the
Hand Mixer speed before the Bowl speed to prevent ingredients from being
ejected from the Bowl. (See the recommended Mixing Speed Chart below)
10. Upon completion of mixing turn the 5-Speed Switch and Bowl Speed
Dial to ‘0’ (Off).
11. Unplug the power cord.
12. While depressing the Tilt Button, raise the Mixer Head until it locks into
the raised position.
13. With fingers placed loosely around the spindle of the attachments,
press the Eject Button to release them from the Sockets.
14. Detach and remove the Bowl from the Base.
15. Remove the Hand Mixer from the Mixer Head.
16. Follow the directions in Care and Cleaning section.
HAND MIXER
1. Place the stainless steel Bowl that is included with this unit or any other
suitable mixing bowl on a level, dry and stable working surface. Ensure
that the Speed Switch is in the ‘0’ (Off) position.
2. Ingredients should be added to the Bowl.
3. Install desired attachment to the Hand Mixer.
4. Plug Hand Mixer into a 120 Volt wall outlet.
5. Select the HI or LO position on the HI/LO Speed Switch. Then select the
desired Hand Mixer speed on the 5 Speed Switch. (See the recommended
Mixing Speed Chart below)
6. Hold the Bowl securely while mixing.
7. Upon completion, turn the 5-Speed Switch to ‘0’ (Off).
8. Unplug the power cord.
9. Remove the attachments from the Hand Mixer.
10. Follow the directions in the Care and Cleaning section.
7
KM-25 Booklet v03 7/23/04 5:45 PM Page 20

MIXING CHART
Mixing Task Recommended Speed(s)
Folding and Blending LO 1 and 2
Light Mixing LO 2 and 3
Creaming and Beating HI 2 and 3 or LO 5
Whipping and Aerating HI 4 , 5 and Boost
CARE AND CLEANING
Before cleaning the Salton Pro-Mixer, ensure the power cord is unplugged
from the electrical outlet.
1. Detach Beaters or Dough Hooks and Bowl immediately after use.
2. Wipe the outside area of the Pro-Mixer Hand Mixer and Base with
a damp cloth and dry with a soft polishing cloth.
3. Wipe excess food particles from the power cord.
4. DO NOT immerse the Stand/Base, Hand Mixer or power cord and plug
in water or any other liquid.
5. DO NOT use harsh detergents or abrasive cleansers on any parts
of the appliance.
6. Wash the Bowl, Beaters and Dough Hooks in warm soapy water.
The Beaters and Dough Hooks may be washed in a dishwasher.
7. Store the Pro-Mixer in a dry accessible place. Place the Beaters and
Dough Hooks in the Bowl. Do not store the attachments in a drawer
with other kitchen utensils as they may become damaged.
8. DO NOT wind the power cord around the Hand Mixer body as the
residual heat from the motor may damage the cord.
8
KM-25 Booklet v03 7/23/04 5:45 PM Page 21

RECIPES
Vanilla Sponge Cake
3 eggs, room temperature and separated
3/4 cup (175 ml) icing sugar
1 vanilla bean, split and seeds removed
1 cup (250 ml) self raising flour, sifted
3 tbsp. (45 ml) water
1. Grease and flour an 8" (20 cm) cake tin. Preheat oven to 350°F (180°C).
2. Place the egg whites in the mixing bowl. Using high speed, beat until
soft peaks form.
3. Add icing sugar and beat until the mixture is thick and shiny. Beat in the
egg yolks and vanilla. Continue mixing until the mixture is well combined.
4. Remove the bowl and use a spatula to fold in the flour and water.
Combine the mixture well but do not over mix.
5. Pour the mixture into the greased cake tin and bake for 20 – 25 minutes
or until a toothpick inserted in the center comes out clean. Remove from
oven and cool at room temperature.
6. Run a knife around the edges of the cake pan. Turn the cake onto
a rack and tap the bottom of the pan lightly to release the cake.
Cool before using.
7. Spread with your favourite frosting or whipped cream and top
with fresh berries.
9
KM-25 Booklet v03 7/23/04 5:45 PM Page 22

Butter Cake
4 ozs. (125g) butter
4 drops vanilla
1/4 cup (60 ml) icing sugar
2 eggs
2 cups (500 ml) self raising flour
1 cup (250 ml) milk
1. Preheat the oven to 350° F (180°C) and grease an 8" (20cm) round
cake pan.
2. Add the butter to the bowl and break up by using the mixer on ‘Lo’
speed 1. Add vanilla and sugar. Cream together on speed 3 until light
and creamy. Approximately 2 minutes.
3. Add eggs one at a time beating well between each addition.
4. Reduce to speed 1 and mix in sifted flour and milk alternately. Mix for
3 – 4 minutes. Cake batter should be smooth, thick and creamy.
5. Pour batter into prepared cake pan and bake for 30 – 35 minutes
or until a toothpick inserted in the center comes out clean.
BUTTER CAKE VARIATIONS:
Lemon or Orange Butter Cake:
Add the rind of one lemon or orange into butter, vanilla and sugar mixture.
Continue with # 3 above.
Chocolate Butter Cake
Melt 2oz. (60 g) of unsweetened chocolate and combine with the milk.
Mix into the cake batter as directed above.
10
KM-25 Booklet v03 7/23/04 5:45 PM Page 23

Frosting
1/3 cup (75 ml) butter or margarine
4 cups (1 L) icing sugar
pinch of salt
3 – 4 tbsp. (60 ml) milk
1 tsp. (5 ml) vanilla
Place all ingredients in the bowl and mix on ‘LO’ speed. Combine until
creamy, light and fluffy.
Crepes
1-1/2 cups (375 ml) flour
pinch salt
2 eggs
1-1/4 cups (310 ml) milk
1 tbsp. (15 ml) oil
1. Combine all ingredients together in the Mixer Bowl. Beat on ‘LO’ speeds
for 2 minutes until smooth.
2. Allow to stand for 1 hour.
3. Grease frying pan and preheat.
4. Pour about 1/3 cup (75ml) of batter into the pan.
5. Cook until light brown, turn and brown other side.
Hot crepes can be rolled and sprinkled with icing sugar and served.
11
KM-25 Booklet v03 7/23/04 5:45 PM Page 24

Meringues
2 egg whites
3 oz. (85 g) extra-fine sugar
3 oz. (85 g) icing sugar
1. Preheat oven to 250°F (120°C)
2. Line two cookie sheets with parchment paper.
3. Add eggs to mixer bowl and beat on ‘HI’ until still but not dry.
4. Add extra-fine sugar gradually, beating well.
5. Reduce speed to ‘LO’ and fold in icing sugar. Mix until stiff and shiny.
6. Place mixture in a large piping bag that has a star tip. Pipe mounds
onto parchment paper.
7. Bake for 10 minutes then reduce heat to 200°F (95°C) and bake for
another 20 – 25 minutes.
8. Cool and serve.
Basic White Bread Dough
1 cup (250 ml) warm water
1 packet active dry yeast
1 tbsp (15 ml) sugar
1 tsp. (5 ml) vegetable oil
3/4 tsp. ( ml) salt
2 cups (500 ml) flour, divided
1. Combine water, yeast and sugar in a small mixing bowl and stir until
thoroughly dissolved. Let stand for 5 minutes. Stir in oil and salt.
2. Insert dough hooks into the Mixer.
3. Place flour in Mixer Bowl. Using ‘LO’ speeds, gradually add yeast mixture.
Note that it will be necessary to scrape sides of bowl with a rubber spatula.
Mix for 3 – 4 minutes or until all ingredients are incorporated and the
dough forms a ball. Mixture will be wet and sticky. Remove the
dough from the bowl using a rubber spatula.
12
KM-25 Booklet v03 7/23/04 5:45 PM Page 25

4. Place the dough in a greased bowl, turning once to grease the top of
the dough. Cover and let rise in a warm place until doubled in size,
approximately 30 minutes.
5. Punch down, fold sides to centre and turn the dough over. Remove the
dough from the bowl and place onto a well floured surface. Lightly
knead dough with the palm of your hands until smooth and elastic.
6. Shape into a loaf pan. Cover loosely with plastic wrap and allow to rise
in a warm place until doubled in size, about 25 – 30 minutes.
7. Preheat the oven to 400°F (200 C) and bake for approximately 30 minutes.
Properly baked loaves should sound hollow when tapped
If desired this recipe and also be used to make bread rolls. Follow the
directions in #1 - 5 above, then continue as follows:
1. Cut dough into 6 - 8 pieces and roll each portion into a ball.
2. Place onto a parchment paper lined baking sheet. Cover in plastic wrap
and allow to double in size (approximately 20 minutes).
3. In a small bowl, mix together one egg yolk and a small amount of water.
4. Brush each of the bread rolls.
5. Bake on 400°F (200 C) for 12 – 15 minutes.
13
KM-25 Booklet v03 7/23/04 5:45 PM Page 26

A short supply cord is provided to reduce the hazards of becoming entangled
in or tripping over a long cord. Extension cords may be used if care is
exercised in their use. If an extension cord is used, the marked electrical rating
of the detachable power-supply cord or extension cord should be at least as
great as the electrical rating of the appliance. If the appliance is of the
grounded type, the extension cord should be a grounded 3-wire cord. The
extension cord should be arranged so that it will not drape over the counter
top or table top, where it can be pulled on by children or tripped over.
LIMITED WARRANTY
Salton Canada warrants that this appliance shall be free from defects in material and
workmanship for a period of one year from the date of purchase. During this
‘in-warranty’ period, defective products will be repaired or replaced at the discretion
of the retailer and/or Salton Canada. This warranty covers normal domestic usage
and does not cover damage which occurs in shipment or failure which results from
alteration, accident, misuse, abuse, glass breakage, neglect, commercial use or
improper maintenance.
A defective product should be returned to the original place of purchase within the
retailer’s stipulated return/exchange period*. If you are unable to have a defective
product replaced under warranty by the retailer, please check our website at
“www.salton.com” for the service centre nearest you. You may also contact us for
assistance by mail, e-mail, fax or telephone as listed below.
To ensure prompt ‘in-warranty’ service securely package and return the product to us
prepaid. Be sure to include the original proof of purchase and a description of the
defect along with your address and postal code.
For repairs not covered by the warranty, please contact us for assistance.
SALTON CANADA
Customer Service Department
81A Brunswick,
Dollard-des-Ormeaux,
Quebec, Canada H9B 2J5
website: www.salton.com
E-mail: [email protected]
Fax: 514-685-8300
Tel: 514-685-3660 Ext.226
* Return/exchange policies at each retailer vary and may differ from the SALTON Canada 1 year limited
warranty period.
Booklet_KM25_EN.qxd:Salton Booklet 7/27/11 3:23 PM Page 2
Table of contents
Other Salton Mixer manuals

Salton
Salton KM-386 User manual

Salton
Salton KM-1078 User manual

Salton
Salton SSBM09 User manual

Salton
Salton Masha PM1324 User manual

Salton
Salton Elite SESM16 Installation guide

Salton
Salton SSBM11 Installation guide

Salton
Salton DM-11 User manual

Salton
Salton KM1390 User manual

Salton
Salton KM-40 User manual