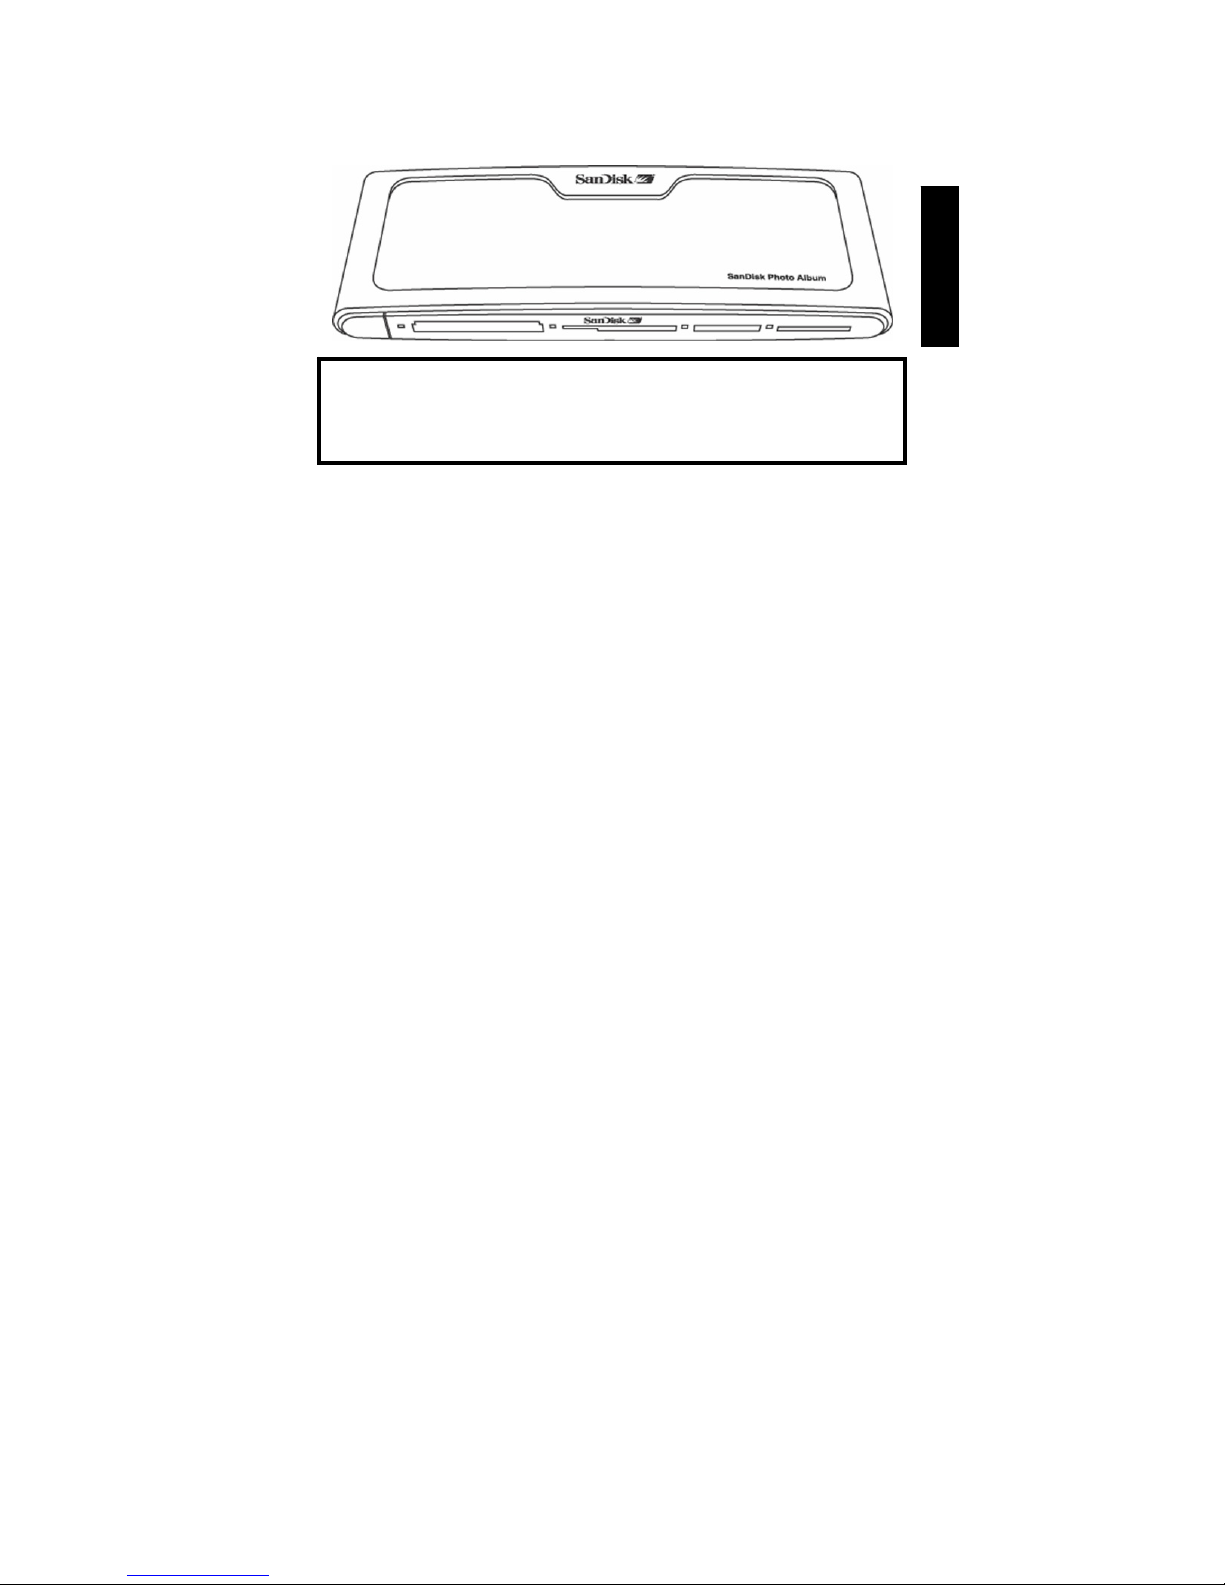
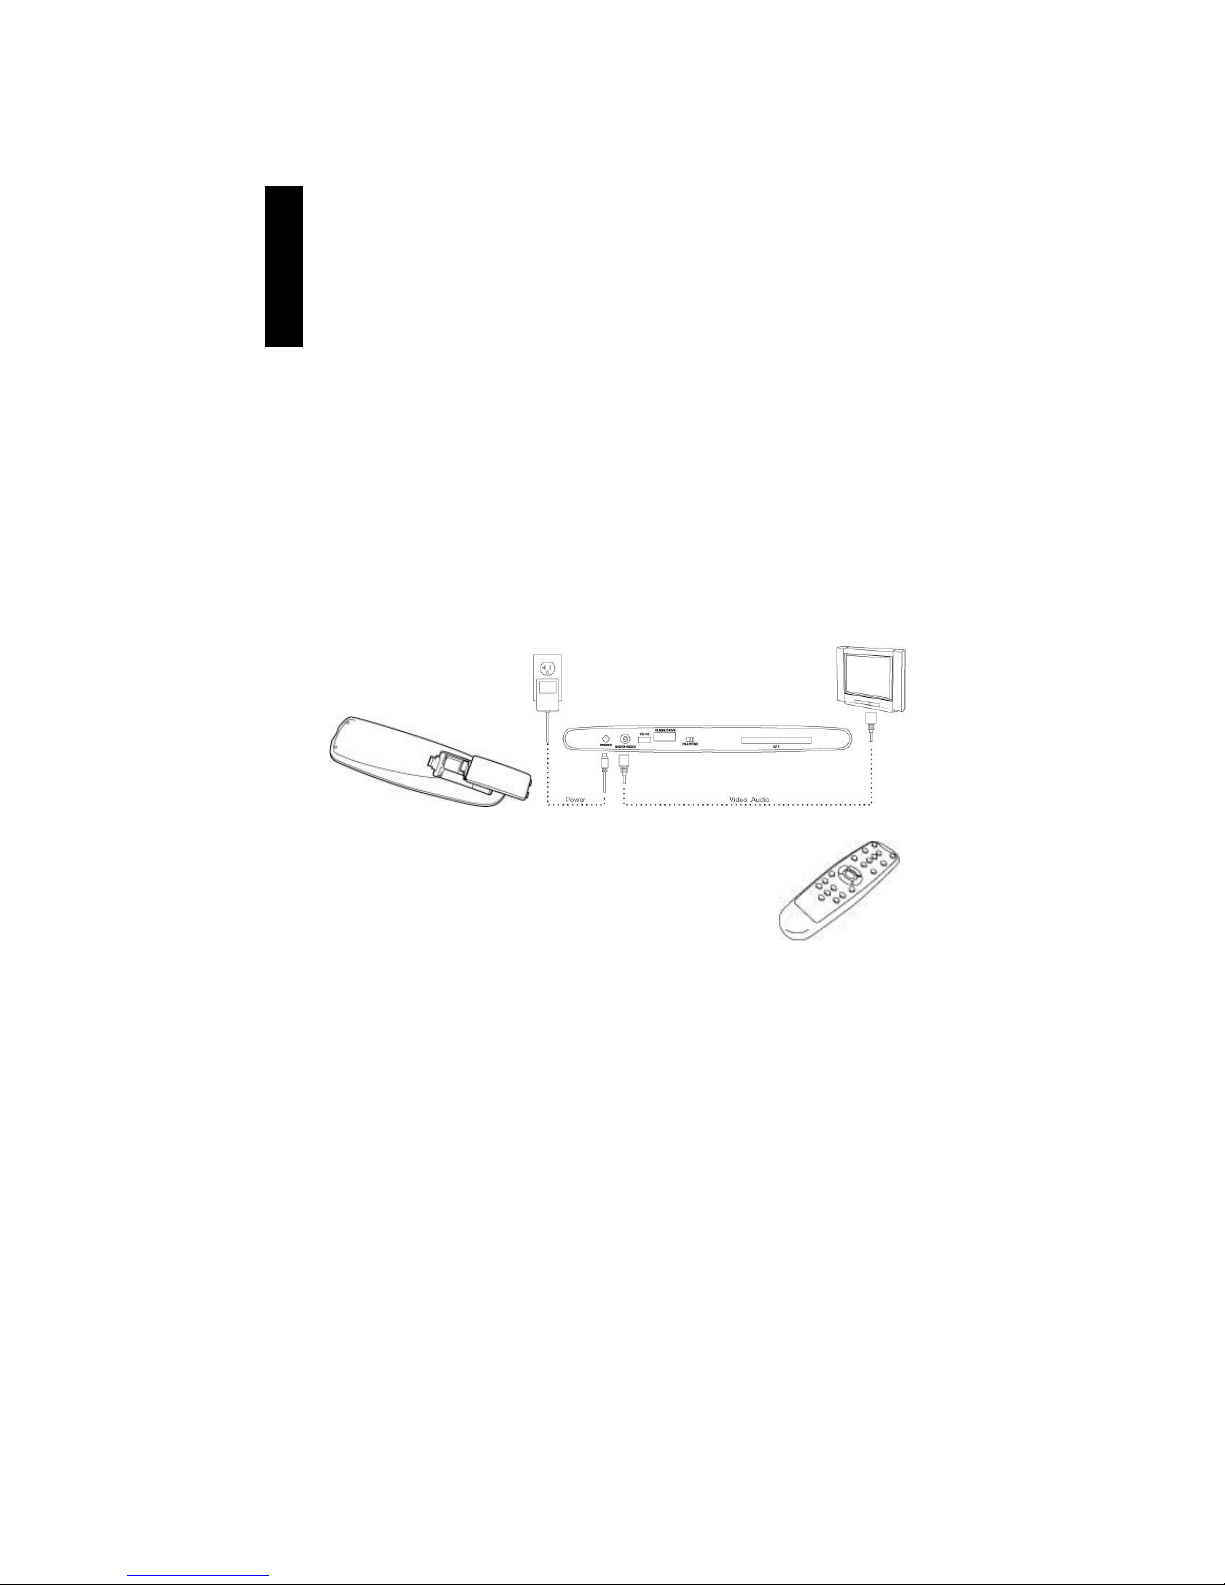
SanDisk Photo Album User manual

SanDisk®Photo Album
User Guide
Contents
Package Contents............................................................................................…......................…….. 1
Product Specification...........................................................................................…..................……...2
Minimum Requirements................................................…...................................…............................ 2
Installing SanDisk Photo Album............................................................................………………….… 2
Using SanDisk Photo Album.................................................................................………………….… 2
Displaying Photos & Video Clips..........................................................................………………..…… 3
Storing and Deleting Photos & Video Clips..........................................................………………..…… 4
Playing Photos with Music....................................................................................………………..……4
Playing Music.........................................................................................................…………………… 5
Files Mode.............................................................................................................………………….…5
Settings & Options.................................................................................................……………….……5
USB Card Reader/Writer Mode.............................................................................…………………….6
Troubleshooting...............…...................................................................................……………………7
Warranty...............................................................................................................………………..……8
Congratulations
Congratulations on your purchase of the SanDisk Photo Album. Now you can easily view and share
your digital photos and more on TV in the comfort of your living room. This user guide tells you how
to install and use your SanDisk Photo Album.
Package Contents
•SanDisk Photo Album
•Power Supply
•Audio/Video Cable
•Remote Control with Batteries
•User Guide
•CD-ROM (for use as an 8-in-1 card reader/writer)
•USB Cable (for use as an 8-in-1 card reader/writer)
You may register your product at
http://www.sandisk.com/registration
and receive e-mail alerts about new firmware versions that enhance the functionality of
your SanDisk Photo Album!
Failure to register your product will NOT diminish the rights you have under the product warranty.
ENGLISH

2
Product Specification
•Content Format Support:
•JPEG (Baseline, up to 16 Megapixel)
•Motion JPEG
•MPEG-1 (QVGA resolution / up to 8 frames per second)
•MP3 (up to 320 Kbps)
•Connections:
•Video (Composite) and Audio (Stereo)
•Two USB 1.1 connectors (to PC & USB Flash Drive)
•Power
•Compatible Flash Memory Card Formats:
•CompactFlash® Type I / II
•SD™ / MultiMediaCard™
•Memory Stick™ / Memory Stick PRO™
•SmartMedia™ / xD
Minimum Requirements
For storing and playback:
•TV with RCA video (NTSC or PAL) and RCA audio connection (left + right)
For use as an 8-in-1 reader/writer:
•Windows: Pentium-class PC with USB support, CD-ROM Drive and Windows 98SE, ME, 2000 or
XP.
•Macintosh: Computer with USB support, CD-ROM Drive and Mac OS 10.1.2+
Installing SanDisk Photo Album
1. Plug the Power Supply into the back of the SanDisk Photo Album and plug the power supply
into a power outlet.
2. Connect the audio/video cable to the TV and/or audio system. On the TV, the yellow plug
should connect to Video In, the red plug should connect to Audio In (R), and the white plug
should connect to Audio In (L).
3. Connect the audio/video cable to the back of the SanDisk Photo Album.
4. Insert the batteries into the remote control.
5. Press the power button on the remote and the SanDisk Photo Album will start up (the SanDisk
logo lights up).
6. Turn on the TV and change the input source on the TV. Depending on the TV, the input source
may be called TV/Video, Input, or Source (consult the TV manual for more information). When
the correct source is selected,
you will see a message to insert
a memory card. The SanDisk
Photo Album is now ready for
use.
Using SanDisk Photo Album
Insert a flash memory card or USB Flash Drive (UFD) into the corresponding slot (for SmartMedia,
insert with gold-plated side facing down). When a card is inserted correctly, the green LED left of the
slot turns on and the SanDisk Photo Album will begin reading the card. If you have photos (JPEG) or
video clips (Motion JPEG or MPEG-1) stored on the card, you will automatically be taken to the
ENGLISH

3
PHOTO & VIDEO menu. If you have music (MP3) on the card, but not one of the supported photo or
video file formats, you will be taken to the MUSIC menu.
The SanDisk Photo Album is operated with the included remote control. If you have more than one
memory card inserted, you can press SELECT CARD. Choose which card (or UFD) to use with the
up and down arrows buttons and then press OK to confirm your choice.
Displaying Photos & Video Clips
•Press the PHOTO/VIDEO button to display the thumbnails of photos and video clips stored on the
selected memory card or UFD.
•Photos and video clips can be inside an album (folder). Use the arrow buttons to select an album
and press OK to enter the album. Press play while the album is pre-selected to play the
photos/video clips as a slide show.
•Use the arrow buttons to select a thumbnail representing a photo or video and use PREVIOUS
and NEXT buttons to switch between pages.
•Press OK to display (photo) or play (video) full screen size. Press PLAY/PAUSE to start playing
photos and videos according to the SLIDE SHOW settings (see Settings & Options).
•Press PREVIOUS to go to the previous photo or video clip.
•Press NEXT to go to the next photo or video clip.
1. Album with photos/video clips stored in original resolutions
2. Album with photos stored in print resolution
3. Album with sub albums and photos/video clips
4. Album that is empty or without compatible content
5. Thumbnail of photo
6. Album with photos. The thumbnail is the first photo/video clip in the album
7. Thumbnail of video clip
4
5
1 2 3
6
7
ENGLISH

4
•Use ZOOM + and ZOOM - buttons to zoom in/out on a photo or to expand the video to fit the
entire screen. When zoomed in on a photo, you can use the arrow buttons to move up, down, left
or right.
•Press the ROTATE button once to rotate the photo 90 degrees clockwise. Press again to rotate 90
degrees further.
•To stop and return to the PHOTO/VIDEO menu, press STOP or EXIT.
•Press the INFO button to view more information about the selected file or to display/hide the
progress bar during video playback.
Storing and Deleting Photos & Video Clips
•The SanDisk Photo Album has an extra CompactFlash Type I slot on the back side. When a
CompactFlash Type I card (not included) is inserted, you can store photos and video clips from
the UFD or from cards inserted in the front slots.
•To store a photo, press the STORE button when the photo is displayed full screen. From the menu
that appears, you can choose to store the photo in its original quality (resolution) or in TV
(640x480 pixels) quality. In TV quality, the photo looks the same on the TV screen as its original
(higher) resolution version but the storage size is only a fraction of its original size. For instance,
when using a 128 MB CompactFlash card in the back slot, you can store up to 2000 photos in TV
quality (based on average storage size of 60 KB per photo).
•Photos that are stored in original resolution are automatically stored in an album called ORIGINAL
•Photos that are stored in print resolution (postcard size) are automatically stored in an album
called PRINT
•Photos that are stored in TV resolution can be stored in an album depending on the storing
settings. Press the SETTINGS & OPTIONS button and select STORING and then ALBUM /
GROUPING. If the option “Group Photos per Day” is selected, then all photos made on the same
day are stored in one album. This happens at the moment that those photos are being stored on
the CompactFlash card in the back. The other options are storing per month (all photos of the
same month are stored in one album) and per year (all photos of the same year are stored in one
album). Photos that are already stored and albums that are already created are not affected when
changing the storing settings. The storing settings only apply to photos that are stored after
changing the settings.
•Video clips are stored in a similar fashion but can be stored only in their original size. Video clips
are automatically stored in an album called ORIGINAL. Be aware that the file size of a video clip is
often much bigger than a photo and can fill up your memory card quickly.
•To delete a photo, video clip or complete album, press the DELETE button when the item is pre-
selected. Then follow the on-screen instructions. You can also delete a photo or video clip when it
is displayed full screen.
Playing Photos with Music
•You can display photos with (background) music. The photos need to be stored in TV quality on
the CompactFlash card inserted in the back. When an MP3 file (128 Kb per second or less) is
stored on the same card, the SanDisk Photo Album will play the photos with the music according
to the slide show settings. When one or more MP3 files are present in an album, the music will
play with the photos in that album.
•To enable or disable playing photos with music, press OPTIONS & SETTINGS, select SLIDE
SHOW and then MUSIC WITH SLIDE SHOW. Select YES (for music) or NO (no music) and press
OK.
•See USB Card Reader/Writer Mode for instructions about how to add MP3 files
•See Settings & Options for how to change slide show settings.
WARNING
Store photos ONLY in TV quality/resolution for TV playback purposes. Photos stored in TV
quality are NOT suitable for making quality prints. A photo stored in TV quality CANNOT
be changed back to its original quality/resolution.
The ori
g
inal
p
hoto is not affected.
ENGLISH

5
Playing Music
•Press the MUSIC button to display the list of songs stored on the selected memory card or UFD.
•Use the arrow buttons to select a song and use PREVIOUS and NEXT buttons to switch between
pages.
•Press OK to play the highlighted song or press PLAY/PAUSE to start playing a series of songs
according to the MUSIC settings (see Settings & Options). During playback, you can press
PLAY/PAUSE to pause playback. Press it again to resume.
•Pressing PREVIOUS one time will skip to the beginning of the song. Press multiple times to go to
previous songs. Press and hold to go fast-backward.
•Pressing NEXT will skip to the next song. Press and hold to go fast-forward.
•Adjust the audio volume with the VOLUME +/- buttons. The maximum volume is the volume set on
the TV or connected audio system.
•To stop and return to the MUSIC menu, press STOP or EXIT.
•Press the INFO button to view more information about the selected file.
•You can also play music without a TV. Connect the A/V cable to the Left and Right Audio In
connection of an audio system. Select the input source on the audio system (if necessary). Insert
a card or UFD with ONLY MP3 files into the SanDisk Photo Album, turn it on and wait until the
LED stops blinking. Now press play and the first music file will start playing. At the end, the next
music file will start according to the music settings.
Files Mode
•Press the FILES button to see all supported files on the selected memory card or UFD.
•Use the arrow buttons to select different files and albums (folders), and press PREVIOUS and
NEXT to switch between pages.
•Use the OK or PLAY/PAUSE buttons to enter albums and to start playing files. Press STORE to
store files and INFO to view
•Once (dis)playing files from Files Mode, the other buttons operate the same way as in
PHOTO/VIDEO mode and MUSIC mode.
Settings & Options
•You can change various settings of the SanDisk Photo Album. Press the SETTINGS & OPTIONS
button on the remote control to access the Settings & Options menu. Use the arrow buttons and
OK button to enter sub-menus and to select options. The activated option is highlighted when you
enter the menu. Press EXIT to return to a previous menu or to leave the Settings & Options menu
without changing any settings.
•Select STORING to view or change the following settings:
•RESOLUTION – Choose the resolution for storing photos.
•ALBUM/GROUPING – Choose how photos should be organized when stored.
•Select SLIDE SHOW to view or change the following settings:
•PLAY ORDER – Choose whether to show photos and video clips in alphabetical order or
randomly.
•SLIDE INTERVAL – Choose how long each slide stays on the screen before changing to the
next one (actual interval times can be longer than setting due to longer file loading times).
•SHOW LENGTH – Choose whether to show every photo/video once and then stop, to loop
playback of photos/videos or to show photos until the music stops.
•TRANSITION EFFECT – Choose which effect to use when changing slides, to randomly
choose an effect each time or to use no effects at all.
•MUSIC WITH SLIDE SHOW – Choose whether music files should be played while showing
slides. This is only functional if the CompactFlash card in the back slot contains MP3 files
(see Playing Photos with Music).
•Select MUSIC to view or change the following settings:
•PLAY ORDER – Choose whether to play songs in alphabetical order or randomly.
•PLAY LENGTH – Choose whether to play every song once and then stop or to loop
playback of songs.
•Select PRINT SETTINGS to view or change the following settings:
ENGLISH

6
•MARK FOR PRINTING – When selecting YES, the photo is marked for printing. If the card
with marked photos is inserted in a printer or photo kiosk that is DPOF compatible, the
printer/kiosk is automatically instructed which photos to print.
•NUMBER OF PRINTS – Select from 1 to 5 for the amount of prints of the marked photo. The
default selection is 1 print.
•SIZE – Select from the following sizes to specify the print size: 100 x 150 mm (4 x 6"), 130 x
180 mm (5 x 7") and 200 x 300 mm (8 x 10"). 100 x 150 mm is the default selection.
•Select FIRMWARE to view the version number of the software that is installed. Visit
www.sandisk.com/registration to sign up for new firmware alerts by e-mail and to download new
firmware versions.
USB Card Reader/Writer Mode
The SanDisk Photo Album can also function as an 8-in-1 USB Card Reader/Writer when connected
to a computer.
NOTE: you can only use ONE USB port on the SanDisk Photo Album at a time; the small USB
connector to connect to the computer OR the large USB connector to connect USB Flash Drives. Do
NOT attempt to use both USB connectors simultaneously.
Windows ME, 2000 and XP: Simply connect the small end of the USB cable to the back of the
SanDisk Photo Album and then connect the other end to the PC. The necessary drivers will load
automatically. Now, the four slots on the front of the SanDisk Photo Album will automatically show
up as four different removable drives in My Computer. You can access files on the memory card as if
it was another drive in the computer.
Windows 98SE:
1. Connect the small end of the USB cable to the back of the SanDisk Photo Album and then
connect the other end to the PC.
2. The New Hardware Wizard window appears. Click the NEXT button.
3. On the next screen, select “Search for the best driver for your device” and click the NEXT button.
4. On the next screen, select only the “CD-ROM drive” option. Insert the SanDisk CD in the CD-
ROM drive and click the NEXT button.
5. Click FINISH when Windows has finished installing the software.
6. Restart the PC. Go to My Computer. The four slots on the front of the SanDisk Photo Album
should now show up as four different removable drives in. You can access files on the memory
card as if it was another drive in the computer.
Macintosh OS 10.1.2+: Connect the small end of the USB cable to the back of the SanDisk Photo
Album and then connect the other end into the USB port on the Mac (do not connect to monitor or
keyboard). A new drive will appear on the desktop when a card is placed into one of the front slots
of the SanDisk Photo Album (you can use only one slot at a time). Drag and drop files to and from
the new drive as you would with any other disk or folder.
ENGLISH

7
Removing Cards/UFD (Windows)
1. Open My Computer
2. Right-click on the corresponding drive icon
3. Select Eject (this is not applicable for Windows 98SE)
4. Pull the card/UFD out of the slot
Removing Cards/UFD (Macintosh)
Drag the ‘untitled’ removable disk icon to the desktop Trash icon and pull the card/UFD out of the
slot.
To avoid losing data or corrupting the card/UFD, NEVER remove the card/UFD or disconnect the
SanDisk Photo Album when the ACTIVITY LED is FLASHING or BLINKING
How to add music files to a slide show (Windows)
1. Connect the SanDisk Photo Album to the USB port on the PC.
2. Double click on the icon "My Computer" and browse to the folder where the music files are
stored.
3. Select the music files by holding down the Ctrl key and clicking on the music files that you want
to copy.
4. Release the Ctrl key, click once with the RIGHT mouse button and select COPY.
5. Take the CompactFlash card with photos in TV resolution out of the back slot and put it in the
front slot. Double click on the removable disk drive (for the CompactFlash slot on the front of the
SanDisk Photo Album), i.e. F: or G: or maybe E. Now you should see the contents stored on
this card.
6. Go up to the menu bar where it says EDIT and click on PASTE. Now the music files are being
copied to the CompactFlash card.
7. To determine the order of the music playback, rename the music files by putting numbers in
front of the names. To rename a file, click once with the RIGHT mouse button on the file, move
the mouse pointer over RENAME, click the LEFT mouse button to select RENAME, put the
mouse pointer at the beginning of the file name and click on the left mouse button. Now enter a
number and press the ENTER key on the keyboard. Now the file name is saved.
8. After the files have been copied, go back to My Computer, right-click on the drive icon for the
front CompactFlash slot and select Eject.
9. Remove the CompactFlash card and insert it in the back slot. Connect the SanDisk Photo
Album to the TV and you are ready to play a multimedia slide show!
How to add music files to a slide show (Macintosh)
1. Connect the SanDisk Photo Album to the USB port on the Mac (do not connect to monitor or
keyboard).
2. Take the CompactFlash card with photos in TV resolution out of the back slot and put it in the
front slot. A new drive will appear on the desktop called “untitled”.
3. Browse to the folder where the music files are stored.
4. Drag and drop the music files to the new drive as you would normally do with any other disk or
folder.
Troubleshooting
For Frequently Asked Questions and other SanDisk Photo Album support information, please go to
our website at http://www.sandisk.com/retail/support.asp
For assistance by phone please call toll free 866-SANDISK (866-726-3475) M-F 7AM till 4 PM PST.
When the drive(s) do not appear in reader mode (see instructions in USB CARD READER/WRITER
MODE), the USB connection of your computer might not provide enough power. Use the SanDisk
Photo Album with its power supply and restart your computer.
ENGLISH

8
Limited Warranty
SanDisk warrants that this product will be free from material defects in design and manufacture and will substantially
conform to the published specifications under normal use for two years from your date of purchase, subject to the
conditions below. This warranty is provided to the original end user purchasing from SanDisk or an authorized
reseller, and is not transferable. Proof of purchase may be required. This product must be used with memory cards
that are compliant with the specifications of the CompactFlash Card Association, the SD Card Association, the
MultiMediaCard Association, or Memory Stick, Memory Stick PRO, SmartMedia and xD-Picture Card requirements as
applicable; use with any other product voids this warranty. SanDisk is not responsible for any failure or defect caused
by any third party product or component, whether authorized or not. This warranty does not apply to any third party
software provided with the product and you are responsible for all service and repair needed for such software. This
warranty is void if the memory card is not used in accordance with the product instructions, or if it is damaged as a
result of improper installation, misuse, unauthorized repair, modification or accident.
To obtain warranty service contact SanDisk at 1-866-SanDisk or send an email to: support@SanDisk.com. You must
return the product in tamper resistant packaging, freight prepaid, as instructed by SanDisk. You must obtain a
tracking confirmation number, which you may be required to provide to SanDisk. SanDisk will, at its option, repair or
replace the product with new or refurbished product of equal or greater capacity and functionality, or refund the
purchase price. The warranty duration on replaced product will be that time period remaining on the original product.
THIS CONSTITUTES SANDISK’S ENTIRE LIABILITY AND YOUR EXCLUSIVE REMEDY FOR BREACH OF THIS
WARRANTY.
SanDisk does not warrant, and shall not be responsible for, any lost data or images contained in any product
(including in any returned product), regardless of the cause of the loss. SanDisk’s products are not warranted to
operate without failure. SanDisk products should not be used in life support systems or other applications where
failure could threaten injury or life. This warranty gives you specific legal rights, and you may also have other rights
which vary by jurisdiction.
THE FOREGOING IS SANDISK’S SOLE WARRANTY. SANDISK DISCLAIMS ALL OTHER EXPRESS AND
IMPLIED WARRANTIES TO THE FULLEST EXTENT PERMITTED BY APPLICABLE LAW. THE IMPLIED
WARRANTIES OF MERCHANTABILITY AND FITNESS FOR A PARTICULAR PURPOSE ARE LIMITED TO THE
DURATION OF THE EXPRESS WARRANTY. SOME JURIDSICTIONS DO NOT ALLOW LIMITATION ON HOW
LONG AN IMPLIED WARRANTY LASTS, SO THE ABOVE LIMITATION MAY NOT APPLY TO YOU. IN NO EVENT
SHALL SANDISK OR ANY AFFILIATED OR SUBSIDIARY COMPANY BE LIABLE UNDER ANY CIRCUMSTANCES
FOR ANY DIRECT, INDIRECT, OR CONSEQUENTIAL DAMAGES, ANY FINANCIAL LOSS OR ANY LOST DATA
OR IMAGE, EVEN IF SANDISK HAS BEEN ADVISED OF THE POSSIBILITY OF SUCH DAMAGE. SOME
JURISDICTIONS DO NOT ALLOW THE EXCLUSION OR LIMITATION OF INCIDENTAL OR CONSEQUENTIAL
DAMAGES, SO THE ABOVE LIMITATION OR EXCLUSION MAY NOT APPLY TO YOU. IN NO EVENT WILL
SANDISK’S LIABILITY EXCEED THE AMOUNT PAID BY YOU FOR THE PRODUCT.
The information in this manual is subject to change without notice. SanDisk shall not be liable for technical or
editorial errors or omissions contained herein, nor for incidental or consequential damages resulting from the
furnishing, performance or use of this material. This documentation may not be copied, reproduced, translated or
reduced to any electronic medium, in whole or in part, without prior written permission from SanDisk.
SanDisk, the SanDisk logo and CompactFlash are trademarks of SanDisk Corporation, registered in the United
States and other countries. Store Your World in Ours is a trademark of SanDisk Corporation. SanDisk is an
authorized licensee of the SD, and MultiMediaCard trademarks. SmartMedia is a trademark of Toshiba Corporation.
Memory Stick and Memory Stick PRO are trademarks of Sony Corporation. Other brand names mentioned herein are
for identification purposes only and may be trademarks of their respective holder(s).
© 2004 SanDisk Corporation. All rights reserved.
ENGLISH

9
SanDisk®Photo Album
Guide d’utilisation
Table des matières
Contenu de l’emballage.................................................................................………………………….09
Spécifications du produit................................................................................………………………… 10
Configuration système minimale....................................................................………………………… 10
Installation du SanDisk Photo Album.............................................................………………………… 10
Utilisation du SanDisk Photo Album..............................................................………………………….10
Affichage des photos et des clips vidéo.........................................................………………………… 11
Stockage et suppression des photos et clips vidéo.......................................………………………….12
Affichage des photos avec musique..............................................................………………………….12
Lecture de la musique....................................................................................………………………… 13
Mode Fichiers................................................................................................………………………….13
Paramètres et options....................................................................................………………………… 13
Mode Lecteur-graveur de cartes USB...........................................................………………………….14
Dépannage....................................................................................................………………………….16
Garantie.........................................................................................................………………………….16
Félicitations !
Nous vous remercions d’avoir acheté le SanDisk Photo Album. Vous pouvez désormais visionner et
partager facilement vos photos numériques, entre autres, sur votre téléviseur dans le confort de
votre salon. Ce guide explique comment installer et utiliser le SanDisk Photo Album.
Contenu de l’emballage
•SanDisk Photo Album
•Câble d’alimentation
•Câble audio/vidéo
•Télécommande et piles
•Guide d’utilisation
•CD-ROM (pour utiliser l’appareil comme un lecteur-graveur de cartes 8-en-1)
•Câble USB (pour utiliser l’appareil comme un lecteur-graveur de cartes 8-en-1)
Enregistrez votre produit à
http://www.sandisk.com/registration
pour recevoir des messages électroniques sur les nouvelles versions micrologicielles
qui améliorent la fonctionnalité de votre SanDisk Photo Album !
Le non enregistrement de votre produit ne limite PAS les droits qui vous sont accordés aux termes de sa garantie.
FRAN
Ç
AIS

10
Spécifications du produit
•Formats de fichier pris en charge:
•JPEG (ligne de base, jusqu’à 16 mégapixels)
•MJPEG
•MPEG-1 (résolution QVGA / jusqu’à 8 images par seconde)
•MP3 (jusqu’à 320 Kbps)
•Connexions:
•Vidéo (composite) et audio (stéréo)
•Deux connecteurs USB 1.1 (vers l’ordinateur et le lecteur flash USB)
•Alimentation
•Formats de carte mémoire flash compatibles:
•CompactFlash® Type I / II
•SD™ / MultiMediaCard™
•Memory Stick™ / Memory Stick PRO™
•SmartMedia™ / xD
Configuration système minimale
Pour le stockage et la lecture:
•Téléviseur avec ports RCA vidéo (NTSC ou PAL) et RCA audio (gauche + droit)
Pour l’utilisation comme lecteur-graveur 8-en-1:
•Ordinateur de bureau de classe Pentium avec prise en charge de USB, lecteur de CD-ROM et
Windows 98SE, ME, 2000 ou XP.
•Macintosh: Ordinateur avec prise en charge de USB, lecteur de CD-ROM et Mac OS 10.1.2+
Installation du SanDisk Photo Album
1. Branchez le câble d’alimentation à l’arrière du SanDisk Photo Album et à une prise murale.
2. Raccordez le câble audio/vidéo au téléviseur ou à la chaîne stéréo. Sur le téléviseur, la fiche
jaune doit être branchée dans l’entrée vidéo (Video In), la fiche rouge dans l’entrée audio droite
(Audio In - R) et la fiche blanche dans l’entrée audio gauche (Audio In - L).
3. Connectez le câble audio/vidéo à l’arrière du SanDisk Photo Album.
4. Insérez les piles dans la télécommande.
5. Appuyez sur le bouton POWER de la télécommande pour démarrer le SanDisk Photo Album (le
logo SanDisk s’allume).
6. Allumez le téléviseur et changez sa source d’entrée. Selon le modèle de téléviseur, la source
d’entrée peut être TV/Vidéo, Entrée (Input) ou Source (consultez le manuel de votre téléviseur
pour de plus amples renseignements). Une fois la source sélectionnée, un message apparaît
pour vous inviter à insérer
une carte mémoire. Le
SanDisk Photo Album est
maintenant prêt à l’emploi.
Utilisation du SanDisk Photo Album
Insérez une carte mémoire flash ou un lecteur flash USB dans le logement
correspondant (si vous avez une carte SmartMedia, veillez à ce que la face
dorée soit tournée vers le bas). Lorsque la carte est correctement insérée,
le voyant vert, à gauche du logement, s’allume et le SanDisk Photo Album
commence à lire la carte. Si celle-ci contient des photos (JPEG) ou des
clips vidéo (MJPEG ou MPEG-1), le menu PHOTO & VIDEO s’affiche
automatiquement. Si la carte contient des morceaux de musique (MP3) et
FRAN
Ç
AIS

11
aucun des formats de fichiers photo ou vidéo pris en charge, le menu MUSIC s’affiche.
Le SanDisk Photo Album fonctionne avec la télécommande fournie. Si vous avez inséré plus d’une
carte mémoire, vous pouvez appuyer sur SELECT CARD. Sélectionnez la carte ou le lecteur que
vous désirez utiliser à l'aide des touches fléchées haut et bas puis appuyez sur OK pour confirmer
votre choix.
Affichage des photos et des clips vidéo
•Appuyez sur le bouton PHOTO/VIDEO pour afficher les miniatures des photos et des clips vidéo
stockés sur la carte mémoire ou le lecteur flash USB sélectionné.
•Les photos et clips vidéo peuvent se trouver à l'intérieur d'un album (dossier). Utilisez les touches
fléchées pour sélectionner un album et appuyez sur OK pour l’ouvrir. Appuyez sur PLAY quand
l'album est présélectionné pour afficher les photos ou clips vidéo en diaporama.
•Utilisez les touches fléchées pour sélectionner une miniature représentant une photo ou un clip
vidéo et appuyez sur les touches PREVIOUS (page précédente) et NEXT (page suivante) pour
passer d’une page à l’autre.
•Appuyez sur OK pour afficher (une photo) ou lire (une vidéo) en format plein écran. Appuyez sur
PLAY/PAUSE pour visualiser les photos et vidéos en fonction des paramètres du SLIDE SHOW
(voir Paramètres et options).
•Appuyez sur PREVIOUS pour retourner à la photo ou au clip vidéo précédent.
•Appuyez sur NEXT pour passer à la photo ou au clip vidéo suivant.
1. Album avec photos/clips vidéo stockés dans leurs résolutions d’origine
2. Album avec photos stockées dans la résolution d’impression
3. Album avec sous-albums et photos/clips vidéo
4. Album vide ou sans contenu compatible
5. Miniature de photo
6. Album avec photos. La miniature est la première photo ou le premier clip vidéo de
l’album
7. Miniature de cli
p
vidéo
4
5
1 2 3
6
7
FRAN
Ç
AIS

12
•Utilisez les touches ZOOM + et ZOOM pour voir des détails d'une photo en gros plan ou pour
agrandir la vidéo sur tout l'écran. Lorsque vous effectuez un zoom, vous pouvez vous déplacer
vers le haut, le bas, la gauche et la droite à l’aide des touches fléchées.
•Appuyez sur la touche ROTATE pour tourner la photo de 90 degrés dans le sens horaire.
Appuyez de nouveau sur la touche pour la faire pivoter encore de 90 degrés.
•Pour arrêter et retourner au menu PHOTO/VIDEO, appuyez sur STOP ou EXIT.
•Appuyez sur la touche INFO pour en savoir plus sur le fichier sélectionné ou pour
afficher/masquer la barre de progression pendant la lecture de la vidéo.
Stockage et suppression des photos et clips vidéo
•Au dos du SanDisk Photo Album se trouve un logement supplémentaire pour une carte
CompactFlash Type I. Lorsqu’une carte CompactFlash Type I (non fournie) est insérée, vous
pouvez y stocker des photos et des clips vidéo depuis le lecteur flash USB ou des cartes se
trouvant dans les logements sur la face avant de l’appareil.
•Pour stocker une photo, appuyez sur le bouton STORE lorsqu’elle s’affiche en plein écran. Dans
le menu qui s’affiche, vous pouvez choisir de stocker la photo dans sa qualité d’origine (résolution)
ou une qualité télévision (640 x 480 pixels). Une photo stockée en qualité télévision a le même
aspect sur l’écran que la version en résolution d’origine (plus élevée) mais sa taille de stockage ne
représente qu’une fraction de sa taille d’origine. Par exemple, si vous insérez une carte
CompactFlash de 128 Mo dans le logement arrière, vous pourrez y stocker jusqu’à 2 000 photos
en qualité télévision (chiffre basé sur la taille de stockage moyenne de 60 Ko par photo).
•Les photos stockées dans leur résolution d’origine sont automatiquement rangées dans un album
appelé ORIGINAL.
•Les photos stockées dans la résolution d’impression sont automatiquement rangées dans un
album appelé PRINT.
•Les photos stockées en résolution télévision peuvent être rangées dans un album en fonction des
paramètres de stockage. Appuyez sur la touche SETTINGS & OPTIONS et sélectionnez
STORING puis ALBUM / GROUPING. Si l’option « Grouper les photos par jour » est sélectionnée,
toutes les photos prises le même jour sont stockées dans un album. Ce regroupement s’effectue
lors du stockage des photos sur la carte CompactFlash insérée au dos de l’appareil. Les autres
options sont le stockage par mois (toutes les photos prises le même mois sont stockées dans un
album) et par année (toutes les photos prises la même année sont stockées dans un album). Les
photos déjà stockées et les albums déjà créés ne sont pas affectés par les modifications des
paramètres de stockage. Seules les photos qui sont stockées après la modification des
paramètres sont concernées.
•Le stockage des clips vidéo est similaire mais ceux-ci ne peuvent être stockés que dans leur taille
d’origine. Ils sont automatiquement rangés dans un album appelé ORIGINAL. Notez que la taille
de fichier d'un clip vidéo est souvent bien plus importante que celle d'une photo et que les clips
remplissent donc une carte mémoire plus rapidement.
•Pour supprimer une photo, un clip vidéo ou un album entier, sélectionnez-les et appuyez sur la
touche DELETE. Suivez ensuite les consignes affichées à l’écran. Vous pouvez aussi supprimer
une photo ou un clip vidéo pendant son affichage plein écran.
Affichage des photos avec musique
•Vous pouvez afficher les photos avec une musique de fond. Les photos doivent être stockées en
qualité télévision sur la carte CompactFlash insérée au dos de l'appareil. Lorsqu’un fichier MP3
(128 Ko par seconde ou moins) est stocké sur la même carte, le SanDisk Photo Album affiche les
photos avec la musique en fonction des paramètres du diaporama. Lorsqu’un album contient un
ou plusieurs fichiers MP3, la musique est lue avec les photos de cet album.
AVERTISSEMENT
Stockez les photos en qualité/résolution télévision UNIQUEMENT pour les visionner sur le
téléviseur. La qualité télévision ne convient PAS pour l’impression de beaux tirages. Une
photo stockée en qualité télévision NE PEUT PAS être restockée dans sa
qualité/résolution d'origine.
Cela n'affecte pas la photo d'origine.
FRAN
Ç
AIS

13
•Pour activer ou désactiver l'affichage des photos avec la musique, appuyez sur la touche
OPTIONS & SETTINGS, sélectionnez SLIDE SHOW puis MUSIC WITH SLIDE SHOW.
Sélectionnez YES (pour entendre la musique) ou NO (pas de musique) et appuyez sur OK.
•Consultez la rubrique Mode Lecteur-graveur de cartes USB pour savoir comment ajouter des
fichiers MP3.
•Consultez la rubrique Paramètres et options pour savoir comment modifier les paramètres du
diaporama.
Lecture de la musique
•Appuyez sur la touche MUSIC pour afficher la liste des morceaux stockés sur la carte ou le lecteur
flash USB sélectionné.
•Utilisez les touches fléchées pour sélectionner une musique et les touches PREVIOUS et NEXT
pour passer d’une page à l’autre.
•Appuyez sur OK pour écouter le morceau en surbrillance ou sur PLAY/PAUSE pour écouter
plusieurs morceaux de musique en fonction des paramètres MUSIC (voir Paramètres et options).
Vous pouvez appuyer sur PLAY/PAUSE pour interrompre momentanément la lecture. Appuyez de
nouveau sur cette touche pour reprendre la lecture.
•Appuyez une seule fois sur PREVIOUS pour revenir au début du morceau. Appuyez sur cette
touche plusieurs fois pour revenir aux morceaux précédents. Maintenez la touche enfoncée pour
revenir en arrière rapidement.
•Appuyez sur NEXT pour passer au morceau suivant. Maintenez la touche enfoncée pour avancer
rapidement.
•Réglez le volume sonore avec les boutons VOLUME +/-. Le volume maximal est le volume réglé
sur le téléviseur ou la chaîne stéréo connectée.
•Pour arrêter et retourner au menu MUSIC, appuyez sur STOP ou EXIT.
•Appuyez sur la touche INFO pour en savoir plus sur le fichier sélectionné.
•Vous pouvez également lire la musique sans téléviseur. Branchez le câble A/V dans les ports
d’entrée audio gauche et droite de la chaîne stéréo. Sélectionnez la source d’entrée de la chaîne
stéréo (si nécessaire). Insérez une carte ou un lecteur flash USB contenant UNIQUEMENT des
fichiers MP3 dans le SanDisk Photo Album, allumez celui-ci et attendez que le voyant arrête de
clignoter. Appuyez sur la touche PLAY pour lancer la lecture du premier fichier de musique. À la
fin du premier fichier, le deuxième est lu en fonction des paramètres de musique.
Mode Fichiers
•Appuyez sur la touche FILES pour consulter tous les formats de fichier pris en charge sur la carte
mémoire ou le lecteur flash USB sélectionné.
•Utilisez les touches fléchées pour sélectionner différents fichiers et albums (dossiers) et appuyez
sur PREVIOUS et NEXT pour passer d’une page à l’autre.
•Utilisez les touches OK ou PLAY/PAUSE pour ouvrir les albums et lancer la lecture des fichiers.
Appuyez sur STORE pour stocker les fichiers et INFO pour les afficher.
•Une fois les fichiers affichés depuis Mode Fichiers, les autres touches fonctionnent de la même
manière qu’en modes PHOTO/VIDEO et MUSIC.
Paramètres et options
•Vous pouvez modifier plusieurs réglages du SanDisk Photo Album. Appuyez sur la touche
SETTINGS & OPTIONS de la télécommande pour accéder au menu SETTINGS & OPTIONS.
Utilisez les touches fléchées et OK pour ouvrir les sous-menus et sélectionner les options.
L’option activée est en surbrillance lorsque vous ouvrez le menu. Appuyez sur EXIT pour
retourner au menu précédent ou quitter le menu SETTINGS & OPTIONS sans modifier les
réglages.
•Sélectionnez STORING pour afficher ou modifier les paramètres suivants:
•RESOLUTION – Choisissez la résolution dans laquelle vous voulez stocker vos photos.
•ALBUM/GROUPING – Choisissez comment vous voulez organiser les photos lors de leur
stockage.
•Sélectionnez SLIDE SHOW pour afficher ou modifier les paramètres suivants:
FRAN
Ç
AIS

14
•PLAY ORDER – Choisissez si vous voulez visionner les photos et clips vidéo dans l'ordre
alphabétique ou dans le désordre.
•SLIDE INTERVAL – Choisissez combien de temps chaque diapositive doit rester à l’écran
avant l'affichage de la suivante (les intervalles réels peuvent être plus longs que les
paramètres si le chargement prend plus de temps).
•SHOW LENGTH – Choisissez si vous voulez afficher chaque photo ou vidéo une fois avant
d’arrêter, afficher les photos ou vidéos en boucle ou afficher les photos jusqu’à la fin de la
musique.
•TRANSITION EFFECT – Choisissez si vous voulez utiliser un effet spécifique entre les
diapositives, utiliser un effet au hasard à chaque fois ou n’utiliser aucun effet.
•MUSIC WITH SLIDE SHOW – Choisissez si vous voulez lire des fichiers de musique
pendant la visualisation des diapositives. Cette option est disponible si la carte
CompactFlash insérée au dos de l'appareil contient des fichiers MP3 (voir la rubrique
Affichage des photos avec musique).
•Sélectionnez MUSIC pour afficher ou modifier les paramètres suivants:
•PLAY ORDER – Choisissez si vous voulez lire les fichiers de musique dans l'ordre
alphabétique ou dans le désordre.
•PLAY LENGTH – Choisissez si vous voulez passer chaque morceau une fois avant
d’arrêter ou lire les morceaux en boucle.
•Sélectionnez PRINT SETTINGS pour afficher ou modifier les paramètres suivants:
•MARK FOR PRINTING – Si vous sélectionnez OUI, la photo est marquée pour être
imprimée. Si la carte contenant des photos marquées est insérée dans une imprimante ou
un kiosque compatible avec DPOF, l'imprimante ou le kiosque détecte automatiquement
les photos à imprimer.
•NUMBER OF PRINTS – Sélectionnez un chiffre entre 1 et 5 correspondant au nombre de
tirages que vous désirez pour la photo marquée. La sélection par défaut est 1 tirage.
•SIZE – Sélectionnez parmi les formats suivants celui que vous désirez pour vos tirages:
100 x 150 mm (4 x 6 po), 130 x 180 mm (5 x 7 po) et 200 x 300 mm (8 x 10 po). 100 x 150
mm est la sélection par défaut.
•Sélectionnez FIRMWARE pour afficher le numéro de version du logiciel installé. Allez à
www.sandisk.com/registration pour vous inscrire et recevoir les messages électroniques
concernant les nouveaux micrologiciels et pour télécharger les nouvelles versions micrologicielles.
Mode Lecteur-graveur de cartes USB
Le SanDisk Photo Album peut également fonctionner comme un lecteur-graveur de cartes USB 8-
en-1 lorsqu’il est raccordé à l’ordinateur.
REMARQUE: vous ne pouvez utiliser qu’UN port USB à la fois sur le SanDisk Photo Album: le petit
connecteur USB pour le branchement à l’ordinateur OU le grand connecteur USB pour la connexion
d’un lecteur flash USB. N’essayez PAS d’utiliser les deux connecteurs USB en même temps.
Windows ME, 2000 et XP: branchez simplement la petite fiche du câble USB au dos du SanDisk
Photo Album et l'autre à l'ordinateur. Les pilotes nécessaires se chargent automatiquement. Les
quatre logements, à l’avant du SanDisk Photo Album, s’affichent automatiquement comme quatre
FRAN
Ç
AIS

15
lecteurs amovibles distincts dans Poste de travail. Vous pouvez accéder aux fichiers de la carte
mémoire comme si celle-ci était un autre lecteur de l'ordinateur.
Windows 98SE:
1. Branchez la petite fiche du câble USB au dos du SanDisk Photo Album et l'autre à l'ordinateur.
2. La fenêtre Assistant Ajout de nouveau matériel s’ouvre. Cliquez sur le bouton SUIVANT.
3. Sur l’écran suivant, sélectionnez « Rechercher le meilleur pilote pour votre périphérique » et
cliquez sur le bouton SUIVANT.
4. Sur l’écran suivant, sélectionnez uniquement l’option « Lecteur de CD-ROM ». Insérez le CD
SanDisk dans le lecteur et cliquez sur le bouton SUIVANT.
5. Cliquez sur TERMINER lorsque Windows a fini d'installer le logiciel.
6. Redémarrez l’ordinateur. Sélectionnez Poste de travail. Les quatre logements, à l’avant du
SanDisk Photo Album, devraient maintenant s’afficher comme quatre lecteurs amovibles
distincts. Vous pouvez accéder aux fichiers de la carte mémoire comme si celle-ci était un autre
lecteur de l’ordinateur.
Macintosh OS 10.1.2+: branchez la petite fiche du câble USB au dos du SanDisk Photo Album et
l’autre fiche dans le port USB du Mac (ne la connectez pas au moniteur ou au clavier). Un nouveau
lecteur s’affiche sur le bureau lorsqu’une carte est insérée dans l’un des logements à l’avant du
SanDisk Photo Album (vous ne pouvez utiliser qu’un seul logement à la fois). Glissez et déposez
les fichiers vers ou depuis le nouveau lecteur comme vous le feriez avec n’importe quel disque ou
dossier.
Retrait des cartes ou du lecteur flash USB (Windows)
1. Ouvrez Poste de travail.
2. Faites un clic droit sur l’icône correspondant au lecteur.
3. Sélectionnez Éjecter (cela ne s’applique pas à Windows 98SE).
4. Retirez la carte ou le lecteur du logement.
Retrait des cartes ou du lecteur flash USB (Macintosh)
Faites glisser l’icône de disque amovible « sans titre » sur l'icône de la corbeille du bureau puis
retirez la carte ou le lecteur flash USB de son logement.
Pour éviter de perdre des données ou de corrompre la carte ou le lecteur flash USB, veillez à NE
JAMAIS retirer la carte ou le lecteur ni déconnecter le SanDisk Photo Album pendant que le
TEMOIN LUMINEUX CLIGNOTE.
Ajout de musique à un diaporama (Windows)
1. Branchez le SanDisk Photo Album au port USB de l’ordinateur.
2. Cliquez deux fois sur l’icône « Poste de travail » et naviguez jusqu'au dossier contenant les
fichiers de musique.
3. Sélectionnez les fichiers de musique que vous désirez copier en cliquant dessus tout en
maintenant la touche Ctrl enfoncée.
4. Relâchez la touche Ctrl, cliquez une fois sur le bouton DROIT de la souris et sélectionnez
COPIER.
5. Sortez la carte CompactFlash contenant les photos en résolution télévision du logement arrière
de l'appareil et insérez-la dans le logement avant. Cliquez deux fois sur le lecteur amovible
(correspondant au logement de la carte CompactFlash, à l'avant du SanDisk Photo Album), par
exemple, F:, G: ou E. Le contenu de la carte devrait apparaître.
6. Dans la barre de menus, sélectionnez ÉDITION et cliquez sur COLLER. Les fichiers de
musique sont maintenant copiés sur la carte CompactFlash.
7. Pour déterminer l’ordre de lecture des fichiers de musique, renommez ceux-ci en tapant un
chiffre devant leur nom. Pour renommer un fichier, cliquez une fois dessus avec le bouton
DROIT de la souris, placez le pointeur sur RENOMMER, cliquez avec le bouton GAUCHE de la
souris pour sélectionner RENOMMER, placez le pointeur au début du nom du fichier et cliquez
avec le bouton gauche de la souris. Tapez un chiffre et appuyez sur la touche ENTRÉE du
clavier. Le nom du fichier est enregistré.
8. Une fois les fichiers copiés, allez de nouveau dans Poste de travail, faites un clic droit sur
l’icône de lecteur correspondant au logement avant de la carte CompactFlash et sélectionnez
Éjecter.
FRAN
Ç
AIS

16
9. Retirez la carte CompactFlash et insérez-la dans le logement arrière. Branchez le SanDisk
Photo Album au téléviseur; vous voici prêt à regarder un diaporama multimédia!
Ajout de musique à un diaporama (Macintosh)
1. Connectez le SanDisk Photo Album au port USB du Mac (ne le connectez pas au moniteur ou
au clavier).
2. Sortez la carte CompactFlash contenant les photos en résolution télévision du logement arrière
de l'appareil et insérez-la dans le logement avant. Un nouveau lecteur apparaît sur le bureau,
intitulé « sans titre ».
3. Naviguez jusqu’au dossier contenant les fichiers de musique.
4. Glissez et déposez les fichiers dans le nouveau lecteur comme vous le feriez avec n’importe
quel disque ou dossier.
Dépannage
Pour consulter la Foire aux questions et d’autres informations sur le SanDisk Photo Album, visitez
notre site Web à http://www.sandisk.com/retail/support.asp.
Pour toute assistance téléphonique, composez le numéro vert 866-SANDISK (866-726-3475) du
lundi au vendredi, entre 7 h et 16 h (heure de la côte ouest des États-Unis).
Si le ou les lecteurs n’apparaissent pas en mode Lecteur (voir la rubrique MODE LECTEUR-
GRAVEUR DE CARTES USB), il est possible que la connexion USB de votre ordinateur ne
fournisse pas suffisamment de courant. Utilisez le SanDisk Photo Album avec son câble
d’alimentation et redémarrez l'ordinateur.
Garantie limitée
SanDisk garantit ce produit contre tout vice de fabrication et de main d’œuvre. Elle garantit en outre qu’il est conforme aux caractéristiques
publiées dans des conditions normales d’utilisation, et ce pour une durée de deux ans à compter de la date d’achat, sous réserve des
stipulations ci-dessous. Cette garantie est offerte à l’utilisateur final initial achetant son produit auprès de SanDisk ou d’un distributeur agréé,
et elle n’est pas transférable. Il est possible qu’une preuve d’achat doive être produite. Ce produit doit être utilisé avec des cartes mémoire
conformes aux spécifications de la CompactFlash Card Association, la SD Card Association et la MultiMediaCard Association, ou aux
stipulations des cartes Memory Stick, Memory Stick PRO, SmartMedia et xD-Picture, le cas échéant ; toute utilisation d’un autre produit
annulerait cette garantie. SanDisk n’est pas responsable des défaillances ou défauts causés par tout produit ou composant de partie tierce,
qu’il soit autorisé ou non. Cette garantie ne couvre aucun logiciel de partie tierce fourni avec le produit ; l’utilisateur est responsable de
l‘entretien et des réparations nécessaires pour ledit logiciel. Cette garantie est nulle et non avenue si la carte mémoire n’est pas utilisée
conformément au mode d’emploi du produit, ou si elle est endommagée à la suite d’une installation incorrecte, d’un mauvais usage, d’une
réparation ou modification non autorisée ou d'un accident.
Pour bénéficier du service sous garantie, contactez SanDisk au 1-866-SanDisk ou envoyez un courriel à: support@SanDisk.com. Le produit
devra être renvoyé dans un emballage inviolable, fret prépayé, selon les instructions de SanDisk. Vous devrez obtenir un numéro de
confirmation de pistage qu’il vous faudra peut-être fournir à SanDisk. SanDisk pourra, à sa discrétion, réparer le produit, le remplacer par un
produit neuf ou réusiné d’une capacité et fonctionnalité égales ou supérieures, ou rembourser le prix d’achat. La durée de garantie du
produit remplacé correspondra à la période restante de la durée de garantie du produit d'origine. CECI CONSTITUE L’ENTIÈRE
RESPONSABILITÉ DE SANDISK ET VOTRE SEUL RECOURS EN CAS DE RUPTURE DE GARANTIE.
SanDisk ne garantit pas et ne saurait être responsable de toute perte de données ou d’images contenues dans un produit (y compris un
produit renvoyé), quelle que soit la cause de cette perte. SanDisk ne garantit pas ses produits contre le risque de défaillance. Les produits
SanDisk ne doivent pas être utilisés dans des équipements de maintien des fonctions vitales ou toute application où une défaillance pourrait
causer des blessures ou la mort. Cette garantie vous donne des droits spécifiques, et il se peut que vous bénéficiez d’autres droits, qui
varient selon la juridiction.
LES STIPULATIONS CI-DESSUS CONSTITUENT LA SEULE GARANTIE DE SANDISK. SANDISK DÉCLINE TOUTES AUTRES
GARANTIES EXPRESSES ET IMPLICITES DANS LES LIMITES PERMISES PAR LA LOI EN VIGUEUR. LES GARANTIES IMPLICITES
DE QUALITÉ MARCHANDE ET D’APTITUDE À UN USAGE PARTICULIER SONT LIMITÉES À LA DURÉE DE LA GARANTIE EXPRESSE.
CERTAINES JURIDICTIONS N’AUTORISANT PAS LA LIMITATION DE LA DURÉE D’UNE GARANTIE IMPLICITE, LA LIMITATION
SUSMENTIONNÉE PEUT NE PAS S’APPLIQUER À VOTRE CAS. EN AUCUN CAS SANDISK OU TOUTE FILIALE OU SOCIÉTÉ
AFFILIÉE NE SERA RESPONSABLE, DANS QUELQUES CIRCONSTANCES QUE CE SOIT, DE TOUS DOMMAGES DIRECTS,
INDIRECTS OU CONSÉQUENTIELS, DE TOUTES PERTES FINANCIÈRES OU PERTES DE DONNÉES OU D’IMAGES, MÊME SI
SANDISK A ÉTÉ AVERTIE DE LA POSSIBILITÉ DE TELS DOMMAGES. CERTAINES JURIDICTIONS N’AUTORISANT PAS
L’EXCLUSION OU LA LIMITATION DES DOMMAGES ACCESSOIRES OU CONSÉQUENTIELS, LA LIMITATION OU EXCLUSION
SUSMENTIONNÉE PEUT NE PAS S’APPLIQUER À VOTRE CAS. EN AUCUN CAS LA RESPONSABILITÉ DE SANDISK N’EXCÈDERA
LE MONTANT QUE VOUS AUREZ PAYÉ POUR LE PRODUIT.
Les informations contenues dans ce guide sont sujettes à modification sans préavis. SanDisk ne saurait être responsable des erreurs
techniques ou rédactionnelles ou des omissions faites dans le présent document, ni des dommages accessoires ou conséquentiels résultant
de la livraison, de la performance ou de l'utilisation de ce produit. Il est formellement interdit de copier, reproduire, traduire ou enregistrer
sous format électronique la présente documentation, en tout ou en partie, sans l'accord préalable écrit de SanDisk.
SanDisk, le logo SanDisk et CompactFlash sont des marques commerciales de SanDisk Corporation, déposées aux Etats-Unis et dans
d’autres pays. Store Your World In Ours est une marque commerciale de SanDisk Corporation. SanDisk est un titulaire autorisé des
marques commerciales SD et MultiMediaCard. SmartMedia est une marque commerciale de Toshiba Corporation. Memory Stick et Memory
Stick PRO sont des marques commerciales de Sony Corporation. Les autres noms mentionnés ici le sont uniquement à titre indicatif et
peuvent être les marques commerciales de leurs détenteurs respectifs.
© 2004 SanDisk Corporation. Tous droits réservés.
FRAN
Ç
AIS

17
SanDisk®Photo Album
Guía del usuario
Contenido
Contenido del paquete........................................................................................…………………...... 17
Ficha técnica................................................................................…………...........…………………… 18
Requisitos mínimos……........................................................................................…………………… 18
Instalación del SanDisk Photo Album...........................................................…………………………. 18
Uso del SanDisk Photo Album......................................................................…………………………. 18
Visualización de fotografías y clips de vídeo.........................................................……………………19
Almacenamiento y borrado de fotografías y clips de vídeo.........................................……………… 20
Reproducción de fotografías con música...............................................................…………………...21
Reproducción de música.......................................................................................…………………… 21
Modo de archivos...................................................................................................…………………...21
Parámetros y opciones.......................................................................................……………………...21
Modo de lector/escritor de tarjetas USB ...............................................................……………………22
Solución de problemas..........................................................................................…………………… 24
Garantía................................................................................................................…………………….24
Enhorabuena
Enhorabuena por la compra del SanDisk Photo Album. Ahora podrá ver y compartir fácilmente sus
fotografías digitales en su televisor, en la comodidad de su hogar. En esta guía del usuario se indica
cómo instalar y usar el SanDisk Photo Album.
Contenido del paquete
•SanDisk Photo Album
•Alimentación eléctrica
•Cable de audio/vídeo
•Mando a distancia con pilas
•Guía del usuario
•CD-ROM (para su uso como lector/escritor de tarjetas 8 en 1)
•Cable USB (para su uso como lector/escritor de tarjetas 8 en 1)
Podrá registrar su producto en
http://www.sandisk.com/registration
y recibir alertas por correo electrónico acerca de nuevas versiones de firmware que
mejoran la funcionalidad de su SanDisk Photo Album.
Los derechos que le confiere la garantía del producto NO varían aunque no lo registre.
ESPAÑOL

18
Ficha técnica
•Soporte de formato del contenido:
•JPEG (Baseline, hasta 16 megapixels)
•Motion JPEG
•MPEG-1 (resolución QVGA / hasta ocho imágenes por segundo)
•MP3 (hasta 320 Kbps)
•Conexiones:
•Vídeo (compuesto) y sonido (estéreo)
•Dos conectores USB 1.1 (a PC y unidad flash USB)
•Alimentación eléctrica
•Formatos de tarjeta de memoria flash compatibles:
•CompactFlash® Tipo I / II
•SD™ / MultiMediaCard™
•Memory Stick™ / Memory Stick PRO™
•SmartMedia™ / xD
Requisitos mínimos
Para almacenamiento y reproducción:
•TV con vídeo RCA (NTSC o PAL) y conexión audio RCA (izquierda + derecha)
Para su uso como lector/escritor de tarjetas 8 en 1:
•Windows: PC clase Pentium con soporte USB, unidad CD-ROM y Windows 98SE, ME, 2000 o XP.
•Macintosh: Ordenador con soporte USB, unidad CD-ROM y Mac OS 10.1.2+
Instalación del SanDisk Photo Album
1. Enchufe la alimentación eléctrica en la parte posterior del SanDisk Photo Album, así como a
una toma de corriente.
2. Conecte el cable de audio/vídeo al televisor y/o sistema de sonido. En el televisor, la clavija
amarilla debe conectarse a Video In (Entrada de vídeo), la roja a Audio In, R (Entrada de audio,
derecha) y la blanca a Audio In, L (Entrada de audio, izquierda).
3. Conecte el cable de audio/vídeo en la parte posterior del SanDisk Photo Album.
4. Coloque las pilas en el mando a distancia.
5. Pulse el botón POWER del mando a distancia y así se encenderá el Álbum Fotográfico
SanDisk (se ilumina la luz del logotipo de SanDisk).
6. Encienda el televisor y cambie la fuente de entrada del televisor. Dependiendo del tipo de
televisor, la fuente de entrada podría denominarse TV/Video, Input o Source (consulte el
manual del televisor para más información). Cuando se selecciona la fuente correcta, aparece
un mensaje indicando que se
introduzca una tarjeta de
memoria. El SanDisk Photo
Album está ahora listo para su
uso.
Uso del SanDisk Photo Album
Introduzca una tarjeta de memoria flash o una unidad flash USB (UFD) en la
ranura correspondiente (las tarjetas SmartMedia deben introducirse con el lado
dorado mirando hacia abajo). Cuando se introduce correctamente una tarjeta,
se enciende el indicador LED verde situado a la izquierda de la ranura y el
SanDisk Photo Album empieza a leer la tarjeta. Si la tarjeta tiene almacenadas
fotografías (JPEG) o clips de vídeo (Motion JPEG o MPEG-1), aparecerá
ESPAÑOL

19
automáticamente el menú PHOTO & VIDEO. Si la tarjeta contiene música (MP3), pero no uno de
los formatos de archivos de fotografías o vídeo que soporta el sistema, aparecerá el menú MÚSICA.
El SanDisk Photo Album se acciona con el mando a distancia adjunto. Si se ha introducido más de
una tarjeta de memoria, puede pulsar SELECT CARD. Elija la tarjeta (o UFD) que desee usar con
los botones de flecha ascendente y descendente, y, a continuación, pulse OK para confirmar su
selección.
Visualización de fotografías y clips de vídeo
•Pulse el botón PHOTO/VIDEO para que aparezcan las imágenes en miniatura de las fotografías y
clips de vídeo almacenados en la tarjeta de memoria seleccionada o UFD.
•Las fotografías y los clips de vídeo pueden estar en un álbum (carpeta). Use los botones de
flecha para seleccionar un álbum y pulse OK para introducir el álbum. Pulse PLAY mientras el
álbum está preseleccionado para reproducir las fotografías y clips de vídeo como en una
presentación.
•Use los botones de flecha para seleccionar una imagen en miniatura que representa una
fotografía o vídeo y use los botones PREVIOUS y NEXT para cambiar de página.
•Pulse OK para visualizar (fotografía) o reproducir (vídeo) a toda pantalla. Pulse PLAY/PAUSE
para empezar la reproducción de fotografías y vídeos según la configuración PRESENTACIÓN
(consulte ell apartado “Parámetros y opciones”).
•Pulse PREVIOUS para pasar a la fotografía o clip de vídeo anterior.
1. Álbum con fotografías/clips de vídeo almacenados en resoluciones originales
2. Álbum con fotografías almacenadas en resolución de impression
3. Álbum con subálbums y fotografías/clip de videos
4. Álbum que está vacío o sin contenido compatible
5. Imagen en miniatura de una fotografía
6. Álbum con fotografías. La imagen en miniatura es la primera fotografía/clip de vídeo del
album
7. Ima
g
en en miniatura del cli
p
de vídeo
4
5
1 2 3
6
7
ESPAÑOL

20
•Pulse NEXT para pasar a la siguiente fotografía o clip de vídeo.
•Use los botones ZOOM + y ZOOM – para hacer zoom en una fotografía o ampliar el vídeo para
que ocupe toda la pantalla. Al hacer zoom en una fotografía se pueden usar los botones de flecha
para mover la imagen hacia arriba, abajo, izquierda o derecha.
•Pulse el botón ROTATE para hacer girar la fotografía 90 grados en la dirección de las manecillas
del reloj. Púlselo otra vez para que gire 90 grados más.
•Para parar y volver al menú PHOTO/VIDEO pulse STOP o EXIT.
•Pulse la tecla INFO para ver más información acerca del archivo seleccionado o para
visualizar/ocultar la barra de progreso durante la reproducción de un vídeo.
Almacenamiento y borrado de fotografías y clips de
vídeo
•El SanDisk Photo Album dispone de una ranura adicional CompactFlash Tipo I en su parte
posterior. Cuando se introduce una tarjeta CompactFlash Tipo I (no incluida), se pueden
almacenar fotografías y clips de vídeo desde el UFD o desde tarjetas insertadas en las ranuras
frontales.
•Para almacenar una fotografía, pulse el botón STORE cuando la fotografía aparezca a toda
pantalla. En el menú que aparecerá podrá elegir almacenar la fotografía en su calidad (resolución)
original o en calidad TV (640 x 480 pixels). En calidad TV, la fotografía tiene el mismo aspecto en
la pantalla del televisor que en su versión de resolución original (más alta), pero el tamaño
almacenado es mucho más pequeño que su tamaño original. Por ejemplo, al usar una tarjeta
CompactFlash de 128 MB en la ranura posterior, se pueden almacenar hasta fotografías en
calidad TV (basado en un tamaño medio de almacenamiento de 60 KB por fotografía).
•Las fotografías almacenadas en su resolución original se almacenan automáticamente en un
álbum denominado ORIGINAL.
•Las fotografías almacenadas en resolución de impresión (tamaño postal) se almacenan
automáticamente en un álbum denominado PRINT.
•Las fotografías almacenadas en resolución TV pueden almacenarse en un álbum dependiendo de
la configuración del almacenamiento. Pulse el botón SETTINGS & OPTIONS y seleccione
STORING y, a continuación, ALBUM / GROUPING. Si se selecciona la opción “Agrupar
fotografías por día”, todas las fotografías tomadas en un día se almacenan en un solo álbum. Esto
ocurre en el momento de almacenarse esas fotografías en la tarjeta CompactFlash situada en la
parte posterior. Las otras opciones son almacenarlas por mes (todas las fotografías del mismo
mes se almacenan en un álbum) y por año (todas las fotografías del mismo año se almacenan en
un álbum). Las fotografías que ya están almacenadas y los álbumes que ya han sido creados no
se ven afectados al cambiar la configuración de almacenamiento. La configuración de
almacenamiento se aplica únicamente a las fotografías que se almacenen después de cambiar la
configuración.
•Los clips de vídeo se almacenan de una manera similar pero solamente se pueden almacenar en
su tamaño original. Los clips de vídeo se almacenan automáticamente en un álbum denominado
ORIGINAL. Adviértase que el tamaño del archivo de un clip de vídeo es mucho mayor que el de
una fotografía y por ello puede llenar rápidamente la tarjeta de memoria.
•Para borrar una fotografía, clip de vídeo o un álbum completo, pulse el botón DELETE cuando el
objeto esté preseleccionado. A continuación, siga las instrucciones en pantalla. También podrá
borrar una fotografía o clip de vídeo cuando se visualice a toda pantalla.
ADVERTENCIA
Almacene fotografías SOLAMENTE en calidad/resolución TV para fines de
reproducción en su televisor. Las fotografías almacenadas en calidad TV NO
son idóneas para producir copias de calidad. Una fotografía almacenada en
calidad TV NO PUEDE volver a adoptar su calidad/resolución original.
ESPAÑOL
Other manuals for Photo Album
2
This manual suits for next models
1
Table of contents
Languages:
Other SanDisk Card Reader manuals

SanDisk
SanDisk ImageMate SDDR-199 User manual

SanDisk
SanDisk SDDR-92-A15 - ImageMate USB 2.0 Reader/Writer Card... User manual

SanDisk
SanDisk MobileMate Micro Memory User manual

SanDisk
SanDisk ImageMate SDDR-89 User manual

SanDisk
SanDisk ImageMate CompactFlash User manual

SanDisk
SanDisk Photo Album User manual

SanDisk
SanDisk ImageMate SDDR-73 Instruction Manual

SanDisk
SanDisk ImageMate SDDR-88 User manual

SanDisk
SanDisk MicroMate User manual

SanDisk
SanDisk ImageMate SDDR-289 User manual