Sangamo choice pr 3 User manual

INSTALLATION INSTRUCTIONS
3 CHANNEL PROGRAMMER
Technical Data
Power Supply: 230V AC, 50Hz
Operating Temperature: 0°C to 35°C
Total Switch Rating: 230V AC, 6(2)A
Contact Type: 1B , Micro-Disconnection (Voltage Free)
Battery Type: Lithium Cell CR2032
Enclosure Protection: IP30
Plastics: Thermoplastic, ame retardant
Insulation Class: Double
Wiring: For xed wiring only
Backplate: Industry standard
Dimensions: 140mm x 87mm x 37mm
Clock: 12 hour am/pm, 1 minute resolution
BST/GMT time change: Automatic
Clock Accuracy: +/- 1 sec/day
Program Cycle: 24hr, 5/2day or 7day selectable.
Program On/offs per day: 2on/off, 3on/off selectable
Program Resolution: 10mins
Program Selection: Auto, On all day, On constant, Off
Program Override: +1,2 or 3Hr, Advance
Heating System: Pumped, Gravity selectable
Complies with : EN60730-1, EN60730-2.7, EMC Directive 2004/108/EC,
LVD Directive 2006/95/EC
Pre-Installation Set Up:
Before installing, set the bank of 4 DIP Switches on the back to congure the unit according
to the chart below:
DIP Switches: Shown in Factory Default Positions.
Fitting the Programmer
Loosen the two ‘captive’ retaining screws on the bottom of the back plate.
Now t the programmer to the back plate, ensuring the lugs of the back
plate engage with the slots on the programmer. Swing the bottom of the
programmer into position ensuring the connection pins on the back of
the unit locate into the terminal slots in the back plate.
Tighten the two ‘captive’ screws to x the unit securely.
Commisioning
Switch on mains supply.
Referring to the user guide
1. Use the buttons to ensure correct product functionality.
2. Set timing and programme details in accordance with customer requirements.
3. Normally unit will be left with all channels in ‘Auto’ mode.
4. Leave these installation instructions with customer for reference.
In the interests of continuous product improvement we reserve the right to alter designs,
specications and materials without prior notice and cannot accept liability for errors.
143706_A
Sangamo Limited, Industrial Estate, Port Glasgow, Renfrewshire PA14 5XG
Tel: 01475 745131 Fax: 01475 744567
CHOICE PR 3
SERVICE AND WARRANTY
Your product is not user serviceable. PLEASE DO NOT TRY TO DISMANTLE THE UNIT.
This product is guaranteed by your supplier for 3 years from the Date of Manufacture. If it should become
defective, please contact your installer or supplier for a replacement unit or visit www.sangamo.co.uk/returns.
An extended warranty may be purchased online (www.sangamo.co.uk/warranty)
CUSTOMER CARE POLICY
As part of Sangamo’s continuous improvement program, the Company operates a Customer Care Policy.
This means that we welcome your comments and complaints, as it can help us to improve our services to you,
our customer.
Due to our policy of continuous product improvement and development, the specications in this guide may be subject to
change without prior notice.
Technical Helpline: 01475 745131

2. All necessary electrical connections should now be made. Ensure that the wiring to the
wall-plate terminals leads directly away from the terminals and is completely enclosed within
the wall-plate aperture. Wire ends must be stripped and screwed to the terminals so that
minimal bare wire is showing.
New Installations
Example circuit diagrams for typical installations are show below. These diagrams are
schematic and should be used as a guide only.
Please ensure that all installations comply with the current IEE regulations.
For reasons of space and clarity not every system has been included and the diagrams have
been simplied, for instance some Earth connections have been omitted.
Other control components shown in the diagrams i.e. Valves, RoomStats etc are general
representations only. However the wiring detail can be applied to the corresponding models of
most manufacturers e.g. Horstmann, Honeywell, Danfoss Randall, Drayton etc.
Cylinder and Room Thermostat Key:
C=Common Call = Call for heat or break on rise SAT = Satiseld on rise N= Neutral
Existing Installations
1. Remove old programmer from its back plate mounting loosening any securing screws as
dictated by its design.
2. Check compatibility of existing back plate & wiring arrangement with that of the new
programmer. See online Programmer Compatibility Guide for direction.
3. Make all necessary changes to back plate & wiring arrangement to suit new programmer
Electrical Connections
Internal Wiring Diagram
PUMPED – allows independent control of CH and HW.
GRAVITY – does not allow CH without HW but can provide HW without CH
24 Hr – runs same programme every day.
5/2 Day – allows different on/off times at weekend.
7 day– allows different on/off times every day.
Installation Safety Notes
This unit must be installed by a suitably qualied person in accordance with the latest IEE
Wiring Regulations.
Isolate mains supply before commencing installation. Please read all installation instructions
before proceeding.
Ensure that the xed wiring connections to the mains supply is via a fuse rated at not more
than 6 amps and a class ‘A’ switch having a contact separation of a minimum of 3mm in all
poles. The recommended cable sizes are 1.0mm2 or 1.5mm2
If the unit is tted to a metal surface, IT IS ESSENTIAL that the metal be earthed. DO NOT
use a surface mounting box.
No earth connection is required as the product is double insulated but ensure continuity of
earth throughout the system.
NEVER t or remove the unit to a live wall-plate
Fitting Back Plate – Direct Wall Mounting
1. Position the wall-plate (terminals along top edge) with 60mm (min) clearance to its right,
25mm (min) above, 90mm (min) below. Ensure that the supporting surface will fully cover
the back of the programmer.
2. The ideal location would be 1.4M above oor level, easily accessible, reasonably lit and
free from condensation or temperature extremes.
3. Offer the back plate to the wall in the position where the programmer is to be mounted
remembering that the back plate ts to the left hand end of the programmer. Mark the xing
positions through the slots in the backplate, drill and plug wall, then secure back plate in
position using screws.
4. All necessary electrical connections should now be made. Ensure that the wiring to the
wall-plate terminals leads directly away from the terminals and is completely enclosed within
the wall-plate aperture. Wire ends must be stripped and screwed to the terminals so that
minimal bare wire is showing.
Fitting Back Plate – Wiring Box Mounting
1. Fix the wall-plate to a ush mounting single conduit box type UA1 (BS4662) using M3.5 x
14 screws. Take care to ensure the opening is adequate and will allow mounting of the unit
onto the base plate. The use of glue, mastic, or other sealants MUST NOT be used to secure
the unit to the wall.

USER INSTRUCTIONS
3 CHANNEL PROGRAMMER
What is a central heating programmer...?
Central Heating programmers allow you to set ‘On’ and ‘Off’ time periods for your heating and/or hot water. One
Channel models switch your central heating and domestic hot water on and off at the same time, while the two and
three channel versions control your domestic hot water and heating to come on and go off at different times. Three
channel programmers are often used to provide separate control for two heating zones (perhaps upstairs and
downstairs) as well as the separate control for your hot water.
Sangamo Choice programmers make it easy to set the ‘On’ and ‘Off’ time periods to suit your own lifestyle, with
options for; 7 day, 5/2 day, and 24 hour programming. You can also choose to have your heating and hot water on
continuously or be permanently off. Choice programmers also adjust automatically between Greenwich Mean Time
and British Summer Time. The Choice programmers even have a default set of programmes, so you can decide not
to adjust the programming at all! And to improve your comfort, you can temporarily adjust the heating programme,
with the Choice; ‘Advance’ or ‘Boost’ buttons.
PROGRAMMER SUMMARY
This programmer can automatically switch your central heating and hot water ON and OFF up to 3 times a day, at
whatever times you choose. Timekeeping is maintained through power interruptions by a non-replaceable battery
designed to last for the lifetime of the programmer. The clock is automatically put forward 1 hour at 1:00am on
Conguration Display Programme Notes
2 ON/OFF Pumped System 2Pl Times same & linked for Central heating 2 and Hot Water
with Central Heating 1
3 ON/OFF Pumped System 3Pl Times same & linked for Central heating 2 and Hot Water
with Central Heating 1
2 ON/OFF Gravity System 2Gl Times same & linked for Central heating 2 and Hot Water
with Central Heating 1
3 ON/OFF Gravity System 3Gl Times same & linked for Central heating 2 and Hot Water
with Central Heating 1
The last letter of the conguration (i.e. a U or an A) will be L if the Central Heating and Hot Water programmes
have been linked. In this mode the Hot Water and Central Heating 2 will run from the Central Heating 1
programme, so changes to the programme need only be made once and this will affect both Central Heating
channels and Hot Water.
POWER INTERRUPTION
In the event of a mains supply failure the screen will go blank but the back-up battery ensures that the
programmer continues to keep the time and retain your stored programme. When power is restored, if there has
been no change to the rear DIP switch, the programmer then goes to RUN mode.
If the conguration setting on the rear DIP switch has been altered during the power
interruption the screen will initially show the new conguration. And the appropriate factory default programme
(see BUILT IN PROGRAMME section) will be installed. Press SET button to return to RUN mode.
SERVICE AND WARRANTY
Your product is not user serviceable. PLEASE DO NOT TRY TO DISMANTLE THE UNIT.
This product is guaranteed by your supplier for 3 years from the Date of Manufacture. If it should become
defective, please contact your installer or supplier for a replacement unit or visit www.sangamo.co.uk/returns.
CUSTOMER CARE POLICY
As part of Sangamo’s continuous improvement program, the Company operates a Customer Care Policy.
This means that we welcome your comments and complaints, as it can help us to improve our services to you,
our customer.
Due to our policy of continuous product improvement and development, the specications in this guide may be subject to
change without prior notice.
Sangamo Limited, Industrial Estate, Port Glasgow, Renfrewshire PA14 5XG
Tel: 01475 745131 Fax: 01475 744567
143705_A
CHOICE PR 3
Technical Helpline: 01475 745131

the last Sunday of March and back 1 hour at 2:00am on the last Sunday of October. The clock is factory pre-set to
UK time and date, but you can alter the time setting if you wish.
During installation, the installer selects 24 hour, or 5 day/2day, or 7 day programming and 2 or 3 on/off periods
per day and pumped system or gravity system via a 4 position DIP switch on the back of the unit (see installation
instructions).
IMPORTANT: These settings should only be changed by a qualied person. Contact your installer.
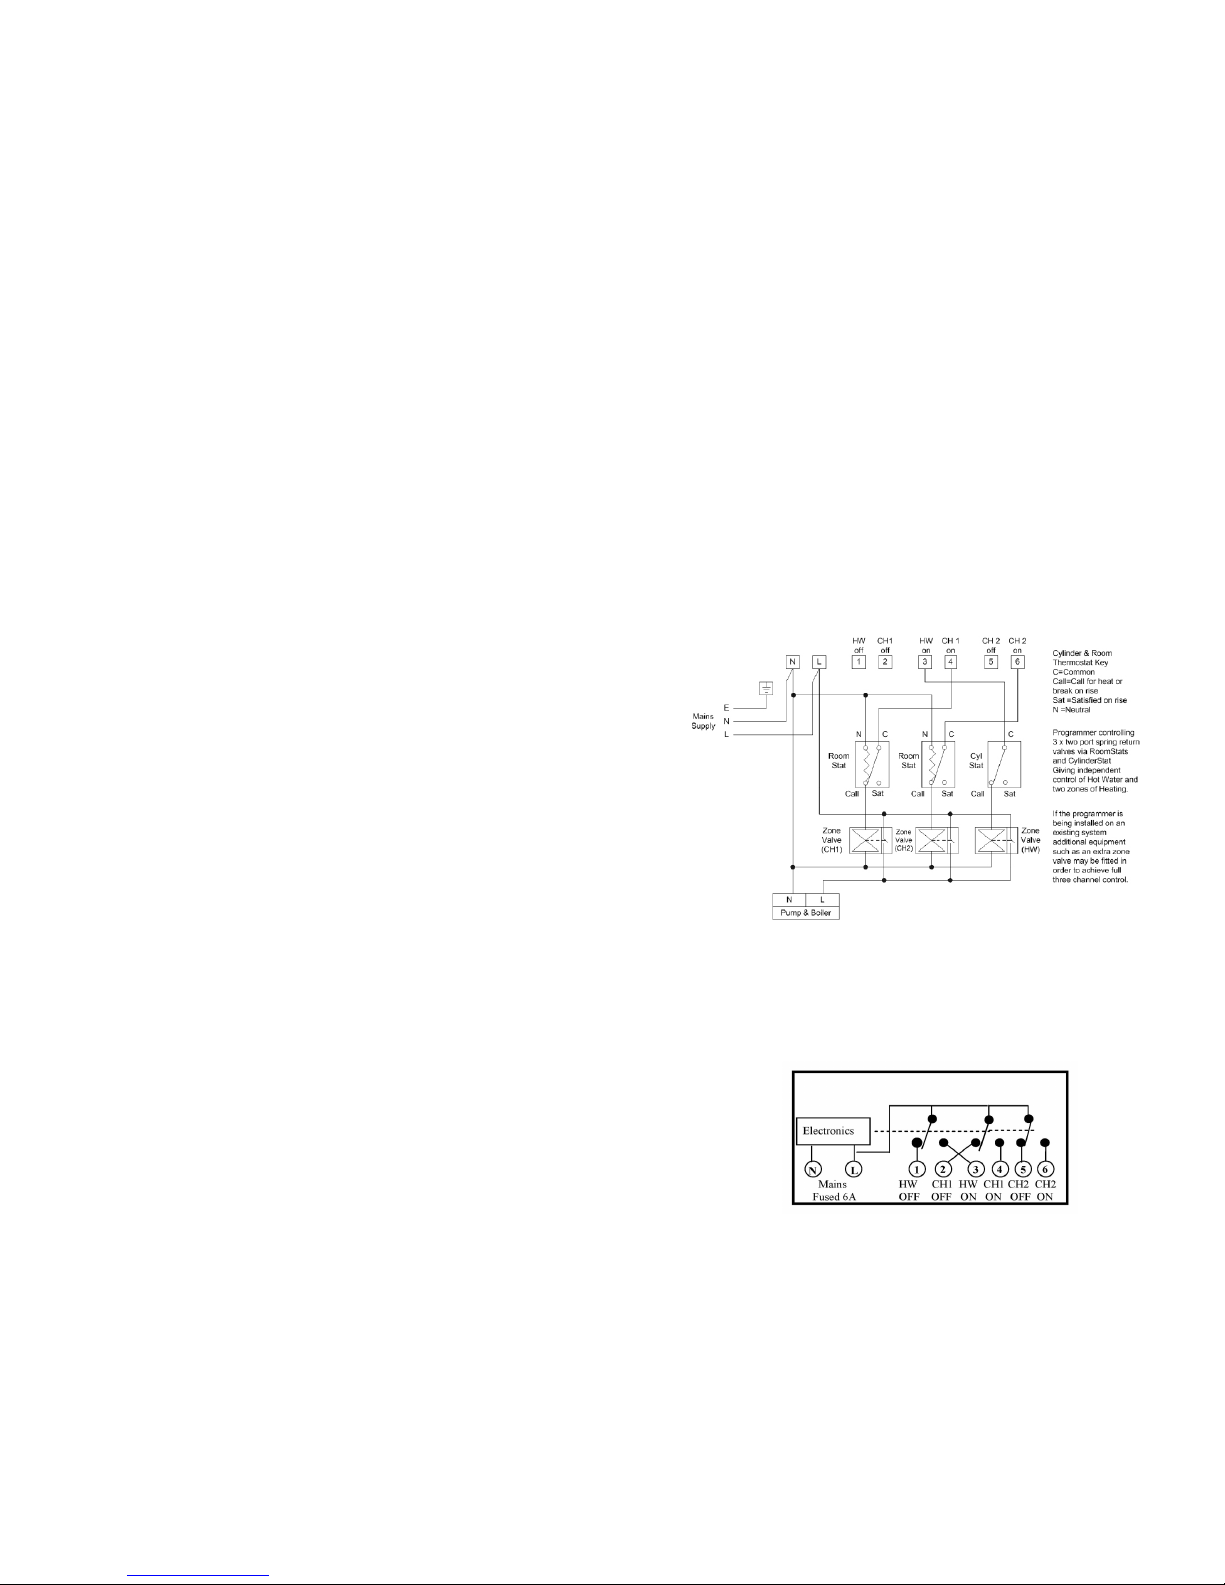
IMPORTANT: This programmer is not suitable for the switching of devices greater than 6Amp rated.
(eg. Not suitable for use as an immersion timer)
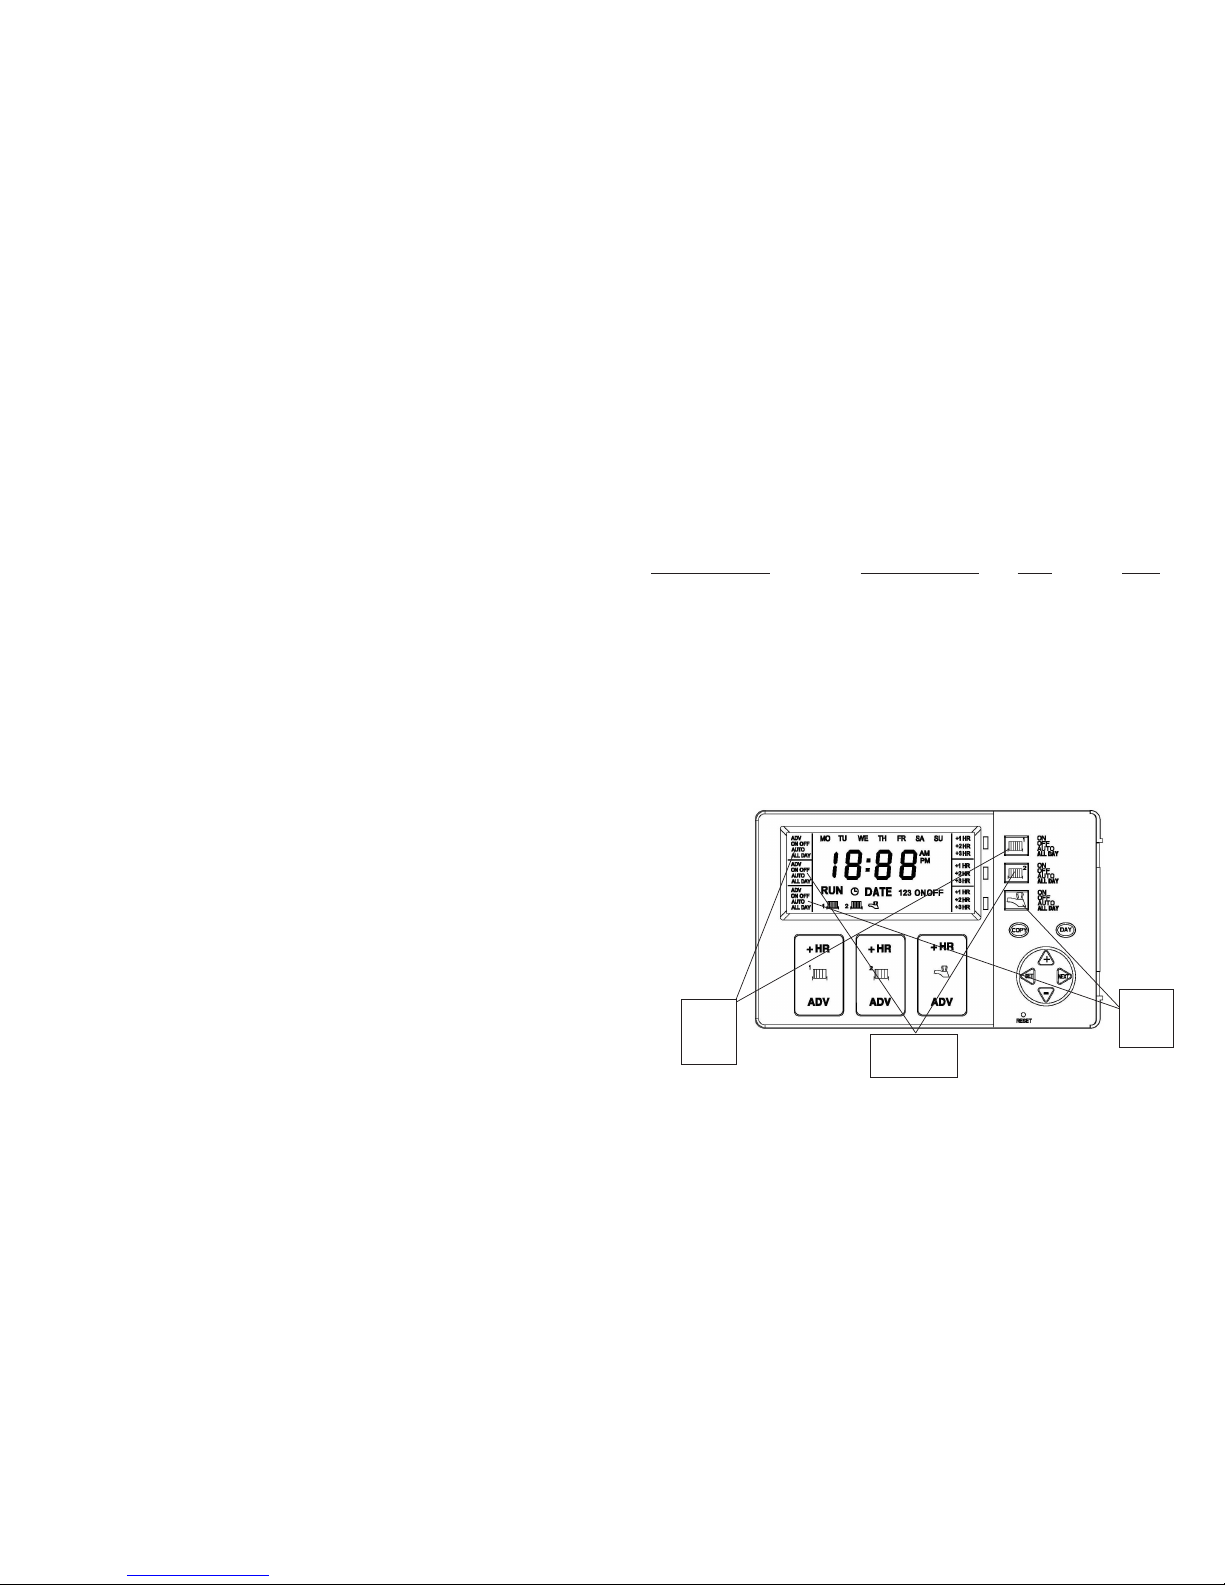
The large, easy to read display makes programming easy and the unit is designed to eliminate the possibility of
accidental changes to your programme. Buttons normally visible only affect your set programme temporarily. All
buttons which can permanently change your programme are located behind the ip-over facia.
- The 24 hour programmer option runs the same programme every day.
- The 5 day/2 day programmer option allows different ON/OFF times at week ends.
- The 7 day programmer option allows different ON/OFF times for each day of the week
- Pumped System (P_) – allows independent control of Central Heating and Hot Water
- Gravity System (G_) – does not allow Central Heating without Hot Water but can provide Hot Water without
Central Heating.
CONFIGURATION
When setting time, date or changing programme times the rst screen displayed indicates the conguration as set
up by the installer. (See SETTING THE TIME section)
Conguration Display Programme Notes
2 ON/OFF Pumped System 2PU Times for Central heating and Hot Water can be independently set.
3 ON/OFF Pumped System 3PU Times for Central heating and Hot Water can be independently set.
2 ON/OFF Gravity System 2GA Times for Central heating and Hot Water can be independently set.
3 ON/OFF Gravity System 3GA Times for Central heating and Hot Water can be independently set.
The 24 hour, or 5 day/2day, or 7 day programming option as set up by the installer can also be veried at this
stage by how the Monday to Sunday indicators are displayed
Programming option Monday to Sunday Indicators ash
7 DAY Mon to Sun individually shown
5/2 DAY Mon to Fri together then Sat & Sun together shown
24 HOUR Mon to Sun together shown
Now press any button to move to Setting the Time and Day.
USING THE +HR BOOST
For +Hr Central Heating
Press the upper half of the Central Heating CH1 or CH2 +HR button (1) or (2). to make the desired selection with
one, two or three hours extra heating and cancel options offered.
Warning: The +HOUR function is only available when programme is in AUTO , ALL DAY or OFF operating modes.
If the Central heating operating mode is OFF, then it will switch on for the extra hours selected. If the Central
heating mode is AUTO or ALL DAY, then during an OFF period, it will switch on for the extra hours selected.
If during an ON period, then it will temporarily extend that programme by the number of hours selected.
The + 1HR , +2HR or +3HR status will appear on the right of the LCD.
For +Hr Hot Water
Press the upper half of the Hot Water channel +HR button (3). to make the desired selection with one, two or three
hours extra heating and cancel options offered.
Warning: The +HOUR function is only available when programme is in AUTO, ALL DAY or OFF operating modes.
If the Hot Water operating mode is OFF, then it will switch on for the extra hours selected. If the Hot Water mode is
AUTO or ALL DAY, then during an OFF period, it will switch on for the extra hours selected. If during an ON period,
then it will temporarily extend that programme by the number of hours selected.
NOTE: If the programmer is in the OFF mode and then +HR button (1 , 2 or 3) is pressed (+1 HR, + 2 HR, or + 3
HR) and the resulting time of the boost overlaps a START / ON time in the AUTO mode programme memory then the
boost will disengage. If this happens simply press +HR button (1 , 2 or 3) again and the boost will activate for the
time period chosen.
LINKED CENTRAL HEATING AND HOT WATER TIMES
To link the programmes hold down the COPY button whilst pressing RESET.
2 7
(3)(2)(1)

BUILT IN PROGRAMME
For convenience, the programmer has a built in programme which will be satisfactory for many people, but which
can be changed very easily (see section CHANGING PROGRAMME TIMES). Once the unit is powered up this built
in programme will run. If the user changes from the built in programme and wishes to return to it, then pressing
the reset button with a non metallic pointed tool will return the unit to the built in / default programme.
NOTE: Every time the reset is pressed, the time and date must be set again. (See the sections SETTING THE
TIME & SETTING THE DATE).
The built in programme is the same for central heating and hot water channels (see below).
Factory Programme Settings
Conguration 2P* & 2G* Conguration 3P* & 3G* Mon-Fri Sat-Sun
1st ON 1st ON 06:00am 07:00am
1st OFF 1st OFF 08:30am 09:00am
_ 2nd ON 12.00noon 12.00noon
_ 2nd OFF 12.00noon 12.00noon
2nd ON 3rd ON 04:30pm 04:30pm
2nd OFF 3rd OFF 10.30pm 11.00pm
* = The last letter of the conguration and may be a U, A or L.
If the unit is installed as a 24 hour programmer the built in programme will be the same for each day (same as
Mon-Fri above).
SELECTING OPERATING MODE
ON Central heating and Hot water is ON continuously
AUTO Central heating and Hot water will be switched ON or OFF as programmed
ALL DAY Central heating and Hot water will be switched ON only once each day
between the rst ON time and last OFF time.
OFF Central heating and Hot water continuously OFF
To change the Hot Water times
Press SET button (1) until tap icon (2) ashes in the display and 1 ON (3) appears. This indicates the time shown
on the display is the rst ON time and proceed in same manner as ‘To change the Central Heating Times 2’ above.
PROGRAMMING NOTES
The unit will automatically return to RUN mode if a period of 5 minutes passes without any buttons being pressed.
For convenience, to allow for programmes to go past midnight, the programme day is from 03:00am to 02:50am
the next day.
If a programme is required to run from 1.00 am to 8.00 am then 2 programmes must be used because it is not
possible to programme through 2.50 am. (The programme should be split up into two sections ; 3.00 am > 8.00
am and 1.00 am > 2.50 am).
RESET
Press the reset button with a non-metallic pointed tool to restore the built in programme. As well as restoring the
built in programme, it also resets the time to 12:00pm and the date to 01/01/2000. Initially the display shows all
segments lit for a few seconds, but then will show the current conguration. See SETTING THE TIME section to
continue.
NOTE: As a safety feature after reset the unit will be in OFF operating mode reselect your required operating mode.
NOTE: Use of excessive force may result in the reset button sticking behind the front cover of the programmer. If this hap-
pens the unit will “freeze” - and the button can only be released by a qualied installer.
USING ADVANCE
The ADVANCE function allows the user to move to the next ON or OFF programme for a “one off” event, without
having to change the programme or use the ON or OFF buttons. Warning: The ADVANCE function is only available
when programme is in AUTO or ALL DAY operating modes.
To advance Central Heating 1 or 2
Press the Central Heating 1 or 2 channel ADV (1 or 2) button. This will turn the Central heating ON if it is in an OFF
period and OFF if it is in an ON period. It will stay in this state until either ADV(1 or 2) button is pressed again, or
until a programmed ON/OFF period commences. The word ADV will appear in the left hand side of the LCD.
To advance Hot Water
Press the Hot Water channel ADV (3) button. This will turn the Hot Water ON if it is in an OFF period and OFF if it
is in an ON period. It will stay in this state until either ADV(3) button is pressed again, or until a programmed ON/
OFF period commences. The word ADV will appear in the left hand side of the LCD.
3
6
CH1
Mode
HW
Mode
CH1 Mode

SETTING THE TIME
- Press the SET button (1) once. The conguration setting will appear on the screen.
- Press the SET button (1) again. The clock icon (2) on the screen will ash.
- Press the +/- buttons (3) to adjust the time. Time will change quicker if pressed continually.
- Press SET (1) once to move on to setting the DATE or press multiple times to return to RUN mode.
SETTING THE DATE
- Press the SET button (1) until the Y:XX icon (year) appears and the (DATE) icon (4) ashes.
- Press the +/- button (3) to set the year.
- Press NEXT button (5). M:XX appears (month).
- Press +/- button (3) to set month.
- Press Next button (S) D: xx appears (Day)
- Press +/- button (3) to set day.
You can review or edit the date you have set just by pressing NEXT button (5) again and repeating the sequence
above. To conrm the date and move on to PROGRAM mode press SET button (1) once or press SET button (1)
multiple times to return to RUN mode.
CHANGING PROGRAMME TIMES
The built in programmes for Central Heating and Hot Water can easily be changed to better suit your lifestyle.
To change the Central Heating 1 time:
Press SET button (1) until rst radiator icon (2) ashes in the display and 1 ON (3) appears. This indicates the time
shown on the display is the rst ON time.
By pressing the +/- buttons (4) you can alter the ON time to the time you want.
Press NEXT button (5), display will now show 1 OFF (3).
By pressing the +/- buttons (4) you can alter the OFF time to the time you want.
Press NEXT button (5) to access remaining ON/OFF periods and alter in same manner as above.
To return to RUN mode, press the SET button until the display indicates RUN on the display
NOTE: Programming is in 10 minute segments.
7 day programmer option
If the unit is installed as a 7 day programmer, the initial programme displayed will be for Monday.
You can go to any day of the week by pressing the DAY button repeatedly.
The ON/OFF times can be changed for each day as described above in the section “CHANGING PROGRAMME TIMES”.
If you press the COPY button, the current programme will be copied onto the next day.
NOTE: it is not possible to copy Sunday to Monday.
5 day /2 day programmer option
If the unit is installed as a 5 day/2 day programmer, the initial programme displayed will be for Monday to Friday.
Pressing the DAY button will take you to the programme for Saturday and Sunday. The ON/OFF times can be
changed for each day group as described above in the section “CHANGING PROGRAMME TIMES”.
If you press COPY button, the current programme will be copied onto the next day group.
24 hour programmer option
If the unit is installed as a 24 hour programmer, the built in programme will be the same for each day. The COPY &
DAY buttons have no effect if installed as a 24 hour programmer.
To change the Central Heating 2 times
Press SET button (1) until second radiator icon (2) ashes in the display and 1 ON (3) appears. This indicates the
time shown on the display is the rst ON time and proceed in same manner as ‘To change the Central Heating 1
time’ above.
4 5
(2)
(4)
(5)
(3)
(1)
(2)
(3)
(5)
(1)
(4)
Table of contents
Other Sangamo Thermostat manuals

Sangamo
Sangamo RSTAT5 RF Quick start guide

Sangamo
Sangamo Choice RSTAT5 RF User manual

Sangamo
Sangamo CHOICE RSTAT5 Guide

Sangamo
Sangamo Rstat8 User manual

Sangamo
Sangamo CHPWIFI User manual

Sangamo
Sangamo Choice RSTAT5 RF User manual

Sangamo
Sangamo CHOICE RSTAT8 User manual

Sangamo
Sangamo Choice Rstat 7 Guide

Sangamo
Sangamo Choice Rstat 3 Assembly Instructions

Sangamo
Sangamo RSTAT1 Guide