Sartorius Factory Series User manual

Industrial
Weighing Technology
98648-009-40
Sartorius Factory Serie
FCT01-X
Modular Weighing Terminal for Hazardous Areas/Locations
Operating Instructions

Contents
Contents....................................2
Operating Design ......................3
Configuring the Scale
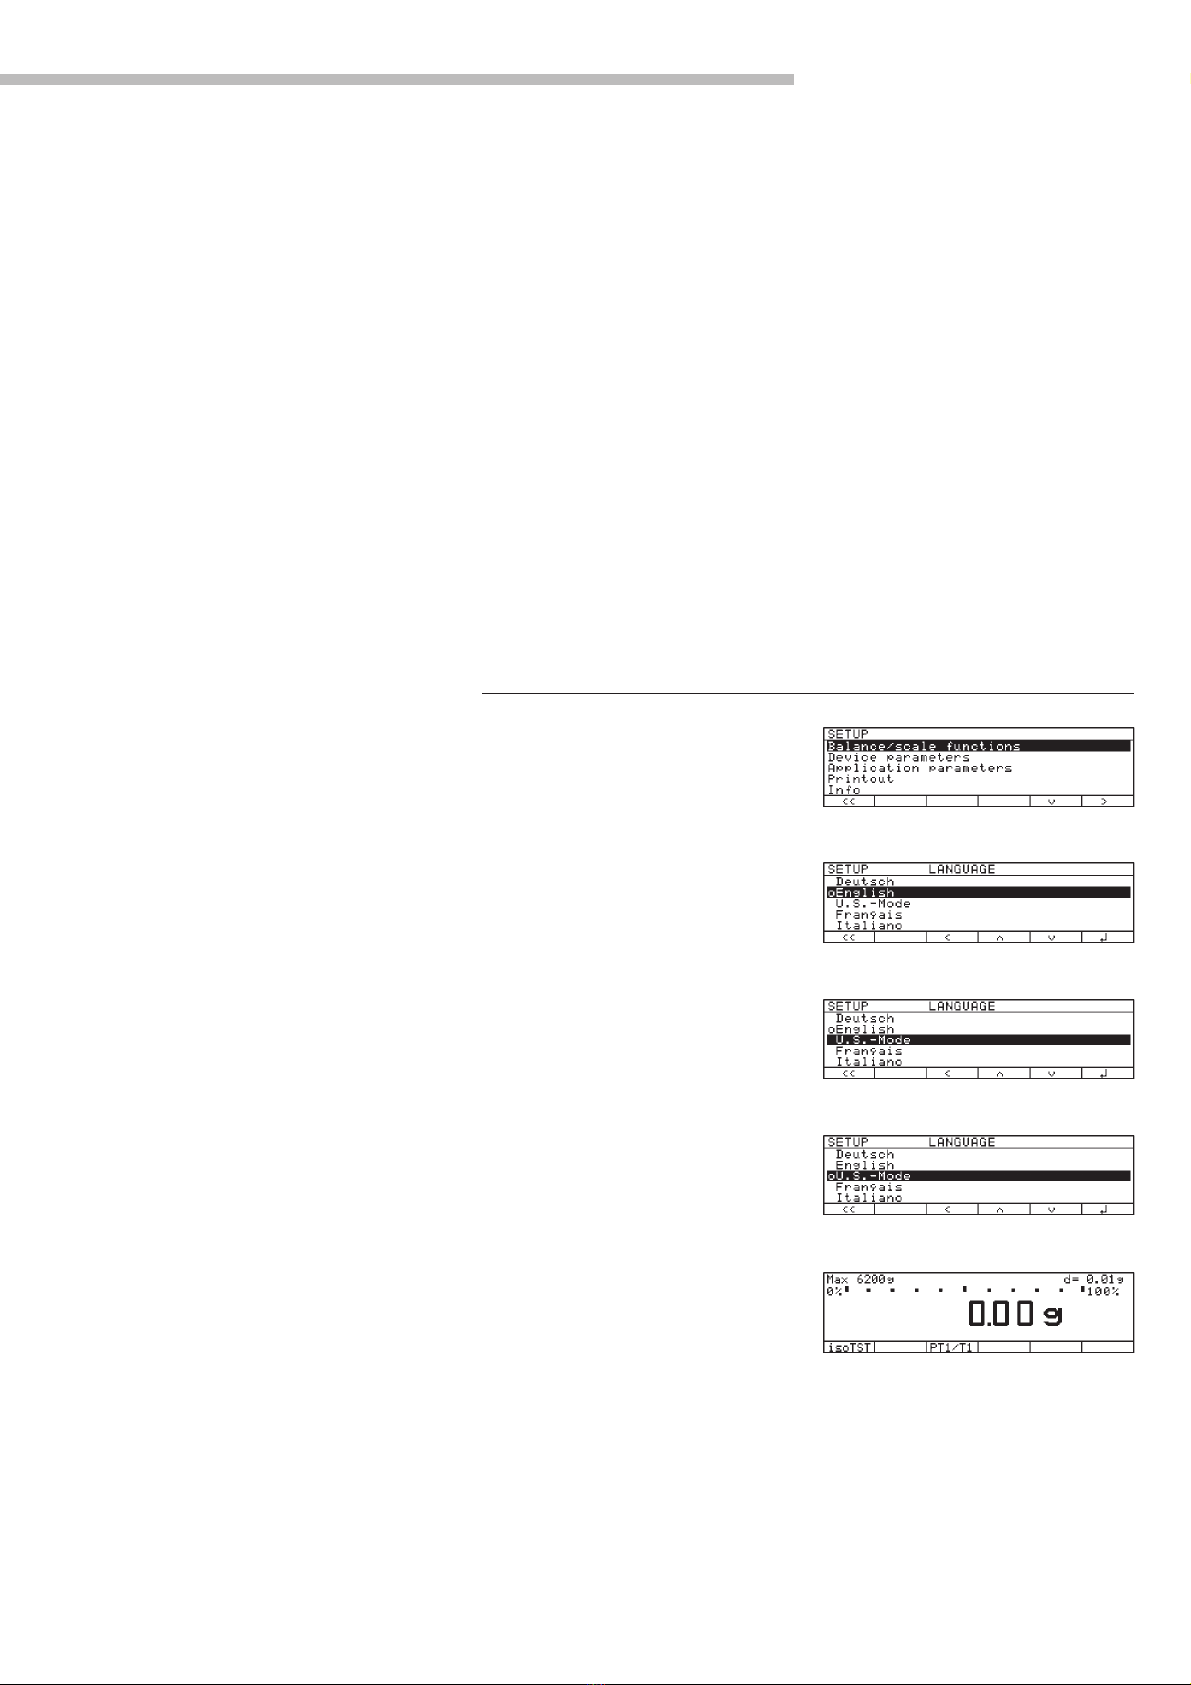
Setting the Language..................7
Navigating in the Setup Menu ....8
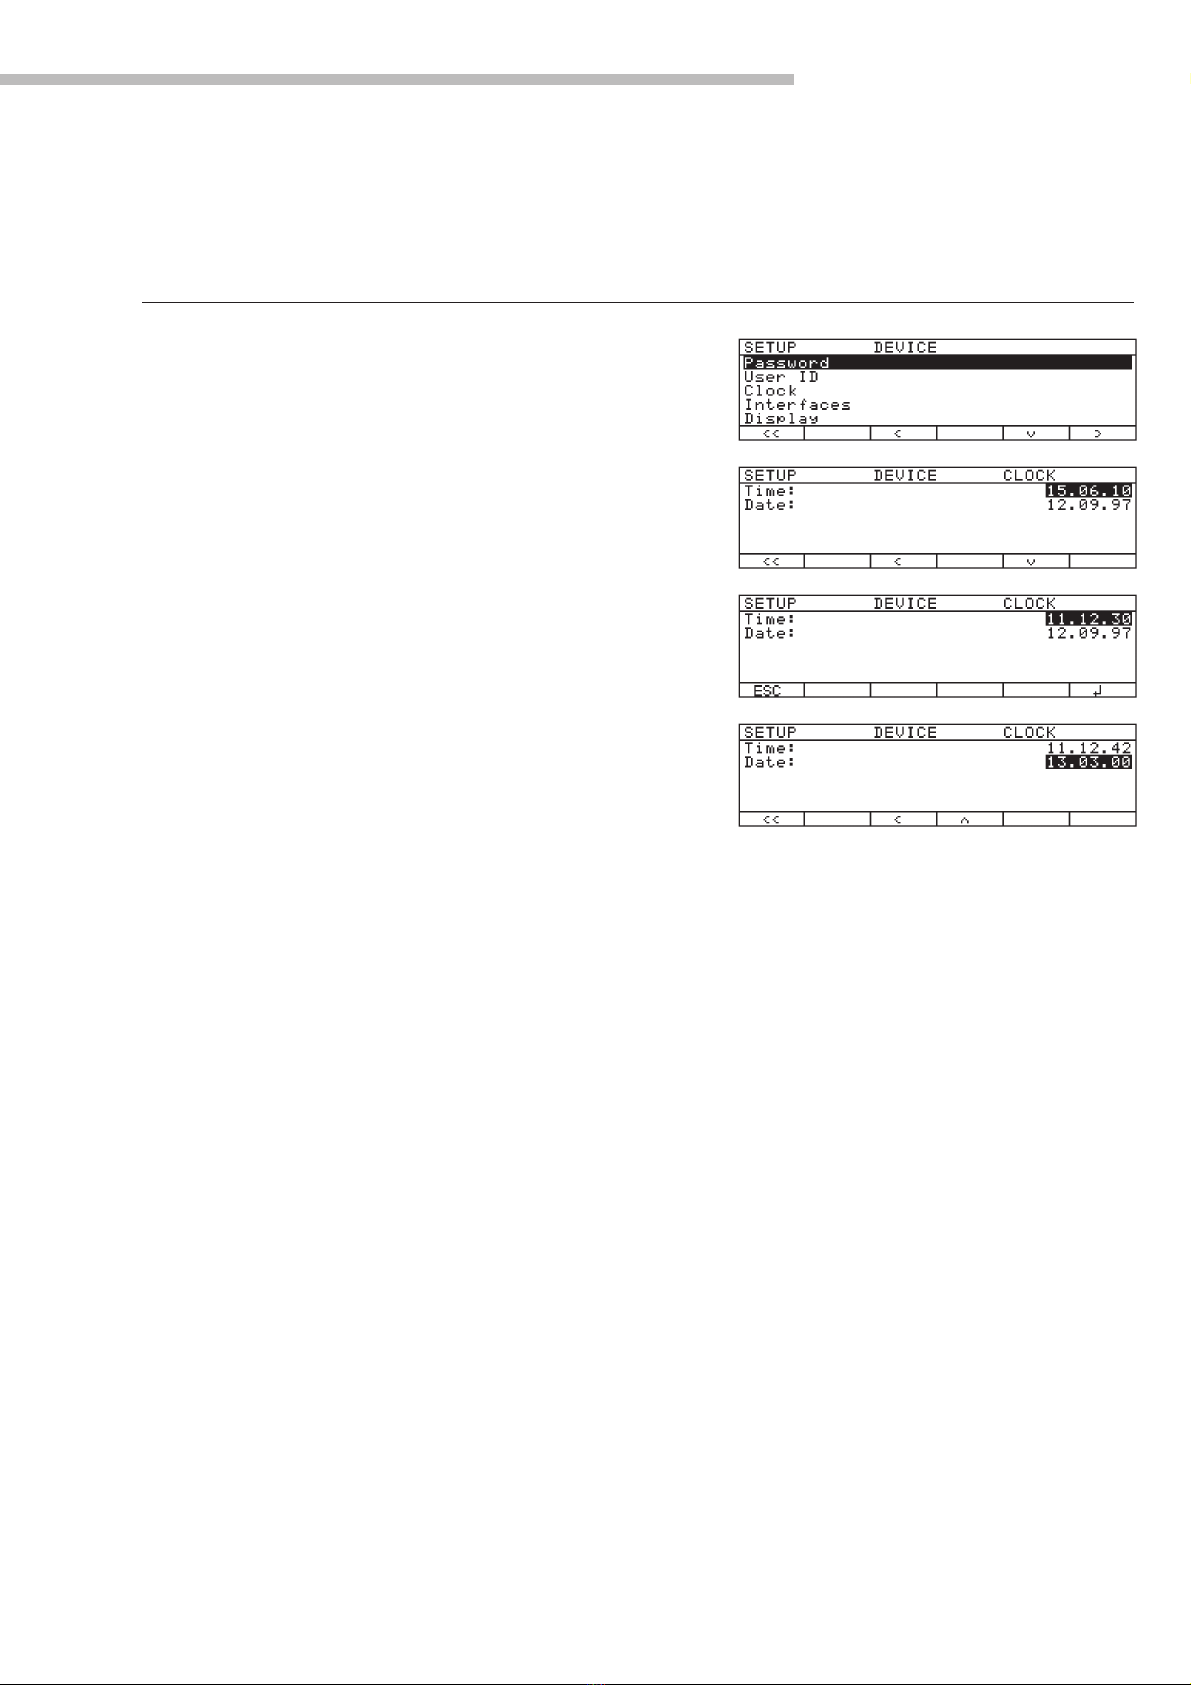
Entering the Time and Date ........ 9
Setting the Scale Functions ........10
Setting the Device Parameters ....13
Entering a Password ..............13
Setting the Application
Parameters ............................17
Selecting the Printout Function.... 25
Configured Printout ................27
Generate FlexPrint ................30
Displaying Info........................32
Device Information ................32
FlexPrint Information ..............32
MP8 Interface Emulation ..........33
Factory Settings ......................33
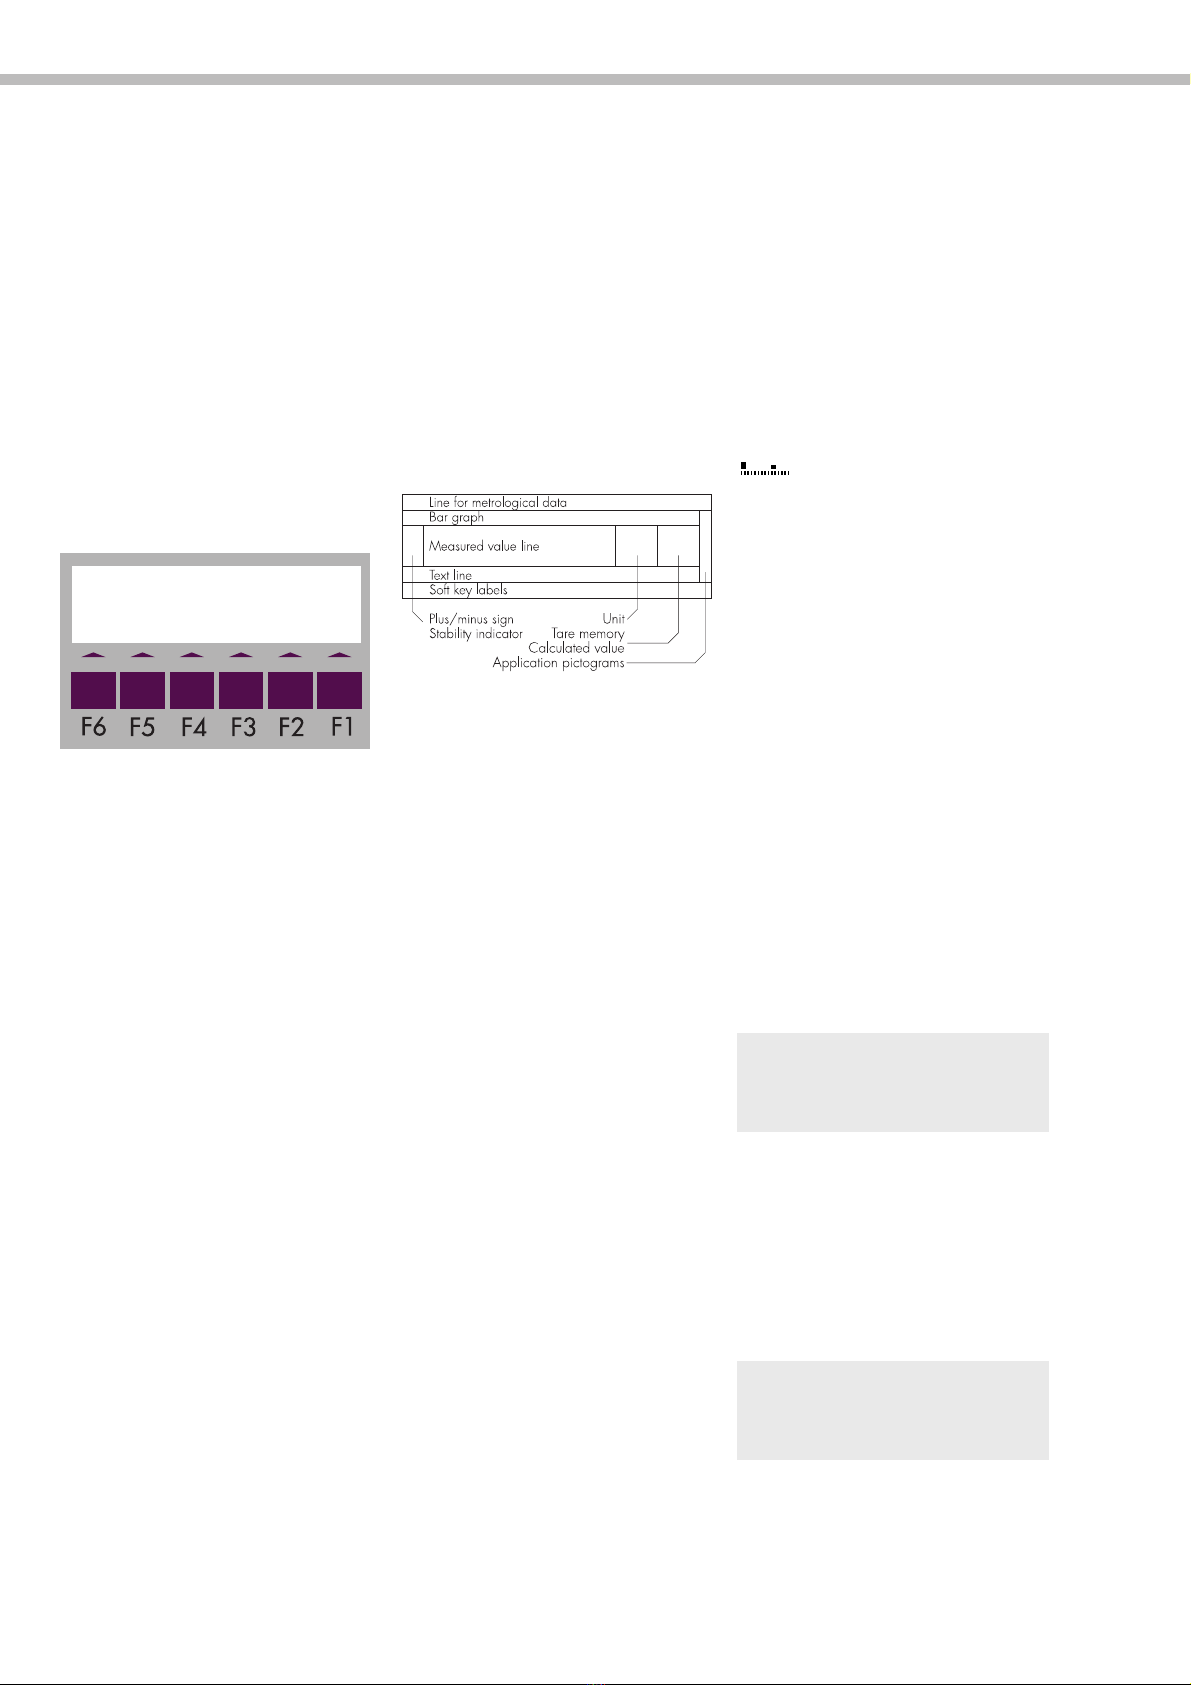
Operating the Scale
Basic Weighing Function ..........35
Device Parameters ..................38
Calibration, Adjustment ............40
Application Programs ..............47
Toggle between
Two Weight Units ..................48
Counting ............................50
Weighing in Percent ..............53
Animal Weighing ..................57
Recalculation ........................61
Calculation ..........................66
Differential Weighing ............69
Checkweighing ....................81
Time-Controlled Functions ...... 86
Totalizing ............................ 89
Formulation ........................ 93
Statistics.............................. 97
Extra Functions .................... 102
Second Tare Memory ..........102
Individual Identification
Codes ..............................104
Saving Values Manually
in M+ ..............................108
Product Data Memory ..........109
Combining Applications ........ 112
Practical Combination of Several
Applications (Example) .......... 114
Data Output Functions .......... 116
Interface Port .................... 119
Pin Assignment Charts ........ 130
Cabling Diagram ................131
Service..................................136
A/D Converter Configuration ..136
Activating the Service Mode ....141
Calibration/Adjustment in the
Service Mode ......................141
Set/Delete Preload ................143
Replacing the PCB ................144
SBI/BPI Toggling ..................145
Replacing Fuses on the PCB ....145
Error Codes and Messages ......146
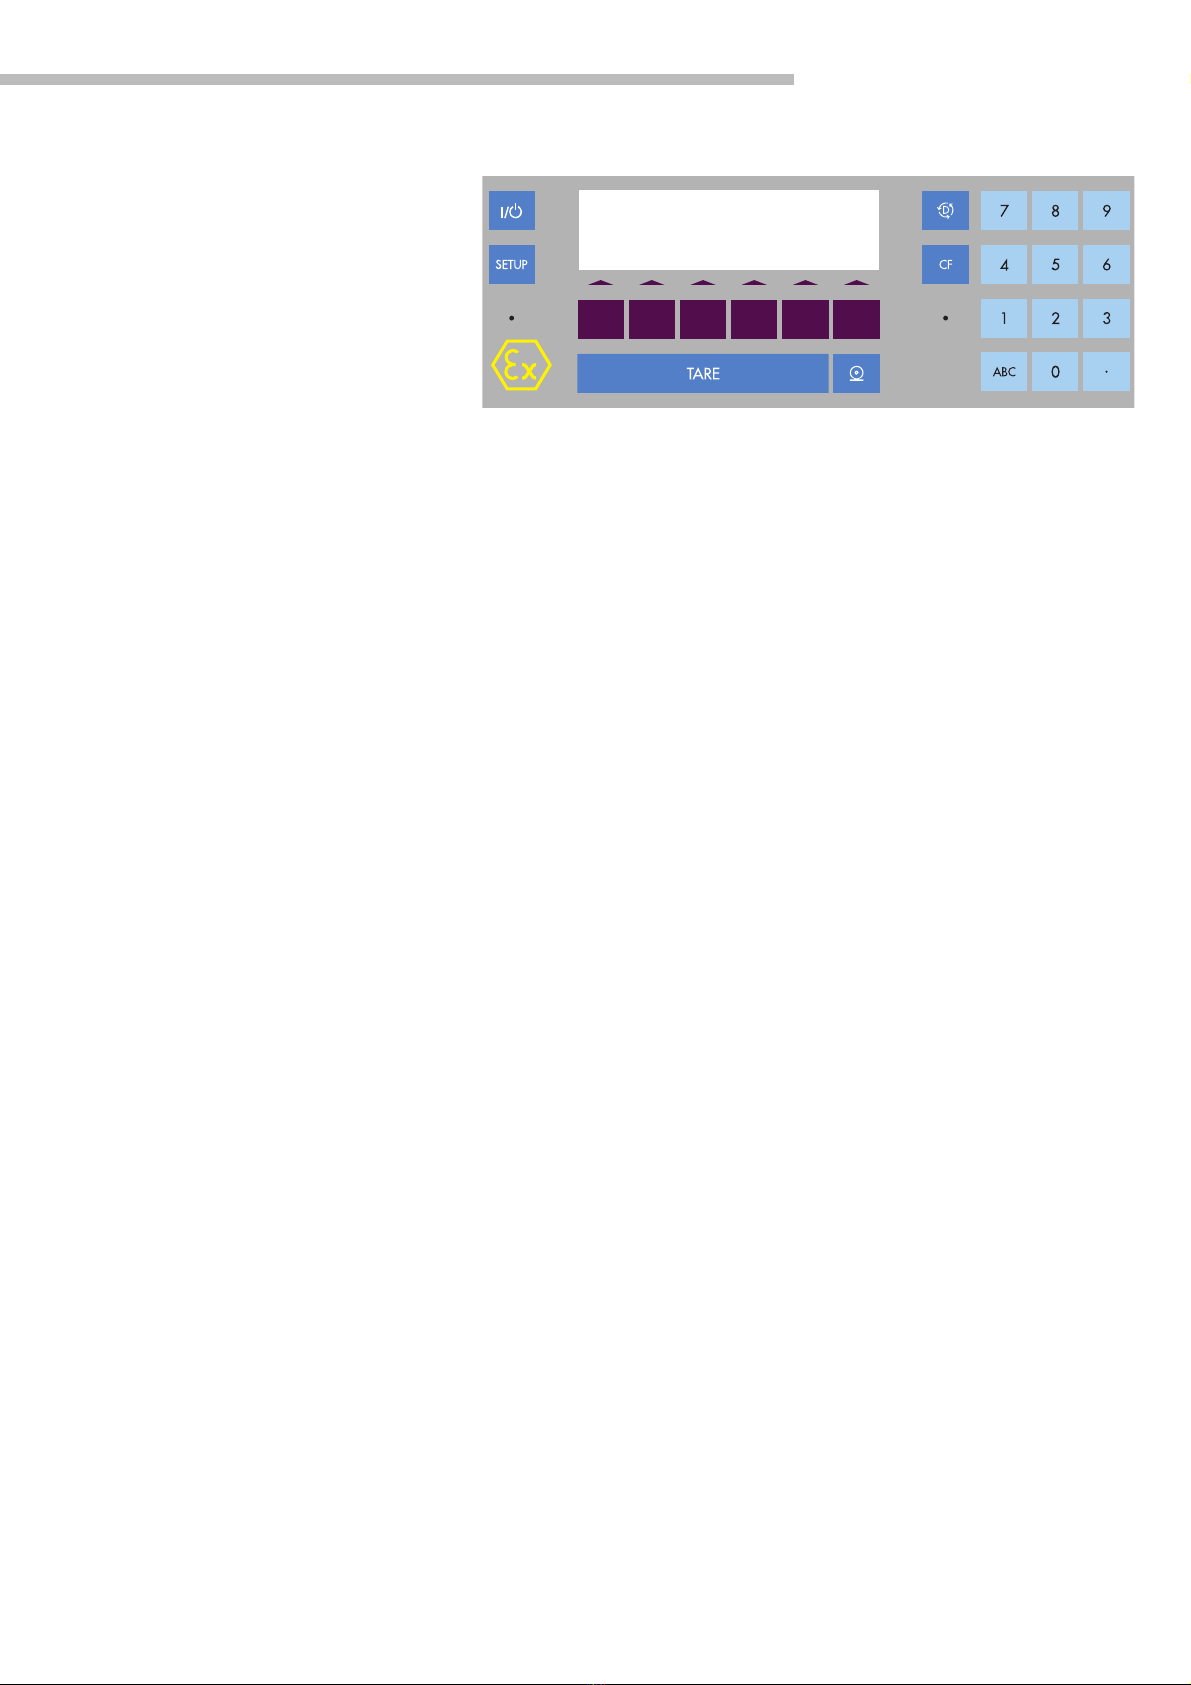
Overview
General View of the Terminal ..150
Specifications ......................151
Dimensions (Terminal Drawings)152
Accessories (Options) ............153
EC Type Examination
Certificates ..........................155
CMarking ........................170
Plates and Markings ..............171
Notes on Checking Verification
..172
Index ..................................173
Appendix
Entering the General Password
Symbols
The following symbols are used in
these instructions:
§indicates steps you must perform
$indicates steps you must perform
only under certain conditions
> describes what happens after you
have performed a certain step
– precedes an item in a list
!indicates a hazard
Note Concerning Verified Scales
Approved for Use as Legal
Measuring Instruments in the EU*:
The notes in this manual that refer to
scales verified for use in legal
metrology apply only if the scale has
been approved for verification. For
more information, contact your local
Sartorius office or dealer.
* including the Signatories of the
Agreement on the European
Economic Area
For technical advice on applications
Phone (in Germany):
+ 49 (0551) 308-4440
Fax (in Germany):
+ 49 (0551) 308-3791
2

Operating Design
You can connect any standard strain-
gauge load cell or analog IWA, IU or
IF-series weighing platform to the
FCT01-X terminal. All cables are
fitted with cable glands or threaded
round connectors for network
connections.
In addition to the power jack, your
scale also has an interface port for
connecting additional devices such
as a printer, computer, or universal
remote control switch, for example.
Operation of the terminal follows a
uniform philosophy, which is
described below.
The term “scale” as used in this
manual indicates an FCT01-X terminal
connected to a weighing cell.
Combination of Several Applications
You can combine the use of various
application programs to meet your
more complicated requirements.
To select application programs one
after the other, press D(toggle
function).
Keys
You can operate the scale either using
the keys on the terminal or from a
connected PC. This manual
describes operation using the keys on
the terminal.
Labeled Keys
These keys always have the function
indicated by their label, but are not
available at all times. Availability of
their functions depends on the current
operating status of the scale and the
menu settings.
Meaning
aAlphabetic keys
Please see section on “Text
Input”
eOn/off key
Turns the scale on and off or
switches it to the standby mode
MMenu settings
Accesses and exits the Setup
DToggles to the next application
program
cClear Function
Deletes keypad input
Interrupts a calibration and
adjustment routine in progress
Quits application programs
pPrint key
Outputs displayed values or
data logs to the interface port
.Enters a decimal point
1... 9 0 keys
See the section on
“Numeric Input”
tTares the scale
Numeric Input
To enter numbers: press 1… 9
0 .
To store numbers entered:
press the corresponding function key
directly below the soft key label
To delete an entire numeric input
digit by digit:
press the ckey
Text input
§To enter numbers: see the section
on “Numeric Input”
§To enter letters or characters:
press the akey
> Letters are displayed in the bottom
line for selection
§To select a different letter:
press the corresponding soft key
to change the letter shown
§To select the letter/character
shown: press the corresponding
function key below the soft key
label
> The selected letter is shown on
the display
$Enter the next letter/character, if
desired, as described above
$To exit the letter input mode
e.g., if the last character entered is
a letter): press the akey
§To store a word: press the corre-
sponding function key (soft key),
such as ID
§To delete an input character by
character: press the ckey
§To delete user data: enter .or a
space “m” and save
3
Operating Design

Function Keys (Soft Keys)
The current function of soft keys is
indicated in the bottom line of the
display (footer).
Texts (abbreviations) or symbols can
be displayed as in the example shown
below:
Texts (Examples)
isoTST:
Start calibration/adjustment
S ID: Save ID
The function keys are numbered from
right (F1) to left (F6).
Symbols
The bottom line shows the following
symbols:
oo Back to the initial state
(in the Setup menu: exit Setup)
oGo to the higher selection level
OShow sub-items under the active
item
QMove upward in the input/output
window
qMove downward in the
input/output window
lSet the selected menu parameter
There are basically two different types
of displays:
– display for weights and calculated
values
– display for menu parameter settings
(Setup)
Operation
Display for Weights and Calculated
Values
Line for Metrological Data:
When the scale is used in legal
metrology, the following metrological
specifications of the weighing cell are
shown here:
Max Maximum capacity (upper
range limit) of the scale
Min Minimum capacity
(lower range limit) of the scale
(verified models only)
eVerification scale interval
(verified models only)
dReadability/scale interval
On standard scales, only Max and d
are displayed.
Bar Graph:
The bar graph indicates how much of
the scale’s capacity is “used up” by
the current load; during
checkweighing, it indicates the
control limits.
The following symbols may be
displayed:
0% Lower load limit
100% Upper load limit
Bar graph showing 10%
intervals
-Minimum for checkweighing
=Target for checkweighing
+Maximum for checkweighing
Plus/Minus Sign, Stability Symbol:
A plus or minus sign (+or -) is shown
here for a weight (or a calculated
value, such as that for counting), or
the Ssymbol indicating that a verified
scale has been zeroed or tared.
Line for Measured Values:
This area shows the weighed or
calculated value and the
alphanumeric input.
Note Concerning Verified Scales
Approved for Use as Legal Measuring
Instruments in the EU*:
For verified scales that have a
verification scale interval enot
equal to the scale interval d, the
last digit on the display is bordered.
* including the Signatories of the
Agreement on the European
Economic Area
Unit and Stability:
When the scale reaches stability, the
weight unit or calculated unit is
displayed here
When the asymbol is displayed
here, the value indicated in the
readout is not valid for legal
metrology.
4

Tare Memory, Calculated Values:
The symbols displayed here indicate
when there is a value in one of the
tare memories or when the value
shown is a result of calculation rather
than direct measurement.
These symbols are as follows:
aCalculated value
s1Net value/tare memory
s2used by an application pro-
gram (e.g., formulation,
second tare memory)
Application Pictograms:
The pictograms displayed here
indicate the application(s) selected.
The pictogram is displayed inversely
(white on a black background) when
the corresponding application is
active.
For example, the following symbols
may be displayed simultaneously:
AThe counting application is active
HCheckweighing is also active
SPrint
TData record
Text Line:
Additional information is displayed
here (e.g., operator guidance
prompts, name of the active program,
etc.)
Soft Key Labels:
The current functions of the soft keys
above the function keys (arrow keys)
are indicated here; during
calibration/adjustment, this line
shows up- and down-arrows (Qand
q) for selecting calibration and
adjustment functions.
Display for Menu Parameter Settings
(Setup)
This display is divided into
three sections.
Status Line:
The status line of shows the function of
the display screen page. In the Setup
menu, the current menu “path” is shown
here.
Setup Menu Example: “Scale functions”
Input and Output Window
This window contains either detailed
information (e.g., on the active
application) or a pick list. A selected
item is displayed inversely (white
characters on a black background).
You can also enter information in an
active field in this window using the
alphabetic and numeric keys.
Setup Menu Example, “Device
parameters, Adapt filter”:
The following symbol in the input and
output window may be displayed:
Sthis symbol marks the saved menu
setting
Soft Key Labels
See the description “Function Keys
(Soft Keys)” on the previous page
Minimum vibration
o Normal vibration
Strong vibration
Extreme vibration
SET P BAL.F NC.
Line for Operating State
Input and Output Window
Soft key labels
To set a parameter:
§
Press the Qor qsoft key repeatedly
until the desired setting is selected
(displayed inversely)
§Confirm your selection: press the l
soft key
To change the numeric value of a
parameter:
§
Press the Qor qsoft key repeatedly,
if necessary, until the desired
setting is selected (displayed
inversely)
§Enter a new value or character:
use the 0 1 …9. or the
akey and enter the desired
letters
§Confirm your selection: press the l
key
To exit Setup: press Mor the oo
soft key
5
Operating Design

Input
Foot Switch Input
You can connect a foot switch to the
terminal and use it to perform a given
keypad function (such as cor t).
PC Input
You can use a computer to control the
functions of the scale via the interface
port (see the “Data Output Function”
section in the chapter entitled
“Operating the Scale”).
Data Output
The FCT01-X is equipped with an
interface port for connecting one of
the following devices:
–Printer*
–Peripheral device (such as a PC)*
* Zener barrier required (see
“Accessories”)
Printer
In the scale Setup menu you can
configure the printer output format to
meet your requirements, with or
without IDs, including ISO/GLP
requirements.
ISO: International Organization for
Standardization
GLP: Good Laboratory Practice
You can have printouts generated
automatically or by pressing p. You
can also configure whether or not
generation of a printout is dependent
on stability or time parameters.
See “Data Output Functions”in the
chapter entitled “Operating the
Scale”for a detailed description.
Interface Port
You can connect a different
peripheral device, such as a PC, to
the interface port rather than a
printer.You can control both the
weighing cell and the terminal
through a connected PC. With this
feature, request messages are sent via
the interface to initiate functions in the
weighing cell and the terminal. Some
of the functions generate response
messages.
See “Data Output Functions”in the
chapter entitled “Operating the
Scale”for a detailed description.
Error Codes
If you press a key that has no
function, or which is blocked at a
certain point in an application
program, this error is indicated as
follows:
–a double beep is sounded as an
acoustic signal if the key has no
function
–a double beep is sounded and the
message "No function" is
displayed in the text line if the key
function is not available at that time
The response to an operator error is
identical in all operating modes. See
the chapter entitled “Error Codes”for
a detailed description.
Storing Settings
Saving Parameter Settings
The settings configured remain stored
in the scale’s non-volatile memory. In
addition, you can reload the factory
settings.
Saving Settings
Under “Setup: Device parameters:
Password”you can assign passwords
that block access to:
–Scale functions
–Device parameters
–Application parameters
–Printout
–Factory settings
6

Configuring the Scale
Purpose
You can configure your FCT01-X
terminal to meet individual
requirements by entering user data
and setting parameters in the Setup
program.
The Setup menu contains the
following submenus:
–Balance/scale functions
–Device parameters
–Application parameters
–Printout
–Device information
–Language
–Factory settings
Configuring the Scale for Use in
Legal Metrology
Set the menu access switch as
described below to configure the
following functions for use of the scale
in legal metrology:
–Display: Verification scale interval
e; lower limit of the weighing
capacity Min
–External calibration blocked
Preparation
§Remove the cap from the back of
the scale housing
§Move the switch to the left.
> When the switch is in the left-hand
position, the Setup menu is locked
and the scale can be used in legal
metrology
> When the switch is in the right-
hand position, the menu is
accessible
Setting the Language
You can choose from 5 languages for the information display:
–German
–English (factory setting)
–English with U.S. date/time format
–French
–Italian
–Spanish
Example: Settting the Language to “U.S. Mode”
Step Press key Display/Output
(or follow
instructions)
1. Select “Setup”menu M
2. Select “Language”repeatedly
and confirm press
q soft key,
then
O soft key
3. Select “U.S. mode”Q soft key
4. Save language l soft key
5. Exit the Setup menu oo soft key
7
Configuring the Scale

8
Navigating in the Setup Menu (Examples):
Example: Adapting the scale to “Extreme vibration”
Step Press key(s)
(or follow instructions) Display/Output
1. Select Setup menu M
2. Confirm “Scale functions”Osoft key
3. Select menu item “Adapt filter”q, then
and confirm Osoft key
4. Select menu item “Extreme vibration”qsoft key
5. Confirm menu item “Extreme vibration”lsoft key
6. If required, select further menu items oqQO soft keys
7. Save setting and exit Setup Menu oo soft key

Example: Entering the time and date
Step Press key(s)
(or follow instructions) Display/Output
1. Select Setup menu; M, then
select “Device parameters“qsoft key and Osoft key
2. Set clock press q repeatedly,
then press O
3. Enter the time 1 1 . 1 2
. 3 0
4. Set the time according to
your local clock lsoft key
5. Enter the date 1 3 . 0 3
. 0 0
6. Store the date lsoft key
7. Enter other data, if desired oqQO soft keys
8. Exit Setup menu oo soft key
9
Configuring the Scale

Setting the Scale Functions
(BAL.F NC.)
Purpose
This menu item enables you to
configure the scale functions, i.e., to
meet individual requirements by
selecting predefined parameters in
the Setup menu. You can block
access to the menu by assigning a
password.
Features
The scale functions are combined in
the following groups (1st menu level):
–Calibration/adjustment
–Adapt filter
–Application filter
–Stability range
–Stability delay
–Taring
–Auto zero
–Weight unit 1
–Display accuracy 1
–Zero range
–Zero range at power on
–Tare/zero at power on
–Factory settings: only wgh.
param. (only the scale functions)
Factory Settings
Parameters: The factory settings are
identified by the symbol “ο”in the list
starting on the next page.
Preparation
Show available balance/scale
functions:
§Select Setup menu:
press the Mkey
> SETUP is displayed
§Select "Scale functions": press the
Osoft key
If you already assigned a pass-
word:
> The password prompt is displayed
$If access is blocked by a password:
enter the password using the nume-
ric/alphabetic keys.
$If the last character of the password
is a letter: conclude input by
pressing a
§Confirm your password and have
the scale functions displayed: Press
the lsoft key.
> Scale functions are displayed:
$To select the next group: press the
qsoft key (down arrow)
$To select the previous item of a
group: press the Qsoft key (up
arrow)
$To select the next sub-item within a
group: press the Osoft key (right
arrow)
$To select the previous group: press
the osoft key (left arrow)
$To confirm: press the lsoft key
Extra Functions
§Exit the Setup menu: press the oo
soft key
> Restart your application
§Print parameter settings:
–When the balance/scale functions
are displayed, press p
> Printout (example)
Texts with more than 20 characters
are cut off
SETUP
BAL.FUNC.
---------------------
Calibration/adjustm
CAL/iso TST key un
Internal cal./adju
Cal/adjustm seq
Cal. with adjustm au
.
isoCAL- unction
O
Start autom. adjus
isoCAL
Print GLP/GMP adju
Automatic i GLP is
selected
Parameter or exte
Wt. ID (W ID):
Cal./adjust.-wt:
5000.00 g
Adapt ilter
Normal vibration
Application ilter
Filling mode
Stability range
2 digits
Taring
A ter stability
Auto zero
O
Weight unit 1
Grams /g
etc.
10

Setup - Calibration / Cal/isoTST key function οExternal calibration/adjustment; with factory-defined calibration weight
Scale - adjustment External calibration/adjustment; user-defined weight
functions Cal key blocked
Selection mode for cal./adjustment)
Calibration/ Calibrate, then auto adjust
adjustment sequence οCalibrate, then manual adjust
isoCAL function Off
Only adjustment prompt
Print GLP/GMP οAutomatic if GLP is selected
adjustment record On request,
from record memory
Parameter for Weight set ID (W ID): Enter 14 characters max.
external weight Calibration/adjustment-
weight: Enter exact weight
Adapt filter Minimum vibration (ambient conditions)
οNormal vibration
Strong vibration
Extreme vibration
Application filter οFinal readout
Filling mode
Low filtering
Without filtering
Stability range 1
/
4digit
1
/
2digit
ο1 digit
2 digits
4 digits
8 digits
Stability No delay
delay οShort delay
Average delay
Long delay
Taring Without stability
οAfter stability
Auto zero οOn
Off
11
Configuring the Scale
Factory setting
Factory setting

Setup –Weight unit 1* Grams /g
Scale Kilograms /kg
functions Carats /ct
Pounds /lb
Ounces /oz
Troy ounces /ozt
Hong Kong taels /tlh
Singapore taels /tls
Taiwanese taels /tlt
Grains /GN
Pennyweights /dwt
Milligrams /mg
Parts per pound //lb
Chinese taels /tlc
Momme /mom
Austrian carats /K
Tola /tol
Baht /bat
Mesghal /MS
Tons /t
Display οAll digits
accuracy 1 Fewer for weight change
Last digit off
Zero range 1 percent/max. capacity
ο2 percent/max. capacity
Zero range at 2 percent/max. capacity
power on ο5 percent/max. capacity
Tare/zero at οOn
power on Off
Only on for zero
Factory settings: No
only weighing Yes
parameters
* = according to the menu codes configured by our Service Center
(Setup: A/D Converter Configuration: User-definable units)
12
Factory setting

13
Configuring the Scale
Setting the Device Parameters
(DEVICE)
Purpose
This menu item enables you to
configure the scale to meet individual
requirements by selecting predefined
menu parameters in the Setup menu.
You can block access to the menu by
assigning a password.
Features
The device parameters are combined
in the following groups (1st menu
level):
–Password
–User ID
–Clock
–Interfaces
–Display
–Keys
–Extra functions
–Factory settings: only device
parameters
Factory Settings
Parameters: The factory settings are
identified by the symbol "ο" in the list
starting on page 15.
Preparation
Display available device parameters
§Select the Setup menu: press M
> SETUP is displayed:
§Select “Device parameters”: use the
qand O soft keys
If no password has been assigned,
anyone can access the Setup menu
device parameters
If a password has already been
assigned:
> The password prompt is displayed
$If access is blocked by a password:
enter the password using the
numeric and/or alphabetic keys
$If the last character of the password
is a letter: conclude input by
pressing the a key
§Press lto confirm the password
> Device parameters are now
displayed:
$To select the next group: press the
qsoft key (down arrow)
$To select the previous menu item of
a group: press Qsoft key (up
arrow)
$To select the next sub-item within a
group: press the Osoft key (right
arrow)
$To select the previous group: press
the osoft key (left arrow)
$Press lsoft key to confirm the
selected menu item
Entering or Changing a Password
–Let’s assume that a password with
8 characters max. has already
been assigned to access the Setup
device parameters
§Select the Setup menu: press M
> SETUP is displayed
§Select parameters: Use the q
and Osoft keys
> The password prompt is displayed:
$Enter the password
$Press the lsoft key to confirm your
password and view the device
parameters
§Write down your password here for
easy reference:
Password = ..............................
If you assign a password and then
forget what the word is:
$Enter the General Password (see
Appendix)
$Press the lsoft key to confirm and
display the password
> The parameters are displayed
§Select the device parameter
“Password”: If necessary, repeatedly
press qor Q, until you see
>Password: and any existing
password

§New password: Enter the numbers
and/or letters for the new
password (8 characters max.)
If "none" is displayed, this means
no password has been assigned to
delete the user password: Press
.and confirm
§To confirm: press the lsoft key
§Exit the Setup menu: press the oo
soft key
> Restart the application
Extra Functions
§Exit the Setup menu: press the oo
soft key
> Restart the application
§Print the parameter settings:
–If the device parameters are dis-
played: press p
> Printout (example)
SETUP
DEVICE
--------------------
User ID
User ID:
Inter aces
Serial communicati
SBI
Baud rate
1200 baud
Number o data b
7 data bits
Parity
Odd
Number o stop b
1 stop bit
Handshake-mode
Hardware handshake
a ter 1 char
Function external
Print key
Function control
Output
Display
Contrast
2
Background
White
Digit size
10mm + bar graph
+text display
Application symbo
On
Keys
CF unction in ap
Clear all applicati
CF unction or i
Delete last charact
Block key unctio
All keys unblocke
etc.
14

15
Configuring the Scale
Device Parameters (Overview)
οfactory setting
√user-defined setting
Setup –
Device-
parameters
Password: None Enter 8 characters
max.
User ID: None Enter 20 characters
max.
Clock Time: Enter hh.mm.ss
Date: Enter dd.mm.yy or mm.dd.yy
(01.01.97)
Interfaces Serial οSBI Baud rate 150 baud
communication 300 baud
(PERIPHERALS) 600 baud
ο1200 baud
2400 baud
4800 baud
9600 baud
19200 baud
Number of data bits ο7 bit 1)
8 bit
Parity Space 2)
οOdd
Even
None 3)
Number of stop bits ο1 stop bit
2 stop bits
Handshake Software handshake
mode οHardware handshake,
1 character after CTS
xBPI Network address: 0
Enter any number from 0 to 31
YDP01IS
YDP02 see YDP03 (without 19200 baud)
YDP03 Baud rate ο1200 baud
2400 baud
4800 baud
9600 baud
19200 baud
Parity Space
οOdd
Even
Handshake Software handshake mode
mode οHardware-handshake,
1 character after CTS
YDP01IS Label (label printer)
xBPI-RS485 Network address: 0
Enter any number from 0 to 31
YDP02IS
YDP02IS Label (label printer)
For the display, keys and extra functions, see next pages
1) not if "None" parity is selected
2) only if 7 data bits selected
3) only if 8 data bits selected
Factory setting
Factory setting
Factory setting

16
Setup –
Device-
parameters
Interfaces Function: Print key
external switch οTare key
Calibration key
F1 function key
(Right soft key)
Clear function key c
F2 function key
(2nd soft key from the right)
Function: Input
control ports οOutput
Display Contrast Select contrast (0 to 4): 0
1
ο2
3
4
Background οWhite
Black
Backlighting οOn
Auto. off after 4 min. (of non-use)
Digit size ο10mm + bar graph + text display
13mm + bar graph
13mm + text display
13mm
Application Off
symbols οOn
Keys CF function οClear all applications
in application Clear only selected applications
CF function Delete entire input
for input οDelete last character
Block key οAll keys unblocked
functions All blocked except for M, a
Alphanumeric
keys blocked
Extra functions Acoustic signal οOn
Off
Power-on οOff/on/standby
mode On/off Automatic After 4 min. (of non-use)
shutoff οOff
Auto on
Factory settings: No
only Yes
device parameters
Factory setting
Factory setting

Setting the Application
Parameters
(Application)
Purpose
This menu item enables you to
configure the scale, i.e., adapt the
scale to your individual requirements
by selecting from a list of parameter
options in a menu. You can block
access to this menu by assigning a
password.
Features
The simple weighing function is
available at all times. You can select
one from each of the following
application groups. This means a
number of combinations are possible.
Application 1 (basic settings)
–Toggle weight units
–Counting
–Weighing in percent
–Animal weighing (averaging)
–Recalculation
–Calculation
–Differential weighing
Application 2 (control functions)
–Checkweighing
–Time-controlled functions
Application 3 (data records)
–Totalizing
–Formulation
–Statistics
In addition, you can assign 2 extra
functions to each of the soft keys, in
some cases (depending on the Setup
configuration):
–Second tare memory
–Identification codes
–Manual storage M+ key
–Product data memory
Auto-start application the scale is
switched on
Factory settings:
only application parameters
Factory Settings
The factory settings are identified by
the symbol "ο" in the list starting on the
next page.
Preparation
Display available application
parameters:
§Select the Setup menu: press the
Mkey
> SETUP is displayed
§Select parameters: repeatedly
press the qand Osoft keys
If you have already assigned a
password:
> The password prompt is displayed:
$If access is blocked by a password:
enter the password using the
numeric/alphabetic keys
$If the last character of the password
is a letter: conclude input by
pressing a
§Confirm your password and have
the application parameters display-
ed: press the lsoft key
> The application menu is displayed:
$To select the next group:
press the qsoft key (down arrow)
$To select the previous item of a
group: press the Qsoft key (up
arrow)
$To select the next sub-item within a
group: press the Osoft key (right
arrow)
$To select the previous group: press
the osoft key (left arrow)
$To confirm: press the lsoft key
Extra Functions
§Exit the Setup menu: press the oo
soft key
> Restart your application
§Print parameter settings:
–When the scale functions are
displayed, press p
> Printout (example)
Texts with more than 20 characters
are truncated
SETUP
APPLICATION
--------------------
Application 1 (basi
O
Application 2 (cont
O
Application 3 (data
O
Extra unction (F4)
2nd tare memory
Container tare we
No
Automatic printou
O
Extra unction (F5)
O
Auto-start app. whe
O
--------------------
17
Configuring the Scale

Application Parameters (Overview)
ο factory settings
√user-defined setting
Setup –Application 1 οOff (weighing only)
Application (Basic settings) Toggle wt. units Weight unit 1 Grams /g
parameters Kilograms /kg
Carats /ct
Pounds /lb
Ounces /oz
Troy ounces /ozt
Hong Kong taels /tlh
Singapore taels /tls
Taiwanese taels /tlt
Grains /GN
Pennyweights /dwt
Milligrams /mg
Parts per pound //lb
Chinese taels /tlc
Momme /mom
Austrian carats /K
Tola /tol
Baht /bat
Mesghal /MS
Tons /t
Display accuracy 1 All digits
Fewer for weight
changes
Last digit off
Weight unit 2 Grams /g
Kilograms /kg
Carat s/ct
Pounds /lb
Ounces /oz
Troy ounces /ozt
Hong Kong taels /tlh
Singapore taels /tls
Taiwanese taels /tlt
Grains /GN
Pennyweights /dwt
Milligrams /mg
Parts per pound //lb
Chinese taels /tlc
Momme /mom
Austrian carats /K
Tola /tol
Baht /bat
Mesghal /MS
Tons /t
Display accuracy 2 All digits
Fewer digits for
weight change
Last digit off
For counting through differential weighing –– see the following pages
Applications 2 and 3 see following pages
18
Factory setting

Setup –Application 1 Counting Accuracy –Average οDisplay accuracy
Application (Basic settings) piece weight calculation + 1 decimal place
parameters (resolution) + 2 decimal places
Average piece Off
weight updating Manual
οAutomatic
Percent weighing Weight storage accuracy οDisplay accuracy
(resolution) + 1 decimal place
+ 2 decimal places
Decimal places for None
readout in percent 1 decimal place
ο2 decimal places
3 decimal places
4 decimal places
5 decimal places
6 decimal places
Display calculated value οResidue
Loss
Ratio 1 (DR)
Ratio 2 (OR)
Animal weighing Animal activity Calm
(averaging) Normal
Active
0.1% of the animal/object
0.2% of the animal/object
0.5% of the animal/object
1% of the animal/object
2% of the animal/object
ο5% of the animal/object
10% of the animal/object
20% of the animal/object
50% of the animal/object
100% of the animal/object
Start Manual mode
οAutomatic mode
Minimum load for automatic None
storage 10 digits
20 digits
50 digits
ο100 digits
200 digits
500 digits
1000 digits
Decimal places in None
result display 1 decimal place
ο2 decimal places
3 decimal places
4 decimal places
5 decimal places
6 decimal places
Printout None
οAverage weight only
Average and calculated value
Recalculation
For calculation to differential weighing, see following pages
Applications 2 and 3 see following pages
19
Configuring the Scale
Factory setting
Other manuals for Factory Series
3
This manual suits for next models
1
Table of contents
Other Sartorius Accessories manuals

Sartorius
Sartorius IS 64 FEG-S0CE User manual

Sartorius
Sartorius TopMix TM01-X User manual

Sartorius
Sartorius WZA25-NC User guide

Sartorius
Sartorius Combics 3 Series User manual

Sartorius
Sartorius WZA224-LC User manual

Sartorius
Sartorius TopMix TM01-Y User manual

Sartorius
Sartorius BioPAT Pressure User manual

Sartorius
Sartorius WZ-L Series User manual

Sartorius
Sartorius Midrics 1 User manual

Sartorius
Sartorius IS...-X Series User manual