Sartorius YDP10BT-0CE User manual
Operating Instructions | Betriebsanleitung | Mode d’emploi
Sartorius YDP10BT-0CE
Data Printer with Bluetooth® Radio Interface for wireless communication
Messwertdrucker mit Bluetooth®-Funkschnittstelle für drahtlose Kommunikation
Imprimante avec interface radio Bluetooth® pour une communication sans fil
98647-004-33

English – page 3
In cases involving questions of interpretation,
the German-language version shall prevail.
Deutsch – Seite 21
Im Auslegungsfall ist die deutsche Sprache
maßgeblich.
Français – page 39
En cas de questions concernant l’interprétation,
la version en langue allemande fera autorité.
2

Information for the User
About these Installation
Instructions
tPlease read these operating instructions
carefully before putting the equipment
into operation for the first time.
tRead the operating instructions careful-
ly and take note.
tThese operating instructions constitute
a part of the product.
Keep these operating instructions in
a safe and easily accessible place.
tIf these instructions are lost, please
contact Sartorius for a replacement or
download the latest manual from our
website www.sartorius.com.
Bluetooth® Adapter
Legal Terms and Conditions
Bluetooth® is a registered and protected
trademark owned by the Bluetooth®
Special Interest Group (Bluetooth® SIG,
Inc.), headquartered in Bellevue,
Washington, USA. The trademark and
logo for Bluetooth® wireless technology
are the property of Bluetooth SIG Inc.
The use of this trademark by Sartorius
is under license.
All other brands and trade names are
the property of their respective owners.
Warning/Danger Symbols
Warning/Danger Symbols Used in these
Instructions:
2Danger of electrical shock Potential
danger of physical injury or death
3Warning of potential physical injury,
health risk or risk of property damage
hUseful information
and tips
Notes for use in legal
metrology
Explanation of Symbols
The following symbols are used in these
instructions:
tIndicates a required action
yDescribes what happens after you have
performed a particular step
1. Perform steps in the given order
2.
– Indicates an item in a list
3

4
User Information. . . . . . . . . . . . . . . 3
Contents . . . . . . . . . . . . . . . . . . . . . 4
Safety Precautions . . . . . . . . . . . . . 5
Equipment Supplied . . . . . . . . . . . . 6
Installation . . . . . . . . . . . . . . . . . . . 7
Power Connection . . . . . . . . . . . . . . 8
Activating the Radio Connection. . . . 9
Operation . . . . . . . . . . . . . . . . . . . . 11
Optical LED Display . . . . . . . . . . . . . 11
Error Messages . . . . . . . . . . . . . . . . 12
Maintenance. . . . . . . . . . . . . . . . . . 13
Changing the Paper Roll. . . . . . . . . . 13
Changing the Ink Ribbon . . . . . . . . . 15
Charging the
Rechargeable Batteries . . . . . . . . . . . 16
Changing the
Rechargeable Batteries . . . . . . . . . . . 16
Cleaning the Printer . . . . . . . . . . . . . 18
Accessories . . . . . . . . . . . . . . . . . . . 18
Technical Data. . . . . . . . . . . . . . . . . 18
Electromagnetic Compatibility . . . . 19
Disposal . . . . . . . . . . . . . . . . . . . . . . 19
Test cerificate . . . . . . . . . . . . . . . . . 20
Declaration of Conformity. . . . . . . . 57
Contents

Safety Precautions
The data printer with radio interface
for wireless communication is compliant
with the directives and standards for
operation of electrical equipment,
electromagnetic compatibility, and the
stipulated safety requirements. Improper
use or handling, however, can result in
damage and/or injury.
Personnel must have read the operating
instructions, especially the safety
instructions. The operator must supple-
ment these warnings and safety precau-
tions if necessary and brief operating
personnel accordingly. The requirements
pertaining to applicable installation reg-
ulations must be followed when using
electrical equipment in systems and
environmental conditions with increased
safety requirements. Relevant laws, stan-
dards, regulations, guidelines and envi-
ronmental protection laws valid in your
country must be observed. Any installa-
tion work or printer operation that does
not conform to the instructions will
result in forfeiture of all claims under
the manufacturer's warranty.
Danger of electrical shock!
2Do not switch on the equipment
if the AC adapter or power cord are
damaged. If the printer, the AC
adapter or cable are damaged,
disconnect the equipment from the
power supply and secure it so that
it cannot be turned on.
2Do not operate the printer if the
housing is damaged; make sure that
the housing is firmly closed so as to
prevent any liquids from getting into
the printer.
Only use a lightly-moistened cloth
to clean the printer.
2Note on Installation: Modifications
to the device and the connection of
power supply units not supplied by
Sartorius are the sole responsibility
of the operator! Information on oper-
ational quality is available upon
request from Sartorius. You should
only use peripherals and options
supplied by Sartorius.
Hazards at the place of installation and
during retrofitting.
3Only use the following type of
rechargeable battery (do not use ordi-
nary batteries): Nickel metal hybrid,
type AA order no. 69Y03136.
Avoid total discharge of accumulators
as otherwise maximum charge capac-
ity is reduced. Used accumulators
must be disposed of as hazardous
waste
3Caution: the serrated paper tear-off
edge is sharp – direct contact can
cause injury!
5
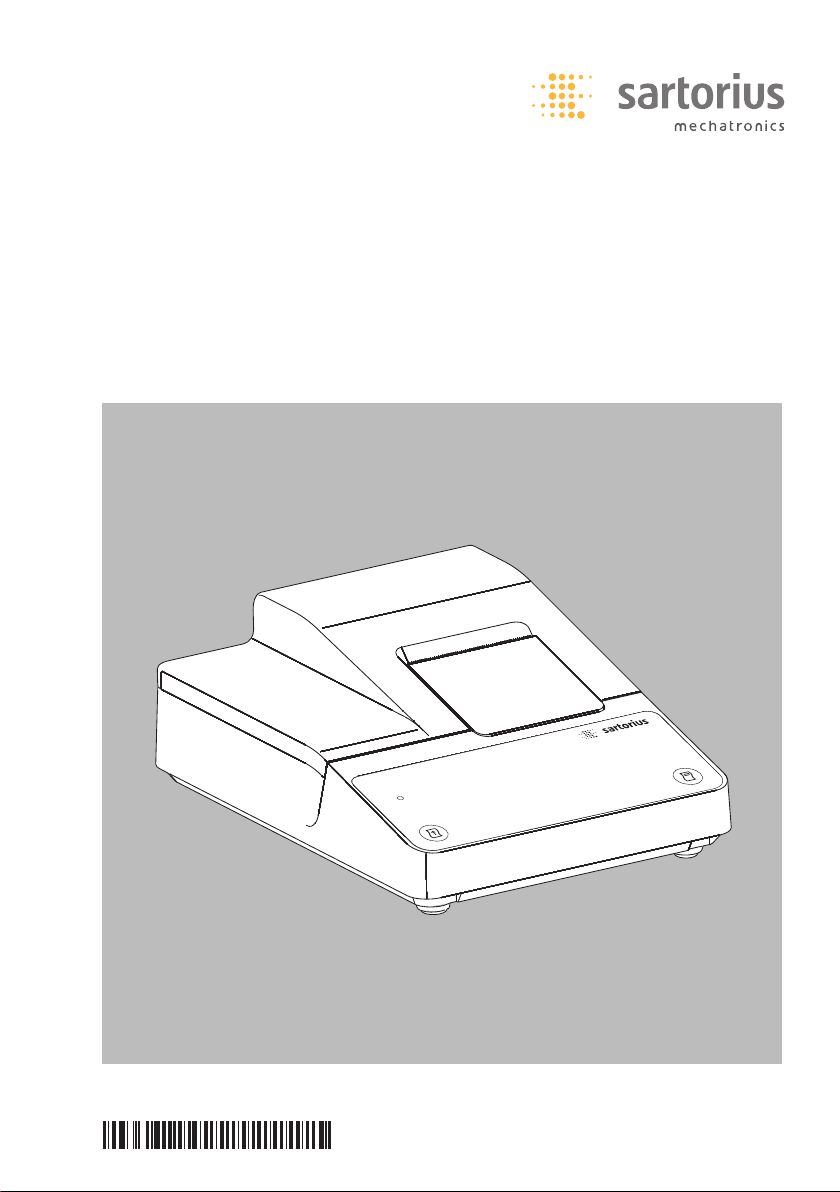
Equipment Supplied
The equipment supplied includes the following:
Name:
– Printer YDP10BT-0CE
– Power supply unit (country-specific – see accessories)
– Paper roll
– 4 rechargeable batteries
– Ink ribbon
6
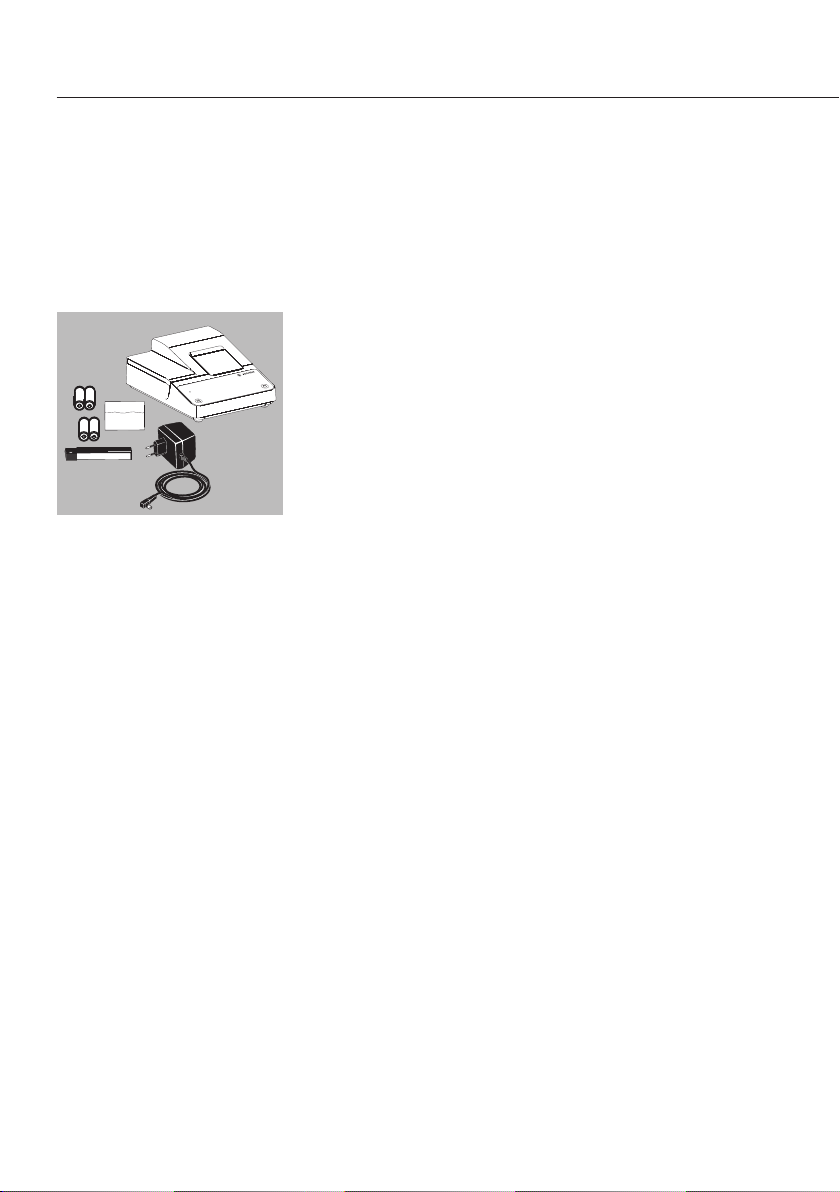
Installation
tRemove accumulators from packing.
Accumulators are discharged.
tOpen the paper compartment.
Lift paper compartment cover.
tOpen the accumulator compartment. Open accumulat
or compartment cover.
tPlace 4 rechargeable batteries in accumulator
compartment:
Pay attention to correct polarity.
tClose accumulator compartment:
Close the accumulator compartment cover.
Note:
yInsert ink ribbon –
see Maintenance section Instandhaltung.
yInsert paper roll –
see Maintenance section Instandhaltung.
The paper roll can only be engaged when the printer
is switched on.
tClose the paper compartment:
Fold down the paper compartment cover.
7
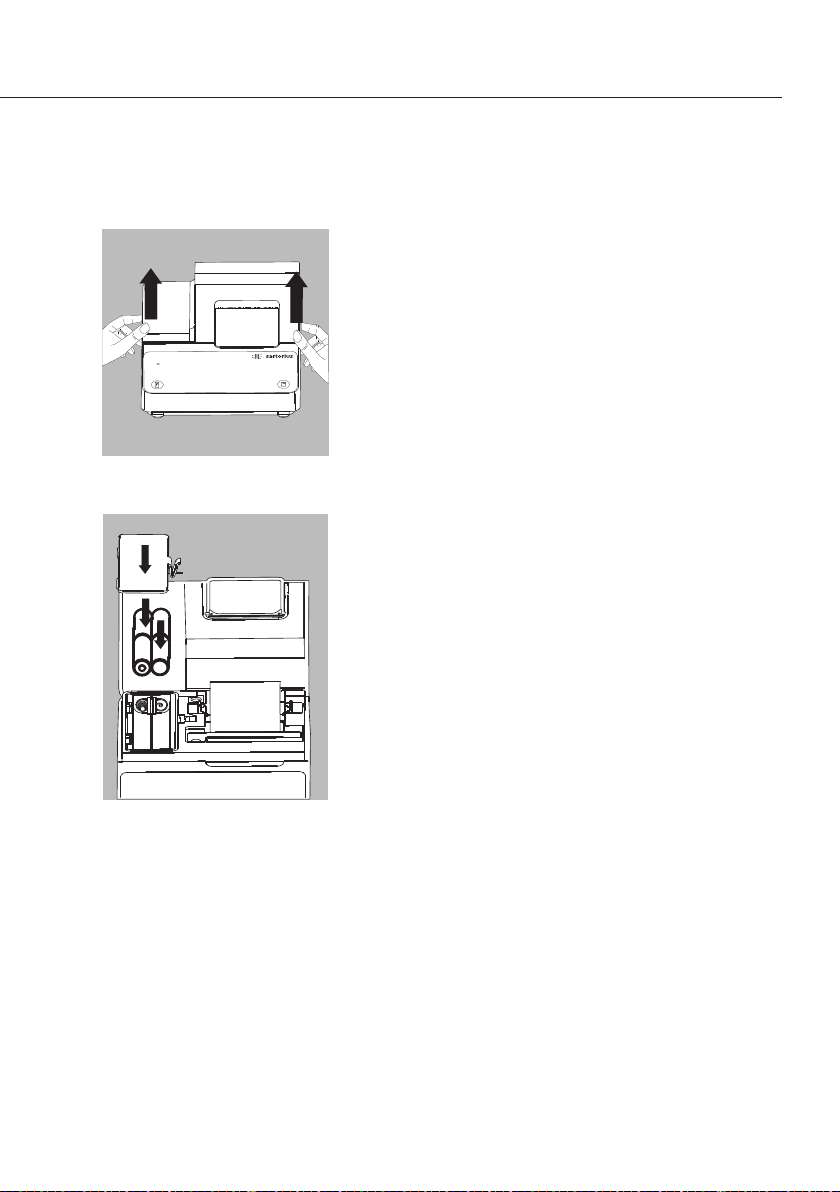
LF
STAT DATE
CNN/N
tConnect the power supply unit
to the printer and plug in the jack plug.
Power Connection
tPlug the power supply unit into the mains supply.
3Observe the safety instructions.
Make sure that the voltage rating printed on this unit
is identical to your local line voltage. If the voltage
specified on the label or the plug design of the power
supply do not match the rating or standard you use,
please contact your Sartorius office or dealer. Use
only original Sartorius power supply units. The use of
cables from other manufacturers, even if these units
have a registered approval rating from a national
testing laboratory, requires the consent of a qualified
electrician.
8
yThe LED on the printer is green.
The printer advances the paper roll.
yCharging of the rechargeable batteries commences.
The printer batteries are fully charged after 28 hours
yIf the LED flashes red, the batteries are not charged.
If the red light flashes and fails to go out after 3 hours:
replace the rechargeable batteries.
hUsed accumulators are hazardous waste
(not household waste):
Dispose of accumulators as hazardous waste
in accordance with the Waste Management Act
3Only operate the printer when the rechargeable
batteries are installed and the power supply unit
is connected.
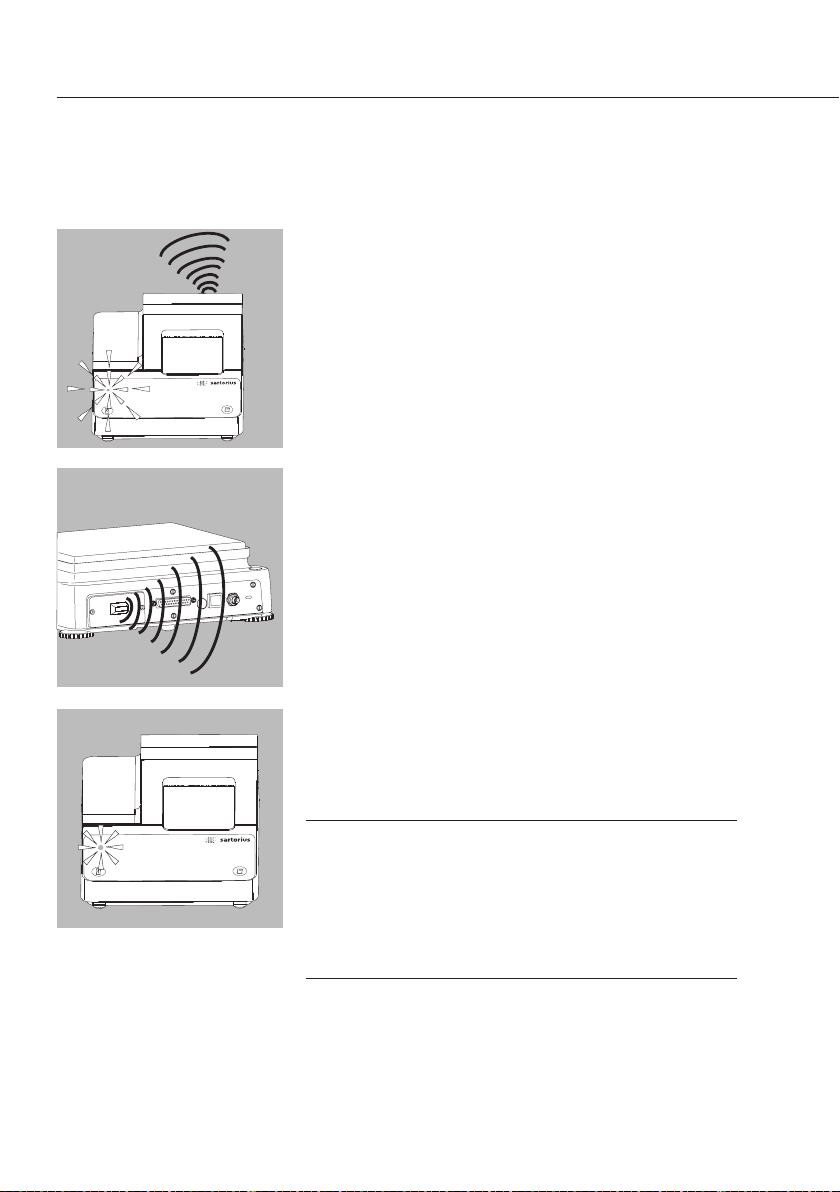
Activating the Radio Connection
A virtual, fixed connection is established between the
scale and the printer.
Radio signals are only exchanged between the scale
and the printer when the relevant identifier matches.
Adjust the settings on the scale for Bluetooth data
transmission – please consult the operating instructions
for the scale in question.
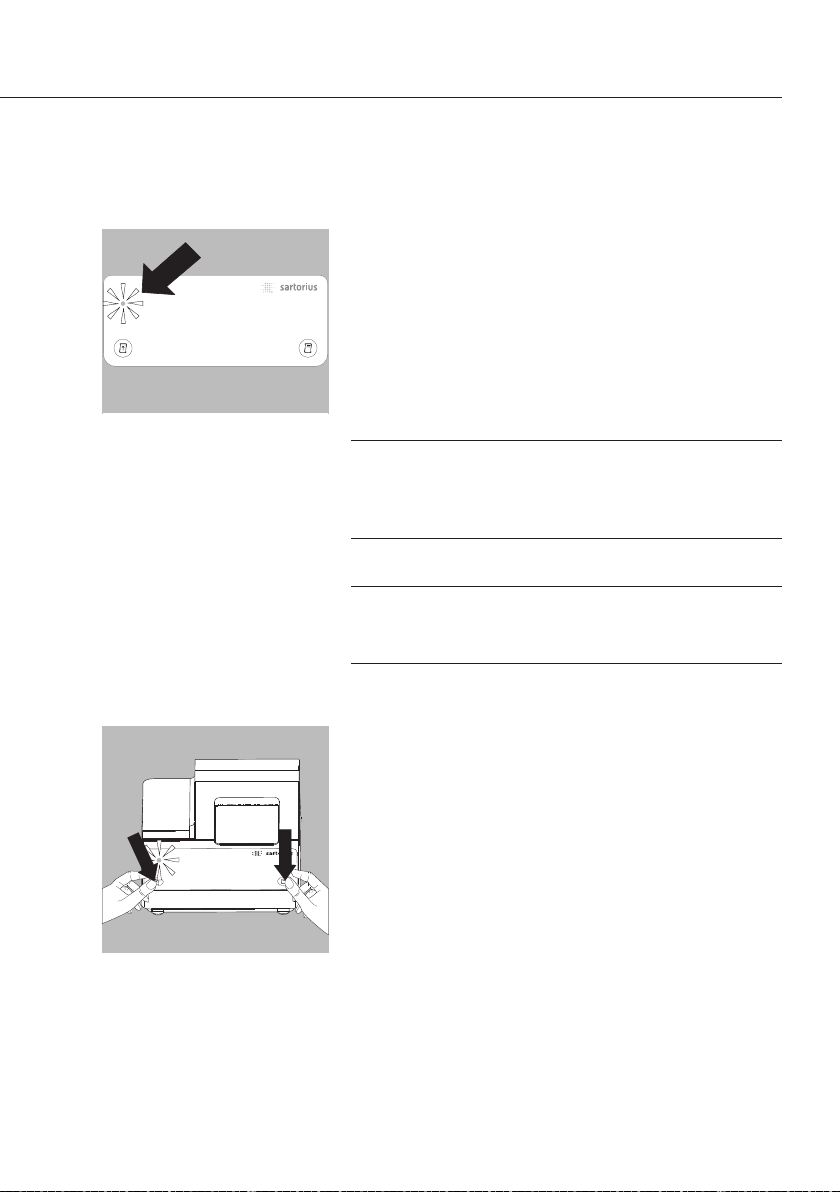
Switch the printer to ready-to-receive mode:
tSimultaneously hold down the P(Line feed) and
G(Print) keys for approx. 10 seconds.
9
LF
STAT DATE
CNN/N
10
yThe LED flashes blue (for approx. 2 minutes):
the printer is visible to other Bluetooth devices.
tActivate the search command on the scale (Search).
The radio connection is established.
yIf the printer is detected an acknowledgement appears
on the scale display.
yThe LED on the printer stops flashing and turns blue:
the search was successful and printer detection is
complete.
The printer can now receive and print data.
hIf the scale does not detect the printer, the LED on
the printer flashes
red-blue. The radio connection is inactive.
The radio connection has to be re-established:
tPress any desired key on the printer, the LED
is now green again.
Now restart the search (see above).
LF
STATDATE
CNN/N
Table of contents
Languages:
Other Sartorius Printer manuals

Sartorius
Sartorius YDP40 User manual

Sartorius
Sartorius YDP40 User manual

Sartorius
Sartorius YDP20-0CE User manual

Sartorius
Sartorius YPD20-OCE User manual

Sartorius
Sartorius YDP30 User manual

Sartorius
Sartorius YDP10-0CE User manual

Sartorius
Sartorius YDP 04 User manual

Sartorius
Sartorius YDP30 User manual

Sartorius
Sartorius YDP 03-0CE User manual


