SCHURTER 4710-5 User guide

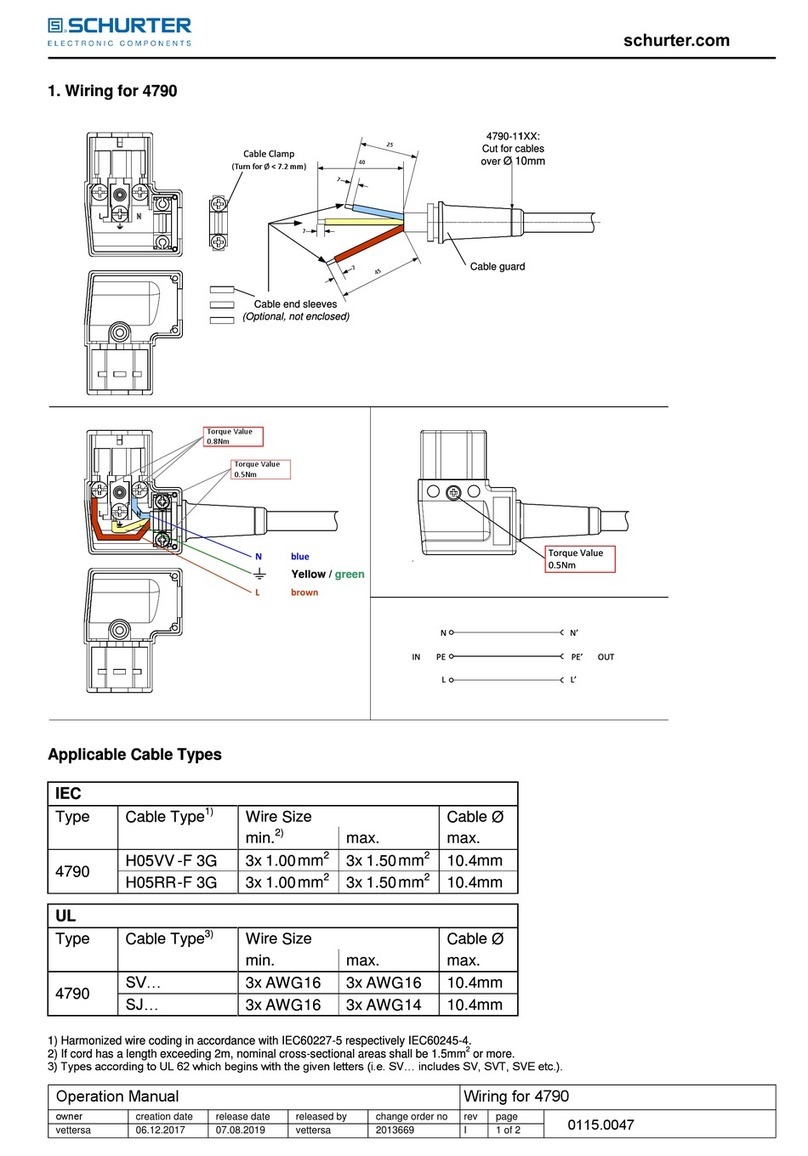
Mounting Instruction
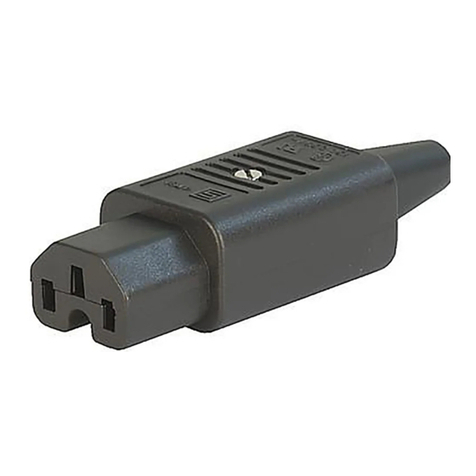
4710-5 Appliance Outlet
CONTENT
1GENERAL..........................................................................................................................................1
2WIRES FOR IDC-CONTACTS............................................................................................................1
3SOLID WIRE ASSEMBLY WITH THE COVER ..................................................................................2
4SOLID WIRE ASSEMBLY WITH A FORCE FITTING TOOL .............................................................3
5LIGHT PIPE ASSEMBLY...................................................................................................................6
1 General
Before assembling the 4710-5 IDC-contacts with the proper wire gauge, make sure that the contacts are
clean and not twisted.
To connect the solid wires into the IDC contacts1), whether the outlet is already installed in a panel or not,
the outlet should be placed on a flat surface where a force for 3 wires of up to 800 N can be applied.
Depending on the wire style (cross-section, insulation), the press-in force for one solid wire is between
150 - 250 N. Therefore, the force for three wires may reach 750 N.
1) IDC contacts according to IEC 60998-2-3, type “r”
2 Wires for IDC-contacts
4710-5111-XXXX-XXX-XX00 6.0 mm2/ 10 AWG Insulated solid wire, single core
4710-5Y11-XXXX-XXX-XX00 (Y: optional type for L, see data sheet)
4710-5222-XXXX-XXX-XX00 4.0 mm2/ 12 AWG Insulated solid wire, single core
4710-5Y22-XXXX-XXX-XX00 (Y: optional type for L, see data sheet)
4710-5333-XXXX-XXX-XX00 2.5 mm2Insulated solid wire, single core
4710-5Y33-XXXX-XXX-XX00 (Y: optional type for L, see data sheet)
Insulation
For America: According to UL 758
For Europe: According to IEC 60228
Outer diameter shall not exceed Ø 4.5 mm
owner
vettersa creation date
17.08.2018 release date
17.08.2018 released by
vettersa change order no
2016073 rev
Bpage
1 of 7 D10-015-719
Product Documentation Mounting Instruction 4710-5
3 Solid wire assembly with the cover
1)
IDC contacts must be clean and not twisted.
The contacts are not rewireable.
2)
Place three solid wires (according to 2 Wires for
IDC-contact) on the IDC contacts L, N and PE
3)
Place the appropriate cover on the outlet.
Ensure the cover is in the right position.
4)
Use the cover to press the wire down into the
IDC contacts. The cover must snap-in with the
body.
owner
vettersa creation date
17.08.2018 release date
17.08.2018 released by
vettersa change order no
2016073 rev
Bpage
2 of 7 D10-015-719
Product Documentation Mounting Instruction 4710-5

5)
This mounting instruction is valid for 4710-5 cross and 4710-5 along.
4710-5 cross
4710-5 along
4 Solid wire assembly with a force fitting tool
1)
A force fitting tool can be designed by the customer. This instruction shows a recommended variation
of a force fitting tool, for both cross and along arrangement variations.
for 4710-5 cross
owner
vettersa creation date
17.08.2018 release date
17.08.2018 released by
vettersa change order no
2016073 rev
Bpage
3 of 7 D10-015-719
Product Documentation Mounting Instruction 4710-5
for 4710-5 along
2)
IDC contacts must be clean and not twisted.
The contacts are not rewireable.
3)
Place the wires on the IDC contacts L, N and
PE. At customer’s option it’s possible to connect
the wires one by one.
for 4710-5 along
2)
IDC contacts must be clean and not twisted.
The contacts are not rewireable.
3)
Place the wires on the IDC contacts L, N and
PE. At customer’s option it’s possible to connect
the wires one by one.
owner
vettersa creation date
17.08.2018 release date
17.08.2018 released by
vettersa change order no
2016073 rev
Bpage
4 of 7 D10-015-719
Product Documentation Mounting Instruction 4710-5
4)
Place the force fitting tool on the outlet
5)
Press the wires down into the IDC contacts.
6)
Press until the wires are fixed at the socket.
7)
Plug in the rear cover to the wired socket. The
cover must snap-in with the body.
4)
Place the force fitting tool on the outlet
5)
Press the wires down into the IDC contacts.
6)
Press until the wires are fixed at the socket.
7)
Plug in the rear cover to the wired socket. The
cover must snap-in with the body.
owner
vettersa creation date
17.08.2018 release date
17.08.2018 released by
vettersa change order no
2016073 rev
Bpage
5 of 7 D10-015-719
Product Documentation Mounting Instruction 4710-5
8)
This mounting instruction is valid for 4710-5 cross and 4710-5 along.
4710-5 cross
4710-5 along
5 Light pipe assembly
1)
Mount the light pipe when the 4710-5 is wired
already.
2)
Place the light pipes and push them slightly in.
8)
This mounting instruction is valid for 4710-5 cross and 4710-5 along.
4710-5 cross
4710-5 along
5 Light pipe assembly
1)
Mount the light pipe when the 4710-5 is wired
already.
2)
Place the light pipes and push them slightly in.
owner
vettersa creation date
17.08.2018 release date
17.08.2018 released by
vettersa change order no
2016073 rev
Bpage
6 of 7 D10-015-719
Product Documentation Mounting Instruction 4710-5
3)
Press in the light pipes with a suitable tool.
4)
Make sure that the light pipes are pressed in.
5)
This mounting instruction is valid for 4710-5 cross and 4710-5 along.
4710-5 cross
4710-5 along
3)
Press in the light pipes with a suitable tool.
4)
Make sure that the light pipes are pressed in.
5)
This mounting instruction is valid for 4710-5 cross and 4710-5 along.
4710-5 cross
4710-5 along
owner
vettersa creation date
17.08.2018 release date
17.08.2018 released by
vettersa change order no
2016073 rev
Bpage
7 of 7 D10-015-719
Product Documentation Mounting Instruction 4710-5
Table of contents
Other SCHURTER Cables And Connectors manuals

SCHURTER
SCHURTER DS11 User manual

SCHURTER
SCHURTER 4781 User manual

SCHURTER
SCHURTER 0104U Series User manual

SCHURTER
SCHURTER 4796 Series User manual

SCHURTER
SCHURTER 4762 Series User manual

SCHURTER
SCHURTER 4783 Series User manual

SCHURTER
SCHURTER 9009 User manual

SCHURTER
SCHURTER 4790 Series User manual

SCHURTER
SCHURTER 4795 Series User manual
Popular Cables And Connectors manuals by other brands

BZB Gear
BZB Gear BG-UHD-DA1x24 user manual

Hamron
Hamron 608-098 User instructions

Rose electronics
Rose electronics CrystalLink CLK-CAB1U3TP-15M Installation and operation manual

CEJN
CEJN Multi-X Series instruction manual

Staubli
Staubli PV-KST4-UR Series Assembly instructions

Zamel
Zamel GPSY Manual instruction