Schwinn Mark II User manual


Operating Instructions Mark II™
Keep this manual for future reference. If you sell this stroller or give it away, make sure
you give this manual to the new owner. Ask them to read instructions completely.
IMPORTANT: Read and follow these Safety Rules and Assembly Instructions
before operating stroller. If you have any questions concerning the safe
use of this product, contact Pacific Cycle at 1-800-242-6110, M-F,
8:00 a.m.-5:00 p.m. CST or visit us at www.instep.net or E-mail us
carried out by an adult.
IMPORTANT: Tires are shipped deflated, DO NOT OVERINFLATE.
Please inflate slowly, with short bursts, to 20-25 PSI maximum.
25 PSI will provide a comfortable ride for your child.
PLEASE DO NOT RETURN PRODUCT TO THE STORE. We appreciate your purchase of
this product, and hope you will be completely satisfied with your selection. Although great
care has been taken to assure the highest quality, some problems may occur. PLEASE DO
NOT RETURN THIS ITEM TO THE STORE! To ensure prompt and correct handling of your
problem, or to answer any questions you may have, please contact our Toll-Free Customer
Service Number listed above. Please have the model number (found on product ID sticker,
carton, or manual), date code, and assembly instructions ready when calling. If none is
available, please tell us the name of the product in question.
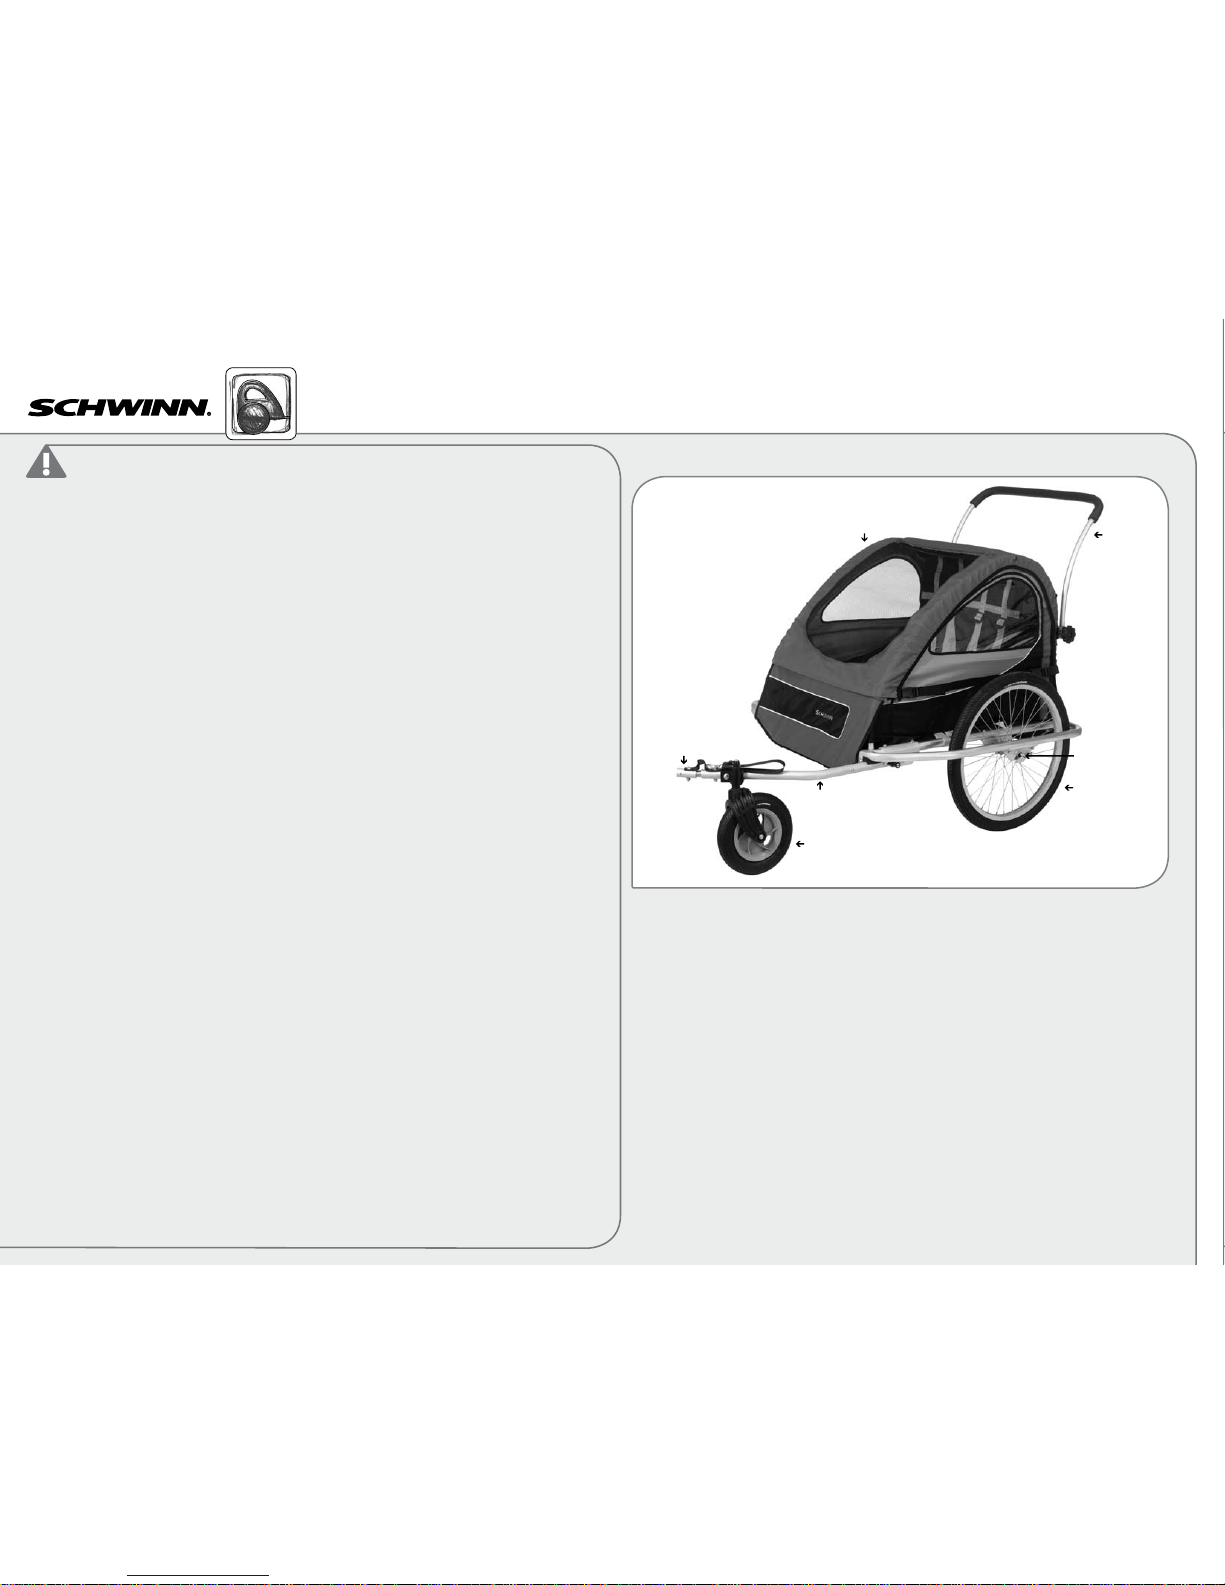
{Figure 1.a}
handlebars
frame
rear wheel
*images may appear different than your product. The assembly process will be the same.
Safety Rules:
WARNING: Failure to follow these warnings and assembly
instructions could result in serious injury or death.
· Immediately discard all plastic bags and plastic wrapping materials!
· Never allow children to fold, assemble or disassemble the stroller.
· Maximum weight capacity for one child is 50 pounds, and for two
children is 100 pounds!
· Never use this trailer/stroller if it becomes damaged!
· To avoid serious injury, children should always wear the seat belt and the
shoulder straps!
· Never leave children unattended in or around this product!
· Never allow children to assemble, fold, or disassemble this unit!
· Accessories or parcels placed in trailer/stroller may cause it to become unstable!
· Not for use with children under 12 months old! Children must be
able to support their own heads!
· Before using, be sure the product is correctly assembled according to the
manufacturer’s instructions!
· Inflate tires to within the range shown on the tire sidewall! Check tire
pressure before each use!
· Use a foot pump or hand pump to inflate tires! Pressurized air hoses can cause overinflation!
· Periodically re-check all fasteners to make sure they are tight!
· Do not use cleaning solvents! Clean only with mild soap and water!
· To prevent injury, please use extreme care when folding and
unfolding this product!
SAFE TOWING TIPS
· Make sure your bike brakes work properly! Braking distance is increased when pulling a trailer!
· This trailer is wide! Allow extra clearance near curbs, signs, parked cars, and other obstacles!
· A bicycle with trailer attached requires a wide turning radius! Do not turn sharply!
· Each child must wear an approved safety helmet when riding in this product in trailer mode!
· Never remove protective canopy when pulling children in the trailer!
· Always use the safety flag when pulling this trailer!
· When pulling one child in the trailer, seat him/her in the center!
· Do not ride over curbs! Avoid bumps and holes! Always signal your turns!
· Use extra caution when turning on uneven pavement, and going downhill!
· Not for use at high speeds! Do not exceed 10 MPH!
· Never ride a bike or pull this trailer at night!
· Install a rearview mirror on your bike to check on children in trailer!
Be aware of exposure hazards such as windchill and heat exhaustion by less active trailer passengers
in prolonged exposure in colder temperatures, or by extended periods in warmer temperature without
adequate ventilation and hydration!
rear wheel
skewer
canopy
coupler
tow bar
front wheel

3. Link sling seat crossbar to side cabin frames
3A. Reach into the trailer, locate the sling seat and cross bar assembly and lift it up.
3B. Position the sling seat crossbar across the top of the trailer cabin frames.
3C. Slide the male joiner at the end of the cross bar into the female joiner on the
cabin frame.
3D. Push the male joiner all the way down until secure. Repeat for the other side.
IMPORTANT! Pull up on both ends of the crossbar to make sure the joiners are
secure!
4.Adjust the sling seat
4A.The underside of the front edge of the sling seat has two sets of adjustable
straps, one behind the other.
4B. Tighten both sets of straps to provide support when children are seated in
the trailer.
IMPORTANT! Loosen both sets of straps to allow the trailer to fold flatter for stor-
age and transport.
Operating Instructions Mark II™...page 2
Parts List:
Description Qty.
Frame with canopy, sling seat with 5 point safety harness, 1
tow bar, tow bar coupler & rear wheel brackets attached (2)
2-in-1 Rain cover 1
Handlebar with safety wrist wrap 1
Safety flag with pole 1
20” Rear wheels 2
Front wheel 1
Tools Required: No tools are required to assemble this trailer/stroller. However,
for those bikes without a quick-release axle on the rear wheel, an adjustable
wrench is required to attach the coupler plate.
For questions concerning the safe use of this product, contact Pacific Cycle at
www.instep.net
Please list your product’s identifying information below and keep for your records.
Model # __________Date Code __________Product Name __________________
ASSEMBLY AND OPERATING INSTRUCTIONS
1.Remove the trailer from the carton and compare the contents with the parts list
1A.Remove all contents from inside the carton and place them on a clean flat
surface. Compare them with the parts list to make sure that no parts are missing.
(Note: the canopy is inside the trailer cabin.)
WARNING Immediately discard all plastic bags and plastic wrapping materials!
2.Open trailer and remove canopy
2A. Lift the side cabin frame with window up so that it folds open.
2B. Lift the other side cabin frame with window up so that it folds open.
2C. Remove the canopy from inside the trailer compartment and set it aside.

7. Rear window flap and front rain shield adjustments
7A. To provide increased ventilation the rear window flap may be rolled up.
7B. Secure the rolled-up flap with the elastic bands at the top corners of the flap.
7C. Release the elastic bands that hold the front rain shield in place and roll the
rain shield down.
7D. Secure it to the hook & loop tape running across the front edge of the
canopy.
7E. The rear flap contains a zippered pocket for storage of your front wheel
when not in use.
8. Prepare wheels for attachment
8A. Lift the front end of the trailer up and rest the trailer on its back. The wheel
bracket slots open upward.
8B. The wheel axles may come with black protective caps. These are for ship-
ping and should be discarded.
8C. Open the quick-release lever and loosen the nut a few turns so the axle is vis-
ible and there is a space between the quick-release axle nut and the black spacer
nuts. Do not remove the quick-release nut.
5. Begin attachment of the canopy to the cabin frame
5A. Drape the 2-in-1 rain cover over the cabin frame.
5B. Line up the snaps on each side of the canopy and those near the top of the
cabin frame.
5C. Snap the canopy to the cabin frame snaps on one side of the trailer.
5D. Repeat for the other side.
6. Complete attachment of the canopy to the cabin frame
6A. Pull the canopy down in front and join the hook & loop tape at the top edge
of the front panel.
6B. Attach the canopy snaps at each corner and pull the side straps tight.
6C.Pull the canopy down in back and join the hook & loop tape at the top edge
of the rear panel.
6D. Attach the canopy snaps at each corner and pull the side straps tight.
Operating Instructions Mark II™...page 3
wheel brackets
Axle Quick-
relase
lever
quick-release
axle nut black spacer
nuts

Operating Instructions Mark II™...page 4
9. Insert wheels into wheel brackets
9A. Slide the wheel all the way down into the wheel bracket slots with the quick-
release lever to the outside. The axle should rest at the bottom of the bracket slots
to ensure that the wheel is properly aligned.
9B. Tighten the nut by hand and then clamp the lever down so that the wheel is
secured.
9C. Repeat for the other wheel. Check to make sure that both wheels are secure
and aligned.
10. Release tow bar and rotate into it position for use in trailer and stroller modes
10A. The tow bar rests within a slotted bracket and is held in place by a spring-
loaded latch.
10B. Grip the tow bar with your left hand and push both sides of the latch down-
ward with your right hand. Once the latch clears the slot, remove your right hand
WARNING To prevent injury, please use extreme care when folding and unfold-
ing this product!
10C. Rotate the tow bar upward. Be mindful of the coupler at the end of the tow bar.
10D. Rotate the tow bar all the way up and press it into the bracket. The latch
will engage automatically.
tow bar
coupler
11. Attach front wheel for use in stroller mode
11A. Remove the lock knob, washer and lock washer from the front wheel assembly bolt.
11B. Slide the end of the front wheel assembly bolt through hole in tow bar.
11C. Replace washer and lock washer and tighten lock knob until secure
12. Attach handle bars for use in stroller mode
12A. Loosen the lock knobs on the handlebar clamps but do not remove the lock
knobs. Hold the handlebar so that the clamps are positioned at the rear of the
cabin frame.
12B. Pinch the clamp to open it and slide the clamp over the canopy and cabin
frame tubing.
12C. Tighten the lock knob and repeat for the other side.
12D. The product is now ready for use in stroller mode.
WARNING Always use the safety wrist strap when pushing this product in stroller mode!
handlebar clamp

Operating Instructions Mark II™...page 5
13. Coupler attachment for bikes with rear hub nuts.
(Note: If your rear bike tire has a quick-release rear axle please proceed to Steps 15 & 16)
13A. Loosen the rear bike hub nut with a wrench.
13B. Remove the hub nut and washer from the bike.
13C. Slide the tab washer over the axle so the tab fits into the slot in the
bike frame dropout.
13D. Position the coupler plate over the axle so that the pegs on the back of the plate
fit into the holes in the tab washer, and the coupler plate is vertical with the large hole
below the axle.
14. Attach trailer tow bar to bike
14A. Replace bike hub nut and washer and tighten by hand.
14B. Tighten the bike hub nut securely with a wrench.
14C. Insert the end of the trailer tow bar into the large hole and fasten the Q/R pin.
14D. Loop safety strap around bike frame and clip the end into the “D” ring at the
end of the tow bar.
WARNING Safety strap must attach to the bike frame when using this
product in trailer mode.
15. Coupler attachment for bikes with quick-release rear axles.
(Note: If your rear bike tire has two hub nuts please refer to Steps 13 & 14.)
15A. Flip open the quick-release lever, and remove the nut and spring from the opposite side.
15B. Hold the lever and pull the axle skewer with spring out.
15C. Completely remove the skewer but leave the wheel in place.
15C. Slide the coupler plate and tab washer onto the skewer. IMPORTANT! The
wide end of the spring should face out and touch the lever, the bell of the coupler
plate should face out, and the tab washer hook should face in toward the wheel hub.
16. Attach trailer tow bar to bike
16A. Insert end of skewer through wheel hub and fit tab washer hook into slot
in bike frame dropout.
16B. Replace the spring (wide end out) over the end of the skewer, followed by the
nut. Tighten the nut by hand and clamp the lever down.
16C. Insert the end of the trailer tow bar into the large hole and fasten the Q/R pin.
16D. Loop the safety strap around the bike frame and clip the end into the “D” ring
at the end of the tow bar.
WARNING Safety strap must attach to the bike frame when using this product in
trailer mode.

Operating Instructions Mark II™...page 6
17. Install the safety flag. Important! The safety flag is for use in trailer mode only.
17A. Slide the ends of the safety flag pole together so they are secure
within the flagpole joiner.
17B. Slide the bottom of the safety flagpole through the slit in the canopy down into
the flagpole sleeve.
17C. Remove the handlebar. The product is now ready for use in the trailer mode.
18. Proper use of the 5-point safety harness for one or two children
WARNING To avoid serious injury children should always wear the seat belt and
shoulder straps!
18A. Proper seating position for one child
A. Undo the lap belt buckle and seat the child in the center of the trailer/stroller.
B. Buckle the lap belt over the child’s lap, and pull the strap until the belt is snug.
C. Place the two center shoulder straps over the child’s shoulders, and clip both
straps into the “D” ring of the center crotch strap.
D. Adjust the shoulder strap height according to the height of the child, then pull the
straps until they are snug.
IMPORTANT! Adjust the straps so that the crotch strap and shoulder straps meet at the
child’s stomach level, not at chest level!
E. Clip the outer shoulder strap on either side into the “D” ring of the outer crotch
strap directly below. This will keep the straps that are not in use out of the way.
18B. Proper seating position for two children
A. Undo the lap belt buckle and seat the children side by side in the trailer/stroller.
B. Buckle the lap belt over both children’s laps, and pull the strap until the belt is
snug. (Note: There is only one lap belt for both children.)
C. Place one outer pair of shoulder straps over the shoulders of the child seated
on that side, and clip both straps into the “D” ring of the outer crotch strap directly
below.
D. Adjust the shoulder strap height according to the height of the child, then pull the
straps until they are snug.
IMPORTANT! Adjust the straps so that the crotch strap and shoulder straps meet at the
child’s stomach level, not at chest level!
E. Repeat for the child seated on the other side.
(Note: The center crotch strap will not be clipped to any shoulder straps.)
REMOVAL, DISASSEMBLY, AND STORAGE INSTRUCTIONS
Entering and exiting the passenger compartment
1. Unclip the front panel clasps near the front corners of the trailer/stroller.
2. Fold the front flap down and underneath the trailer/stroller so that it is out of the way.
3. Assist children as they enter and exit the passenger compartment.
(See STEP 18 of the Owner’s Manual for instructions on the proper use of the 5-point
safety harness.)
safety
flagpole
joiner
flagpole slit
in canopy
safety
flagpole sleeve

Operating Instructions Mark II™...page 7
Removal of the trailer from the bike
1. Remove children and all cargo from inside the passenger compartment.
2. Unclip the tow bar safety strap from the “D” ring.
3. Loop the strap back around the bike frame tube so that the strap is free of the bike frame.
4. Clip the end of the strap back on to the tow bar “D” ring.
5. Remove the quick-release pin from the tow bar coupler.
6. Slide the tow bar out of the tow bar coupler plate and re-insert the quick-release
pin into the holes at the end of the tow bar. The coupler plate may remain attached
to the bike frame.
7. Set the front end of the trailer on the ground.
Storage
1. Remove the flag and pole and separate the three sections.
2. If handlebar is present, remove the handlebar and replace the pins in the brackets.
3. Release the quick-release lever on each rear wheel axle.
4. Remove the rear wheels and set them to the side.
5. Unscrew the lock knob of the front wheel assembly and separate the front wheel
from the tow bar. Set the wheel aside.
6. Release the tow bar quick-release latch at the front corner of the trailer.
7. Fold the tow bar back underneath the trailer and press the tow bar into the bracket
to secure it.
8. Place all loose items inside the passenger compartment, and close the rain cover.
9. Loosen the straps under the front edge of the sling seat. Then, release the sling
seat crossbar joiners and carefully fold the trailer compartment flat. Use caution to
avoid getting pinched!
10. Store the trailer in a dry place. If the storage area will get hot, release some of
the air from the tire inner tubes to prevent excessive expansion or popping.
Prior to next use
1. Make sure that all parts are in good working order, and that no parts are missing.
Do not use this product if any parts are broken or missing!
2. Check that all fasteners are securely tightened.
3. Check the tires to make sure they have the correct PSI.
4. If you have any questions concerning the proper use of this product after it has
been stored, please contact a qualified technician.
CARE AND MAINTENANCE
Check fasteners after one hour of use; check all fasteners to make sure they are
secure. Adjust if necessary. Periodically check the trailer to ensure that it is in
good operating condition.
To clean seat and canopy: If light cleaning is required, use a soft cloth with warm
water and mild soap then air dry. Do not put in washing machine. Do not put in
dryer. DO NOT BLEACH.
To clean frame: Wipe using a soft cloth with warm water and mild soap. Air dry.
DO NOT USE polish or abrasives.
If you have any questions concerning the safe use of this product,
please contact Pacific Cycle before using:
1.800.242.6110
8am-5pm CST, Monday-Friday, or MAIL to:
Pacific Cycle Inc.
4730 East Radio Tower Lane
Olney IL 62450
Tel: 1.800.242.6110
or visit us at www.instep.net
E-mail: [email protected]
To purchase official Schwinn accessories for you trailer, please visit us at
our site listed above or call us for more information.

FIVE YEAR LIMITED WARRANTY
Pacific Cycle warrants this product to be free of defective materials and work-
manship for 5 year from the date of original purchase.
THIS LIMITED WARRANTY IS THE ONLY WARRANTY APPLICABLE
TO THIS PRODUCT, AND IS EXPRESSLY IN LIEU OF ANY OTHER
WARRANTY. ANY IMPLIED WARRANTIES, INCLUDING ANY
WARRANTY OF MERCHANTABILITY AND WARRANTY OF FITNESS
FOR A PARTICULAR PURPOSE IS LIMITED IN DURATION TO THE
DURATION OF THIS EXPRESS WARRANTY. This limited warranty gives
you specific legal rights and you may also have other rights which may vary
from state to state.
This warranty is extended only to the original consumer purchaser for
non-commercial use and does not cover tires or tubes, grips, brake shoes,
or other wear part, ordinary wear and tear, abuse, misuse, neglect, rust, theft,
or damage due to accident.
PACIFIC CYCLE, INC., IS NOT RESPONSIBLE FOR INCIDENTAL OR
CONSEQUENTIAL DAMAGES. THIS LIMITED WARRANTY DOES NOT
COVER ANY PERSONAL INJURIES, DAMAGE TO, OR, FAILURE OF THE
PRODUCT OR ANY OTHER LOSSES DUE TO ACCIDENT, ABUSE,
MISUSE, ALTERATION, NEGLECT, RUST, NORMAL WEAR AND TEAR,
IMPROPER ASSEMBLY, IMPROPER FIT, IMPROPER MAINTENANCE
OR USE OF UNAUTHORIZED REPLACEMENT PARTS NOT DESIGNED
FOR THE PRODUCT.
To make claim under warranty, notification of such defect must be given to Pacific
Cycle, Inc at the address stated on the previous page. You will be instructed on
how the product or part needing replacement should be shipped postpaid to
Pacific Cycle, Inc.
Operating Instructions Mark II™...page 8

Table of contents
Other Schwinn Bicycle Accessories manuals