Scottoiler CR-01 User manual

Dispenser Setup Comments:-
Additional Comments / Recommendations:-
If you wish to be on the Scottoiler Mailing List please tick the box.
Thank you.
Scottoiler (Scotland) Ltd, 2 Riverside, Milngavie, Glasgow, G62 6PL
Telephone: + 44 (0)141 955 1100 Fax: + 44 (0)141 956 5896

CR-01 Off Road System
Fitting and using the Scottoiler CR-01 system is straightforward. The kit contains
a pair of handlebar grips - one with integral ‘squid’ pump; a ‘C’ shaped reservoir
and breather, foam reservoir protector and cover; and the dispenser assembly.
Designed for Off-Road riding, (but also suitable for road riding) the CR-01 system
gives you ultimate control of the amount of lubrication you supply to your chain
whilst offering superior grip quality and unobtrusive operation. Simply squeeze
the grip and fluid is dispensed to the chain. Relax your grip and the
handlebar grip will re-charge.
1) ‘C’ Reservoir with siphon tube
2) Breather Assembly (with male luer)
3) Filler Plug
4) Foam padding for reservoir
5) Plastic wrap around cover for reservoir
6) Handlebar Grip with dual lumen connection (smaller internal diameter for clutch side)
7) Handlebar Grip (larger internal diameter for throttle side)
8) Black delivery tubing - 1.5m x 4mm (Clear tubing also supplied in kit)
9) Dispenser plate (stainless steel)
10) Circlip (stainless steel)
11) Sandpaper
12) Superglue
13) Dispenser mounting sleeve (2 pieces)
14) PVC Tape (black, 5m)
15) Nylon joiner tube (make from black dispenser tubing)
16) Clear PVC delivery tube with dispenser assembly
17) Delivery tube conduit (u shaped, clear, 30cm)
18) Cable ties (6 assorted)
19) 500ml Scottoil (Traditional Oil UK)
20) Scottoiler Stickers (3 assorted)
21) Pre paid postage envelope to return Warranty Card.
22) Fitting Instructions, including Warranty Card
CR-01 Warranty Card Ref SCO 86
Please detach this page and answer the following questions before returning it to
Scottoiler in the postage paid envelope provided.
Weld numbers on reservoir:
Siphon tube end number:- Breather end number:-
Name: Email:
Address:
Telephone Number:
Bike:
Type of riding:- (e.g. Mud, road, green track, moto-cross)
How easily did the handlebar grip push onto the handlebar?
How easily did the handlebar grip squeeze to dispense fluid?
How long did you ride before inspecting the chain and reservoir?
No. of miles:- Length of time:-
How much fluid was left in the reservoir? (half, quarter, please estimate)
Had you delivered more or less oil than expected?
How did the chain look?
Too oiled / oiled / not oiled
If you used more oil than expected, do you think you were squeezing the grip
during normal riding?
If you only have one grip fitted (i.e. didn’t fit the RH grip) were you aware of the
squid on the LHS, and did it feel imbalanced or intrusive?
Would you prefer only one grip rather than a pair?
Which delivery tube did you use? Black / Clear.
Which dispensing option did you use – Dispenser Plate / Cable Tie / Dispenser
mounting Sleeve / Other? (Please describe, overleaf if necessary.)
If you could make recommendations, what would they be? (Please list overleaf.)
Only parts in bold are shown on the above diagram.
Kit Contents

To make the connector cut a 3cm length from the black nylon tubing in the kit, with a 45 degree cut.
Heat the other end with a match or lighter so that it ‘mushrooms’.
Be careful not to set it on fire!
Push the mushroomed end into the clear siphon tubing from the reservoir and then push the 45-
degree end into the short side of the dual lumen.
Dispenser Assembly
There are alternative ways to fit the dispenser assembly – either to the swinging
arm, or the rear wheel spindle. If you want to use the spindle mount option first
check that you can fit the dispenser plate onto the rear wheel spindle on your
bike. If the wheel spindle is too large a diameter to fit the dispenser plate, you
will have to mount the delivery tubing to the underside of the swinging arm using
the dispenser mounting sleeve (clear delivery tubing) or cable tie it to the lower
chain guide (either black or clear delivery tubing). Our general guide on
dispenser mounting in the technical section of our website: www.scottoiler.com
gives more information on this.
To fit the clear delivery tubing, start by routing the tube neatly from the reservoir
to the swinging arm, being careful to avoid any mechanism which may trap the
tubing, or become trapped by the tubing. Thoroughly clean the underside of the
swinging-arm with an alcohol-based solvent and prepare the surface to glue with
sandpaper. Glue the clear mounting sleeve (14) forward of the spindle. (For
bikes with brushed aluminium swinging arms, epoxy glue may work better than
the superglue provided; this is available – free of charge – from Scottoiler.)
Lightly coat the dispenser mounting sleeve with Loctite Superglue and breathe on
the surface. Press onto the sterilized area and hold for about 30 seconds. Lightly
oil and insert the dispenser assembly (12) into the sleeve. Bend the sleeve to
drop oil approx 2mm above the inner side-plates of the chain at the 6 o’clock
position alongside the rear sprocket. The black injector can be trimmed, turned,
and/or bent with heat into position; it must clear the sprocket retaining bolts.
We recommend the use of either black or silver cable ties in addition to the
superglue. Installation is shown above left. You can also cable tie to a chain
guard if the bike has one, see above right. If cable tied to chain guard, it is
possible to use either black or clear delivery tubing from reservoir to chain.
Alternatively, you can mount the
dispenser by bolting the metal dispenser
mounting plate (10) to the rear wheel
spindle. The plate can be drilled and/or
trimmed to suit. Bend to drop oil approx
2mm above the inner side-plates of the
chain at the 6 o’clock position alongside
the rear sprocket. The black injector can
be trimmed, turned, and/or bent with heat
into position; it must clear the sprocket
retaining bolts. This fitting is shown in the
picture above.
Delivery Tubing
Once the dispenser assembly is secure, route the tubing from the dispenser back
towards the LHS handlebar grip and trim to length, allowing a little slack at the
swinging arm pivot for suspension movement and also around the headstock.
Secure with tape, tie wraps, conduit or pieces of dispenser mounting sleeve. To
fit the conduit, glue down one end, stretch, then glue down the other end. Then
glue the delivery tubing into the conduit channel. Once the delivery tubing
reaches the LHS handlebar grip trim to length. If using the black delivery tubing
make a 45-degree cut and push into the longer pointed end of the dual lumen. If
using clear delivery tubing you will have to make a connector (see previous
page).
Fluid goes into the handlebar ‘squid’ pump from the ‘C’
reservoir. Once the handlebar grip ‘squid’ has been squeezed
the fluid comes out in the direction of the pointed end of the
dual lumen.
The inlet side of the ‘squid’
pump is the SHORTER side of
the dual lumen.

Filling
Remove the black rubber pull plug from
the side of the reservoir (it’s near the
right hand breather end.) Fit the spout
to the bottle. Put the end of the spout in
the hole and squeeze oil into the
reservoir. Once the reservoir is full
remove the spout and replace the black
rubber plug. Ensure the filler/breather
tube is neatly routed either along the
open section of the ‘C’ reservoir, or
down the hole in the middle of the
headstock. Make sure that the siphon tube to the LHS grip is submerged as much
as possible, and that the reservoir is sitting with the open section of the ‘C’ facing
upwards. Fit the foam pad over the reservoir making sure it’s pushed in properly,
then wrap the handlebar pad cover around and secure tightly with the
Velcro.
Priming
Firmly squeeze the LHS handlebar grip squid to expel as much air as possible
(use 2, 3, or 4 fingers if possible.) Release and fluid will be drawn into the squid.
Squeeze again expelling as much air/lubricant as possible. When you squeeze
you will see the squid ‘bulge’ at one end to bypass the inlet valve, and escape
down the delivery tubing. Once the fluid has been dispensed and the grip
released, you will see the squid end return to its normal size. On release fluid will
be drawn in from the ‘C’ reservoir to re-charge the squid. Repeat until fluid is
dispensed at the rear sprocket. On first use, the hard plastic inside the neck of
the oil chamber of the handlebar grip may need ‘massaging’ to assist initial oil
passing through. Alternatively, try resting your index finger on this hard plastic
insert and use a rolling action. Basically you’re trying to deform the rubber over
the plastic to allow oil to pass through. After a few squeezes once oil is being
dispensed at the chain, a normal 2 or 3-fingered squeeze should be sufficient to
dispense oil.
Flow Rates / Adjustment
Squeeze the squid to lubricate the chain. You may find you squeeze inadvertently
when standing up, jumping, or riding on particularly uneven terrain. Inspect
chain regularly and if dry, squeeze more often.
Maintenance / Troubleshooting
If you have any comments or queries, please contact Scottoiler, either by phone
from Mon-Fri 9am-5pm.
Scottoiler (Scotland) Ltd, 2 Riverside, Milngavie, Glasgow, G62 6PL
Telephone: + 44 (0)141 955 1100 Fax: + 44 (0)141 956 5896
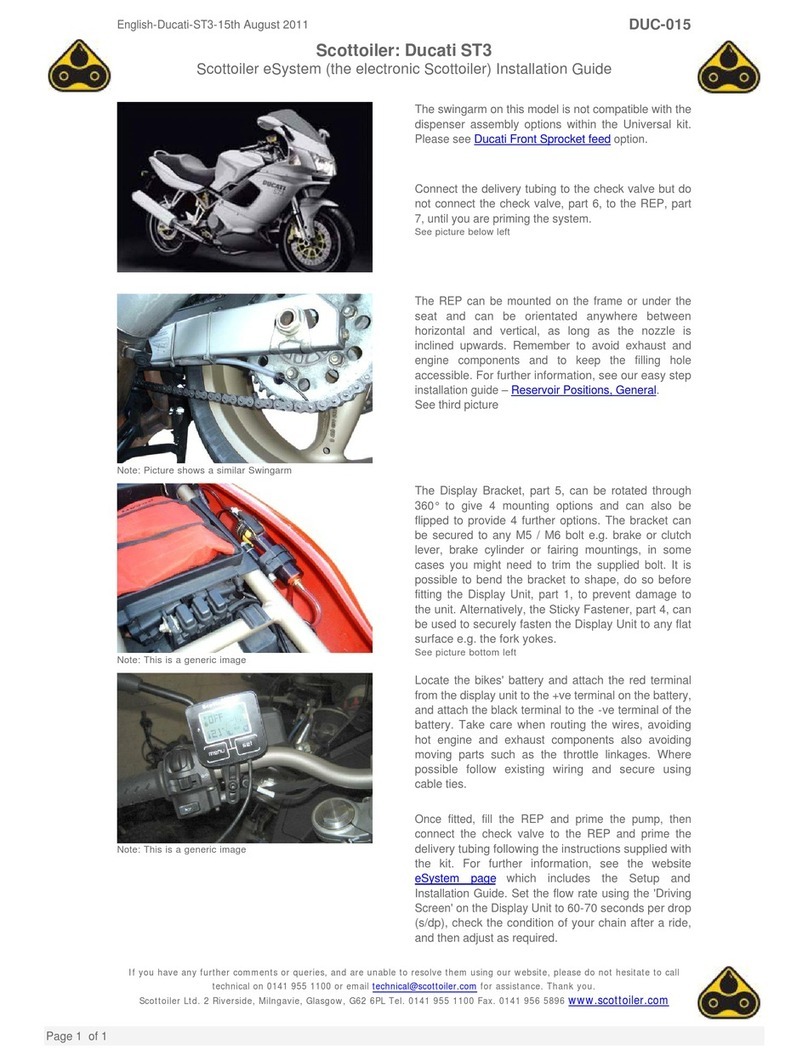
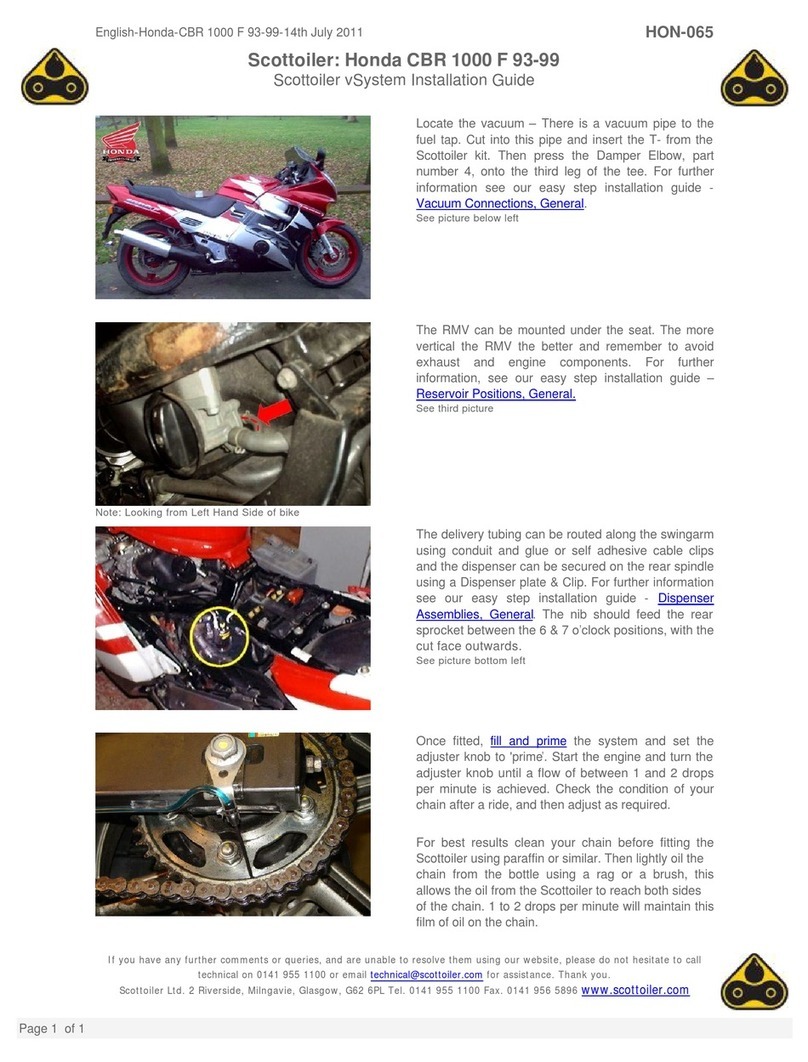
Installation Guide
‘C’ Shaped Reservoir
The description below is the most common for bikes with throttle twist grips on
the RHS and clutch levers on the LHS of the handlebar.
To fit the ‘C’ shaped reservoir, firstly remove any bar pads or covers which may
be on the bike. Push the ‘C’ shaped reservoir onto the brace bar on the
handlebar. Make sure it is the right way round – the end-cap with the clear
siphon tubing should be on the LHS (clutch side) of the bike. The end-cap with
the smaller tapered hole needs to be on the RHS of the bike (throttle side), as
shown in the picture below left.
In its final position, the ‘C’ reservoir should sit with the open section of the ‘C’
facing upwards with the siphon tube mid way along the reservoir pointing as
near to the bottom as possible, as shown in the picture below right. Once the
siphon tube and reservoir are correctly positioned push the tapered luer on the
breather assembly into the RHS end-cap, and either tuck along the open length
of the reservoir or route neatly through the headstock. Ensure no cables are
trapped and the steering is not restricted.
Handlebar Grips
With the reservoir in place fit the handlebar grips. The grip with the smaller
internal diameter (20mm) has to be fitted to the LHS handlebar. The grip with
the larger internal diameter (23mm) has to be fitted to the RHS (throttle side.)
The RHS grip is larger to allow it to fit over the throttle twist sleeve. Use water
to lubricate both the bars and the grips before trying to push them on, and
rotate them to ensure the raised ‘squid’ section is comfortable under the hand
when sitting on the bike. All grips are tested with oil at Scottoiler. Remove black
plug from dual lumen before installing siphon tubing
Siphon Tubing
With the handlebar grips fitted connect the clear siphon tubing from the reservoir
to the LHS handlebar grip. Allowing a little free play, wind the clear tubing
around the handlebar once or twice before connecting it to the inlet side of the
handlebar grip ‘squid’ pump as shown in the following picture.
Siphon tube, viewed
sitting on bike
T
hrottle Side
Other Scottoiler Motorcycle Accessories manuals


