SDT International LUBExpert User manual
SDT International sa-nv • Bd de l’Humanité 415 • B-1190 Brussels (Belgium) • Tel: +32(0)2 332 32 25 • email: i[email protected]
SDT North America • 1532 Ontario Street, Cobourg, ON • Phone: 1-800-667-5325 | 1-905-377-1313 •email: info@sdthearmore.com
www.sdtultrasound.com

MAN.LUBExpert.EN--01--SDT-Lubexpertuser-manual-EN.DOCX
Copyright 2017 by SDT International, sa/nv All Rights Reserved
2/27
Table of Contents
1. Before You Begin ................................................................................................................. - 3 -
1.1. Good to Know ......................................................................................................................................... - 3 -
1.2. Recommended Calibration Intervals....................................................................................................... - 3 -
1.3. Declaration of conformity....................................................................................................................... - 3 -
1.4. Warranty ................................................................................................................................................. - 4 -
1.5. Responsibility limits ................................................................................................................................ - 4 -
1.6. Destruction and recycling of waste equipment ...................................................................................... - 4 -
1.7. Copyright................................................................................................................................................. - 5 -
2. Welcome Message .............................................................................................................. - 6 -
Introduction.........................................................................................................................- 7 -
3.1. What is LUBExpert?................................................................................................................................. - 7 -
4. Description........................................................................................................................... - 7 -
4.1. LUBExpert is available in two forms........................................................................................................ - 7 -
4.2. LUBExpert Kit .......................................................................................................................................... - 7 -
4.3. LUBExpert Base Kit Contents................................................................................................................... - 8 -
4.4. LUBExpert Upgrade for SDT270SU or SDT270DU (MK2 Only) ................................................................ - 9 -
4.5. Upgrade Kit Contents.............................................................................................................................. - 9 -
4.6. Charging the Battery ............................................................................................................................. - 10 -
4.7. Turning the LUBExpert “ON” and “OFF” ............................................................................................... - 10 -
Getting Started..........................................................................................................................- 11 -
4.8. Have you Installed UAS? ....................................................................................................................... - 11 -
4.9. Are UAS and LUBExpert up-to-date?..................................................................................................... - 11 -
5. System Settings Edits.........................................................................................................- 12 -
5.1. Grease Gun Management..................................................................................................................... - 12 -
5.2. Sensor Options –LUBExpert Mode....................................................................................................... - 13 -
6. LUBExpert databases in UAS .............................................................................................- 13 -
6.1. Managing Databases............................................................................................................................. - 13 -
6.2. Modifying a Database ........................................................................................................................... - 14 -
7. Working with Surveys........................................................................................................- 17 -
7.1. Create a new Survey ............................................................................................................................. - 17 -
7.2. Transfer Survey to LUBExpert ............................................................................................................... - 18 -
8. In the Field.........................................................................................................................- 19 -
8.1. Connecting LUBEsense.......................................................................................................................... - 19 -
8.2. Planned Survey Mode ........................................................................................................................... - 19 -
8.3. Lubrication Steps................................................................................................................................... - 20 -
9. Transfer Results to PC........................................................................................................- 22 -
10. View Results in UAS...........................................................................................................- 23 -
10.1. Selecting, Viewing Trends, FFT, and Measurement Details .................................................................. - 23 -
11. Reports ..............................................................................................................................- 24 -
11.1. Overall lubricant consumption.............................................................................................................. - 24 -
11.2. Lube consumption comparison............................................................................................................. - 25 -

MAN.LUBExpert.EN--01--SDT-Lubexpertuser-manual-EN.DOCX
Copyright 2017 by SDT International, sa/nv All Rights Reserved
3/27
1.Before You Begin
1.1. Good to Know
Due to typical self-discharging characteristics of NiMH batteries, it is recommended to charge
the LUBExpert battery at least every 3 months, even if the equipment is not used.
This manual contains instructions specific to LUBExpert App Firmware and its interface to
Ultranalysis Suite Software (UAS). References to UAS usage in the manual are intentionally
“LITE”. For instructions using UAS, refer to the UAS user’s manual.
LUBExpert App runs on an SDT270SU or SDT270DU. If you are using the LUBExpert App on one
of these devices and need device specific instructions, refer to your SDT270 User Manual.
1.2. Recommended Calibration Intervals
SDT recommends annual recalibration of SDT instruments and annual verification of sensors. The one-
year interval is consistent with the observed long-term stability of SDT electronic equipment’s.
For new equipment leaving the factory, however, the initial period is extended to 15 months. This
accounts for the lapse of time from delivery from factory floor to end users.
SDT recognizes that each customer may have their own Quality Assurance Standards and internal
requirements. If a customer has established a Quality Assurance Program that includes a documented
procedure for measurement deviations, and if an instrument and the relevant sensor show acceptable
deviations and do not show signs of physical damage, then calibration periodicity could be extended to
two years.
Third party organizations having more authority (Class, or State Administrations) may have defined their
own regulations for example 6 months, or 2 years calibration interval: by evidence, local legally
applicable regulations supersede SDT rules.
For these reasons, SDT Calibration Certificates no longer mention a “calibration due date”. Instead, SDT
codes each instrument with the “last calibration date”.
For user convenience, you can view the date of the last calibration of an SDT200, SDT270, or LUBExpert
instrument on the System Info menu screen.
This text refers to SDT document DC.QUAL.0051, part of SDT’s quality management system (ISO-9001).
1.3. Declaration of conformity
SDT International n.v. s.a. Boulevard de l’Humanité 415, B - 1190 BRUSSELS, BELGIUM
declares that LUBExpert, the object of this declaration, is built in conformity with the applicable
European Directives:
Electrical equipment for measurement IEC EN 61010-1
EMC Directive 2004/108/CE
Low voltage Directive 2006/95/CE.
The equipment hence displays the EC logo of being compliant to the current EC regulations.
To be able to operate by state of the art rules, as stipulated in the directive, it has been designed by the
following rules:

MAN.LUBExpert.EN--01--SDT-Lubexpertuser-manual-EN.DOCX
Copyright 2017 by SDT International, sa/nv All Rights Reserved
4/27
The SDT270 does not radiate electromagnetic waves (EMC)
The SDT270 is immunized against external electromagnetic radiation (EMI)
The SDT270 is protected against electrostatic discharges (ESD).
Note: the owner is obliged to preserve the present user’s manual with the obligation to pass it on to
future users or owners.
Brussels, January 2017
The Manager
1.4. Warranty
SDT International guarantees the LUBExpert unit against manufacturing faults for a period of 2 (two)
years, with the exception of the battery and accessories (charger, headphones, sensors, etc.) which are
guaranteed for a period of 6 (six) months. The warranty covers all material supplied and implies the free
replacement of all parts that contain a manufacturing fault.
Warranty does not include shipping, handling and importation.
The warranty applies to general and acceptable use. The warranty does not apply to normal wear and
tear, is void if misused, or accident damages the product, if the product is altered in any way, if an
unauthorized party attempts repair, or the unit is opened without written authorization of SDT
International.
SDT reserves the right to accept or deny warranty claims based on final inspection in our workshop.
In the event of a defect, contact your local SDT representative or SDT International.
1.5. Responsibility limits
Neither the company SDT International, nor any related company, will in any circumstances be liable for
any damages, including, without limitation, damages for loss of business, business interruption, loss of
information, defect of the SDT270 unit or its accessories, bodily harm, loss of time, financial or material
loss or any other indirect or consequential loss arising out of the use, or inability to use this product,
even when it has been warned of possible damages.
1.6. Destruction and recycling of waste equipment
In conformance with European Union (EU) Directives and in particular with Directive 2006/66/EU
"Batteries" and Directive 2012/19/EU "WEEE –Waste Electrical and Electronic Equipment", SDT
International is organizing the management of waste equipment. However local legal regulations have
precedence.
Thus, SDT Customers may
Either transfer a waste apparatus to a local company that will recycle it in accordance with
applicable local laws
Or return the waste apparatus to SDT International or to a SDT Dealer
For an apparatus that contains a battery, SDT International will transfer the battery to a local company
that will recycle it in accordance with EU "Batteries" Directive and Belgian laws.
SDT International will transfer the rest of the apparatus to a local company that will recycle it in
accordance with EU "WEEE" Directive and Belgian laws.

MAN.LUBExpert.EN--01--SDT-Lubexpertuser-manual-EN.DOCX
Copyright 2017 by SDT International, sa/nv All Rights Reserved
5/27
1.7. Copyright
© 2017 SDT International n.v. s.a. All rights reserved.
No one is permitted to reproduce or duplicate, in any form, the whole or part of this document without
the written permission of SDT International n.v. s.a.
The information herein is believed to be accurate to the best of our knowledge.
Due to continued research and development, specifications of this product can change without prior
notice. The most recent version of this manual is available at sdtultrasound.com in the downloads
section.

MAN.LUBExpert.EN--01--SDT-Lubexpertuser-manual-EN.DOCX
Copyright 2017 by SDT International, sa/nv All Rights Reserved
6/27
2.Welcome Message
Congratulations and thank you for your purchase of LUBExpert. Get ready to explore the world of
ultrasound assisted machinery lubrication. Whether you grease bearings on a time-based or calendar
based schedule, LUBExpert’s onboard lubrication and greasing assistant is ready to guide you to a
perfect and precise result every time.
Major bearing manufacturers claim that as much as 40% of all bearing related failures result from poor
lubrication practices. “Poor Lubrication Practices” include, but are not limited to, bearings receiving too
much grease, not enough grease, or even the wrong type of grease.
LUBExpert helps you Grease Bearings Right. That means delivering grease to the right location, using the
right grease type, dispensing the right quantity, at the right intervals, while receiving the right indication
about the condition of the lubrication.
If you’re ready to optimize your machinery lubrication practices, then let’s get started. The following
detailed and illustrated instructions will help you get the most from your LUBExpert/UAS investment.

MAN.LUBExpert.EN--01--SDT-Lubexpertuser-manual-EN.DOCX
Copyright 2017 by SDT International, sa/nv All Rights Reserved
7/27
Introduction
3.1. What is LUBExpert?
LUBExpert is an ultrasound solution dedicated to acoustic bearing lubrication.
LUBExpert combines SDT’s strong measurement capabilities and clever user interface to create an
onboard lubrication & greasing assistant. Intelligent algorithms guide lube-techs before, during, and
after re-greasing resulting in optimal lubrication parameters on all assets.
Given only a few machine parameters, LUBExpert monitors each stroke of grease and its effect on
bearing friction and temperature. Before and after bearing conditions are reported with a “GOOD”,
“BAD”, or “SUSPECT” status report.
4.Description
4.1. LUBExpert is available in two forms.
1. LUBExpert Kit –A complete standalone ultrasound instrument with dedicated firmware and
software for precision guided lubrication of bearings.
2. LUBExpert Upgrade –An upgrade kit that adds LUBExpert functionality to any SDT270SU and
SDT270DU ultrasound instrument. Please note that LUBExpert upgrade is only for SDT270 (MK2)
instruments with serial number beginning with “280”. If your serial number begins with “270”,
please contact your local SDT representative.
4.2. LUBExpert Kit
LUBExpert Base Kit Hardware
LUBExpert Ultrasound Data Collector equipped with the following features and functions:
•Static measurements with four condition indicators (4CI)
-Ultrasound –structure borne (LUBEsense Innovative Sensor Technology)
•Temperature –non-contact spot radiometer (°F/C)
•Onboard Assistant provides real-time stroke-by-stroke guidance
•Integration to UAS for user-defined planned survey mode
•Non-contact laser guided temperature measurement
•New and innovative LUBEsense ultrasound sensor
•Lube consumption report
•Before and After report
•“Good” “Bad” “Suspect” report
•Embedded algorithm constantly calculates bearing friction
•Four condition indicators
•Support for 6 languages plus icon commands
•2 stage backlit LCD
•IP addressable USB interface to PC (upload/download)
•12 button keypad and one-handed operation
•Aluminum extruded housing with rubber protective bumpers
MAN.LUBExpert.EN--01--SDT-Lubexpertuser-manual-EN.DOCX
Copyright 2017 by SDT International, sa/nv All Rights Reserved
8/27
LUBExpert Data Management Software
•Ultranalysis Suite™ Static LUBExpert License includes 1 licensed installation
•Tree structured database with dedicated “LUBExpert Mode”, multiple survey creation, trend
graphs, asset image mapping, customizable alarming, sensor and data collector serial number
recording for accountability.
Sensors & Accessories
•LUBEsense contact sensor, flat & curved magnetic bases, acoustic lube adaptor, sensor cable
•Custom swivel cradle mounts LUBExpert to any standard grease gun
•Headphones with 130dB noise attenuation (neckband style)
•Universal voltage battery charger (110-240V AC 50/60Hz)
•Manuals and applicable software on memory flash drive or downloadable
•Belt attachment and shoulder Strap
4.3. LUBExpert Base Kit Contents
Article Code
Description
FS.LBX.001 (.002 or .003)
LUBExpert Base Kit
FASFTWUASS01
Ultranalysis Suite Single LUBExpert License, Static
FU.LBX.001
LUBExpert Standard Device w/Battery
FAUPGRKEY270T
Key Activation, Temperature
FUBATTR270-01
Battery, SDT270/200/LUBExpert
FUHDPH-1
Headphone, Neckband
FUPWSPUN-01
SDT Universal Battery Charger w/o Cord
LUBExpert Accessory Pack Includes:
FAHOLSAC-01
Shoulder Strap
FAHOLSAC-02
Leather Belt Holder w/ Clip
SICABUSBAUSBBM
USB Cable
FUCABLPWRC7EU-01
EU Power Cord for Universal Battery Charger (.002)
FUCABLPWRC7US-01
US Power Cord for Universal Battery Charger (.001)
DMSDTNAUSB
SDT USB Memory Drive
Case:
FUSUITEPC-T6-01
LUBExpert Custom Carrying Case
Additional Components Include:
FU.SEN.LUBE.001
LUBEsense Contact Sensor, Threaded, w/o Cable
FUCABLSPLE7LE7-3
Cable for Contact Sensor, LEMO to LEMO, Coiled
FUSEACMAG-01
Magnetic Base, Flat Surface
FUSEACMAG-02
Magnetic Base, Multi Surface
FUSEACLUBE-03
Acoustic Lube Adaptor
FU.LBX.DVC.001
Grease Gun Mounting Cradle
MAN.LUBExpert.EN--01--SDT-Lubexpertuser-manual-EN.DOCX
Copyright 2017 by SDT International, sa/nv All Rights Reserved
9/27
4.4. LUBExpert Upgrade for SDT270SU or SDT270DU (MK2 Only)
LUBExpert Firmware Features
•Static measurements with four condition indicators (4CI)
-Ultrasound –structure borne (LUBEsense Innovative Sensor Technology)
•Onboard Assistant provides real-time stroke-by-stroke guidance
•Integration to UAS for user-defined planned survey mode
•New and innovative LUBEsense ultrasound sensor
•Lube consumption report
•Before and After report
•“Good” “Bad” “Suspect” report
•Embedded algorithm constantly calculates bearing friction
LUBExpert Upgrade Criteria for SDT270
•Different scenarios exist to add the LUBExpert Key to your SDT270. Some things to consider
prior to purchasing the LUBExpert Upgrade:
•Only SDT270 device serial numbers beginning with “280 xxx xxx” are eligible for upgrade. If the
SDT270 device serial number begins with “270 xxx xxx” the device must be exchanged. Contact
your local SDT Representative for details.
•Do you have a license of UAS (STATIC or DYNAMIC)? LUBExpert requires it.
•What is the platform of your SDT270 device?
-LUBExpert only functions on an SDT270SU or SDT270DU
-All other devices must be upgraded first
Sensors & Accessories Included in LUBExpert Upgrade Kit
•LUBEsense threaded contact ultrasound sensor
•Flat and curved magnetic bases
•Acoustic lube adaptor
•Sensor cable
•Custom swivel cradle mounts LUBExpert to any standard grease gun
4.5. Upgrade Kit Contents
Article Code
Description
FA.UKIT.R270.LBX
LUBExpert Upgrade Kit for SDT270SU/DU
FAUPGRKEY270L
Key Activation, LUBExpert
DMSDTNAUSB
SDT USB Memory Drive (manuals, drivers, software)
FU.SEN.LUBE.001
LUBEsense Contact Sensor, Threaded, w/o Cable
FUCABLSPLE7LE7-3
Cable for Contact Sensor, LEMO to LEMO, Coiled
FUSEACMAG-01
Magnetic Base, Flat Surface
FUSEACMAG-02
Magnetic Base, Multi Surface
FUSEACLUBE-03
Acoustic Lube Adaptor
FU.LBX.DVC.001
Grease Gun Mounting Cradle
MAN.LUBExpert.EN--01--SDT-Lubexpertuser-manual-EN.DOCX
Copyright 2017 by SDT International, sa/nv All Rights Reserved
10/27
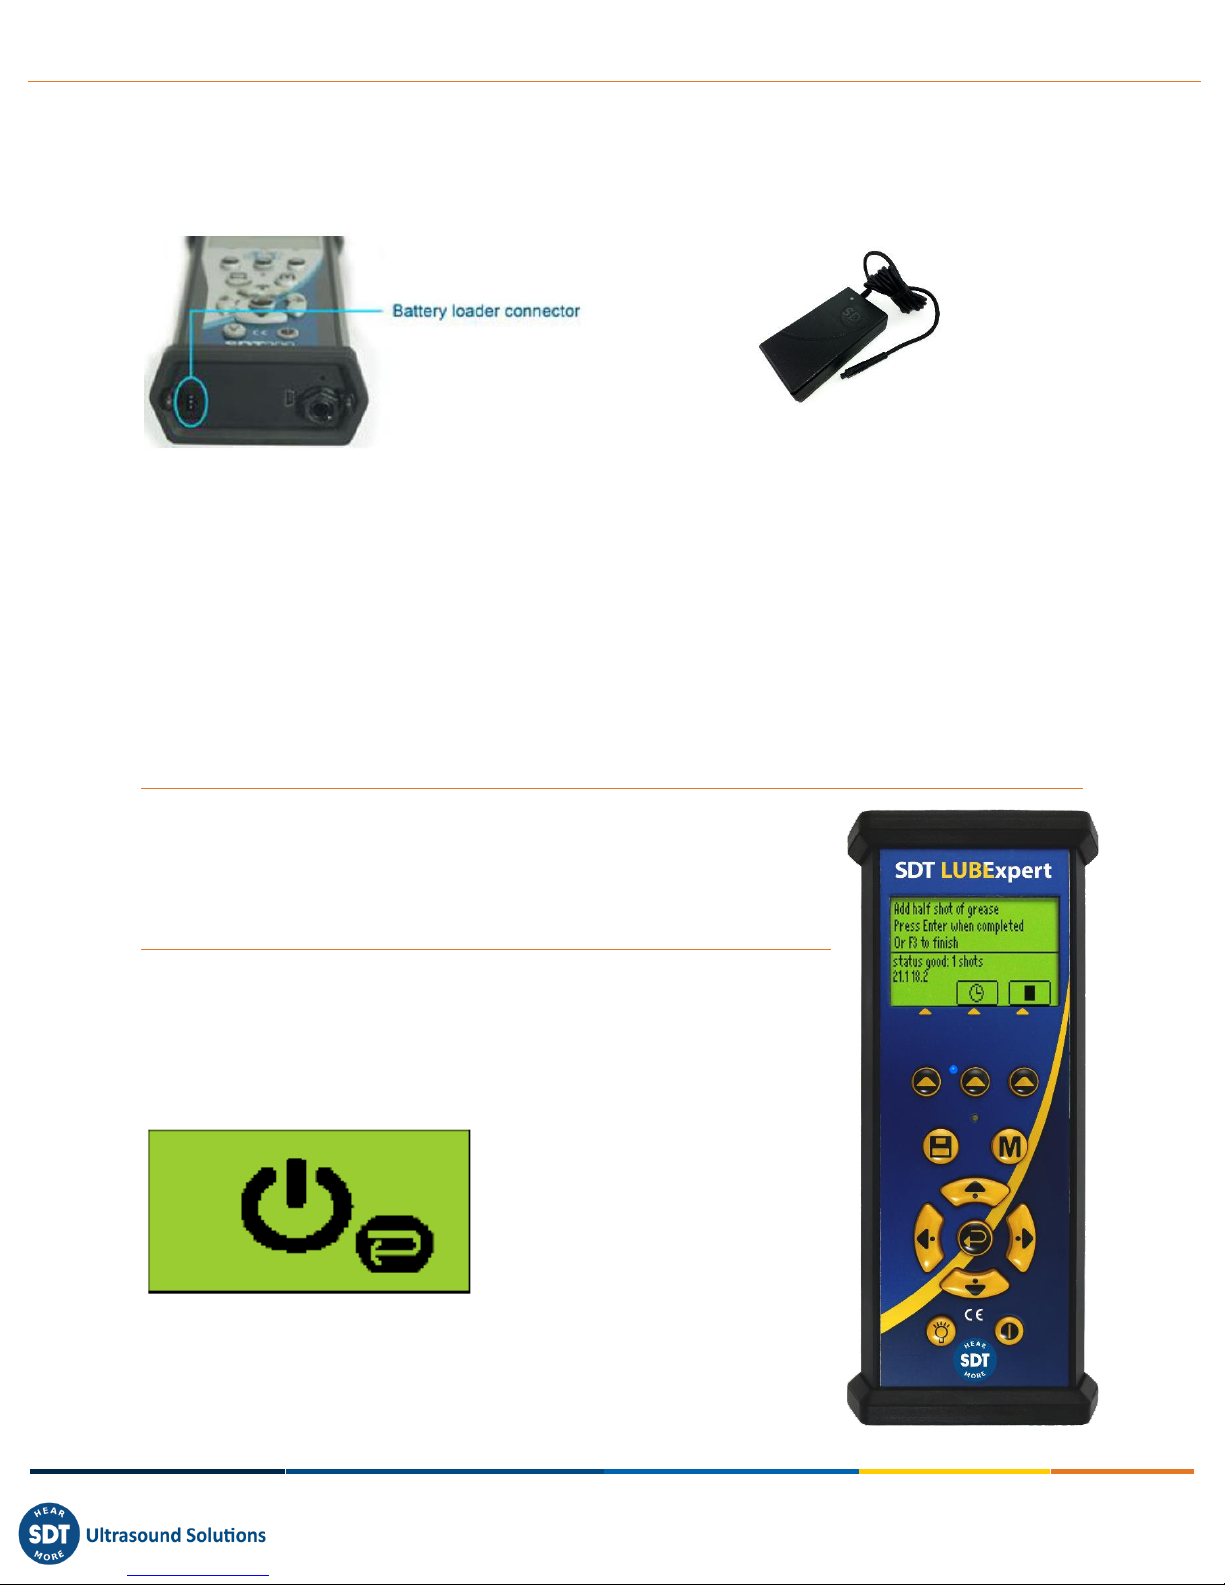
4.6. Charging the Battery
The LUBExpert uses an internal NiMH battery. The battery charger connects to a socket on the bottom
side of the Instrument, near the headphone jack.
The charging time is typically 6 hours. When the LED of the charger is continuously green, the LUBExpert
battery is completely charged.
Like most batteries, leaving the LUBExpert charging after the charger says it is charged does not hurt the
battery –in fact it very slowly tops the charge up a little more.
Expect up to 8 hours of continuous use from your LUBExpert when the battery is fully charged. This will
vary depending on your need to use the backlight and the TEMP1 internal temperature sensor. Use the
function settings in the main menu to adjust the auto power down and the delay to automatically switch
off the backlight.
4.7. Turning the LUBExpert “ON” and “OFF”
To Turn On
Press the Power Button ①on the bottom right of the keypad. The status
LED ②will shine dark blue. Then, a few seconds later the SDT logo and a
“loading” message appears on the screen. If you do not see this message
your battery may be flat (see above for battery charging instructions).
To Turn Off
Push the Power Button ①on the bottom right of the keypad. The following
confirmation displays, asking to confirm that you indeed want to switch off
the unit, and to avoid accidently powering down LUBExpert. Confirm the
device shut down by pressing the Enter Button③.
①
②
③

MAN.LUBExpert.EN--01--SDT-Lubexpertuser-manual-EN.DOCX
Copyright 2017 by SDT International, sa/nv All Rights Reserved
11/27
Getting Started
4.8. Have you Installed UAS?
On-condition machinery lubrication starts with creating logical and manageable asset databases from
which routine greasing surveys evolve. Your LUBExpert kit includes a single installation license of SDT’s
highly acclaimed Ultranalysis Suite (UAS) software. If you have not already installed UAS and the SDT
device driver on your PC you’ll need to do that first. Everything you need resides on the USB drive
delivered with your LUBExpert kit. The installation process is simple enough however should you require
installation assistance contact your SDT authorized representative.
4.9. Are UAS and LUBExpert up-to-date?
Before we get started, let’s make sure your working with the latest tools. SDT takes customer feedback
seriously and we continuously improve UAS and LUBExpert to ensure the best experience possible. It is
therefore a good idea, from time to time, to check for firmware and software updates. While connected
to the Internet, you can confirm that both your software and your hardware are at the current update
by clicking the “?” Tab in UAS.
1. Launch UAS from the desktop icon or your program start menu.
2. UAS checks your software version and advises you if new updates are
available.
3. Now let’s check the firmware on your LUBExpert. Power up LUBExpert first, then connect it to
your PC with the supplied USB cable. UAS queries the device version and advises you if updates
are available.
4. Follow the simple and intuitive prompts and don’t hesitate to contact us if you experience
difficulties

MAN.LUBExpert.EN--01--SDT-Lubexpertuser-manual-EN.DOCX
Copyright 2017 by SDT International, sa/nv All Rights Reserved
12/27
5.System Settings Edits
UAS is a multi-functional software platform designed for all sorts of ultrasound condition monitoring
tasks. Before we create your first lubrication database and survey, there are a few setup tasks to attend
to. The onboard assistant needs some basic information about your lubrication processes.
If you haven’t already launched UAS software, do so now. Then select “Options” from the main menu
and then “System Settings”.
The System Settings dialogue box appears with several selector tabs oriented horizontally across the
top. The active window is bold and the rest appear lighter grey. Click on the “Grease Gun” tab located at
the right of the window.
5.1. Grease Gun Management
UAS and LUBExpert want to ensure you always use the right grease and the right amount. To do that you
need to specify the quantity of grease dispensed by a full stroke of your grease gun. If you don’t know
the dispensing capacity of your grease gun contact the manufacturer or better yet, measure it yourself.
A list of all the lubricants used in your greasing program are maintained in UAS using the simple
add/edit/delete tool here. Later you can assign the correct grease name to each asset bearing in your
plant.
Once you’re finished here, click Save to exit the System Settings dialogue window.

MAN.LUBExpert.EN--01--SDT-Lubexpertuser-manual-EN.DOCX
Copyright 2017 by SDT International, sa/nv All Rights Reserved
13/27
5.2. Sensor Options –LUBExpert Mode
SDT offers versatile solutions for so many applications; so, there are lots of sensors available. But for
LUBExpert, there are only two (LUBEsense and TEMP2). To help eliminate confusion we created
“LUBExpert Mode” in UAS to hide all the sensors that do not apply to LUBExpert. To enter LUBExpert
Mode, select “Options” from the main menu and then “System Settings”. The System Settings dialogue
box appears with several selector tabs oriented horizontally across the top. The active window is bold
and the rest appear lighter grey. Click on Sensors tab and then click the LUBExpert Mode check box and
then click LUBEsense and TEMP2 check boxes. All other sensor options will be hidden from view during
LUBExpert operation.
Once you’re finished, click Save to keep your selections and exit the System Settings dialogue window.
6.LUBExpert databases in UAS
6.1. Managing Databases
To create a new Tree Structure or a new Data Folder, click on the Create New button ⑤. From the new
window, type in the Data Folder field ⑧the desired name for creating a new Data Folder. In the Tree
Structure field, type the desired name for creating a new Tree Structure. Click on Save when done;
To select an existing Data Folder, click the arrow ②of the drop down menu then click on the desired
Data Folder;
To open an existing Tree Structure, select it from the list and click on Open ④;
To rename an existing Tree Structure, select it from the list and click on Edit ⑥;
To rename an existing Data Folder, click on the Edit button ②and then from the new window, type its
new name and click on Save;
To delete a Tree Structure, select it from the list and click on Delete ⑦. This action will delete the delete
the database. This operation is not reversible and cannot be undone. A warning message asks first for a
confirmation;
To Delete a Data Folder, click on the Delete button ③. This action will delete the delete the Data Folder
and all its associated databases. This operation is not reversible and cannot be undone. A warning
message asks first for a confirmation.

MAN.LUBExpert.EN--01--SDT-Lubexpertuser-manual-EN.DOCX
Copyright 2017 by SDT International, sa/nv All Rights Reserved
14/27
6.2. Modifying a Database
Add Descriptive Tree Nodes
You may choose to add a descriptive node or a
measurement node. Descriptive nodes serve to
describe the location of the physical asset.
Right click your mouse on any node in the open
database tree and select “Add New > Tree Node”
from the short-cut menu. This action opens the
“Create New Tree Node” dialogue box. Type the
name of the new Node and then click save. The new
node is added as a lower level sub-Node of the
database or Node level you selected.
②
①
③
④
⑤
⑥
⑦
⑧
⑨
MAN.LUBExpert.EN--01--SDT-Lubexpertuser-manual-EN.DOCX
Copyright 2017 by SDT International, sa/nv All Rights Reserved
15/27
Add Measurement Tree Nodes
The last node in the tree (up to seven) is always used as the measurement node. Measurement nodes
describe the type of measurement data collected from the asset. UAS will only allow you to assign
Measurement Nodes in the correct place on the tree structure. If “Measurement” option is inactive then
you have chosen the wrong section of the tree to add a measurement.
Adding LUBExpert measurements to your data tree is no different than adding other measurements. The
only difference is that for a LUBExpert measurement, you only have two sensor choices (LUBEsense and
TEMP2).
Assigning LUBExpert Sensors
If you followed the instructions to go into LUBExpert Mode,
the list of available sensors should only be two (LUBEsense
and TEMP2). The other sensors are still visible but inactive.
Choose LUBEsense to create an ultrasound measurement
node and TEMP2 to create a temperature measurement
node as required.
For ultrasound measurements, UAS gives you the option to
choose either Static or Dynamic and for temperature
measurements you can set the measurement interval and
the emissivity. Your LUBExpert will not measure Dynamic
data so it doesn’t really matter what you choose here. If
you choose Dynamic, LUBExpert and SDT270SU will only
record the 4 Static Condition Indicators (4CI).
If you are using an SDT270DU, choosing Dynamic here will
instruct your SDT270DU to collect both Dynamic and Static
data simultaneously.

MAN.LUBExpert.EN--01--SDT-Lubexpertuser-manual-EN.DOCX
Copyright 2017 by SDT International, sa/nv All Rights Reserved
16/27
Setting Data collection Interval, Acquisition Time, and Temperature Emissivity
For both LUBEsense and TEMP2 measurements, the choice to
set your preferred data collection interval time ①in months,
weeks, days, or hours ②is made here. For TEMP2
measurements the additional choice to set emissivity exists
here. The default emissivity is 1.0.
Acquisition Time ③refers to the length of time you commit
your SDT instrument to sample data. Longer time for slow
speed applications and less time for normal and high speed.
The goal is to set the acquisition time long enough to capture
at a minimum, 2 to 3 full shaft rotations.
The default acquisition
time is one second. Enter
the desired value in the
Acquisition Time field of
the Create New
Measurement dialogue
box.
Setting Grease Type
Earlier we described how to set up a list of all the lubricant types
used in your plant under “Grease Gun Management”. With the
“Create New Measurement” dialogue box open, here you select the
grease type for this bearing using the drop down box ①beside
Grease Type.
Now locate the field named “Grease Qty” ②. Here you enter the
theoretical grease quantity when re-lubricating this bearing. This field
is important. It empowers LUBExpert to warn, in-the-field, if an
operator is about to dispense more grease to the bearing than it
should theoretically receive, thus preventing over-lubrication for
Suspect and Bad lubrication conditions.
If you don’t know the maximum lubricant capacity for your bearing,
this information is readily available from your bearing manufacturer,
or through a web search. Otherwise, you may leave this field blank.
Then LUBExpert will stop the lubrication process after two shots when the lubrication condition is
Suspect or Bad.
①
②
③
①
②
MAN.LUBExpert.EN--01--SDT-Lubexpertuser-manual-EN.DOCX
Copyright 2017 by SDT International, sa/nv All Rights Reserved
17/27
Stop on Status or Max Grease Capacity
LUBExpert returns three status conditions to signal the completion of
the lubrication task.
•GOOD
•SUSPECT
•BAD
In the event of a “SUSPECT” or “BAD” assessment, LUBExpert allows
you to perform one of two operations.
1. Stop greasing after 2 shots;
2. Stop greasing when the max grease quantity is reached.
From the “Create New Measurement” dialogue box, choose either
Option 1 (stop greasing after 2 shots) or Option 2 (Stop when the
"Grease Qty" value is reached). Save your selection and exit the
dialogue box.
7.Working with Surveys
Working with surveys in UAS for LUBExpert should be familiar to UAS users. For more detailed
explanations, reference your UAS user manual.
7.1. Create a new Survey
To create a new lubrication survey, right click on any asset in the data tree to access the shortcut menu.
From the shortcut menu select “Add to Survey” and then “To SDT270/LUBExpert” and then “New
Survey”. A dialogue box appears asking for the name of the new survey. Type it and click Save. The asset
is added to the New Survey.
Operator’s may choose to add assets one at a time, or a bulk addition is possible.
It is also possible to perform this action from the “Tree Nodes” menu.
MAN.LUBExpert.EN--01--SDT-Lubexpertuser-manual-EN.DOCX
Copyright 2017 by SDT International, sa/nv All Rights Reserved
18/27
7.2. Transfer Survey to LUBExpert
To transfer lube surveys from UAS to LUBExpert or SDT270SU/DU:
•Connect LUBExpert or SDT270 instrument to PC using the USB transfer cable supplied (article
code SICABUSBAUSBBM).
-The device driver is found on the supplied USB Flash Drive.
•From the “Device” menu in UAS select “SDT270/LUBExpert” and then “Upload from PC to
SDT270/LUBExpert
•Wait for message “SDT2xx device is ready” and select “Transfer”
-If the message doesn’t appear, there is no connection between PC and device
Is the device switched on?
Is the correct driver installed?
•Wait for transfer progress to complete
•After a successful transfer a status report provides relevant transfer statistics
•Click OK. You’re ready to go!

MAN.LUBExpert.EN--01--SDT-Lubexpertuser-manual-EN.DOCX
Copyright 2017 by SDT International, sa/nv All Rights Reserved
19/27
8.In the Field
8.1. Connecting LUBEsense
LUBEsense is the only ultrasound sensor that works with LUBExpert or LUBExpert Mode on an
SDT270SU/DU. Connect sensor to instrument with the coiled LEMO to LEMO cable (Article Code:
FUCABLSPLE7LE7-3) supplied by SDT.
Carefully line up the red dots on the cable connector
with the Black input on the instrument. It is important to
line up the red dots to avoid damaging the cable’s
connector pins. Gently push the connector into the input.
The LUBEsense probe is identified as “LUBEsense1” on
the top left of the display when a successful connection
is made.
LUBEsense is delivered with both a Magnetic Mount (Article Code FUSEACMAG-01 and FUSEACMAG-02)
and the SDT Acoustic Grease Gun Adaptor (Article Code: FUSEACLUBE-03). Choose the interface you
want and screw it to the base of the LUBEsense.
8.2. Planned Survey Mode
You are now ready to begin a lubrication survey.
Press the Center Button (Enter) on the LUBExpert or SDT270SU/DU device to access the Main Menu.
Using the Down Arrow, highlight Planned Survey and press Enter. A list of available surveys appears.
Highlight the one you want using the Up/Down Arrows and press Enter.
LUBExpert displays the first asset point in the survey. Be sure that this is the machine you actually want
to lubricate, and press Enter to begin.
For your confirmation, and reminder, LUBExpert displays the lubricant designated for this bearing, the
maximum quantity of lubricant (bearing capacity) before the bearing is over-greased, and the number of
shots that value represents with the calibrated grease gun. Press Enter to begin lubrication.
MAN.LUBExpert.EN--01--SDT-Lubexpertuser-manual-EN.DOCX
Copyright 2017 by SDT International, sa/nv All Rights Reserved
20/27
8.3. Lubrication Steps
Set Amplification
Connect the SDT headphones to the LUBExpert or SDT270 instrument and place them over your ears.
Using the Right/Left arrows on the keypad, adjust the listening volume in the headset to a comfortable
level. This adjustment has no bearing on the measurement accuracy and repeatability.
Attach LUBEsense either to the grease fitting (if using the Lube Adaptor) or as close to the bearing as
possible with the magnetic mount.
Using the Up/Down arrows on the keypad, adjust the
amplification (gain A=XX) to the correct level. A
correct amplification level is attained only after both
Up and Down arrow indicators disappear from the
display.
Press the Enter button on the keypad and then F3 button to save the initial
condition data for the bearing.
Adding Grease
Follow the intuitive on-screen instructions to add grease to the bearing. Add one full shot of grease and
press Enter once the grease is delivered.
The bearing and lubricant are now in the churning phase.
LUBExpert enters a stabilization period of 10 seconds (default value) to allow the grease to churn into
the bearing.
Changing Stabilization Time
For larger bearings and extreme weather/temperature environments, it may
be necessary to increase the stabilization time to allow for a longer churning
phase.
To adjust the stabilization time press F2 (middle function button). This screen
appears. Press F2 to decrease and F3 to increase the stabilization time. Press
F1 to return to previous menu.
Status Report
Once the stabilization time counts down to zero LUBExpert will either give a
status report or ask for another shot of grease. You may:
•Add another shot of grease and press Enter to begin stabilization time
countdown for churning phase
•Press F3 to end the task
LUBExpert returns one of three results:
Other manuals for LUBExpert
1
Table of contents
Other SDT International Measuring Instrument manuals


