Seafloor EchoBoat 160 ASV User manual

Seaoor
EchoBoat 160
TM
Model # ASV/RCV
Uncrewed Survey Vessel
TM
Horseshoe Bay, San Francisco, CA, USA

Page 2
Table of Contents
Model # ASV/RCV
Seafloor Systems, Inc. | [email protected] | +1(530) 677-1019
Introduction............................................................................................4
Overview.......................................................................................................................4
Safety and Specifications...................................................................................5
Warranty Information...........................................................................................6
Battery Safety........................................................................................7
Charging.......................................................................................................................9
Operation................................................................................................10
Remote Control........................................................................................................10
Testing Thrusters...................................................................................................12
Launching and Retrieving..................................................................................13
Quickstarts............................................................................................14
Prelaunch...................................................................................................................14
Connection................................................................................................................16
Mission Planning...................................................................................................19
Hypack.........................................................................................................................25
SmartCast..................................................................................................................29
Troubleshooting...............................................................................36
Remote Pairing......................................................................................................36
Remote Calibration..............................................................................................38
AutoNav Calibration.............................................................................................39
Speed Controller Calibration..........................................................................44
ESC Programing Card Information...............................................................42
Thruster Maintenance........................................................................................46
Change of Record............................................................................51

Page 3
Table of Contents
Model # ASV/RCV
Seafloor Systems, Inc. | [email protected] | +1(530) 677-1019
Manufacturer’s Declaration of Conformity
This certificate of conformity is based on an evaluation of the following mentioned
products; and technical reports and documentation are at the manufacturer’s offices.
They meet all relevant requirements of all product safety directives applicable to that
product. All equipment sold is new.
John Tamplin (Seafloor Systems President)

Parts List
Number Description QTY
8Shore Side POE with 10' Ethernet 1
7Shore Side Antenna 1
6EchoBoat 160 Battery Charger 1
5Long Range Battery Charger 1
4Long Range Battery 1
3Fins 2
2QX7 Transmitter with USB Charging Cable 1
1EchoBoat 160 1
1
2
3
7
TM
Seaoor
EchoBoat 160
TM
Model # ASV/RCV
Uncrewed Survey Vessel
Thank you for your recent purchase of the Seafloor EchoBoat Uncrewed Surface Vessel or “USV”. It
was designed specifically to allow the hydrographic surveyor to tackle hydrographic surveys reliably
and effectively in shallow waters or difficult to reach areas when conventional survey boats are not
an option. The EchoBoat features corrosive resistant materials and dual thruster motors for ease of
control and operation. It has an integral transducer well and allows for multi-sensor payload
capability. The EchoBoat’s multi-payload remotely controlled surveying function combined with its
portability makes owning and operating this remote control survey vessel affordable to all in the
hydrographic community.
If you are adding the optional AutoNav™ Auto-Pilot Module:
The survey vehicle can be monitored while underway, in both Auto and Manual modes. The mission
planner application runs on board the EchoBoat, controlled with remote desktop connection and
displays the vehicle’s positioning and progress against a background map of the survey area.
Battery voltage remaining may be monitored via remote desktop connection.
4
5
8
6

EchoBoat Safety and Cautions
Always practice caution when working with electricity in water and with the spinning blades of
the propeller. Keep body parts away from the thruster inlet and outlet to avoid injury.
Prior to use, please read the included battery instructions. Failure to observe the included
precautions can result in fire, explosion and cause personal injury/property damage.
Do not operate the thrusters for an extended period outside of the water. The bearings are
lubricated by the water, therefore vibration and noise will be greater when dry. A slight clicking
noise is normal, especially when operated dry. This is caused by slight movement of the shaft
in the plastic.
The thrusters can handle saltwater and sandy environments however, to avoid damage refrain
from sucking debris into the thruster.
NEVER leave batteries connected while the EchoBoat is unattended. Always disconnect all
batteries immediately after use.
• Even with the power switch in the off position the batteries may discharge below the
recommended safe levels of discharge.
When powering up the EchoBoat, always turn on the remote control unit before powering the
boat. If, when powered up, the receiver on the boat does not detect a controller signal, the
remote control unit may unexpectedly enter the fail-safe mode.
Conversely, when shutting down, always power down the boat using the rear thruster
switches switch on the rear of the boat before shutting down the remote control.
Improperly installed instruments can cause the boat to fill with water. Never try to operate the
EchoBoat without properly installed instruments.
Typical Survey Speed ....................................... 1.9 kts (1 m/s)
Top Speed ....................................................... 4 kts (2 m/s)
Hull Width ........................................................ 0.8 m
Hull Length ...................................................... 1.6 m
Battery Endurance – Survey Speed ................ 8 hours
Payload............................................................. 34 kg / 75 lbs
Power .............................................................. 4x 22.2V (6S) 22Ah LiPo battery
Motor ................................................................ 2x brushless thruster
Hull Material ..................................................... UV resistant HDPE
Steering .......................................................... Differential
Weight ............................................................ 31 kg / 69 lbs empty
Hardware ......................................................... Stainless steel
Remote Control Unit ........................................ 2.4 GHz
Remote Antenna .............................................. Directional
Remote Range ............................................... Up to 2km
GPS ................................................................. Customer specified
Communications .............................................. 5Ghz
Depth Sounder Transducer ............................ Through hull mount
EchoBoat Specifications

EchoBoat 160 G5 Warranty
Seafloor Systems, Inc. makes every effort to assure its products meet the highest quality,
reliability and durability standards and warrants to the original purchaser or purchasing agency
that each EchoBoat be free from defects in materials or workmanship for a period of one year
from date of shipment.
Warranty does not apply to defects of misuse, negligence or accidents. Warranty also does not
cover repairs or alterations outside of our facilities, use of the EchoBoat for purposes othe than
water measurements, or use with instruments weighing more than 75 pounds.
Seafloor is not responsible for loss of boat, instruments, damage to property, or injury/death
associated with the use of any of its products or 3rd party products that may be included or used
with Seafloor products. Seafloor does not warranty third-party products sold by Seafloor. These
may include GPS, depth sounders and other ancillary equipment.
All warranty services are FOB Seafloor’s facility in Shingle Springs, California, U.S.A.
Optional Equipment
Sonar:
•Multibeam EchoSounder
•Singlebeam EchoSounder
•Dual Frequency EchoSounder
•Side Scan Sonar
•ADCP
GPS:
•RTK/GNSS
•Differential GPS
Auxiliary:
•Sound Velocimeter
•Sound Velocity Profiler
•CTD Instrument
•Wi-Fi remote desktop
•AutoNav Control System
•PC
•SmartCast

Battery Warning
Page 7
1. Before and after every use of a LiPo battery, carefully inspect the pack to
ensure no physical damage, swelling or “ballooning” is visible.
2. If at any time you have an accident with your model, or if the battery swells,
“balloons”, or feels too hot to the touch, immediately stop use and carefully follow
these safety steps:
a. Using electrical protective gloves, remove the battery pack from your model
or charger.
b. Place the battery in a LiPo safety sack or other fireproof container, away
from flammable materials and in a well-ventilated area.
c. Observe the battery from a safe distance for at least 30
minutes.
d. If after 30 minutes the pack appears stable, follow the battery disposal
instructions below.
e. Under no circumstances should you return a battery to service that has
“ballooned” or been damaged in any way.
3. Always handle LiPo batteries with extreme care and take all necessary
precautions to avoid battery packs and cells being dinged, dented, punctured, or
otherwise damaged.
4. Keep battery packs out of the reach of children and pets.
5. Do not disassemble, modify, or attempt any form of repair of a LiPo battery.
6. Do not allow exposed battery wires to touch each other.
7. Always disconnect your battery from any device when not in use. All devices
continue to draw power even when turned off.
8. Store your batteries in a cool, dry place between 40-80 Fº / 4-26Cº. All battery
packs should be stored away from any flammable materials in a LiPo safety sack or
other fireproof container (not included) with the plugs/connectors covered.
9. Batteries should be stored at 3.75-3.80 volts per cell. Failure to maintain these
levels could result in a loss of battery capacity. Do not store batteries with voltage
above or below this range for longer than one week. Check cell voltage with a LiPo
Checker, following the included instructions.
10. LiPo batteries must be fully charged and returned to the recommended storage
voltage range (3.75-3.85 volts per cell) at least once a month.
11. Always take precautions to cover the battery plugs/connectors while not in use.
12. Always transport LiPo batteries in LiPo safety sack or other fireproof container
with the battery plugs/connectors covered.
13. Never leave LiPo battery packs in an automobile. Temperatures within a vehicle
can quickly reach unsafe levels.
14. Always keep a class D chemical fire extinguisher nearby, in case of fire when
storing, handling, charging, or using LiPo battery packs.
Seafloor Systems, Inc. | [email protected] | +1(530) 677-1019

Page 8
10. Make sure the battery connections are connected in the proper polarity.
11. Battery packs should be properly secured within the vehicle to prevent
movement and damage to the battery while in use.
12. If the battery exceeds temperatures of 140 Fº / 60Cº immediately discontinue
charging and isolate the battery pack. Refer to point number two above from the
Safety Warnings for further instruction.
13. Do not, under any circumstances, heat up a battery pack in an attempt to
increase pack performance. Doing so greatly increases the risk of fire.
14. Never allow your model to discharge a LiPo battery pack at more than the
recommended continuous discharge rate. Refer to the label of your specific battery to
determine the proper continuous discharge rate. You must also refer to your specific
vehicle user manual to ensure your batteries continuous discharge rate is not
exceeded.
15. Damaged or ruptured battery packs or cells may leak electrolytes which can
cause moderate to severe irritation including burning and dryness of the skin and
eyes. For contact with the skin, thoroughly wash the affected area with soap and
warm water. For contact with the eyes, rinse thoroughly with cool water. Seek
immediate medical attention for any burns.
Seafloor Systems, Inc. | [email protected] | +1(530) 677-1019
1. Due to international shipping regulations, LiPo batteries are not shipped fully
charged. All LiPo battery packs should be fully charged prior to the first use.
2. Always use a charger specifically designed for LiPo batteries. Never use
NiCD or NiMH chargers to charge LiPo batteries.
Failure to observe any of the following precautions can result in
fire, explosion and cause personal injury.
Before Charging
Important Information Regarding Charging & Safety Warnings
1. For the longest lifecycle and most thorough charging of your LiPo battery we
recommend a 1C charge rate. Batteries that are properly maintained have an average lifespan
of 150-250 charge cycles. Many batteries are capable of higher charge rates to reduce charge
times. While your charge time will be greatly reduced, the lifespan of your pack will also be
reduced with repeated charging above 1C. Always confirm and follow your specific packs
maximum charge rate as shown on the battery label.
2. Do not charge LiPo batteries to more than 4.2 Volts per cell for normal voltage
batteries, or 4.35 Volts per cell for High Voltage (LiHV) LiPo batteries. Refer to the label of
your specific battery for maximum cell and pack voltage.
3. Always charge batteries in a LiPo safety sack or other fireproof container (not included).
Do not charge any type of battery on or near any flammable materials including in or near your
model.
Safety

Charging
Page 9
1. Never leave batteries unattended while charging, even when using a LiPo
safety sack or other fireproof container. Batteries on charge MUST remain
under constant observation so that you may react quickly should any problems
arise.
2. LiPo batteries, 2S and greater, feature a separate balancing plug that isolates
each cell in a pack and allows each to be charged and monitored independently. This
ensures that all cells charge equally and discharge at the same rate during use. Never
charge a 2S or greater LiPo battery without connecting the balance lead to the
charger. Always balance charge a 2S or greater LiPo batter.
3. Charge each battery pack individually. Never charge battery packs in series.
Charging packs in series may result in improper charger cell recognition, improper
charging rate, and over charging that may lead to a fire. We recommend using a LiPo
balance charger when charging your LiPo batteries.
4. Always check to make sure that your LiPo charger settings match those listed
on the battery pack label. Refer to the battery label for the proper cell count and 1C
charging amperage setting.
Seafloor Systems, Inc. | [email protected] | +1(530) 677-1019
Battery Disposal Instructions & Safety Warnings
1. Any battery that has been subjected to conditions outside of normal
use, shows signs of swelling, “ballooning”, damage or has been retired from
use should be disposed of properly. We recommend transporting these
battery packs to an approved disposal facility while observing the applicable safety warnings
above.
2. Check with your local waste facility to determine if they can handle disposal of lithium
batteries and if they are permitted. Many stores also offer free recycling of rechargeable
batteries. To find a drop-off location near you please visit: http://www.call2recycle.org/locator
***********ALL BATTERIES MUST HAVE SAME LEVEL OF
CHARGE, EACH CELL IN EACH BATTERY MUST BE WITHIN
10%, AND THEY SHOULD REMAIN ABOVE 3.2V AND BELOW
4.2V PER CELL*******
Failure to follow any of the instructions and safety
warnings contained within this document may cause
irreversible damage to the battery pack or to your model.
Batteries
Before using your vessel in the field, it is important to conduct a systems check to
ensure the job is successful. The first check for operation is checking battery voltage.
Due to regulations, LiPo batteries must be discharged for shipping, and it is important
for their health and longevity that they are charged fully before being used.

TM
TARANIS X7 Controller
Arming Safety
Switch
Forward
Left Right
Reverse
Start Up Arm EchoBoat
1Center all switches and joysticks.
2Hold Power button until all four loading
process dots appear on the screen.
3If “Switch Warning” appears, ensure all
switches are turned off or centered
(Winch Knob center), auto switch is set to
Manual and arming is set to Disarm.
1To arm EchoBoat’s AutoNav, move
arming switch to arming position then
hold arming toggle switch up for 3
seconds. You will hear the EchoBoat
AutoNav chime when arming is complete.
2To Disarm, switch the Arm switch to
Disarm and hold arming safety switch
for 3 seconds. The AutoNav will chime
when disarmed.
SmartCast Control
Clockwise: Deploy
Counterclockwise: Recover
AutoNav
Up: Arm
Down: Disarm
Alarm Volume
Clockwise: Up
Counterclockwise: Down
Power
ON/OFF
EchoBoat-160™
Loiter
Up: On
Down/Center: Off
AutoNav
Up: Manual Mode
Down: Auto Mode

Calibrating Speed Controls for Motors
•Start with the AutoNav on and armed. Keep thrusters turned off.
•Press and hold Speed Controller settings button on motor you want to calibrate.
•While still holding the Speed Controller setting button, turn on the thruster switch you
want to calibrate. When the LED starts blinking red you can release the settings button.
•Tap the settings button to enter calibration mode.
•Push the throttle joystick up all the way for full throttle and tap the settings button.
You will hear a chime.
•Pull the throttle joystick back all the way for full reverse and tap the settings button.
You will hear a chime.
•Put joystick back to Center. You will hear a final chime, and the LED on the speed
control will change to green.
•You should have control of the throttle motors now.
Optional Long Range Module
•Install R9M with antenna on the back side of the remote.
•Plug in external 2s battery to the R9M.
*More in depth instructions on page 46*

Testing Thruster
•Before launching the EchoBoat check the thruster motors for proper operation.
Before testing thrusters, it is important to note that these thrusters are lubricated by
water. The thrusters should be wet for the following steps. Do not run the thrusters
for more than a few seconds at a time out of the water.
•Refer to propulsion system calibration procedures if you notice the thrusters are not
spinning evenly, or if the propulsion system does not operate as outlined in the
thruster test below.
•Note: the thruster motors are designed to be counter rotating. With forward thrust
both propellers should rotate inboard, that is, port propeller rotates clockwise and
starboard propeller rotates count-clockwise (as viewed from standing behind boat).
With reverse thrust the propellers should rotate outboard.
•Forward Thrust Test: While holding a piece of paper approximately 6 inches aft of
each thruster motor, slowly push throttle joystick on remote control unit straight
forward. The paper should be pushed away from the thruster motors, that is,
thruster motor will blow air aft of the boat. This indicates forward thrust of the boat.
•Reverse Thrust Test: While holding a piece of paper approximately 6 inches aft of
each thruster motor, slowly pull throttle joystick on remote control unit straight
backwards. The paper should be pulled toward the thruster motors, that is, thruster
motor will blow air toward bow of boat. This indicates reverse thrust of the boat.
•Turning Thrust Test: The propulsion systems uses differential thrust to turn the
boat, that is, as one motor provides forward thrust the other motor provides reverse
thrust.
•Use the paper technique to test forward and reverse thrust of each motor while
turning port and starboard.
•Turn to port:
Slowly push throttle joystick on remote control unit forward and to the left. The port
motor will provide reverse thrust and the starboard motor will provide forward
thrust.
•Turn to starboard:
Slowly push throttle joystick on remote control unit forward and to the right. The
starboard motor will provide reverse thrust and the port motor will provide forward
thrust.

Power Off
• NOTE – Leaving the LiPo batteries at too high or too low of a state of charge for
extended periods of time will cause irreversible damage to the batteries.
•Turn off Sonar and auxiliary equipment using installed software programs, save files,
then close software programs.
•Never turn off PC using main EchoBoat power switch.
Alway turn off PC using Windows Start menu power button shut down, only then
turn off the main EchoBoat power switch.
•Lastly turn off remote-control.
•Disconnect the 4 - 22.2V (6S) batteries at the XT90 connectors.
•Allow the batteries to fully cool and perform a storage charge if the EchoBoat will
not be used the following day otherwise fully charge the batteries.
Launching and Retrieving the EchoBoat
•Power up the EchoBoat and test thrusters before launching.
•Before launching the EchoBoat, ensure the drain plug is tight and hull lid is secure.
•Check that the remote-control joysticks are in the center position prior to launching
the EchoBoat
•The EchoBoat should be launched stern first. This will protect the thrusters from
accidental grounding and possible damage. Please be mindful of your sonar and
payload
•Thoroughly familiarize yourself with the way the EchoBoat responds to the controls
before deploying in moving water. When the EchoBoat is traveling away from you it
will respond to control signals as expected. When the EchoBoat is inbound (traveling
toward you) the controls will be the same but can cause confusion. Please practice
in calm water, close to shore until you are familiar with how the controls respond
when the EchoBoat is traveling towards you and away from you.

Prelaunch Checklist
Before heading into the field
Make sure the batteries you are bringing are fully charged!
The ESCs have a low voltage cutoff of (3.2 per cell)
The 6s LiPo batteries charge up to 25.2v (4.2 per cell)
Qx7 remote charges up to 8.5v
USV - Shoreside & Cables for Shoreside
Page 14
For RCV
Center throttle sticks and turn on the QX7 remote
Turn EchoBoat power switch on and wait for ESC
tones to finish
Check if motors are responsive
Launch
Seafloor Systems, Inc. | [email protected] | +1(530) 677-1019
For ASV
The Autonav requires NMEA GPS strings.
•GGA, RMC, HDT at 5hz with GP talker ID(Prefix) at 57600 baud rate
Turn the Qx7 remote on
Turn EchoBoat power switch on and wait for ESC tones to finish
Power on the GPS or INS
Flip the Arm/Disarm switch (SA) to the up position and hold safety switch (SH)
towards the operator for about 5-10 seconds until the AutoNav makes an
arming tone, it is now ARMED
Using the right throttle stick to check if both thrusters are responsive in all
directions (forward, reverse, left, right)
Open Mission Planner
Connect to the AutoNav using the correct Com port and 115200 baud rate
Verify the AutoNav has GPS
Launch
Page 15
Seafloor Systems, Inc. | [email protected] | +1(530) 677-1019
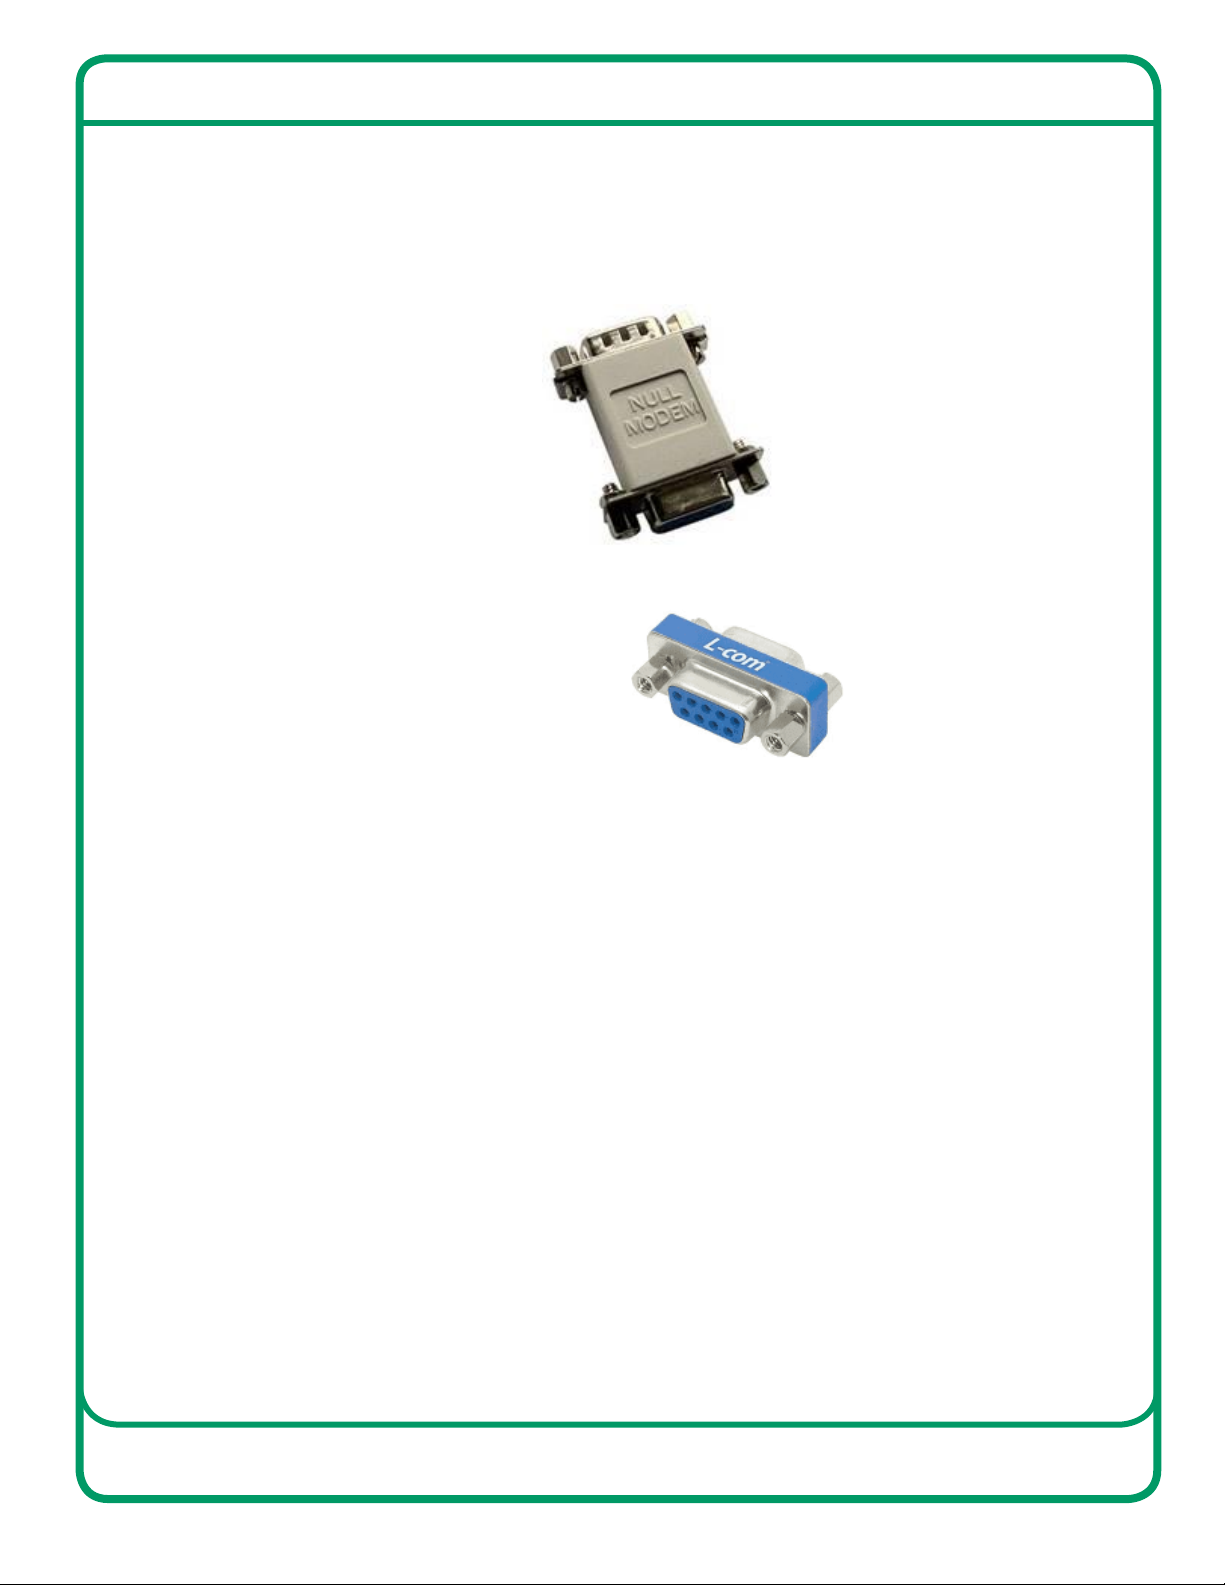
Items to Keep in Kit
These items are not provided by Seafloor as they vary based upon the user’s smart antenna
specifications.
1. Null Modem
2. Serial Gender Changer

2
Operation
Shoreside Setup
To setup the shoreside Wi-Fi Bridge plug in an ethernet to the MicroTik shoreside, and plug the other
end of the ethernet into the POE adapter. Attach the bullet connector to the POE and plug it into a
power source. Then, plug the POE ethernet adapter into the computer being used to remote into the
AutoNav Plus.
Now, setup the base computers network settings following the steps below:
1. Open Control Panel (Figure 2).
Figure 2
EchoBoat 160 G5 Quickstart Guide

2. Open “Network and Internet” (Figure 3).
Figure 3
3. Right Click on the ethernet port with the description “Unidentified network” and select
“properties” (Figure 3).
Figure 4
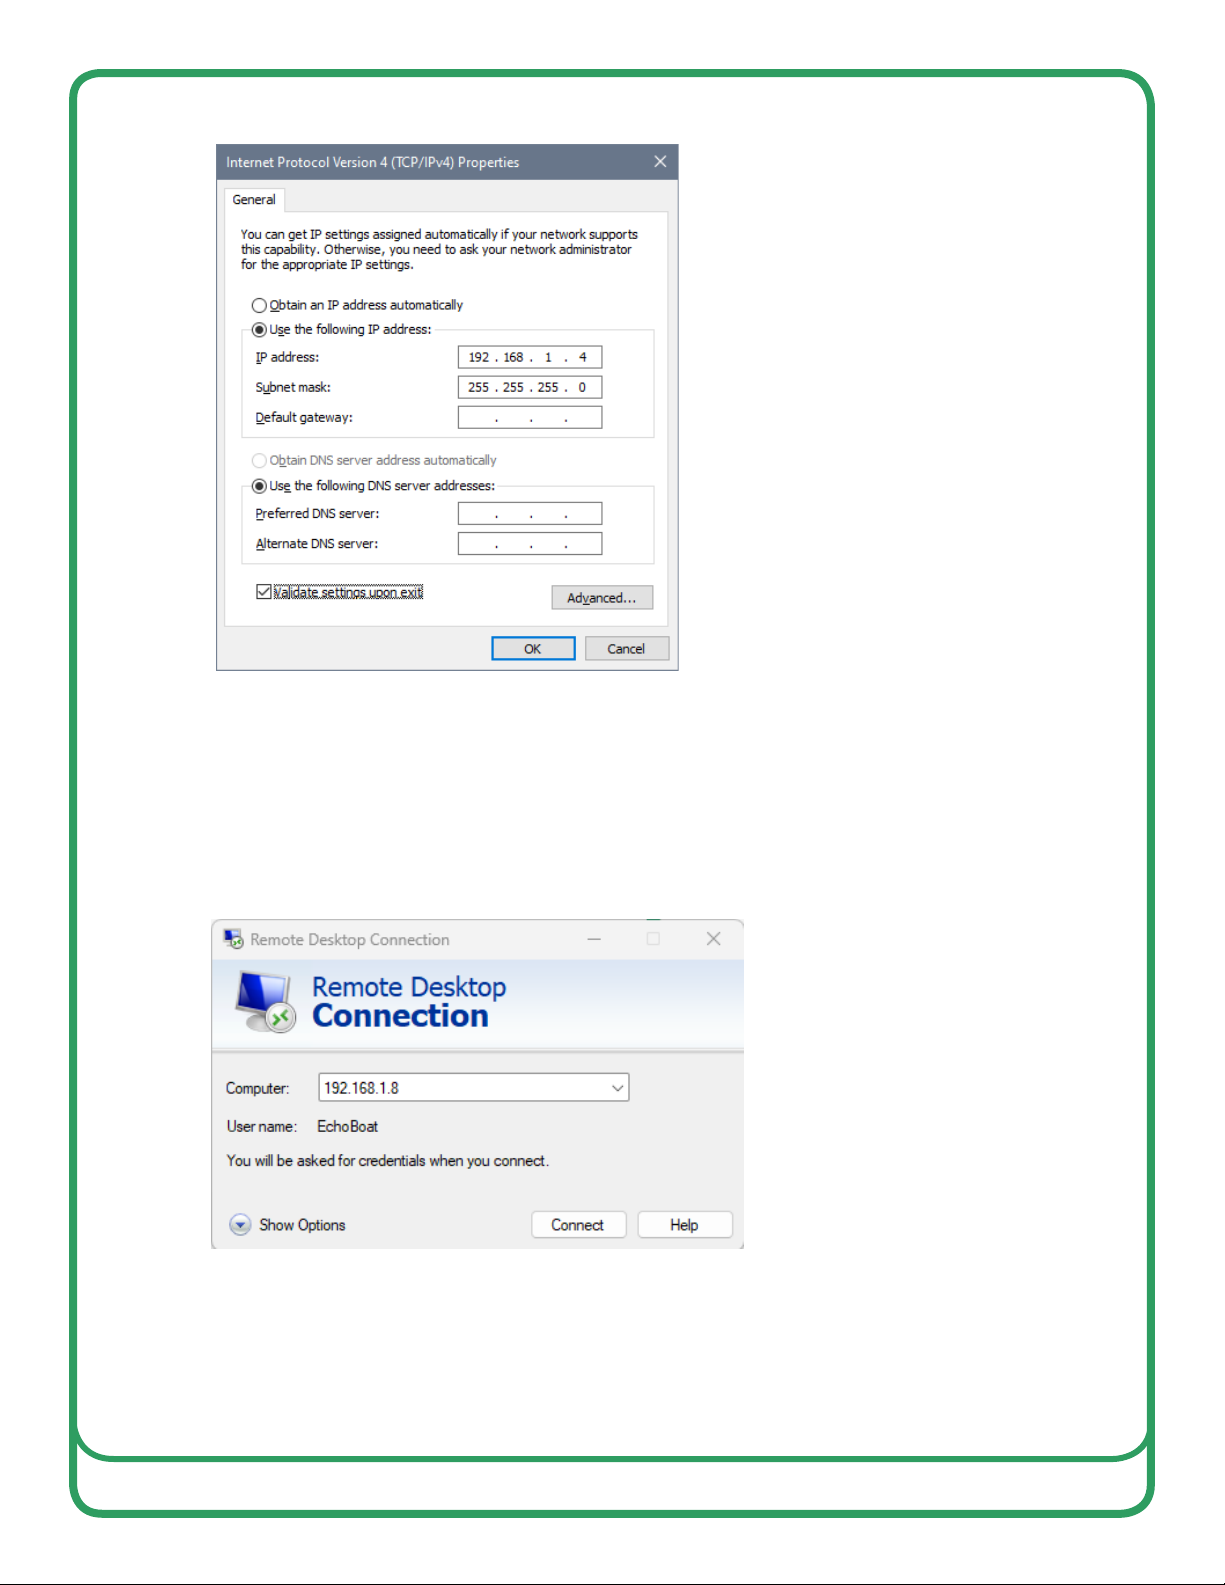
4. Highlight “Internet Protocol Version 4 (TCP/IPv4)” and click “Properties” (Figure 4).
Figure 5
5. Set the IP address and Subnet mask as shown in Figure 5.
6. Select “OK” and close all windows.
7. Using the Windows search bar type “Remote Desktop” and hit
enter.
8. Type in the IP address: 192.168.1.8 as shown in Figure 6
Figure 6
9. Make sure the Username to log in is “EchoBoat”
10. The password is “Seafloor” with a capital S.

Flight Plan
1. Click FLIGHT PLAN in Mission Planner on the control bar.
Page 19
Seafloor Systems, Inc. | [email protected] | +1(530) 677-1019
2. Find your survey area on the satellite map.
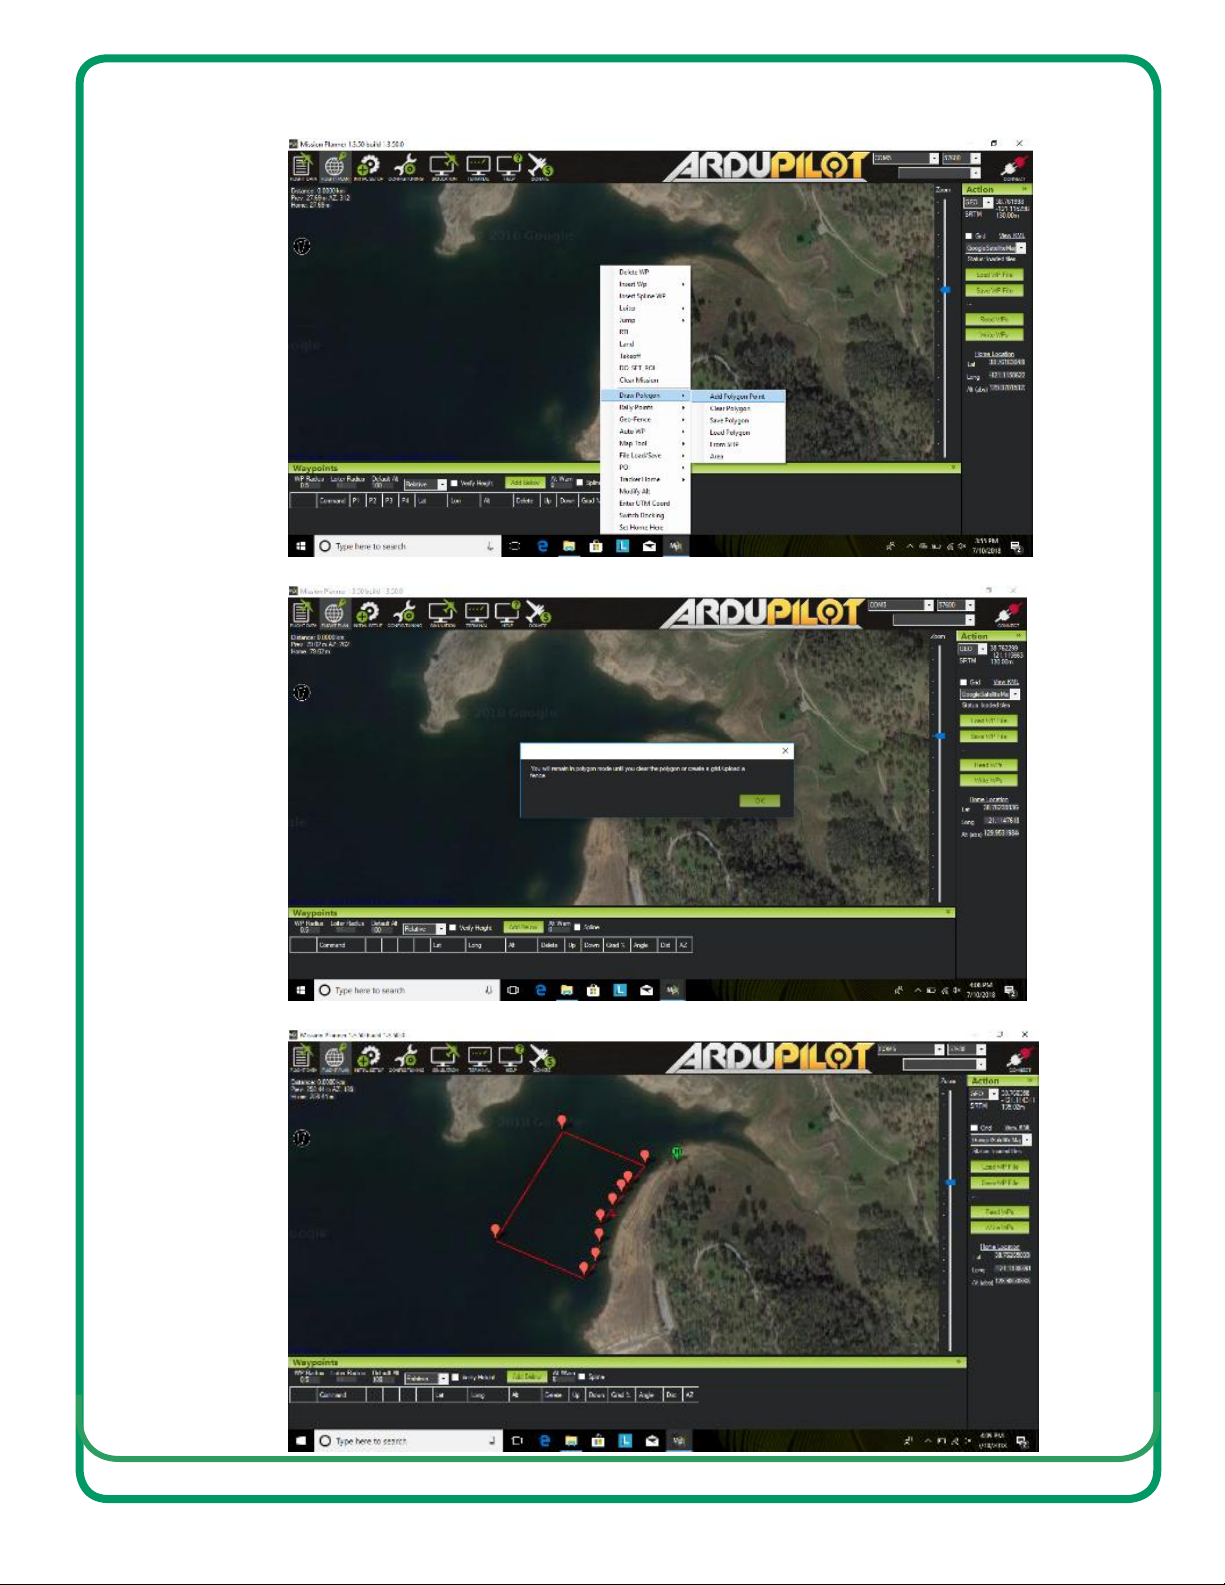
3. Right click Draw Polygon (Newer versions of Mission Planner have removed it and is now the
Polygon that is circled on the top far left. Click to enable, click again to disable)
a. Click Add Polygon (click OK through prompt)
Page 20
Seafloor Systems, Inc. | [email protected] | +1(530) 677-1019
b. Draw your survey area
This manual suits for next models
1
Table of contents
Other Seafloor Marine Equipment manuals

Seafloor
Seafloor TriDrone Programming manual

Seafloor
Seafloor EchoBoat-240 User manual

Seafloor
Seafloor HydroCat 180 User manual

Seafloor
Seafloor AutoNav PLUS User manual

Seafloor
Seafloor Sonarmite User manual

Seafloor
Seafloor HyDrone ASV User manual

Seafloor
Seafloor HydroLite-DFX User manual

Seafloor
Seafloor AutoNav User manual
Popular Marine Equipment manuals by other brands


Harken
Harken 3299 instructions

ALBIN PUMP
ALBIN PUMP Marine Defroster 9 kW Instructions for use

ACR Electronics
ACR Electronics Nauticast 2607 user manual

Skipper
Skipper GDS102 Operation and installation manual

mcmurdo
mcmurdo C1 S-VDR Service manual

Apollo
Apollo REACH WIRELESS RW1300-110APO quick start guide