manuals.online logo
Brands
  1. Home
  2. •
  3. Brands
  4. •
  5. Sealey
  6. •
  7. Lantern
  8. •
  9. Sealey CP1810 User manual

Sealey CP1810 User manual

INSTRUCTIONS FOR:
RECHARGEABLE LANTERN
Model: CP1810
Thank you for purchasing a Sealey product. Manufactured to a high standard this product will, if used according to these instructions and
properly maintained, give you years of trouble free performance.
IMPORTANT:PLEASE READ THESE INSTRUCTIONS CAREFULLY. NOTE THE SAFE OPERATIONAL
REQUIREMENTS, WARNINGS AND CAUTIONS. USE THIS PRODUCT CORRECTLY AND WITH CARE FOR THE
PURPOSE FOR WHICH IT IS INTENDED. FAILURE TO DO SO MAY CAUSE DAMAGE AND/OR PERSONAL INJURY
AND WILL INVALIDATE THE WARRANTY. PLEASE KEEP INSTRUCTIONS SAFE FOR FUTURE USE.
1. SAFETY INSTRUCTIONS
1.1. GENERAL
3Ensure the battery is correctly charged before initial use.
7DO NOT cover or block the lens during use.
7DO NOT shine directly into your eyes or the eyes of others (inc. animals).
7The lens can get hot. DO NOT touch the lens or stand the lantern
near any surface or item that may be adversely affected by the heat.
7DO NOT allow children to use the lantern.
7DO NOT use the lantern if you suspect that the battery or the lantern
casing is damaged.
7DO NOT handle lamp bulb with your fingers. Use a soft lint-free cloth.
3Ensure that the correct battery pack and bulb are used for replacements.
3When not in use, store the lantern and charger in a safe, dry,
childproof location.
1.2. BATTERY SAFETY INSTRUCTIONS
pWARNING! The battery pack contains nickel-cadmium, which is
dangerous. It must, therefore, be handled with care to avoid damage,
fire or corrosion which could lead to personal injury.
3Charge battery pack prior to first use. The battery pack will have been
shipped in a low charge state.
3Use only the charger provided to charge the battery pack.
7DO NOT charge the battery pack when room temperature is below 50OF
(10OC) or above 95OF (35OC).
7DO NOT attempt recharging the pack by means of an engine generator or a
DC power source.
7DO NOT short-circuit the battery pack by touching both terminals with a metal object, or your fingers etc.
7DO NOT store the battery pack (or lantern) in locations where the temperature may exceed 104OF(40OC) - such as
sheds, above heaters, or metal buildings in summer.
pWARNING! Dispose of spent battery pack correctly as it contains nickel-cadmium.
s
DANGER! DO NOT attempt to disassemble the battery pack. For safety and environmental reasons DO NOT
discard in domestic waste or by burning. ONLYdiscard or recycle according to local authority regulations.
pWARNING! DO NOT allow battery leakage to contact your skin or eyes, but if this does happen, take the following
action immediately:
a) Skin contact: Wash immediately with soap and water, then wash with either lemon juice or vinegar.
b) Eye contact: Wash eye with plenty of cold water and seek immediate medical attention.
1.3. MAINS POWER ELECTRICAL SAFETY (battery charger)
pWARNING! It is the owners responsibility to check the following:
You must check all electrical equipment and appliances to ensure they are safe before using. You must inspect
power supply leads, plugs and all electrical connections for wear and damage. You must ensure that the risk of
electric shock is minimised by the installation of appropriate safety devices. An RCCB (Residual Current Circuit
Breaker) should be incorporated in the main distribution board. CP1810 - 1 - 260303
We recommend that an RCD (Residual Current Device) is used with all electrical products. It is particularly important
to use an RCD with portable products that are plugged into a supply not protected by an RCCB. If in doubt consult
a qualified electrician. You may obtain an RCD by contacting your dealer. You must also read and understand the
following instructions concerning electrical safety.
1.3.1. The Electricity At Work Act 1989 requires all portable electrical appliances, if used on business premises,
to be tested by a qualified person, using a Portable Appliance Tester (PAT), at least once a year.
1.3.2. The Health & Safety at Work Act 1974 makes owners of electrical appliances responsible for the safe
condition of the appliance and the safety of the appliance operator. If in any doubt about electrical
safety, contact a qualified electrician.
1.3.3. DO ensure that the insulation on all cables and the product itself is safe before connecting to the mains
power supply. See 1.3.1. above and use a Portable Appliance Tester (PAT).
1.3.4. DO ensure that cables are protected against short circuit
and overload.
1.3.5. DO regularly inspect power supply leads, plugs and sockets
for wear, damage or loose connections.
1.3.6. DO check that the voltage marked on the product is the
same as the power supply to be used and check that all
fused plugs are fitted with the correct capacity fuses.
1.3.7. DO NOT pull or carry the charger by the lead.
1.3.8. DO NOT pull the plug from the socket by the lead.
1.3.9. DO NOT use worn or damaged cables, plugs or connectors.
Immediately have any faulty item repaired or replaced by
a qualified electrician. When a BS 1363/A UK 3 pin plug is
damaged, cut the cable just above the plug and dispose
of the plug safely.
Fit a new plug according to the following instructions (UK only). The charger is double insulated and there
is no earth core.
a) Connect the BROWN live wire to the live terminal L.
b) Connect the BLUE neutral wire to the neutral terminal N.
c) After wiring, check that there are no bare wires, that all wires have been correctly connected, that
the cable outer insulation extends beyond the cable restraint and that the restraint is tight.
1.4. BATTERY CHARGER SAFETY INSTRUCTIONS
pWARNING! DO NOT attempt to charge any battery other than that specified. Other types of battery may explode!
3All mains electrical supply safety features must be followed as described in Section 1.3. above.
3Disconnect the charger from the mains power supply when not in use.
7DO NOT expose the charger to damp or wet conditions.
7DO NOT pull or carry the charger by the power lead.
7DO NOT operate the charger if it has been dropped, or has received a sharp knock, or is damaged. Take charger
to an authorised agent.
7DO NOT dismantle the charger as this may cause damage and/or personal injury and will invalidate your warranty.
7DO NOT insert foreign objects into the hole reserved for the battery pack.
7DO NOT recharge a second battery pack immediately after charging the first. Consecutive charging will overheat
the charger. Allow the unit to cool for 15 minutes before charging the next pack.
7DO NOT attempt to connect two chargers together.
3Store the charger in the same manner as the battery pack, see Section 1.2.
2. INTRODUCTION & OPERATION
2.3. BATTERY CHARGING
p
p
WARNING! Ensure that you read, understand and apply the safety instructions relating to the battery
and charger before use.
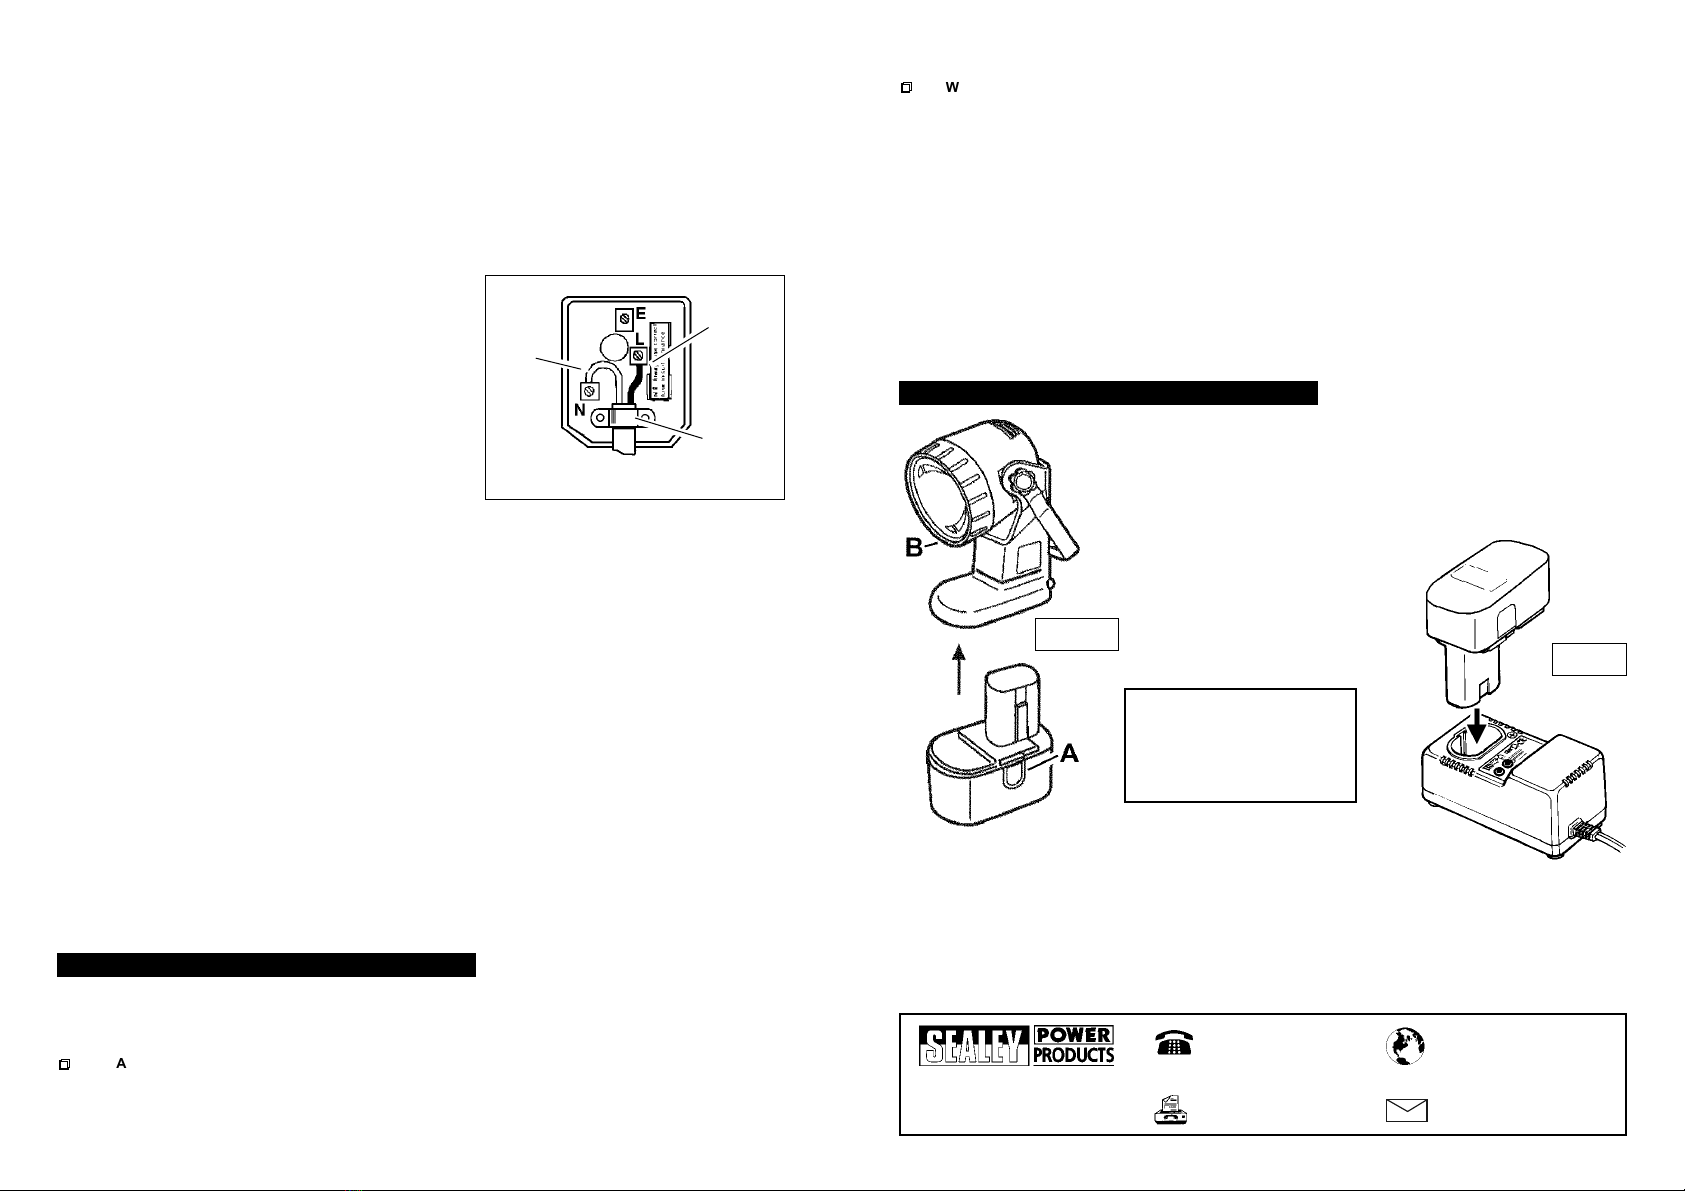
1. Remove the battery from the lantern by depressing the two latch buttons (fig. 1.A).
2. Insert battery into the charger (as supplied with the CP2018VHK Cordless Hammer Drill). Note that the
battery will only fit one way round - DO NOT use force. See fig. 2.
3. Plug the charger into the mains supply and switch on.
4. The red LED on the charger will illuminate to indicate that the battery is being charged. When the battery
is fully charged (approx. 1 hour) the green LED will illuminate.
5. Switch offthe mains supply to the charger. Remove the battery from the charger and refit it to the lantern.
6. Store the charger in a safe, dry location.
Notes: a) Battery packs are shipped in a low charge state. They take longer to charge initially, and several subsequent
charges may also take a little longer, than when they reach optimum performance.
b) A fully charged battery will last for approximately two hours.
c) There is no need to fully discharge the battery before recharging.
3.1. CHANGING THE LANTERN BULB
pWARNING! Ensure that lantern is turned off and the lens has cooled
prior to changing the bulb.
1. Unscrew the lens ring (fig. 1.B) and remove ring, lens and reflector as one.
2. Pull the failed bulb from the bulb holder.
3. Hold the new bulb with a lint-free cloth (do not touch the bulb directly)
and push it into bulb holder.
3. MAINTENANCE
PARTS FOR: CP1810
RECHARGEABLE LANTERN
Part No. Description
CP1810/B Bulb, 18V 10W
CB18/99 Battery Pack
CP9918VHK/32 Mains Charger
CP1810 - 1 - 260303
fig. 2
fig. 1
2.1. INTRODUCTION
The CP1810 Halogen Lantern is powered by a sealed, rechargeable, 18 volt Ni-Cad battery pack as supplied
with the CP2018VHK Cordless Hammer Drill. The battery and battery charger are not supplied with this lantern.
2.2. OPERATION
p
p
WARNING! Ensure you read and understand the safety instructions before using the lantern or charger.
1. Charge the battery before use (para. 2.3).
2. Turn lantern On and Off by the switch on the main body.
3. The lantern has an adjustable carrying handle.
FUSE RATING 3 AMP
Blue
Neutral
Wire
Cable
Restraint
Brown
Live
Wire
Sole UK Distributor,
Sealey Group,
Bury St. Edmunds, Suffolk.
01284 757500
sales@sealey.co.uk
www.sealey.co.uk
01284 703534
NOTE: It is our policy to continually improve products and as such we reserve the right to alter data, specifications
and component parts without prior notice.
IMPORTANT: No liability is accepted for incorrect use of this equipment.
WARRANTY: Guarantee is 12 months from purchase date, proof of which will be required for any claim.
INFORMATION: For a copy of our latest catalogue and promotions call us on 01284 757525 and leave your full
name and address, including postcode.
Web
e-mail

Other Sealey Lantern manuals

Sealey LED181 User manual

Sealey

Sealey LED181 User manual

Sealey ML18/36.V3 User manual

Sealey

Sealey ML18/36.V3 User manual

Sealey AK435 User manual

Sealey

Sealey AK435 User manual

Sealey LED026EU User manual

Sealey

Sealey LED026EU User manual

Sealey LED3607G User manual

Sealey

Sealey LED3607G User manual

Sealey ML111.V2 User manual

Sealey

Sealey ML111.V2 User manual

Sealey LED026 User manual

Sealey

Sealey LED026 User manual

Sealey LED3606 Series User manual

Sealey

Sealey LED3606 Series User manual

Sealey LED439 User manual

Sealey

Sealey LED439 User manual

Sealey AK3306 User manual

Sealey

Sealey AK3306 User manual

Sealey LED136 User manual

Sealey

Sealey LED136 User manual

Sealey AK433.V2 User manual

Sealey

Sealey AK433.V2 User manual

Popular Lantern manuals by other brands

BEGA 77 148 Instructions for use

BEGA

BEGA 77 148 Instructions for use

Finelite HP-6 Recessed Flush Diffuser Tech Zone 6"... installation instructions

Finelite

Finelite HP-6 Recessed Flush Diffuser Tech Zone 6"... installation instructions

DW Windsor Sofia installation instructions

DW Windsor

DW Windsor Sofia installation instructions

esotec Stone 40 Using instructions

esotec

esotec Stone 40 Using instructions

Intelight ORION LED Installation and maintenance instructions

Intelight

Intelight ORION LED Installation and maintenance instructions

Fiberli AC5N installation guide

Fiberli

Fiberli AC5N installation guide

BEGA 33 880 Instructions for use

BEGA

BEGA 33 880 Instructions for use

Visual Comfort & Co. Elsinore Bracket Lantern Assembly instructions

Visual Comfort & Co.

Visual Comfort & Co. Elsinore Bracket Lantern Assembly instructions

AEG BFL18X instructions

AEG

AEG BFL18X instructions

Portfolio Outdoor LWS20325J1 manual

Portfolio Outdoor

Portfolio Outdoor LWS20325J1 manual

ROBLAN VIASOL installation manual

ROBLAN

ROBLAN VIASOL installation manual

LUG MEDICA 2.0 TUNABLE WHITE Installation instruction

LUG

LUG MEDICA 2.0 TUNABLE WHITE Installation instruction

Acuity 247 Series installation instructions

Acuity

Acuity 247 Series installation instructions

Lucci LEDlux 240780 installation instructions

Lucci LEDlux

Lucci LEDlux 240780 installation instructions

Home & Lighting 60W Solar Street Light 6000 Lumens instruction manual

Home & Lighting

Home & Lighting 60W Solar Street Light 6000 Lumens instruction manual

ESP Duceri EMDLED3WMBULK2 manual

ESP

ESP Duceri EMDLED3WMBULK2 manual

Sistemalux Continuous Line S.7006 Installation sheet

Sistemalux

Sistemalux Continuous Line S.7006 Installation sheet

Teknoware Trail TWTC151WK installation guide

Teknoware

Teknoware Trail TWTC151WK installation guide

manuals.online logo
manuals.online logoBrands
  • About & Mission
  • Contact us
  • Privacy Policy
  • Terms and Conditions

Copyright 2025 Manuals.Online. All Rights Reserved.