manuals.online logo
Brands
  1. Home
  2. •
  3. Brands
  4. •
  5. Sealey
  6. •
  7. Lifting System
  8. •
  9. Sealey 1250CX User manual

Sealey 1250CX User manual

2.1. All Models
2.1.1. Line up the holes in the two-piece handle and fasten with the assembly screw.
2.1.2. Loosen location bolt at the side of the handle base. Insert jack handle and tighten the bolt.
2.2. Model 3030CXD only
Assemble rocket-lift foot pedal arm to main lift arm support pin (fig. 1) and tighten assembly
screw.
Models: 1250CX, 2050CXL, 3000CXD & 3030CXD
Ensure that the jack is in sound condition and good working order. Take action for immediate
repair or replacement of damaged parts. Use recommended parts only. Unapproved parts may be
dangerous and will invalidate the warranty.
Locate the jack in an adequate, well lit work area.
Keep work area clean and tidy and free from unrelated materials.
Use jack on level and solid ground, preferably concrete. Avoid tarmacadam as jack may sink in.
Place wedges under the wheels of the vehicle but ensure that the wheels of the jack can move freely.
Ensure that the vehicle handbrake is engaged and switch off the engine.
Ensure a minimum distance of 0.5m between vehicle tilt and static objects such as doors, walls, etc.
Ensure all non-essential persons keep a safe distance whilst the jack is in use.
Ensure that there are no passengers in the vehicle to be jacked up.
Place jack under vehicle manufacturer’s recommended lifting points (see vehicle handbook).
Check that the lifting point is stable and centred on the jack saddle.
 Ensure that the jack wheels are free to move and that there are no obstructions.
 IMPORTANT! During the jacking operation ensure that you can always see the vehicle-to-jack
saddle contact point.
 DANGER! Use the Jack for lifting only, NOT for supporting the lifted load.
Use correctly rated axle stands under the vehicle before proceeding with any task.
 Ensure that there are no persons or obstructions beneath the vehicle before lowering.
Use a qualified person to lubricate and maintain the jack.
 Confirm that the recommended hydraulic jack oil is used during maintenance.
 DO NOT operate the jack if it is damaged.
 DO NOT allow untrained persons to operate the jack.
 DO NOT exceed the rated capacity of the jack.
 DO NOT allow the vehicle to move during lifting and/or lowering.
 DO NOT use the jack to move vehicle.
 DO NOT jack vehicle if it may result in spillage of fuel, battery acid, or other dangerous substance.
 DO NOT work under the vehicle until axle stands have been correctly positioned.
 DO NOT use the jack for purposes other than which it is intended.
 DO NOT top up system with brake fluid. Use hydraulic jack oil only.
 DO NOT adjust the safety overload valve.
 When not in use store jack in a safe, dry, child proof area in the ‘down’ position.
INSTRUCTIONS FOR:
TROLLEY JACKS
Your new Trolley Jack is produced and manufactured to a high standard of dependability, and if correctly cared for, will give you years of trouble
free performance.
IMPORTANT: READ THESE INSTRUCTIONS CAREFULLY. NOTE THE SAFE OPERATIONAL REQUIREMENTS, WARNINGS AND CAUTIONS.
USE THIS JACK CORRECTLY AND WITH CARE FOR THE PURPOSE FOR WHICH IT IS INTENDED. FAILURE TO DO SO MAY CAUSE DAMAGE
AND/OR PERSONAL INJURY AND WILL INVALIDATE THE WARRANTY. RETAIN THESE INSTRUCTIONS FOR FUTURE USE.
1. SAFETY PRECAUTIONS
2. ASSEMBLY
3.1. Before first use
Before using the jack, purge the hydraulic circuit, in order to eliminate any air in the system,
by turning the handle anti-clockwise to open, and pumping 8 or 9 times (fig. 2).
3.2. Jacking
WARNING! Before lifting ensure that Section 1 safety instructions are strictly followed.
3.2.1. Prepare the vehicle as described in the safety instructions, ensuring that the ground on which
the jack is to stand is level and solid (not tarmacadam).
3.2.2. Position the jack saddle under the vehicle manufacturer’s recommended lifting point.
3.3. Rocket Lift Pedal - Model 3030CXD only
Note: You can use your Rocket Lift jack as a standard trolley jack with out the Rocket Lift pedal. If this is your intention please
ignore references to the Rocket Lift pedal in the following instructions.
There are two methods of operating the Rocket Lift mechanism to raise the jack swiftly to the designated vehicle lifting point.
3.3.1. Turn the jack handle clockwise until the release valve is closed. Depress the Rocket Lift pedal (fig. 1) and the saddle will rise and stop
once contact is made with the vehicle lifting point. The saddle will then drop back about 60mm.
3.3.2. Alternatively, turn handle to the left so the release valve is open, operate the foot pedal (fig. 1) until saddle is at desired height and then
close the valve quickly. This will avoid the saddle “dropping back”.
3. OPERATING INSTRUCTIONS fig. 2
Model 1250CX Specification
Capacity ...............2Tons
Min. Saddle Height ......132mm
Max. Saddle Height .....440mm
Max. Chassis Height.....135mm
Length .........540mm
Weight..................21kg
Model 2050CXL Specification
Capacity .............2.25Tons
Min. Saddle Height ......130mm
Max. Saddle Height .....500mm
Max. Chassis Height.....154mm
Length .........610mm
Weight..................33kg
Model 3000CXD Specification
Capacity ...............3Tons
Min. Saddle Height ......145mm
Max. Saddle Height .....490mm
Max. Chassis Height.....154mm
Length ........685mm
Weight..................42kg
Model 3030CXD Rocket Lift
Specification
Capacity ...............3Tons
Min. Saddle Height ......145mm
Max. Saddle Height .....490mm
Max. Chassis Height.....154mm
Length ..........
685mm
Weight..................43kg
Model: 3030CXD only
fig. 1
Original Language Version 1250CX, 2050CXL, 3000CXD, 3030CXD Issue: 2 - 20/10/09
3.4. Jacking
Weight Distribution
Up to 80% of the lifted load is carried by the front jack wheels, placing exceptional stress on the point of contact with the supporting
floor. For this reason use on a hard level concrete surface only.
3.4.1. Turn the handle clockwise to close the valve and commence pumping the handle up and down using maximum strokes until the vehicle
reaches the working height.
Note: If the jack becomes overloaded, a safety excess pressure valve will open, and stop the vehicle from lifting further.
3.5. Lowering
3.5.1. The lowering speed is controlled by the amount you turn the handle. Lower carefully, avoiding sudden release.
 WARNING! Ensure that there are no persons or obstacles beneath the vehicle, or in the path of its descent.
5. TROUBLE SHOOTING
PROBLEM POSSIBLE CAUSE REMEDY
Jack will not lift
the load
Jack does not lift
high enough or
feels “spongy”
Jack lifts poorly
Jack lifts but will
not hold load
Jack will not lower
completely
Jack does not
lower at all
1) Be sure to use jack with adequate capacity.
2) Top up oil level.
3) Check and close release valve.
4) Open release valve and air vent (if fitted) and pump the handle a few times. Close valve and re-try.
5) Clean and replace oil.
6) Replace packing.
1) Fill or remove excess oil.
2) Return jack to local service agent.
3) Open release valve and air vent (if fitted) and pump the handle a few times. Close valve and re-try.
4) Check and close release valve.
1) Replace packing and/or clean valves.
2) Replace oil.
3) Open release valve and air vent (if fitted) and pump the handle a few times. Close valve and re-try.
1) Check and close release valve.
2) Lower jack, close release valve. Place foot on front wheel and pull up lifting arm to its full height by hand.
Open the release valve to lower arm.
3) Open release valve and air vent (if fitted) and pump the handle a few times. Close valve and re-try.
4) Replace packing or contact local service agent.
5) Replace packing.
1) Oil all external moving parts.
2) Replace rod or contact local service agent.
3) Replace damaged parts or contact local service agent.
4) Open release valve and air vent (if fitted) and pump the handle a few times. Close valve and re-try.
5) Check and fully open release valve.
6) Replace spring or contact local service agent.
1) Check and fully open release valve.
1) Overloaded
2) Oil level low
3) Release valve not correctly closed
4) Air in system
5) Piston rod not functioning
6) Packing worn or defective
1) Oil level too high or too low
2) Worn seals
3) Air in system
4) Release valve not closed
1) Pump packing or valves malfunctioning
2) Oil is dirty
3) Air in the system
1) Release valve partially open
2) Dirt on valve seats
3) Air in system
4) Faulty seals
5) Packing worn or defective
1) Unit requires lubrication
2) Piston rod bent or damaged
3) Jack frame/link system distorted due
to overloading/poor positioning
4) Air in system
5) Release valve partially open
6) Jack spring damaged
1) Release valve still closed
IMPORTANT! Only fully qualified personnel should attempt maintenance or repair.
4.1. When the jack is not in use, the ram and the handle socket should be in their lowest positions to minimise
corrosion. Remove the handle to deactivate the jack.
4.2. Keep the jack clean and lubricate all moving parts with a good quality oil on a regular basis.
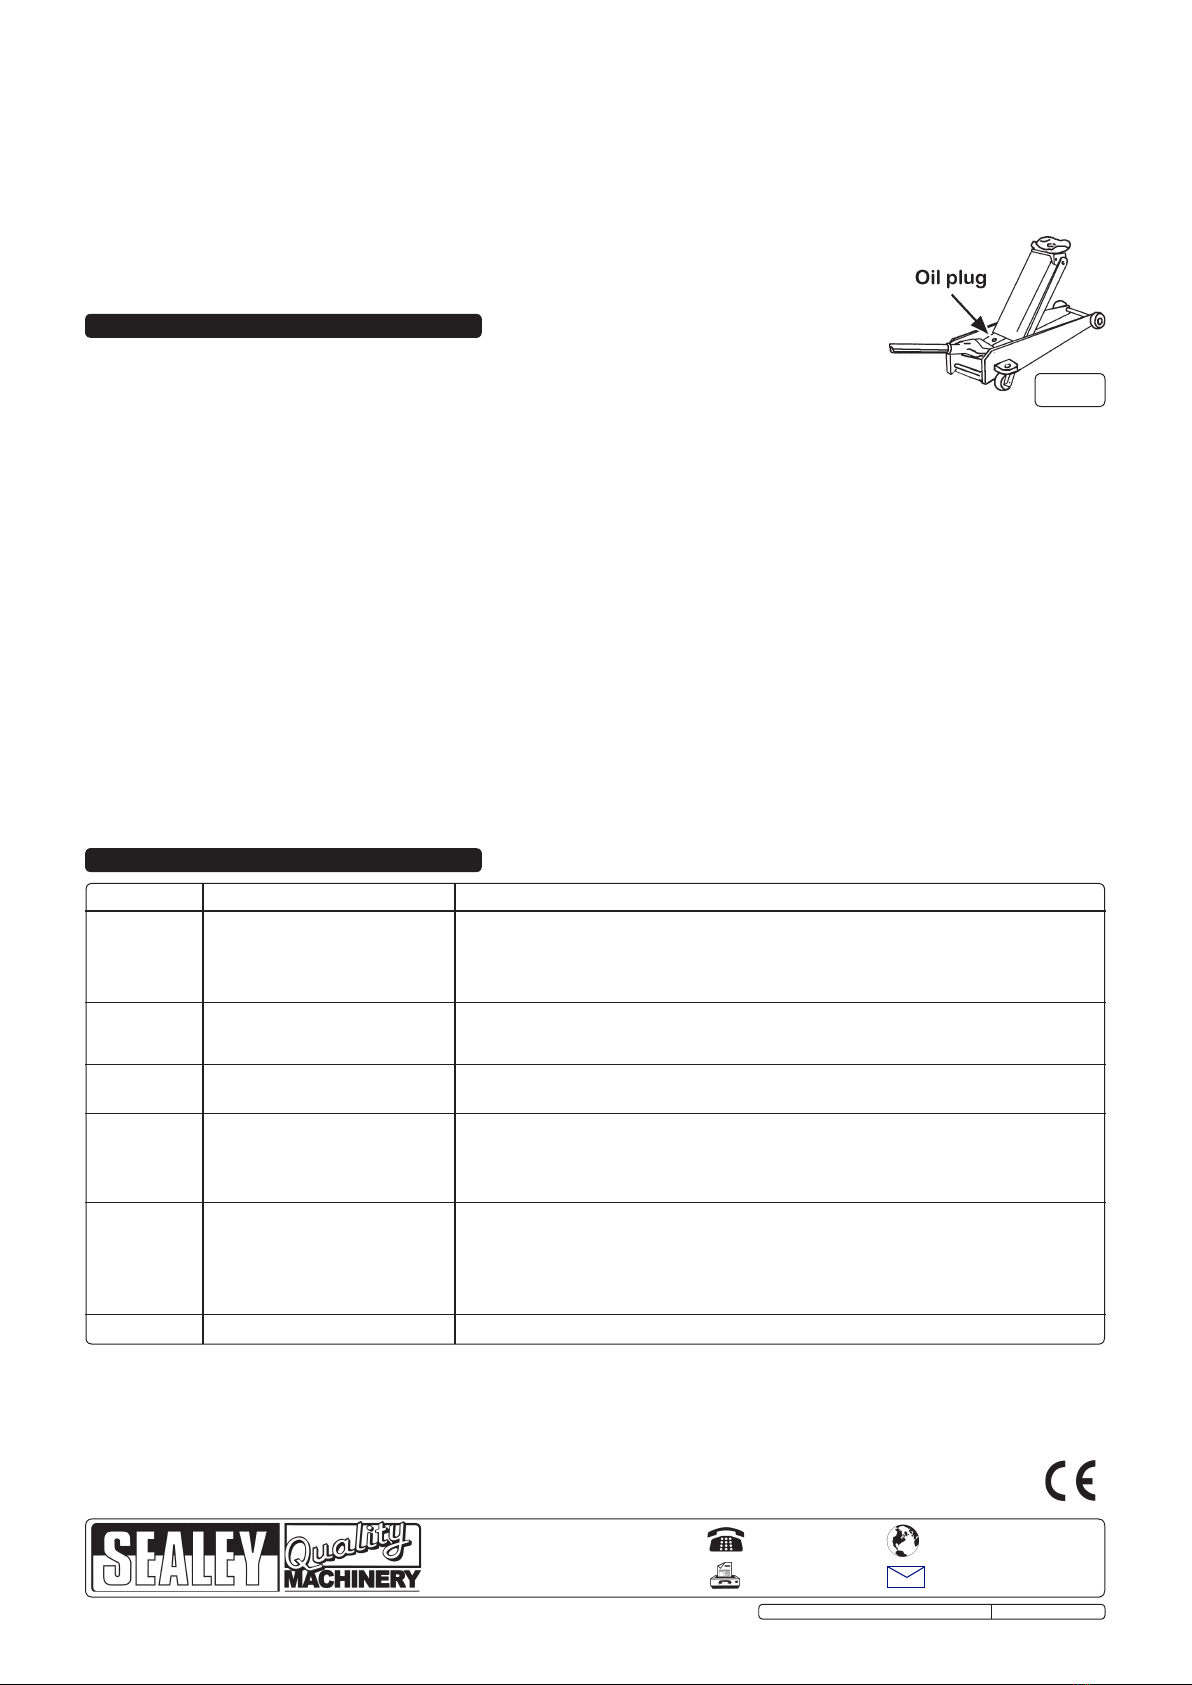
4.3. To check the hydraulic oil level, fully lower the jack and remove filler plug (fig. 3). The correct oil level should be approximately 5mm
below the filler opening. If oil level is low, fill as required. Pump unloaded jack 5 or 6 times to expel air and then refit plug.
Note: Use a good quality jack oil, such as SEALEY HYDRAULIC JACK OIL.
WARNING! DO NOT use brake fluid, or any fluid other than hydraulic jack fluid as this may cause serious damage to the jack and will
invalidate the warranty!
4.4. Before each use, check for broken, cracked, bent, or loose parts, or any visible damage to welds, ram, pump, saddle, lifting arm, frame
and all parts including nuts, bolts, pins and other fasteners. If any suspect item is found, remove jack from service and take necessary
action to remedy the problem.
DO NOT use the jack if it is believed to have been subjected to abnormal load or shock. Inspect and take appropriate action.
4.5. Every three months remove the locking rings on the caster wheels and lubricate the ball bearings with grease.
4.6. After a year of extensive use, the oil should be replaced in order to extend the life of your equipment. To drain the oil, remove the filler
cap and valve. Make sure that no dirt is allowed to enter the hydraulic system. See 4.3. for refill instructions.
4.7. Periodically check the pump piston and piston rod for signs of corrosion. Clean exposed areas with a clean oiled cloth.
IMPORTANT: NO RESPONSIBILITY IS ACCEPTED FOR INCORRECT USE OF THE MACHINE.
Hydraulic products are only repaired by local service agents. We have service/repair agents in all parts of the UK.
DO NOT RETURN JACKS TO US. Please telephone us on 01284 757500 to obtain the address and telephone number of your local agent.
If the jack is under guarantee please contact your dealer.
De-commissioning
If the jack becomes completely unserviceable, draw off the oil into an approved container and dispose of the jack and the oil according to local
regulations.
4. MAINTENANCE
fig. 3
NOTE: It is our policy to continually improve products and as such we reserve the right to alter data, specifications and component parts without prior notice.
IMPORTANT: No liability is accepted for incorrect use of this product.
WARRANTY: Guarantee is 12 months from purchase date, proof of which will be required for any claim.
INFORMATION: For a copy of our latest catalogue and promotions call us on 01284 757525 and leave your full name and address, including postcode.
01284 757500
01284 703534
sales@sealey.co.uk
Sole UK Distributor, Sealey Group,
Kempson Way, Suffolk Business Park,
Bury St. Edmunds, Suffolk,
IP32 7AR
www.sealey.co.uk
Web
email
Original Language Version 1250CX, 2050CXL, 3000CXD, 3030CXD Issue: 2 - 20/10/09
1250CX,
2050CXL,
3000CXD &
3030CXD

This manual suits for next models

3

Other Sealey Lifting System manuals

Sealey EVBT700 User manual

Sealey

Sealey EVBT700 User manual

Sealey MR1.V2 User manual

Sealey

Sealey MR1.V2 User manual

Sealey MC680A User manual

Sealey

Sealey MC680A User manual

Sealey ES502.V2 User manual

Sealey

Sealey ES502.V2 User manual

Sealey MC401.V3 User manual

Sealey

Sealey MC401.V3 User manual

Sealey WCR02 User manual

Sealey

Sealey WCR02 User manual

Sealey DH02 User manual

Sealey

Sealey DH02 User manual

Sealey MC365A User manual

Sealey

Sealey MC365A User manual

Sealey WD80 User manual

Sealey

Sealey WD80 User manual

Sealey Quality MACHINERY MC402.V3 User manual

Sealey

Sealey Quality MACHINERY MC402.V3 User manual

Sealey MT680.V3 User manual

Sealey

Sealey MT680.V3 User manual

Sealey MC680A User manual

Sealey

Sealey MC680A User manual

Sealey WD80 User manual

Sealey

Sealey WD80 User manual

Sealey MC365A.V2 User manual

Sealey

Sealey MC365A.V2 User manual

Sealey FLR680T User manual

Sealey

Sealey FLR680T User manual

Sealey AK9894 User manual

Sealey

Sealey AK9894 User manual

Sealey MC500 User manual

Sealey

Sealey MC500 User manual

Sealey HPT300 User manual

Sealey

Sealey HPT300 User manual

Sealey MT680 User manual

Sealey

Sealey MT680 User manual

Sealey MT680.V4 User manual

Sealey

Sealey MT680.V4 User manual

Sealey MT500 User manual

Sealey

Sealey MT500 User manual

Sealey Quality MACHINERY MC550 User manual

Sealey

Sealey Quality MACHINERY MC550 User manual

Sealey MC401A User manual

Sealey

Sealey MC401A User manual

Sealey FCR500 User manual

Sealey

Sealey FCR500 User manual

Popular Lifting System manuals by other brands

RITE-HITE RHE3 owner's manual

RITE-HITE

RITE-HITE RHE3 owner's manual

Dino lift 135T Maintenance instructions

Dino lift

Dino lift 135T Maintenance instructions

Terrier TVK owner's manual

Terrier

Terrier TVK owner's manual

Bolton Tools HP-L4G Installation, operation & maintenance manual

Bolton Tools

Bolton Tools HP-L4G Installation, operation & maintenance manual

Smart Lift SL 400 Skylifter instruction manual

Smart Lift

Smart Lift SL 400 Skylifter instruction manual

Pro-Lift PL5500 Operating instructions & parts manual

Pro-Lift

Pro-Lift PL5500 Operating instructions & parts manual

Palfinger ILU 40 INSTALLATION MANUAL & CHECK-OFF SHEET

Palfinger

Palfinger ILU 40 INSTALLATION MANUAL & CHECK-OFF SHEET

Sumner 2300 Series Operator's manual

Sumner

Sumner 2300 Series Operator's manual

unicraft K 1001 operating instructions

unicraft

unicraft K 1001 operating instructions

Harsh HS10T Operator's manual

Harsh

Harsh HS10T Operator's manual

CMC Boardlift CM70 SG instructions

CMC

CMC Boardlift CM70 SG instructions

Sinoboom GTJZ0408SE parts manual

Sinoboom

Sinoboom GTJZ0408SE parts manual

BLUM AVENTOS HF quick guide

BLUM

BLUM AVENTOS HF quick guide

Terex TA50RT Operator's manual

Terex

Terex TA50RT Operator's manual

Manitou MI-X 50L D C ST3A S2 Operator's manual

Manitou

Manitou MI-X 50L D C ST3A S2 Operator's manual

Zepro Z 1500-135 installation instructions

Zepro

Zepro Z 1500-135 installation instructions

Hy-Brid Lifts HB-1230CE MAINTENANCE & TROUBLESHOOTING MANUAL

Hy-Brid Lifts

Hy-Brid Lifts HB-1230CE MAINTENANCE & TROUBLESHOOTING MANUAL

Jula Hamron 334-013 User instructions

Jula

Jula Hamron 334-013 User instructions

manuals.online logo
manuals.online logoBrands
  • About & Mission
  • Contact us
  • Privacy Policy
  • Terms and Conditions

Copyright 2025 Manuals.Online. All Rights Reserved.