manuals.online logo
Brands
  1. Home
  2. •
  3. Brands
  4. •
  5. Sealey
  6. •
  7. Power Screwdriver
  8. •
  9. Sealey cp12035v.v2 User manual

Sealey cp12035v.v2 User manual

1.1 GENERAL SAFETY.
 Disconnect the battery from the drill unit before changing
accessories, servicing or performing any maintenance.
 Maintain the drill and battery in good condition. Check moving
parts alignment on a regular basis.
Replace or repair damaged parts. Use an authorised service
agent and recommended parts only. Unauthorised parts may
be dangerous and will invalidate the warranty.
 Ensure the drill is switched off before installing the battery pack.
Keep the drill and charger clean for best and safest performance.
Remove ill fitting clothing. Remove ties, watches, rings and
other loose jewellery and contain long hair.
 Evaluate your working area before using the drill e.g. ceiling,
floors and enclosures may contain electrical items or water piping.
 Ensure battery pack is correctly inserted into the drill handle
and latched in place before attempting to switch on drill.
 Secure loose workpieces with a clamp, vice or other adequate
holding device.
 Avoid unintentional starting.
 Wear approved safety eye protection (standard spectacles are
not adequate).
 Maintain correct balance and footing. Ensure the floor is not
slippery and wear non-skid shoes.
 Be aware that this drill does not need to be plugged into the
mains power.
 Keep chuck direction switch in the locked position until the drill
is required for use.
Keep children and unauthorised persons away from the
working area.
 DO NOT use the drill where there are flammable liquids, solids
or gases, such as paint solvents, etc.
 DO NOT allow children to operate the drill.
 DO NOT operate the drill if any parts are missing as this may
cause failure or possible personal injury.
 DO NOT hold unsecured workpiece in your hand.
 DO NOT leave the drill operating whilst unattended.
 DO NOT carry the drill with your finger on the power switch.
Keep chuck direction switch in the locked position.
 DO NOT use the drill for a task it is not designed to perform.
 DO NOT operate the drill when you are tired or under the
influence of alcohol, drugs or intoxicating medication.
 DO NOT get the drill or battery charger wet or use in damp or
wet locations.
Keep drill and charger in the case and store in a safe, dry,
childproof area where the temperature will not exceed 104°F
(40°C).
1.2 BATTERY SAFETY INSTRUCTIONS.
 WARNING! Battery contains nickel-cadmium which is dangerous.
Handle with care to avoid damage, fire, corrosion or personal
injury.
Charge battery prior to its first use. The battery pack will have
been shipped in a low charge state.
Use only the charging base provided to charge the drill battery.
 DO NOT charge battery when room temperature is below 50°F
(10°C) or above 104°F (40°C).
 DO NOT attempt recharging the battery by means of an engine
generator or a DC power source.
 DO NOT short-circuit the battery by linking both terminals with
a metal object, or your fingers etc.
 DO NOT store the battery (or drill) in locations where the
temperature may exceed 104°F (40°C) such as outside sheds,
above heaters, or metal buildings in summer.
 WARNING! Dispose of spent batteries correctly as they
contain nickel-cadmium. DANGER! DO NOT attempt to
disassemble the battery pack. For safety and environmental
reasons DO NOT discard in domestic waste or by burning.
ONLY discard or recycle according to local authority regulations.
 WARNING! DO NOT allow a leaking battery to contact your
person. If you come into contact with battery liquid take the
following immediate action:
a) Skin contact: Wash immediately with soap and water,
then wash flesh in either lemon juice or vinegar.
 b) Eye contact: Wash with a strong solution of boric acid,
and seek immediate medical attention.
1.3 ELECTRICAL SAFETY.
REGARDING DIRECT MAINS POWER USE WITH THE
CHARGING BASE AND TRANSFORMER PLUG ONLY.
 WARNING! It is the owner’s responsibility to read, understand
and comply with the following electrical instructions:
You must ensure the risk of electric shock is minimised by the
installation of appropriate safety devices. An RCCB (Residual
Current Circuit Breaker) should be incorporated in the main
distribution board. We also recommend that an RCD (Residual
Current Device) is used with all electrical products, particularly
portable equipment which is plugged into an electrical supply
not protected by an RCCB.You must also read and understand
the following instructions concerning electrical safety.
1.3.1 The Electricity At Work Act 1989 requires all portable
electrical appliances, if used on business premises, to be
tested by a qualified electrician, using a Portable
Appliance Tester (PAT), at least once a year.
1.3.2 The Health & Safety at Work Act 1974 makes owners of
electrical appliances responsible for the safe condition of the
appliance, and the safety of the appliance operator. If in any
doubt about electrical safety, contact a qualified electrician.
1.3.3 You must ensure that you:
Inspect the transformer plug, cable, adaptor and the charging
base for wear and damage to ensure items are safe before
connecting to the mains power supply. If worn or damaged DO
NOT use. Immediately replace or contact a qualified electrician.
Check cables are always protected against short circuit and
overload.
Important: Check that the voltage marked on the transformer
plug is the same as the power supply to be used.
Uncoil the power cable between the transformer and the
charging base before use.
 DO NOT pull or carry the charging base by the transformer power
lead, or pull the transformer plug from the mains socket by the
power lead.
 DO NOT use any other type of transformer with the charging base.
 DO NOT place the power connector into any area of charging
base except the correct socket (beneath the green power light
bulb).
 DO NOT try to open or dis-assemble the transformer plug or
charging base.
 DO NOT use the transformer plug to power any other electrical
item.
 DO NOT get the transformer wet, or use in wet, damp
conditions (for indoor use only).
 WARNING!NEVER substitute a standard 13Amp 3 pin plug, or
any other type of plug, for the transformer plug.
1.4 BATTERY CHARGING BASE SAFETY INSTRUCTIONS.
 WARNING! DO NOT use the charging base to charge any
battery other than that supplied for the drill. Other types of
batteries may explode!
1. SAFETY INSTRUCTIONS
cordless drill/drivers
INSTRUCTIONS FOR MODEL NOS:
CP12035V.V2 (12V)
CP18035V.V2 (18V)
Thank you for purchasing a Sealey product. Manufactured to a high standard this product
will, if used according to these instructions and properly maintained, give you years of
trouble free performance.
IMPORTANT: PLEASE READ THESE INSTRUCTIONS CAREFULLY. NOTE THE SAFE OPERATIONAL REQUIREMENTS, WARNINGS, AND
CAUTIONS. USE THIS PRODUCT CORRECTLY, AND WITH CARE FOR THE PURPOSE FOR WHICH IT IS INTENDED. FAILURE TO DO SO
MAY CAUSE DAMAGE AND/OR PERSONAL INJURY AND WILL INVALIDATE THE WARRANTY.
Original Language Version CP12035V.V2 & CP18035V.V2 Issue No.2 - 17/08/10
All mains electrical supply safety features must be followed as
described in 1.3 above.
Disconnect the transformer plug from the charging base and
the mains power supply when not in use.
 DO NOT expose the charging base to damp or wet conditions
(for indoor use only).
 DO NOT pull or carry the charging base by the transformer
power lead.
 DO NOT operate the charging base if it has been dropped, or
has received a sharp knock, or is damaged. Contact an
authorised service agent.
 DO NOT dismantle the charging base as this may cause
damage or personal injury and will invalidate your warranty.
 DO NOT insert foreign objects or material into the hole
reserved for the battery.
 DO NOT force the battery into the charging base. The battery
will only fit one way to ensure correct polarity alignment.
 DO NOT immediately charge a second battery. Consecutive
charging will overheat the charging base. Allow the unit to cool
for 15 minutes before charging the next battery.
 DO NOT attempt to connect two charging bases together.
Store the charging base in the same manner as battery, see
para.1.2.
2. INTRODUCTION & SPECIFICATIONS
• Electronic variable speed control, forward and reverse.
• 15 Torque settings plus ‘Drill’.
• 3-5 Hour charger with plug transformer.
• 10mm Keyless chuck.
• Integral bit holder.
• Supplied in carry-case, complete with accessories.
Variable Speeds: ................................................................... 0-600rpm
Chuck Size: ........................................................................10mm(1/2”)
Weight Inc. Battery (CP10235V): .................................................1.5kg
Weight Inc. Battery (CP10835V): .................................................1.8kg
Battery Model No (CP10235V):............................................ CB12VBP
Battery Model No (CP10835V):............................................ CB18VBP
Noise Power: ...........................................................................84.2dBA
Vibration: .................................................................................. 0.6m/s²
Accessories:
Drills................................................................... 1.5, 2.5, 3, 4, 5, 6mm
Slotted Bits .............................................................................. 5, 6mm,
Phillips Bits ............................................................................... #1, #2,
Pozi Bits .................................................................................... #1, #2
Magnetic Bit Holder
3. OPERATING INSTRUCTIONS
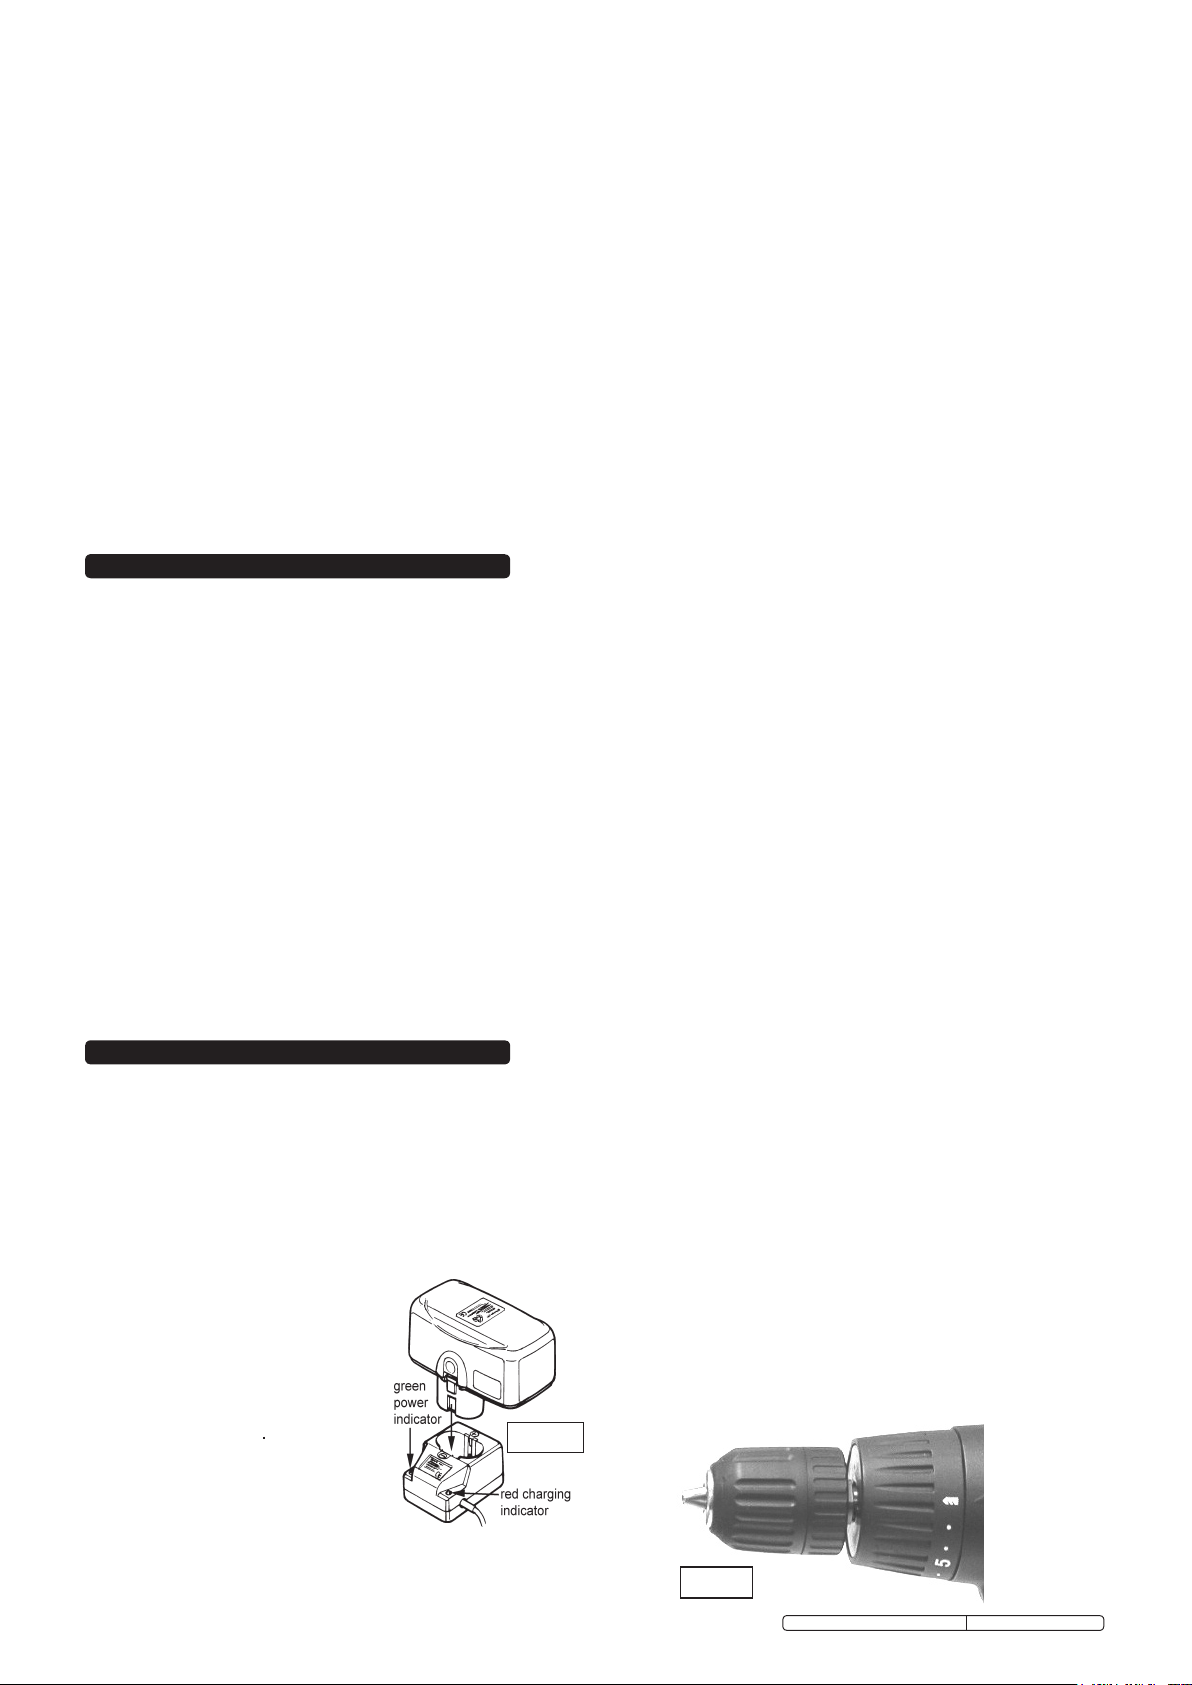
fig 2
Note: When new, the battery will have been shipped in a low charge
state. It will take longer to charge the battery initially (about 8
hours) and several subsequent charges may also take a little
longer than when the battery reaches its optimum performance.
3.1 CHARGING THE BATTERY PACK.
3.1.1 To remove the battery pack from the drill, depress the two side
clips on the battery. Do not touch the metal battery terminals.
3.1.2 Place drill in carrying case and remove the battery charging
base and transformer plug.
3.1.3 Connect mains transformer to the charging base (fig.1) and
place the base on a safe flat
surface. Plug the transformer into
mains socket and switch on.The
green power light will come on.
3.1.4. The battery is designed to fit into
the charging base one way only.
This is to ensure that the positive
(+) and negative (-) polarities
correspond. Align the + and -
polarity marks on the base of the
battery with the + and - marks on
the charging base, insert the battery
and press lightly to seat the battery
firmly into the charging
base, as in fig.1. WARNING! DO
NOT try to force battery into the base with crossed polarities.
3.1.5 The red charge light will come on when the battery is
inserted into the charging base, and will remain on until the
battery is removed from the base. Under normal conditions the
battery will take 3 - 5 hours to fully charge from flat.
NOTE: It will take about 8 hours for the initial charge (see Section
header note).
3.1.6 Remove the battery from the charging base and the red light
will go out. Switch off and unplug the transformer from the
mains. Push the battery into the drill base until it latches into
place. The drill is now ready for use.
3.1.7 Place the transformer plug and charging base back into the
case. Note: Attempting to recharge a battery immediately after
use may result in the red charge light not coming on. In such a
case allow the battery to cool for a time and try again.
3.2 DRILLING INSTRUCTIONS. (Ensure you have read,
understood and comply with all the safety instructions).
WARNING! Always wear approved safety glasses when drilling.
3.2.1 Preparation
1.Open the chuck by holding the rear collar and turning the
front chuck collar. See direction arrow on chuck.
2.Insert the required drill bit into the full depth of the chuck
and tighten.
3.Check the drill to ensure the direction switch is in the mid
(lock) position.
4.Insert the battery pack into the base of the drill and latch
into place.
5.The speed of the drill is controlled by the electronic
variable speed switch. After moving direction switch to
‘forward’ (or ‘reverse’) press the speed switch gently for a
slow speed and progressively increase the pressure on the
switch to produce correspondingly higher speeds (try
before starting to drill).
3.2.2 Torque Setting
Torque is the amount of turning force applied when you use
the drill. Torque setting ‘1’ is the lowest and will apply the
least effort - to the final turns of a screw, for example. The
torque becomes progressively greater with increased setting
numbers, up to a maximum of ‘6’. The combination of
variable speed and torque gives maximum drilling efficiency.
Suggested torque settings:
1 - Small screws
2 - Screws into soft material
3 - Screws into hard material
4 - Screws into hard wood
5 - Regular drilling
“Drill” symbol - Heavy drilling
There are 15 different torque settings in total, however, the
numbered notches are a rough guideline of which level of
torque should be used (see fig.2 for reference).
3.2.3 To Drill Holes
Lock a pilot drill (smaller size drill than the finished hole size)
into the chuck. Select an appropriate torque setting (para.
3.2.2.). Check to confirm the turning direction is correct.
DO NOT attempt to change direction whilst the drill is running.
Drill a pilot hole in the middle of the spot where the final hole
is to be drilled. Insert the final sized drill bit. Hold drill firmly
and place the drill bit at the entrance of the pilot hole and
press the trigger as in 3.2.1.
If the drill becomes stuck, release the switch and place the
drill in reverse by pressing the direction switch to the other
side. If this does not work, gently work the drill bit free. If the
chuck stops turning, check the torque setting.
3.2.4 As a Screw or Bolt Driver
Lock appropriate tool bit in the chuck, set appropriate torque
and proceed with the task. To remove screws, bolts, etc.,
switch the drill to reverse.
3.2.5 When you have finished working, remove the bit from the
chuck, clean drill and bit and store in the carry case.
fig 1
Original Language Version CP12035V.V2 & CP18035V.V2 Issue No.2 - 17/08/10
Risk of Hand Arm Vibration Injury.
The CP12035.V2 & CP18035.V2 Cordless Drill/Drivers, when operated in accordance with these instructions and tested in accordance with
EN 28662-1: 1993 results in the following vibration emission declared in accordance with BS EN12096: 1996.
Measured vibration emission value: 0.6m/s² Uncertainty: 0.24m/s²
These values are suitable for comparison with emission levels of other tools that have been subject to the same test.
This tool may cause hand-arm vibration syndrome if its use is inadequately managed.
Recommended Measures to reduce risk of hand-arm vibration syndrome: This item represents a low Hand Arm Vibration risk to users. The
calculated maximum usage period exceeds 8 hours. We recommend appropriate safety equipment is utilised and regular breaks for the
operator are employed to reduce any residual risk of fatigue or repetitive strain injury.
Environmental Protection.
Recycle unwanted materials instead of disposing of
them as waste. All tools, accessories and packaging
should be sorted, taken to a recycle centre and
disposed of in a manner which is compatible with
the environment.
When the product is no longer required, it must be
disposed of in an environmentally protective way.
Rechargeable battery contains nickel cadmium
(NiCad). It is recyclable. Take to your local recycling
centre to be disposed of properly. Do not incinerate
Ni-Cd battery as it may explode when exposed to
fire. Do not attempt to open battery pack.
CP12035V.V2
NOTE: It is our policy to continually improve products and as such we reserve the right to alter data, specifications and component parts without prior notice.
IMPORTANT: No liability is accepted for incorrect use of this product.
WARRANTY: Guarantee is 12 months from purchase date, proof of which will be required for any claim.
INFORMATION: For a copy of our latest catalogue and promotions call us on 01284 757525 and leave your full name and address, including postcode.
01284 757500
01284 703534
sales@sealey.co.uk
Sole UK Distributor, Sealey Group,
Kempson Way, Suffolk Business Park,
Bury St. Edmunds, Suffolk,
IP32 7AR
www.sealey.co.uk
Web
email
Original Language Version CP12035V.V2 & CP18035V.V2 Issue No.2 - 17/08/10

This manual suits for next models

1

Other Sealey Power Screwdriver manuals

Sealey CP18V User manual

Sealey

Sealey CP18V User manual

Sealey CP36B.V2 User manual

Sealey

Sealey CP36B.V2 User manual

Sealey CP5002 User manual

Sealey

Sealey CP5002 User manual

Sealey CP18VLD.V2 User manual

Sealey

Sealey CP18VLD.V2 User manual

Sealey STS103 Firmware update

Sealey

Sealey STS103 Firmware update

Sealey CP72S User manual

Sealey

Sealey CP72S User manual

Sealey POWER TOOLS SA57 User manual

Sealey

Sealey POWER TOOLS SA57 User manual

Sealey CP4VSD User manual

Sealey

Sealey CP4VSD User manual

Sealey CP36S.V2 User manual

Sealey

Sealey CP36S.V2 User manual

Sealey CP14VLD User manual

Sealey

Sealey CP14VLD User manual

Sealey CP108VCD User manual

Sealey

Sealey CP108VCD User manual

Sealey SA623.V2 User manual

Sealey

Sealey SA623.V2 User manual

Sealey SA58.V2 User manual

Sealey

Sealey SA58.V2 User manual

Sealey CP36MS User manual

Sealey

Sealey CP36MS User manual

Sealey CP72S User manual

Sealey

Sealey CP72S User manual

Sealey CP36S.V4 User manual

Sealey

Sealey CP36S.V4 User manual

Sealey CP36B User manual

Sealey

Sealey CP36B User manual

Sealey SV12 Series User manual

Sealey

Sealey SV12 Series User manual

Sealey CP36S User manual

Sealey

Sealey CP36S User manual

Sealey Power Tools SA623.V2 User manual

Sealey

Sealey Power Tools SA623.V2 User manual

Sealey CP36MS.V2 User manual

Sealey

Sealey CP36MS.V2 User manual

Sealey CP36S.V3 User manual

Sealey

Sealey CP36S.V3 User manual

Sealey SA57 User manual

Sealey

Sealey SA57 User manual

Sealey STS104 User manual

Sealey

Sealey STS104 User manual

Popular Power Screwdriver manuals by other brands

Black & Decker CS3651LC Original instructions

Black & Decker

Black & Decker CS3651LC Original instructions

Makita 6842 technical information

Makita

Makita 6842 technical information

Makita DFT082R instruction manual

Makita

Makita DFT082R instruction manual

Makita DHP446 instruction manual

Makita

Makita DHP446 instruction manual

Ingersoll-Rand 4RSERIES Operation and maintenance manual

Ingersoll-Rand

Ingersoll-Rand 4RSERIES Operation and maintenance manual

MYTORQ MYBT-ASP0520 Operation and maintenance manual

MYTORQ

MYTORQ MYBT-ASP0520 Operation and maintenance manual

Napa Carlyle DSD14 instruction manual

Napa

Napa Carlyle DSD14 instruction manual

Makita BFR540 Specifications

Makita

Makita BFR540 Specifications

EINHELL TE-CW 18 Li BL-Solo Original operating instructions

EINHELL

EINHELL TE-CW 18 Li BL-Solo Original operating instructions

Ingersoll-Rand QP1P Series instructions

Ingersoll-Rand

Ingersoll-Rand QP1P Series instructions

EINHELL 45.133.10 operating instructions

EINHELL

EINHELL 45.133.10 operating instructions

MYTORQ MY9-TR0206L Operation and maintenance manual

MYTORQ

MYTORQ MY9-TR0206L Operation and maintenance manual

Panasonic EYFGA1N operating instructions

Panasonic

Panasonic EYFGA1N operating instructions

Ryobi CSD-4030G user manual

Ryobi

Ryobi CSD-4030G user manual

EINHELL TP-CD 18/50 Li Original operating instructions

EINHELL

EINHELL TP-CD 18/50 Li Original operating instructions

Ferm CDM1080 Original instructions

Ferm

Ferm CDM1080 Original instructions

Black & Decker 9036 manual

Black & Decker

Black & Decker 9036 manual

Vessel GT-PLXD instruction manual

Vessel

Vessel GT-PLXD instruction manual

manuals.online logo
manuals.online logoBrands
  • About & Mission
  • Contact us
  • Privacy Policy
  • Terms and Conditions

Copyright 2025 Manuals.Online. All Rights Reserved.