5. OPERATION
STW291 Issue No.1 28/06/12
Original Language Version
© Jack Sealey Limited
NOTE: ENERGY SAVINGS FUNCTION:
If left on and unused, the torque adaptor will turn off
automatically after a period of 4 minutes.
5.1 PREPARATION:
5.1.1 Unscrew the battery cover and install the two batteries
supplied as shown below, ensuring the correct polarity
as indicated in g.1A. Rex the battery cover as shown
in g.1B.
5.4.1 This value can then be stored by pressing the “ M/u “
button. Once the value is stored, taking 2 to 3 secs, the
display will revert to “ 000.0 “.
5.4.2 If you attempt to store a torque value that is below the
minimum value or above the maximum value dened in
the specication, the abbreviation “Erro” will be shown
on the display. After 1 second, the torque adaptor will
revert to torque measuring mode. The preset value will
not have been stored, and the warning indicators will
not work until a valid value has been stored.
5.5 (b) ANGLE setting mode:
NOTE: Before setting the angle, the adaptor (with
wrench and socket attached) should be positioned onto
the tting to be tightened so that the adaptor has a
datum starting point against which to set the angle.
5.5.1 To set the angle value, press the “ “ button for 2
seconds. (NOTE: If no buttons are then pressed, the
display will revert to zero after 6 seconds).
5.5.2 The display will initially show “ SET “ for 1 second and
then revert to the last saved angle or “ 0° “. ( To zero
the last saved angle setting press the “ “ button).
By repeatedly pressing the “ “ button, the angle
value will be progressively increased until the required
angle value is reached.
5.5.3 This value can then be stored by pressing the “ M/u “
button. Once the value is stored, taking 2 to 3 secs, the
display will revert to “ 0° “.
5.5.4 When in ANGLE measuring mode the direction of
rotation of the adaptor can be changed from clockwise
(CW) to counterclockwise (CCW) and back again by
pressing the “ M/u “ button
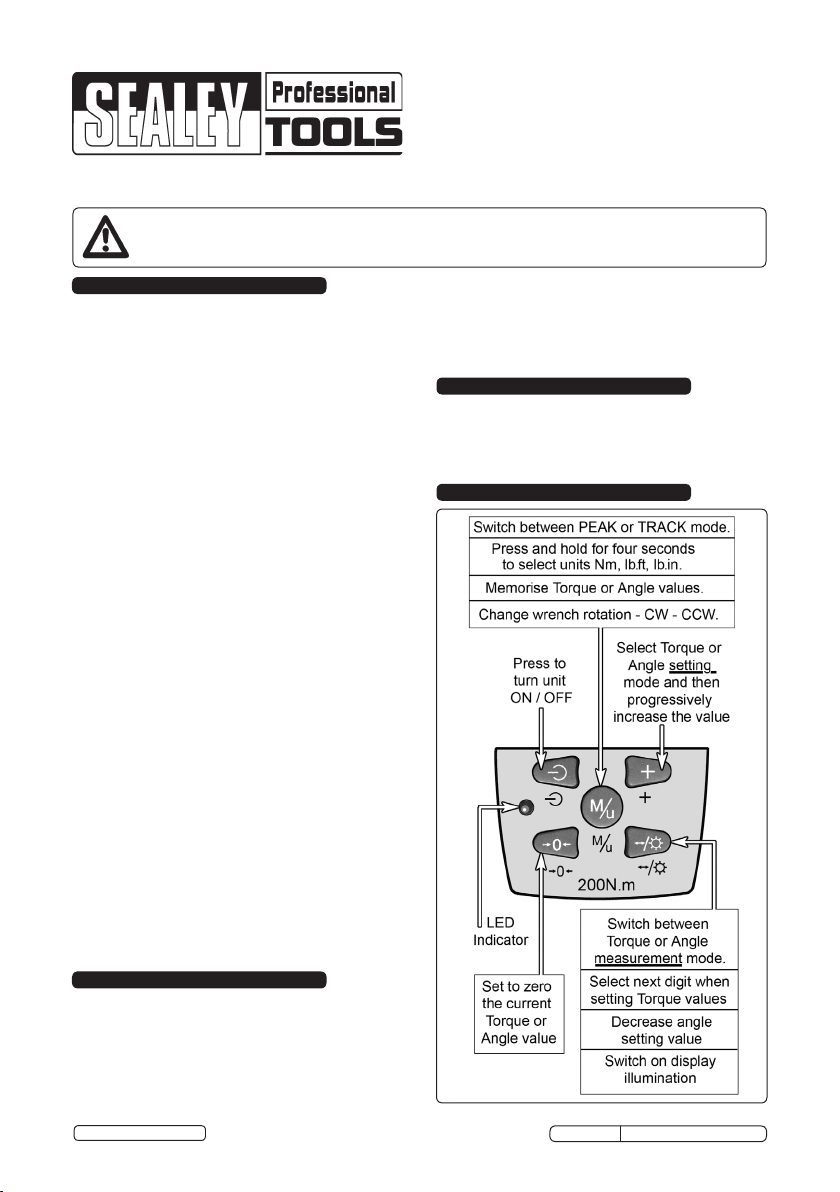
5.6 Mode Select:
5.6.1 The “TRACK” mode is the default when the torque
adaptor is switched on. In “TRACK” mode the display
shows the reading in real time during the torque
process both when the pressure is increased or
released. When the programmed value is reached the
unit signals both audibly and visually whilst the adaptor
is under pressure. As soon as the pressure is released
the display reverts to zero
5.6.2 Press the “M/u” button to shift into “PEAK” mode. The
display shows “peak” in the top left of the display.
5.6.3 In “PEAK” mode the display will always hold the current
value reached, even if the pressure is slightly released.
When the programmed value is achieved, the unit
signals both audibly and visually and the value shown
on the display will begin to ash after approx. one
second. If further pressure is applied after the
programmed value has been reached the unit assumes
that further torque is to be applied up to the current
programmed value and the display again shows torque
ascending from zero. Alternatively, you can zero the
display and apply the programmed torque to another
xing.
5.7 Turning the display illumination on/off.
The display illumination can be turned on prior to or
after programming the torque. In order to do this, press
and hold the “ “ button for 2 Secs.
5.8 OPERATION:
5.8.1 When you approach within +/- 5 Nm of the programmed
torque value the unit will beep intermittently.
5.8.2 When you approach within +/- 2 Nm of the programmed
value the unit will emit a quicker sound sequence.
g.1
5.1.2 Press the ON/OFF button once to turn the meter on.
The display will initially show four zeros (“0000”) before
reverting to a “0.0” torque reading.
5.1.3 To select the required unit of measurement, press and
hold the “M/u” button for 4 seconds. As soon as the
display jumps to the next unit of measurement let go of
the button. Repeat this process until the display shows
the unit you require. ( Nm / lb.ft / lb.in ).
5.1.4 Ascertain the correct size and type of socket for the
xing to be tightened and attach it to the square drive
connection (1/2” ) at the base of the adaptor.
5.1.5 Insert the required ratchet wrench/drive bar into the
socket at the top of the adaptor. Do not use a tool that
will allow you to apply excessive force through the
adaptor.
5.2 SELECTING THE TORQUE OR ANGLE
MEASUREMENT MODE:
5.2.1 By default, the adaptor switches on in Torque
Measurement Mode. Press “ “ button to switch
to Angle Measurement Mode or back into Torque
Measurement Mode when required.
5.3 SETTING THE TORQUE OR ANGLE VALUE:
5.3.1 In order to set the torque or angle value, press the
“ “ button for 2 seconds. NOTE: If no buttons are
then pressed, the display will revert to zero after 6
seconds.
5.4 (a) TORQUE setting mode: The display will initially
show “ SET “ for 1 second and then revert to the last
saved torque or “ 000.0 “. The rst digit of this value
( “000.0“ ) will be ashing, indicating that the value can
now be set/altered. ( To zero the last saved torque
setting press the “ “ button ). By repeatedly
pressing the “ “ button, the value of the ashing
digit will be progressively increased. When the
required value is reached, press the “ “ button to
move to the next digit. Repeat this process for all digits
(ones, tens, hundreds etc) until the desired value has
been set.