Sears Free Spirit User manual

OWNER SMANUAL
MODELNO.
C249 300460
16216859
FREE SPIRIT
RECUMBENTCYCLE
lAssembly
lOperation
lTrouble Shooting
lParts
lWarranty
RETAINFOR
FUTUREREFERENCE
CAUTION:
You mustreadand understand thisowner’smanual beforeoperating unit
MAGNETICRECUMBENTCYCLE
PDFcreated withpdfFactorytrialversion www.softwarelabs.com

2009
1
MANUFACTURE S ONE-YEARLIMITEDWARRANTY
YourFREE SPIRITcycleiswarranted forone yearfromthe dateof purchaseagainst
defectsinmaterial, when usedforthe purposeintended, undernormalconditions,and
provided itreceivespropercare.Anypart founddefectiveormissingwillbe sentat no cost
when returnedinaccordancewiththe termsof thiswarranty.
Thiswarrantyisnot transferableandisextended onlytothe originalowner.
The warrantyshallnot applytoexercisecycleswhichare(1)used forcommercialorother
incomeproducing purposes, or(2)subject tomisuse, neglect, accident orunauthorized
repairsandalterations.
Thiswarrantyprovided hereinisinlieu ofallotherexpress warranties.Anyimplied
warranties,including anyimpliedwarrantiesofmerchantabilityorfitness forparticular
purpose,arelimited indurationtothefirst12 monthsfromthe dateof purchase.Allother
obligationsorliabilities,including liabilityforconsequentialdamages, areherebyexcluded.
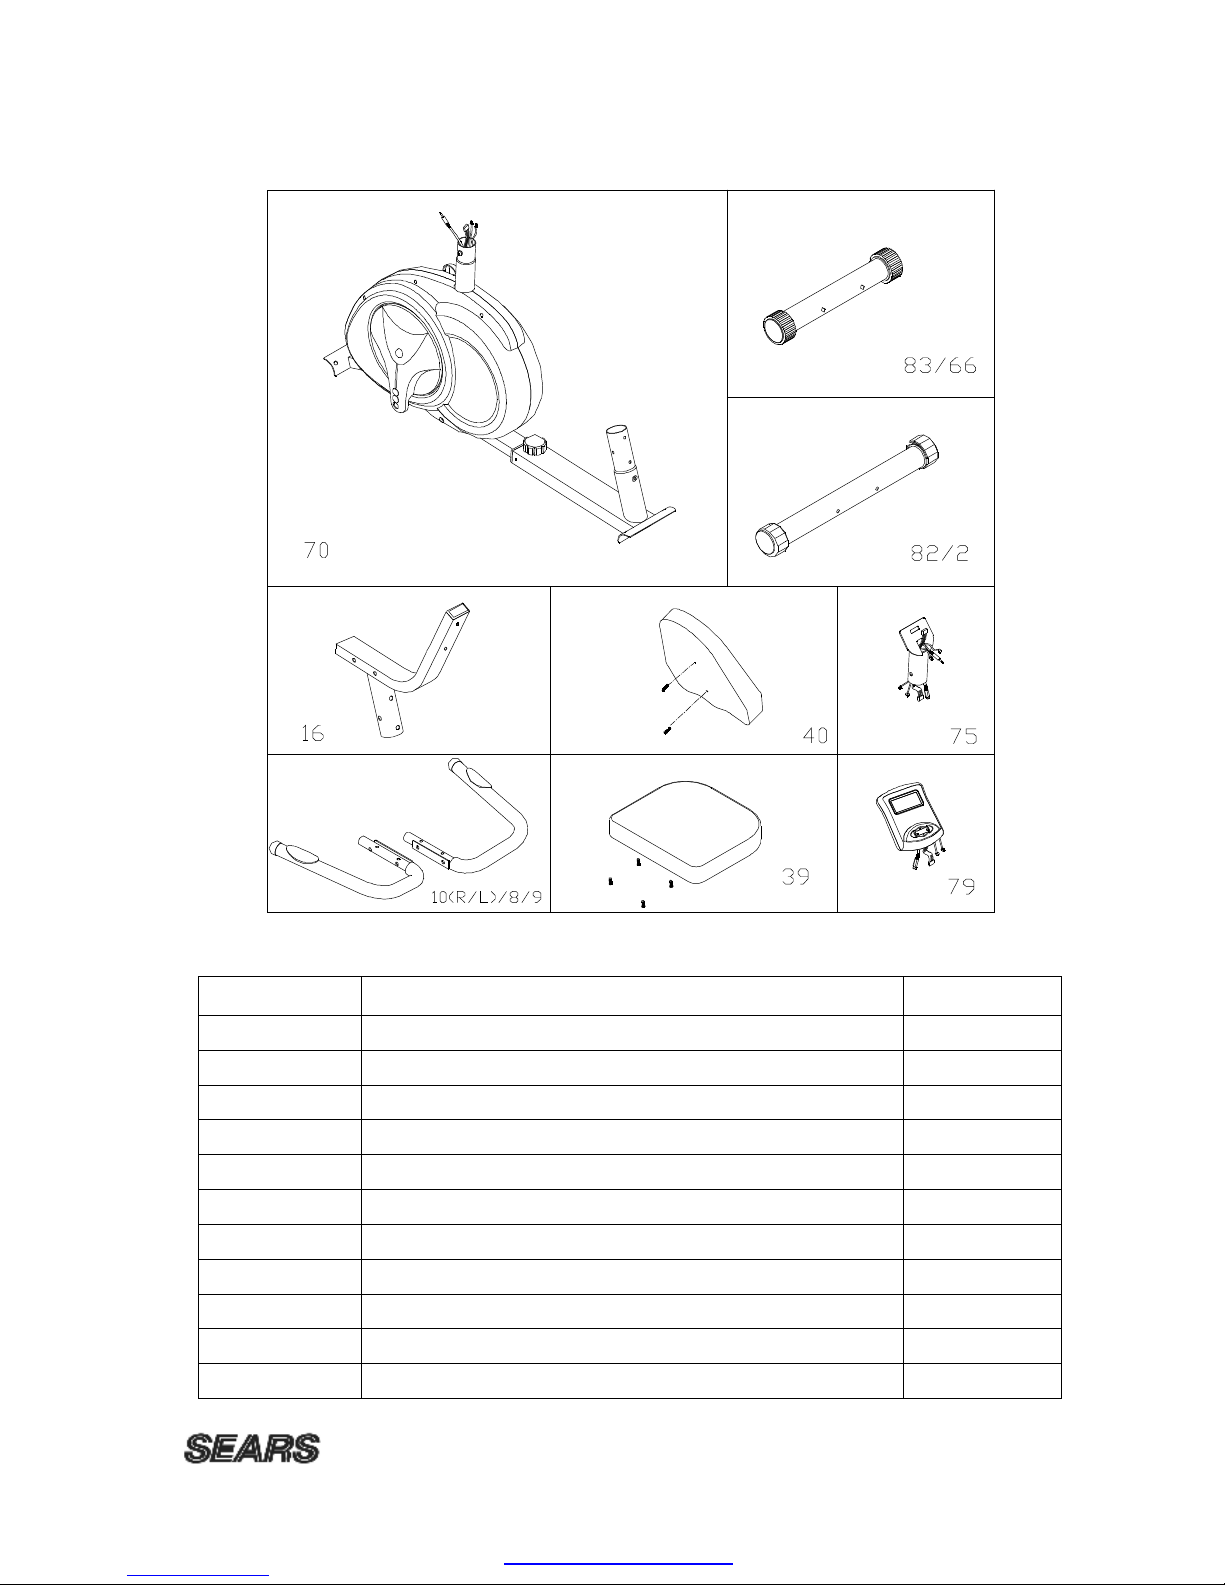
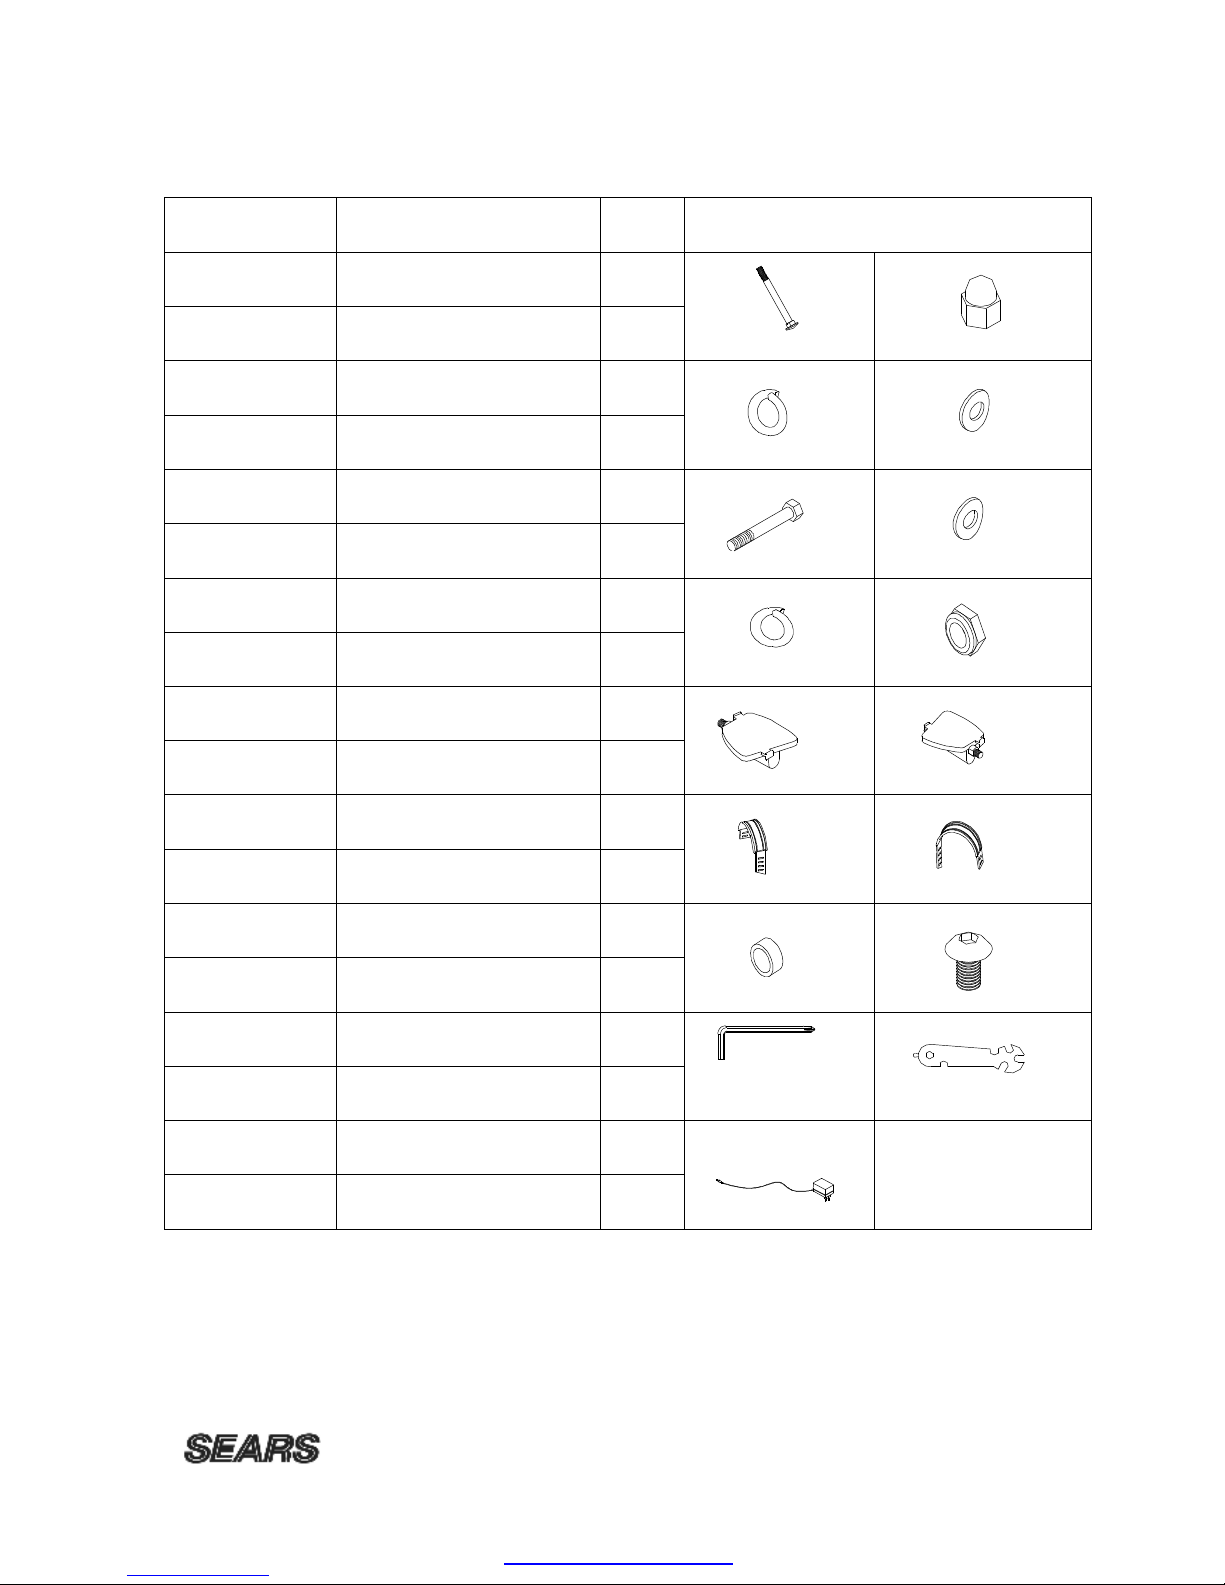
REPAIRPARTSAND SERVICE
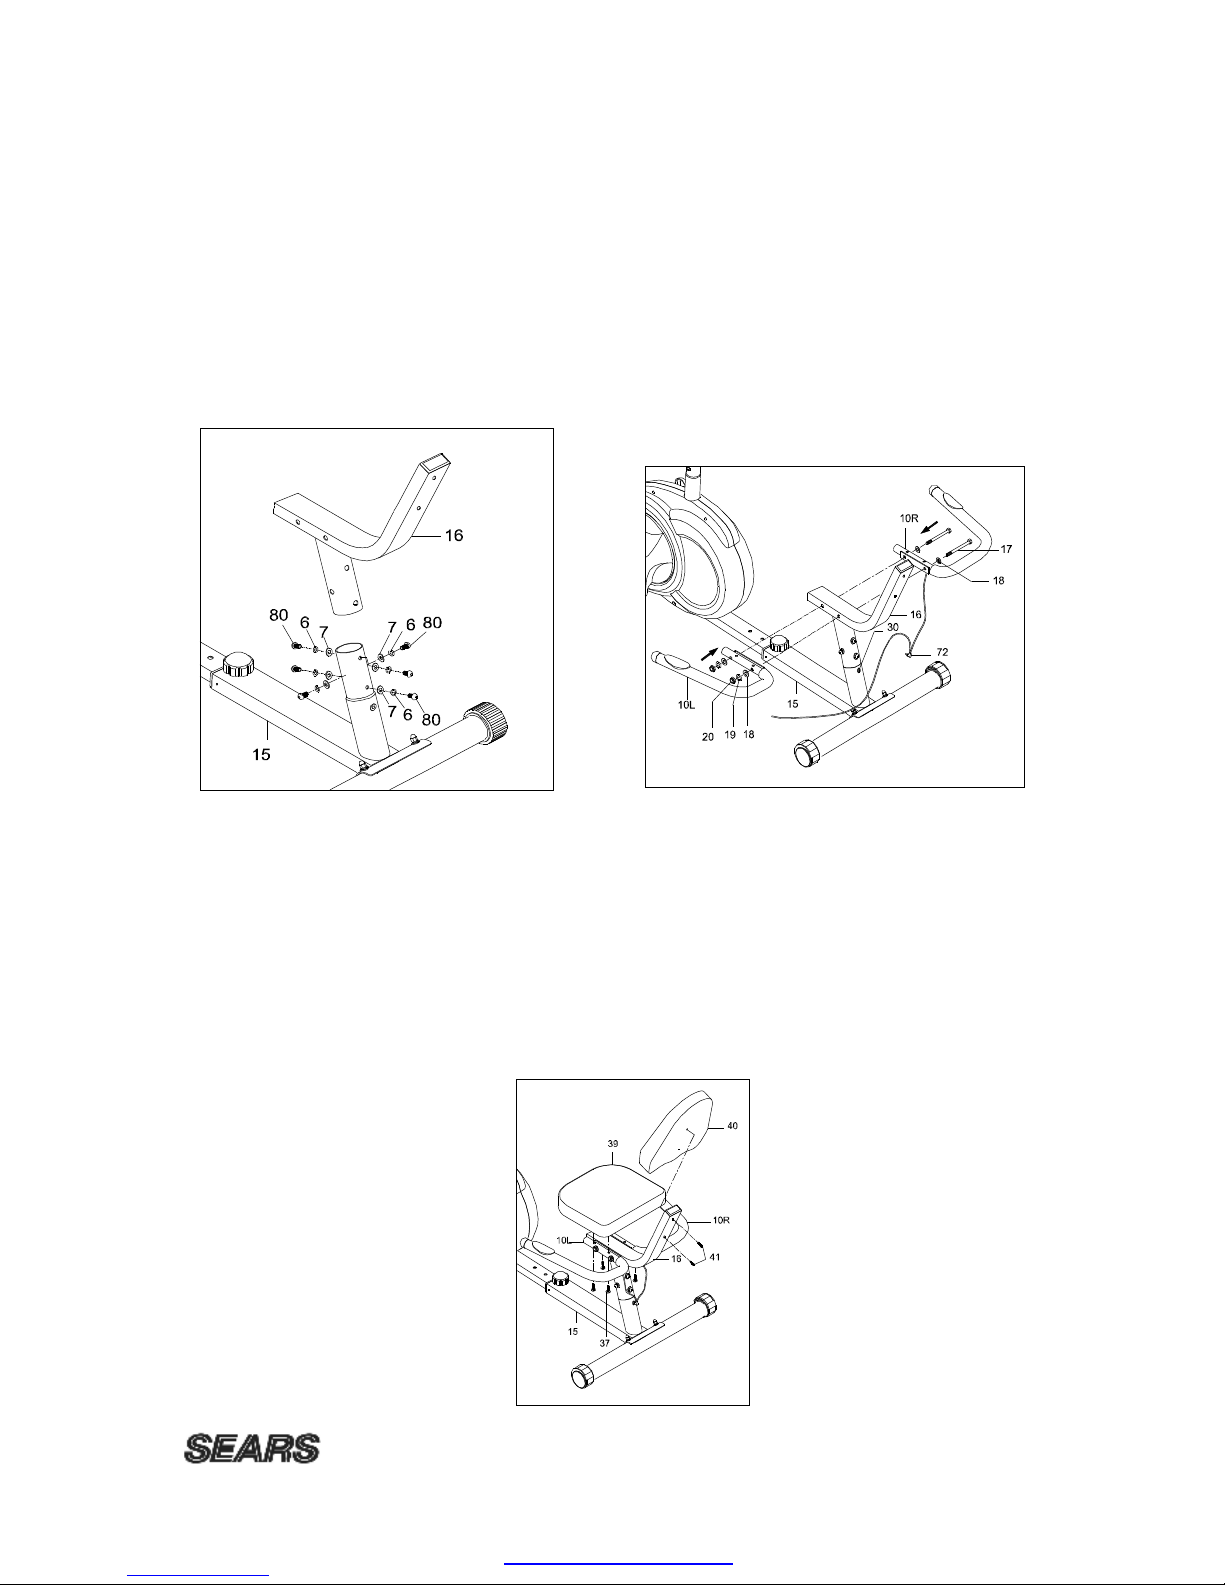
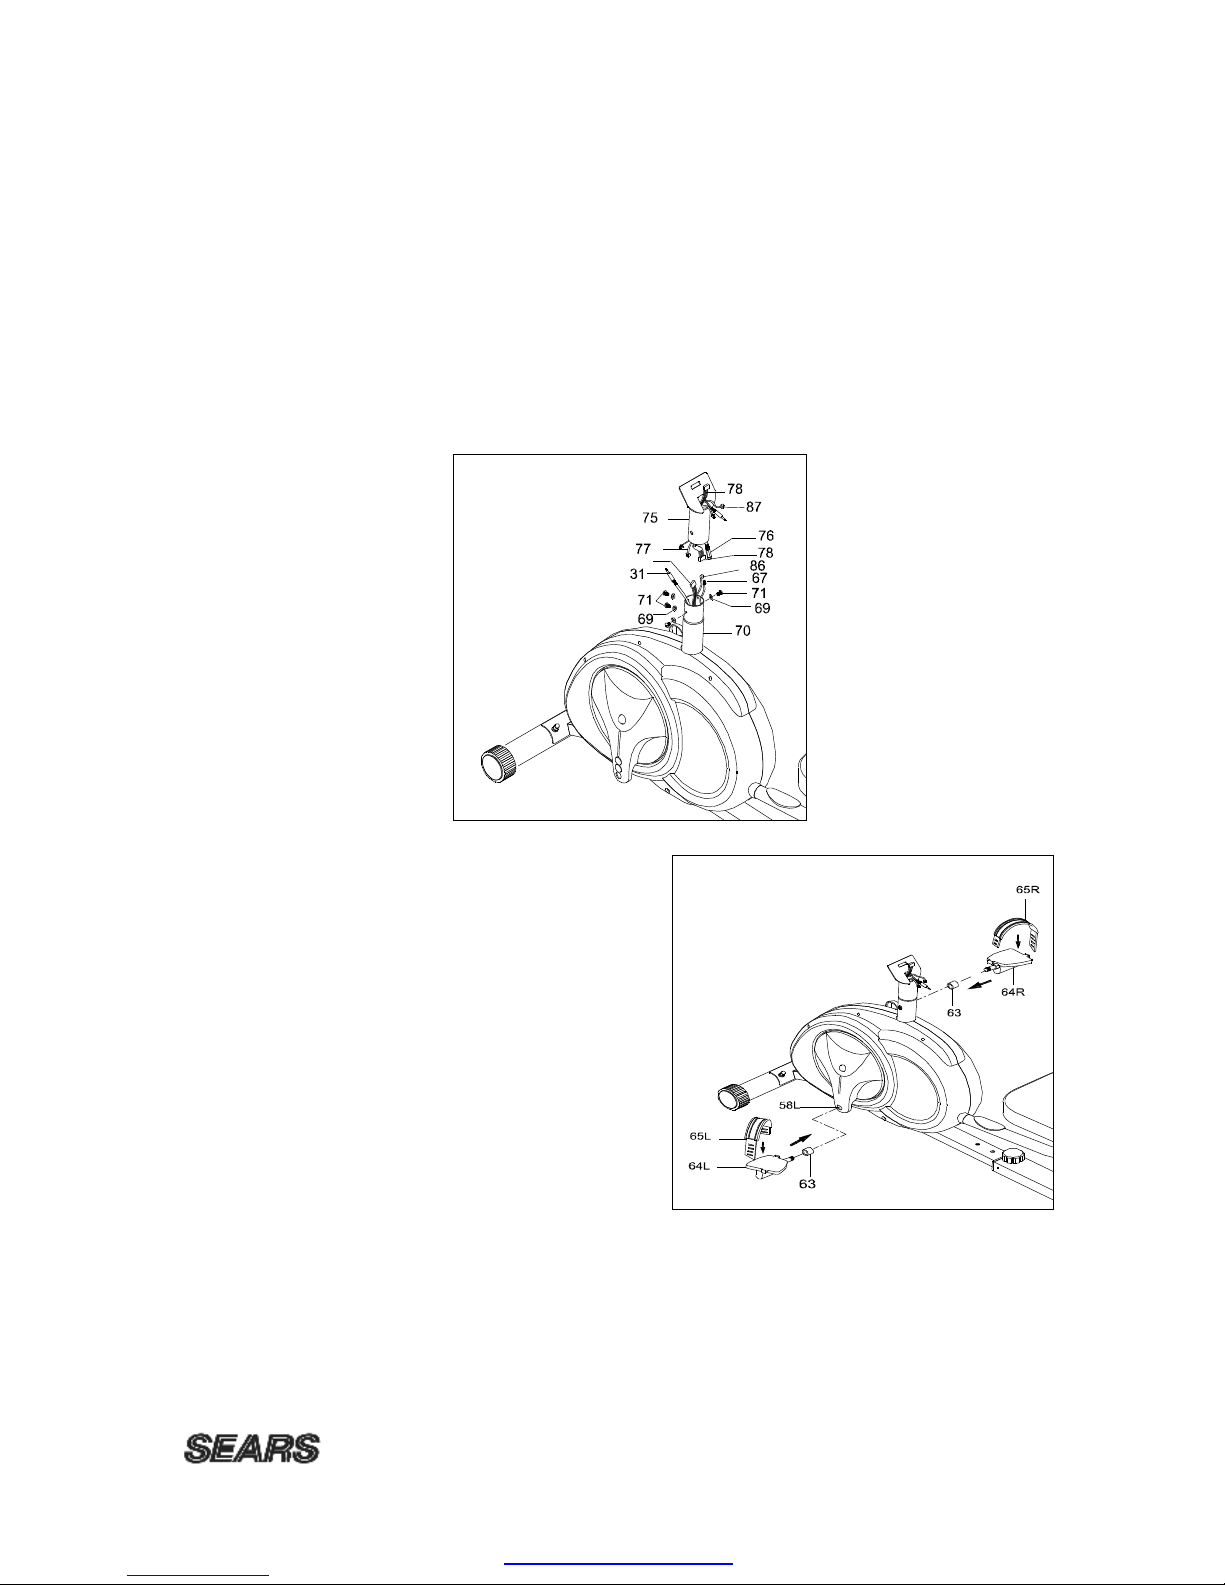
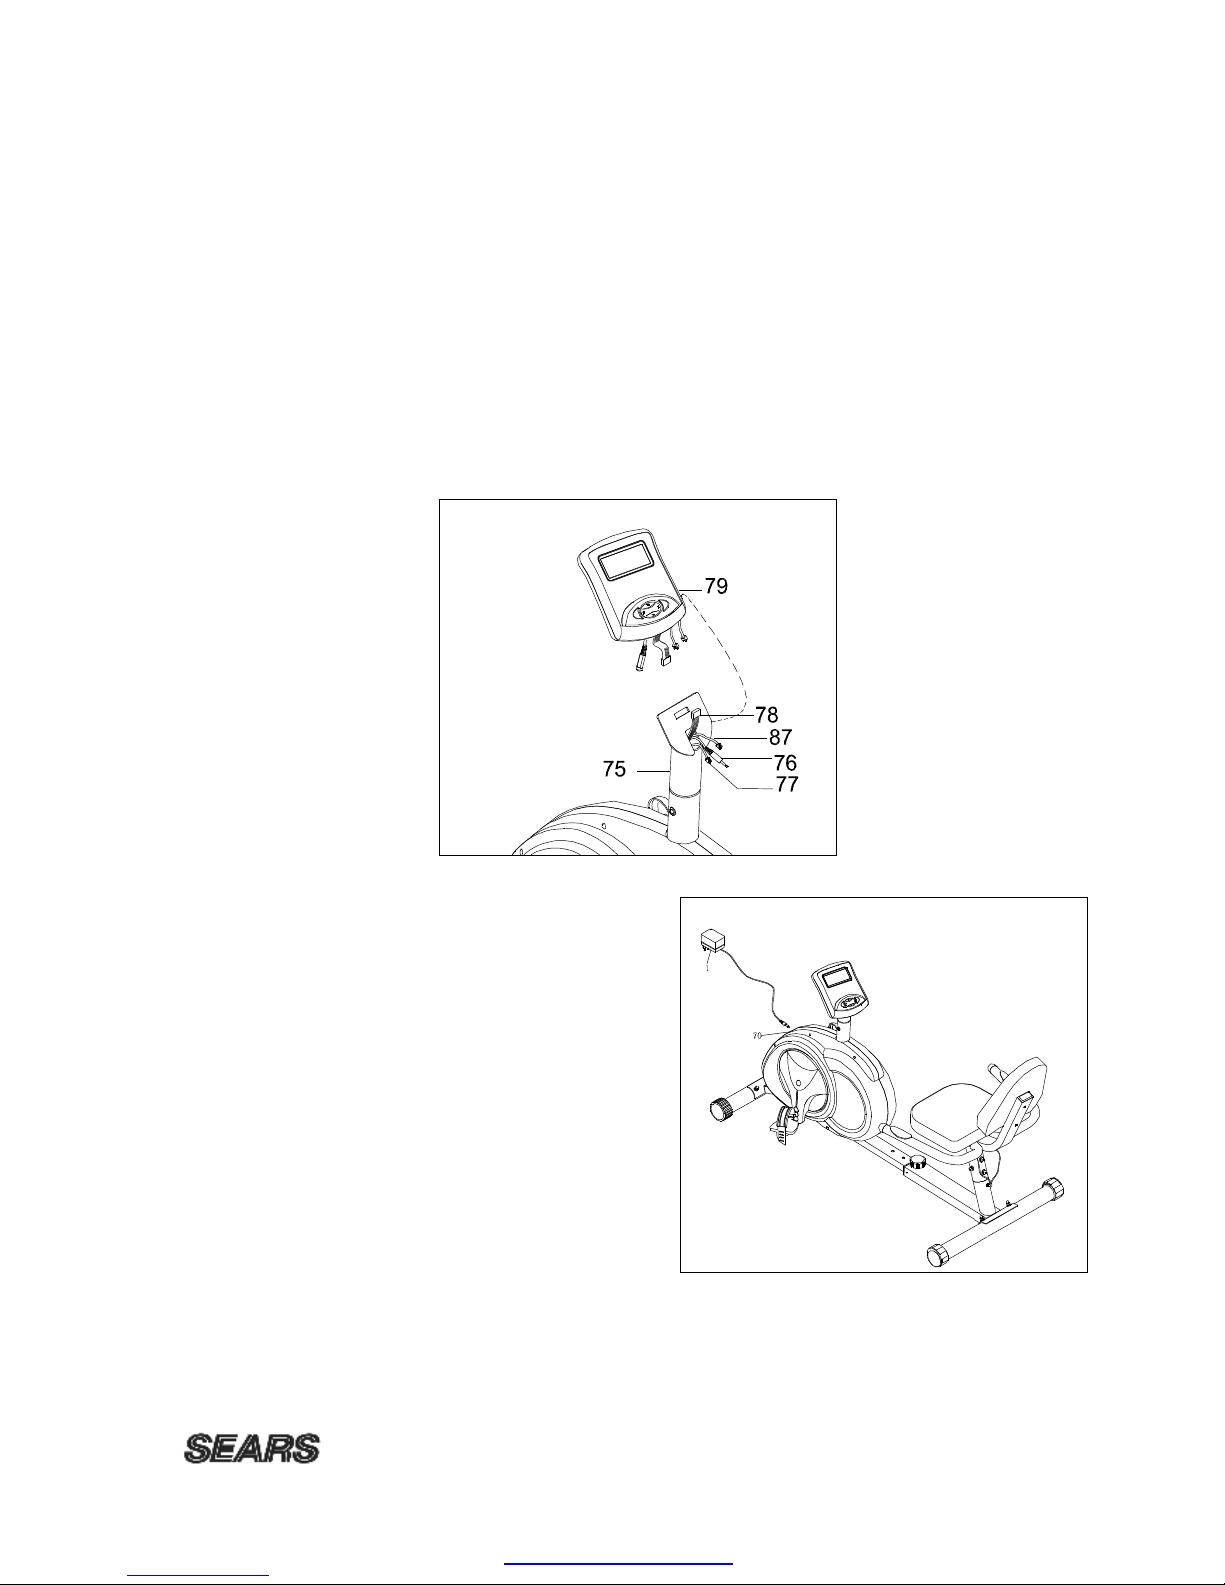
Allof thepartsforthe exercisecycle, showninfigurecan be ordered fromMauricePincoffs
Canada Inc.6050 DONMURIESTREET, NIAGARAFALLS, ONTARIO L2E6X8.When
orderingparts, thepartswillbe sent andbilledat the current prices.Pricesmaybe subject
tochangewithout notice. Check ormoneyordermust accompanyallorders. Standard
hardwareitemsareavailableat yourlocalhardwarestore.
Toensureprompt and correct handling ofanyerrors, ortoansweranyquestions,please
callourTollFree number: 1-888-707-1880,orlocalnumber1-905-353-8955 orfax
1-905-353-8968 oremail customerservice@pincoffs.ca.Officehoursarefrom8:30 AMto
5:00 PMMondaytoFridayEasternStandardTime.
Always include the followinginformation whenorderingparts
lModelNumber
lNameof EachPart
lPart Numberof EachPart
TABLE OFCONTENTS
WARRANTY1PARTSLIST&DIAGRAM11-14
SAFETYPRECAUTIONS2TROUBLESHOOTING GUIDE15
PRE-ASSEMBLYCHECKLIST3TRAINING GUIDELINES 16-18
PARTSBAG PACKING LIST4STRETCHING19-20
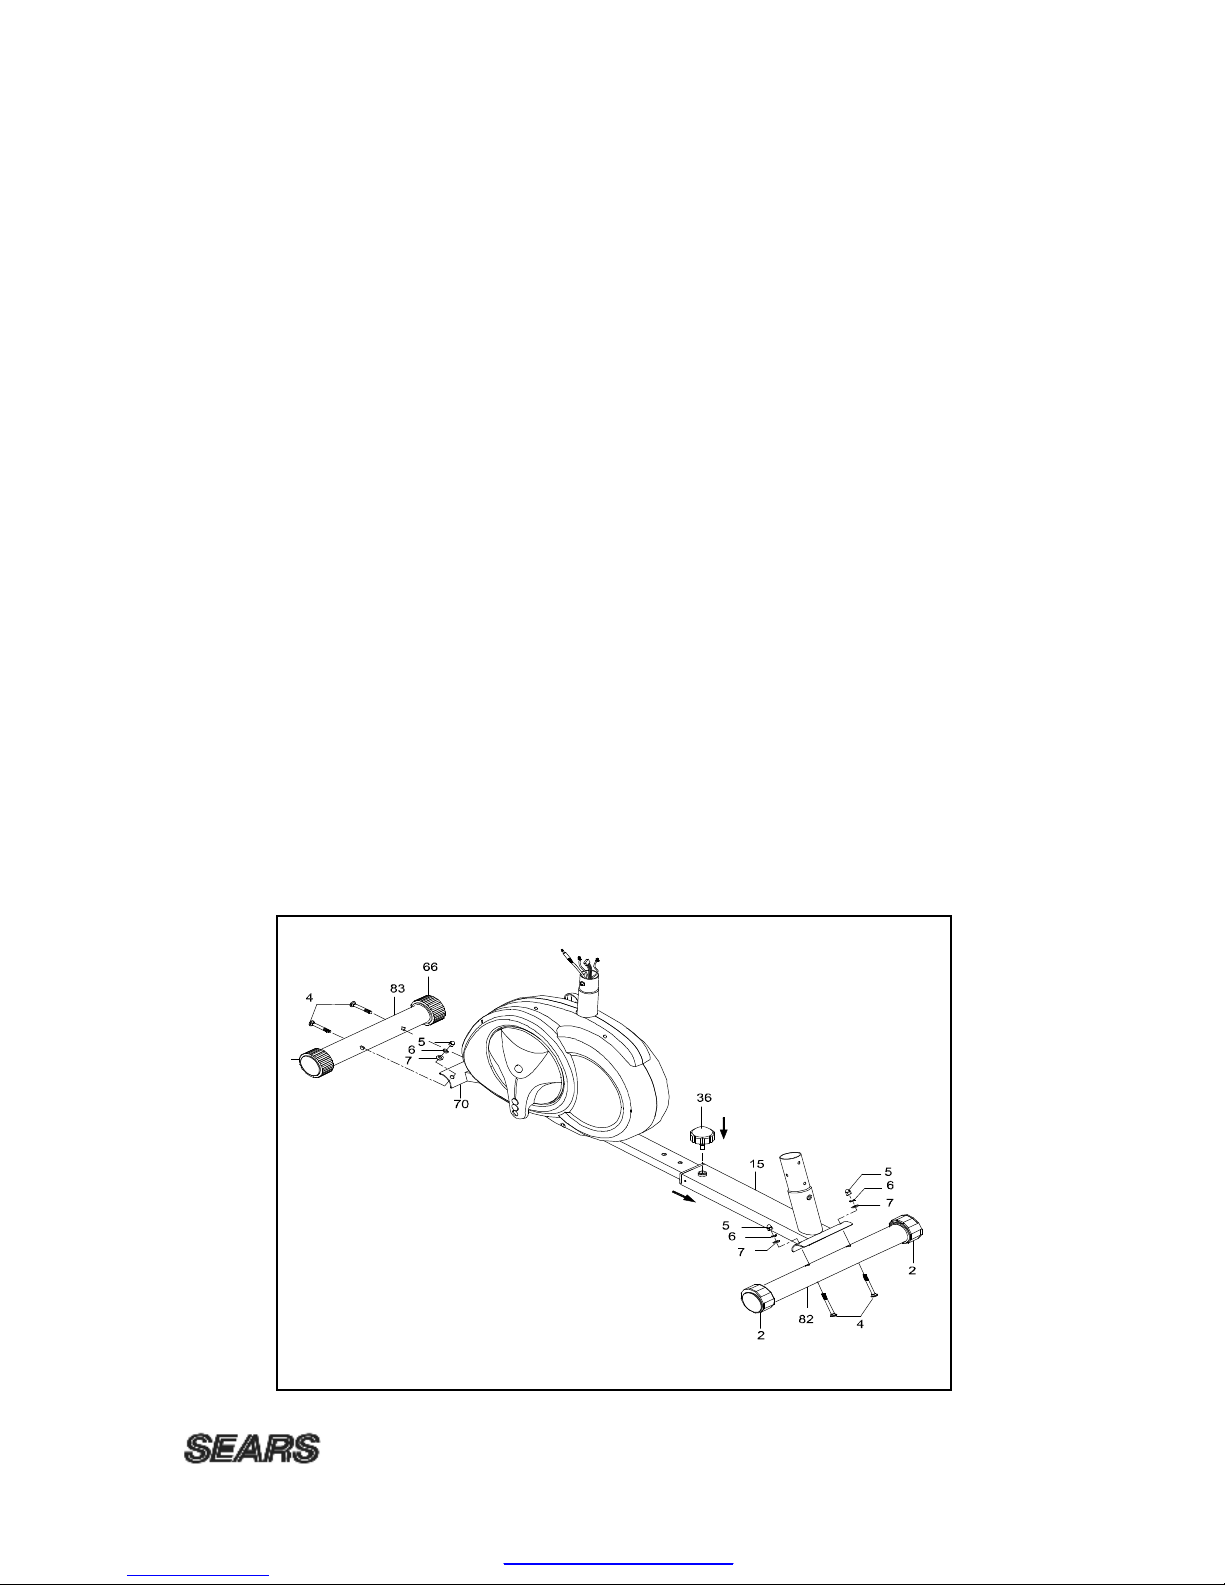
ASSEMBLYINSTRUCTION5-8ORDERING REPLACEMENTPARTS21
MONITORINSTRUCTION9-10 SERVICEAND PARTS22
PDFcreated withpdfFactorytrialversion www.softwarelabs.com

2009
2
SAFETYPRECAUTIONS
Thankyouforpurchasing ourproduct. Even though wego togreateffortstoensurethe
qualityof eachproduct weproduce, occasionalerrorsand /oromissionsdooccur. Inany
eventshouldyoufindthisproduct tohaveeitheradefectiveoramissingpartpleasecontact
usforareplacement.
Thisproduct hasbeen designedforhomeuseonly. Productliabilityand guarantee
conditionswill notbeapplicabletoproductsbeingsubjectedtoprofessionaluseorproducts
beingused inagymcenter.
Thisexerciseequipment wasdesignedand built foroptimumsafety. However, certain
precautionsapplywheneveryouoperateapieceofexerciseequipment. Besuretoreadthe
entiremanualbeforeassemblyand operation of thismachine.Also, pleasenotethe
followingsafetyprecautions:
1.Read the OWNER’SOPERATING MANUALand allaccompanying literatureand
followit carefullybeforeusing yourcycle.
2.If dizziness, nausea, chest pains, oranyotherabnormalsymptomsareexperienced
whileusingthisequipment, STOPthe workout at once.CONSULTAPHYSICIAN
IMMEDIATELY.
3.Inspect yourexerciseequipment priortoexercising toensurethat allnutsand bolts
arefullytightened beforeeachuse.
4.The cyclemust be regularlycheckedforsignsof wearand damage.Anypart found
defective, must be replacedwithanewpart fromthe manufacturer.
5.Fitness equipment mustalways be installed onaflatsurface,donotplacethe uniton
alooserugorunevensurface. It isrecommended tousean equipmentmat to
prevent the unitfrommoving whileitisbeingused, whichcouldpossiblyscratchor
damage the surfaceof yourfloor.
6.Nochangesmust be made whichmight compromisethe safetyof the equipment.
7.Keep children and petsawayfromthisequipment at all timeswhileexercising.
8.It isrecommended tohaveaminimumof 2’safeclearancearound the exercise
equipment whileinuse.
9.
Warmup 5to10 minutesbeforeeachworkoutand cooldown5to10 minutesafterward.
Thisallowsyourheart ratetograduallyincreaseand decreaseand willhelpprevent you
fromstraining muscles.
10.Neverholdyourbreathwhileexercising. Breathingshouldremainat anormalratein
conjunction withthe levelof exercisebeing performed
11.Always wearsuitableclothing andfootwearwhileexercising. Donot wearloosefitting
clothingthatcouldbecomeentangledwiththemoving partsof yourcycle.
12.Caremust be taken when lifting ormoving theequipment, soasnot toinjureyourback.
Always useproperlifting techniques.
13.Userweight shouldnotexceed 250 lbs.
WARNING:BEFOREBEGINNINGANYEXERCISEPROGRAMCONSULTYOUR
PHYSICIAN. THISISESPECIALLYIMPORTANTFORINDIVIDUALSOVERTHEAGE
OF35 ORPERSONSWITHPRE-EXISTING HEALTHPROBLEMS. READALL
INSTRUCTIONSBEFOREUSINGANYFITNESS EQUIPMENT. WEASSUMENO
RESPONSILITYFORPEROSNALINJURYORPROPERTYDAMAGESUSTAINEDBY
ORTHROUGHTHEUSE OFTHISPRODUCT.
PDFcreated withpdfFactorytrialversion www.softwarelabs.com

2009
3
PRE-ASSEMBLYCHECKLIST
LIST DESCRIPTION Q TY
70 Mainframe 1
83 Front stabilizerw/ transportation wheels1
82 Rearstabilizerw/ adjustableend cap 1
39 Seat1
79 Monitor1
10R/L Handlebarw/pulse(L&R) 2
40 Back cushion1
16 Seat support tube 1
75 Upright post 1
Instruction Manual 1
Hardwarepack 1
PDFcreated withpdfFactorytrialversion www.softwarelabs.com

2009
4
PARTS BAGPACKINGLIST
PART DESCRIPTION Q TY
SKETCH
4 Carriage bolt M8*75mm
4
5 Cap nut M8 4 45
6 Spring washerM8 10
7 CurvewasherM8 10 6 7
17 Hexbolt M10*135mm 2
18 CurvewasherM10 4 17 18
19 Spring washerM10 2
20 Nylon nut M10 2 19 20
64R Pedal(right) 1
64L Pedal(left) 1 64R 64L
65R Pedalstrap (right) 1
65L Pedalstrap (left) 1 65R 65L
63 Spacer 2
80 Allen bolt M8*20mm 6 63 80
84 Allen wrench 1
85 Universalwrench 1 84
85
1 Adaptorw/cable 1
1
Abovedescribedpartsareall thepartsyouneedtoassemblethismachine. Before
youstarttoassemble, please check thehardwarepackingtomake suretheyare
included.
PDFcreated withpdfFactorytrialversion www.softwarelabs.com

2009
5
ASSEMBLYINSTRUCTION
Thismanualisdesigned tohelpyoueasilyassemble, adjust and usethismachine.Please
read thismanualcarefully.Forthe sakeof familiarizing yourself withthepartsidentified in
the instruction, firststudythe overviewdrawing.
Set allpartsinacleararea on the floorandremovethe packing material. Refertothe parts
list forhelptoidentifythe parts.
It willtaketwopeopletoassemblethisunit.
STEP1.ATTACHING THESTABILIZERS
nAttachthe front stabilizer (83) withtransportation wheels (66) tothe front frame (70)
usingtwocarriage boltsM8*75mm (4), twocurvewashersM8 (7),twospringwashers
M8 (6) and twocap nutsM8 (5).
nAttachthe rearstabilizer (82) withadjustableend caps (2) tothe rearframe (15) using
twocarriagebolts M8*75mm (4), twocurvewashersM8 (7), twospringwashersM8 (6)
and twocap nutsM8 (5).
Adjustingthelengthofyourbike:
Removethe seat adjustment knob (36). Slidethe rearframe(15)intothe frontframe
(70)toyourdesiredlocation and securewiththe adjustment knob (36).
NOTE: Ensurethe boltsarefastened securelytoavoidinjuries.
If the unitiswobblyusethe levelingcapson the rearstabilizertoleveltheunit.
PDFcreated withpdfFactorytrialversion www.softwarelabs.com

2009
6
STEP2.ATTACHING THESEATSUPPORTTUBEAND HANDLEBARS
nInsert theseat support tube (16) intothe rearframe (15). Secureusing sixallen head
bolts (80), sixspringwashers (6) and sixcurved washers (7).
nSecurethe right handlebar (10R) andthe lefthandlebar(10L)tothe right and left side
of the seat support tube (16) usingtwohexhead boltsM10*135mm (17), fourcurved
washersM10 (18), twospring washers (19) and twonylon nuts (20).
nInsert thehandpulsewire (72) intothepulsejack (30) foundon therearframe (15).
NOTE: Ensurethe boltsarefastened securelytoavoidinjuries.
STEP3.ATTACHING THESEATAND BACKCUSHION
nAttachthe seat (39) totheseat supporttube (16).Alignthefourholesandfastenwith
fourcross headbolts (37) found underneaththe seat.
nAttachthe back cushion (40) tothe backrestof the seat support tube (16).Alignthe
twoholesandfastenwithtwocross headboltsM6*35mm (41) foundunderneaththe
back cushion.
NOTE: Ensurethe boltsarefastened securelytoavoidinjuries.
PDFcreated withpdfFactorytrialversion www.softwarelabs.com

2009
7
STEP4.ATTACHING THEUPRIGHTPOST
nConnect theextensionhandpulsewire (31) intothe upperhandpulsewire (76).
nConnect thesensorwire (67) intothe extensionsensorwire (77).
nConnect thegearboxw/wire (56) intothe extensionmonitorwire (78).
nConnect thepowerwire (86) tothe extension powerwire (87).
nInserttheuprightpost (75) intothefrontframe (70).Secureusingfourcrossheadbolt
M6x15mm (71) and fourcurvedwashersM6 (69) thatarepre-assembled on the front
frame (70).
NOTE: Ensurethe boltsarefastened securelytoavoidinjuries.
56
STEP5.ATTACHING THEPEDALS
nAttachthe rightand leftpedal
straps (65R/ 65L) tothe right
and left pedals (64R/64L).
Note:The end withfour
adjustableholesmust be set
outwards.
nAttachthe left pedal (64L) and
spacer (63) tothe left crank
arm (58L). Repeat for
the rightpedal (64R).
Note:The rightpedal “R”shouldbe threaded on clockwise.The leftpedal “L”shouldbe
threadedon counter-clockwise.
It isimportant toassemblethe correct pedaltothe correct sideof thecrankarmto
avoidcross-threading and damaging the pedal.
PDFcreated withpdfFactorytrialversion www.softwarelabs.com

2009
8
STEP6.ATTACH THEMONITOR
nConnect theupperhandpulsewire (76) intotheback of the monitor (79).
nConnect theextensionsensorwire (77) intotheback of the monitor (79).
nConnect theextensionmonitorwire (78) intothe back ofthe monitor (79).
nConnect theextensionpowerwire (87) tothe back of themonitor (79).
nSlide themonitor (79) ontothebracket of the upright post (75).
Note:Beforesecuring the monitorontothemonitorbracketof thehandlebarpost, please
ensureallwiresaresafelytucked inside the opening ofthe handlebarpost. Thiswill
ensurethat themonitorslideson easilyand avoidspinching the wires.
Yourunitcomeswithan adaptor.
Plug theadaptorcable (1)
intothe front of the mainframe.
Yourunitisnowfullyassembled.
PDFcreated withpdfFactorytrialversion www.softwarelabs.com

2009
9
MONITORINSTRUCTION
KEYGUIDE
FUNCTIONBUTTON
MODE:Press toselect between speed/rpmand calorie/watt
ENTER:Press topreset thetargetvalue oftimeand age
RESET: Press toreset allvaluestozero
▲(UP)Press toincreasethetension level
Press toselect aprogram
Press toset thetarget value of timeand age
▼(DOWN): Press todecreasethe tensionlevel
Press toselect aprogram
Press toset thetarget value of timeand age
START/STOP Press tobeginorend yourexerciseprogram.
FUNCTIONS
Time: Showsyourelapsedworkout timeup to99:59
Countsdownfromyourpreset target timeto00:00 during yourworkout
Speed: Displays the current speed upto99.9km
RPM: Displays the currentrotation perminute.
Distance: Displays the cumulativedistancetraveled during yourworkoutup to
99.9KM
Calorie/ Displays the cumulativecaloriesburned at anygiventimeduringyour
workout.
Watt Displays current watt figures.
Note:Thisisaroughguideused forcomparison of different exercise
sessions, whichcannot beused formedicalpurposes
Grippedpulse: The monitorwilldisplaythe user’scurrent heart rateinbeatsper
minuteduring the workout. Bothhandsmust holdthe gripped pulsefor
aheartratereadingduring yourworkout.
Note: Thisdataisarough guide usedforcomparison of different
exercisesessions, whichcannot be used formedicalpurposes.
PDFcreated withpdfFactorytrialversion www.softwarelabs.com

2009
10
Program: Displays the programlevelfromP1toP12.
P1 –Manualyou can controlthe tension levelbypressingtheP2toP10
programsarepreset atthe factory.P11and P12 arehart ratecontrol
programs.The monitorautomaticallyadjust theworkout resistance
according toyourheart rate.
Monitorfunction
Program1toProgram10
Press the up ordownkeytochooseyourprogram(P1-P10).
Press Etoaccept the program.
Press the up ordownkeytoset yourtime.
Press Etoaccept yourpreset time.
Press Stostart yourexerciseprogram.
Program11-program12
P11is60%of yourtarget heartrate.
P12 is85%of yourtargetheart rate.
Press the up ordownkeytochoosethe programp11orp12.
Press Etoaccept the program.
Press the up ordownkeytoset yourtime.
Press Etoaccept yourpreset time.
Press the up ordownkeytoset yourage.
Press the Etoaccept yourage.
Press Stostart yourexerciseprogram.
Remarks
1.The monitorwillturnon automaticallybypressinganykeyorwhen yourstarttopedal.
The monitorwillshutoffautomaticallyifnosignalisdetected forfourminutesandwill
keep allfunction values.You maypress Sorstart topedaltohavethecomputer
resume.
2.Press the reset button forfoursecondstoreset allvaluestozero
3.Whenyou preset yourtime, the computerwilldivide the timeby10 regularintervals
foryourprograms.
4.You can increaseordecreaseyourtension whileinprogramsP1toP10.
PDFcreated withpdfFactorytrialversion www.softwarelabs.com

2009
11
PARTLIST
KEYNO.
PARTNO. DESCRIPTION Q TY
1
8
59
0
1
Adaptorw/cable 1
2 85902 Rearstabilizerend cap 2
3 85903 Machine screwM4*12mm 16
4 85904 Carriage bolt M8*75mm 4
5 85905 Cap nut M8 4
6 8590 Spring washerM8mm 10
7 85907 CurvewasherM8mm 10
8 85908 Foamgrip 2
9 85909 Hand pulsesensor 2
10R 85910R
Handlebarright
1
10L 85910L Handlebarleft 1
11 85911 Plasticendcap 1’2
12 85912 Plasticendcap 1’2
13 85913 Machine screwM4*15mm 12
14R 85914R Back chaincoverright 1
14L 85914L Back chaincoverleft 1
15 85915 Rearframe 1
16 85916 Seat support tube 1
17 85917 Hexbolt M10*135mm 2
18 85918 CurvewasherM10 4
19 85919 Spring washerM10 2
20 85920 Nylon locknut M10 2
21R 82921R Front chaincoverright 1
21L 85921L Front chaincoverleft 1
22 85922 Machine screwM5*25mm 6
23 85923 Nut 3/8’*7mm 3
24 85924 Nut 3/8’*4mm 1
25 85925 Belt adjusterM6*50mm 2
26 85926 Chaincoverprotector 2
27 85927 Cclip26mm 1
28 85928 Mag. Flywheelsystem 1
29 85929 Plasticsleeve 2
PDFcreated withpdfFactorytrialversion www.softwarelabs.com

2009
12
KEYNO.
PARTNO. DESCRIPTION Q TY
30 85930 Hand pulsejack w/wire 1
31 85931 Extension hand pulsewire 1
32 85932 Plasticsleeve 1
34 85934 Machine screwM4*8mm 2
35 85935 Fixed bracket 1
36 85936 Seat adjustableknob 1
37 85937 Machine screwM6*30mm 4
38 85938 Squareendcap 2
39 85939 Seat 1
40 85940 Back cushion 1
41 85941 Machine screwM6*35mm 2
42 85942 V-Belt 1
43 85943 Pulleyw/axle 1
44 85944 Magnet 6.5*15mm 1
45 85945 Spring 1
46 85946 Allen head bolt M10*20mm 1
47 85947 Idlerwheelbracket 1
48 85948 Flat washer22*10.2*1.0mm 1
49 85949 Nylon nut M10*7mm 2
50 85950 Idlerwheel 1
51 85951 Allen head bolt M10*40mm 1
52 85952 Bearing 1
53 85953 Spacer15*10*15mm 1
54 85954 Bearing 2
55 85955 Spring clip 2
56 85956 Gearboxw/wire 1
57 85957 Flat washer 1
58R 85958R Crankright 1
58L 85958L Crankleft 1
59 85959 Antislipperynutright threadM8*20mm 2
60 85960 Crankbracket 2
61 85961 Crankcover 2
62 85962 Crankcap 2
PDFcreated withpdfFactorytrialversion www.softwarelabs.com

2009
13
KEYNO.
PARTNO. DESCRIPTION Q TY
63 85963 Spacer18*13*10mm 2
64R 85964R Pedalright 1
64L 85964L Pedalleft 1
65R 85965R Pedalstrap right 1
65L 85965L Pedalstrap left 1
66 85966 transportation wheel 2
67 85967 Sensorw/wire 1
68 85968 Machine screwM5*15mm 3
69 85969 CurvewasherM6 4
70 85970 Frontframe 1
71 85971 Cross head screwM6*15mm 4
72 85972 Hand pulsewire 1
73 85973 Plug 2
74 85974 Decoration strap 1
75 85975 Upright post 1
76 85976 Upperhand pulsewire 1
77 85977 Extension sensorwire 1
78 85978 Extension monitorwire 1
79 85979 Monitor 1
80 85980 Allen head bolt M8*20mm 6
81 85981 Flat washerM6 10
82 85982 Rearstabilizer 1
83 85983 Front stabilizer 1
84 84984 Allen wrench6mm 1
85 85985 Universalwrench 1
86 85986 Powercable 1
87 85987 Extension powercable 1
88 85988 Nut 1
PDFcreated withpdfFactorytrialversion www.softwarelabs.com

2009
14
DIAGRAM
PDFcreated withpdfFactorytrialversion www.softwarelabs.com

2009
15
TROUBLE SHOOTINGGUIDE
Problem Cause Correction
Monitordoesnot
display Adaptornot plug in Plug inadaptor
Nospeed ordistance
displays on the
monitor
Gearboxnot connecting
properly Securelyplug sending unitinto
extension wireand the back of the
monitor
Sendingunit not working
properly Replacesendingunit
Monitornot working properlyReplacemonitor
Notension Tensioncontrolcablenot
connected Securelyplug tension controlcable
intothe extension tension control
cable
Magneticwheelnot working
properly Replacemagneticwheel
Heart ratenot
displayingPulsewirenot connected
not connected Securelyplug wiresintotheback of
the monitor
Hand pulsedefective Replacehandpulsegriporearclip
Monitornot working properlyReplacemonitor
Grinding Crankbearing defective Replacecrankbearings
Idlerpulleydefective Replaceidlerpulley
Mag wheeldefective Replacemagneticwheel
Squealing V-belt slipping Adjust v-belt
PDFcreated withpdfFactorytrialversion www.softwarelabs.com

2009
16
TRAININGGUIDELINES
Exercise
Exerciseisone ofthe mostimportantfactorsinthe overallhealthofan individual.Listed
among itsbenefitsare:
žIncreasedcapacityforphysicalwork(strengthendurance)
žIncreasedcardiovascular(heart andarteries/veins)and respiratoryefficiency
žDecreased risk of coronaryheart disease
žChangesinbodymetabolism, e.g. losing weight
žDelayingthe physiologicaleffectsof age
žPhysiologicaleffects, e.g. reduction instress,increaseinself-confidence,etc.
BasicComponentsofPhysical Fitness
žTherearefourallencompassing componentsofphysicalfitness and weneed tobriefly
define eachand clarifyitsrole.
žStrengthisthe capacityofamuscletoexertaforceagainstresistance.Strength
contributestopowerand speed and isofgreatimportancetoamajorityofsports
people.
žMuscularEnduranceisthecapacitytoexertaforcerepeatedlyoveraperiodoftime,
e.g.itisthe capacityof yourlegstocarryyou10 Kmwithout stopping.
žFlexibilityisthe range ofmotion aboutajoint. Improving flexibilityinvolvesthe
stretching ofmusclesand tendonstomaintainorincreasesuppleness,and
providesincreased resistancetomuscleinjuryorsoreness.
žCardio-RespiratoryEnduranceisthe mostessentialcomponentofphysicalfitness.
It isthe efficient functioning ofthe heart and lungs
AerobicFitness
The largestamountofoxygen thatyou can useperminuteduring exerciseiscalled your
maximumoxygen uptake(MVo2).Thisisoftenreferred toasyouraerobiccapacity.
The effortthatyou canexertoveraprolonged periodoftimeislimited byyourabilityto
deliveroxygen tothe working muscles.Regularvigorousexerciseproducesatraining effect
thatcanincreaseyouraerobiccapacitybyasmuchas20 to30%.AnincreasedMVO2
indicatesan increased abilityofthe hearttopumpblood,ofthe lungstoventilateoxygen
and of themusclestotakeupoxygen.
AnaerobicTraining
Thismeans “withoutoxygen”and isthe outputofenergywhen the oxygen supplyis
insufficient tomeet the body’slong termenergydemands. (Forexample, 100 metersprint).
TheTrainingThreshold
Thisistheminimumlevelof exercisewhichisrequiredtoproducesignificantimprovements
inanyphysicalfitness parameter.
Progression
Asyourbecomefitter, ahigherintensityof exerciseisrequired tocreateanoverload and
thereforeprovide continued improvement
Overload
Thisiswhereyou exerciseatalevelabovethatwhichcan becarried outcomfortably.The
intensity,duration and frequencyofexerciseshouldbeabovethetrainingthresholdand
shouldbe graduallyincreased asthe bodyadaptstothe increasingdemands.Asyour
fitness levelimproves, sothe training thresholdshouldberaised.
Workingthrough yourprogramand graduallyincreasing the overload factorisimportant.
PDFcreated withpdfFactorytrialversion www.softwarelabs.com

2009
17
Specificity
Different formsofexerciseproducedifferent results.Thetypeofexercisethat iscarriedout
isspecificbothtothe musclegroupsbeingused and tothe energysourceinvolved.
Thereislittletransferoftheeffectsofexercise,i.e.fromstrengthtrainingtocardiovascular
fitness.Thatiswhyitisimportanttohaveanexerciseprogramtailored toyourspecific
needs.
Reversibility
If you stop exercising ordo notdo yourprogramoften enough,you willlosethebenefitsyou
havegained. Regularworkoutsarethe keytosuccess.
Warm Up
Everyexerciseprogramshouldstartwithawarmup wherethe bodyispreparedforthe
effort tocome. It shouldbe gentleandpreferablyusethe musclestobe involvedlater.
Stretchingshouldbeincluded inbothyourwarmup andcooldown,and shouldbe
performed after3-5minutesoflowintensityaerobicactivityorcallisthenictype exercise.
Warm UporCool Down
Thisinvolvesagradualdecreaseinthe intensityofthe exercisesession.Followingexercise,
alarge supplyof blood remainsinthe workingmuscles. If itisnot returned promptlytothe
centralcirculation, pooling ofblood mayoccurinthe muscles
HeartRate
Asyou exercise,sothe rateatwhichyourheartbeatalsoincreases.Thisisoften used asa
measureoftherequiredintensityofexercise.You need toexercisehardenoughto
condition yourcirculatorysystem,and increaseyourpulserate,butnotenough tostrain
yourheart.
Yourinitiallevelof fitness isimportant indevelopingan exerciseprogramforyou. If you are
starting off,you cangetagoodtraining effectwithaheartrateof110-120 beatsper
minute(BPM). If you arefitter, youwillneed ahigherthresholdof stimulation.
Tobeginwith,you shouldexerciseatalevelthatelevatesyourheartratetoabout65 to
70%ofyourmaximum.If you find thisistooeasy,you maywanttoincreaseit, butitis
bettertolean onthe conservativeside.
Asaruleof thumb, the maximumheart rateis220 minusyourage. Asyou increaseinage,
soyourheart, likeothermuscles,losessomeofitsefficiency. Someofitsnaturallossiswon
back asfitness improves.
The followingtableisaguide tothosewho are “startingfitness”.
Age 25 30 35 4045 50 55 60 65
Target heart Rate
10Second Count23 22 22 2120 19 19 18 18
BeatsperMinute138132 132 126120114 114108108
Pulse Count
The pulsecount(on yourwristorcarotidarteryintheneck,takenwithtwoindexfingers)is
done forten seconds,taken afewsecondsafteryou stop exercising.Thisisfortworeasons:
(a)10 secondsislongenoughforaccuracy, (b)thepulsecountistoapproximateyourBPM
rateatthetimeyou areexercising.Sinceheartrateslowsasyourecover,alongercount
isn’t asaccurate.
PDFcreated withpdfFactorytrialversion www.softwarelabs.com

2009
18
The target isnot amagicnumber,butageneralguide. If you’reaboveaveragefitness,you
mayworkquitecomfortablyalittleabovethat suggested foryouragegroup.
The followingtableisaguidetothosewho arekeepingfit. Hereweareworkingatabout
80%of maximum.
Age 25 30 35 40 45 50 55 60 65
Target heart Rate
10Second Count23 22 22 21 20 19 19 18 18
BeatsperMinute138132 132126120114 114 108 108
Don’tpushyourselftoohardtoreachthefiguresonthistable.It can be veryuncomfortable
ifyou overdoit. Letithappennaturallyasyouworkthroughyourprogram.Remember,the
targetisaguide, not arule, alittleaboveorbelowisjust fine.
Twofinalcomments:(1)don’tbe concerned withdaytodayvariationsinyourpulserate,
beingunderpressureornotenough sleep canaffectit;(2)yourpulserateisaguide,don’t
becomeaslavetoit.
MuscleSoreness
Forthe firstweekorso,thismaybe the onlyindicationyouhavethat you areon an exercise
program. This, of course, doesdepend on youroverallfitness level. Aconfirmation that you
areon the correctprogramisaveryslightsoreness inmostmajormusclegroups.Thisis
quitenormalandwilldisappearinamatterofdays.
If youexperiencemajordiscomfort, youmaybe onaprogramthatistooadvancedoryou
haveincreased yourprogramtoo rapidly.
If you experiencePAINduringorafterexercise, yourbodyistelling yoursomething.
Stop exercisingand consult yourdoctor.
WhattoWear
Wearclothing thatwill notrestrictyourmovementinanywaywhileexercising.Clothes
shouldbe lightenough toallowthe bodytocool.Excessiveclothingthatcausesyou to
perspiremorethanyounormallywouldwhileexercising,givesyounoadvantage.The extra
weight you loseisbodyfluidandwillbe replaced withthenext glass of wateryoudrink. It is
advisabletowearapairof gymorrunning shoesor “sneakers”.
BreathingduringExercise
Donot holdyourbreathwhileexercising. Breathe normallyasmuchaspossible.Remember,
breathinginvolvestheintakeand distribution of oxygen, whichfeedsthe working muscles.
Restperiods
Onceyou startyourexerciseprogram,you shouldcontinue through tothe end.Donot
breakoffhalfwaythroughandthenrestartatthe sameplacelateronwithoutgoingthrough
the warm-up stage again.
The rest period requiredbetween strengthtrainingexercisesmayvaryfromperson to
person.Thiswilldepend mostlyon yourlevelof fitness andthe programyou havechosen.
Rest between exercisesbyallmeans, but do not allowthistoexceed twominutes. Most
peoplemanage withhalf minutetoone minuterest periods
PDFcreated withpdfFactorytrialversion www.softwarelabs.com

2009
19
STRETCHING
Stretching shouldbeincludedinbothyourwarm up and cooldown, and shouldbe
performed after3-5minutesoflowintensityaerobicactivityorcallisthenictype exercise.
Movementsshouldbeperformed slowlyandsmoothly, withno bouncingorjerking.Move
intothe stretchuntilslighttension,notpain,isfeltinthe muscleand holdfor20-30 seconds.
Breathing shouldbe slow, rhythmicaland undercontrol, making surenevertoholdyour
breath.
HEADROLLS SHOULDERLIFTS
Rotateyourhead tothe right forone count, feeling Lift yourright shoulderup towardyourear
the stretchup the left side ofyourneck. Next rotateforone count.Then liftyourleft shoulder
yourheadbackforone count, stretching yourchintoup forone count asyou loweryourright
the ceiling and letting yourmouthopen. Rotateyourshoulder.
head tothe leftforone count, and finally, drop your
head toyourchest forone count.
SIDESTRETCHES QUADRICEPS STRETCH
Open yourarmstothe side andcontinue liftingWithone hand against awall forbalance,
themuntil theyareoveryourhead. Reachyourreachbehind youandpull yourright foot up.
right armasfarupwardtowardthe ceilingasBringyourheelasclosetoyourbuttocks as
youcan foronecount. Feelthe stretchuppossible. Holdfor15 countsand repeat with
yourright side. Repeat thisaction withyourleft foot up.
left arm.
PDFcreated withpdfFactorytrialversion www.softwarelabs.com
Other manuals for Free Spirit
2
Table of contents
Other Sears Exercise Bike manuals

Sears
Sears PRO-FORM GL36 User manual

Sears
Sears FREE SPIRIT C249 30045 0 User manual

Sears
Sears C249 30101 0 16216802 User manual

Sears
Sears 831.287602 User manual

Sears
Sears PRO-FORM CrossTrainer 56 User manual

Sears
Sears Lifestyler 142.288040 User manual

Sears
Sears PRO-FORM SR 20 User manual

Sears
Sears 831.288265 User manual