Sebo BS 36 Comfort User manual

MADE IN GERMANY
MADE IN GERMANY
SEBO BS 36/46 COMFORT
GEBRAUCHSANWEISUNG / INSTRUCTION MANUAL

Inhaltsverzeichnis
Seite
1 Zubehör 3
2 Technische Daten 3
3 Sicherheitshinweise 4
4 Hinweis zur Entsorgung 5
5 Inbetriebnahme 6
6 Wartung 7
7 Ersatzteile 8
Table of contents Page
1 Attachments 3
2 Technical Details 3
3 Safety Instructions 4
4 Note on Disposal 5
5 Preparation 6
6 Maintenance 7
7 Spare parts 8
2
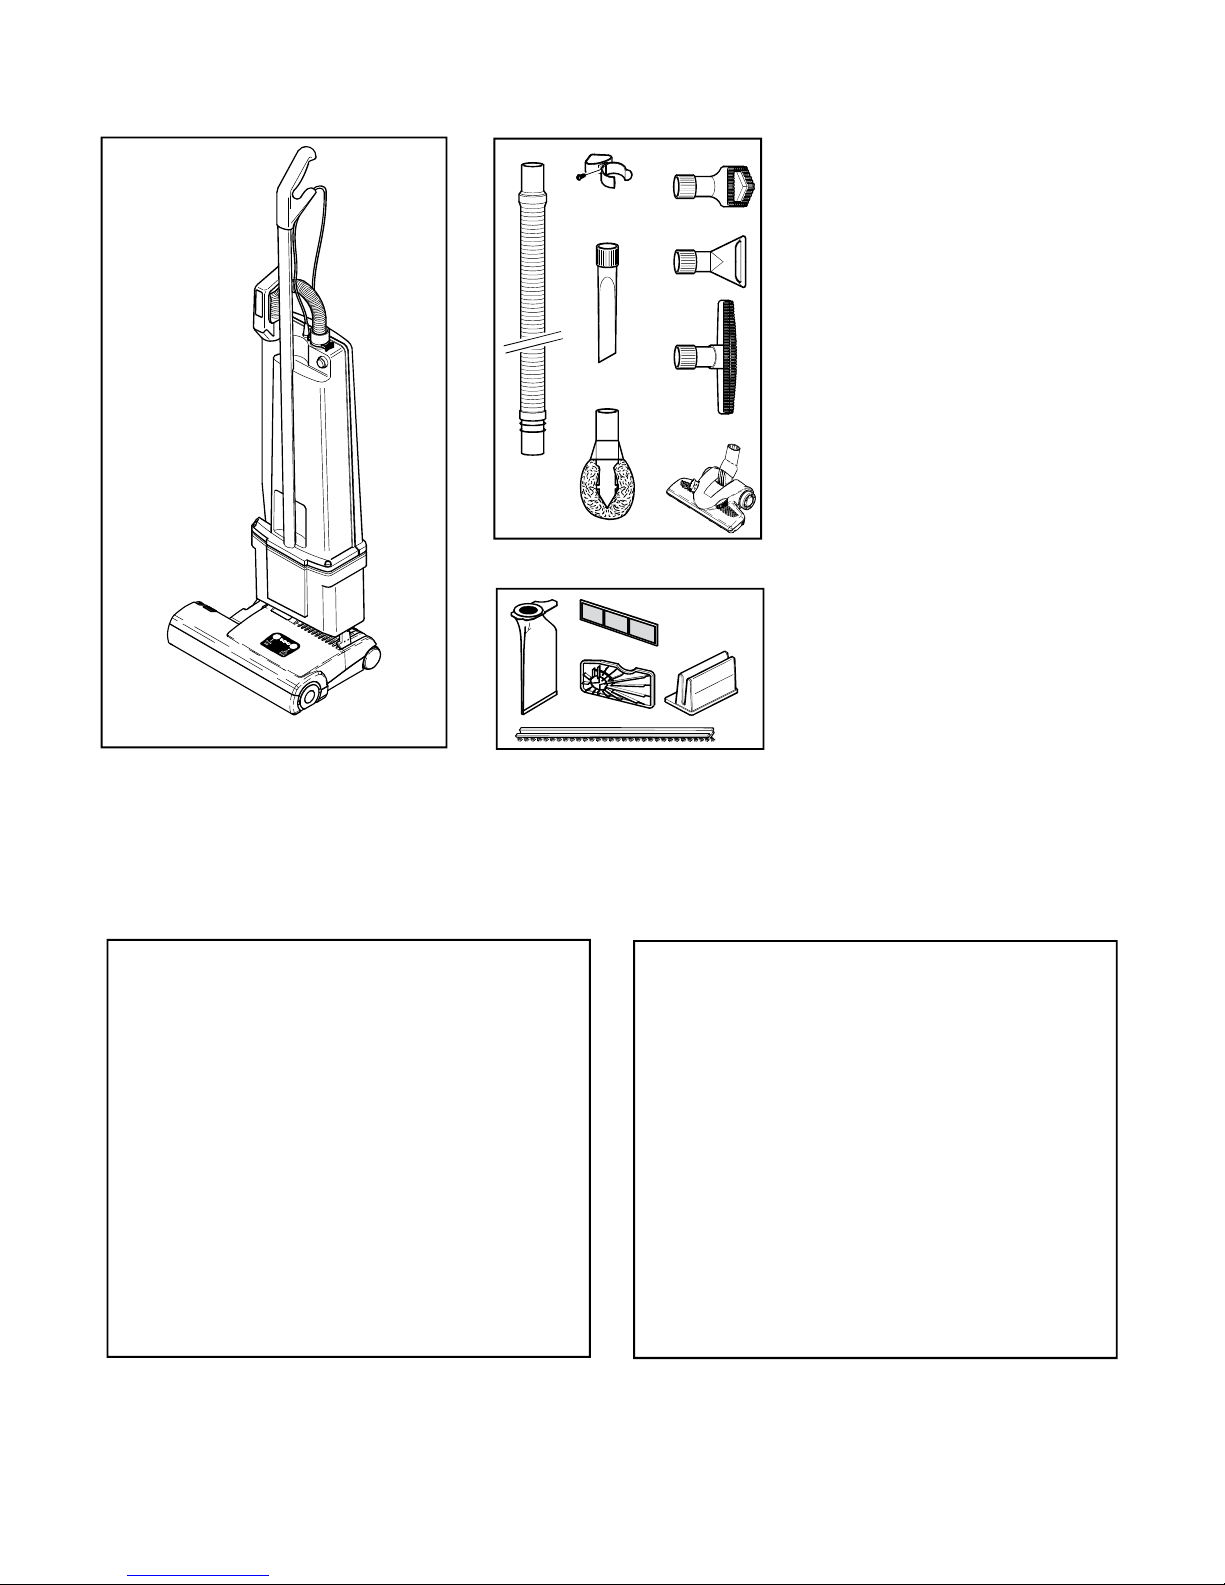
Sonderzubehör
1 1495 Verlängerungsschlauch
2 1081 Zubehörklammer
3 1092 Fugendüse
4 1094 Staubpinsel
5 1090 Flachpolsterdüse
6 1325 Wand- und Polsterbürste
7 7290dg Kombi-Bodendüse
8 1496 Heizkörperpinsel
Service -Teile
1 1055 Filtertüte
2 1079 Stoff-Filterbeutel
(nur mit Mikrofilter verwenden)
3 1467 Abluftfilter
4 1044 Sicherheitsfilter
5 1435 Mikrofilter
6 2046 Bürstenstreifen BS36 COMFORT
6 4028 Bürstenstreifen BS46 COMFORT
Optional Attach ents
1 1495 Extension Hose
2 1081 Clamp
3 1092 Crevice Nozzle
4 1094 Dusting Brush
5 1090 Upholstery Nozzle
6 1325 Wall- and Floor Brush
7 7290dg Combination Nozzle
8 1496 Radiator Brush
Service Parts
1 1055 Paper Bag
2 1079 Cloth Bag
(only use with Micro-Filter)
3 1467 Exhaust Filter
4 1044 Vacuum Motor Filter
5 1435 Micro-Hospital-Filter
6 2046 Brush strip BS36 COMFORT
6 4028 Brush strip BS46 COMFORT
1
2
3
4
5
6
7
8
1
2
3
4
5
6
2. Technische Daten
Staubsauger:
Gebläsemotor ....................................... 1 Watt
max ...................................... 13 Watt
Unterdruck .......................................... 23 mbar
(235 mm WS)
Luftmenge ............................................ 52 l/s
Filtertüte ............................................. 5, liter, 3-lagig
Bürstenmotor ....................................... 175/2 Watt
Arbeitsbreite ........................................ 36 /46 mm
Borstenstreifen .................................... auswechselbar
Bürstenantrieb .................................... Zahnriemen mit
elektrischem
Überlastungsschutz
Höhe .................................................... 125 mm
Breite ................................................... 36 /46 mm
Gewicht ................................................ 9,1/9,6 kg
Vibrationspegel ................................... <= 2,5 m/s
2
Schalldruckpegel ................................. 68/69 dB(A)
Schutzklasse ....................................... II, doppelt isoliert
Arbeiten an der elektrischen Installation dürfen nur von Sach-
kundigen ausgeführt werden
Vacuu Cleaner:
Vacuum Motor ................................................1 Watt
max ................................................13 Watt
Suction ...........................................................23 mbar
(235 mm WS)
Air Flow .........................................................52 l/s
Filter Bag .......................................................5. litres, 3-layer
Brush motor ..................................................175/2 Watt
Working width................................................36 /46 mm
Brush strip.....................................................replaceable
Brush drive.....................................................non slip drive belt
with electronic
overload protection
Height ............................................................125 mm
Width .............................................................36 /46 mm
Weight ............................................................9.1/9.6 kg
Vibration level ................................................<= 2,5 m/s2
Sound pressure level .....................................68/69 dB(A)
Protection ......................................................double insulated
For Service please contact your supplier or the address below.
2. Technical Details
1. Zubehör / Attach ents
3

Original Bedienungsanleitung
Lesen Sie bitte diese Gebrauchsanweisung und
beachten Sie die darin enthaltenen Gebrauchs-,
Sicherheits- und Warnhinweise, bevor Sie das
Gerät in Betrieb neh en.
Vielen Dank, dass Sie sich für einen SEBO entschieden haben Wir
sind sicher, dass Ihnen dieses Gerät gute Dienste leisten wird und
Sie viel Freude an ihm haben werden Ihre Hinweise und Wünsche
nehmen wir gerne unter www.sebo.de entgegen
Ihr neuer SEBO ist ein hochwertiges, langlebiges und innovatives
Produkt, das nach neuester Technologie in Deutschland entwik-
kelt und gefertigt wurde Seine effiziente Saugleistung und seine
serienmäßig integrierte S-Klasse-Filtration bieten Ihnen außer-
gewöhnlich hohe Standards Erleben Sie selbst das professionelle
Saugerlebnis!
3. Sicherheitshinweise
Die Gebrauchsanweisung bitte gut aufbewahren Wird das
Gerät an Dritte weitergegeben, muss unbedingt die Ge-
brauchsanweisung mit übergeben werden
Die Benutzung des Gerätes geschieht auf eigene Verant-
wortung Der Hersteller haftet nicht für Schäden, die durch
falsche Bedienung oder nicht bestimmungsgemäßen Ge-
brauch verursacht werden
Bestimmungsgemäße Verwendung
Diese Maschine ist für gewerbliche Zwecke bestimmt zB
Hotels, Schulen, Krankenhäusern, Fabriken, Büros, Ge-
schäften
Dieses Gerät kann von Kindern ab 8 Jahren und darüber
und von Personen mit verringerten physischen, sensori-
schen oder mentalen Fähigkeiten oder Mangel an Erfah-
rung und/oder Wissen benutzt werden, wenn sie beauf-
sichtigt werden oder bezüglich des sicheren Gebrauchs
des Gerätes unterwiesen wurden und die daraus resultie-
renden Gefahren verstanden haben Kinder dürfen nicht
mit dem Gerät spielen Reinigung und Benutzerwartung
dürfen nicht durch Kinder ohne Beaufsichtigung durchge-
führt werden
Vor Inbetriebnahme des Staubsaugers ist dieser auf sicht-
bare Schäden am Gerät, der Netzanschlussleitung sowie
dem Saugschlauch zu untersuchen Falls ein Defekt festge-
stellt wird, muss dieser durch den Hersteller, seinem Kun-
dendienst oder einem qualifiziertem Servicepersonal beho-
ben werden Ein Gerät mit Defekten nicht anschließen!
Menschen oder Tiere nicht ab- bzw aufsaugen
Keine scharfen, leicht entflammbaren, explosiven und ge-
sundheitsschädlichen Stoffe oder Gase aufsaugen Nichts
Glühendes, Heißes oder Wasser aufsaugen
Niemals bei angeschlossenem oder laufenden Gerät an
die Bürste fassen! Es besteht Verletzungsgefahr durch
Einklemmung
Das Gerät nur an einwandfreien und korrekt abgesicher-
ten elektrischen Installationen betreiben
Netzkabel von scharfen Kanten fern halten
Original instruction manual
Please read these instructions and also the
Floor aintenance guide carefully before using
the achine.
Thank you for choosing a SEBO We are sure that you will enjoy
using your new SEBO machine We listen to our customers and if
you have any suggestions, please contact us at www.sebo.co.uk
Your new SEBO is a high quality, reliable, innovative product that
was developed in Germany with the most modern technology The
S-Class filtration and the effective cleaning power give you the
highest standards of cleaning efficiency
3. Safety Instructions
Please save these instructions If you pass the machine to
a third party, please pass these on as well The use of the
machine is at your own risk The manufacturer / supplier
is not liable for any injury or damage caused by incorrect
usage of the machine
Safe Use
This appliance is suitable for commercial use, e g in ho-
tels, schools, hospitals, factories, shops, offices, and rental
companies
This appliance can be used by children aged from 8 years
and above and persons with reduced physical, sensory or
mental capabilities or lack of experience and knowledge if
they are given supervision or instruction concerning use of
the appliance in a safe way and understand the hazards in-
volved Children should not play with the appliance Clean-
ing and user maintenance should not be done by children
without strict supervision
Before using the vacuum cleaner, always check for any
signs of damage, especially to the mains cable and hose
If a component is damaged, it must be replaced with a
genuine SEBO part For safety reasons this must be done
by a SEBO service representative or an authorized Service
technician The use of non-genuine parts will waive the
warranty for this product and could pose a serious safety
risk All repairs within the guarantee period should be
performed by an authorised SEBO service representative
Do not use a damaged machine
Do not use on people or animals
This machine must not be used for picking up liquid, sharp
objects, hot material, such as fire ash, or hazardous/
harmful dust
Do not use in the presence of flammable, explosive or
harmful materials and gases
Do not touch the brush when it is turning as this will cause
a risk of injury to the fingers
The machine should only be operated with fault-free and
correct electricity supply systems
Do not connect a damaged appliance to the power supply
Keep the cable away from sharp edges and prevent it
becoming trapped or crushed, or over-stretched (e g by
winding on too tightly)
4

Dieser Staubsauger ist nur zur Trockenanwendung be-
stimmt und darf nicht im Freien und unter nassen Bedin-
gungen verwendet oder aufbewahrt werden
Nach Benutzung des Gerätes den Staubsauger ausschal-
ten und den Netzstecker ziehen
Sicherer Gebrauch
Den Staubsauger nur an den vorgesehenen Griffen trans-
portieren und bedienen Handgriff während des Betriebes
stets festhalten Das Gerät erst abstellen, sobald die rotie-
rende Bürste komplett zum Stillstand gekommen ist, der
Netzschalter ausgeschaltet und der Netzstecker gezogen
wurde
Wickeln Sie die Netzanschlussleitung nach dem Betrieb
wieder auf, da durch sie eine Stolpergefahr für Personen
entsteht
Technische Sicherheit
Den Staubsauger nur gemäß der Anschlusswerte des Ty-
penschildes anschließen und betreiben
Benutzen Sie das Anschlusskabel oder den Saugschlauch
nicht zum Tragen des Gerätes
Netzstecker nicht am Kabel aus der Steckdose ziehen
Achten sie darauf, dass das Netzkabel niemals einge-
quetscht wird
Mit eingeschaltetem Gerät nicht über die Anschlusslei-
tung fahren
Den Staubsauger niemals ohne Filtertüte bzw Filter be-
nutzen Der Filterdeckel schließt nur mit korrekt einge-
setzter Filtertüte Wenden sie keine Gewalt an
Beobachten Sie die Füllanzeige des Staubbeutels und
wechseln Sie diesen bitte rechtzeitig
Vor Hitzequellen, Feuchtigkeit und Wasser schützen und nur
trocken oder mit einem leicht feuchten Tuch reinigen
Vor allen Arbeiten am Staubsauger:
Erst das Gerät ausschalten und den Netzstecker zie-
hen.
Das Gerät darf nur mit original SEBO Filtertüten und origi-
nal SEBO Ersatz- und Verschleißteilen betrieben werden
Nur die Verwendung von Originalteilen für dieses Produkt
berechtigt zu Garantieleistungen und gewährleistet die
Betriebssicherheit des Gerätes Änderungen am Staub-
sauger sind nicht zulässig
Zubehör
Die Steckdose am Staubsauger ist nur für original Zube-
hör zu verwenden
4. Hinweis zur Entsorgung
SEBO Geräte sind langlebig ausgelegt und können
meist problemlos und kostengünstig repariert wer-
den Am Ende seines Nutzungszeitraums können
Sie das Gerät kostenlos an jeder öffentlichen Sam-
melstelle abgeben Elektroaltgeräte gehören nicht
in den Restmüll Weitere Informationen erhalten Sie
durch Ihre Kommune
Use on dry surfaces only Do not store outdoors or in damp
conditions
When you finish or interrupt your work, always turn off,
unplug the machine and ensure the rotating brush has
stopped
Only carry the vacuum cleaner by the carry handle Always
hold the handle when operating the vacuum cleaner
Always stand the machine on a stable surface
Rewind the mains cable if the machine is not in use to re-
duce the risk of tripping
Ensure that the connection data on the data label (voltage
and frequency) match the mains electricity supply
Do not carry the vacuum cleaner by the cable or hose
Only disconnect from the socket by pulling the plug
Do not run over the cable
Do not over stretch the cable When winding it on the
machine ensure there is some slack where it enters the
handle
Do not use the vacuum cleaner without the filter bag or
filters If a filter bag is not fitted, the cover will not close
Never force it
Inspect the filter bag indicator regularly and change the fil-
ter bag when necessary We recommend changing all fil-
ters regularly, either when they have become dirty, or once
20 filter bags have been used
Electrical appliance, do not expose to liquid, moisture or
heat Only clean with a dry or slightly damp cloth
Always turn off and unplug the machine before un-
dertaking any maintenance.
This machine should only be operated with genuine SEBO
filter bags, filters and replacement parts The use of non-
genuine parts will waive the warranty for this product and
could pose a serious safety risk
Use only genuine SEBO Attachments
4. Note on Disposal
For advice on disposal of used appliances, please
contact your local authority
5
1
11
3
4
10
2
7
8
5
6
12
9
4
13
14
15
7
25
8
6
17
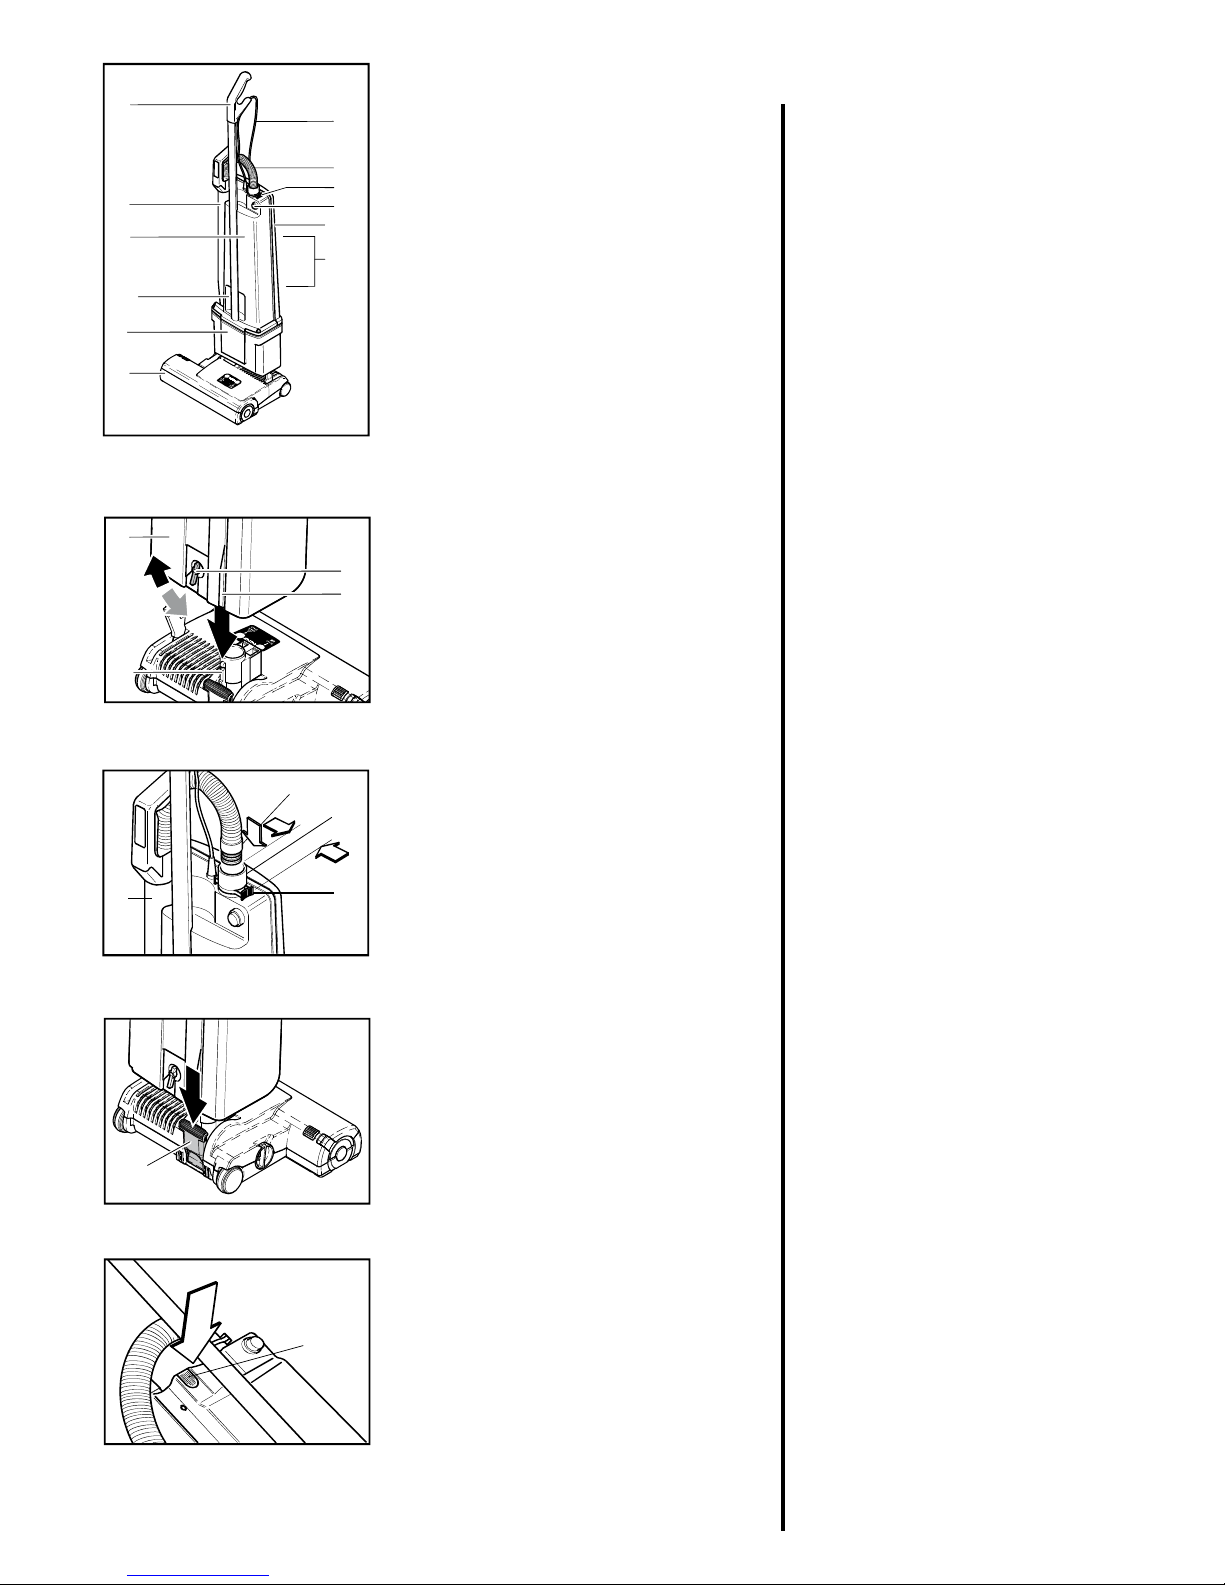
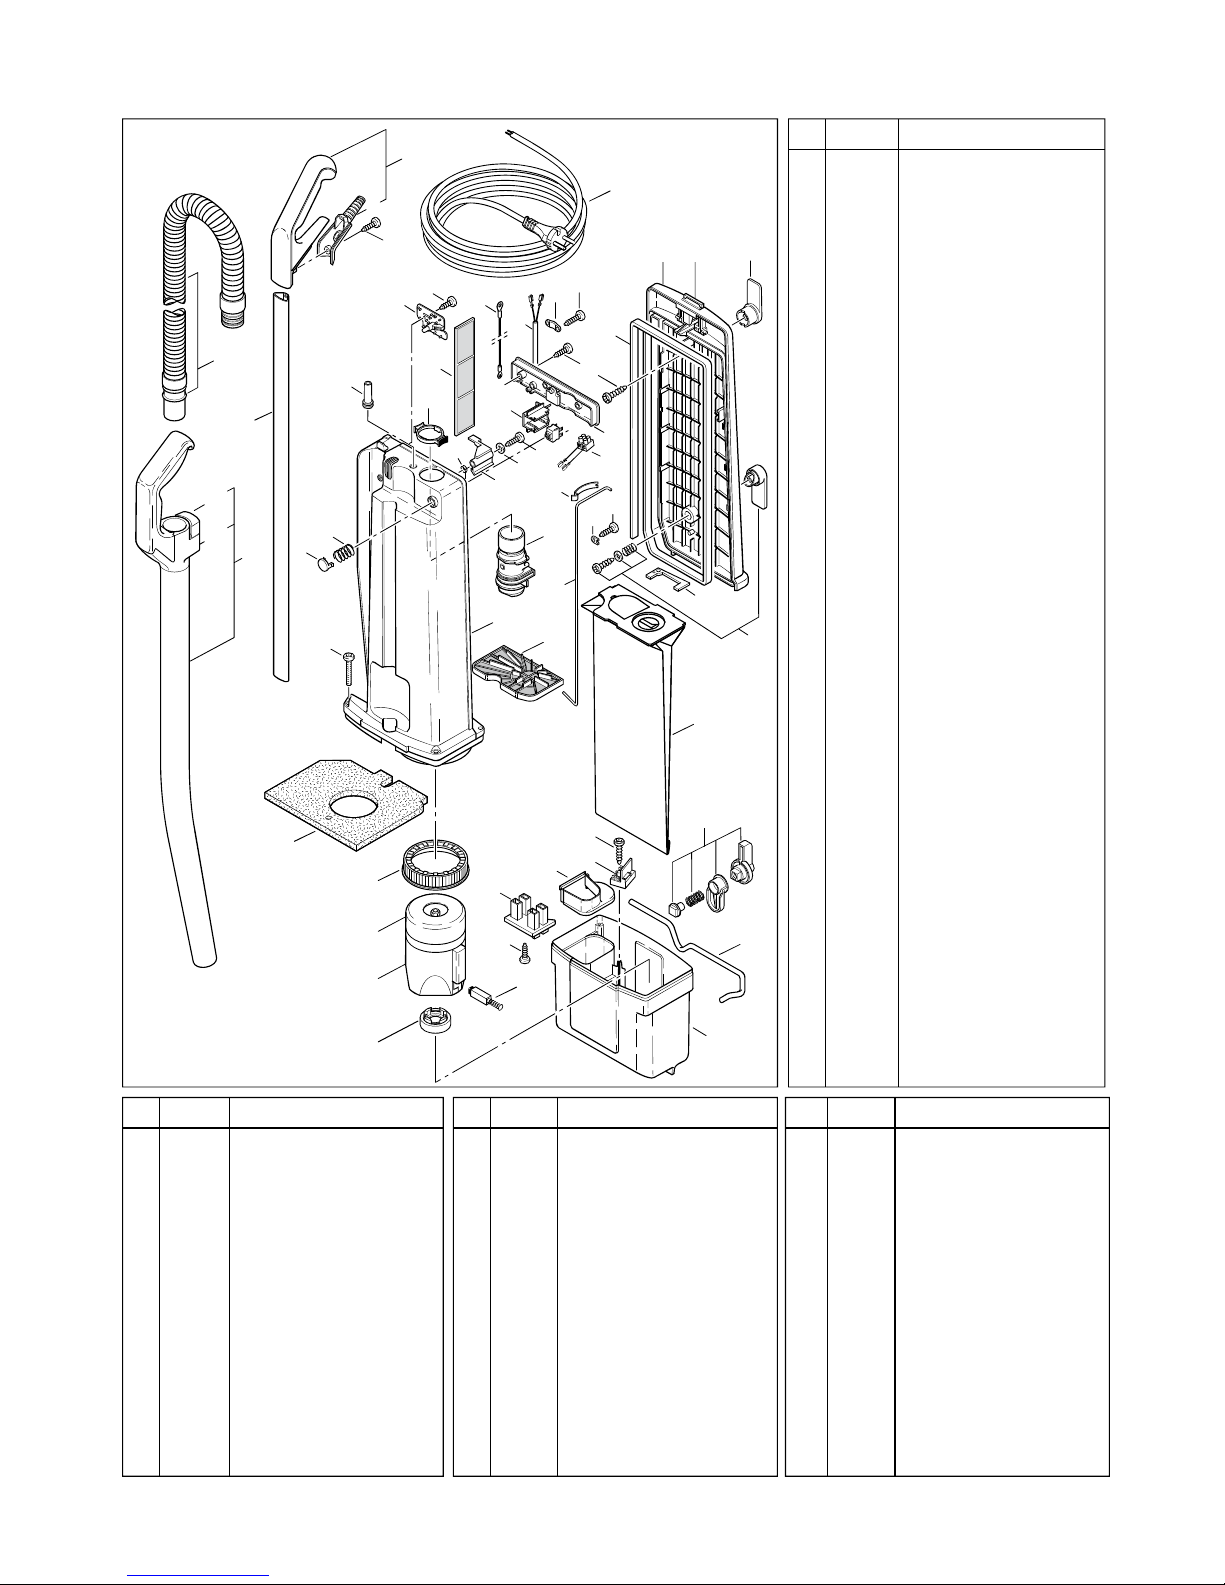
Zusa enbau des Bürstsaugers
Das Staubsauger-Oberteil in senkrechter Posi-
tion auf die Elektro-Teppichbürste stecken Die
Linie (13) auf dem Motorgehäuse (4) zeigt dabei
genau auf die Rippe am Gelenk (14) Der Dreh-
knopf (15) muß während des Aufsteckens nach
links gedreht sein, nach dem Aufstecken Knopf
in senkrechte Stellung drehen
Saugschlauch anschließen
Das Teleskopsaugrohr (6) erst in das Gelenk
einführen und dann mit dem Griff auf den Nok-
ken am Filtergehäuse stecken Die passende
Schlauchseite in das Teleskopsaugrohr (6) ein-
führen Zum Anschließen des Schlauches (7) an
das Filtergehäuse, das Ende mit der schwarzen
Buchse in die Verbindungshülse (25) einführen
und ganz einschieben Zum Lösen des Schlau-
ches den Sicherungsring (8) an den Griffflächen
zusammendrücken
Gelenkraste
Die Gelenkraste (17) arretiert den Universal-
staubsauger in senkrechter Ruhestellung Zum
Lösen der Gelenkraste (17) das Rastpedal tre-
ten und das Gerät nach hinten kippen
Teppichbürste einschalten
Die Teppichbürste schaltet sich automatisch
ein, sobald der Ein-/Aus-Schalter (9) betätigt
und die Gelenkraste (17) gelöst wurden
Filterfüllanzeige
Bei Aufleuchten der Kontrolleuchte(18) bitte
prüfen:
a) ist die Filtertüte voll ?
b) ist die Teppichbürste verstopft ?
c) ist der Saugschlauch verstopft ?
Entweder Filtertüte wechseln oder Verstopfung
beseitigen Es liegt keine Störung vor, wenn
beim Saugen mit dem Saugschlauch das Hand-
rohr verschlossen wird und die Lampe aufleuchtet
1 Griff
2 Anschlußleitung
3 Filtergehäuse
4 Motorkopf
5 Elektrobürste
6 Teleskoprohr
7 Schlauch
8 Sicherungsring
9 Ein-/Aus- Schalter
10 Deckel
11 Kabelhaken
12 Griffmulde
5. Inbetriebnah e
Asse bling the vacuu cleaner
Hold the vacuum section in the vertical position
and insert into the power head Locate the line
(13) on the motor housing (4) accurately oppo-
site the rib on the swivel neck (14) The locking
catch must be turned to the left during the lo-
cating Secure the vacuum section in place by
turning the locking catch to the vertical position
Attaching suction hose
Push the black end of the hose into the connect-
ing tube (25) so that it clicks into place Fit the
attachment tube (6) to the dust bag housing and
push the handle over the projection The other
end of the hose fits into the attachment tube only
one way
Upright lock
To release the machine from the locked upright
position depress the foot pedal (17) and lower
the dust bag housing (3)
Power head on/off
The power head motor stops automatically
when the machine is put in the upright posi-
tion and restarts when the foot pedal (17) is
depressed and the dust bag housing (3) tilted
back
Bag full indicator
If warning light (18) comes on check:
a) Is the dust bag full ?
b) Is there a blockage in the hose or power
head?
5. Preparation
Universalstaubsauger BS 36/46 COMFORT
1 Handle grip
2 Cable
3 Dust bag housing
4 Vacuum motor housing
5 Power head
6 Attachment tube
7 Hose
8 Retaining ring
9 On / Off switch
10 Back cover
11 Cable hook
12 Carrying recess
18
6
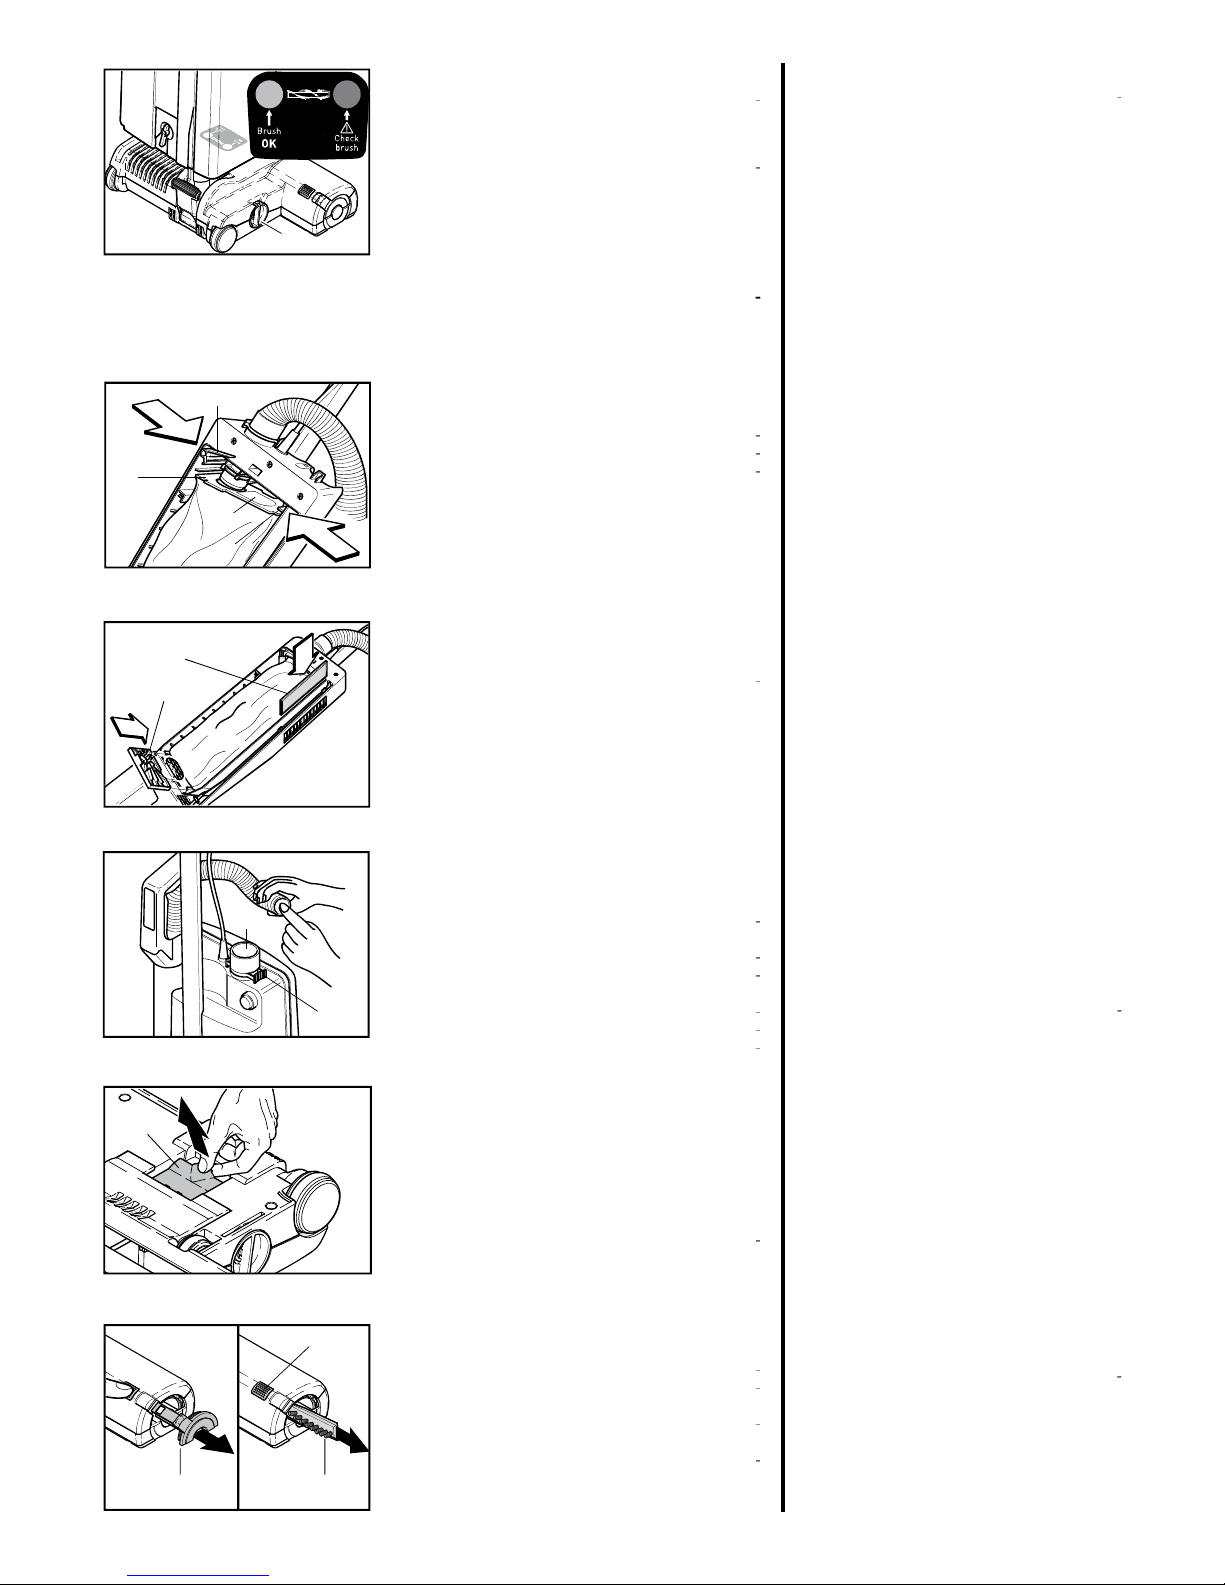
Wechseln der Filtertüte
Zum Filtertütenwechsel den Deckel (10) von
dem Filtergehäuse abnehmen Filtertütensiche
-
rung (20) nach unten drücken bis sich die Filter
-
tüte vom Stutzen abziehen läßt Filtertütenöff
-
nung mit Verschlußdeckel (21A) verschließen
Haltepappe (21) der neuen Filtertüte mit der
Schmalseite in die Halterung (22) einstecken
Filtertütensicherung nach unten drücken und
Haltepappe über den Rohrstutzen schieben bis
sie in die Filtertütensicherung einrastet
Filter wechseln
Sicherheitsfilter (23) - bei Verschmutzung durch
Ausklopfen reinigen, nach etwa 20 Filtertüten
-
wechseln austauschen Abluftfilter (24) - bei
starker Verschmutzung austauschen
Verstopfungen beseitigen
Um Verstopfungen im Schlauch zu entfernen,
sollte der Schlauch durch Drücken der Si
-
cherungsrasten (8) ausgerastet werden, den
Schlauch an der ausgerasteten Stelle auf Ver
-
stopfung überprüfen Ist an dieser Stelle kei
-
ne Verstopfung sichtbar, das andere Ende des
Schlauches in die Verbindungshülse (25) ste
k
-
ken Das dann freie Ende einige Male bei einge
-
schaltetem Gerät mit der Handfläche verschlie
-
ßen und wieder freigeben
ACHTUNG - Den Schlauch nie als it eine
Stab reinigen!
Danach das Gelenk des Saugvorsatzes an der
Einsteckstelle des Staubsaugers und dann ggf
durch die Klappe (33) auf der Unterseite der
Elektroteppichbürste überprüfen Stellen Sie
sicher, dass sich zwischen der Klappe und der
Einsteckstelle im Gelenk keine Verstopfung be
-
findet
Borstenstreifen wechseln
Zum Wechsel des Bürstenstreifens die Entriege
-
lungstaste (32) drücken und die Verschlusskap
-
pe (26) entfernen Die Bürstenwalze so drehen,
dass sich der Bürstenstreifen (27) durch die seit
-
liche Öffnung herausschieben lässt Den neuen
Bürstenstreifen ganz einschieben und die Ver
-
schlusskappe wieder einrasten lassen
19
20
21
21a
22
24
23
8
25
26 27
32
Bürstenkontrolle
Die Bürstenkontrolle überwacht ständig die Funk
-
tion der Bürste
Grün-Licht: Bürste arbeitet gut
Grün- und Rot-Licht: Teppichbürste durch Drehen
des Stellknopfes (19) auf eine niedrigere Zahl stel
-
len
Bei Stellung 1 und Grün- und Rot-Licht: Wechsel
des Bürstenstreifens
Rot-Licht blinkt: Die Bürste wurde blockiert oder
überlastet Das Gerät ausschalten, den Netzstecker
ziehen und die Bürste auf Verunreinigung prüfen
ACHTUNG - Bei allen Wartungs und Reinigungsar
-
beiten Gerät ausschalten und Netzstecker ziehen.
6. Wartung
Changing the paper bag
To change the dust bag: Remove back cover
(10) Push down lever (20) Lower dust bag from
connecting tube Close aperture of dust bag top
with cardboard cover (21 A) To fit new dust bag:
Insert top of dust bag (21) into slot (22) Push
lever (20) down and fit aperture of dust bag top
over connecting tube Return lever so that it is in
horizontal position
Do not re-use bags.
Changing filters
Vacuum motor filter (23) - Replace after ca 20
paper bags have been used
Exhaust filter (24) - Change when it becomes
dirty
Do not wash filters.
Clearing blockages
Blockages in the hose can cleared by squeezing
the retaining ring (8) and taking the hose off the
machine Please check both ends of the hose If
there isn’t a visible blockage please replace it
the wrong way round in the connecting tube (25),
holding it upright with one hand blocking the top
and switching on the machine If necessary rap
-
idly lift your hand on and off the end of the hose
Attention! Never use anything sharp to clear the
hose
Also check for a blockage in the swivel neck of
the power head and under the orange trap-door
(33) on the bottom of the power head Please
also ensure that the passage between these two
openings in the power head is clear
Changing the brush strip
To replace brush strip, push the button (32), re
-
move the side plate (26) and turn the brush so
that the brush strip (27) can be pulled out of the
opening Ensure that the new brush strip is fully
inserted and press the side plate back into place
Please ensure that the side plate is fully pushed
home so that it locks in place
Brush controller
The electronic brush controller monitors the op
-
eration of the brush
Green light: brush set correctly and running
Green and red light: Brush too high Adjust the
brush setting by turning the pile adjustment knob
(19) to a lower number
If the green and red light are still on at position
number one the brush strips is worn out and
must be replaced
Red light blinking: The brush is blocked and is
not turning Switch machine off, unplug from the
socket and clear the blockage
CAUTION - Always unplug fro the ains socket
before dis antling any part of achine.
6. Maintenance
33
7
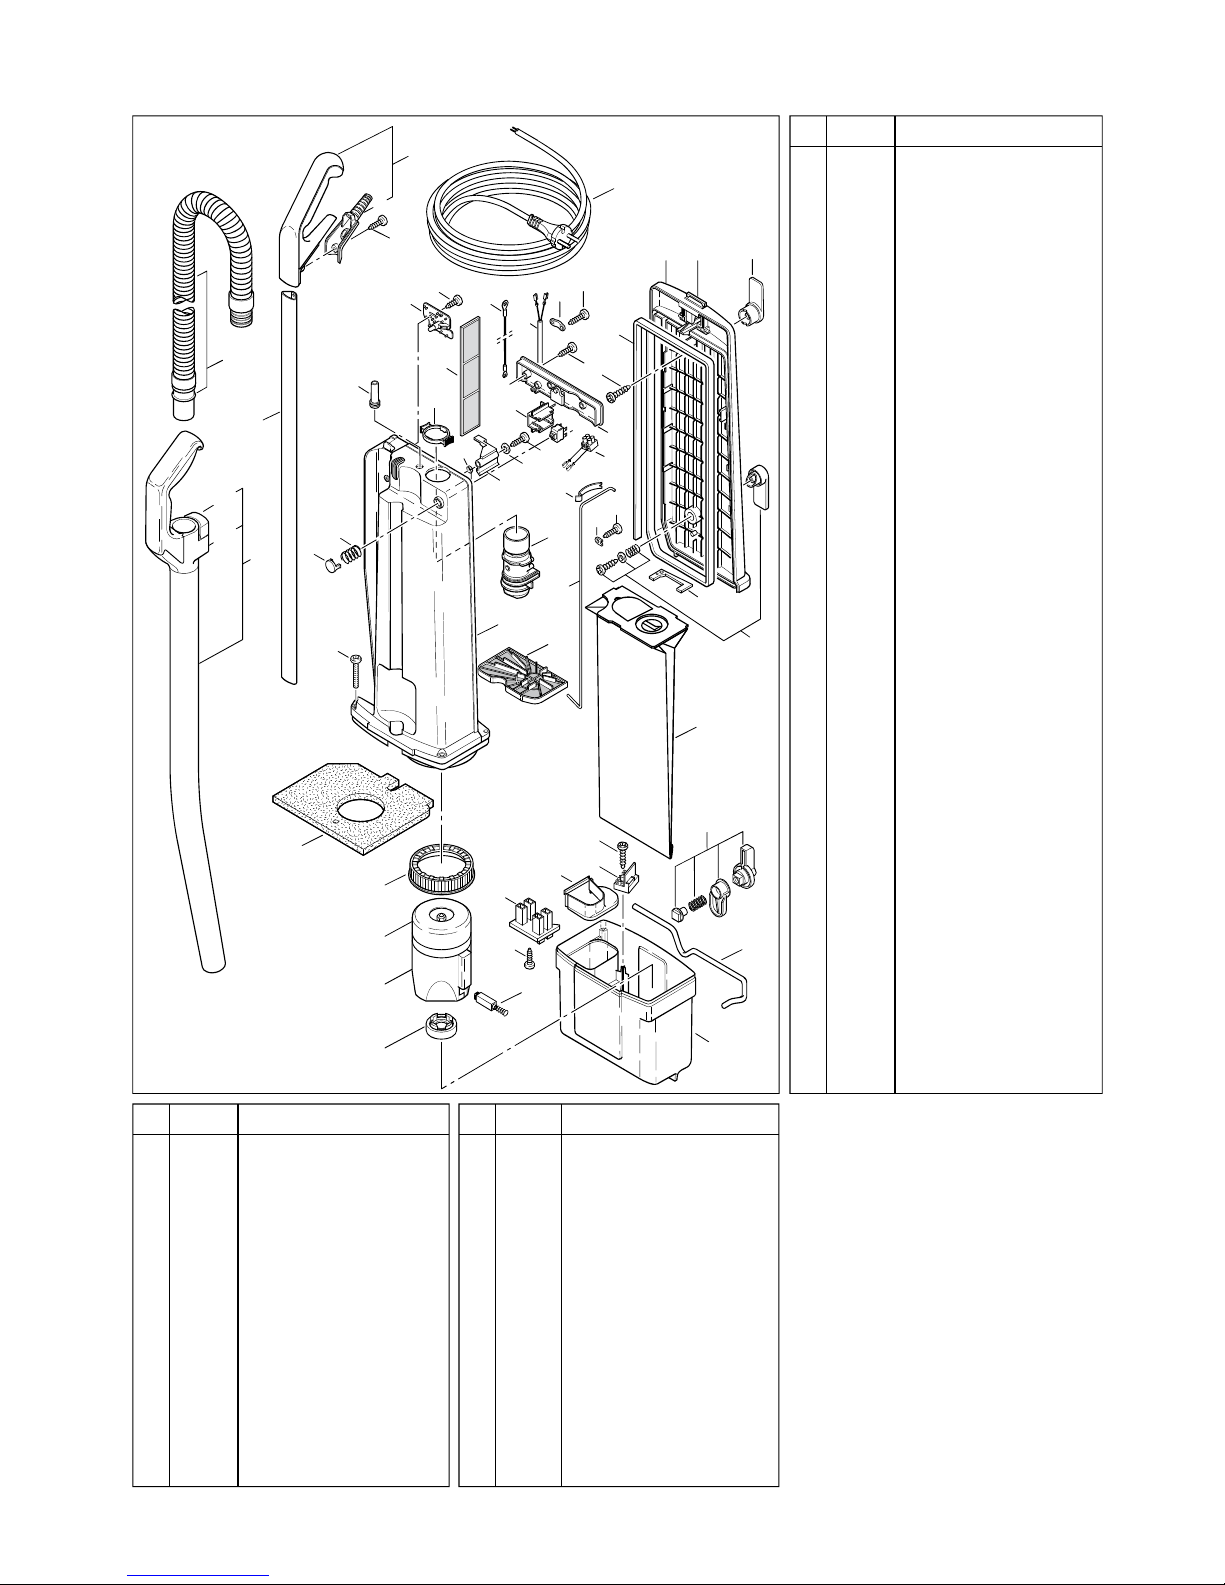
Pos. Art.-No. Benennung (DE)
26
8
6
30
36
46
46
46
917
53
22
1
54
50
51 31
4
32
2
3
5
23
38
11
21
12
16 47
29
Pos. Art.-Nr. Pos. Art.-Nr.Benennung (DE) Benennung (DE)
27
13
20
10
24
19
45 14
15
7
48
44
42
46
43
46
28
49
18
33
52
34
41
37
39
40
35
25
30
1462 DG
Leitungshaken, kompl. d-grau
1462 BL
Leitungshaken, kompl. lau
1462 DB
Leitungshaken, kompl. d- lau
31
1783 hg
Handsaugrohr, kompl.
32
1784 sb
Schlauch
33
1967 E
Topf
34
1580
Schalldämmungsmatte
35
1553
Verriegelungsstange
36
0819 dg
Verriegelungsknopf, kompl.
37
1888 ER
Ge läsemotor 230V / 1000W
38
05118
Kohle ürsten-Set
39
1821
Schalldämpfer
40
1411
Stützgummi
41
1047
Ge läsedichtring
42
1541
Kontaktaufnahme
43
1012 N
Kontaktsockel, kompl.
44
1559 hg
Kappe
45
0101 ER
Linsen lechschrau e C 3,9x9,5
46
0102 ER
Linsen lechschrau e F 3,9x13
47
0103 ER
Linsen lechschrau e C 3,9x16
48
0111 ER
Linsenschrau e AM 5x30
49
0140 ER
Schei e 4,3
50
1776 ER
Rastknopf incl. Rastenfedern
1739
Rastenfeder
51
1775 hg
Rastenkappe
52
1055
Filtertüte
53
05116ER
Anschlußklemme für
Schalter 05115
54
0127ER
Spiralformschrau e 4x10
1
1870/1dg
Anschlussleitung mit K-Stecker
1
1871/1dg
Anschlussleitung mit CH-Stecker
2
1037 EH
Griff, komplett
3
1596 HG
Griffa deckung
4
1794
Stiel
5
1968 dg
Gehäuse dunkelgrau
1968 bl
Gehäuse lau
1968 db
Gehäuse dunkel lau
6
1035 hg
Knickschutztülle
7
1966 hg
Schalterknopf
8
1962
Druckfeder
9
05115
Druckschalter 2-pol.
10
1955
Halter für Schalter
11
1897 dg
Ver indungshülse dunkelgrau
1897 bl
Ver indungshülse lau
1897 db
Ver indungshülse dunkel lau
12
1792 hg
Sicherungsring
13
1977 ER
Leiterplatte 230V
14
0835
Antistatikleitung (205 mm)
14
0836
Antistatikleitung (160 mm)
15
1028
Zwischenleitung
16
1030 UL
Zugentlastungsschelle
17
1026 dg
A deckung dunkelgrau
1026 bl
A deckung lau
1026 db
A deckung dunkel lau
18
1040
Filtertütensicherung
19
1041
Drehfeder
20
1027
Blattfeder (Filtersicherung)
21
1025
Sicherheitsfiltergestänge
22
1073
Lasche
23
1044
Sicherheitsfilter
24
1467
A luftfilter
25
1039 dg
Deckel dunkelgrau
1039 bl
Deckel lau
1039 db
Deckel dunkel lau
26
1059
Deckeldichtung 1,6 m
27
1061
Flachdichtung
28
1057 DG
Deckelschloss dunkelgrau
1057 BL
Deckelschloss lau
1057 DB
Deckelschloss dunkel lau
29
1461 dg
Leitungshaken dunkelgrau
1461 bl
Leitungshaken lau
1461 db
Leitungshaken dunkel lau
7. Ersatzteilliste BS36/46 COMFORT
8
7. Spare parts list BS36/46 COMFORT
Pos. Art.-No. Descrition (ENG)
26
8
6
30
36
46
46
46
917
53
22
1
54
50
51 31
4
32
2
3
5
23
38
11
21
12
16 47
29
Pos. Art.-No. Pos. Art.-No.
Description (ENG) Description (ENG)
27
13
20
10
24
19
45 14
15
7
48
44
42
46
43
46
28
49
18
33
52
34
41
37
39
40
35
25
Description (ENG)
Art.-No.
29 1461 dg Upper cord hook dark grey
1461 bl Upper cord hook blue
1461 db Upper cord hook dark blue
30 1462 DG Lower cord hook, compl. d grey
1462 BL Lower cord hook, compl. blue
1462 DB Lower cord hook, compl. d blue
31 17 3 hg Extension tube, compl.
32 17 4 sb Hose, compl.
33 1967 SE Motor housing
34 15 0 Sound insulation
35 1553 Locking rod
36 0 19 dg Locking catch, compl.
37 1 ER Vacuum motor 230V / 1000W
1 9 Vacuum motor 240V / 1000W
1 7 Vacuum motor 120V / 1000W
1 6 Vacuum motor 100V / 1000W
38 0511 S Carbon brush vac. motor
230V / 240V
05117 S Carbon brush vac. motor
100V / 120V
39 1 21 Motor cover
40 1411 Motor support
41 1047 Vacuum motor seal
42 1541 Female contact holder
43 1012 N Terninal block, compl.
44 1559 hg Cap
45 0101 ER Srew C 3,9x9,5
46 0102 ER Screw F 3,9x13
47 0103 ER Screw C 3,9x16
48 0111 ER Screw AM 5x30
49 0140 ER Washer 4,3
50 1776 ER Catch incl. Leaf spring
1 1 70/1 dg Cable with contour Plug
1 72/1 dg Cable with GB Plug
1954 dg Cable with US plug
1 74/1 dg Cable with AUS plug
1 73/1dg Cable with S Africa plug
2 1037 EH Handle grip, cpl.
3 1596 HG Handle cover
4 1794 Handle
5 196 dg Dust bag housing dark grey
196 bl Dust bag housing blue
196 db Dust bag housing dark blue
6 1035 hg Grommet
7 1966 hg Switch button
8 1962 Spring
9 05115 Switch 2 pol. 230/240V
9 05114 Switch 1 pol. 110/120V
10 1955 Switch holder
11 1 97 dg Connecting tube dark grey
1 97 bl Connecting tube blue
1 97 db Connecting tube dark blue
12 1792 hg Retaining ring
13 1977ER Printed circuit board
(230/240V)
1974ER Printed circuit board (120V)
14 0 35 Antistatic wire, blue (205 mm)
14 0 36 Antistatic wire, blue (160 mm)
15 102 Internal cable 220 240V
15 12 4 Internal cable 100 120V
16 1030 UL Cable clamp
17 1026 dg Switch housing dark grey
1026 bl Switch housing blue
1026 db Switch housing dark blue
18 1040 Dust bag lever
19 1041 Return spring
20 1027 Leaf spring
21 1025 Connecting rod
22 1073 Clamp
23 1044 Motorfilter
24 1467 Exhaust filter
25 1039 dg Cover dark grey
1039 bl Cover blue
1039 db Cover dark blue
26 1059 Back cover seal
27 1061 Gasket
28 1057 DG Latch with spring and pin d grey
1057 BL Latch with spring and pin blue
1057 DB Latch with spring and pin d blue
1739 ER Leaf spring
51 1775 hg Catch holder
52 1055 Paper bag
53 05116ER
Terminal block cpl.
54
0127ER
Screw 4x10
Pos.
9
114a
109
127
130
128
100
136
126
101
102
110
142
108
138
137
137
103
103
138
120
110
108
104
139 138
141
139
132
115
114
136
138
121
116
129
138
138
107
134
133
131 107 138
131a
131a
112
143
138
111 113
105
X
X
125
106
106
Pos. Art.-Nr. Benennung (DE)
140
117 119
118
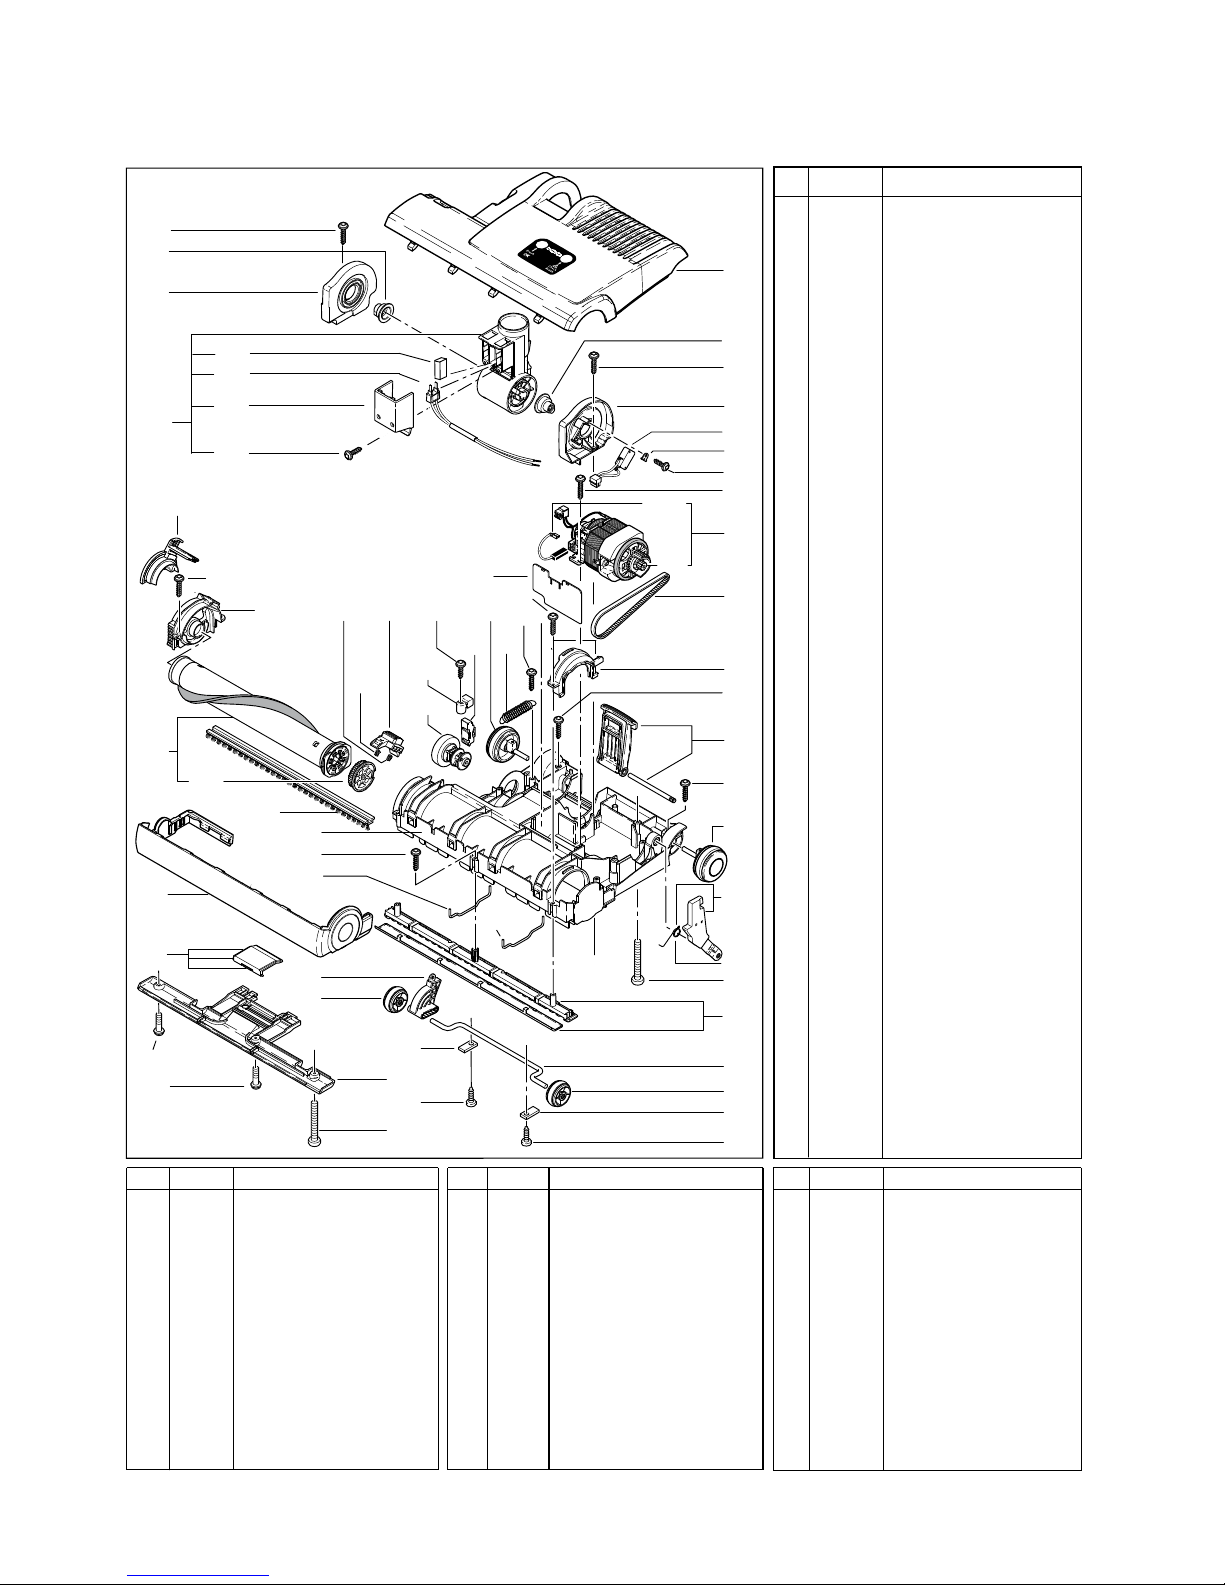
100 20200hg Unterteil, kompl.
101 20204ER Bodenleiste vorne, kompl.
102 20109ER Stossbanda e kpl.
103 20115 Haltebü el
104 20107ER Bodenleiste hinten
105 20230ER Rastpedal kpl.
106 20136ER Gelenkla erbuchse
107 2306 G Laufrolle, kompl.
108 2014ER Lasche
109 20126ER Stellachse
110 2608hg Stellrolle
111 2833 Druckstück kpl.
112 20128ER Stellknopf, HG bedruckt
113 4019 Zu feder (Stellhebel)
114 2975ER Bürstenmotor 230V
114a 05141S Kohlebürsten-Set
115 2319 Zahnriemenritzel
116 2923 Zahnriemen
117 20233ER Gelenk, 2-poli , kompl.
118 0898ER Flachsteckeraufnahme, kompl.
119 2530hg Gelenkdeckel
120 20217ER Gelenkla er, rechts kpl.
121 20218ER Gelenkla er, links kpl.
122 0897ER Leitun ssatz Gelenkschalter
123 20134 Dichtun Gelenk
124 1073 Lasche
125 2919ER Zahnscheibe
126 20163ER Leiterplatte BS36, 230V
127 4098ER Bürstenwalze, kompl.
128 2046 Bürstenstreifen
129 20123ER Bürstenla er links
130 20117ER Bürstenla er rechts fest
131 20120ER Ausrückbü el
131a 20121ER Druckfeder Ausrückbü el
132 2258hg Gelenkarm mit Feder
133 2651 Drehfeder
134 20224dgSE Oberteil dunkel rau, kompl.
20224blSE Oberteil blau, kompl.
20224dbSE Oberteil dunkelblau, kompl.
135 20118ER Bürstenla er rechts lose
136 01017ER Linsenkopfschraube 4x20
137 0197ER Bodenblechschraube 4x12
138 01036ER Amtec Schraube 4x14
139 0176ER Linsenschraube AM 4x30
140 0102ER Screw F 3,9x13
141 20124ER Reini un sklappe kpl
142 20127ER Hebel Stellachse
143 20129ER Befesti un skappe
100 20200hg Chassis
101 20204ER Front base plate
102 20109ER Bumper
103 20115 Wire tie
104 20107ER Rear base plate
105 20230ER Foot pedal cpl.
106 20136ER Swivel bearin
107 2306 G Wheel
108 2014 ER Axle clamp
109 20126ER Pile adjustment axle
110 2608hg Pile adjustment wheel
111 2833 Trust member
112 20128ER Pile adjustment knob
113 4019 Sprin
114 2975ER Brush motor 220-240V, 175W
114 2973ER Brush motor 110/120V, 175W
114 2971ER Brush motor 100V, 175W
114a 05141S Carbon brush set
115 2319 Motor pulley
116 2923 Belt
117 20233UL Swivel neck cpl. 100 -120V
20233ER Swivel neck cpl. 220 -240V
118 0898ER Wire swivel neck 2-wire
119 2530hg Swivel neck cover
120 20217ER Swivel support r.h.
121 20218ER Swivel support l.h.
122 0897ER Micro switch incl. wire
123 20134 Gasket
124 1073 Clamp
125 2919ER Brush roller pulley
126 20163ER PCB 220/230, 175W
126 20164ER PCB 240V, 175W
126 20161ER PCB 100V, 175W
126 20162ER PCB 110/120V, 175W
127 4098ER Brush roller cpl.
128 2046 Brush strip
129 20123ER Bearin block l.h.
130 20117ER Bearin block r.h.
131 20120ER Brush cover release
131a 20121ER Sprin
132 2258hg Support lever with sprin
133 2651 Return sprin
134 20224dgSE Power head cover d- rey cpl.
20224blSE Power head cover blue cpl.
20224dbSE Power head cover d-blue cpl.
135 20118ER Brush strip cover
136 01017ER Screw 4x20
137 0197ER Screw 4x12
138 01036ER Screw 4x14
139 0176ER Screw 4x30
140 0102ER Screw 3.9x13
141 20124ER Access door cpl.
142 20127ER Pile adjustment lever
143 20129ER Mountin cap
Pos. Art.-No. Pos. Art.-No.Description (ENG) Description (ENG) Pos. Art.-No. Description (ENG)
123
122
124
138
136
135
136
BS36 COMFORT
10
114a
109
135
130
128
131a 131a
100
136
126
101
102
110
108
138
139
137
137
103
103
103
138
120
106
142
110
108
104
139
138
141
139
132
115
114
136
138
121
116
129
138
106
138
107
134
133
131
107
112
143
138
111 113
Pos. Art.-Nr. Benennung (DE)
105
X
X
127
125
100
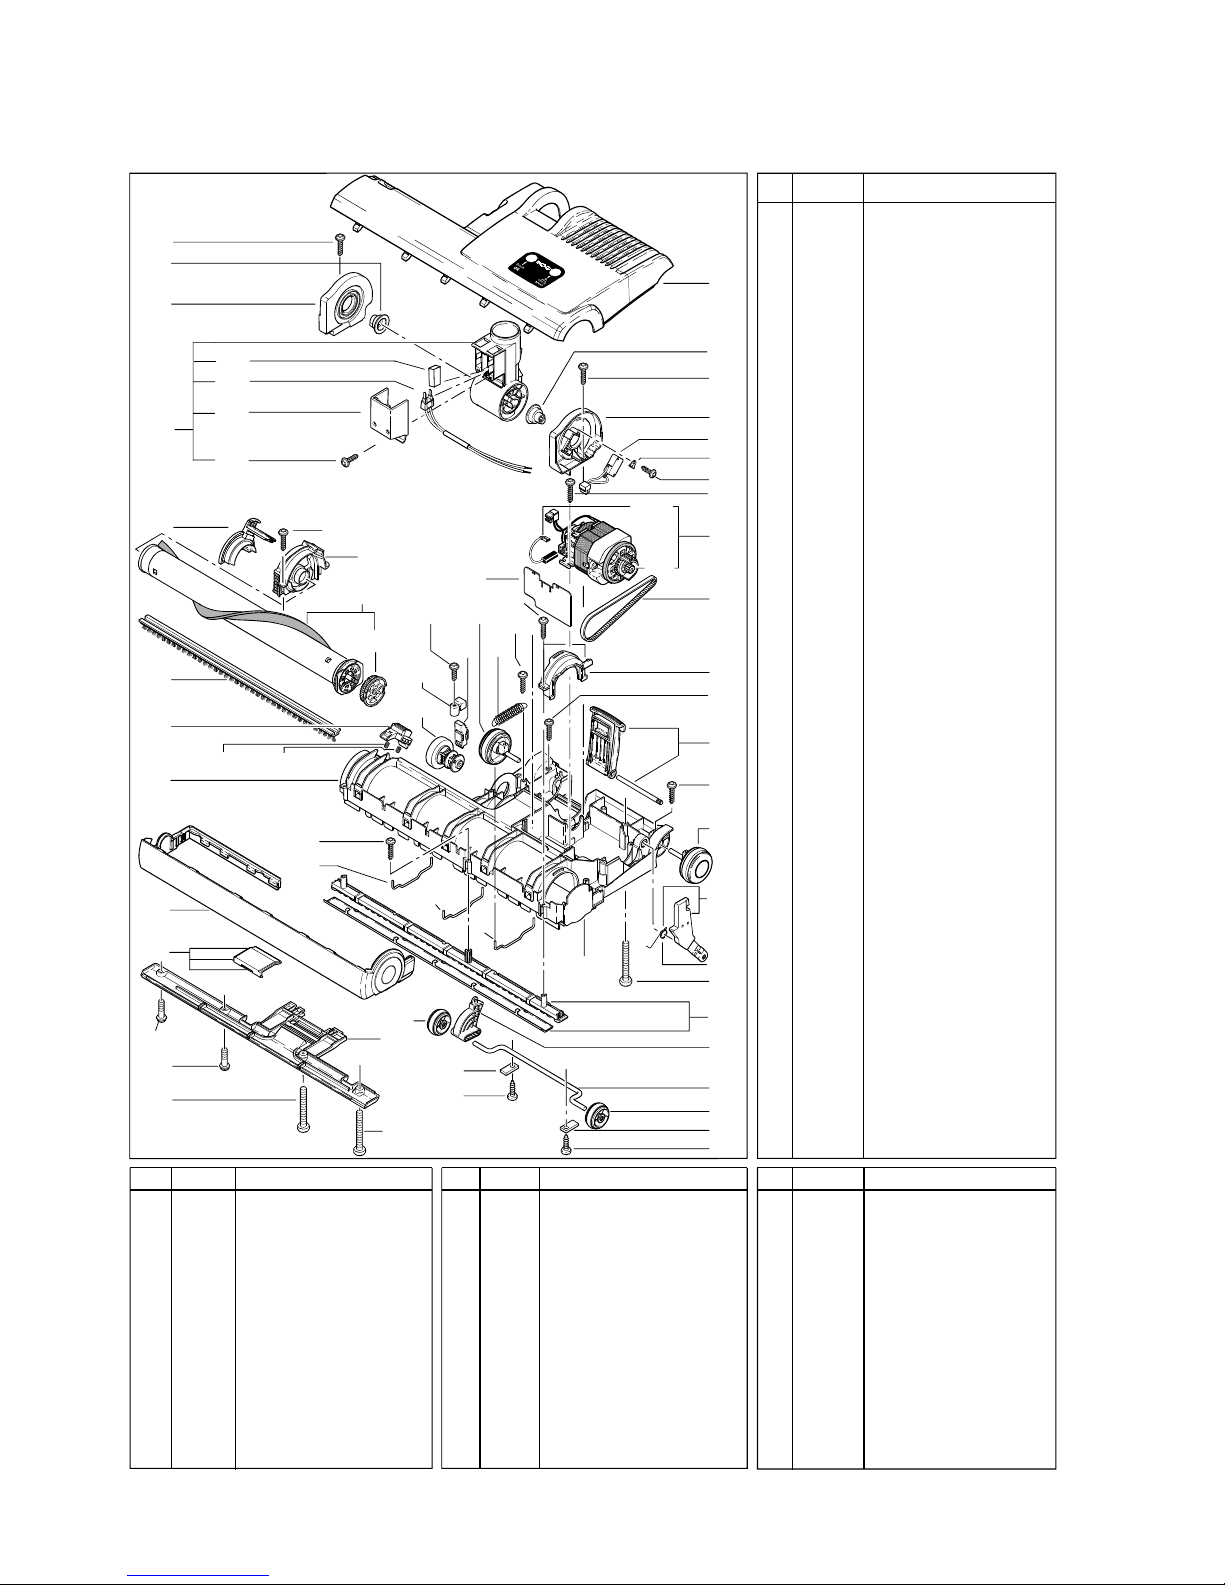
20202hg
Unterteil, kompl.
101
20205ER
Bodenleiste vorne, kompl.
102
20110ER
Stossbanda e kpl.
103
20115
Haltebü el
104
20108ER
Bodenleiste hinten
105
20230ER
Rastpedal kpl.
106
20136ER
Gelenkla erbuchse
107
2306HG
Laufrolle, kompl.
108
201 ER
Lasche
109
20126ER
Stellachse
110
2608hg
Stellrolle
111
2833
Druckstück kpl.
112
20128ER
Stellknopf, HG bedruckt
113
019
Zu feder (Stellhebel)
114
3260ER
Bürstenmotor 230V, 200W
114a
051 1S
Kohlebürsten-Set
115
2319
Zahnriemenritzel
116
2923
Zahnriemen
117
20233ER
Gelenk, 2-poli , kompl.
118
0898ER
Flachsteckeraufnahme, kompl.
119
2530hg
Gelenkdeckel
120
20217ER
Gelenkla er, rechts kpl.
121
20218ER
Gelenkla er, links kpl.
122
0897ER
Leitun ssatz Gelenkschalter
123
2013
Dichtun Gelenk
124
1073
Lasche
125
2919ER
Zahnscheibe
126
20167ER
Leiterplatte BS46, 230V
127
099ER
Bürstenwalze, kompl.
128
028
Bürstenstreifen
129
20123ER
Bürstenla er links
130
20117ER
Bürstenla er rechts fest
131
20120ER
Ausrückbü el
131a
20121ER
Druckfeder Ausrückbü el
132
2258hg
Gelenkarm mit Feder
133
2651
Drehfeder
134
20225dgSE
Oberteil dunkel rau, kompl.
20225blSE
Oberteil blau, kompl.
20225dbSE
O
berteil dunkelblau, kompl.
135
20118ER
Bürstenla er rechts lose
136
01017ER
Linsenkopfschraube 4x20
137
0197ER
Bodenblechschraube 4x12
138
01036ER
Amtec Schraube 4x14
139
0176ER
Linsenschraube AM 4x30
140
0102ER
Screw F 3,9x13
141
2012 ER
Reini un sklappe kpl
142
20127ER
Hebel Stellachse
143
20129ER
Befesti un skappe
100
20202hg
Chassis
101
20205ER
Front base plate
102
20110ER
Bumper
103
20115
Wire tie
104
20108ER
Rear base plate
105
20230ER
Foot pedal cpl.
106
20136ER
Swivel bearin
107
2306HG
Wheel
108
201 ER
Axle clamp
109
20126ER
Pile adjustment axle
110
2608hg
Pile adjustment wheel
111
2833
Trust member
112
20128ER
Pile adjustment knob
113
019
Sprin
114
3260ER
Brush motor 220-240V, 200W
114
3261ER
Brush motor 110/120V, 200W
114
3262ER
Brush motor 100V, 200W
114a
051 1S
Carbon brush set
115
2319
Motor pulley
116
2923
Belt
117
20233ER
Swivel neck cpl. 220 -240V
20233UL
Swivel neck cpl. 100 -120V
118
0898ER
Wire swivel neck 2-wire
119
2530hg
Swivel neck cover
120
20217ER
Swivel support r.h.
121
20218ER
Swivel support l.h.
122
0897ER
Micro switch incl. wire
123
2013
Gasket
124
1073
Clamp
125
2919ER
Brush roller pulley
126
20167ER
PCB 220/230V, 200W
126
20168ER
PCB 240V, 200W
126
20165ER
PCB 100V, 200W
126
20166ER
PCB 110/120V, 200W
127
099ER
Brush roller cpl.
128
028
Brush strip
129
20123ER
Bearin block l.h.
130
20117ER
Bearin block r.h.
131 2
0120ER
Brush cover release
131a
20121ER
Sprin
132
2258hg
Support lever with sprin
133
2651
Return sprin
134
20225dgSE
Power head
cover d- rey cpl.
20225blSE
Power head
cover blue cpl.
20225dbSE
Power head
cover d-blue cpl.
135
20118ER
brush strip cover
136
01017ER
Screw 4x20
137
0197ER
Screw 4x12
138
01036ER
Screw 4x14
139
0176ER
Screw 4x30
140
0102ER
Screw 3.9x13
141
2012 ER
Access door cpl.
142
20127ER
Pile adjustment lever
143
20129ER
Mountin cap
Pos. Art.-No. Pos. Art.-No.
Description (ENG) Description (ENG) Pos. Art.-No. Description (ENG)
140
117 119
118
123
138
124
122
136
138
136
BS46 COMFORT
11
SEBO (UK) Ltd - The Merlin Centre
Cressex Business Park, High Wyc mbe, Bucks HP12 3QL.
Ph ne: 0 14 94 - 46 55 33 , Fax: 0 14 94 - 46 10 44, www.seb .c .uk
©2013 SEBO Stein&C . GmbH ®Registered Trademark. Subject t change.
SEBO Stein&C . GmbH, Wülfrather Straße 47-49, 42553 Velbert, Germany
Telef n +49 (0) 20 53 / 89 81, Telefax +49 (0) 20 53 / 89 85, www.seb .de
©2013 SEBO Stein&C . GmbH ®Eingetragenes Warenzeichen. Technische Änderungen v rbehalten.
MADE IN GERMANY
Art.-No. 6638D5- 7.2 13
Other manuals for BS 36 Comfort
5
This manual suits for next models
1
Other Sebo Vacuum Cleaner manuals

Sebo
Sebo duo User manual

Sebo
Sebo Airbelt K3 User manual

Sebo
Sebo BS 36 Comfort User manual

Sebo
Sebo automatic X Series User manual

Sebo
Sebo 470 Comfort User manual

Sebo
Sebo AIRBELT C2.1 User manual

Sebo
Sebo Airbelt E User manual

Sebo
Sebo Felix IceBlue User manual

Sebo
Sebo ET-H User manual

Sebo
Sebo air belt C3.1 User manual

Sebo
Sebo FELIX User manual

Sebo
Sebo Felix Premium User manual

Sebo
Sebo BS 36 Comfort Quick guide

Sebo
Sebo EVOLUTION 320 User manual

Sebo
Sebo 470 Comfort User manual

Sebo
Sebo Felix Series User manual

Sebo
Sebo Automatic X4 User manual

Sebo
Sebo X-Series User manual

Sebo
Sebo DART 3 User manual

Sebo
Sebo DART 3 User manual


